Downloaded 35 times


![FS-UAE AMIGA EMULATOR
HAS ANYBODY TALKED ABOUT
THE COOLEST COMPUTER BEFORE
ODROIDS? WE SURE LIKE TO!
by Tobias Schaaf
The Commodore Amiga was a popular gaming comput-er
in the late 1980s and 1990s, with many unique and
fun games available. Although the Amiga is no lon-ger
available, the Linux application called FS-UAE, located at
http://fs-uae.net, provides an emulation platform for running
any Amiga game, including those written for the A1200.
To install FS-UAE, type the following into Terminal:
$ sudo -s
$ wget http://oph.mdrjr.net/meveric/sources.lists/
meveric-all-main.list
$ wget -O- http://oph.mdrjr.net/meveric/meveric.asc
| apt-key add -
$ apt-get update && apt-get install fs-uae
fs-uae-launcher
ODROID MAGAZINE 11
OS SPOTLIGHT
Easy and straightforward configurations are a guarantee that you
will take much more time enjoying your ODROID than tweaking it
pages. The language of the pages is adapted to your brows-er
language if available, with English as the default.
Advanced Usage
To create your own plugins for the web interface, you
can use the script in /opt/max2play/createplugin.sh to cre-ate
the correct folder structure and files in /var/www/max-
2play/application/plugins/[plugin name]. After running
the script, the plugin may be activated on the “Settings
/ Reboot” tab. Refer to some of the existing plugins for
examples of writing shell scripts for your custom plugins.
Software notes
There is a known bug that when using the Alsaequal
equalizer with Squeezeslave, there is no output through
the headphone jack, but the HDMI audio stream does
work properly. If you don’t need the equalizer, stick to
Squeezelite as a player. If there is a way to get it working
with Alsaequal, please create a post on the ODROID fo-rums
at http://forum.odroid.com.
More information
Questions, suggestions, improvements or comments re-garding
the Max2Play image may be posted on the original
forum announcement at http://bit.ly/1te1Edx. The Max-
2Play website, which is available in German and English,
offers pre-built Max2Play U3 hardware packages as well as
offering free downloads for those who already own a U3 at
http://www.max2play.com.
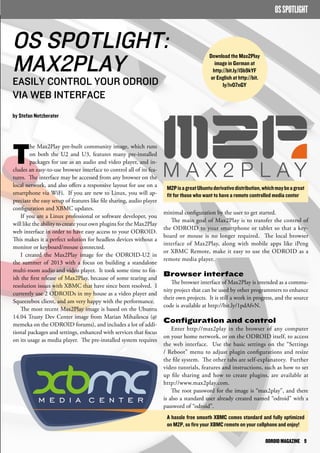
AMIGA EMULATOR
FS-UAE makes the ODROID Magazine team nostalgic for games
The Amiga was one of
the best 1980s gaming
machines available](https://image.slidesharecdn.com/odroid-magazine-2014122-141212171957-conversion-gate02/85/ODROID-Magazine-December-2014-11-320.jpg)

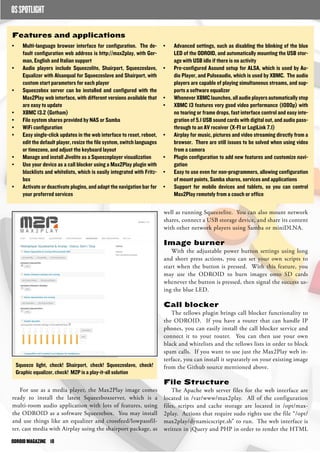
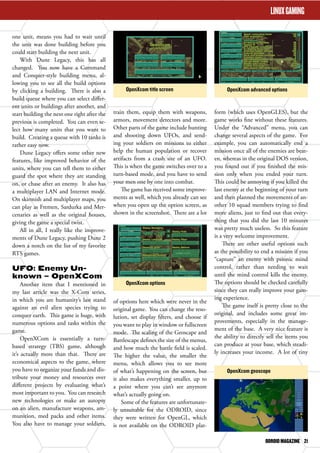
![ODROID VS RASPBERRY PI
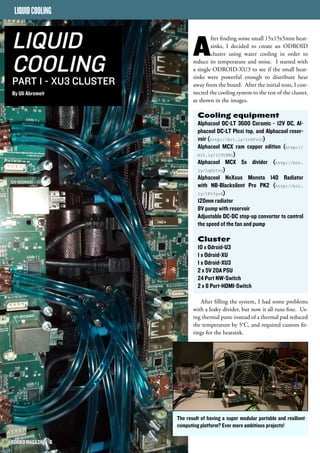
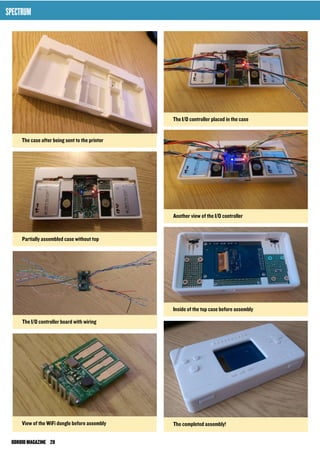
Benchmarks
We ran a simple, popular benchmark called Unix-Bench
(version 5.1.3) to compare the performance of the two boards.
Tests were done using several manufacturer-provided images
based on a clean install, and the “apt-get update && apt-get
upgrade” commands were first run to ensure that both boards
was up-to-date.
The RPi was clocked at 800Mhz using a Sandisk UHS-1
8GB SDCard running the Debian Wheezy OS. The C1 was
clocked at 1.5Ghz using an 16GB eMMC with Ubuntu 14.04
OS. Both units were powered by a 5V/2A power supply and
connected to the 1920x1080 HDMI output. Note that in or-der
to utilize all four cores in the C1, the “./run –c 4” com-mand
was used.
The results show that the Dhrystone-2 benchmark is about
8 times faster on the C1. File I/O benchmark is about 4 times
faster because of the faster storage speed of the eMMC module.
Overall performance test result show that the C1 is approxi-mately
6 times faster than the RPi, even though the price of C1
is exactly same.
Storage I/O comparison
To obtain the results in the storage I/O comparison graph,
type the following lines at a command prompt. The first com-mand
tests the write speed, and the second command tests the
read speed:
$ dd if=/dev/zero of=test.tmp oflag=direct bs=500K
count=1024
$ dd if=test.tmp of=/dev/null iflag=direct bs=500K
count=1024
If you use the eMMC storage, you can get about two to
three times faster storage I/O read performance. However, an
affordable microSD UHS-1 card can still achieve reasonably
fast speeds thanks to the advanced SD 3.01 host controller in
the S805 processor. The MicroSD card read performance on
C1 is still about 1.7 times faster then RPi if you use the UHS-1
memory card.
Ethernet I/O comparison
To replicate the results in the Ethernet comparison graph,
type the following lines at a command prompt:
Server agent on the C1 and Client agent on the host PC
ruppi@ruppi-desktop:~$ iperf -c 192.168.2.10 -P 10
[SUM] 0.0-10.0 sec 700 MBytes 584 Mbits/sec
Server agent on the host PC and Client agent on the C1
odroid@odroid:~# iperf -c 192.168.2.2 -P 10
[SUM] 0.0-10.1 sec 351 MBytes 292 Mbits/sec
Server agent on the RPi and Client agent on the host PC
ruppi@ruppi-desktop:~$ iperf -c 192.168.2.11 -P 10
[SUM] 0.0-10.3 sec 121 MBytes 98.6 Mbits/sec
Server agent on the host PC and Client agent on the RPi
pi@raspberrypi:~$ iperf -c 192.168.2.2 -P 10
[SUM] 0.0-10.3 sec 81.6 MBytes 66.6 Mbits/sec
Performance comparison of C1 vs Rpi
File I/O comparison of C1 vs Rpi
Benchmark results of C1 vs Rpi
ODROID MAGAZINE 16](https://image.slidesharecdn.com/odroid-magazine-2014122-141212171957-conversion-gate02/85/ODROID-Magazine-December-2014-16-320.jpg)
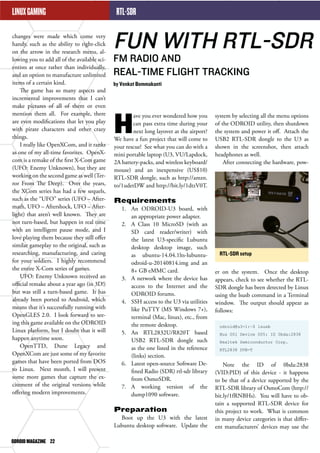
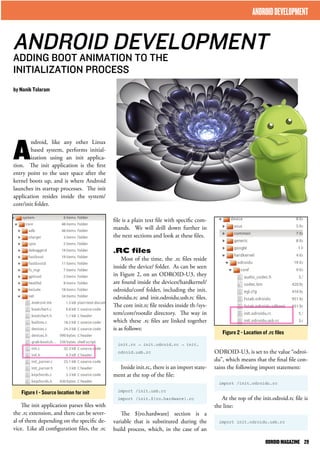
![usb_rtl28xxu: unknown tuner=NONE
[ 233.042345] usb 1-3.2: dvb_
usb_v2: ‘Realtek RTL2832U refer-ence
design’ error while loading
driver (-19)
[ 233.042905] usb 1-3.2: dvb_
usb_v2: ‘Realtek RTL2832U refer-ence
design’ successfully deini-tialized
and disconnected
On further examination, you can see
that a relevant kernel module, which is
part of the installed image, is dvb_usb_
rtl28xxu. In this example, only one of
the RTL modules worked:
odroid@u3-1:/lib$ sudo find .
-name *rtl*
...
./modules/3.8.13.28/kernel/driv-ers/
media/usb/dvb-usb-v2/dvb-usb-rtl28xxu.
ko
./modules/3.8.13.28/kernel/driv-ers/
media/dvb-frontends/rtl2832.
ko
./modules/3.8.13.28/kernel/driv-ers/
media/dvb-frontends/rtl2830.
ko
...
odroid@u3-1:~$ sudo modprobe dvb_
usb_rtl2832
modprobe: FATAL: Module dvb_usb_
rtl2832 not found.
odroid@u3-1:~$ sudo modprobe dvb_
usb_rtl2830
modprobe: FATAL: Module dvb_usb_
rtl2830 not found.
odroid@u3-1:~$ sudo modprobe dvb_
usb_rtl28xxu
Prerequisites
While it is presumed that the system
is up to date, it is worthwhile to run the
following commands to install any miss-ing
components. If using the Lubuntu
image supplied by Hardkernel, it will
probably already include these applica-tions:
Vendor Specific Class
bInterfaceSubClass 255
Vendor Specific Subclass
bInterfaceProtocol 255
Vendor Specific Protocol
iInterface 5
Endpoint Descriptor:
bLength 7
bDescriptorType 5
bEndpointAddress 0x81
EP 1 IN
bmAttributes 2
Transfer Type
Bulk
Synch Type
None
Usage Type
Data
wMaxPacketSize 0x0200 1x
512 bytes
bInterval 0
Interface Descriptor:
bLength 9
bDescriptorType 4
bInterfaceNumber 1
bAlternateSetting 0
bNumEndpoints 0
bInterfaceClass 255
Vendor Specific Class
bInterfaceSubClass 255
Vendor Specific Subclass
bInterfaceProtocol 255
Vendor Specific Protocol
iInterface 5
However, examining the dmesg logs,
you’ll see that the appropriate driver is
not loaded.
odroid@u3-1:~$ dmesg | grep dvb
[ 232.967274] usb 1-3.2: dvb_
usb_v2: found a ‘Realtek RTL2832U
reference design’ in warm state
[ 232.967407] usbcore: regis-tered
new interface driver dvb_
usb_rtl28xxu
[ 233.029934] usb 1-3.2: dvb_
usb_v2: will pass the complete
MPEG2 transport stream to the
software demuxer
[ 233.030736] usb 1-3.2: dvb_
LINUX GAMING
same VID:PID combination, and one
may work but another may not. Also
note the bus:device-id of 001:005 in the
output. Using that information, the fol-lowing
command outputs detailed de-vice
information for verification:
odroid@u3-1:~$ lsusb -D /dev/bus/
usb/001/005
Device: ID 0bda:2838 Realtek
Semiconductor Corp. RTL2838 DVB-T
Couldn’t open device, some infor-mation
will be missing
Device Descriptor:
bLength 18
bDescriptorType 1
bcdUSB 2.00
bDeviceClass 0
(Defined at Interface level)
bDeviceSubClass 0
bDeviceProtocol 0
bMaxPacketSize0 64
idVendor 0x0bda Re-altek
Semiconductor Corp.
idProduct 0x2838
RTL2838 DVB-T
bcdDevice 1.00
iManufacturer 1
iProduct 2
iSerial 3
bNumConfigurations 1
Configuration Descriptor:
bLength 9
bDescriptorType 2
wTotalLength 34
bNumInterfaces 2
bConfigurationValue 1
iConfiguration 4
bmAttributes 0x80
(Bus Powered)
MaxPower
500mA
Interface Descriptor:
bLength 9
bDescriptorType 4
bInterfaceNumber 0
bAlternateSetting 0
bNumEndpoints 1
bInterfaceClass 255
RTL-SDR
ODROID MAGAZINE 23](https://image.slidesharecdn.com/odroid-magazine-2014122-141212171957-conversion-gate02/85/ODROID-Magazine-December-2014-23-320.jpg)
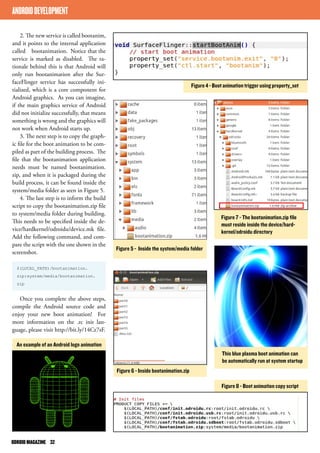
![RTL-SDR
$ sudo apt-get install git-core
git cmake
$ sudo apt-get install libusb-
1.0-0-dev build-essential
Build the library
software
Change to your home directory and
fetch the source code from git repository
using these commands:
$ cd ~
$ git clone git://git.osmocom.
org/rtl-sdr.git
The source is placed in a newly cre-ated
rtl-sdr sub-directory. Now, prepare
to build the source code using the fol-lowing
commands:
odroid@u3-1:~$ cd rtl-sdr/
odroid@u3-1:~/rtl-sdr$ mkdir
build && cd build
odroid@u3-1:~/rtl-sdr/build$
cmake ../ -DINSTALL_UDEV_RULES=ON
odroid@u3-1:~/rtl-sdr/build$ make
odroid@u3-1:~/rtl-sdr/build$ sudo
make install
...
[ 5%] Built target convenience_
static
[ 35%] Built target rtlsdr_shared
[ 40%] Built target rtl_adsb
[ 45%] Built target rtl_eeprom
[ 50%] Built target rtl_fm
[ 55%] Built target rtl_power
[ 60%] Built target rtl_sdr
[ 65%] Built target rtl_tcp
[ 70%] Built target rtl_test
[100%] Built target rtlsdr_static
Configure the dynamic linker run-time
bindings using the command:
odroid@u3-1:~/rtl-sdr/build$ sudo
ldconfig
Check for the presence of the rtl-sdr
utilities just built:
48.0 49.6
Sampling at 2048000 S/s.
No E4000 tuner found, aborting.
Requirements
In the list of utilities just built, of
special interest is rtl_fm, which is basi-cally
an FM radio tuner. Prior to any
listening test, such as FM reception, it is
always safe to ensure that the audio vol-ume
levels are safe, otherwise you could
damage your hearing. First, disconnect
all headphones or speakers, adjust the
volume to 5% of maximum, then re-connect
them.
Next, select an FM station closest to
you. In my case, it would be the local
Classic Rock favorite KFOG 97.7FM.
Using the station frequency, launch the
FM tuner like so:
odroid@u3-1:~/rtl-sdr$ rtl_fm -f
97.7M -M wbfm -s 200000 -r 48000
- | aplay -r 48k -f S16_LE
Found 1 device(s):
0: Realtek, RTL2838UHIDIR, SN:
00000001
Using device 0: Generic RTL2832U
OEM
Found Rafael Micro R820T tuner
Tuner gain set to automatic.
Tuned to 98016000 Hz.
Oversampling input by: 6x.
Oversampling output by: 1x.
Buffer size: 6.83ms
Sampling at 1200000 S/s.
Output at 200000 Hz.
Playing raw data ‘stdin’ : Signed
16 bit Little Endian, Rate 48000
Hz, Mono
underrun!!! (at least 326.562 ms
long)
Note the syntax for the frequency
specification (97.7M) and internal con-version
(to 98016000), using MHz and
Hz units respectively. If you are using
headphones, get them close to your ear.
odroid@u3-1:~/rtl-sdr/build$
which rtl_eeprom
/usr/local/bin/rtl_eeprom
Examine the dongle’s eeprom con-tents.
Note that this device variant uses
the Rafael Micro R820T tuner.
odroid@u3-1:~/rtl-sdr/build$ rtl_
eeprom
Found 1 device(s):
0: Generic RTL2832U OEM
Using device 0: Generic RTL2832U
OEM
Found Rafael Micro R820T tuner
Current configuration:
________________________________
__________
Vendor ID:
0x0bda
Product ID:
0x2838
Manufacturer: Re-altek
Product:
RTL2838UHIDIR
Serial number:
00000001
Serial number enabled: yes
IR endpoint enabled: yes
Remote wakeup enabled: no
________________________________
__________
odroid@u3-1:~/rtl_sdr$ rtl_test
-t
Found 1 device(s):
0: Realtek, RTL2838UHIDIR, SN:
00000001
Using device 0: Generic RTL2832U
OEM
Found Rafael Micro R820T tuner
Supported gain values (29): 0.0
0.9 1.4 2.7 3.7 7.7 8.7 12.5 14.4
15.7 16.6 19.7 20.7 22.9 25.4
28.0 29.7 32.8 33.8 36.4 37.2
38.6 40.2 42.1 43.4 43.9 44.5
ODROID MAGAZINE 24](https://image.slidesharecdn.com/odroid-magazine-2014122-141212171957-conversion-gate02/85/ODROID-Magazine-December-2014-24-320.jpg)

![the “on boot” action, we instruct the
init app to execute the following com-mands:
mount, setprop, write a n d
chmod. The commands are the same as
normal Linux utilities, but sometimes it
varies in terms of what parameter need
to be passed to it.
Properties
One of the ways in which the dif-ferent
modules in Android share infor-mation
is by using properties. If you
execute the command getprop inside
Android (using Terminal Emulator or by
typing “adb shell”), you will see the dif-ferent
properties that govern Android’s
internal settings.
Property Service
Most operating systems make use of
environment variables to communicate
states to different processes, and Android
is no different. If you use the Android
Debug Bridge (ADB) shell to monitor
the ODROID-U3, you will see some-thing
similar to the output below when
running the command “getprop” on An-droid’s
command line:
[dalvik.vm.dexopt-flags]: [m=y]
[dalvik.vm.heapgrowthlimit]:
[192m]
…
…
[dhcp.eth0.pid]: [1799]
[dhcp.eth0.reason]: [PREINIT]
[dhcp.eth0.result]: []
…
…
[init.svc.dhcpcd_eth0]: [running]
[init.svc.drm]: [running]
[init.svc.fuse_sdcard0]: [run-ning]
[init.svc.healthd]: [running]
[init.svc.insmod_ax88179]:
[stopped]
[init.svc.insmod_smsc95xx]:
[stopped]
[init.svc.insmod_usb_audio]:
[stopped]
[init.svc.insmod_usbmidi]:
ANDROID DEVELOPMENT
You can add your own .rc files and
use the import statement to package
them together. The .rc files follow a sim-ple
notation that is easy to learn, which
can be broken down into the following
categories:
Actions
These are actions that need to be per-formed
during the init process. If you
look inside init.rc, will see the following:
on early-init
write /proc/1/oom_adj -16
setcon u:r:init:s0
start ueventd
mkdir /mnt 0775 root system
The “on early-init” statement in-structs
the init application to execute
the commands underneath it in the first
stage of the initialization process. The
commands will be executed when the
init application starts up, and will do the
following:
• write the number -16 to /
proc/1/oom_adh
• execute setcon app using with
the u:r:init:s0 parameter
• start up the ueventd daemon
• make directory /mnt with the
parameter 0775 root system
Services
Services are applications that will be
run during the init process. The init
process along with other internal mod-ules
(including property service) will
take care of stopping or restarting appli-cations
on behalf of the system or user.
If you look inside init.odroidu.rc, you
will see the following service definition:
service dhcpcd_eth0 /system/bin/
dhcpcd -ABDKL
class main
disabled
oneshot
service iprenew_eth0 /system/bin/
dhcpcd -n
class main
disabled
oneshot
The above statement is defining a ser-vice
called dhcp_eth0, which is linked to
the dhcpcd application. The iprenew_
eth0 label is linked to the same dhpcd
application, but with different param-eters.
The defined services will be run
as background process. If you run ps
or pstree, you will see the different ap-plications
defined as services running in
memory.
The parameters below the service –
class main, disabled and oneshot – are
the properties of the service itself. One-shot
property tells init not to restart the
application if it exits, disabled means the
service is disabled or not running, and
class main means the service belongs to
a group called main. Normally services
that are disabled will be run when cer-tain
conditions are met, such as property
value changes. Grouping services using
classes is useful if we need to start or stop
applications as a unit.
Commands
There are specific commands that
you can run when defining actions:
on boot
mount debugfs /sys/kernel/de-bug
/sys/kernel/debug
setprop ro.radio.noril yes
write /proc/sys/vm/lowmem_re-serve_
ratio “128 128”
chmod 0222 /sys/kernel/debug/
tracing/trace_marker
write /sys/kernel/debug/trac-ing/
tracing_on 0
on fs
mount_all /fstab.odroidu
setprop ro.crypto.fuse_sdcard
true
In the above example, extracted from
init.odroidu.rc, we can see that under
ODROID MAGAZINE 30](https://image.slidesharecdn.com/odroid-magazine-2014122-141212171957-conversion-gate02/85/ODROID-Magazine-December-2014-30-320.jpg)
![downloaded from a community website
at http://bit.ly/1wRbAL2, and you can
select any of the available .zip files on
that website.
Installation
The steps that need to be done to
install the boot animation are outlined
below. Remember that the Android
source code must be recompiled in order
to see the results. For more information
on compiling Android from source for
the ODROID-U3, please refer to my
previous ODROID magazine article at
http://bit.ly/1vkwuYk.
1. Open the file init.odroid.rc and
add the following line:
service bootanim /system/bin/
bootanimation
class main
user graphics
group graphics
disabled
oneshot
srw-rw---- root radio
2000-01-01 01:00 rild
Inside the .rc files you will see a lot
of setprop commands, which are used
to set various environment variables. In
the next section, we will see how the init
application uses the property service to
inform the boot animation code to start
execution after it successfully initializes
the graphics stack.
Boot Animation
If you have ever owned any kind of
Android device, you have seen the famil-iar
Android boot animation when you
start up the device. This boot animation
is actually an application that is defined
inside the .rc files and executed as part
of the init process. The boot animation
images that you see is actually a sequence
of graphics that are played continuous-ly.
In this section, we will add a boot
animation inside ODROID-U3. The
updated boot animation graphics were
ANDROID DEVELOPMENT
[stopped]
…
…
[ro.board.platform]: [exynos4]
[ro.build.characteristics]: [tab-let]
[ro.build.date.utc]: [1414813591]
[ro.build.date]: [Sat Nov 1
14:46:31 EST 2014]
[ro.build.description]: [odroi-du-
eng 4.4.4 KTU84Q eng.nan-ik.
20141101.144528 test-keys]
[ro.build.display.id]: [odroi-du-
eng 4.4.4 KTU84Q eng.nan-ik.
20141101.144528 test-keys]
…
…
[ro.build.version.incremental]:
[eng.nanik.20141101.144528]
[ro.build.version.release]:
[4.4.4]
[ro.build.version.sdk]: [19]
[ro.product.brand]: [Android]
The way to modify environment
variables is different in Android when
compared to Linux. In Android, you
use the commands setprop and getprop,
which sets and gets properties. Try run-ning
“getprop ro.board.platform”, and
you will see the output of your board
platform. The prefix that is used in the
environment variables is significant. For
example, the prefix ro means read only,
so that the environment variable cannot
be modified
The process that takes care of setting
and getting the environment variables is
called property_service, and it is run as
part of the init process. If you browse
through the /dev/socket directory, you
will see the property_service socket:
srw-rw---- system system
2000-01-01 01:00 adbd
srw-rw---- root inet
2000-01-01 01:00 dnsproxyd
…
…
srw-rw-rw- root root
2000-01-01 01:00 property_service
Figure 3 - Setprop inside .rc file
ODROID MAGAZINE 31](https://image.slidesharecdn.com/odroid-magazine-2014122-141212171957-conversion-gate02/85/ODROID-Magazine-December-2014-31-320.jpg)


The document discusses liquid cooling projects for ODROID boards. It describes a liquid cooling system built for an ODROID XU3 computing cluster consisting of 10 ODROID-U3 boards, 1 ODROID-XU, and 1 ODROID-XU3 connected to a water cooling loop. It also details a liquid cooling project for an ODROID XU+E that took 5 weeks to complete and cost $950, involving a complex water cooling setup with 6 fans, LED lighting, and a customized power supply. Temperature tests showed significant cooling for the ODROID hardware.


