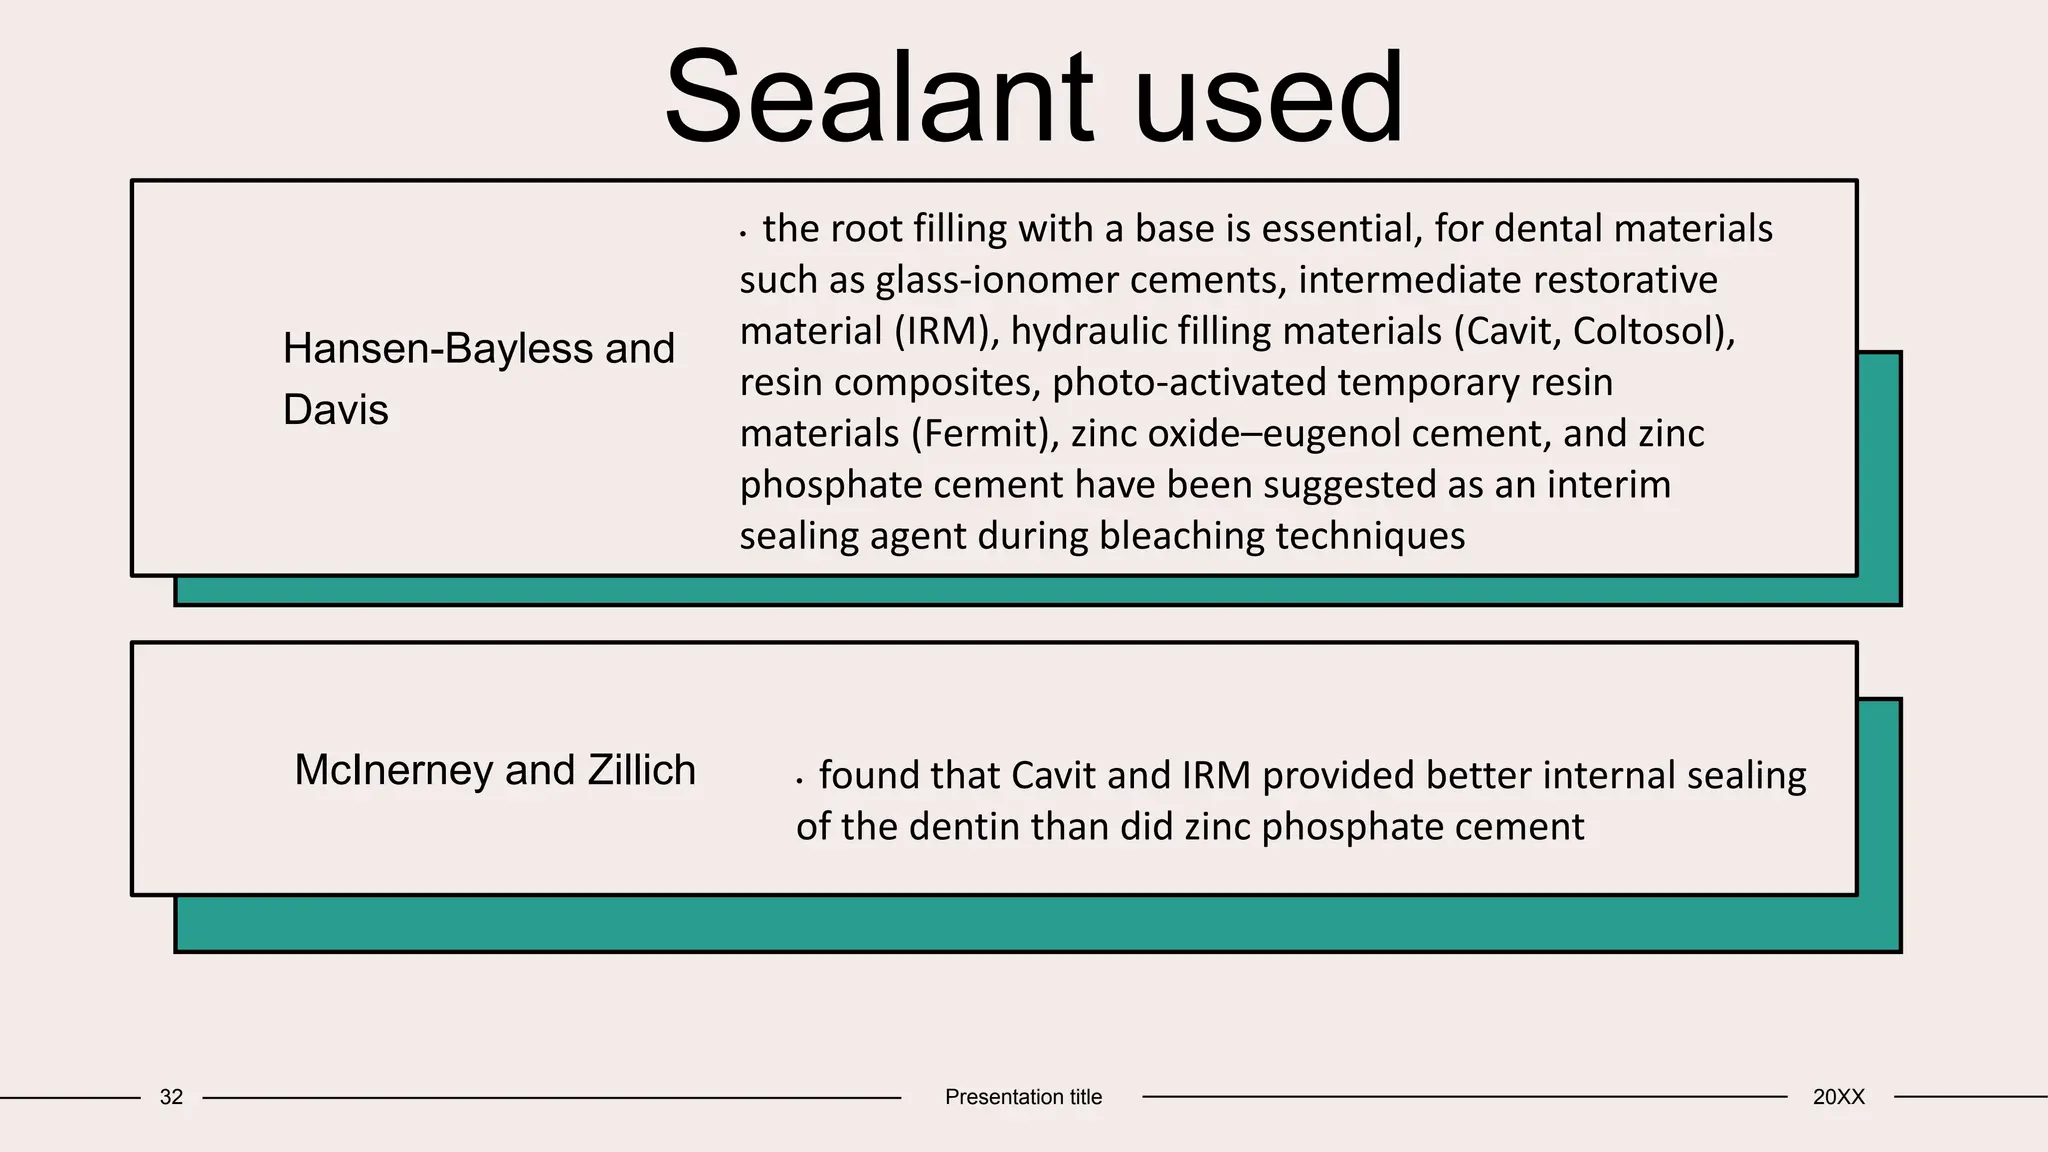
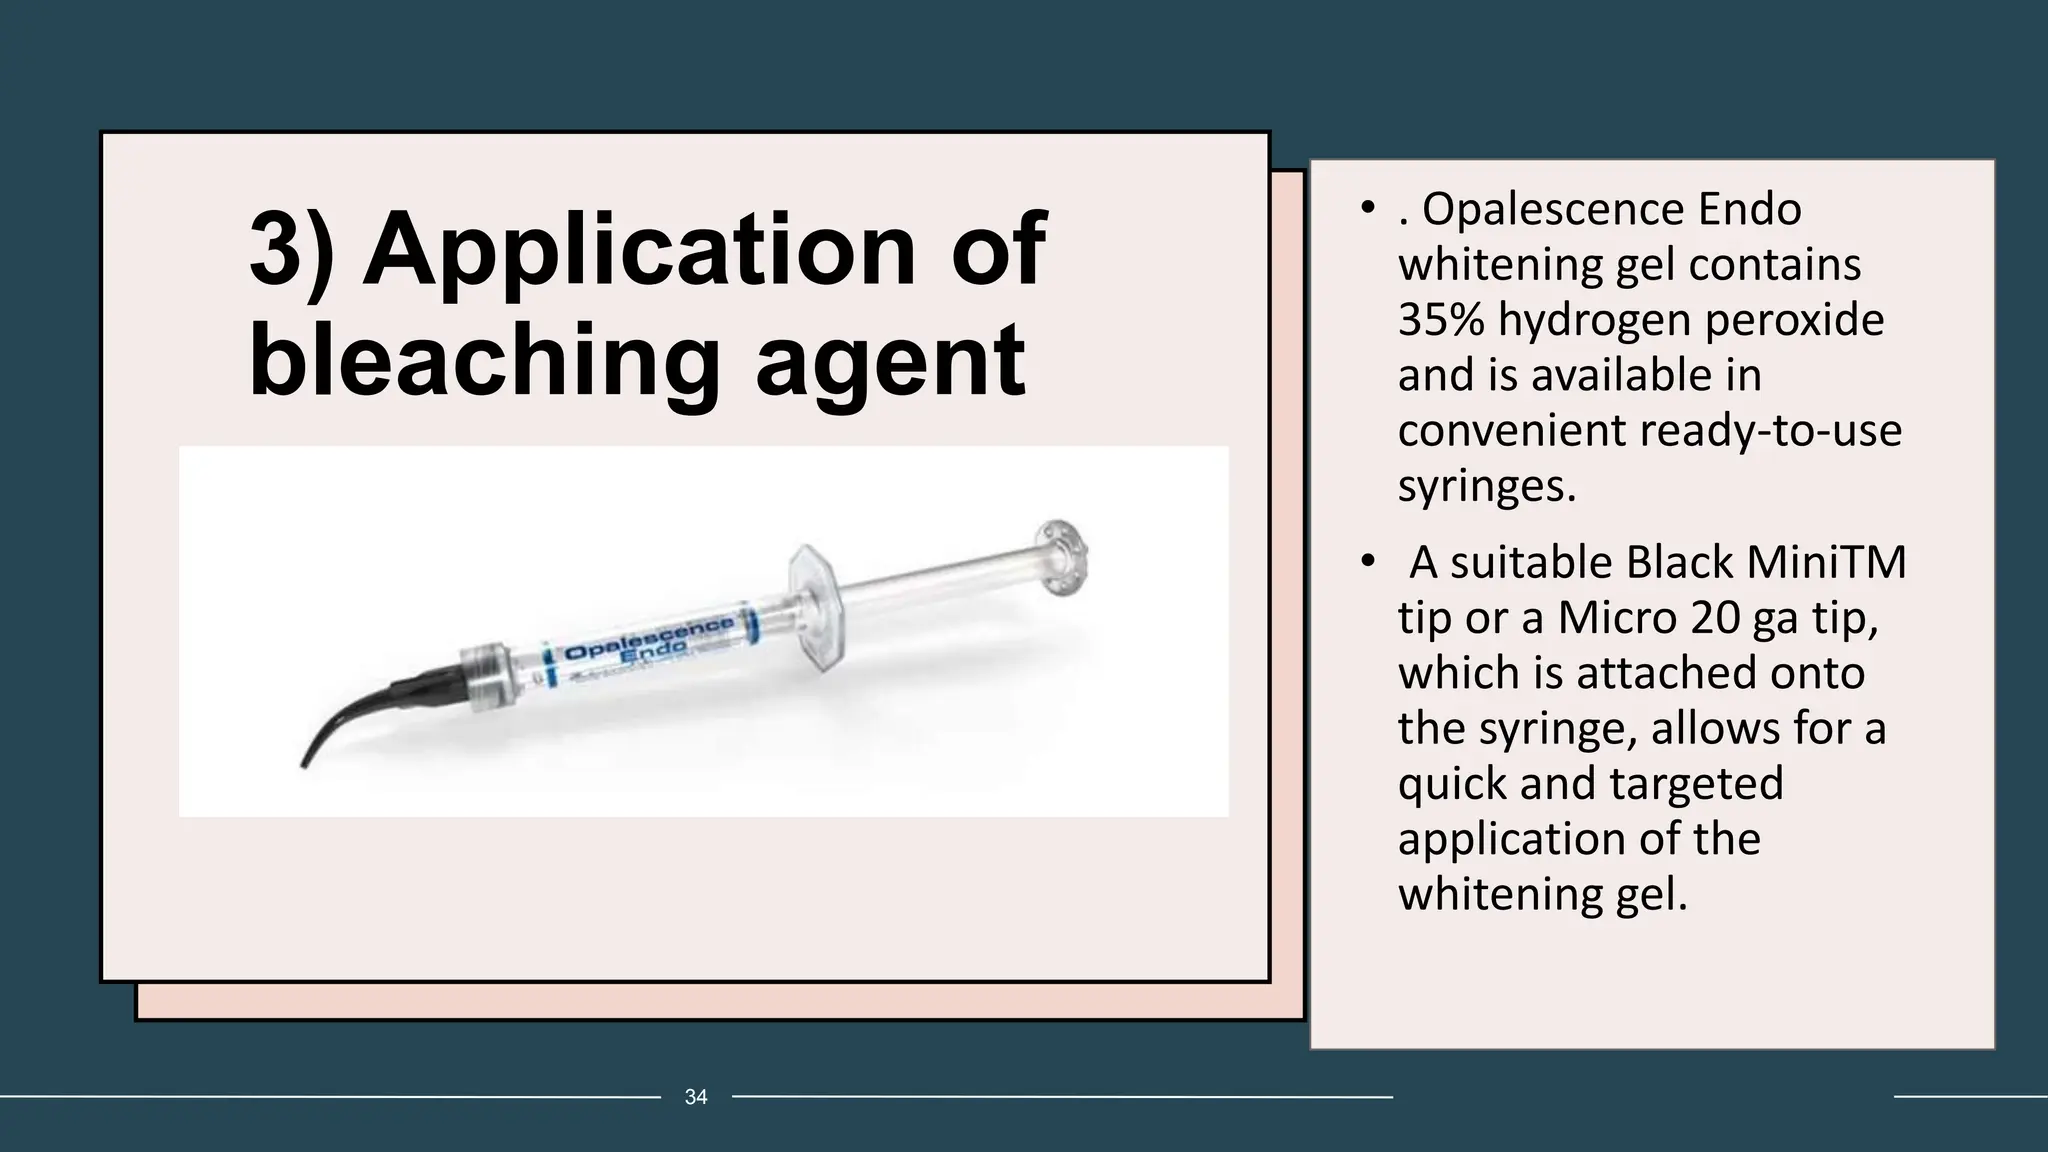
2. content
20XX
Presentation title
2
INTRODUCTION
CLASSIFICATION of NONVITAL BLEACHING
INDICATION
CONTRAINDICATION
ADVANTAGE AND DISADVANTAGE
PRELIMINARY TREATMENT
WALKING BLEACHING TECHNIQUE
INSIDE/OUTSIDE BLEACHING
LASER BLEACHING
THERMOCATALYTIC TECHNOQIUE
COMPLICATIONS AND RISKS
RECENT ADVANCEMENTS
CONCLUSION
REFFERENCE
3. Introduction
Aesthetics is a field of growing importance
An aesthetic smile
It has a psychosocial impact and influences the
individual’s esthetic self-perception
3
4. DEFINITION
"The lightening of the color of
a tooth through the application
of a chemical agent to oxidize
the organic pigmentation in the
tooth is referred to as
Bleaching"
20XX
Presentation title
4
5. Difference between vital and nonvital bleaching
Vital bleaching
Applied by dentist or by patient
(using home bleaching
techniques)
Applied on - external tooth
structure only
Protection of the gingival tissues
is of main importance
Nonvital bleaching
Applied by the dentist.
Applied mainly inside thepulp chamber.
Endodontically treated root canal must be
protected using GI or RMGI to prevent leakage
of the bleaching material.
5 Presentation title 20XX
6. CAUSES
• Non-vital tooth discoloration may have many causes,
I. Dental trauma-Necrotic pulp
II. Root canal treatment
III. Blood decomposition in pulp chamber
• presence of necrotic debris on the pulp horns and dentinal tubules, poor
irrigation, or sealing materials located in the pulp chamber or chamber walls .
• The most commonly described cause is intracoronal blood decomposition.
Hemolysis of erythrocytes in the dentin tubules is accompanied by the
release of iron. This, combined with hydrogen sulfate, forms ferric sulfide, a
black compound, responsible for the discoloration of the tooth
6 Presentation title 20XX
7. • There are several internal tooth bleaching techniques,
the most common being the walking-bleach technique, first described by
Spasser , in 1961.
Other techniques include thermocatalytic technique and inside-outside
technique.
• Commonly used Bleaching agents
I. Hydrogen peroxide,
II. Carbamide peroxide
III. Sodium perborate
• These three agents promote reversion of the chromatic change through
oxidative reactions
7 Presentation title 20XX
8. CLASSIFICATION
I. The walking bleach
II. Inside-outside bleaching
III. Thermocatalytic
IV. Laser bleaching
• Internal tooth bleaching is a
minimally invasive,
conservative, relatively
simple, effective, and low-
cost method in the treatment
of discolored endodontically
treated teeth
9. INDICATION
• A sealed root-canal filling is an important requirement for allowing an endodontically
treated tooth to be bleached.
• The tooth must be symptom-free, but a waiting period is called for in the case of a
radiologically detectable periapical radiolucency. Such lesions should be observed to
determine whether the alteration is increasing or if a healing process is apparent.
• In every case, the root-canal filling material should be sealed with a base material, in
order to prevent penetration of the bleaching agent into the periodontal space or
root canal.
• The ubiquitous cements used to close perforations must also be covered with a base.
• Prior to bleaching, insufficient coronal restorations must be replaced by restorations
providing an excellent marginal seal.
9 Presentation title 20XX
10. INDICATION
Discolored non vital
teeth
Stable restoration
After intentional RCT of
abutment tooth
Esthetic
requirements-for
non vital teeth
Patient compliance
10 Presentation title 20XX
11. 11 Presentation title 20XX
• The indication for nonvital bleaching, also known as internal bleaching, is primarily
for teeth that have become discolored due to factors within the tooth, such as pulp
tissue damage, root canal therapy, or the presence of blood byproducts. Here are
the key indications for nonvital bleaching:
• Discolored Non-Vital Teeth: The primary indication for nonvital bleaching is
discolored, non-vital teeth. This discoloration is often due to:
• Pulp Necrosis: When the pulp (nerve) of a tooth dies or becomes non-vital due
to infection or trauma, it can lead to discoloration over time.
• Root Canal Treatment: Teeth that have undergone root canal therapy can
develop internal staining because the pulp chamber and root canal system are
sealed off from the bloodstream, causing the tooth to darken.
12. 12 Presentation title 20XX
• Stable Restorations: Nonvital bleaching is most effective on teeth with
stable restorations, such as crowns or fillings, as the restorations do not
respond to bleaching agents. The restorations should match the shade of
the surrounding natural teeth before bleaching.
• Patient Desire for Aesthetics: When patients with discolored non-vital
teeth desire an improvement in the aesthetics of their smile, nonvital
bleaching can be a suitable treatment option.
• Patient Compliance: Patients should be willing to comply with the
treatment process, which may involve multiple appointments and good oral
hygiene practices during and after the bleaching.
13. CONTRAINDICATION
13 Presentation title 20XX
• What are the contraindications for internal bleaching
• The most important factor in bleaching effectiveness seems to be precise removal
of all restorative materials from the access cavity without additional dentin
elimination.
• Dentin has to be cleaned in order to facilitate diffusion of the bleaching agent
through the dentinal tubules.
• If a fiber post was cemented in the root canal and the pulp chamber was filled with
composite resin, removing the restorative material and post can compromise the
amount of sound dentin.
• Therefore, such a case calls for careful evaluation of aesthetic benefits vs.
structural sacrifice.
15. 15 Presentation title 20XX
• Other contraindications for internal bleaching include:
– discolourations caused by amalgam or other metallic materials (not bleachable)
– Significant dentin loss in the cervical portion (risk of fracture and leakage of bleaching
agent)
– Extensive restorations
– Visible cracks, especially with subgingival extension (risk of bleaching agent
penetrating towards periodontal ligaments)
– Young patients (<19 years old)
• Vital Teeth: Nonvital bleaching is intended for discolored non-vital teeth. It should not
be used on vital (living) teeth, as the bleaching agents are designed to act within the
pulp chamber and may cause unnecessary harm to healthy dental pulp.
• Unstable Restorations: If a tooth has unstable or leaking restorations (e.g., old and
faulty fillings or crowns), it is not a suitable candidate for nonvital bleaching. The
bleaching agents can potentially seep under the restorations and cause complications.
16. 16 Presentation title 20XX
• Severe Structural Damage: Teeth with severe structural damage, such as
extensive cracks, fractures, or large cavities, are not ideal candidates for
nonvital bleaching. The structural integrity of the tooth should be sufficient to
withstand the procedure.
• Pulpal Inflammation or Infection: Nonvital bleaching should not be performed
if the tooth has active pulpitis (inflammation of the dental pulp) or untreated
pulp infection. Addressing the underlying dental issue should be the priority
before considering bleaching.
• Unresolved Periapical Pathosis: If there are unresolved periapical pathologies,
such as abscesses or cysts at the root tip, these should be treated before
attempting nonvital bleaching.
• Pregnancy: The safety of nonvital bleaching during pregnancy has not been
well studied, and it's generally advisable to avoid elective dental procedures
during pregnancy unless necessary for health reasons.
17. 17 Presentation title 20XX
• Severe Allergies or Sensitivities: Patients with known allergies or sensitivities to the
bleaching agents or materials used in the procedure should not undergo nonvital
bleaching.
• Unrealistic Patient Expectations: If a patient's expectations are unrealistic or they
seek an extreme level of tooth whitening that may compromise the integrity of the
tooth structure, it's important to communicate and manage these expectations
appropriately. In such cases, alternative treatments should be considered.
• Youthful Patients with Developing Teeth: Nonvital bleaching is typically not
recommended for young patients with developing teeth (e.g., children or teenagers)
as it can interfere with normal tooth development. A good cervical seal is decisive in
young teeth, as the diffusion rate of the bleaching agent through the tooth is much
higher than in older patients
• Inadequate Informed Consent: A patient should be adequately informed about the
risks, benefits, and alternatives to nonvital bleaching. If the patient is unable or
unwilling to provide informed consent, the procedure should not be performed.
• In cases where the internal bleaching technique compromises the remaining tooth
structure, other options, such as porcelain or composite veneers should be
considered.
18. 18 Presentation title 20XX
ADVANTAGE DISADVANTAGE
Aesthetics: Nonvital bleaching can have a
significant positive impact on a patient's
appearance. It can help restore the natural
whiteness of teeth, resulting in a brighter and
more attractive smile.
Minimally Invasive: Nonvital bleaching is a
conservative treatment option. It doesn't require
removing or altering healthy tooth structure, as is
often the case with restorative procedures like
crowns or veneers.
Preservation of Tooth Structure: Unlike some
other cosmetic dental treatments, nonvital
bleaching doesn't involve reshaping or removing
tooth structure. This means that more of the
natural tooth is preserved.
Limited Effectiveness: Nonvital bleaching may
not be effective for all types of tooth
discoloration. It works best for extrinsic stains
caused by factors like tea, coffee, or tobacco,
but it may not be as effective for intrinsic stains
resulting from factors such as dental decay,
certain medications, or genetics.
Temporary Results: The results of nonvital
bleaching are not permanent. Over time, teeth
can gradually revert to their original color,
especially if patients continue to consume
staining substances.
Sensitivity: Some patients may experience
tooth sensitivity during and after the bleaching
process. This sensitivity is typically temporary,
but it can be uncomfortable for some
individuals.
19. 19 Presentation title 20XX
ADVANTAGE DISADVANTAGE
Cost-Effective: Nonvital bleaching is generally
more cost-effective compared to restorative
treatments like crowns or veneers, making it an
attractive option for patients looking to
enhance their smile without breaking the bank.
Quick Results: Patients can typically see
noticeable improvements in tooth color within
a few weeks of starting nonvital bleaching
treatment, which is relatively quick compared
to other dental procedures.
Uneven Results: Achieving uniform whitening
across all teeth can be challenging, especially if
some teeth are more discolored than others. In
such cases, it may be necessary to combine
bleaching with other cosmetic treatments for a
consistent look.
Multiple Sessions: To achieve the desired level of
whitening, patients may need multiple bleaching
sessions. This can be time-consuming and require
careful patient compliance.
Supervision: Nonvital bleaching should be
performed under the supervision of a dentist to
ensure that it is done safely and effectively. Over-
the-counter whitening products may not provide
the same level of care and expertise as a dental
professional
20. PRELIMINAR
Y
TREATMENT
PHOTODOCUMENTED WITH COLOUR KEY
RADIOGRAPHIC ASSESMENT–PRE&POSTOPERATIVE
INFORM THE RISK OF TREATMENT AND
ALTERNATIVE MTHODS
EDUCATING PATIENT
NO GARUNTEE-PERSISTING RESTORATON-
COST-ALLERGY
CONSENT-YOUNGPATIENTS
DETERMINE THE CAUSE OF DISCOLORATION
INTRINSIC STAIN AND EXTRINSIC STAIN1
21. • Deficient restorations should be identified and replaced; carious lesions should be
restored.
• If restorations do not match the shade of the tooth, they should be replaced at the end of
the treatment with materials matching the whitened tooth.
• The final shade of the tooth as a result of bleaching cannot be reliably predicted, and this
makes it difficult to select the correct shade of filling material before bleaching.
• Therefore, it is advisable to restore carious lesions or replace deficient fillings with
temporary materials before treatment or to replace restorations after completion of
bleaching.
• It should be emphasized that the tooth be restored with high quality fillings to ensure the
effectiveness of the bleaching agent and to avoid leakage of the agent into the oral cavity.
• Furthermore, it is of great importance to apply rubber dam to isolate the treated tooth, to
prevent reinfection of the root canal, and to protect the adjacent structures from the
bleaching agent. For difficult cases it is possible to use a liquid dam.
21 Presentation title 20XX
22. 20XX
Presentation title
22
OPG was made to have a general overwiev of the situation.
Looking at tooth 11, the root filling seems to be correct and no
periapical pathology is visible. Furthermore, we can see a very
large coronal access cavity, partially filled by guttapercha, what
can presumably cause the coronal discoloration.
23. WALKING
METHOD
The name "walking bleach" is
derived from the process itself
and how it involves a gradual,
controlled approach to
whitening the tooth.
The whitening agent is placed
inside the tooth, and the patient
"walks away" with the
bleaching agent left in the
tooth.
24. HISTORY
• The first description -with a mixture of sodium perborate and distilled
water was mentioned in a congress report by Marsh and published by
Salvas. In this procedure, the mixture was left in the pulp cavity for a few
days, and the access cavity was sealed with provisional cement.
• The mixture of sodium perborate and water was reconsidered by Spasser
and modified by Nutting and Poe , who advocated the use of 30%
hydrogen peroxide instead of water to improve the bleaching
effectiveness of the mixture.
• A mixture of sodium perborate and water or hydrogen peroxide
continues to be used today and has been described many times as a
successful technique for intracoronal bleaching
24 Presentation title 20XX
25. 25 Presentation title 20XX
Preparation of pulp
cavity
Cervical seal
Application of
bleaching agent
Temporary filling
RESTORATION OF
THE ACSESS
CAVITY AND POST
OPERATIVE
RADIOGRAPH
26. 1.Preparation of
access cavity
26
• Before preparation of the
access cavity, rubber dam
should be applied to
protect the adjacent
structures.
• The access cavity should
be shaped in such a way
that remnants of
restorative materials,
root-filling materials, and
necrotic pulp tissue are
completely removed.
27. • For this reason, in particular for maxillary incisors, it is very important to
include the mesial and distal pulp horns in the access cavity, because
they can contain necrotic pulpal remnants, which can cause discoloration
• Additional cleaning of the pulp cavity with sodium hypochlorite is also
recommended
• In some reports, conditioning of the dentin surface of the access cavity
with 37% orthophosphoric acid is suggested to remove the smear layer
and to open the dentinal tubules.
• This promotes the penetration of the bleaching agent deep into the
tubules and increases its effectiveness .
27 Presentation title 20XX
28. • It has also been recommended to clean the pulpal cavity with alcohol
before application of the bleaching agent to dehydrate dentin and reduce
surface tension; consequently the bleaching agent will penetrate with
greater ease into the dentin, achieving improved efficacy .
• However, studies have shown that removal of the smear layer with 37%
orthophosphoric acid does not improve the bleaching effectiveness of
either sodium perborate or a high concentration of hydrogen peroxide .
• Furthermore, the pre-treatment of dentin with acid might lead to an
increased diffusion of bleaching agents into the periodontium .
• Therefore, removal of the smear layer from the dentin of the pulp
chamber before the bleaching procedures is still a controversial issue.
28 Presentation title 20XX
30. 2) Cervical seal
30
• The root filling should be
reduced 1–2 mm below
the CEJ.
• This can be determined
by using a periodontal
probe placed in the pulp
cavity, while reproducing
the corresponding
external probing to the
CEJ.
• To remove filling material
up to this level, Gates-
Glidden or Largo burs can
be used.
31. 31 Presentation title 20XX
• It is important to clean the cavity
surfaces from debris and remnants of
endodontic materials, because the
presence of contaminants on the
surfaces might negatively influence the
efficacy of the bleaching agent.
• A root filling does not adequately
prevent diffusion of bleaching agents
from the pulpal chamber to the apical
foramen
32. Sealant used
Hansen-Bayless and
Davis
• the root filling with a base is essential, for dental materials
such as glass-ionomer cements, intermediate restorative
material (IRM), hydraulic filling materials (Cavit, Coltosol),
resin composites, photo-activated temporary resin
materials (Fermit), zinc oxide–eugenol cement, and zinc
phosphate cement have been suggested as an interim
sealing agent during bleaching techniques
McInerney and Zillich • found that Cavit and IRM provided better internal sealing
of the dentin than did zinc phosphate cement
32 Presentation title 20XX
33. • The sealing material should reach the level of the epithelial attachment or the CEJ,
respectively, to avoid leakage of bleaching agents into the periodontium .
• The shape of the cervical seal should be similar to the external anatomic
landmarks, thus reproducing CEJ position and interproximal bone level.
• A flat barrier, level with the labial CEJ, leaves a large portion of the proximal
dentinal tubules unprotected. Therefore, the barrier should be determined by
probing the level of the epithelial attachment at the mesial, distal, and labial
aspects of the tooth barrier.
33 Presentation title 20XX
34. 3) Application of
bleaching agent
34
• . Opalescence Endo
whitening gel contains
35% hydrogen peroxide
and is available in
convenient ready-to-use
syringes.
• A suitable Black MiniTM
tip or a Micro 20 ga tip,
which is attached onto
the syringe, allows for a
quick and targeted
application of the
whitening gel.
35. 35 Presentation title 20XX
• Sodium perborate (tetrahydrate) mixed with distilled water in a ratio of
2:1 (g/mL) is a suitable bleaching agent .
• In case of severe discoloration, 3% hydrogen peroxide can be applied in
lieu of water .
• The bleaching agent can be applied with an amalgam carrier or plugger
and should be changed every 3–7 days
• Successful bleaching becomes apparent after 2–4 visits, depending on the
severity of the discoloration.
• The patients should be instructed to evaluate the tooth color on a daily
basis and return when the bleaching is acceptable to avoid “over-
bleaching”
36. 4) Temporary filling
36
• Before application of the
bleaching agent, the enamel
margins of the cavity should
be etched with 37%
orthophosphoric acid to
accomplish an adhesive
temporary filling.
• The walking bleach
technique requires a sound
seal around the access
cavity with a resin
composite or compomer to
ensure its effectiveness and
to avoid leakage of the
bleaching agent into the oral
cavity
37. 37 Presentation title 20XX
• This cannot be guaranteed if temporary filling materials are being used ( 103 ).
• In addition, a good seal prevents recontamination of the dentin with microorganisms and
reduces the risk of renewed staining.
• It is often difficult to place filling materials on a soft bleaching agent. A small sterile cotton
pellet impregnated with a dentin bonding agent, placed on the bleaching agent and then
light-cured, simplifies the placement of a filling material.
• The temporary filling should only be attached to the enamel margins of the access cavity.
• During this phase of the treatment, the pulp chamber is filled with the bleaching agent
and not with an adhesively attached restorative material, so that no internal stabilization
of the tooth is provided.
• Therefore, the patient should be informed about an increased risk of fracture
38. 5) Restoration of the
Access Cavity and
Postoperative
Radiograph
38
• After bleaching, the
access cavity should be
restored with a resin
composite, which is
bonded by means of the
acid-etch technique to
enamel and dentin.
• This avoids
recontamination with
bacteria and staining
substances and improves
the stability of the tooth.
39. 39 Presentation title 20XX
• A sound restoration with sealed dentinal tubules is a prerequisite to successful bleaching therapy
• . Some author recommend using resin composites with lighter shades to compensate for bleaching
that was not completely successful.
• The adhesive strength of resin composites and glass-ionomer cements to bleached enamel and
dentin is temporarily reduced
• It has been established that remnants of peroxide or oxygen inhibit the polymerization of resin
composites
• It is less likely that changes in the enamel structure might influence resin composite adhesion
• . Nevertheless, the appearance of the hybrid layer in bleached enamel is less regular and distinct
than in unbleached enamel .
• This might explain why access cavities of bleached teeth that are restored with resin composite
occasionally show marginal leakage.
40. 40 Presentation title 20XX
• The negative influence of hydrogen peroxide–containing bleaching agents on adhesion
can be reduced by moderate bevelling of the cavity before acid etching .
• The same can be achieved by pre-treatment of enamel with dehydrating agents such as
alcohol and the use of acetone-containing adhesives .
• To dissolve remnants of peroxide, the cavity can also be cleaned with sodium
hypochlorite .
• A contact time of at least 7 days with water is recommended to avoid the reduction of
adhesion of composites to enamel .
• Optimal bonding to bleached dental hard tissue can be achieved after a period of about
3 weeks .
• During this period, the color of the bleached tooth should be stable and a calcium
hydroxide dressing placed in the pulp cavity for buffering the acid pH that can occur on
cervical root surfaces after intracoronal application of bleaching agents.
• The calcium hydroxide suspension temporarily placed into the pulp chamber after
completion of the bleaching procedure does not interfere with the adhesion of
composite materials used for final restoration of the access cavity.
• Furthermore, compromised bonding to bleached enamel can be reversed with sodium
ascorbate, an antioxidant
41. Case 1
a ) Pre-treatment photograph of right maxillary
central incisor showing severe discoloration due
to a necrotic pulp caused by trauma. Endodontic
treatment was performed before bleaching.
( b ) Appearance after bleaching with the walking
bleach technique for 3 consecutive treatments
shows considerable whitening.
( c, d ) Esthetic restoration was completed 7 days
after bleaching.
( e ) Immediate postoperative view after
placement of a composite resin.
( f ) Esthetic appearance after 1 year.
41
42. Case 2
( a ) Pre-treatment photograph shows a yellow-
brown discoloration of tooth #8 caused by
endodontic treatment.
( b ) Clinical results after 3 applications of the
walking bleach technique, resulting in a slightly
overbleached tooth.
42
43. Thermocatalytic
technique
• Same as walking bleach
technique
• But heat is applied using a
different instrument
• Due to the heat and high
concentration of bleaching
agent ,cervical root resorption
could occur
• Not recommended for routine
use
44. 44 Presentation title 20XX
• This technique has been proposed for many years as the best technique to bleach nonvital teeth because of the
strong interaction between hydrogen peroxide and heat .
• Moreover, a common clinical technique is to use 30%–35% hydrogen peroxide placed in the pulp chamber between
appointments .
• Preparation of the access cavity consists of cleaning, removal of filling materials, and all the preparation procedures
described for discolored teeth when using the walking bleach technique.
• However, this technique involves placement of 30%–35% hydrogen peroxide in the pulp chamber followed by heat
application by electric heating devices or specially designed lamps.
• It has been observed that heat application causes a reaction that increases bleaching properties of the hydrogen
peroxide .
• Heat might be applied by using a heated metal instrument or other commercial heat applicators (Touch’n Heat,
System B; Analytic Technology, Orange, CA).
• Heat application is repeated 3 or 4 times at every appointment, changing the pellet with “fresh” bleaching agent at
each visit. When heat is applied, a reaction produces foam and releases the oxygen present in the preparation.
• At the end of each appointment the bleaching agent is sealed into the pulp chamber for additional bleaching
between appointments as in the walking bleach technique
45. 45 Presentation title 20XX
Coronal restoration is removed completely and
access preparation is improved and gutta-
percha is removed to just below the cervical
margin
Cervical seal of 1mm GIC base placed over
the GP to form the barrier between the sealed
root canal and bleaching material
A loose mat of cotton is saturated with 30%
h2o2 placed on the labial surface and another
is placed in the pulp chamber of the tooth to
be bleached
46. 46 Presentation title 20XX
The solution is activated by exposing it to light and
heat from a powerful light. unually a severe 5-6min
exposure and the bleaching solution is replenished at
frequent interval
On completion a pellet of cotton moistend with h2o2is
sealed in the pulp chamber until the following
appointment
To reduce the possibility of resorption , immedietly after
bleaching a paste of ca(oh)2 powder and sterile water is
placed in the pulp chamber
Also can use sodium perborate as primary bleaching agent
instead of h2o2-may be slow bleaching but safe
47. Case 1
b ) Pre-treatment photograph demonstrates
dark discoloration of right upper canine . Root
canal treatment had been completed many
years ago.
d ) Post-bleaching photograph before
replacement of the stained distal composite
resin restoration. A thermocatalytic
intracoronal bleaching technique was used.
The distal composite resin was replaced 2
weeks after bleaching.
f ) Two-year postoperative/bleaching results
show very nice esthetic appearance.
47
49. • Settembrini introduced the inside-outside bleaching technique, in which bleaching
occurs simultaneously with in the tooth structure and on tooth external surface.
• In this technique, generally 10% carbamide peroxide gel applied to tooth structure
internally and externally in root-filled, discolored teeth and refreshed on a regular
basis.
• This bleaching agent (CH4N2O • H2O2) has undergone extensive research.
• An in vitro study showed that carbamide peroxide has a bleaching capacity
comparable to that of hydrogen peroxide [20]. Inside-outside technique is a fast
technique because the oxygen reactive species released from the hydrogen peroxide
freely diffuse inside and outside of the tooth structure to effect tooth whitening.
49 Presentation title 20XX
51. 51 Presentation title 20XX
Laser Assisted BleachingTechniqueThis technique achieves power bleaching process withthe
help of efficient energy source with minimum sideeffects.Laser whitening gel contains thermally
absorbedcrystals, fumes silica and 35 percent hydrogenperoxide.In this, gel is applied and is
activated by light sourcewhich further activates the crystals present in gel,allowing dissociation of
oxygen and therefore betterpenetration into enamel matrix.Following laser have been approved
by FDA for toothbleaching:Argon laserC02 laser
54. 54 Presentation title 20XX
• External cervical resorption- There is speculation that hydrogen peroxide can
diffuse through the dentinal tubules, cement, and periodontal ligament and
can reach bone
directly induces an inflammatory resorption process.
On its own, hydrogen peroxide is not very reactive, and the body has
mechanisms in place to deal with it
However, in the presence of inflammation, proinflammatory agents activate
reduced nicotinamide adenine dinucleotide phosphate oxidase, which
produces superoxides that can react with hydrogen peroxide.
It is speculated that the resultant hypochlorous acid, N-chloroamines, and
reactive hydroxyl ions might initiate some disease processes ( 178 ).
• .
55. 55 Presentation title 20XX
• Temporary Tooth Sensitivity: During nonvital bleaching, a bleaching agent (typically hydrogen peroxide
or carbamide peroxide) is applied inside the tooth. This process can cause temporary tooth sensitivity,
especially when the bleaching gel is in contact with the dentin, the inner layer of the tooth. The
sensitivity is often transient and can be managed with desensitizing toothpaste or by reducing the
duration and frequency of bleaching sessions.
• Root Resorption: Root resorption is a rare but severe complication. It occurs when the internal
bleaching agents come into contact with the root structure of the tooth and start to break it down.
This can weaken the tooth's integrity and may lead to tooth loss. Proper isolation and precise
application are crucial in preventing this complication.
• Gum Irritation: The bleaching agents can sometimes seep out of the tooth and come into contact with
the surrounding gums and oral tissues. This can lead to irritation, inflammation, and chemical burns.
To prevent this, a protective barrier is usually placed around the tooth to isolate it from the gums.
Careful monitoring and adjustments during the procedure are necessary to avoid gum-related
complications.
56. 56 Presentation title 20XX
• Color Uniformity: Achieving even and consistent whitening results can be challenging,
especially if the tooth being treated has various colors or shades. Different areas of the tooth
may bleach at different rates, leading to uneven results. Proper assessment and customization
of the bleaching process are important to minimize this risk.
• Overbleaching: Overusing bleaching agents, leaving them on for too long, or using a higher
concentration than recommended can lead to overbleaching. This can result in a chalky or
translucent appearance of the tooth, which may look unnatural. Patients attempting at-home
bleaching without professional guidance are more prone to this risk.
• Relapse: After nonvital bleaching, there's a risk of the tooth slowly reverting to its original color
over time. This can occur due to intrinsic staining, dietary habits, or other factors. Patients
should be aware that the results of nonvital bleaching may not be permanent, and retreatment
may be necessary to maintain the desired level of whiteness.
57. 57 Presentation title 20XX
• Fracture Risk: In some cases, overbleached teeth can become more brittle.
This increased fragility may raise the risk of tooth fractures, especially if the
tooth has been compromised by previous dental procedures or structural
issues.
• It's crucial for dental professionals to carefully evaluate each patient's
specific case and take precautions to minimize these risks. Additionally,
thorough patient education is important to manage expectations and
ensure they understand the potential complications associated with
nonvital bleaching
58. conclusion
• In conclusion, non-vital bleaching techniques represent a valuable and
effective approach in enhancing the esthetics of discolored teeth with pulp-
related issues. Throughout this presentation, we have explored various
methods, including walking bleach and thermocatalytic bleaching, highlighting
their advantages, considerations, and outcomes.
• As we conclude, it's essential to emphasize the significance of proper
diagnosis, treatment planning, and patient communication in the success of
non-vital bleaching procedures. Each case is unique, and a thorough
assessment by the dental practitioner is crucial to determine the most suitable
technique, concentration, and duration.
58 Presentation title 20XX
Currently aesthetics is a field of growing importance, particularly having an aesthetic smile since it has a psychosocial impact and influences the individual’s esthetic self-perception.