This document provides an instruction manual for an induction hob with an integrated ventilation system. It describes the various features and functions of the appliance, including its operating modes, control panel, hotplates, safety features, cleaning instructions, and troubleshooting tips. The manual provides guidance on how to properly use and maintain the induction hob to cook safely and efficiently.
![Black Friday Discounts from Sellers
on
Home Appliances
Electromaster POWERFUL Vaccum …
USh 300,000 USh 240,000
Home Appliances
Vacuum Cleaner for Sale
USh 100,000 USh 50,000
Home Appliances
Geepas Vacuum Cleaner Wet Dry 28…
USh 550,000 USh 470,000
Home Appliances
Wishing Star Italy
USh 150,000 USh 100,000
Home Appliances
LG Ac12000btu R410 Air Conditioner
USh 2,450,000 USh 1,650,000
Home Appliances
Vaccum Cleaner 20 Litres
USh 800,000 USh 550,000
Home Appliances
Humidifiers
USh 95,000 USh 65,000
Home Appliances
Mechanical Bathroom Scales For Chil…
USh 160,000 USh 120,000
Home Appliances
Rechargeable Vacuum Cleaner
USh 250,000 USh 200,000
Home Appliances
Phillips Flatiron
USh 80,000 USh 65,000
Home Appliances
Easy Home 2 in 1 Rechargeable Vacu…
USh 240,000 USh 200,000
Home Appliances
Quality Compact Children Mechanica…
USh 150,000 USh 120,000
Home Appliances
USA Made Multi Purpose Blower
USh 290,000 USh 190,000
Home Appliances
Vacuum Cleaner 60L
USh 3,000,000 USh 1,850,000
Home Appliances
Ac Logik Air Conditioner Give Away P…
USh 450,000 USh 350,000
Home Appliances
Saachi [NL-IR-145] Electric Dry Flat Ir…
USh 80,000 USh 60,000
Home Appliances
Iron Cable
Home Appliances
Washer and Dryer Hisense 8kg Wash…
-20% -50%
-15% -33%
-33% -31%
-32% -25%
-20% -19%
-17% -20%
-34% -38%
-22% -25%
-17% -15%
Chat Show contact Chat Show contact
Chat Show contact Chat Show contact
Chat Show contact Chat Show contact
Chat Show contact Chat Show contact
Chat Show contact Chat Show contact
Chat Show contact Chat Show contact
Chat Show contact Chat Show contact
Chat Show contact Chat Show contact](https://image.slidesharecdn.com/manualbosh-211126090217/75/Manual-bosh-1-2048.jpg)

![3FHJTUFSZPVS
OFXEFWJDFPO
.Z#PTDIOPXBOE
HFUGSFFCFOFGJUT
CPTDIIPNFDPN
XFMDPNF
[en] Instruction manual Hob
Induction hob with integrated
ventilation system
PVQ...F1..](https://image.slidesharecdn.com/manualbosh-211126090217/75/Manual-bosh-3-2048.jpg)
![en
3
Table of contents
[en]InstructionmanualHob
8 Intended use. . . . . . . . . . . . . . . . . . . . . . . . . . . . . 4
( Important safety information . . . . . . . . . . . . . . . 5
] Causes of damage . . . . . . . . . . . . . . . . . . . . . . . . 7
7 Environmental protection . . . . . . . . . . . . . . . . . . 7
Energy saving tips . . . . . . . . . . . . . . . . . . . . . . . . . . . . 7
Environmentally-friendly disposal . . . . . . . . . . . . . . . . . 7
f Induction cooking . . . . . . . . . . . . . . . . . . . . . . . . 8
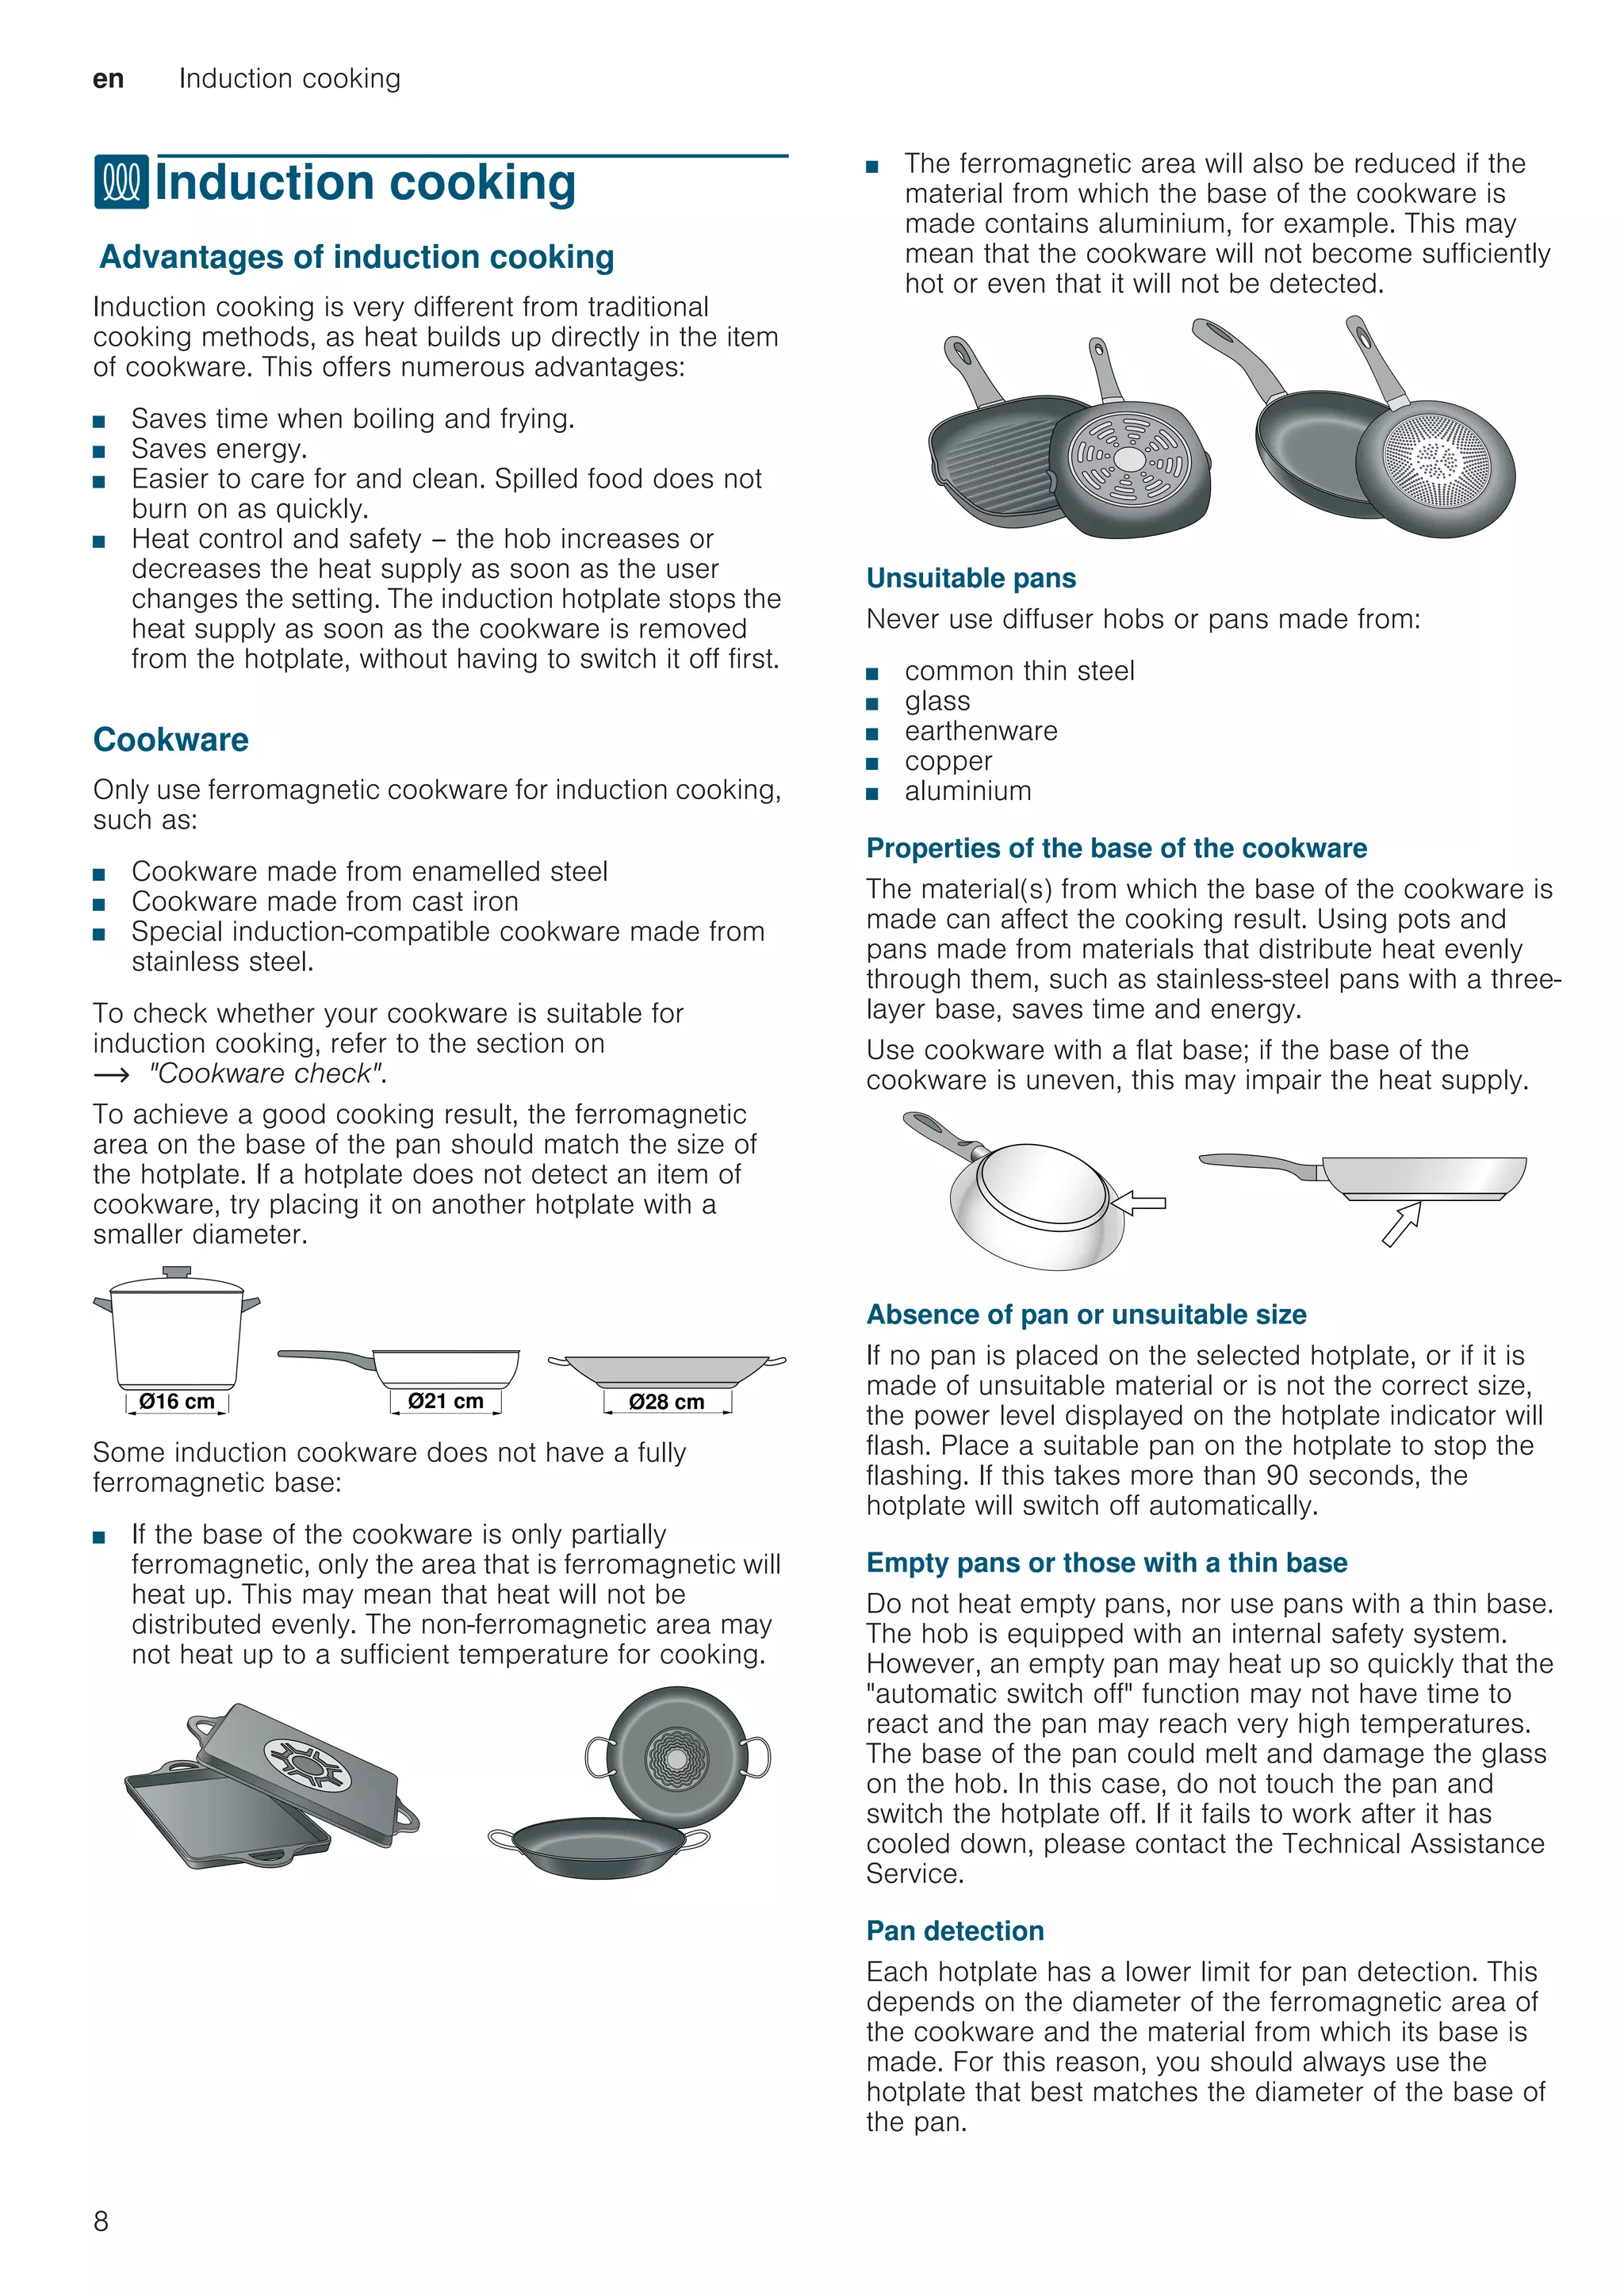
Advantages of induction cooking. . . . . . . . . . . . . . . . . 8
Cookware. . . . . . . . . . . . . . . . . . . . . . . . . . . . . . . . . . . 8
* Getting to know your appliance . . . . . . . . . . . . . 9
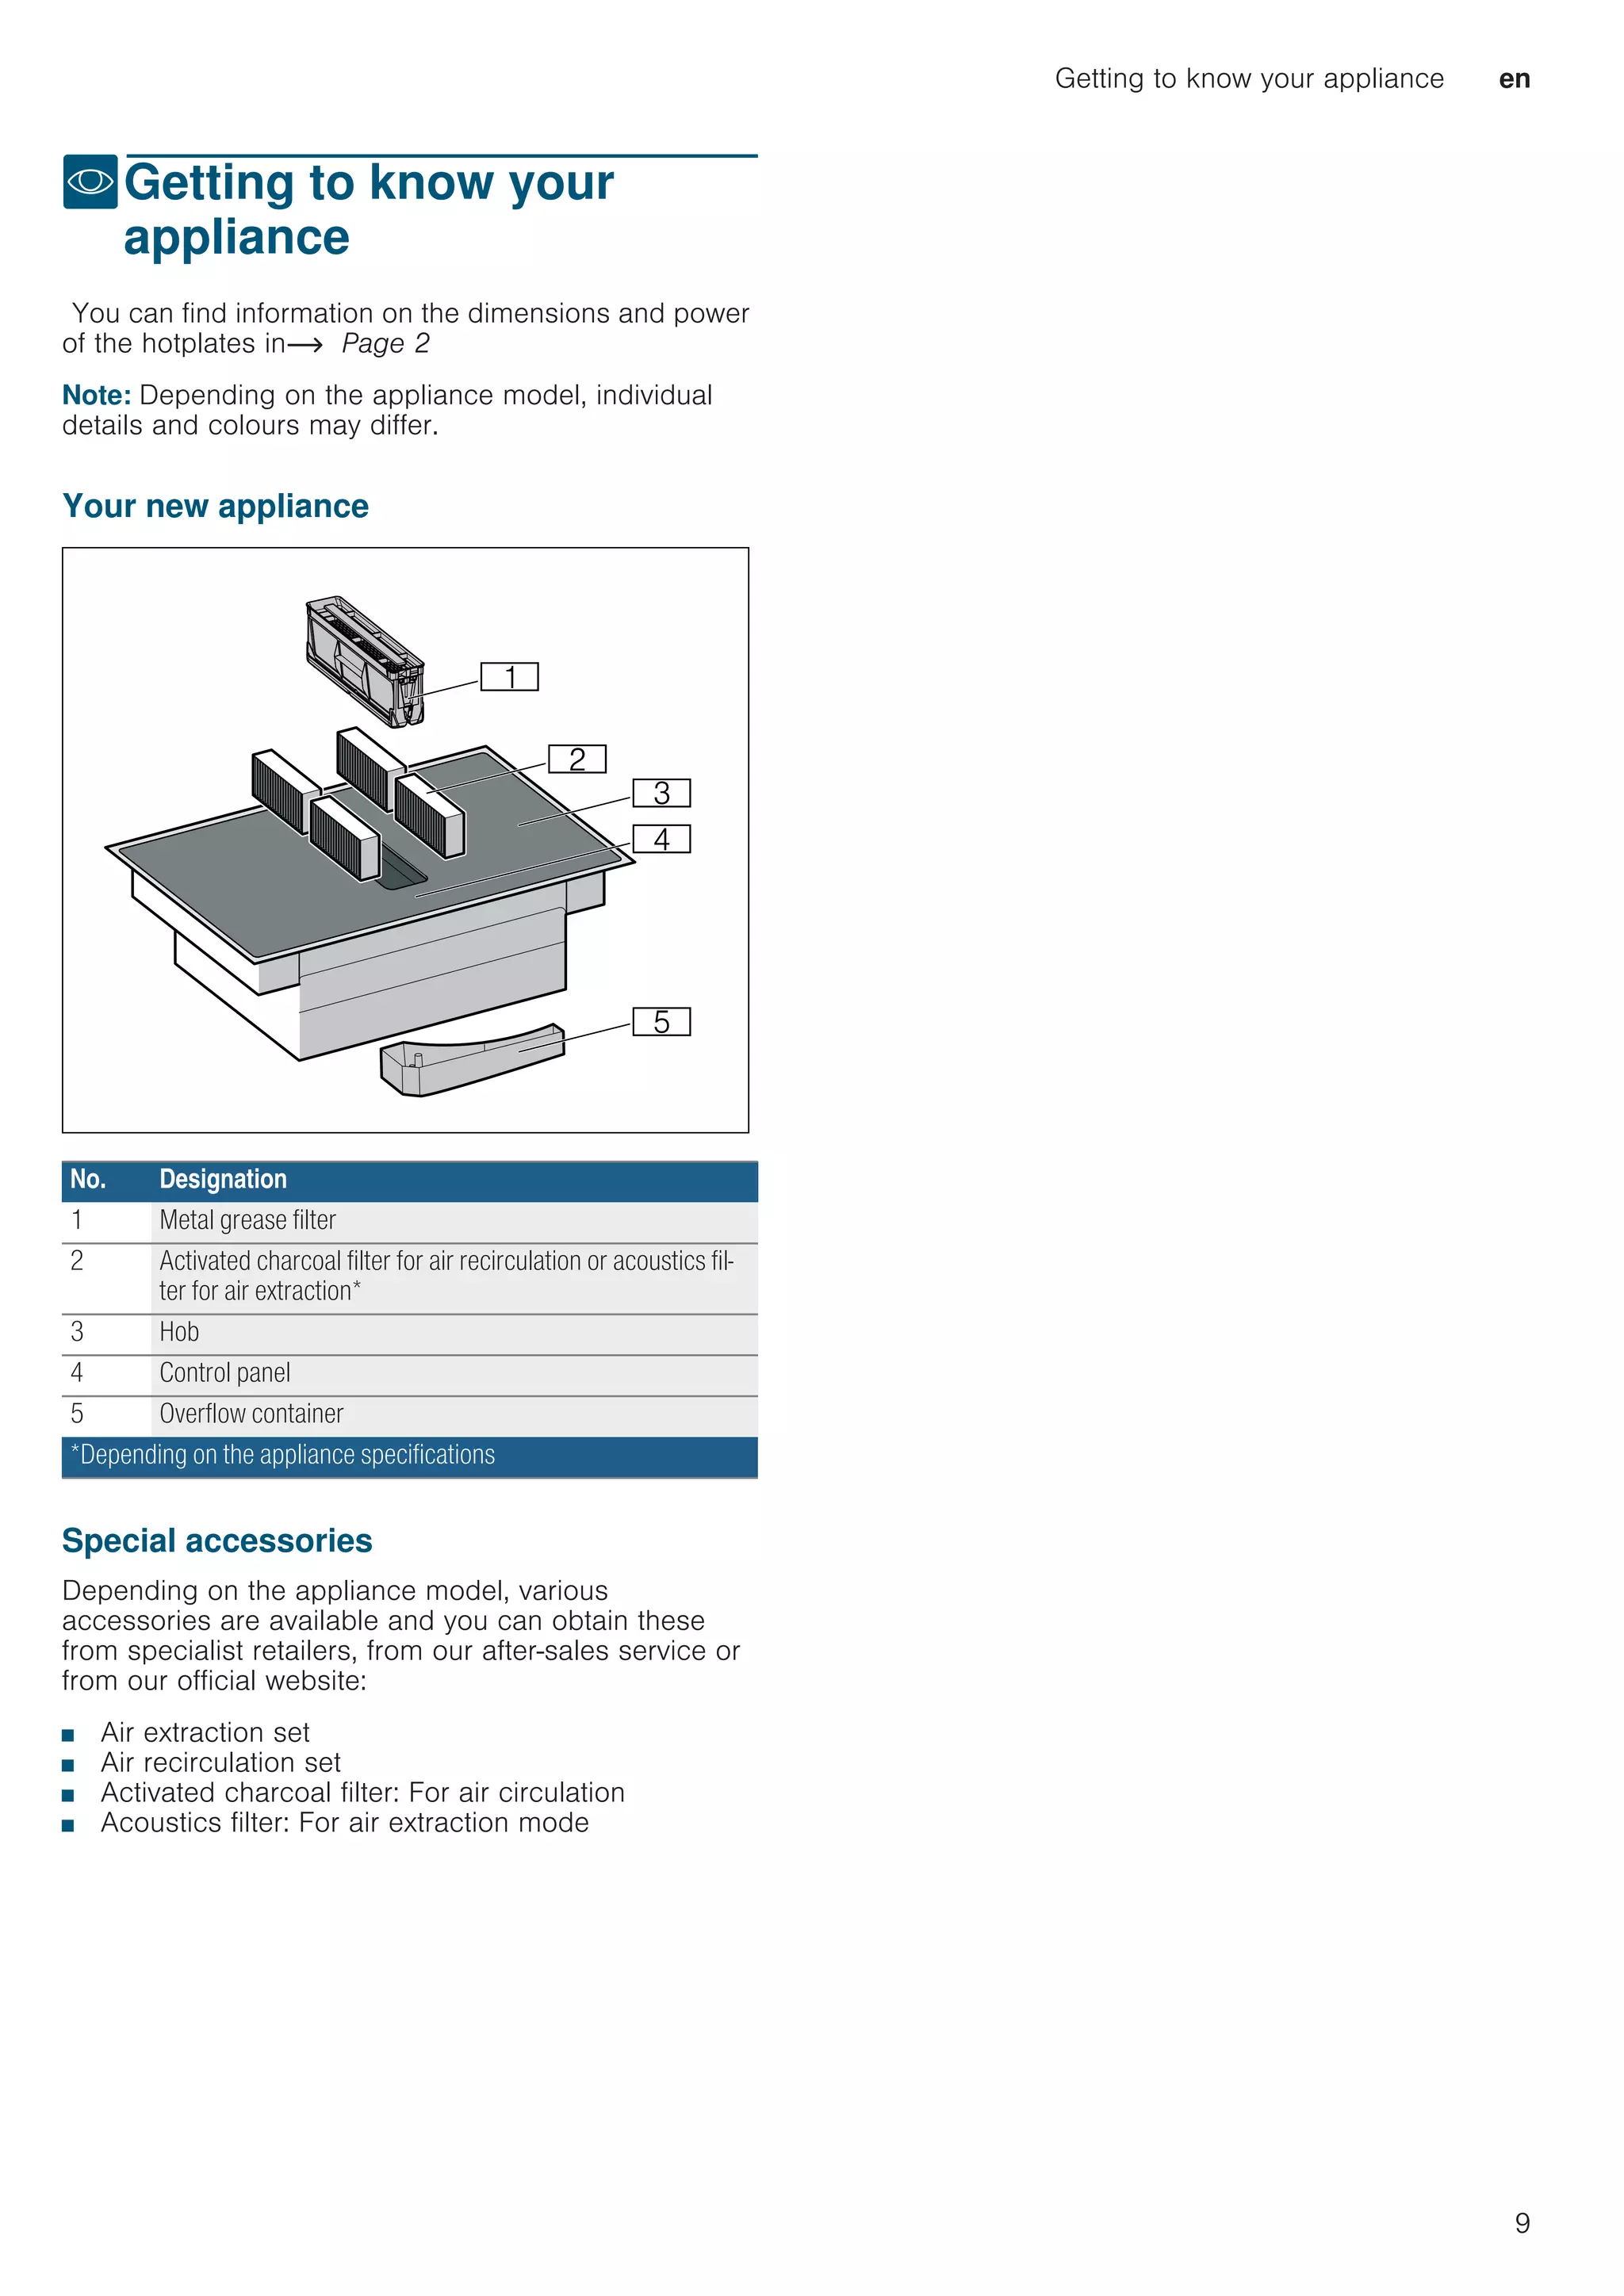
Your new appliance . . . . . . . . . . . . . . . . . . . . . . . . . . . 9
Special accessories . . . . . . . . . . . . . . . . . . . . . . . . . . . 9
The control panel . . . . . . . . . . . . . . . . . . . . . . . . . . . .10
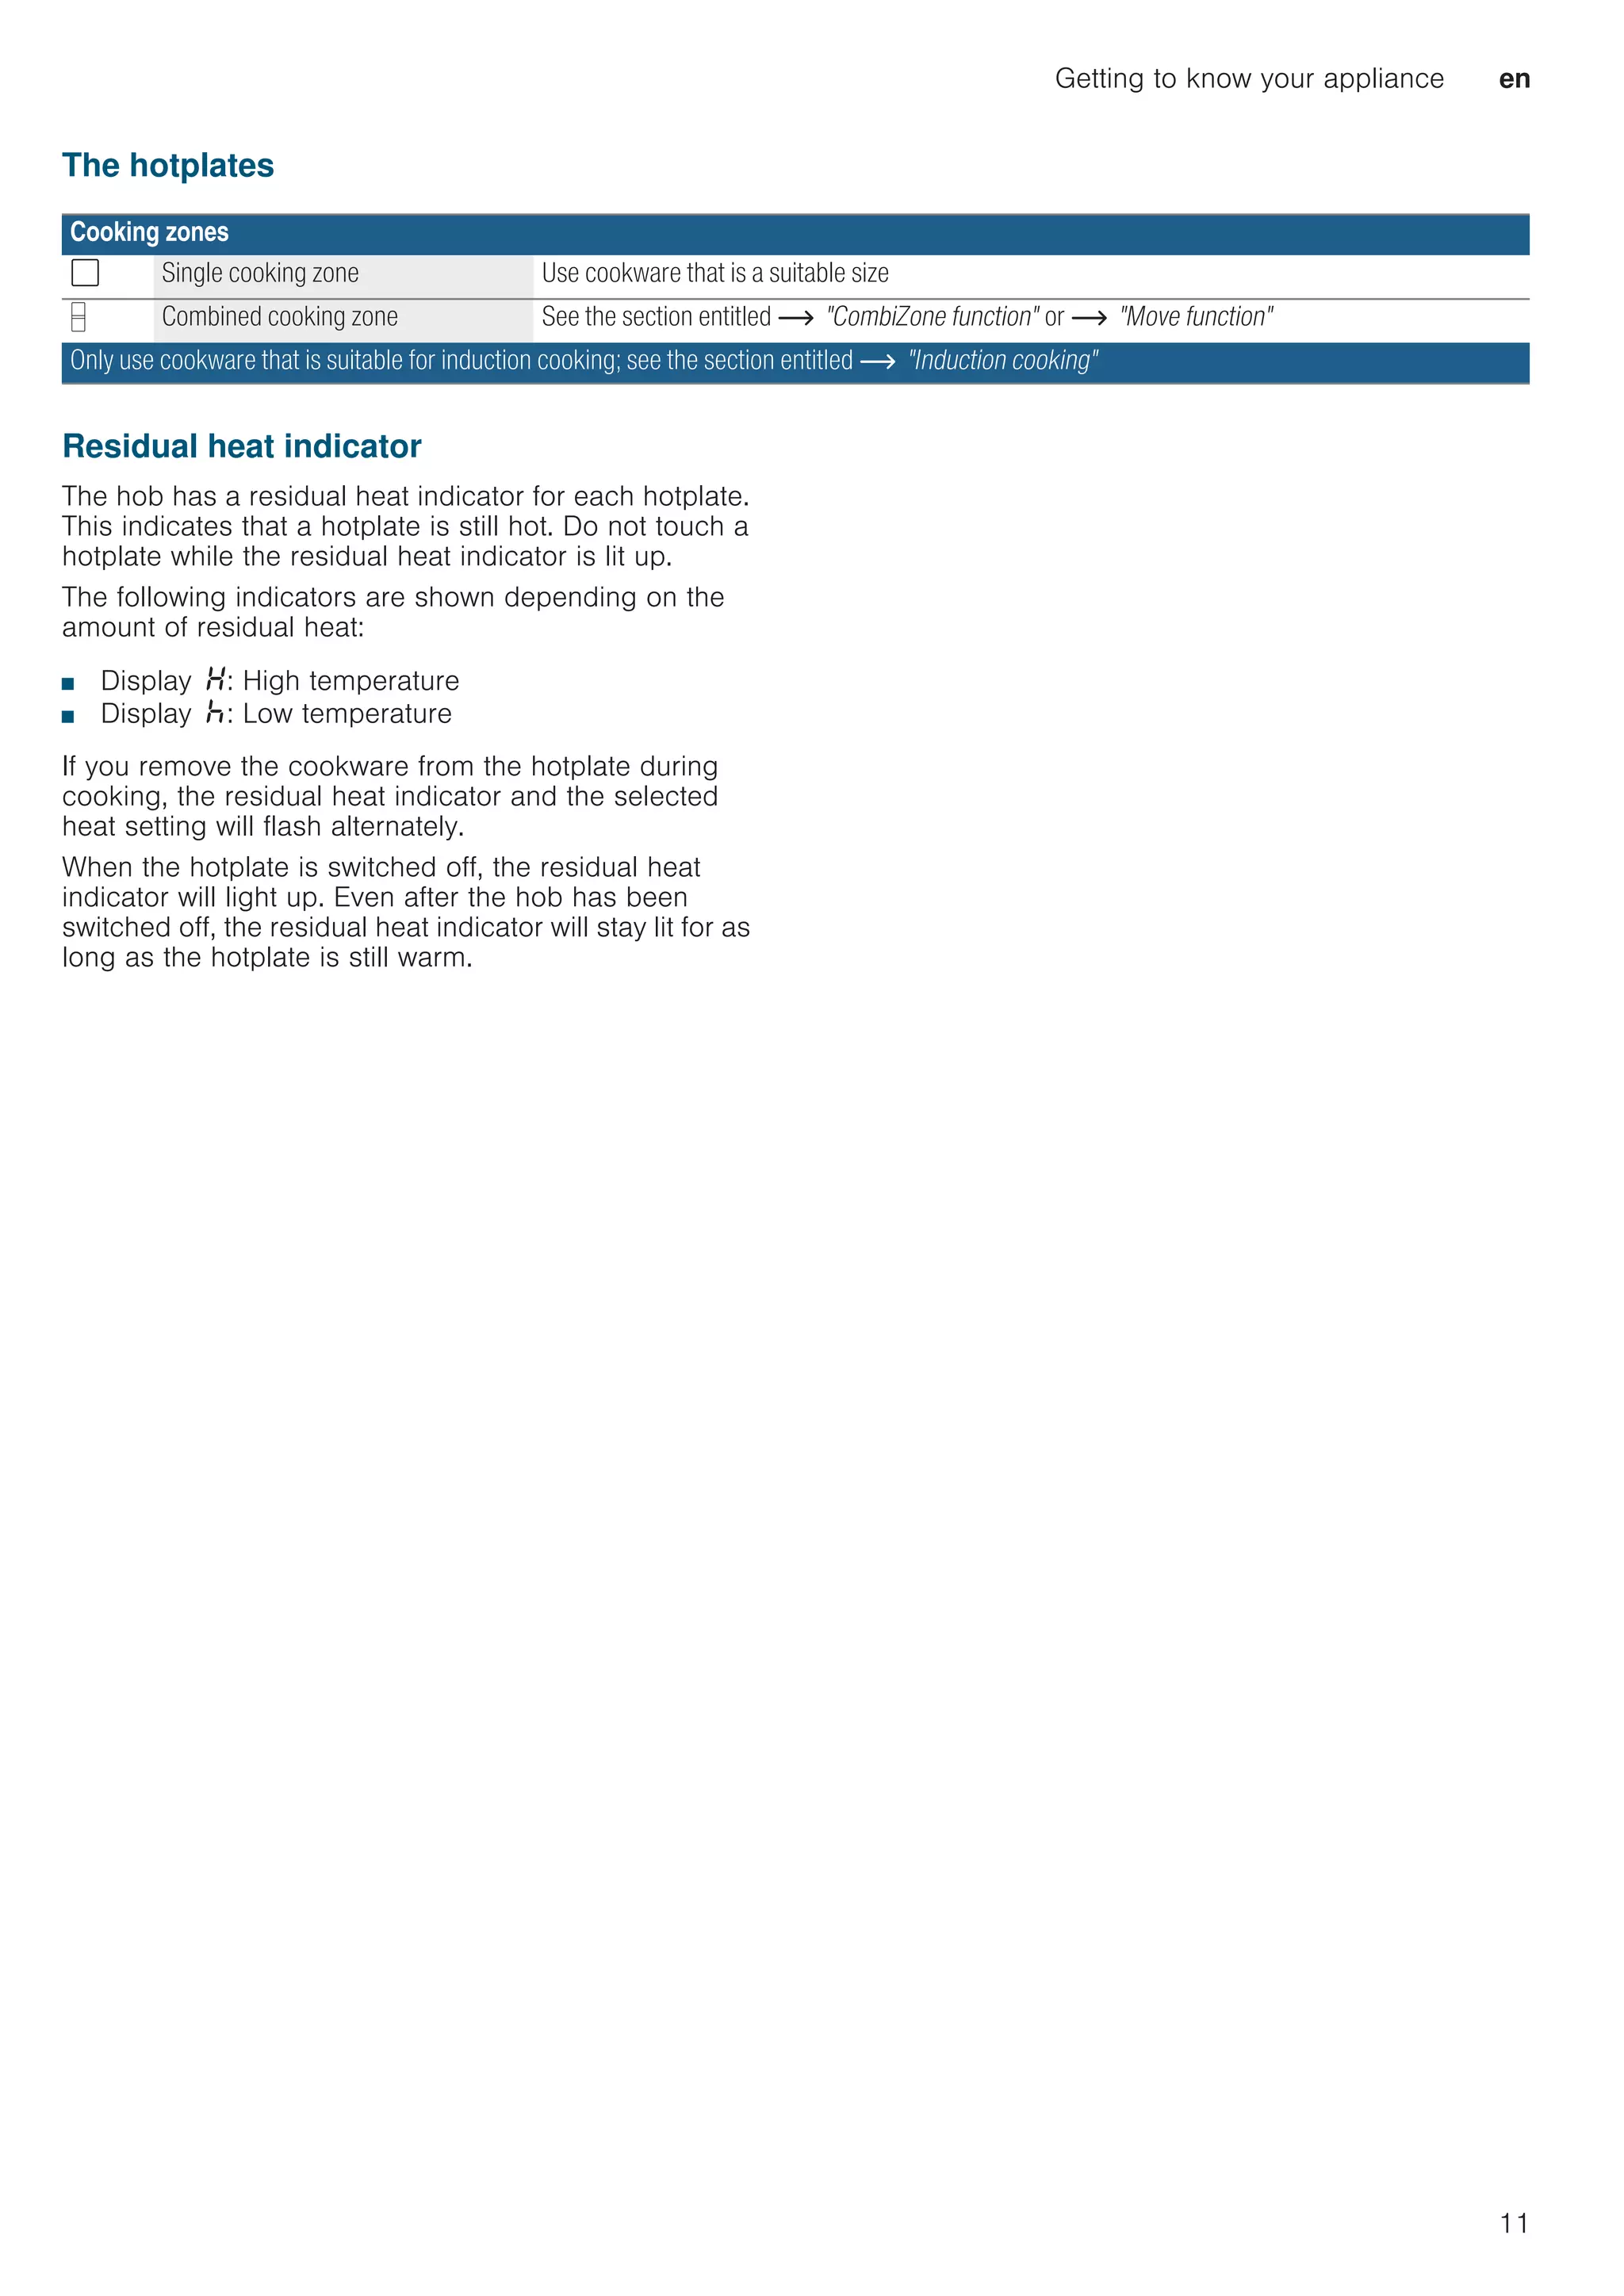
The hotplates . . . . . . . . . . . . . . . . . . . . . . . . . . . . . . .11
Residual heat indicator. . . . . . . . . . . . . . . . . . . . . . . .11
Ç Operating modes . . . . . . . . . . . . . . . . . . . . . . . . 12
Exhaust air mode . . . . . . . . . . . . . . . . . . . . . . . . . . . .12
Circulating-air mode . . . . . . . . . . . . . . . . . . . . . . . . . .12
K Before using for the first time. . . . . . . . . . . . . . 12
Setting the operating mode . . . . . . . . . . . . . . . . . . . .12
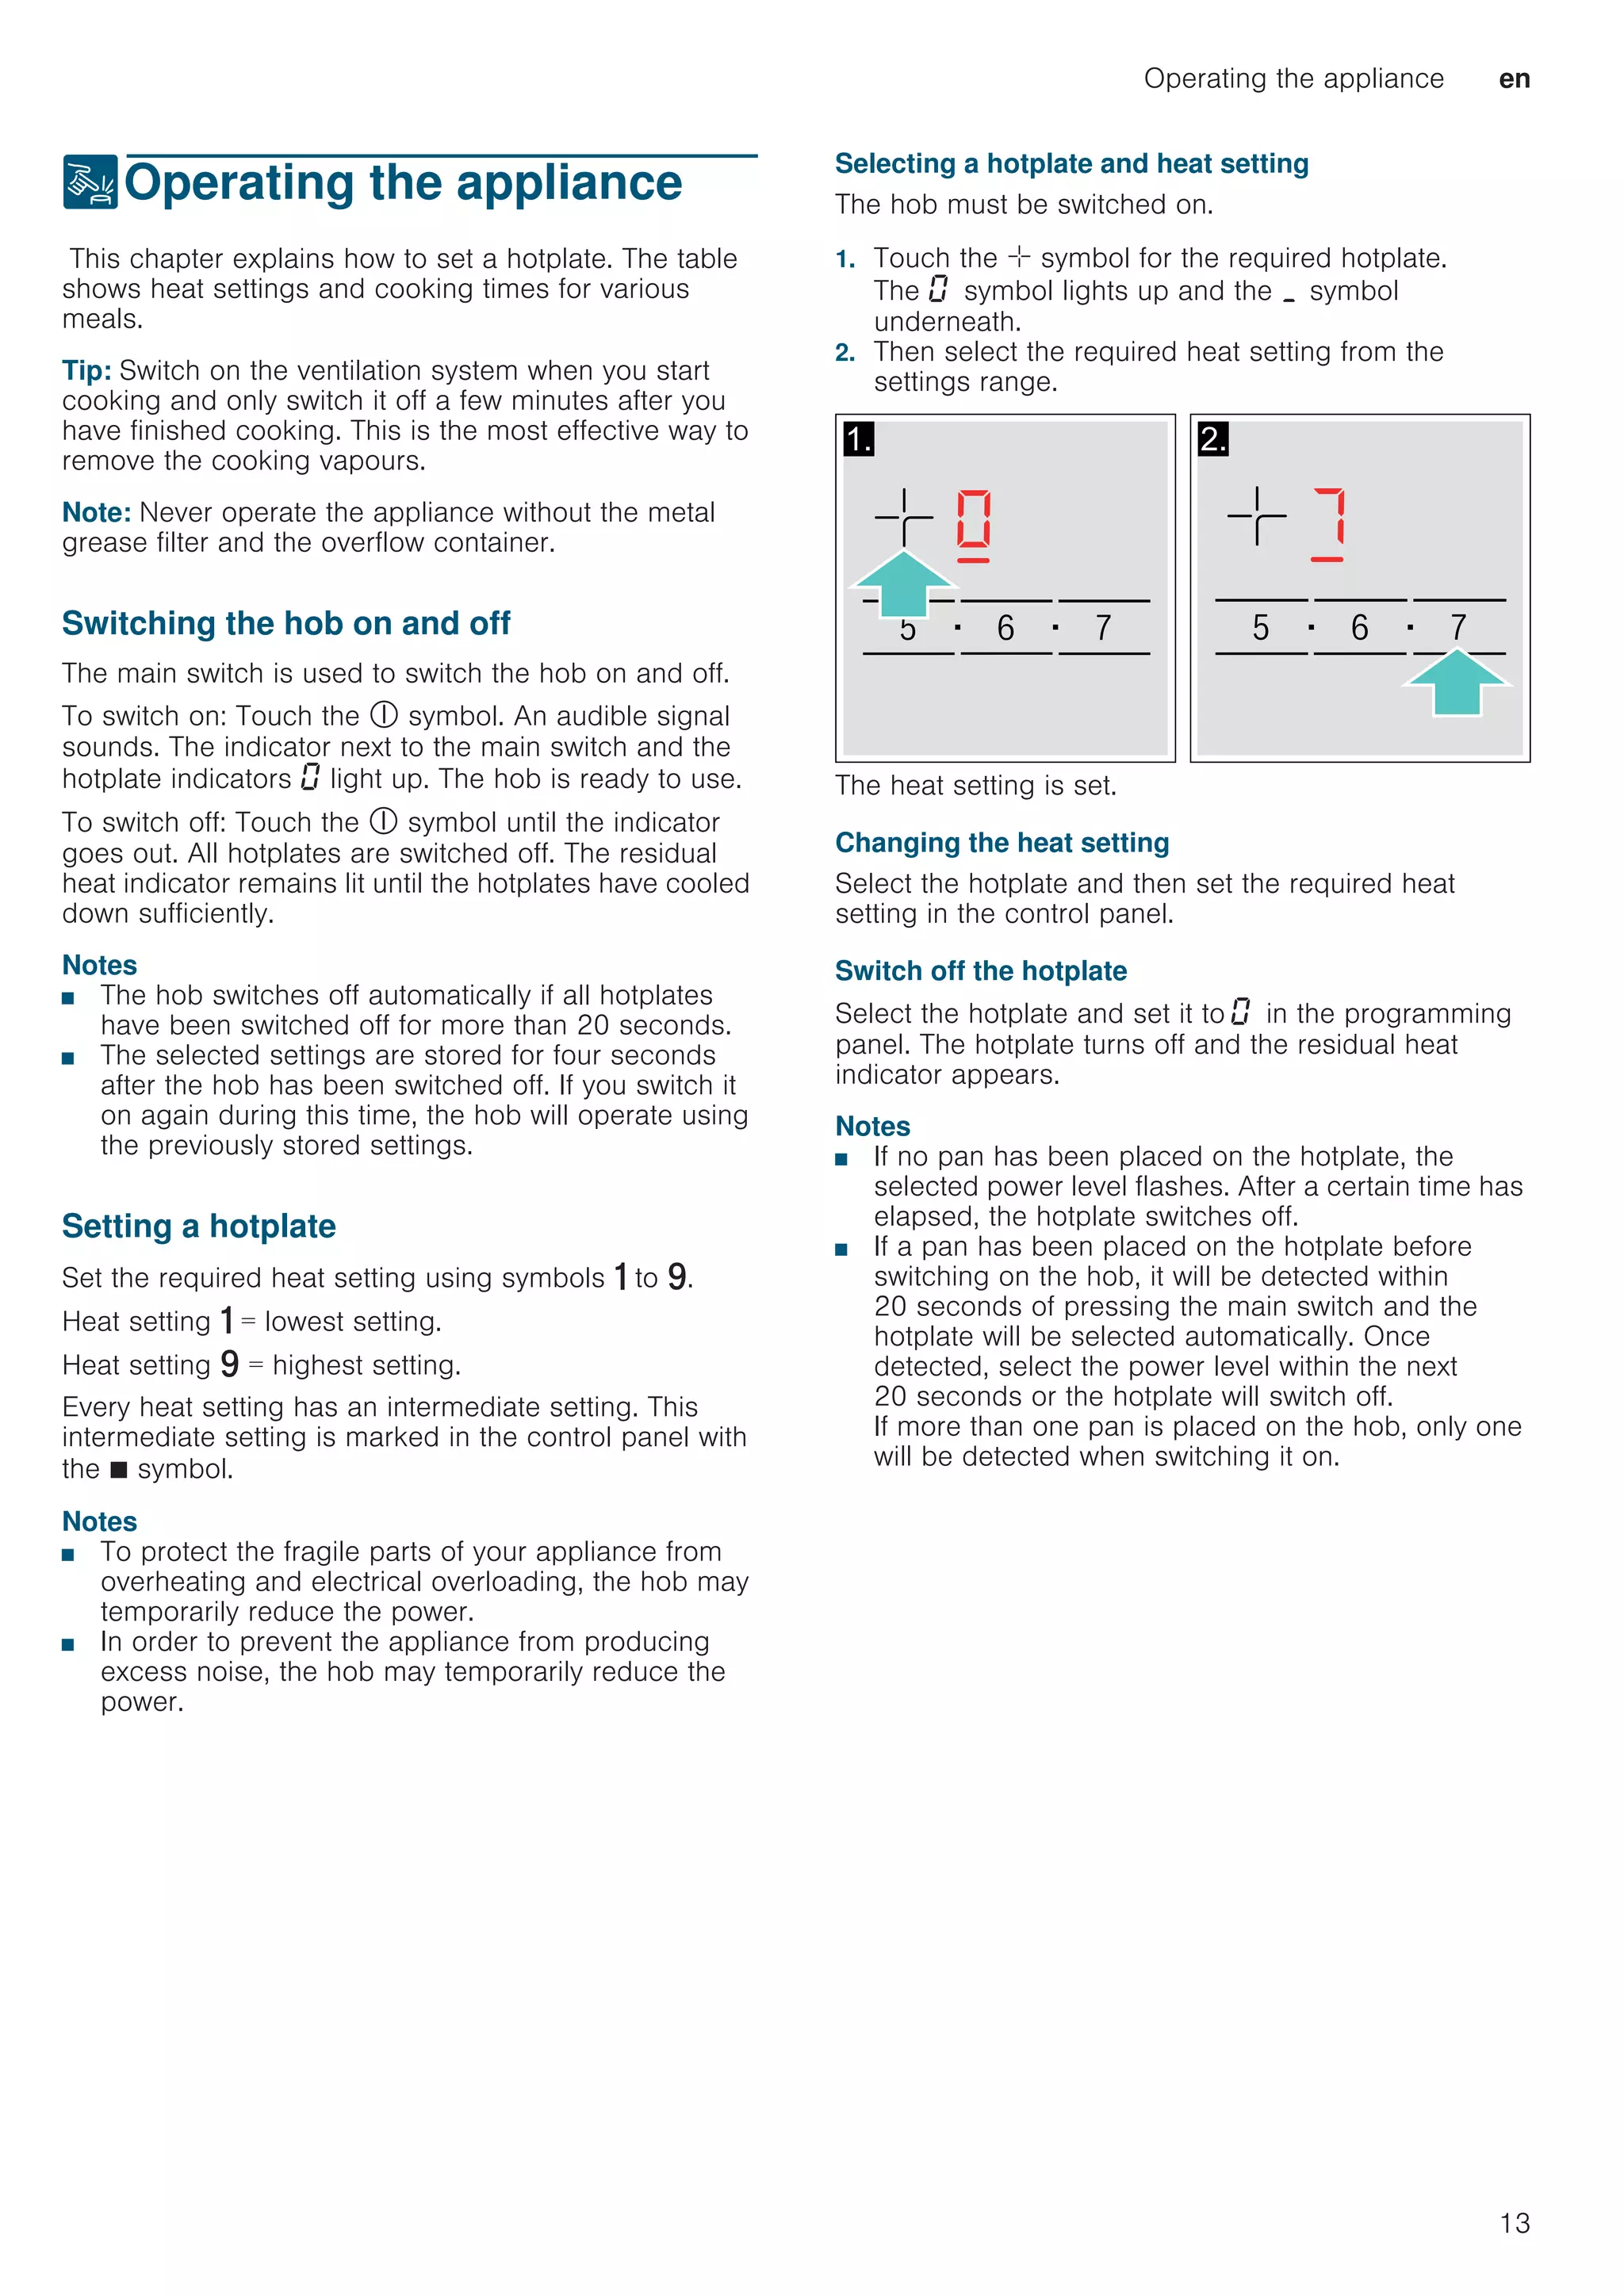
1 Operating the appliance . . . . . . . . . . . . . . . . . . 13
Switching the hob on and off . . . . . . . . . . . . . . . . . . .13
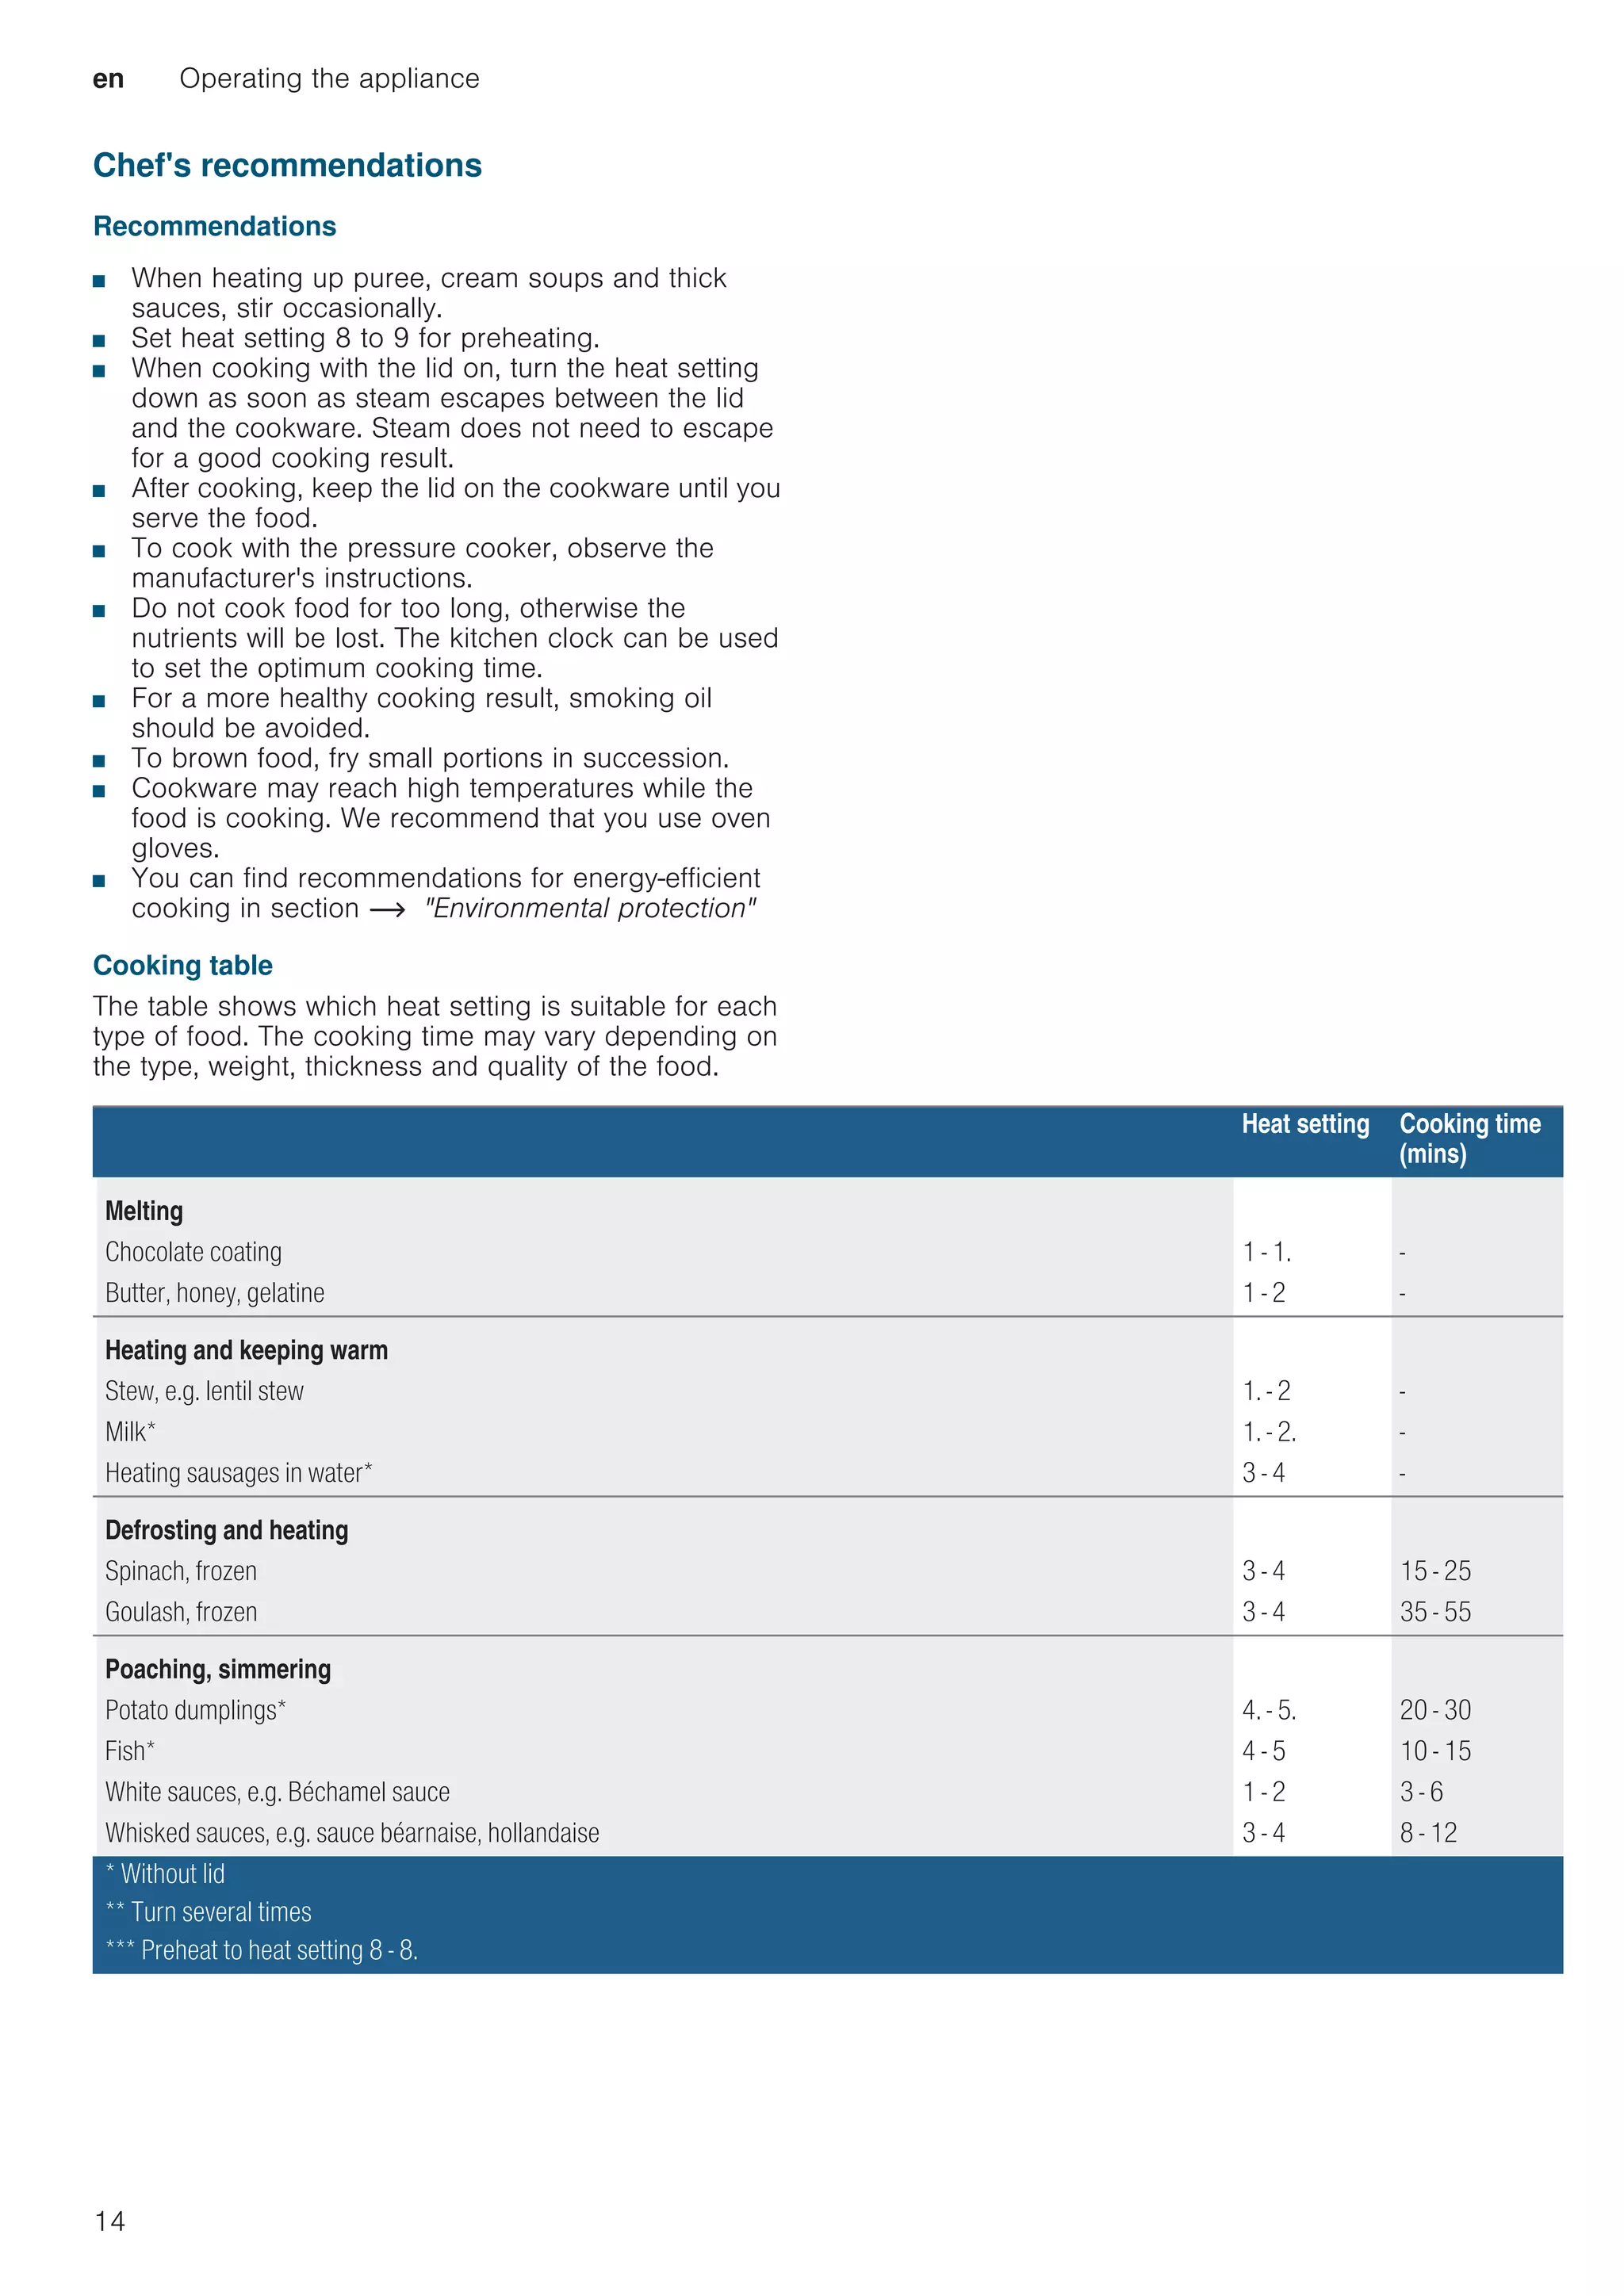
Setting a hotplate . . . . . . . . . . . . . . . . . . . . . . . . . . . .13
Chef's recommendations . . . . . . . . . . . . . . . . . . . . . .14
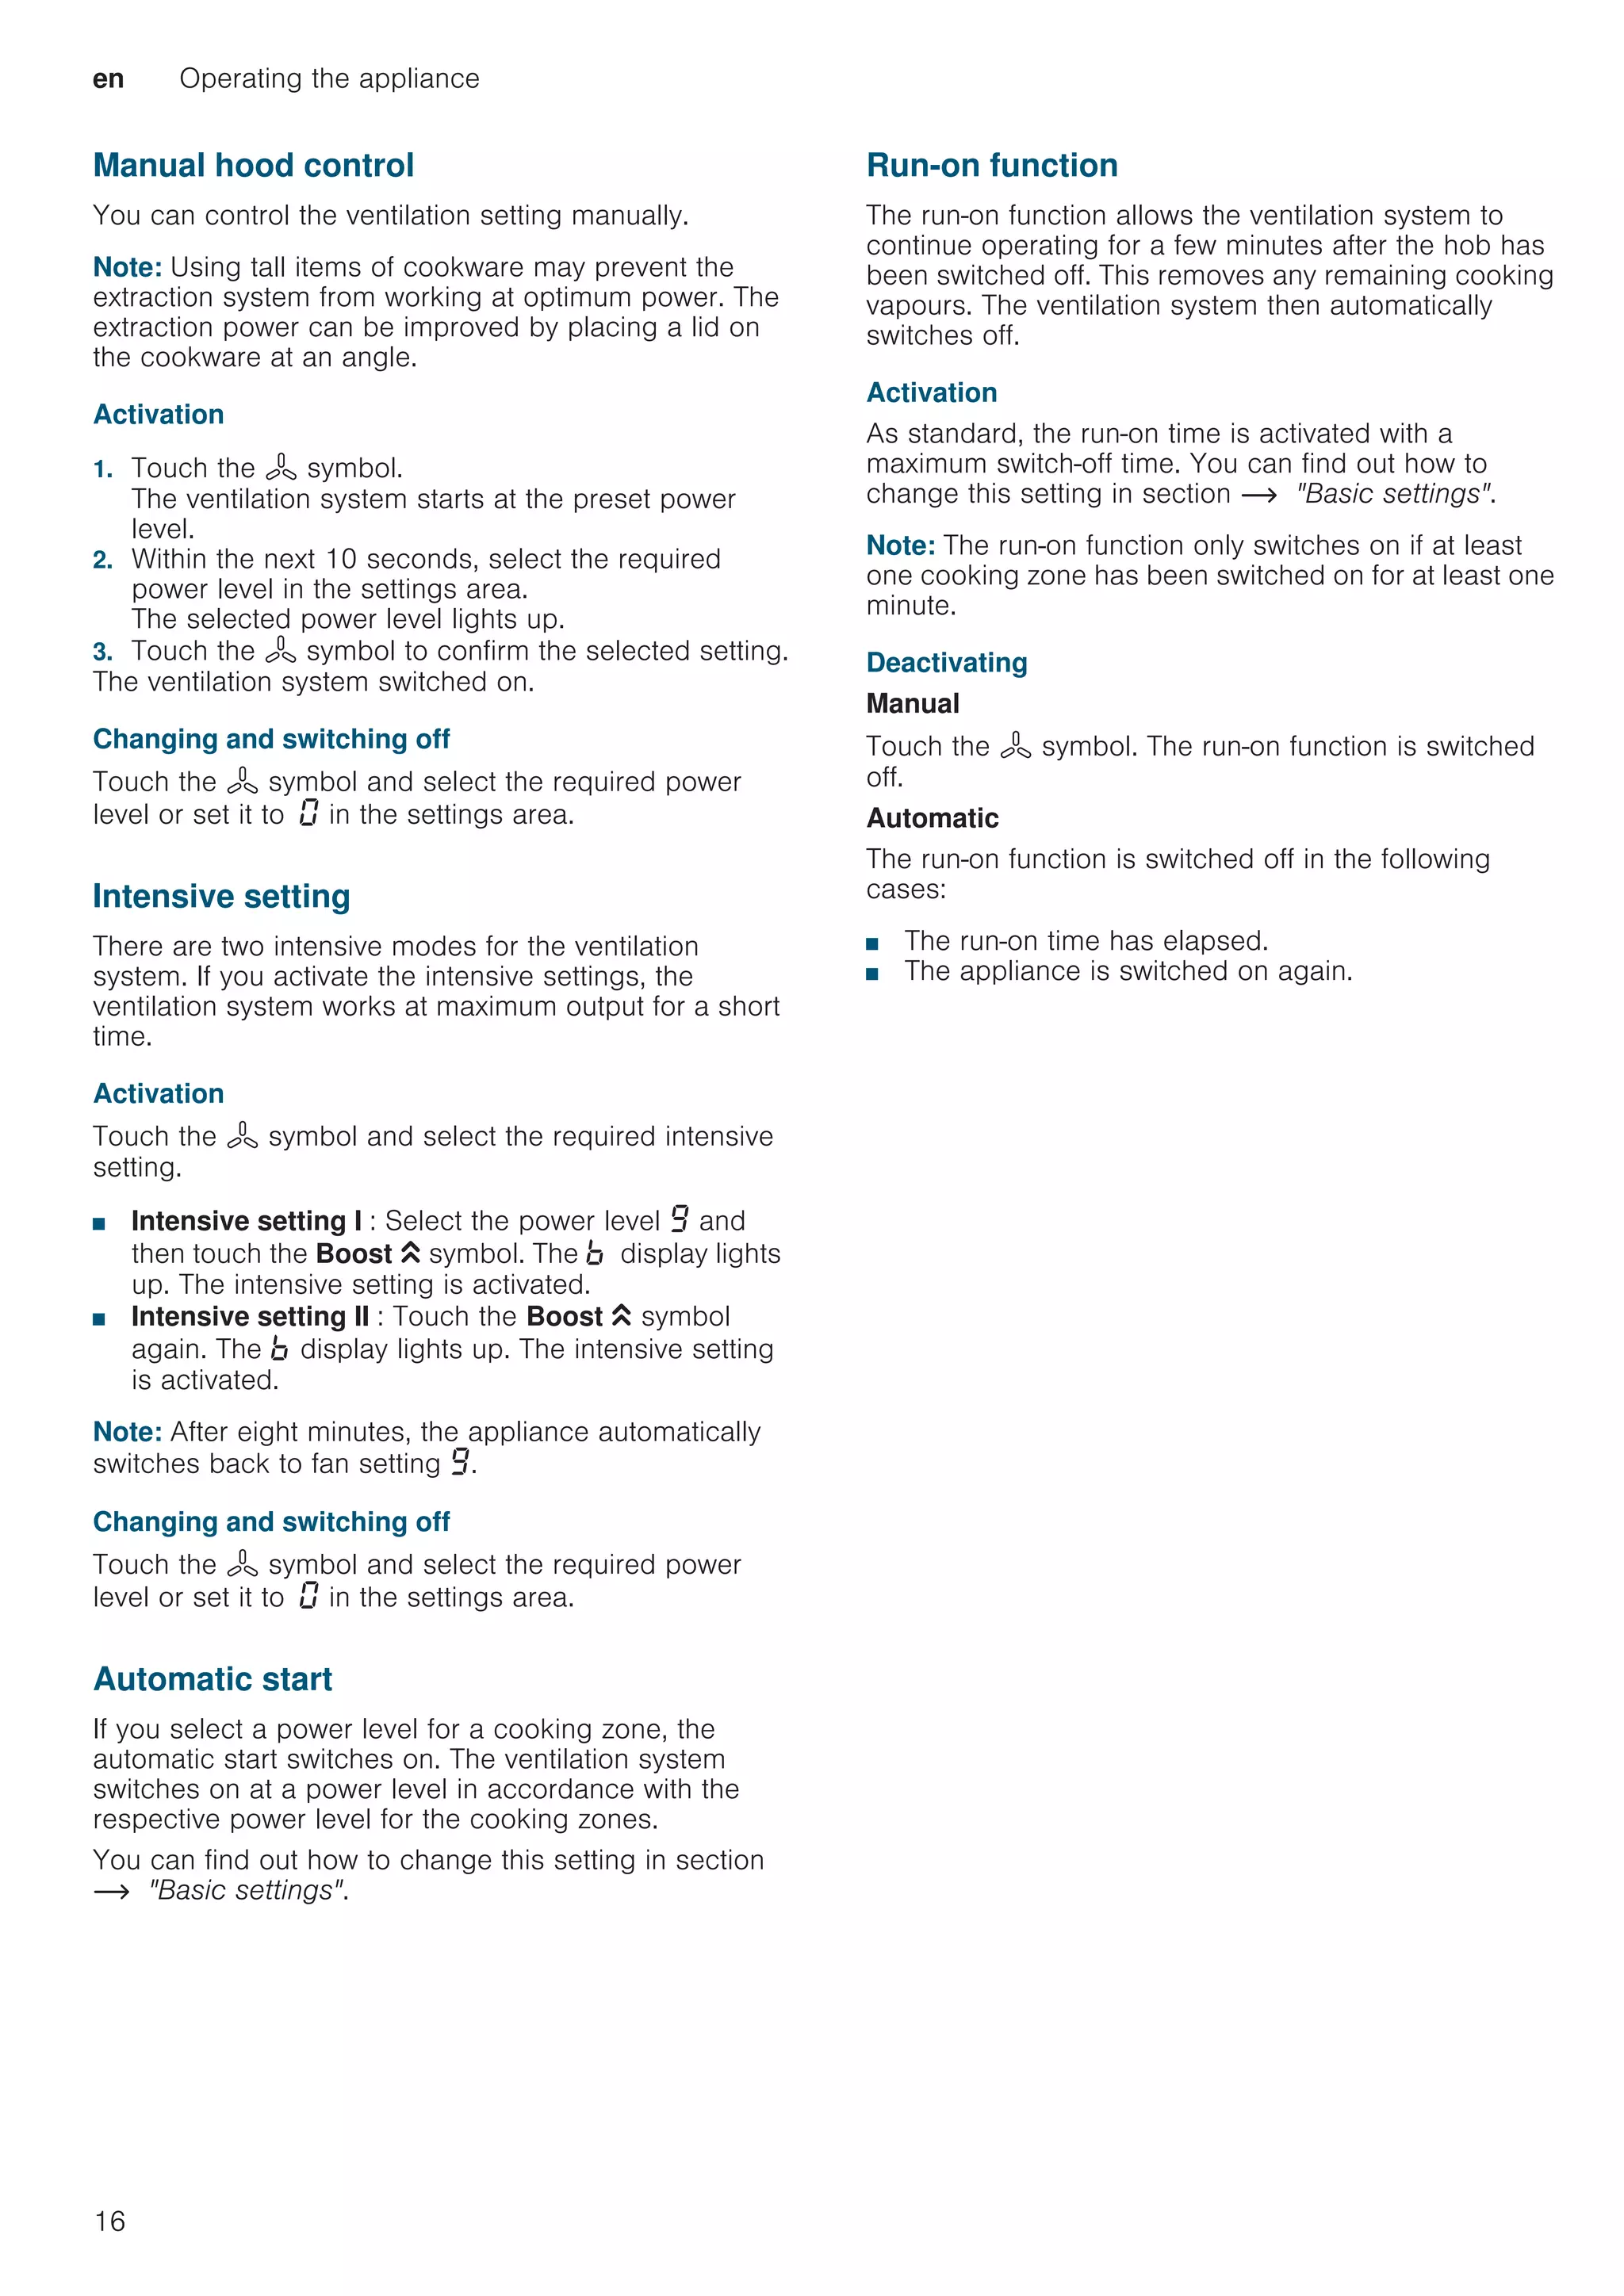
Manual hood control . . . . . . . . . . . . . . . . . . . . . . . . .16
Intensive setting . . . . . . . . . . . . . . . . . . . . . . . . . . . . .16
Automatic start. . . . . . . . . . . . . . . . . . . . . . . . . . . . . .16
Run-on function . . . . . . . . . . . . . . . . . . . . . . . . . . . . .16
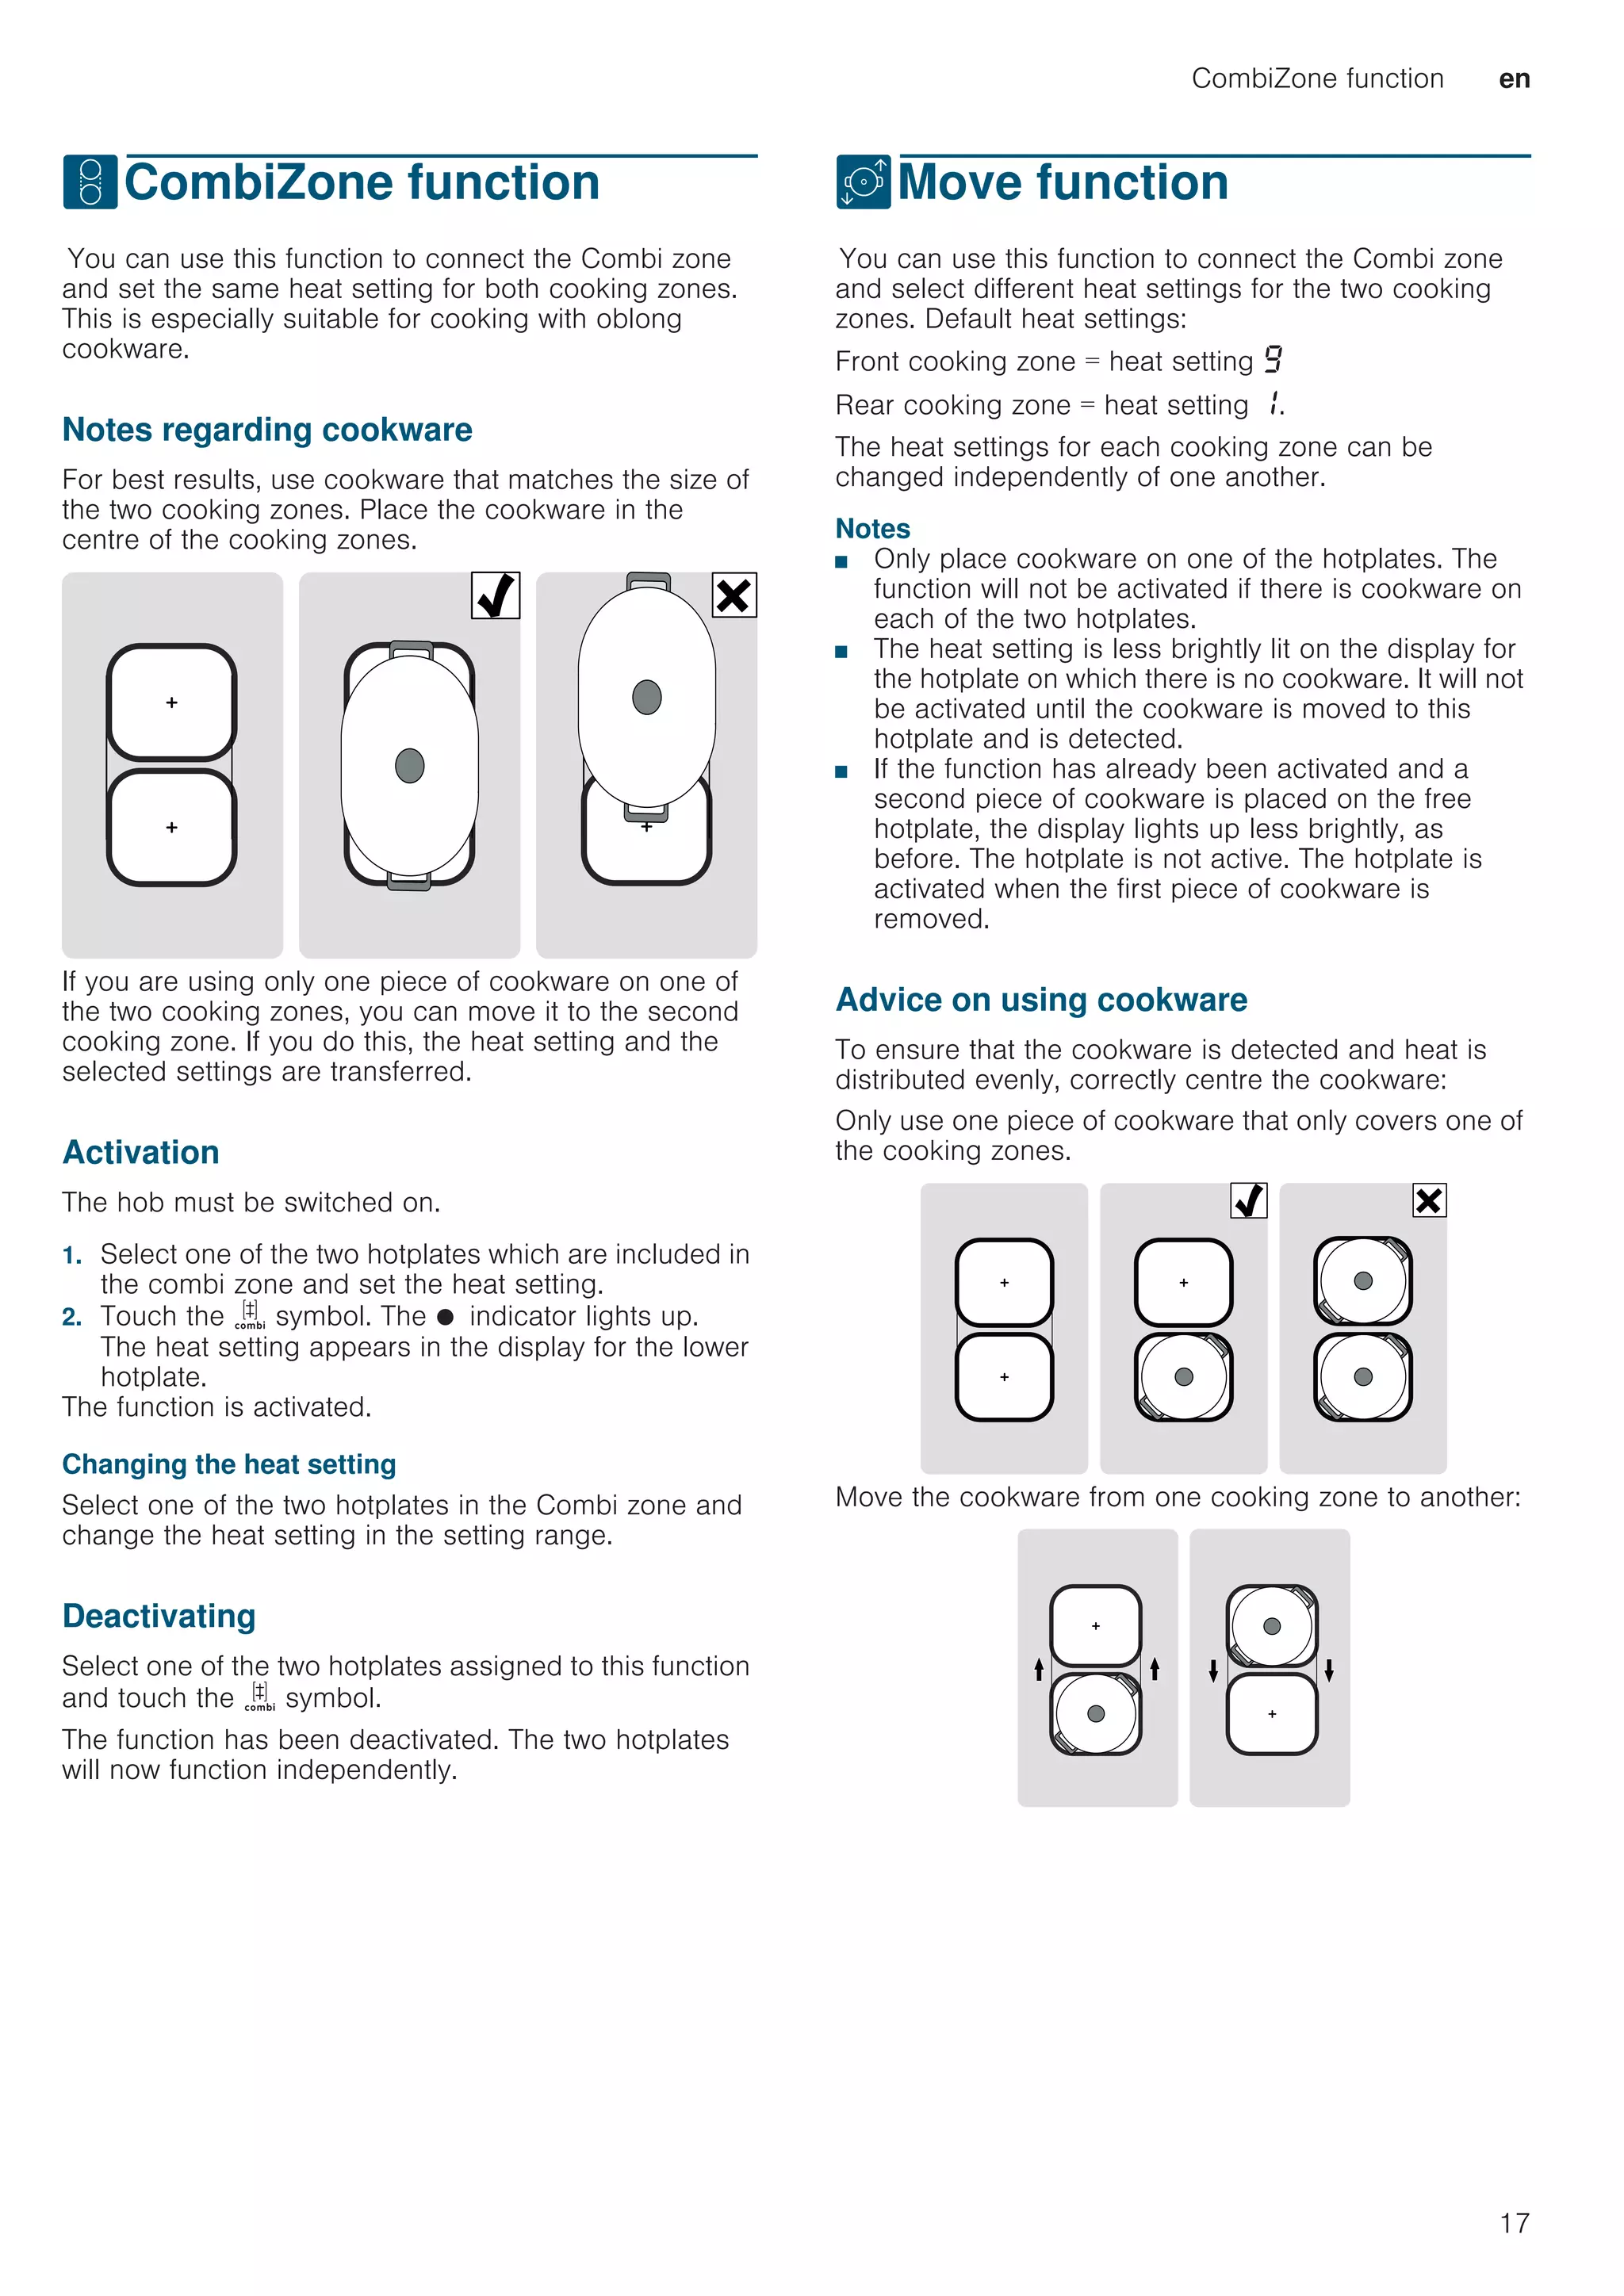
w CombiZone function . . . . . . . . . . . . . . . . . . . . . 17
Notes regarding cookware. . . . . . . . . . . . . . . . . . . . .17
Activation . . . . . . . . . . . . . . . . . . . . . . . . . . . . . . . . . .17
Deactivating . . . . . . . . . . . . . . . . . . . . . . . . . . . . . . . .17
u Move function. . . . . . . . . . . . . . . . . . . . . . . . . . . 17
Advice on using cookware. . . . . . . . . . . . . . . . . . . . .17
Activation . . . . . . . . . . . . . . . . . . . . . . . . . . . . . . . . . .18
Deactivation . . . . . . . . . . . . . . . . . . . . . . . . . . . . . . . .18
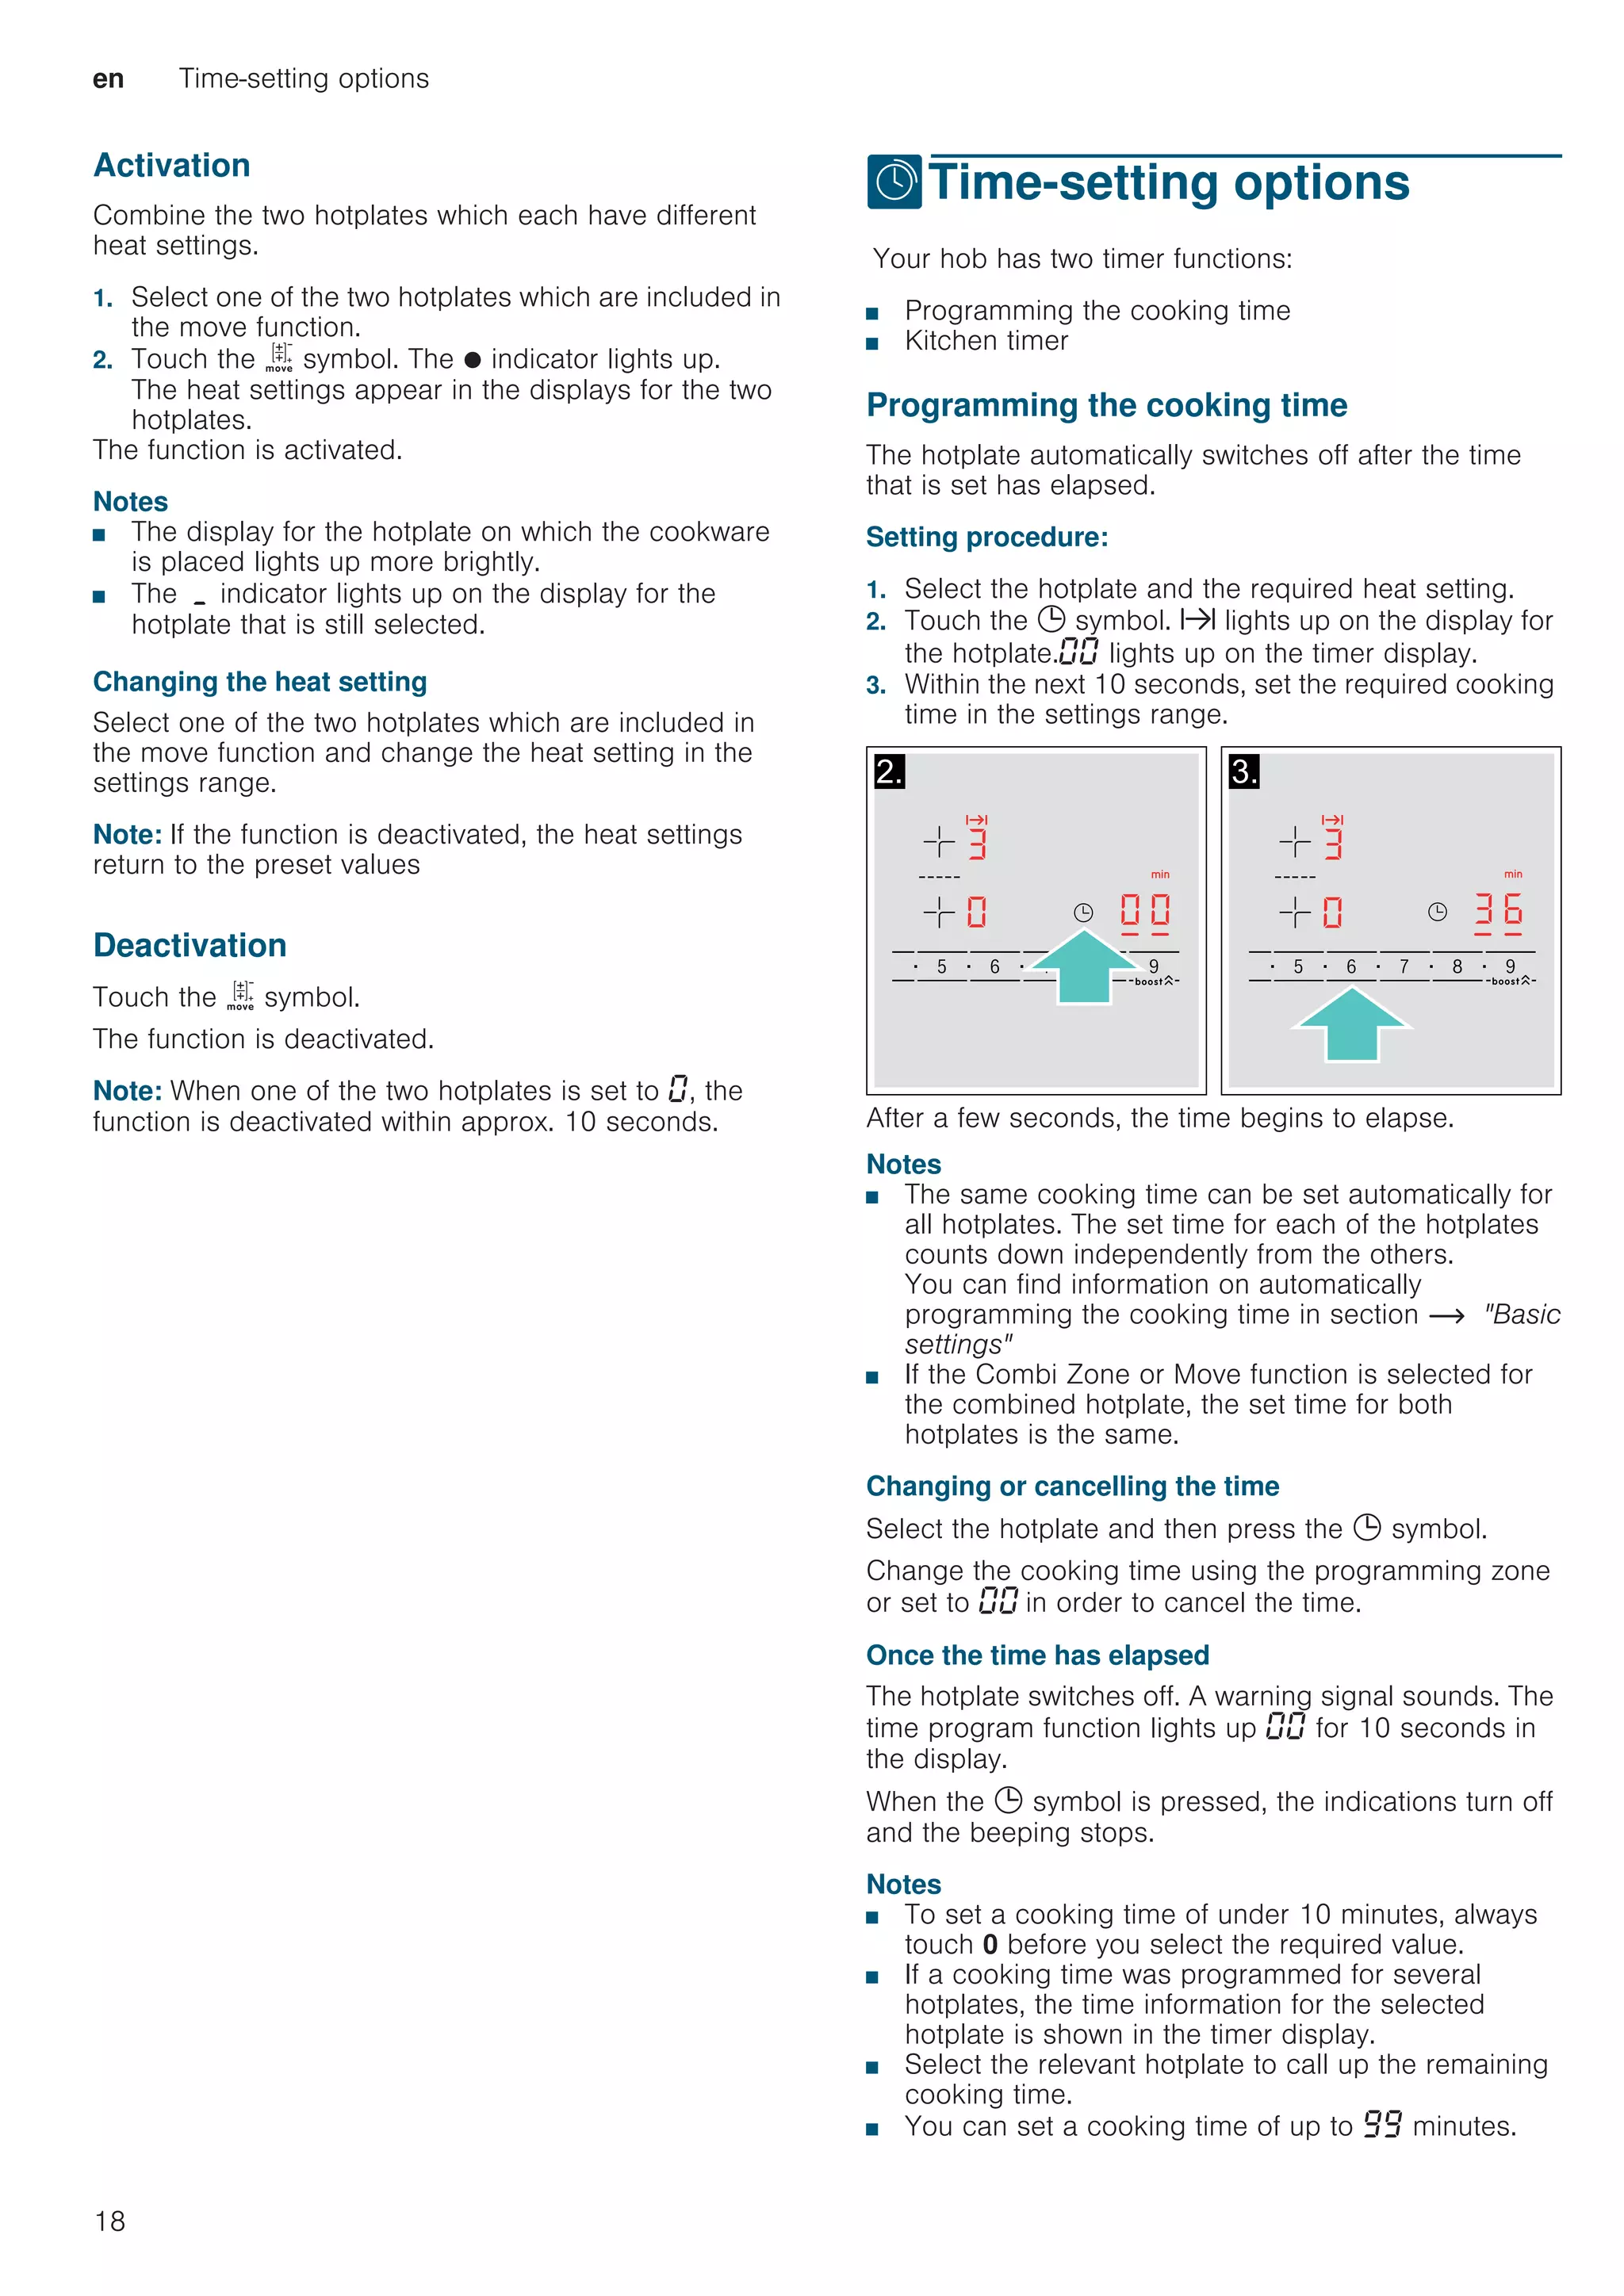
O Time-setting options . . . . . . . . . . . . . . . . . . . . . 18
Programming the cooking time . . . . . . . . . . . . . . . . .18
The kitchen timer . . . . . . . . . . . . . . . . . . . . . . . . . . . .19
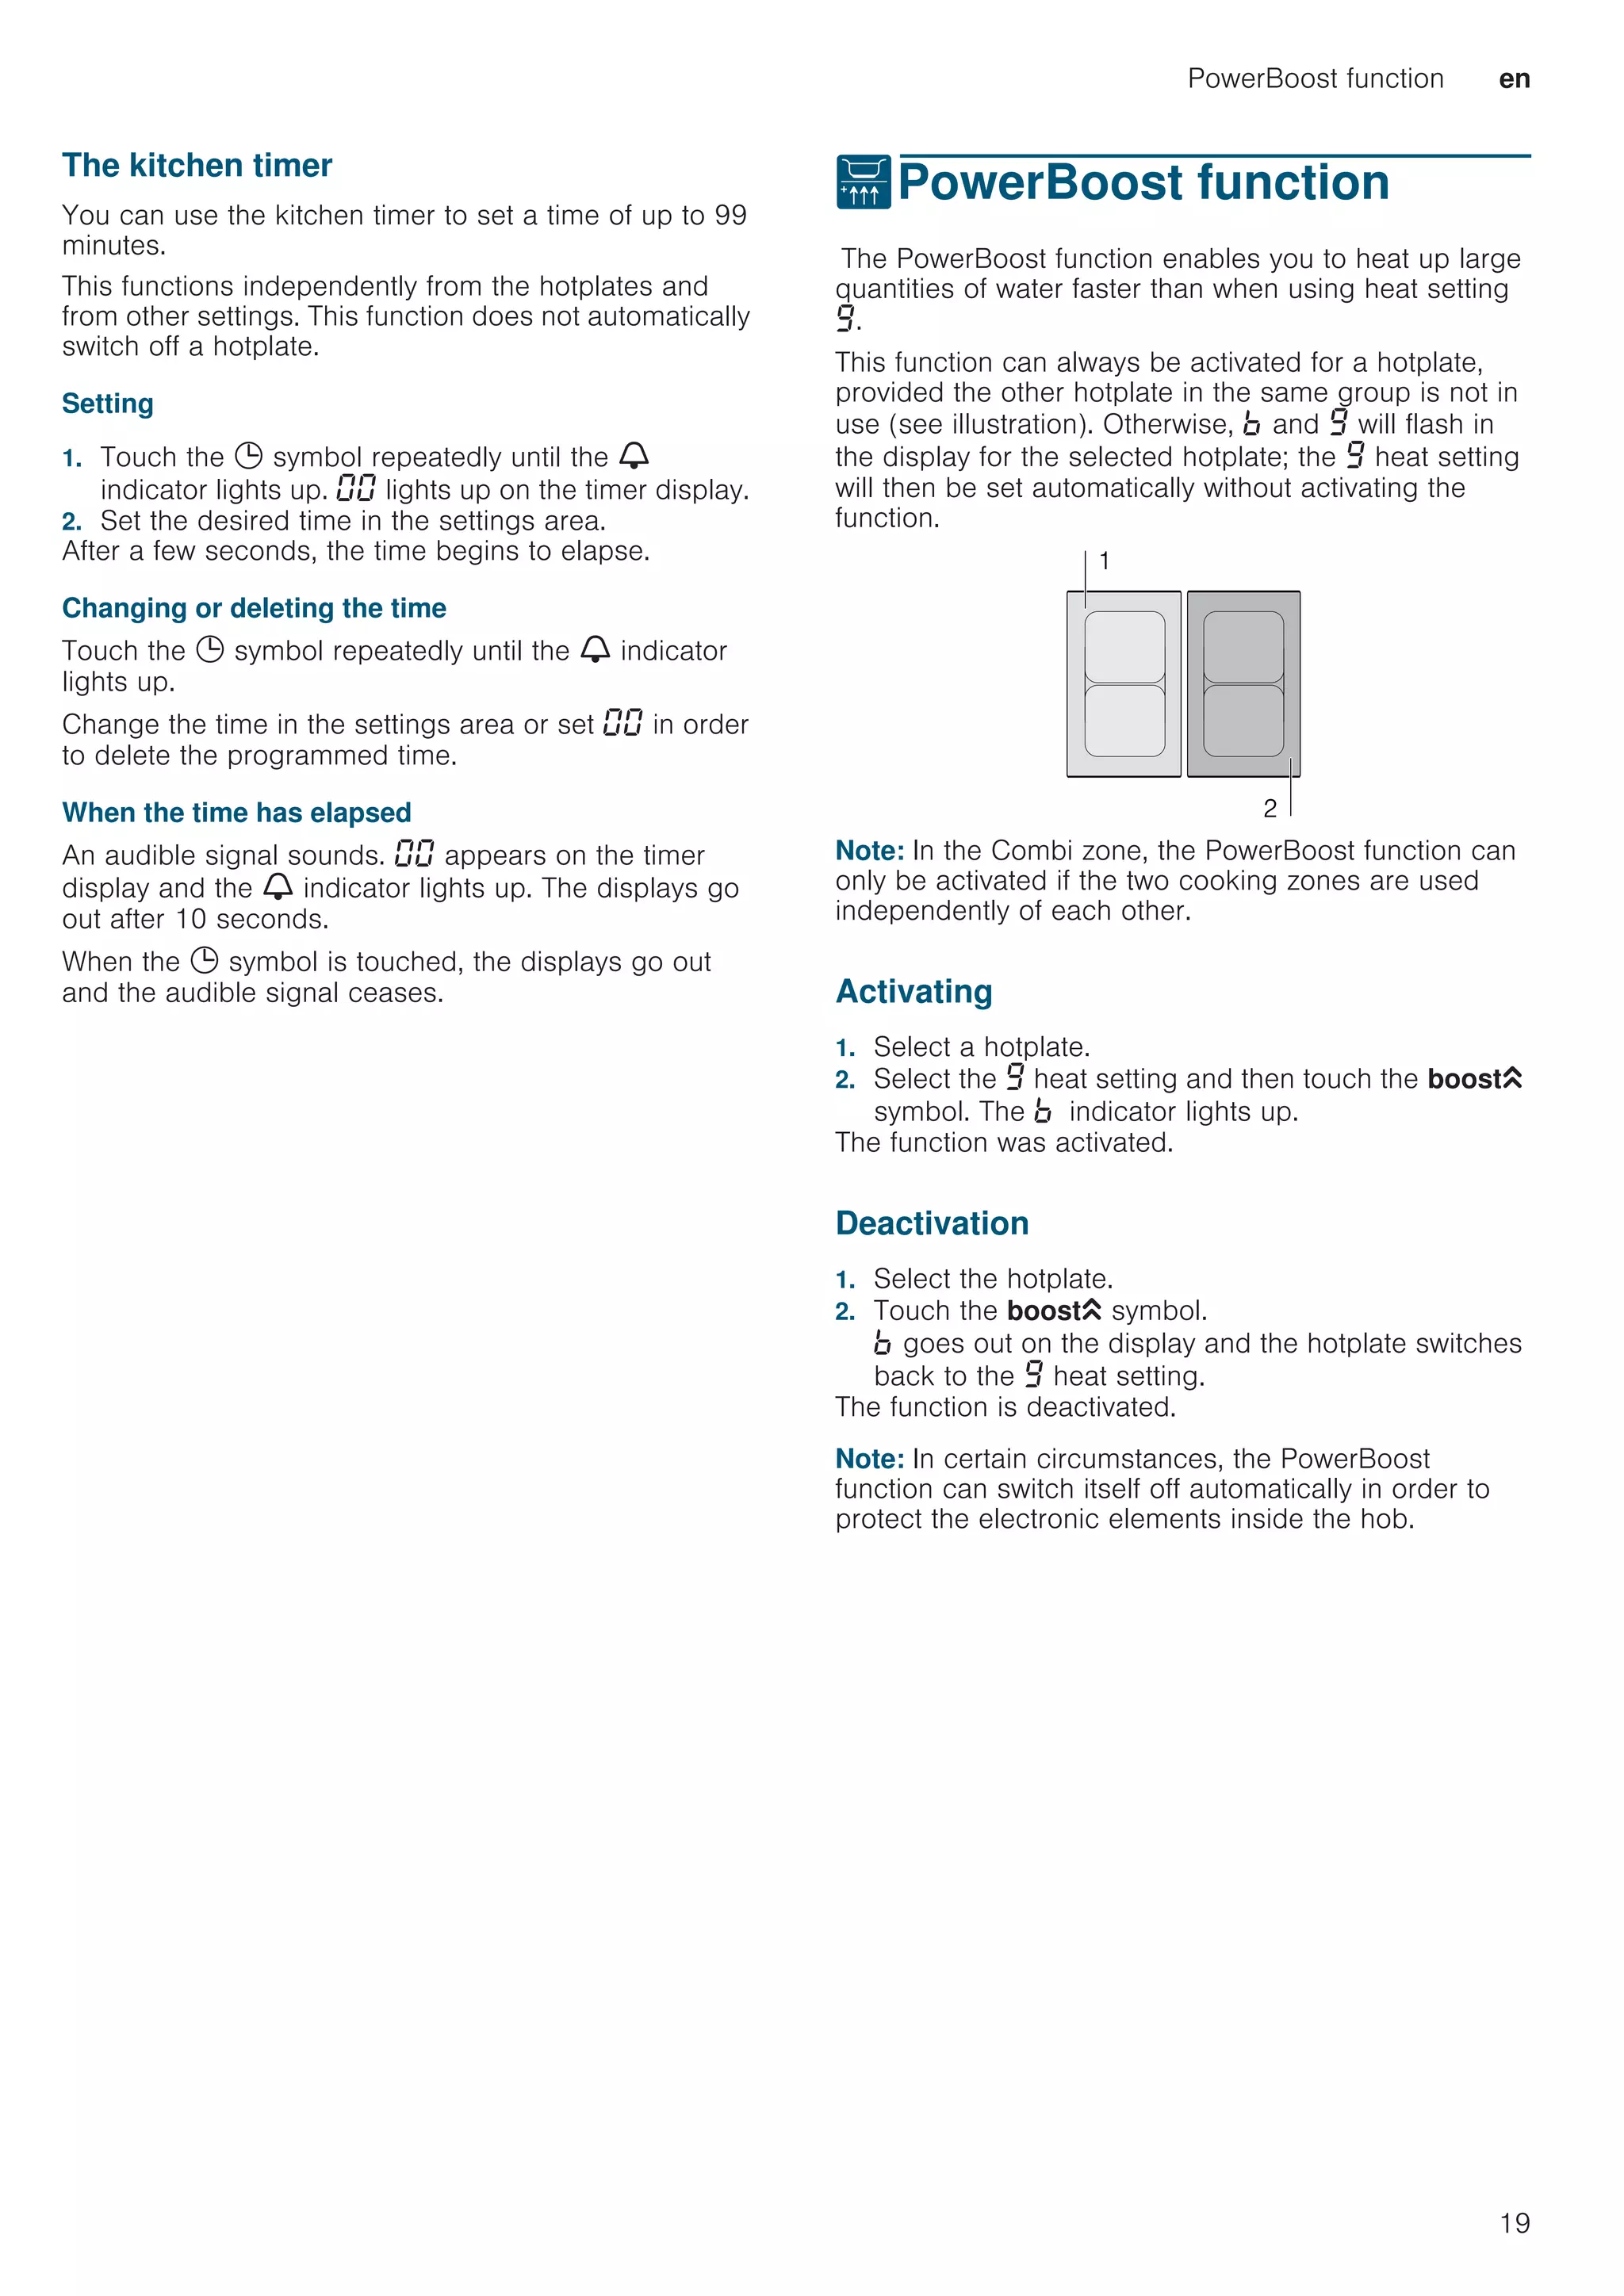
v PowerBoost function. . . . . . . . . . . . . . . . . . . . . 19
Activating . . . . . . . . . . . . . . . . . . . . . . . . . . . . . . . . . .19
Deactivation . . . . . . . . . . . . . . . . . . . . . . . . . . . . . . . .19
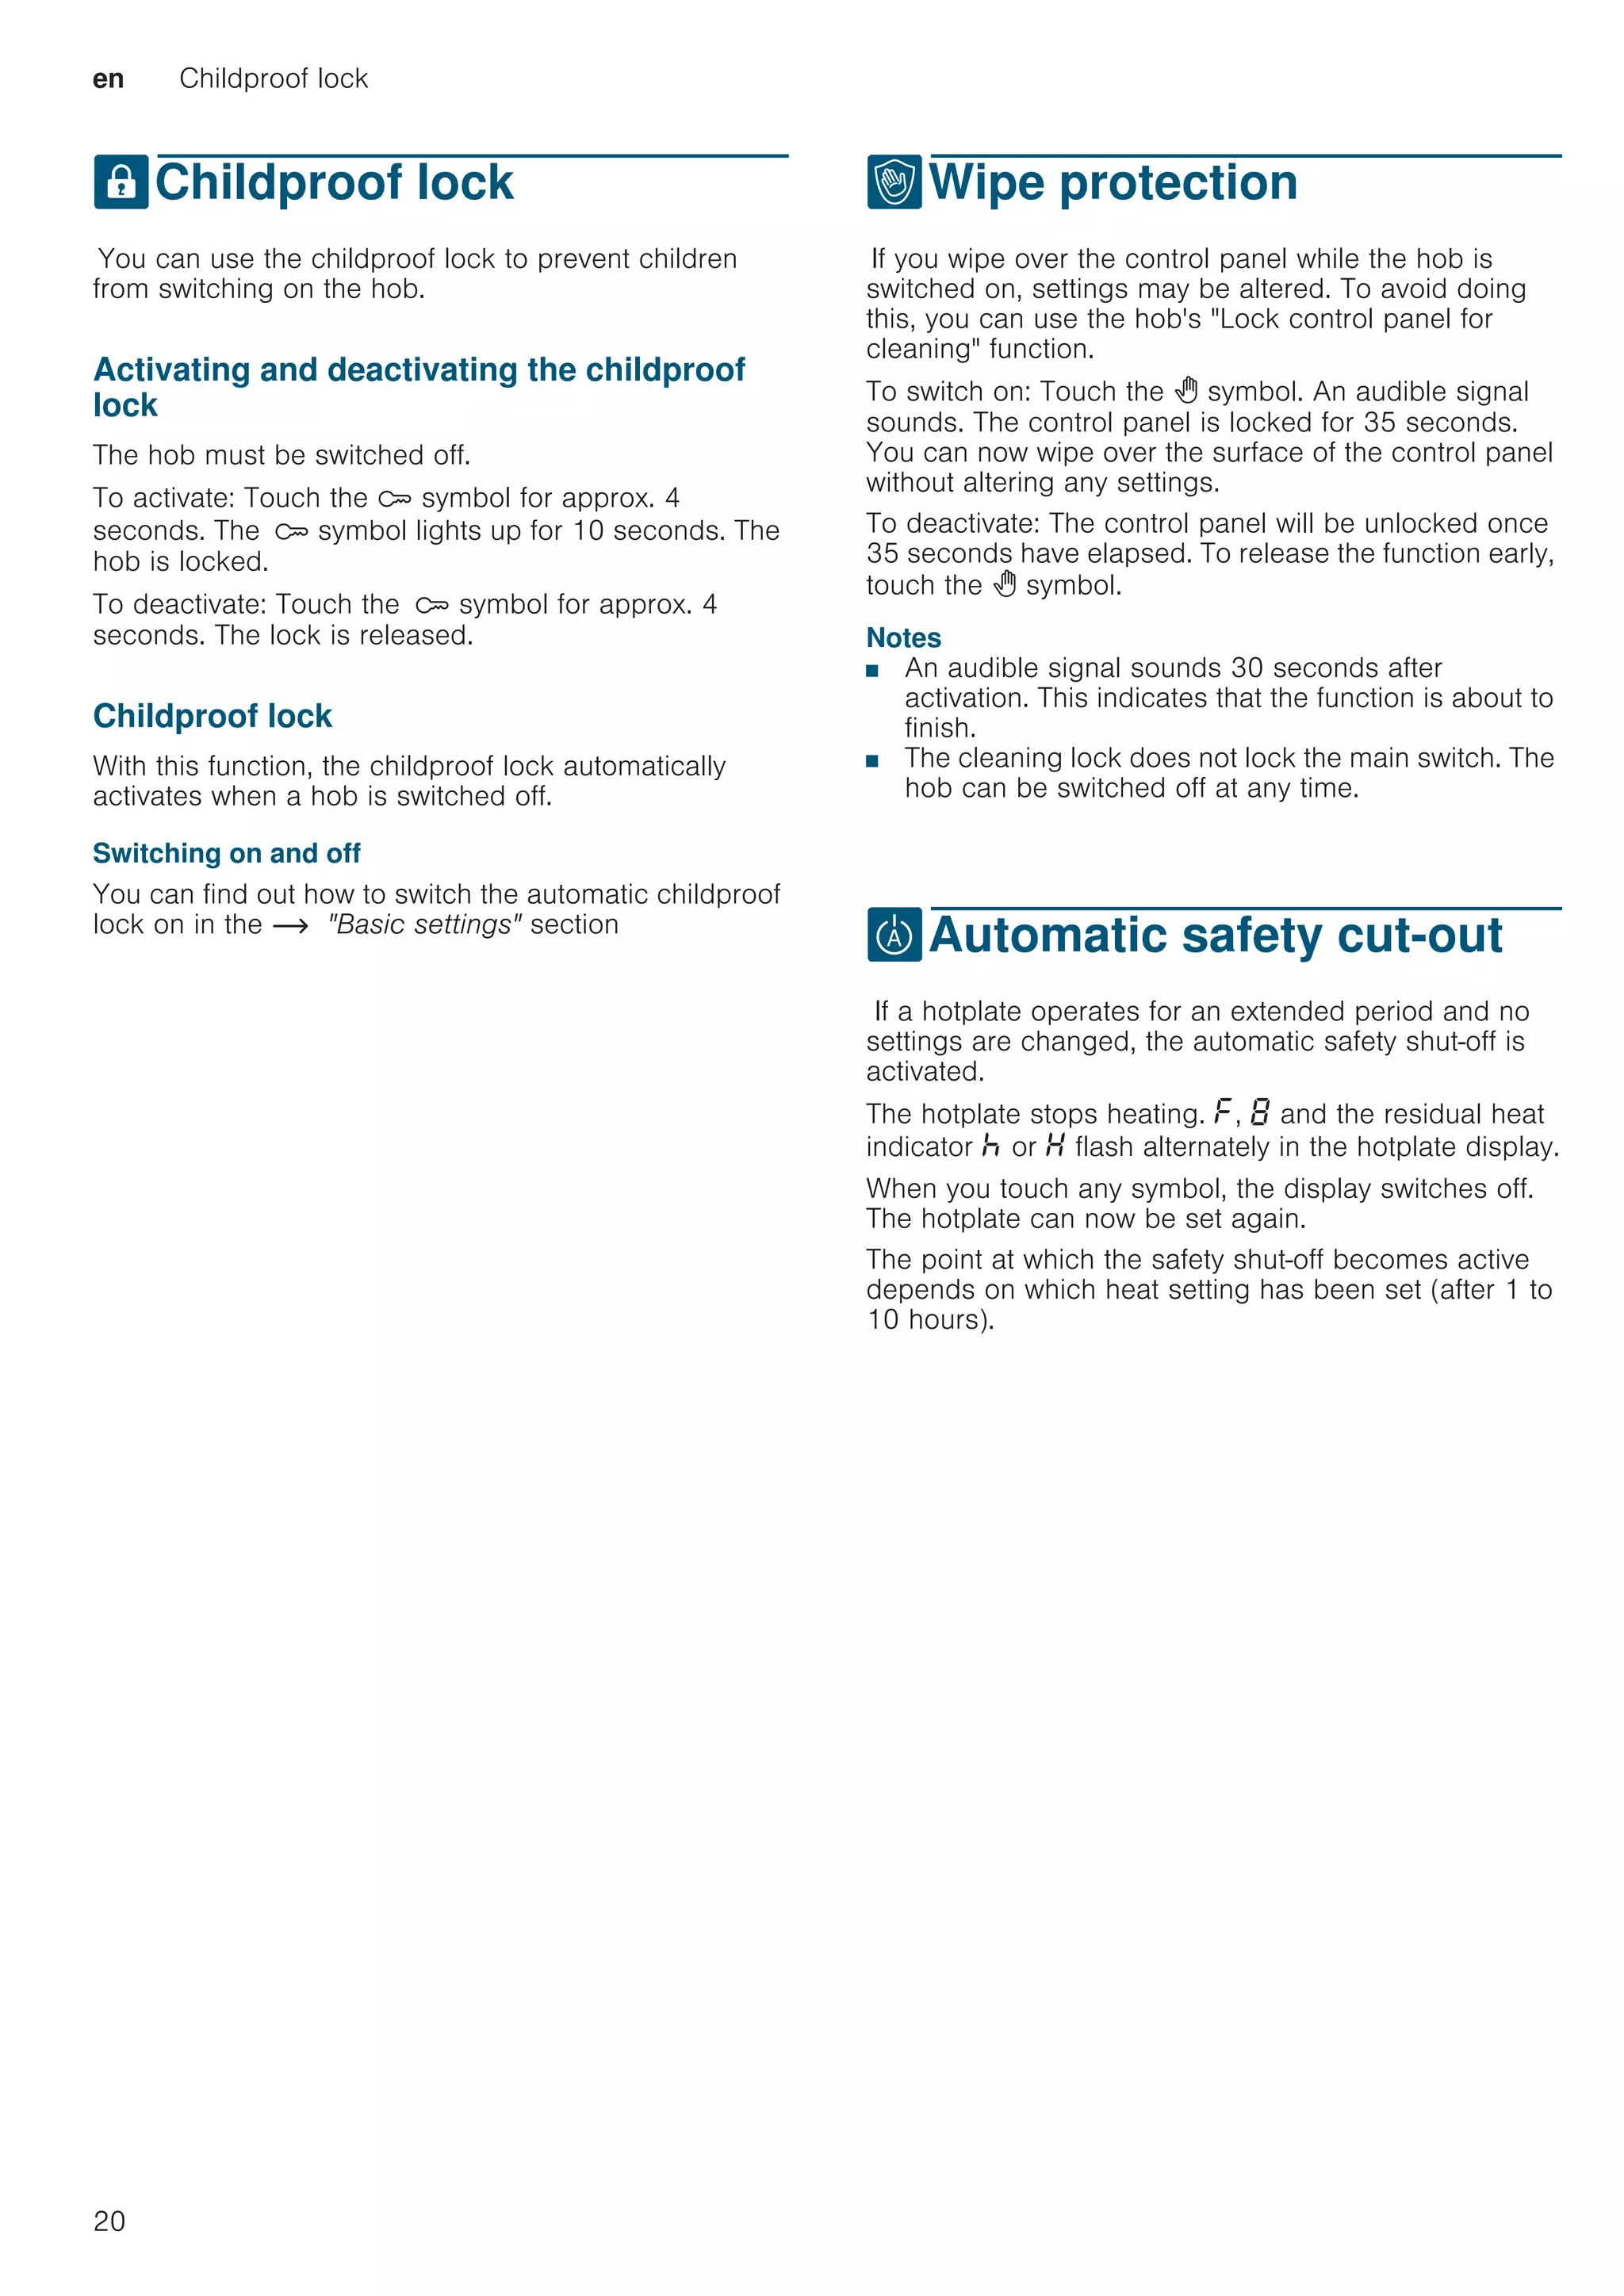
A Childproof lock. . . . . . . . . . . . . . . . . . . . . . . . . . 20
Activating and deactivating the childproof lock . . . . .20
Childproof lock . . . . . . . . . . . . . . . . . . . . . . . . . . . . . .20
k Wipe protection . . . . . . . . . . . . . . . . . . . . . . . . . 20
b Automatic safety cut-out. . . . . . . . . . . . . . . . . . 20
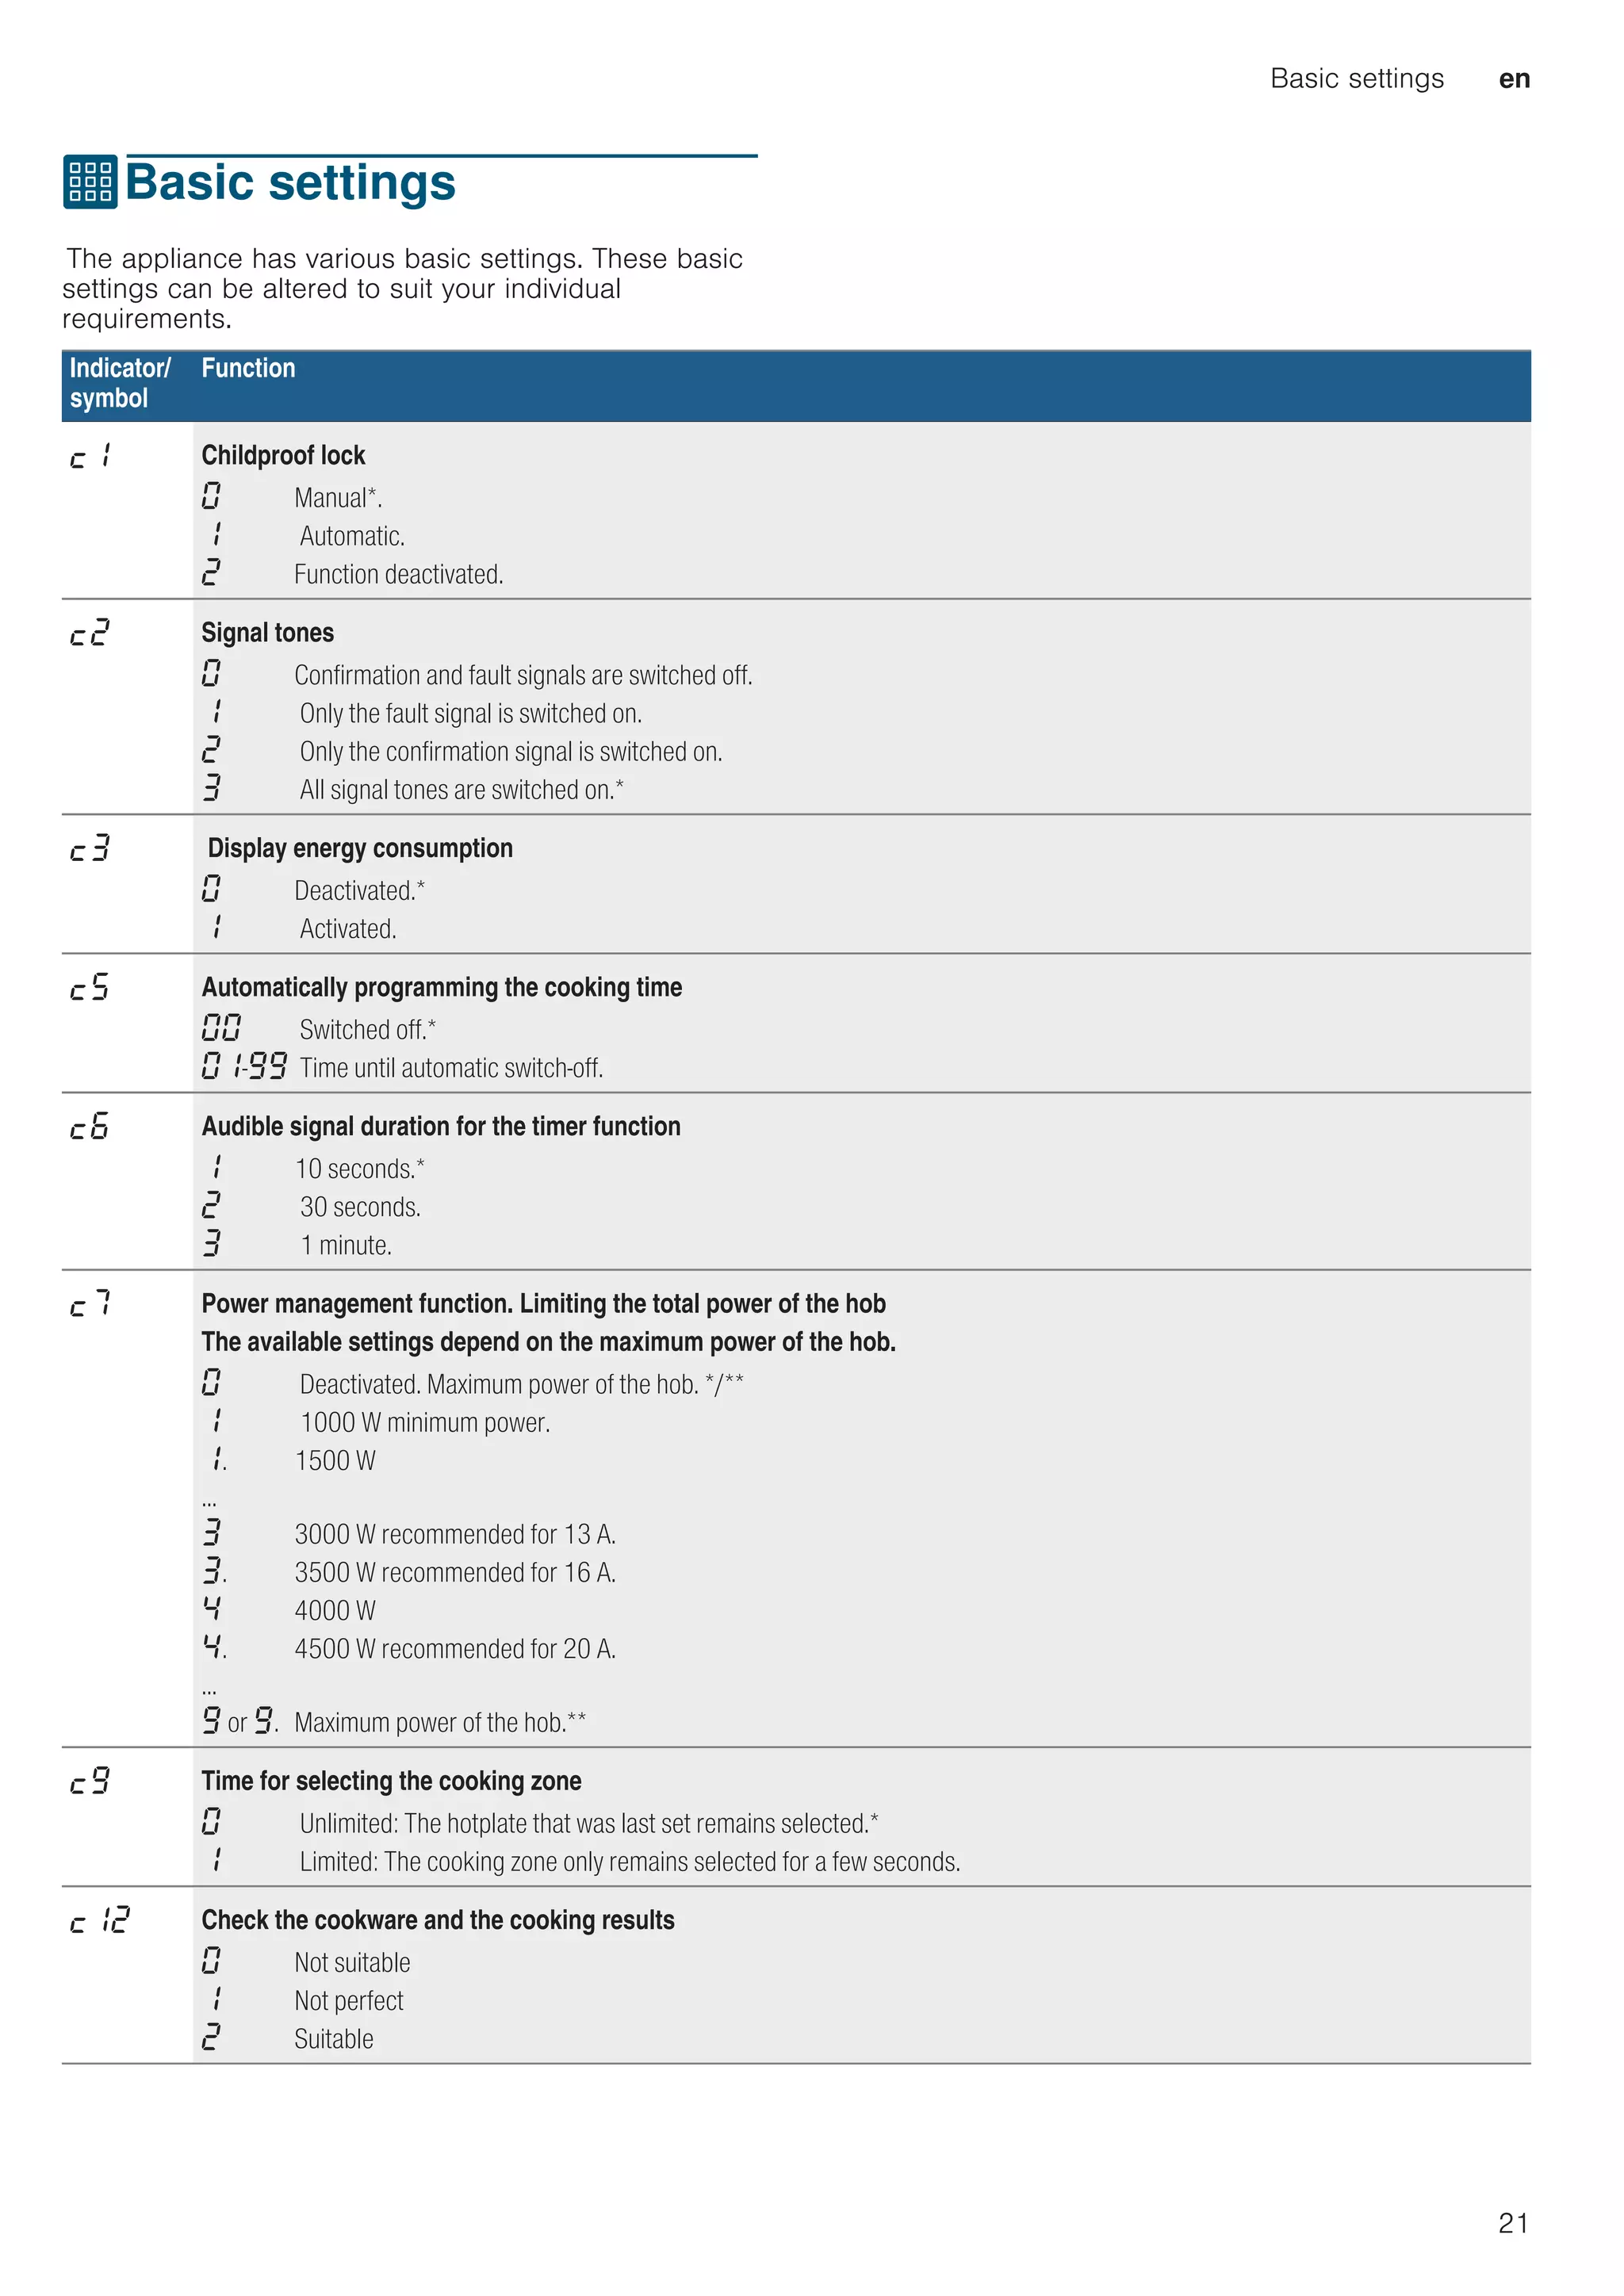
Q Basic settings. . . . . . . . . . . . . . . . . . . . . . . . . . . 21
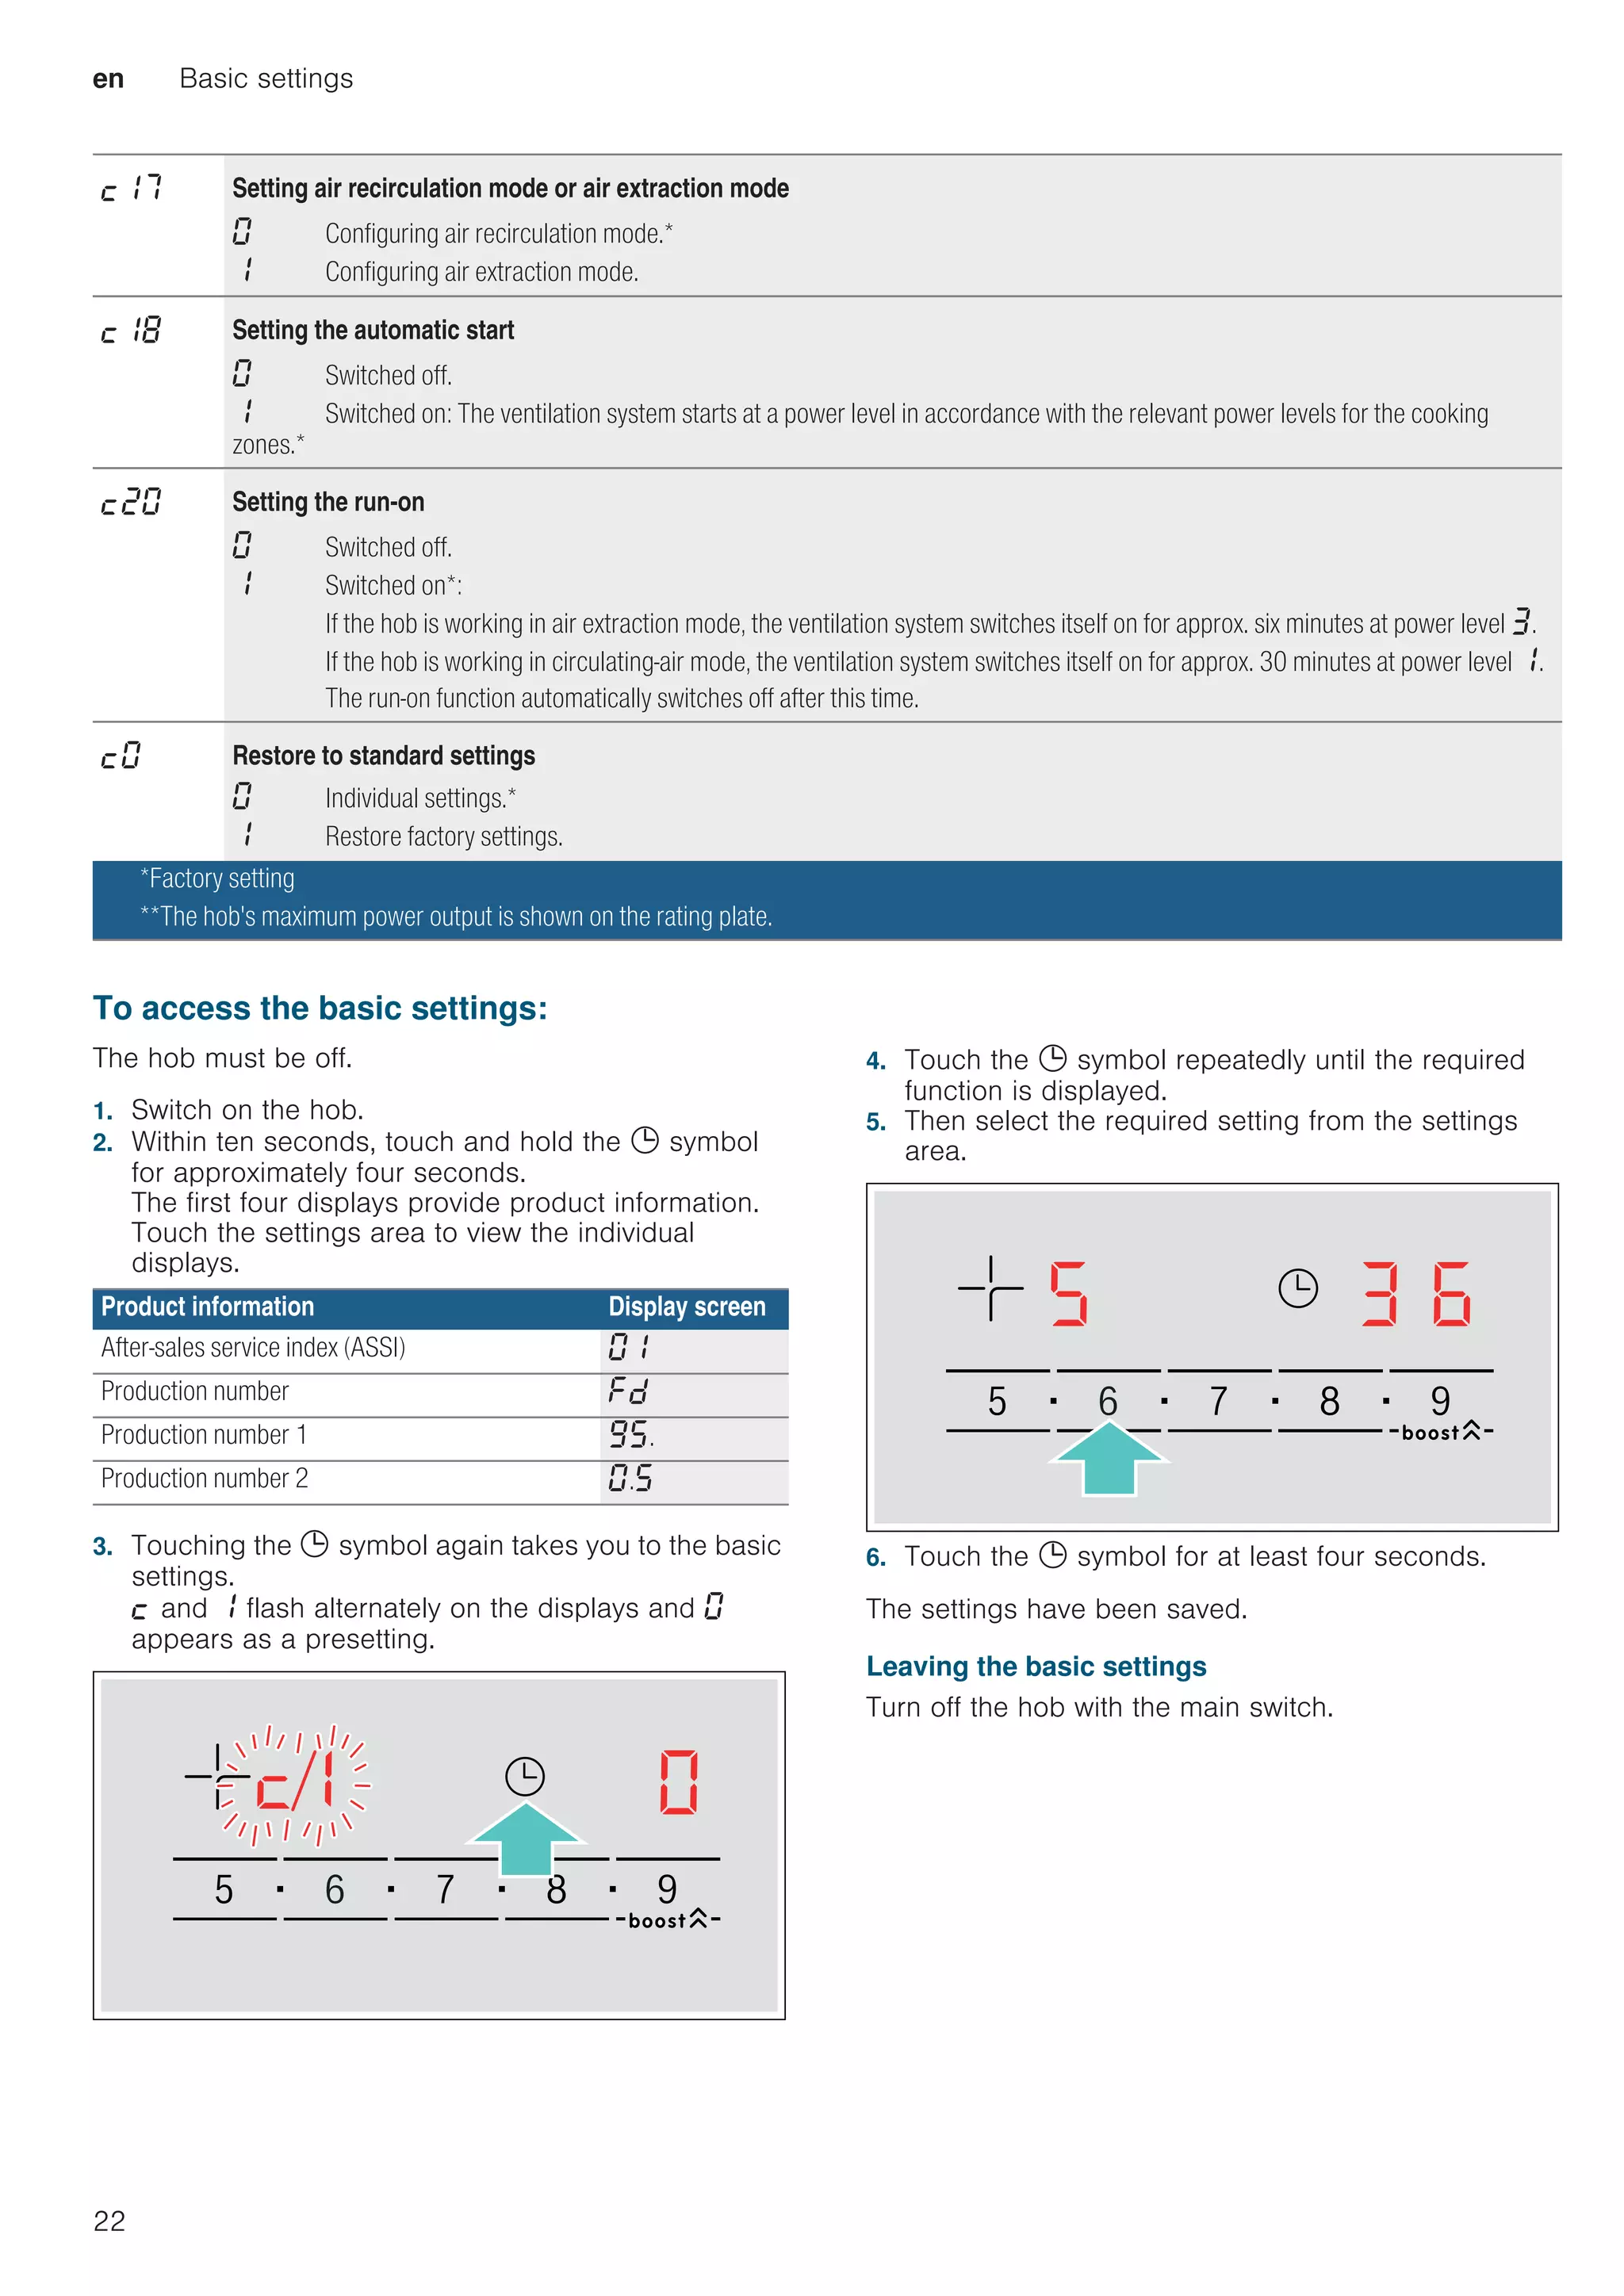
To access the basic settings: . . . . . . . . . . . . . . . . . . .22
[ Energy consumption indicator . . . . . . . . . . . . . 23
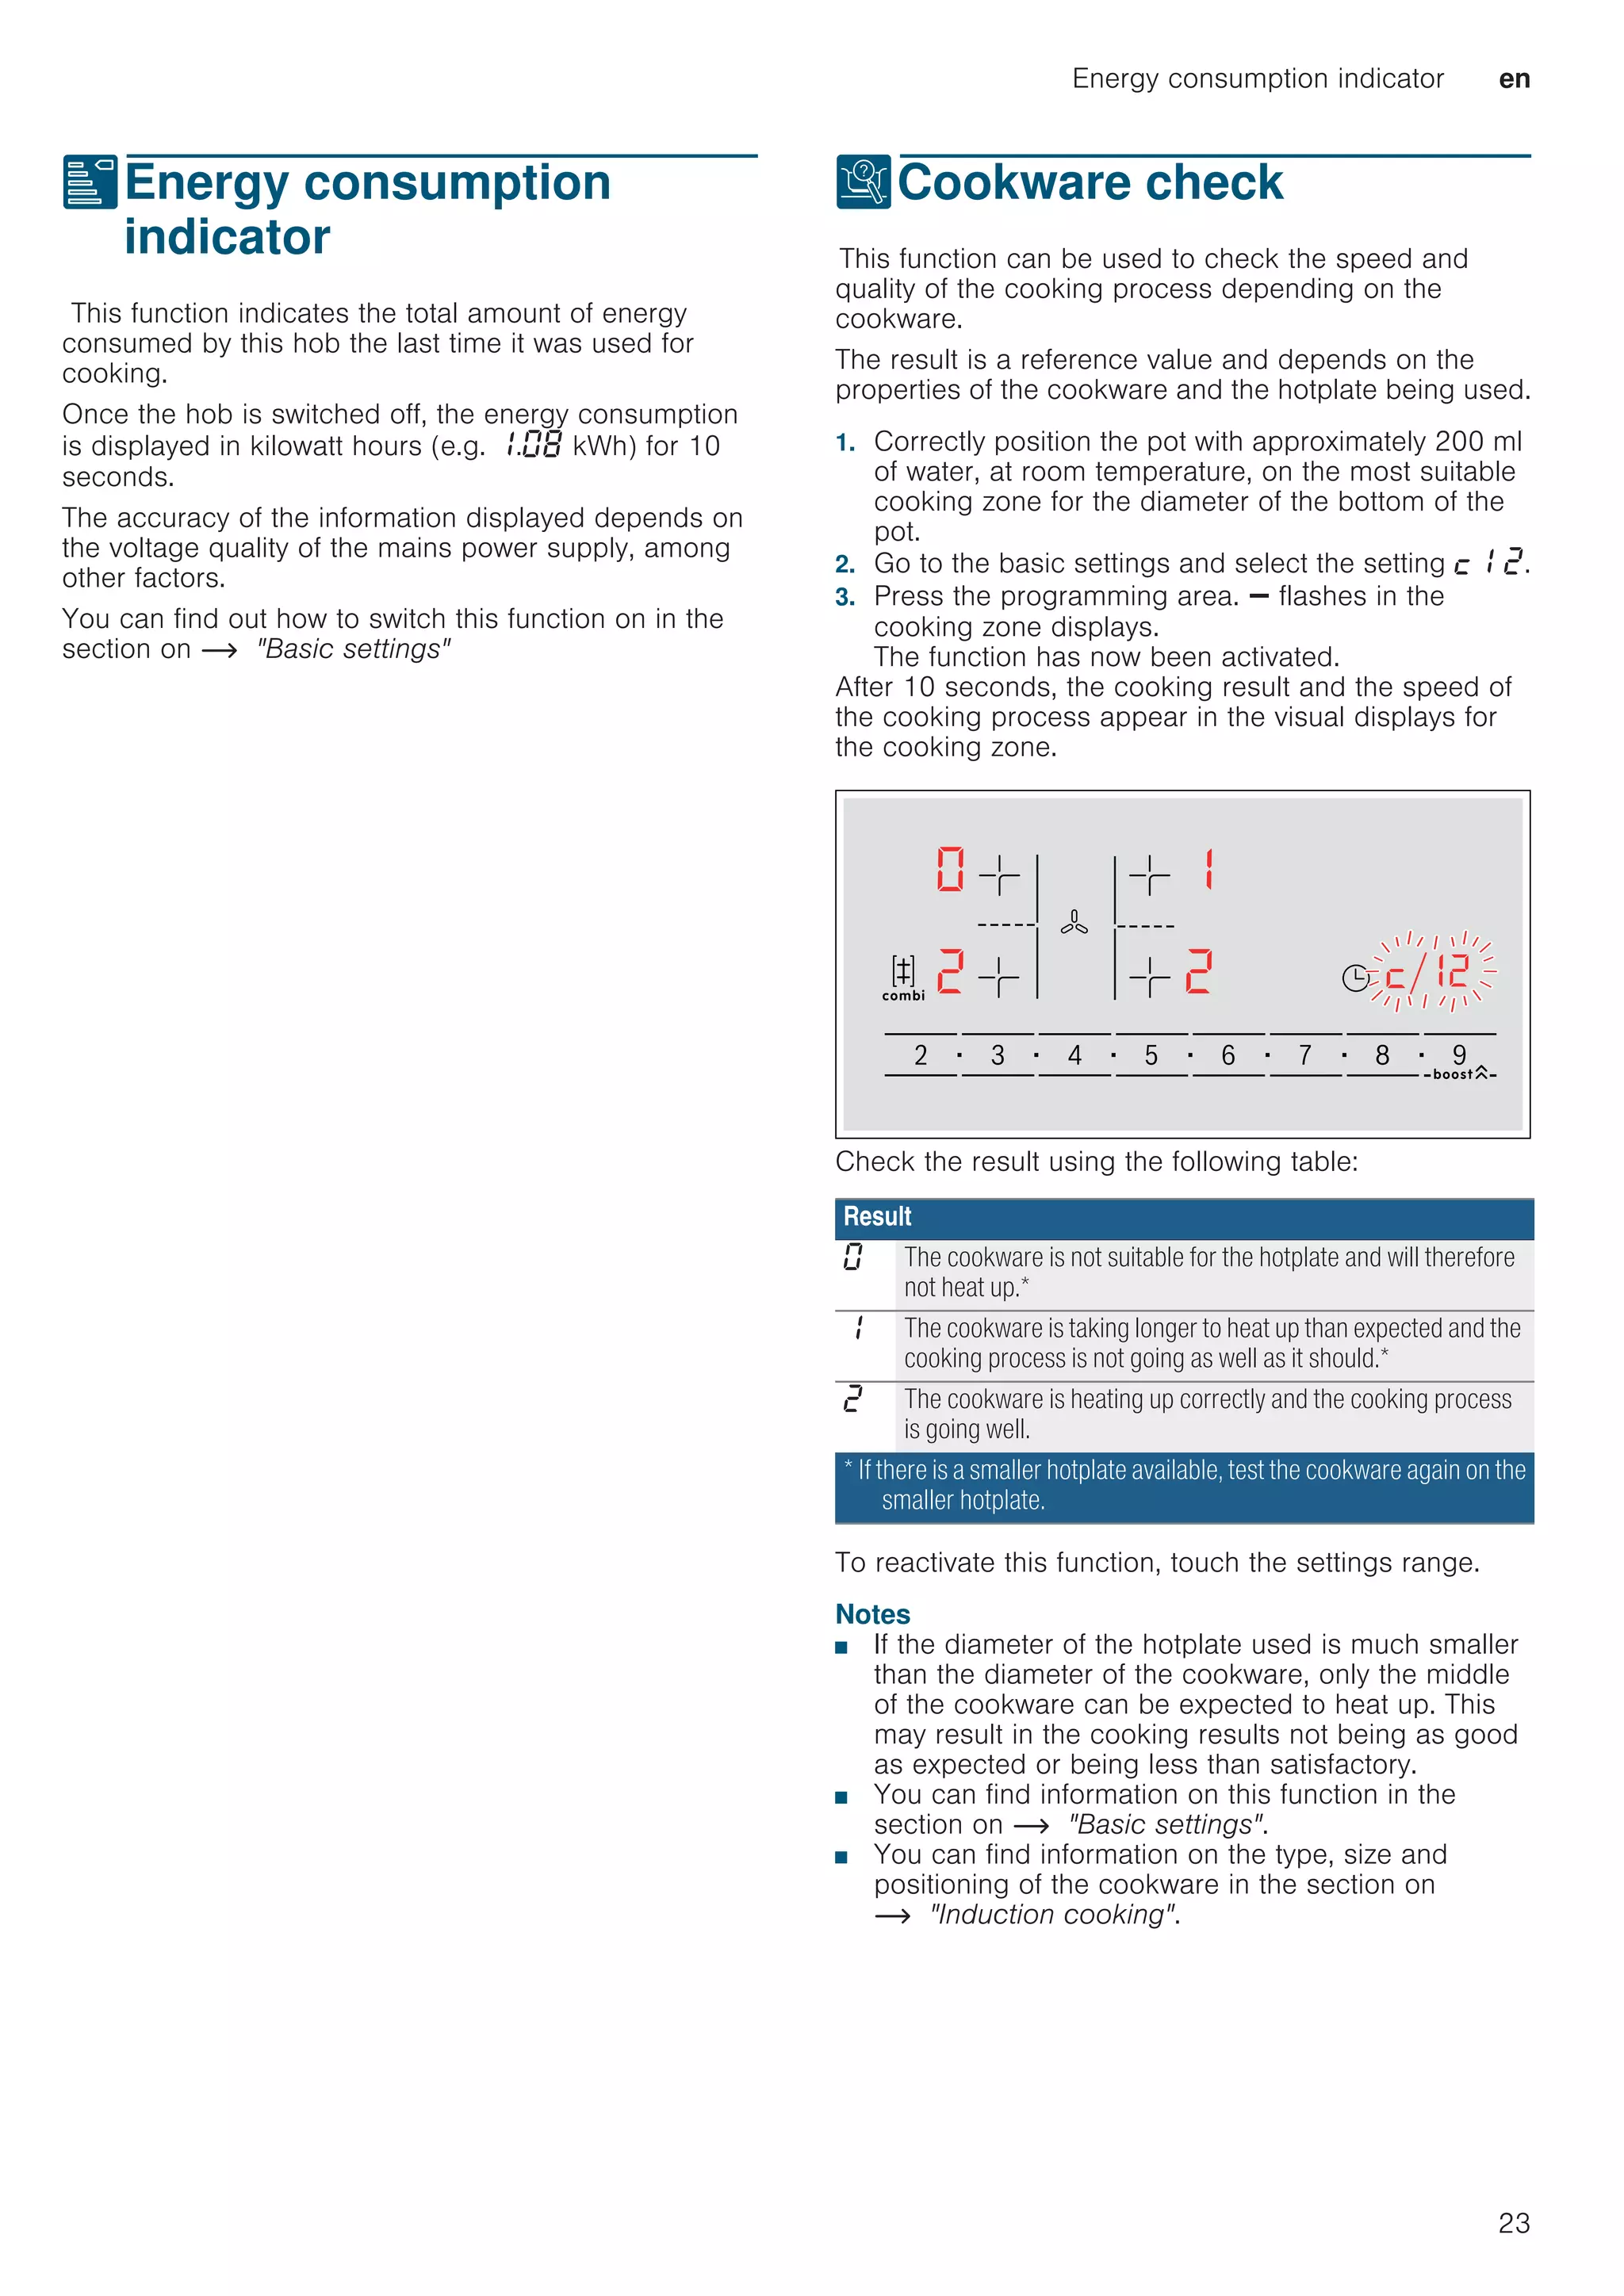
t Cookware check. . . . . . . . . . . . . . . . . . . . . . . . . 23
h Power manager . . . . . . . . . . . . . . . . . . . . . . . . . 24
D Cleaning . . . . . . . . . . . . . . . . . . . . . . . . . . . . . . . 24
Cleaning agents . . . . . . . . . . . . . . . . . . . . . . . . . . . . .24
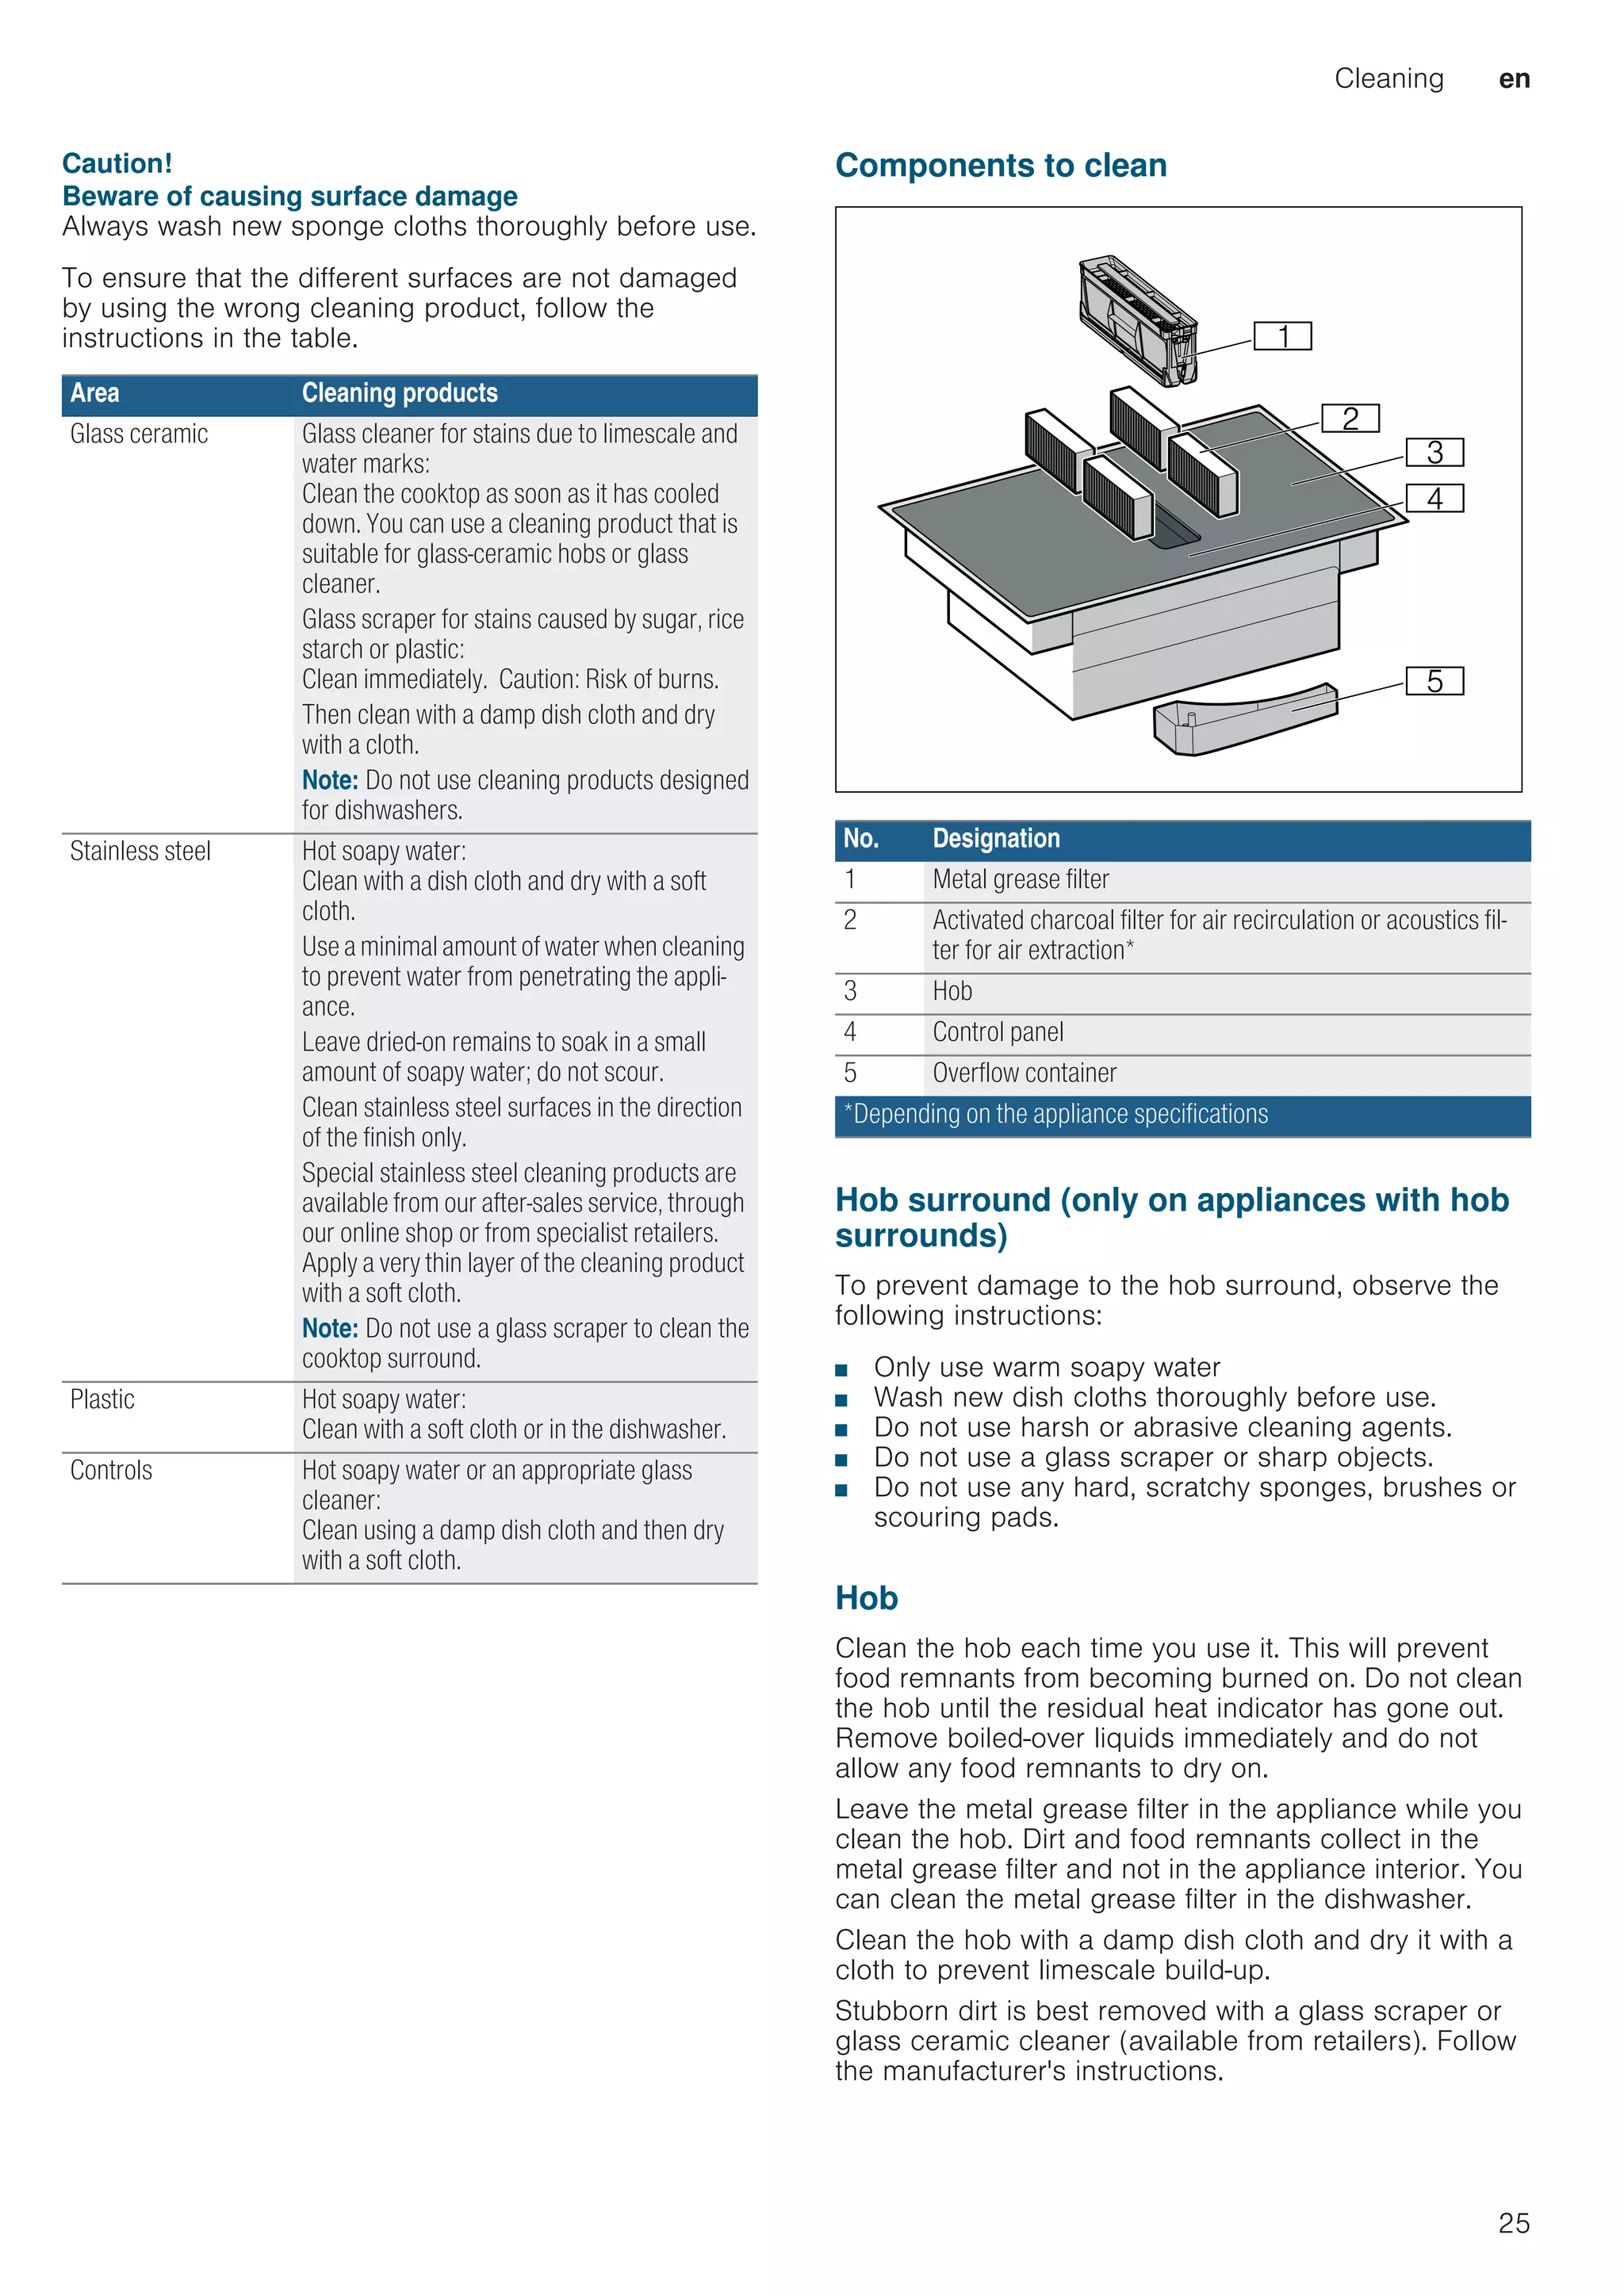
Components to clean . . . . . . . . . . . . . . . . . . . . . . . . .25
Hob surround (only on appliances with hob surrounds).
25
Hob . . . . . . . . . . . . . . . . . . . . . . . . . . . . . . . . . . . . .25
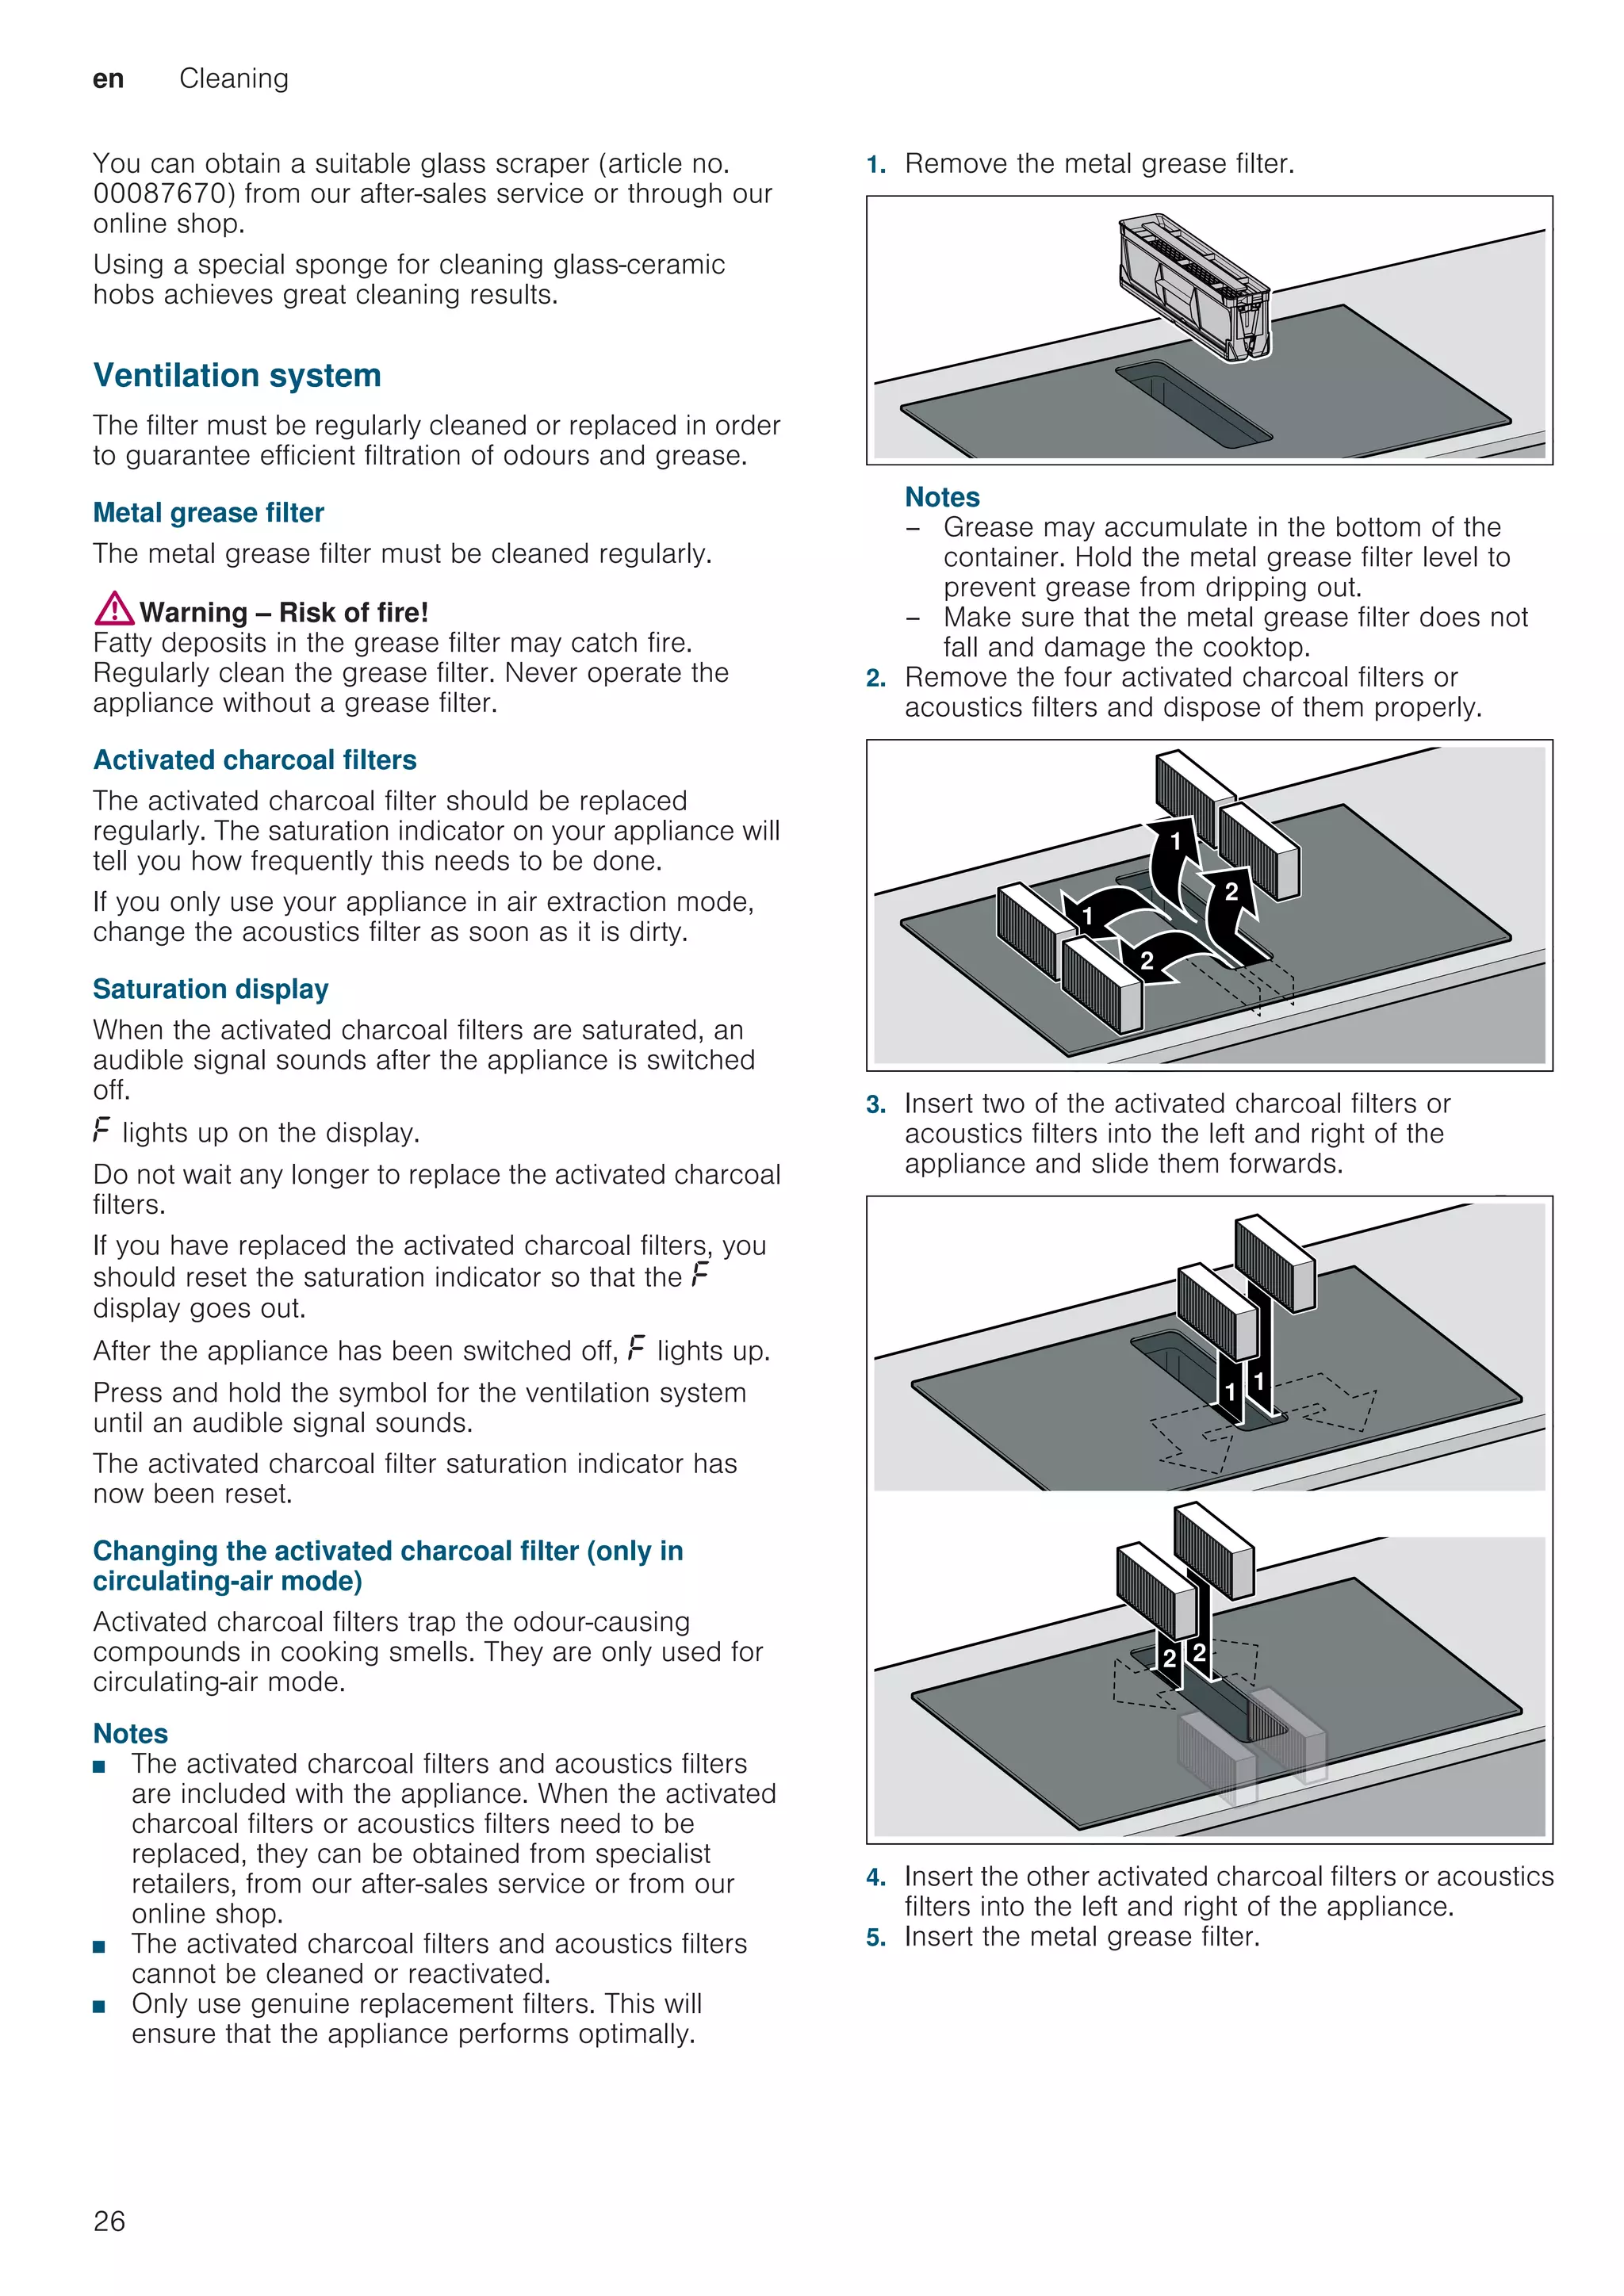
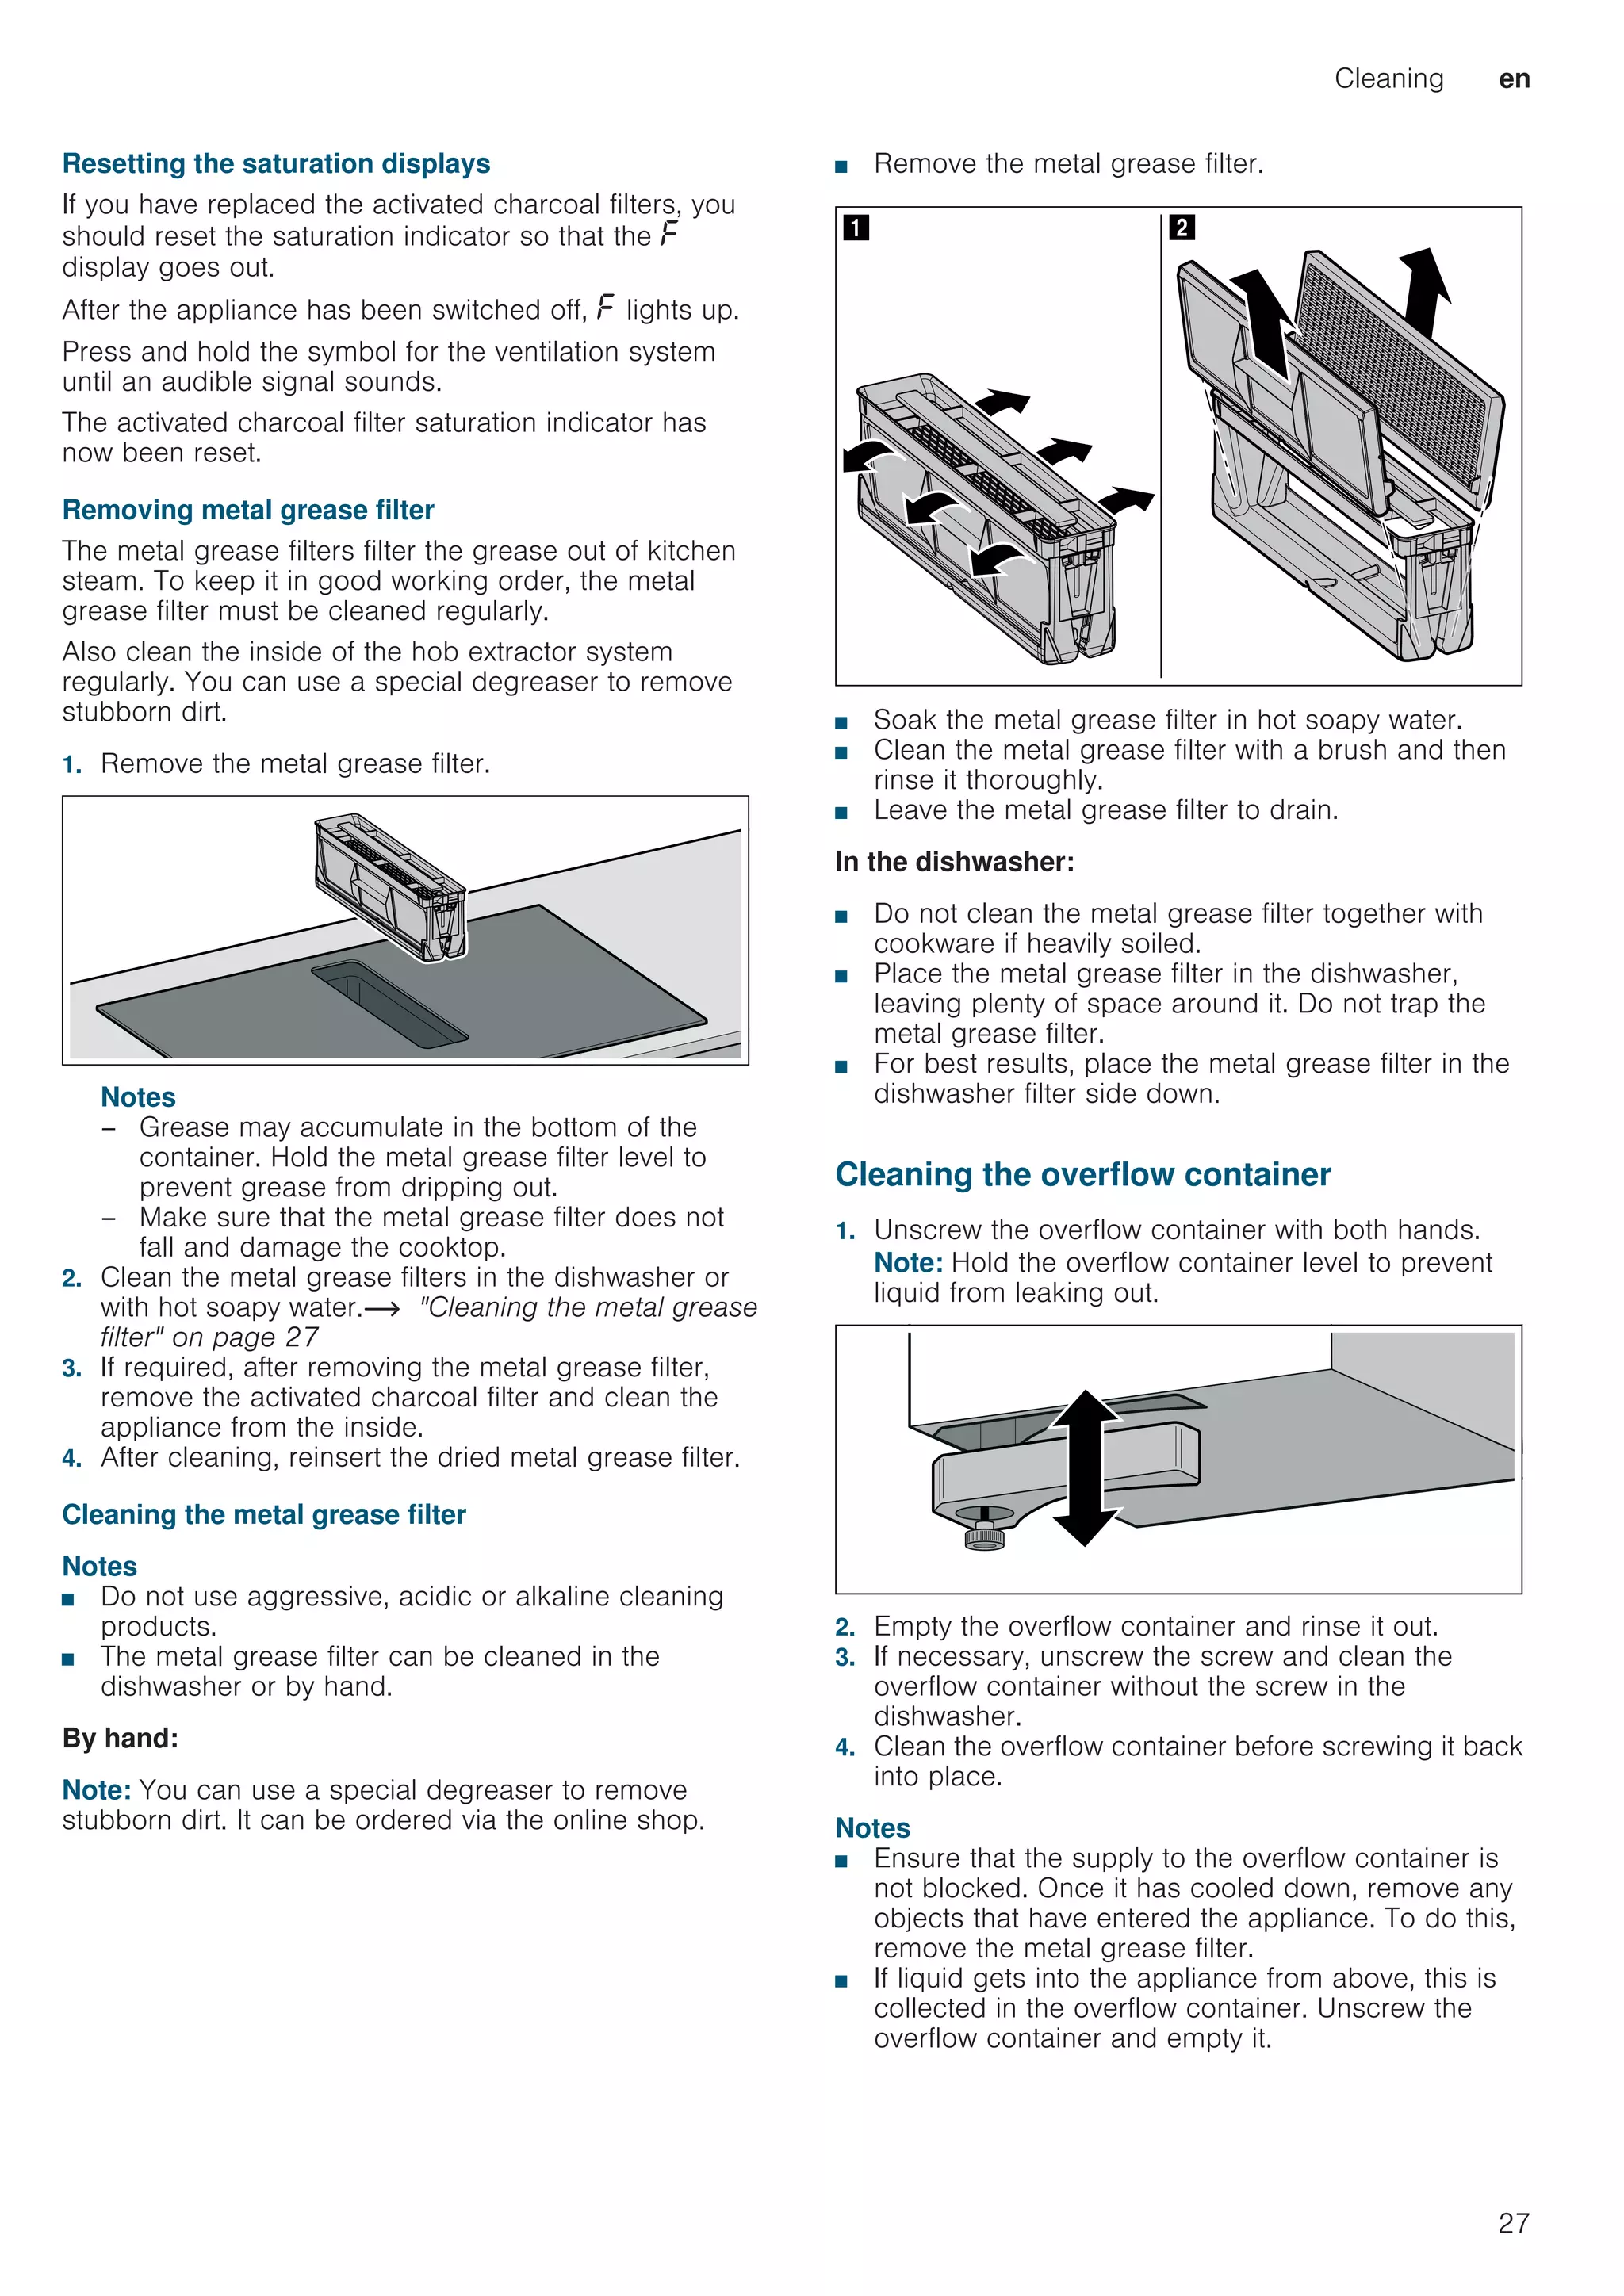
Ventilation system. . . . . . . . . . . . . . . . . . . . . . . . . . . .26
Cleaning the overflow container . . . . . . . . . . . . . . . . .27
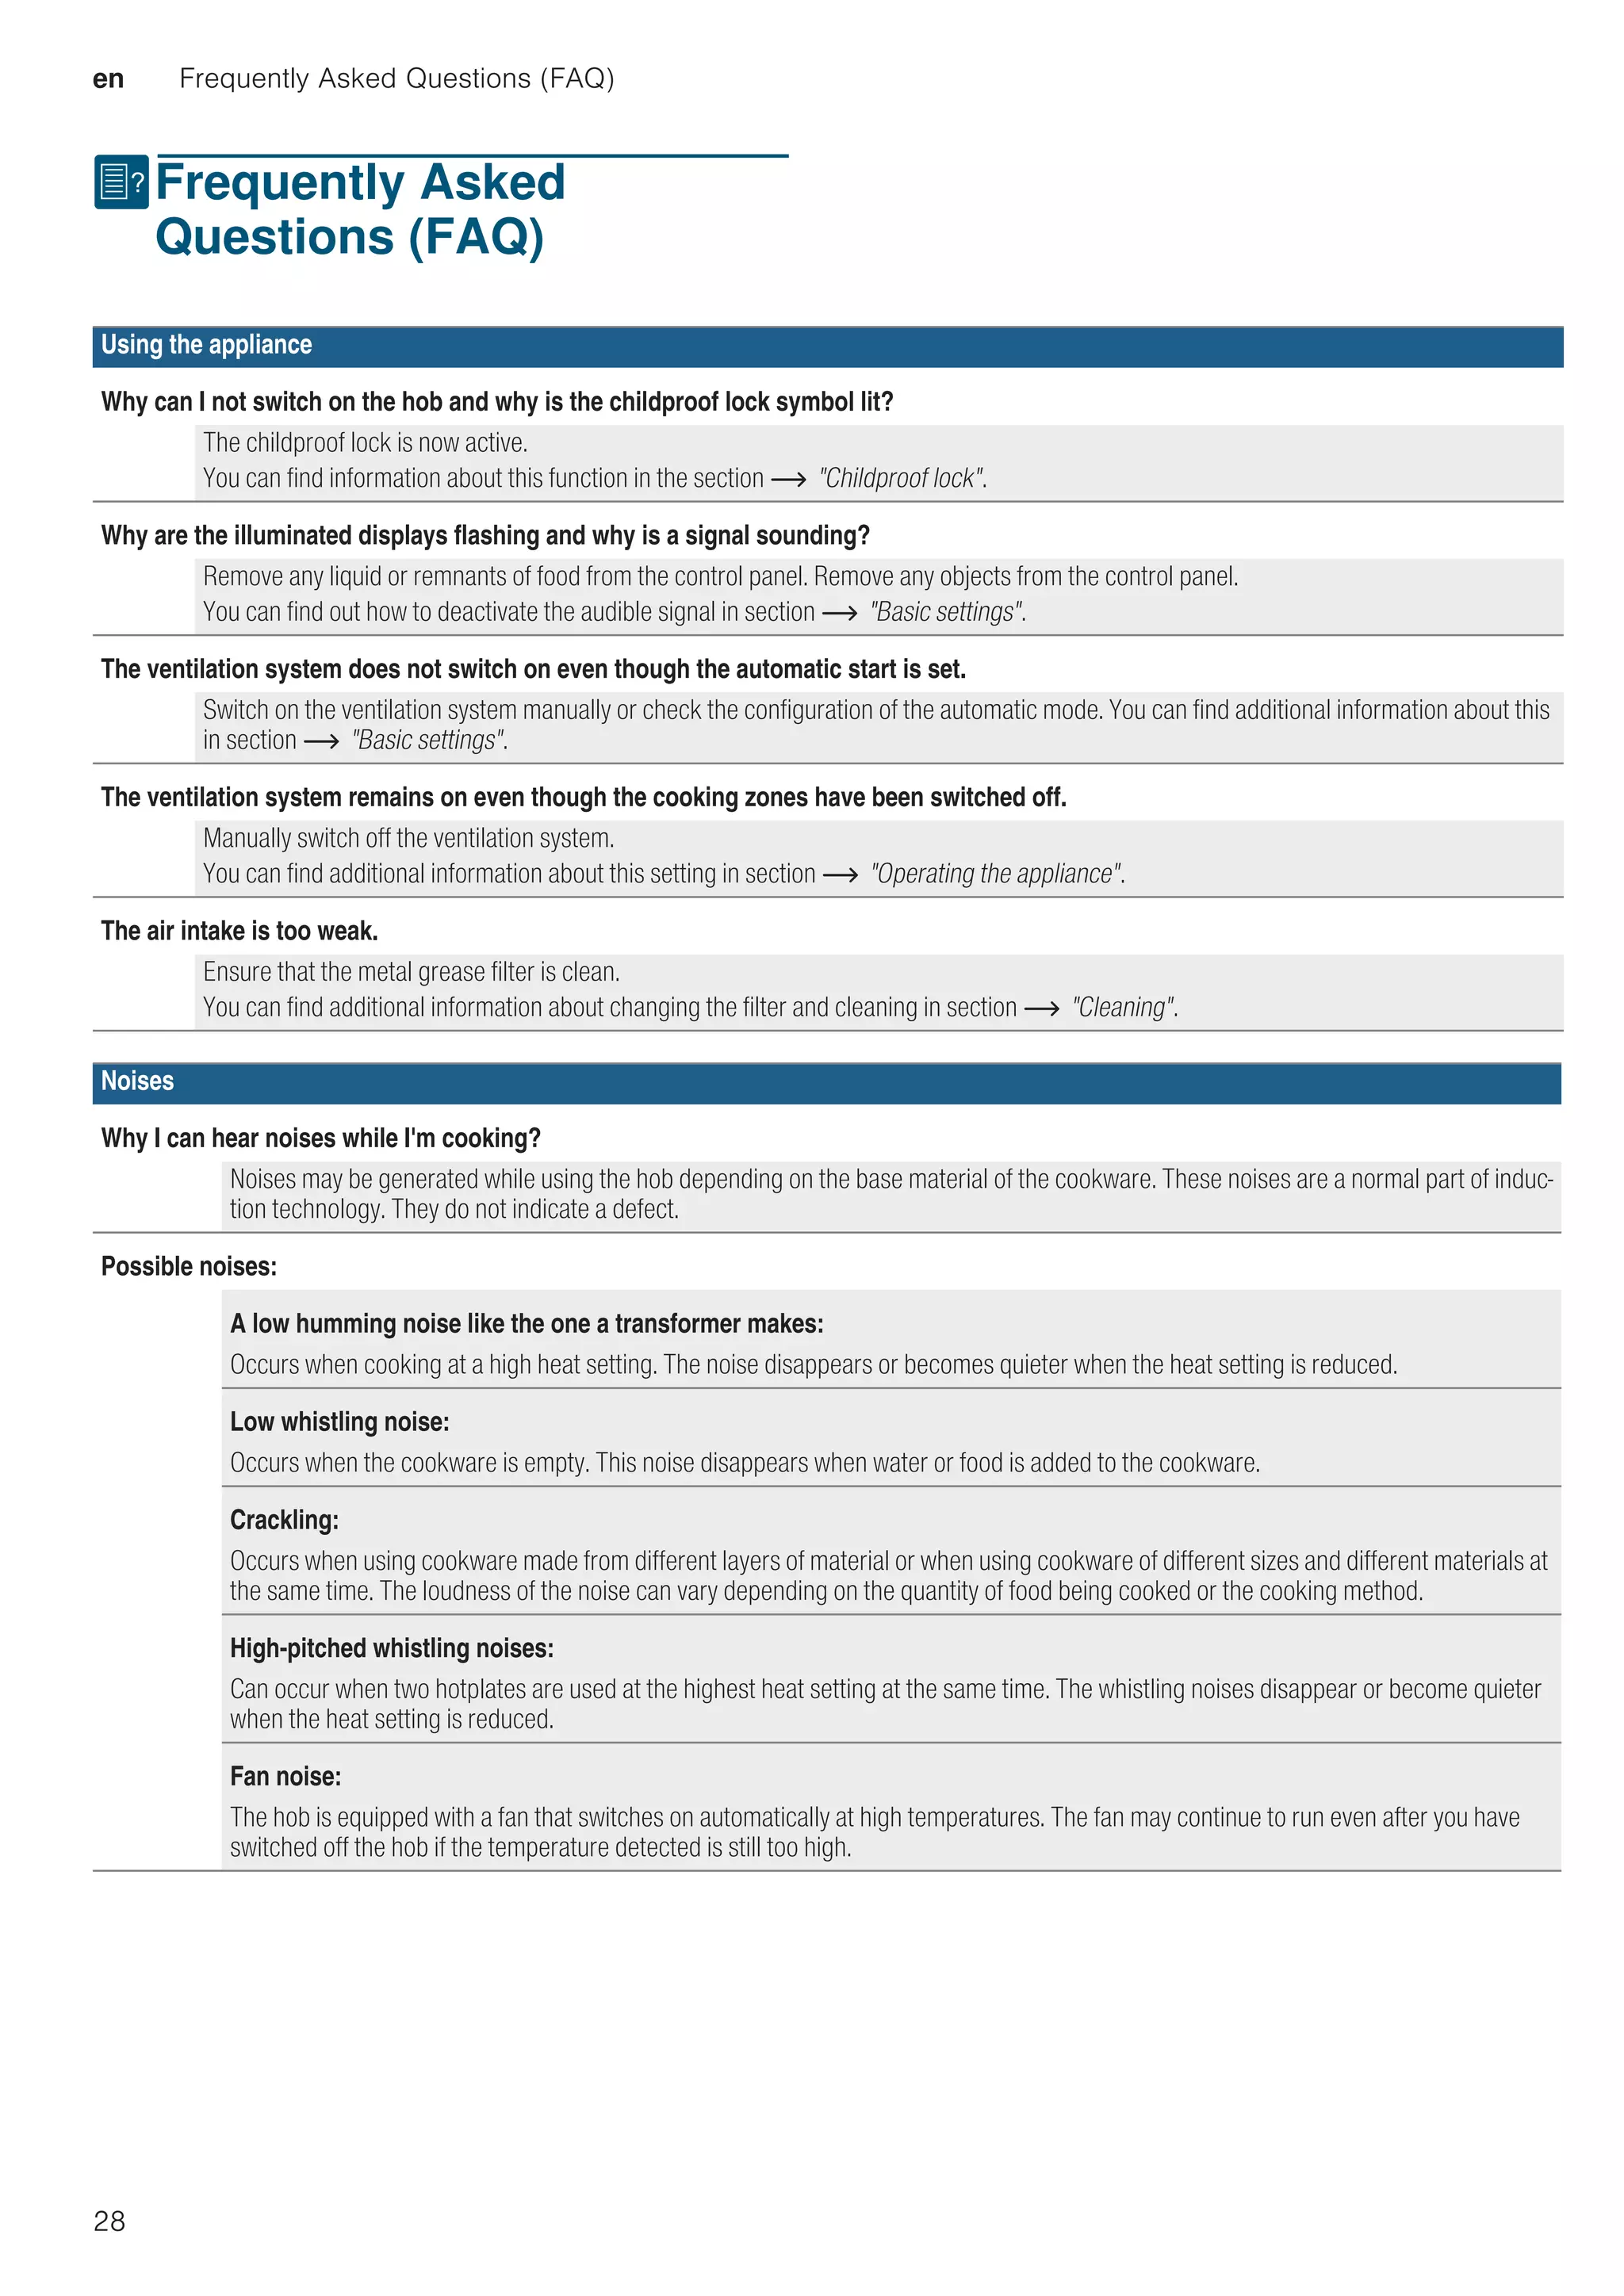
{ Frequently Asked Questions (FAQ) . . . . . . . . . 28
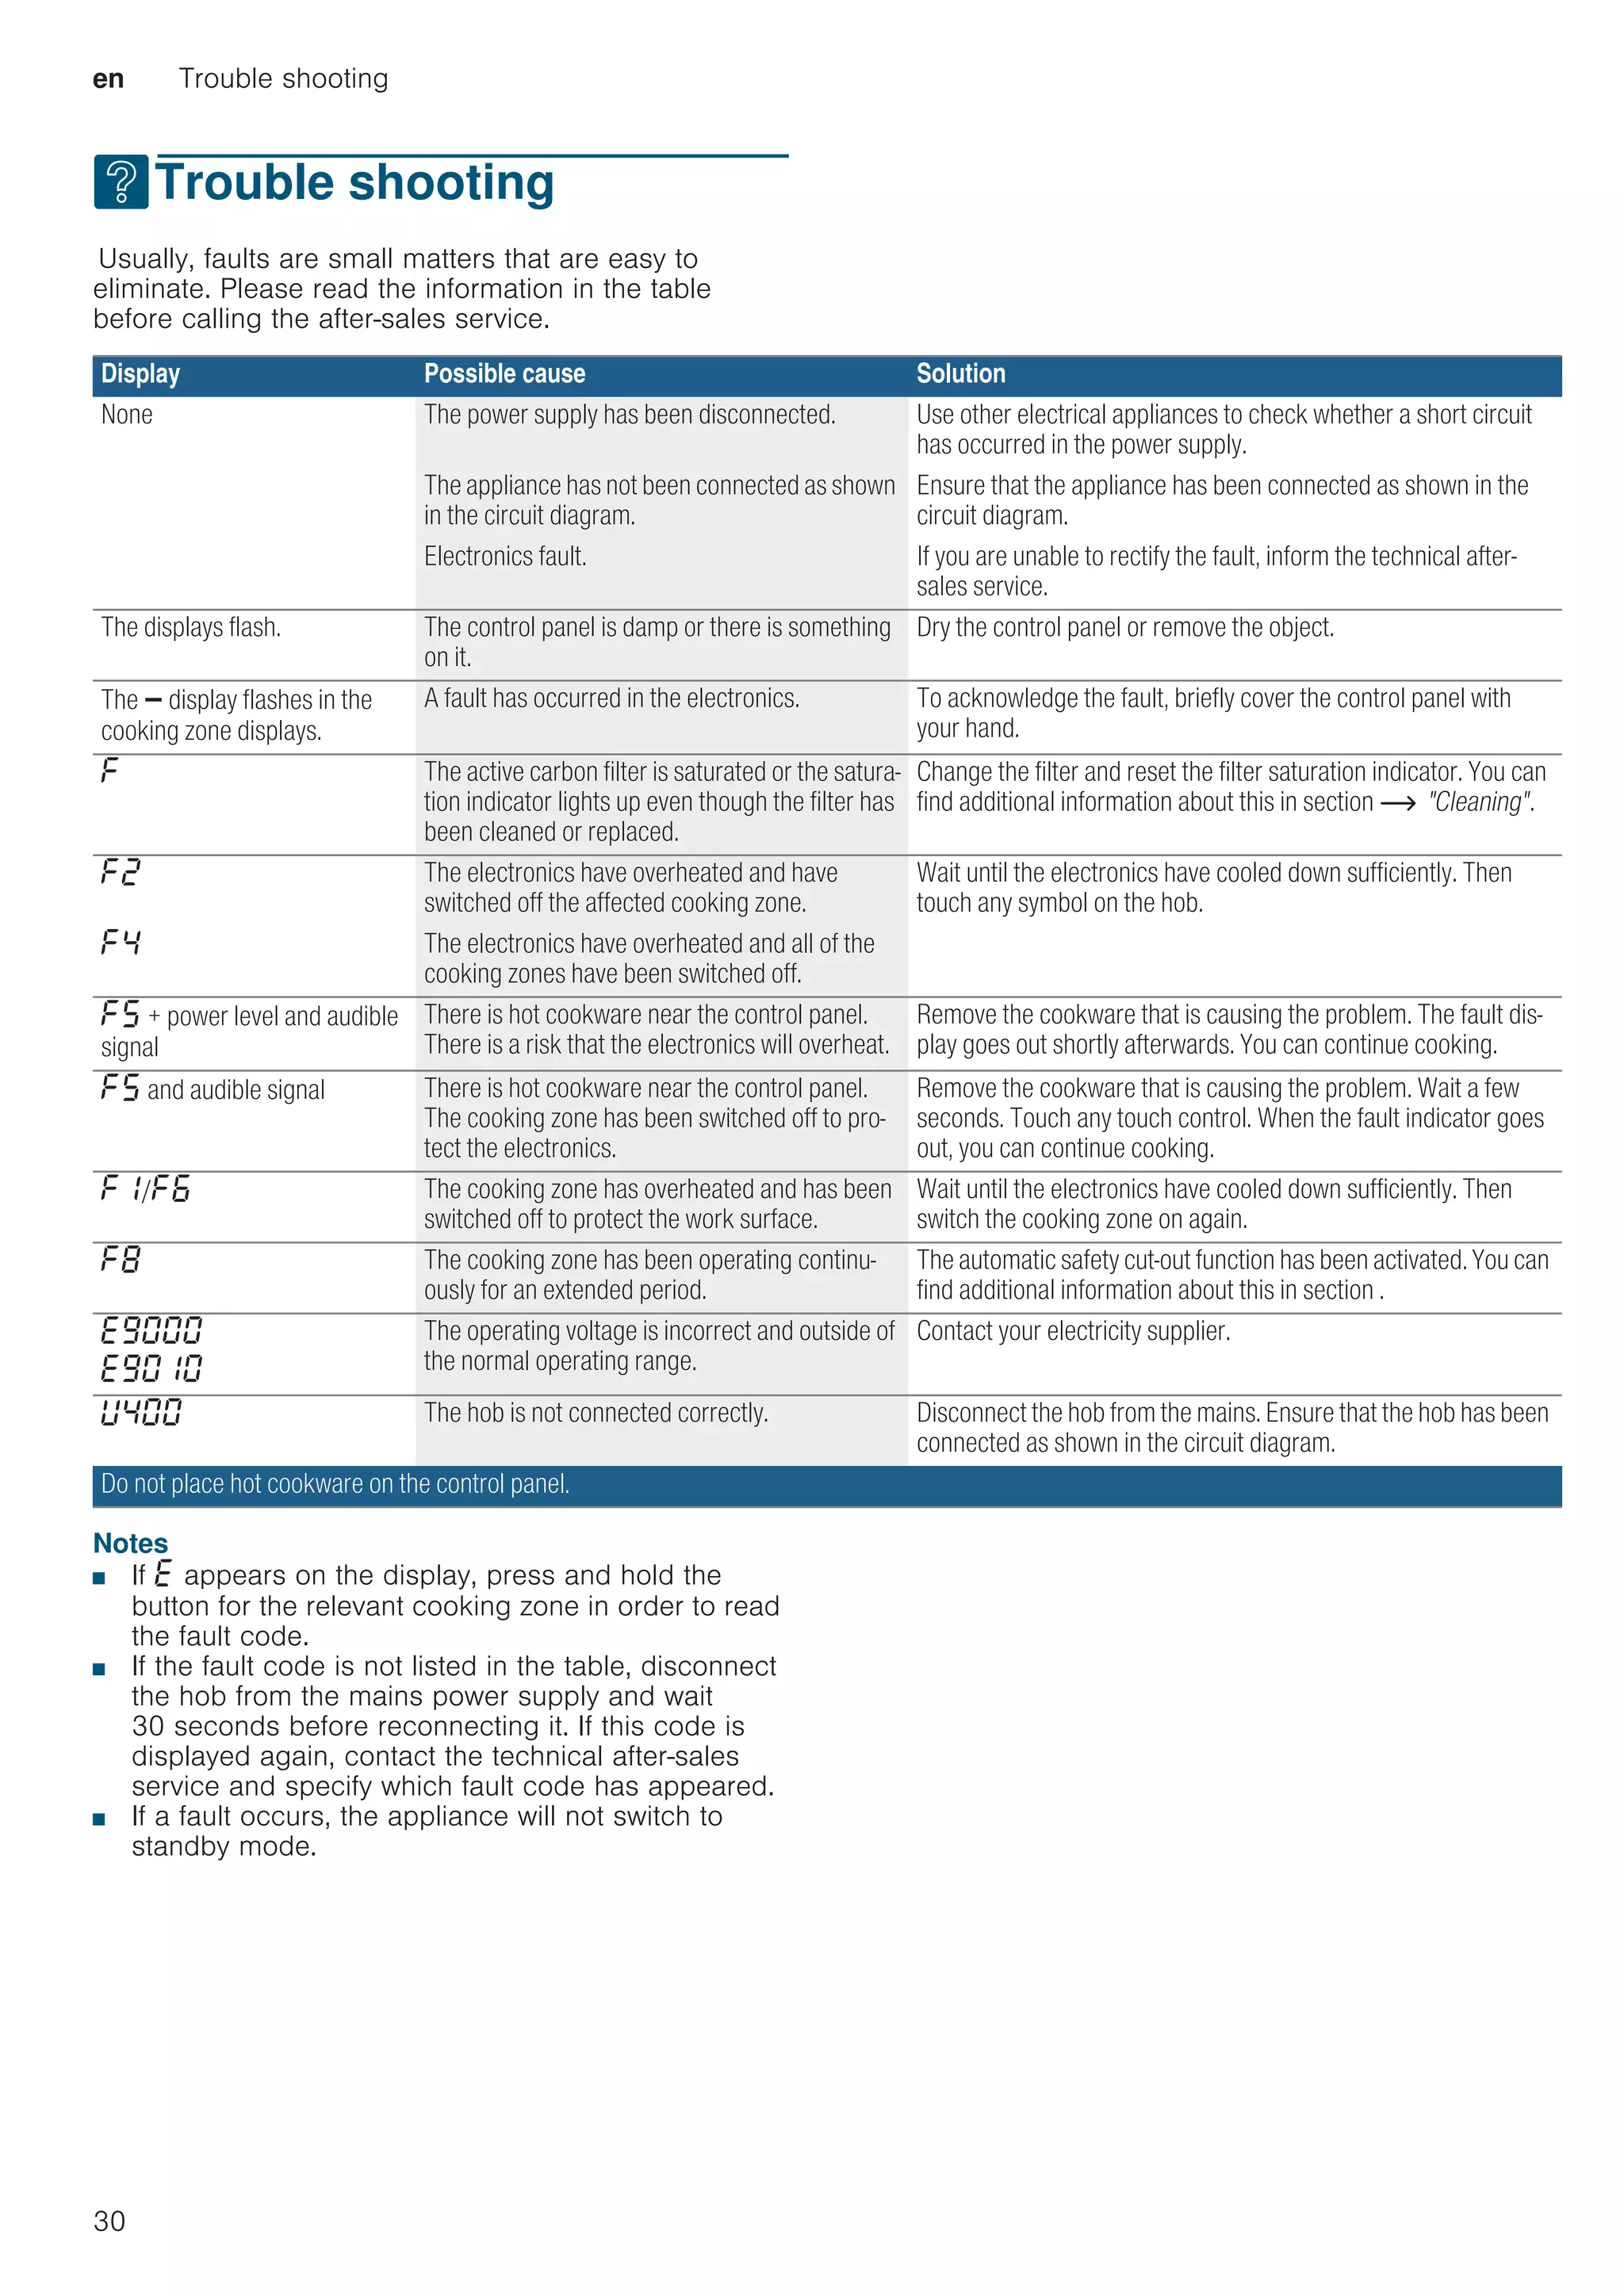
3 Trouble shooting . . . . . . . . . . . . . . . . . . . . . . . . 30
4 Customer service. . . . . . . . . . . . . . . . . . . . . . . . 31
Product number (E no.) and production number (FD
no.) . . . . . . . . . . . . . . . . . . . . . . . . . . . . . . . . . . . . .31
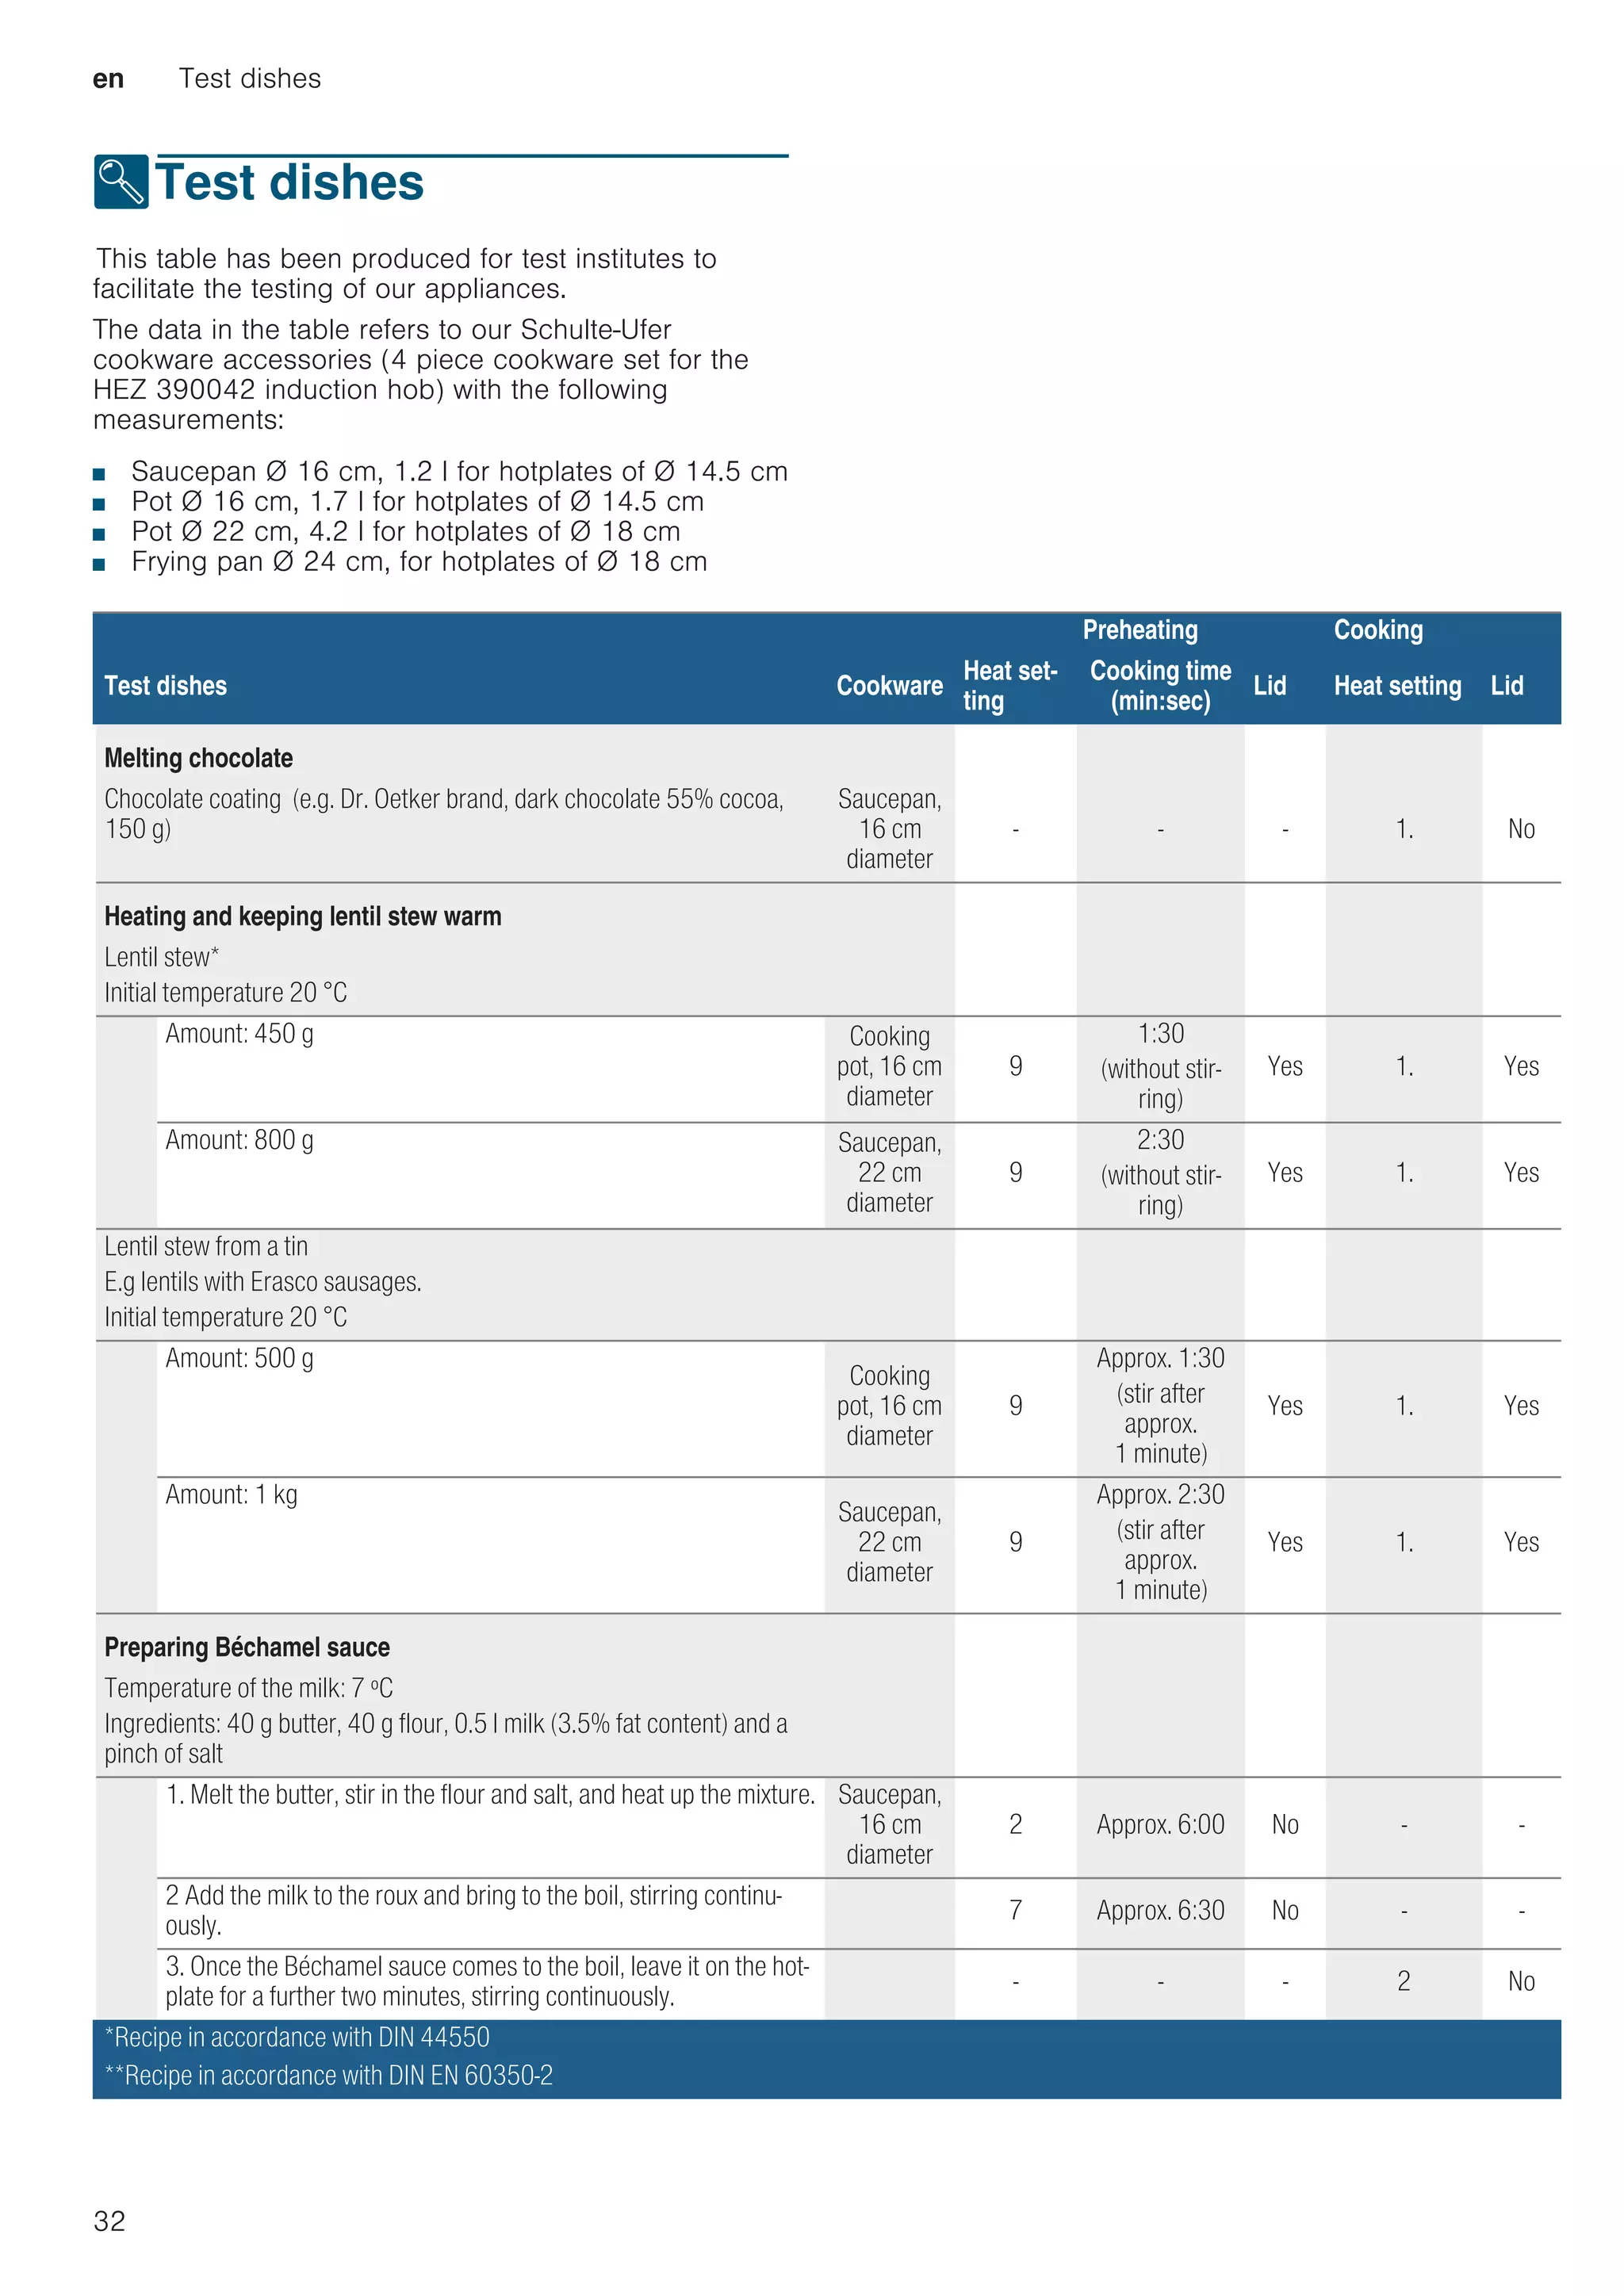
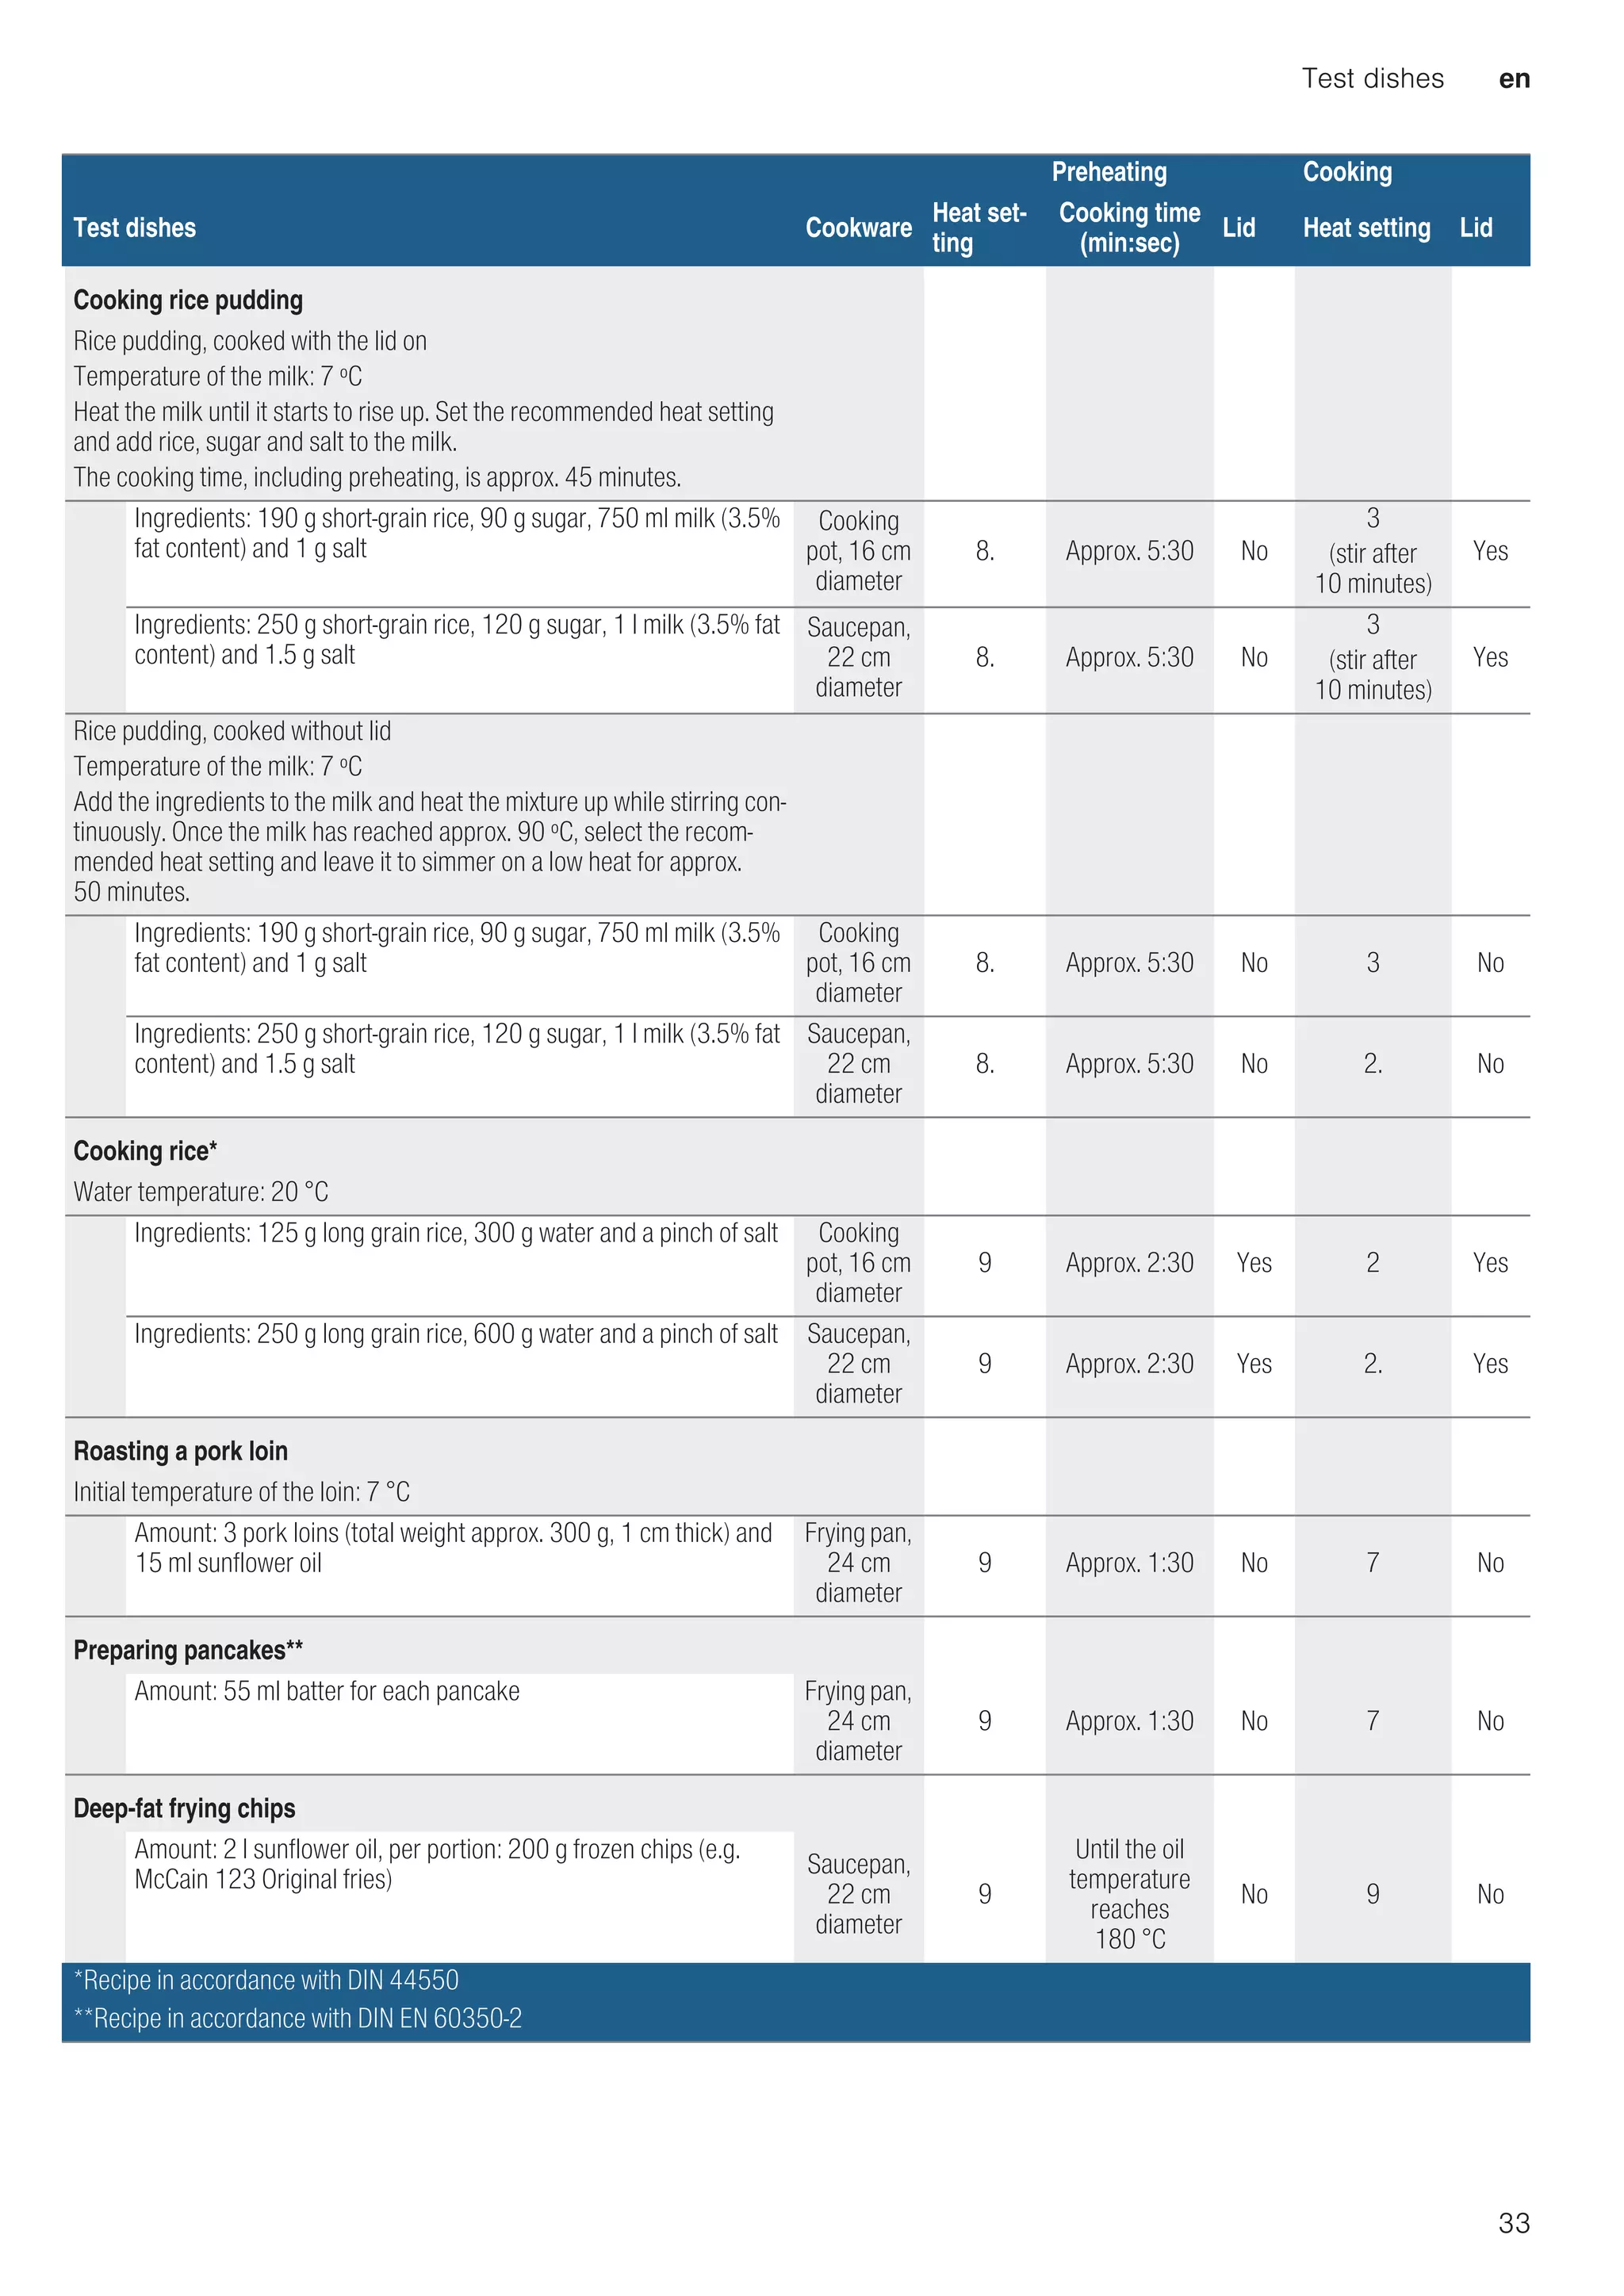
E Test dishes . . . . . . . . . . . . . . . . . . . . . . . . . . . . . 32
Produktinfo
Additional information on products, accessories,
replacement parts and services can be found at
www.bosch-home.com and in the online shop
www.bosch-eshop.com](https://image.slidesharecdn.com/manualbosh-211126090217/75/Manual-bosh-5-2048.jpg)
![Causes of damage en
7
]Causes of damage
CausesofdamageCaution!
■ Rough pan bases may scratch the hob.
■ Objects that are hard or sharp may damage the hob.
Do not allow hard or sharp objects to fall on the hob.
■ Heating cookware when empty may cause surface
damage. Never leave empty cookware on the heat.
■ Do not place hot pans on the control panel, the
indicator area, or the hob frame. Doing so may
cause damage.
■ Never leave aluminium foil or plastic containers on
hot hotplates as this may damage the hob. No not
use oven liners.
■ Using unsuitable cleaning products may cause
surface damage, discolouration and stains. Only use
cleaning products that are suitable for this type of
hob.
■ Friction from pots and pans may cause surface
damage and discolouration. Always lift pots and
pans up before repositioning them; do not slide
them across the surface of the hob.
■ Burnt-on food may cause surface damage and
staining. Immediately remove any food that has
boiled over using a glass scraper.
■ Salt, sugar and sand may cause surface damage.
Do not use the hob as a work surface or storage
space.
■ Using cookware with a rough base may cause
surface damage. Check all cookware before use.
■ Sugar and foods with a high sugar content may
cause surface damage or conchoidal fracturing.
Immediately remove any food that has boiled over
using a glass scraper.
7Environmental protection
EnvironmentalprotectionIn this section, you can find information about saving
energy and disposing of the appliance.
Energy saving tips
■ Always use a matching lid for every item of
cookware. Cooking without a lid consumes
significantly more energy. Use a glass lid. Then you
can see into the pan without raising the lid.
■ Use cookware with a flat base. Uneven bases
increase the energy consumption.
■ Make sure that the diameter of the cookware base
corresponds to the size of the cooking zone. Please
note: Cookware manufacturers often specify the
diameter of the top of the pan, which is usually larger
than the diameter of the base of the pan.
■ For small quantities, use small items of cookware.
Using cookware that is large but barely filled
requires a lot of energy.
■ Cook with as little water as possible. This saves
energy and preserves the vitamins and minerals in
vegetables.
■ Switch to a lower heat setting in good time. This
prevents energy from being wasted.
■ During cooking, ensure that there is a sufficient
supply of air to enable the ventilation system to work
efficiently and with a low level of operating noise.
■ Adjust the fan speed to the amount of cooking
vapour produced during cooking.Only use the
intensive setting if needed. A lower fan speed
consumes less energy.
■ If cooking produces large amounts of vapour, select
a higher fan speed in good time. If the cooking
vapour has already spread around the kitchen, the
ventilation system will need to be operated for
longer.
■ Switch the appliance off when you are not using it.
■ Clean and (if required) replace the filter at regular
intervals in order to increase the effectiveness of the
ventilation system and to prevent the risk of fire.
Environmentally-friendly disposal
Dispose of packaging in an environmentally-friendly
manner.
This appliance is labelled in accordance with
European Directive 2012/19/EU concerning
used electrical and electronic appliances
(waste electrical and electronic equipment -
WEEE). The guideline determines the
framework for the return and recycling of used
appliances as applicable throughout the EU.](https://image.slidesharecdn.com/manualbosh-211126090217/75/Manual-bosh-9-2048.jpg)