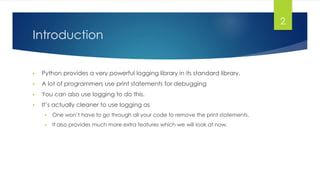
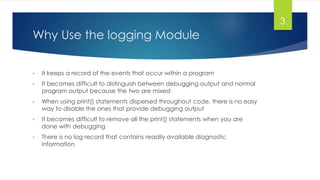
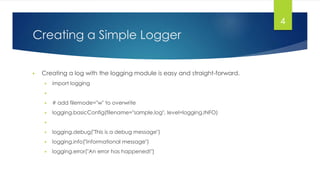
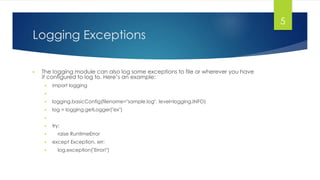
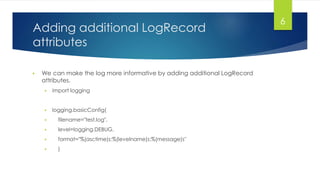
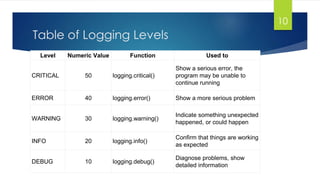
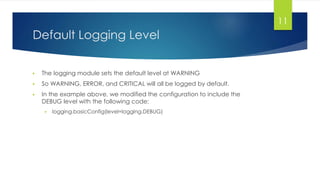
Logging in Python
Introduction
▶ Python provides a very powerful logging library in its standard library.
▶ A lot of programmers use print statements for debugging
▶ You can also use logging to do this.
▶ It’s actually cleaner to use logging as
▶ One won’t have to go through all your code to remove the print statements.
▶ It also provides much more extra features which we will look at now.
2
Why Use the logging Module
▶ It keeps a record of the events that occur within a program
▶ It becomes difficult to distinguish between debugging output and normal
program output because the two are mixed
▶ When using print() statements dispersed throughout code, there is no easy
way to disable the ones that provide debugging output
▶ It becomes difficult to remove all the print() statements when you are
done with debugging
▶ There is no log record that contains readily available diagnostic
information
3
Creating a Simple Logger
▶ Creating a log with the logging module is easy and straight-forward.
▶ import logging
▶
▶ # add filemode="w" to overwrite
▶ logging.basicConfig(filename="sample.log", level=logging.INFO)
▶
▶ logging.debug("This is a debug message")
▶ logging.info("Informational message")
▶ logging.error("An error has happened!")
4
Logging Exceptions
▶ The logging module can also log some exceptions to file or wherever you have
it configured to log to. Here’s an example:
▶ import logging
▶
▶ logging.basicConfig(filename="sample.log", level=logging.INFO)
▶ log = logging.getLogger("ex")
▶
▶ try:
▶ raise RuntimeError
▶ except Exception, err:
▶ log.exception("Error!")
5
Adding additional LogRecord
attributes
▶ We can make the log more informative by adding additional LogRecord
attributes.
▶ import logging
▶ logging.basicConfig(
▶ filename="test.log",
▶ level=logging.DEBUG,
▶ format="%(asctime)s:%(levelname)s:%(message)s"
▶ )
6
Code with Formatted Log Stamp
▶ When we run the code with the added attribute, we’ll get new lines
added to our test.log file
▶ that include the human-readable time stamp in addition to the level name of
DEBUG and the associated messages that are passed into the logger as strings.
7
Output
▶ Output
▶ DEBUG:root:Pizza created: Sicilian ($18)
▶ DEBUG:root:Made 5 Sicilian pizza(s)
▶ DEBUG:root:Ate 4 pizza(s)
▶ DEBUG:root:Pizza created: quattro formaggi ($16)
▶ DEBUG:root:Made 2 quattro formaggi pizza(s)
▶ DEBUG:root:Ate 2 pizza(s)
▶ 2017-05-01 16:28:54,593:DEBUG:Pizza created: Sicilian ($18)
▶ 2017-05-01 16:28:54,593:DEBUG:Made 5 Sicilian pizza(s)
▶ 2017-05-01 16:28:54,593:DEBUG:Ate 4 pizza(s)
▶ 2017-05-01 16:28:54,593:DEBUG:Pizza created: quattro formaggi ($16)
▶ 2017-05-01 16:28:54,593:DEBUG:Made 2 quattro formaggi pizza(s)
▶ 2017-05-01 16:28:54,593:DEBUG:Ate 2 pizza(s)
8
Table of Logging Levels
▶ As a developer, you can ascribe a level of importance to the event that is
captured in the logger by adding a severity level.
▶ The severity levels are shown in the table in next slide.
9
Table of Logging Levels
Level Numeric Value Function Used to
CRITICAL 50 logging.critical()
Show a serious error, the
program may be unable to
continue running
ERROR 40 logging.error() Show a more serious problem
WARNING 30 logging.warning()
Indicate something unexpected
happened, or could happen
INFO 20 logging.info()
Confirm that things are working
as expected
DEBUG 10 logging.debug()
Diagnose problems, show
detailed information
10
Default Logging Level
▶ The logging module sets the default level at WARNING
▶ So WARNING, ERROR, and CRITICAL will all be logged by default.
▶ In the example above, we modified the configuration to include the
DEBUG level with the following code:
▶ logging.basicConfig(level=logging.DEBUG)
11
Thanks
12

Logging in Python.pptx

  • 1.
  • 2.
    Introduction ▶ Python providesa very powerful logging library in its standard library. ▶ A lot of programmers use print statements for debugging ▶ You can also use logging to do this. ▶ It’s actually cleaner to use logging as ▶ One won’t have to go through all your code to remove the print statements. ▶ It also provides much more extra features which we will look at now. 2
  • 3.
    Why Use thelogging Module ▶ It keeps a record of the events that occur within a program ▶ It becomes difficult to distinguish between debugging output and normal program output because the two are mixed ▶ When using print() statements dispersed throughout code, there is no easy way to disable the ones that provide debugging output ▶ It becomes difficult to remove all the print() statements when you are done with debugging ▶ There is no log record that contains readily available diagnostic information 3
  • 4.
    Creating a SimpleLogger ▶ Creating a log with the logging module is easy and straight-forward. ▶ import logging ▶ ▶ # add filemode="w" to overwrite ▶ logging.basicConfig(filename="sample.log", level=logging.INFO) ▶ ▶ logging.debug("This is a debug message") ▶ logging.info("Informational message") ▶ logging.error("An error has happened!") 4
  • 5.
    Logging Exceptions ▶ Thelogging module can also log some exceptions to file or wherever you have it configured to log to. Here’s an example: ▶ import logging ▶ ▶ logging.basicConfig(filename="sample.log", level=logging.INFO) ▶ log = logging.getLogger("ex") ▶ ▶ try: ▶ raise RuntimeError ▶ except Exception, err: ▶ log.exception("Error!") 5
  • 6.
    Adding additional LogRecord attributes ▶We can make the log more informative by adding additional LogRecord attributes. ▶ import logging ▶ logging.basicConfig( ▶ filename="test.log", ▶ level=logging.DEBUG, ▶ format="%(asctime)s:%(levelname)s:%(message)s" ▶ ) 6
  • 7.
    Code with FormattedLog Stamp ▶ When we run the code with the added attribute, we’ll get new lines added to our test.log file ▶ that include the human-readable time stamp in addition to the level name of DEBUG and the associated messages that are passed into the logger as strings. 7
  • 8.
    Output ▶ Output ▶ DEBUG:root:Pizzacreated: Sicilian ($18) ▶ DEBUG:root:Made 5 Sicilian pizza(s) ▶ DEBUG:root:Ate 4 pizza(s) ▶ DEBUG:root:Pizza created: quattro formaggi ($16) ▶ DEBUG:root:Made 2 quattro formaggi pizza(s) ▶ DEBUG:root:Ate 2 pizza(s) ▶ 2017-05-01 16:28:54,593:DEBUG:Pizza created: Sicilian ($18) ▶ 2017-05-01 16:28:54,593:DEBUG:Made 5 Sicilian pizza(s) ▶ 2017-05-01 16:28:54,593:DEBUG:Ate 4 pizza(s) ▶ 2017-05-01 16:28:54,593:DEBUG:Pizza created: quattro formaggi ($16) ▶ 2017-05-01 16:28:54,593:DEBUG:Made 2 quattro formaggi pizza(s) ▶ 2017-05-01 16:28:54,593:DEBUG:Ate 2 pizza(s) 8
  • 9.
    Table of LoggingLevels ▶ As a developer, you can ascribe a level of importance to the event that is captured in the logger by adding a severity level. ▶ The severity levels are shown in the table in next slide. 9
  • 10.
    Table of LoggingLevels Level Numeric Value Function Used to CRITICAL 50 logging.critical() Show a serious error, the program may be unable to continue running ERROR 40 logging.error() Show a more serious problem WARNING 30 logging.warning() Indicate something unexpected happened, or could happen INFO 20 logging.info() Confirm that things are working as expected DEBUG 10 logging.debug() Diagnose problems, show detailed information 10
  • 11.
    Default Logging Level ▶The logging module sets the default level at WARNING ▶ So WARNING, ERROR, and CRITICAL will all be logged by default. ▶ In the example above, we modified the configuration to include the DEBUG level with the following code: ▶ logging.basicConfig(level=logging.DEBUG) 11
  • 12.