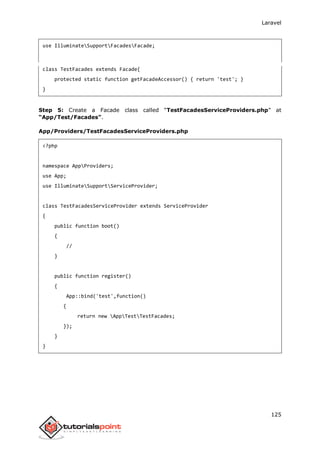
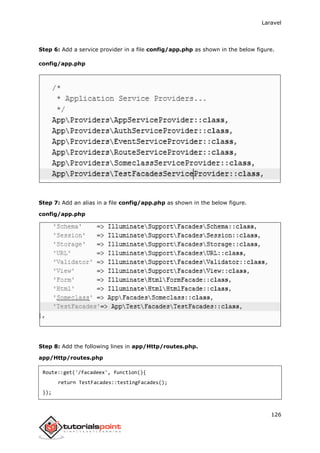
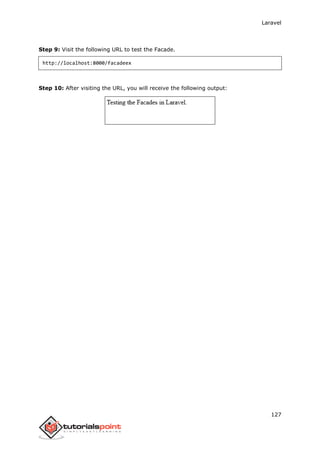
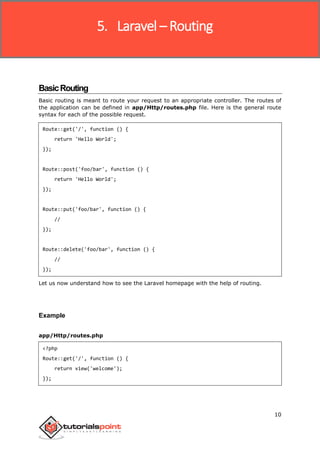
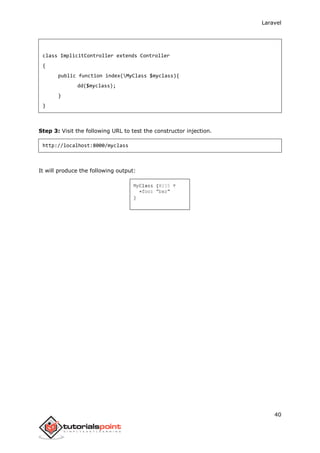
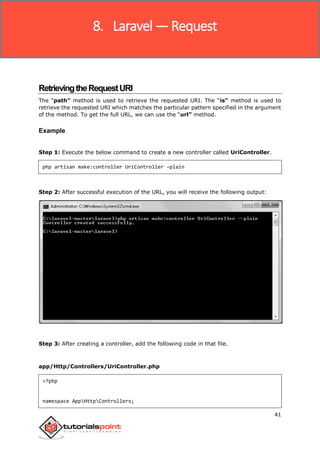
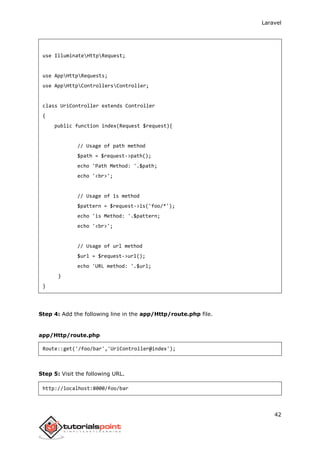
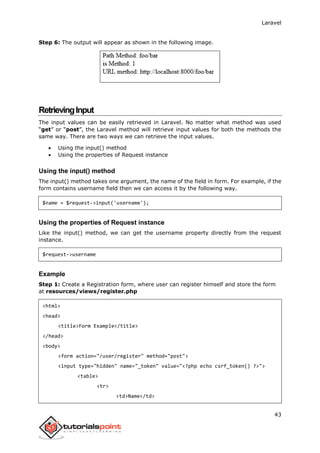
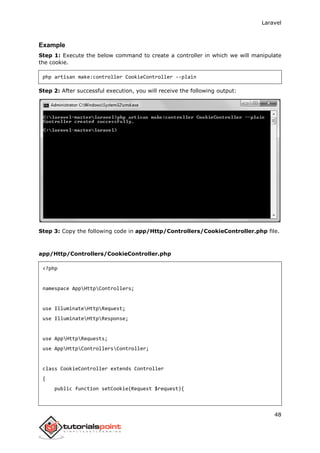
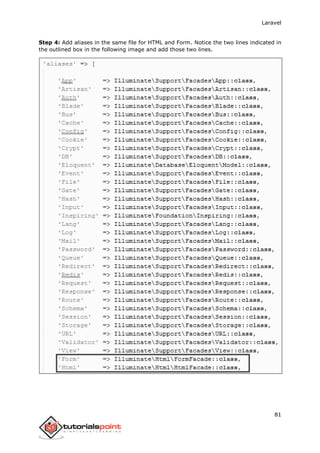
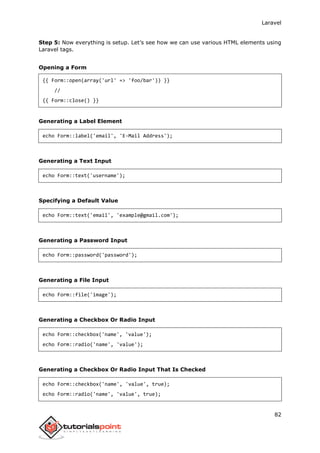
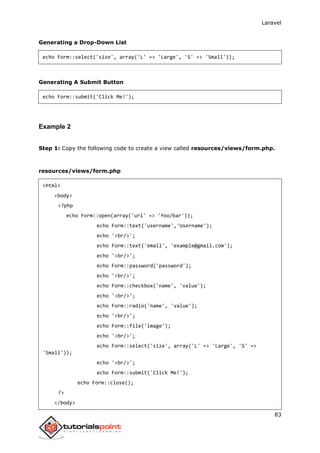
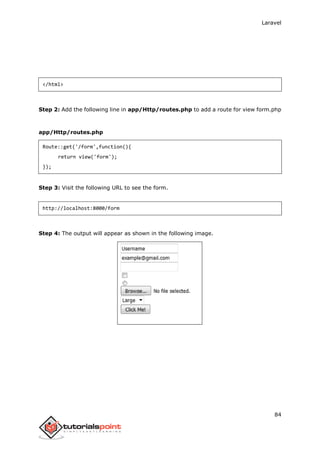
This document provides an overview and introduction to the Laravel PHP framework. It discusses Laravel's features and provides instructions on installing Laravel and understanding its core components like routing, middleware, controllers, requests, responses and views. It also demonstrates how to work with databases in Laravel, including inserting, retrieving, updating and deleting records. The document is intended to guide developers who are new to Laravel.

![Laravel
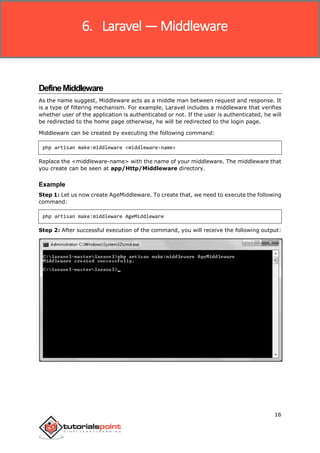
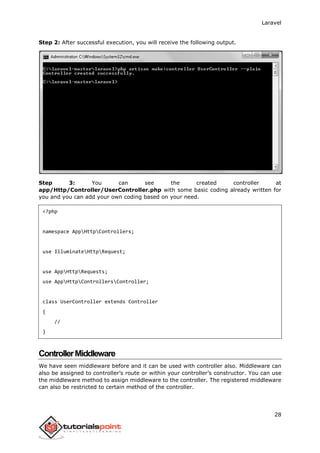
17
Step 3: AgeMiddlware will be created at app/Http/Middleware. The newly created
file will have the following code already created for you.
<?php
namespace AppHttpMiddleware;
use Closure;
class AgeMiddleware
{
public function handle($request, Closure $next)
{
return $next($request);
}
}
RegisterMiddleware
We need to register each and every middleware before using it. There are two types of
Middleware in Laravel.
Global Middleware
Route Middleware
The Global Middleware will run on every HTTP request of the application, whereas the
Route Middleware will be assigned to a specific route. The middleware can be registered
at app/Http/Kernel.php. This file contains two properties $middleware and
$routeMiddleware. $middleware property is used to register Global Middleware and
$routeMiddleware property is used to register route specific middleware.
To register the global middleware, list the class at the end of $middleware property.
protected $middleware = [
IlluminateFoundationHttpMiddlewareCheckForMaintenanceMode::class,
AppHttpMiddlewareEncryptCookies::class,
IlluminateCookieMiddlewareAddQueuedCookiesToResponse::class,
IlluminateSessionMiddlewareStartSession::class,
IlluminateViewMiddlewareShareErrorsFromSession::class,
AppHttpMiddlewareVerifyCsrfToken::class,
];](https://image.slidesharecdn.com/laraveltutorial-200907024346/85/Laravel-tutorial-23-320.jpg)
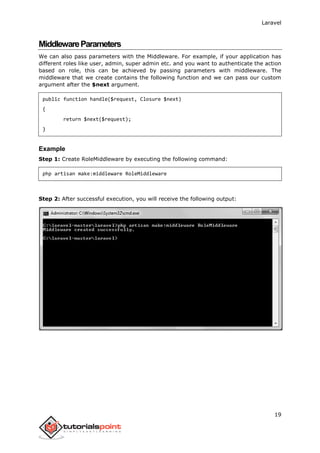
![Laravel
18
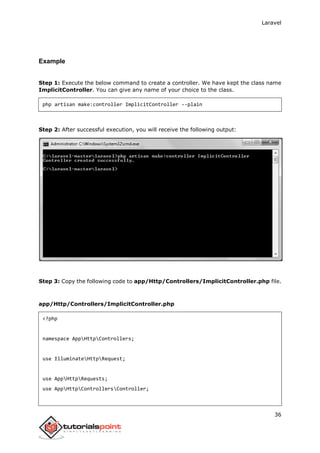
To register the route specific middleware, add the key and value to $routeMiddleware
property.
protected $routeMiddleware = [
'auth' => AppHttpMiddlewareAuthenticate::class,
'auth.basic' =>
IlluminateAuthMiddlewareAuthenticateWithBasicAuth::class,
'guest' => AppHttpMiddlewareRedirectIfAuthenticated::class,
];
Example
We have created AgeMiddleware in the previous example. We can now register it in
route specific middleware property. The code for that registration is shown below.
The following is the code for app/Http/Kernel.php:
<?php
namespace AppHttp;
use IlluminateFoundationHttpKernel as HttpKernel;
class Kernel extends HttpKernel
{
protected $middleware = [
IlluminateFoundationHttpMiddlewareCheckForMaintenanceMode::class,
AppHttpMiddlewareEncryptCookies::class,
IlluminateCookieMiddlewareAddQueuedCookiesToResponse::class,
IlluminateSessionMiddlewareStartSession::class,
IlluminateViewMiddlewareShareErrorsFromSession::class,
AppHttpMiddlewareVerifyCsrfToken::class,
];
protected $routeMiddleware = [
'auth' => AppHttpMiddlewareAuthenticate::class,
'auth.basic' => IlluminateAuthMiddlewareAuthenticateWithBasicAuth::class,
'guest' => AppHttpMiddlewareRedirectIfAuthenticated::class,
'Age' => AppHttpMiddlwareAgeMiddleware::class,
];
}](https://image.slidesharecdn.com/laraveltutorial-200907024346/85/Laravel-tutorial-24-320.jpg)
![Laravel
22
app/Http/routes.php
Route::get('role',[
'middleware' => 'Role:editor',
'uses' => 'TestController@index',
]);
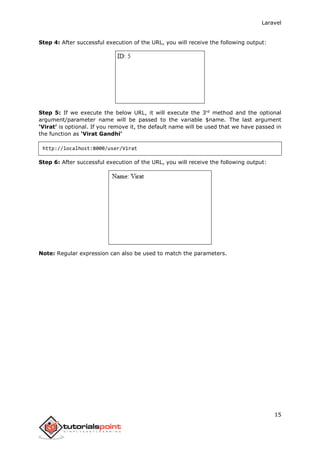
Step 9: Visit the following URL to test the Middleware with parameters
http://localhost:8000/role
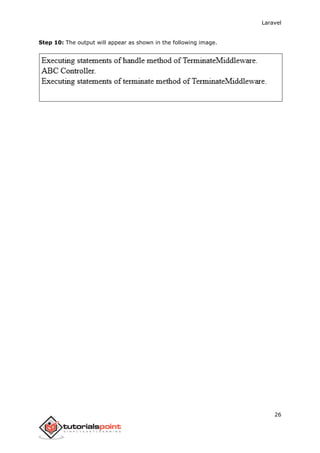
Step 10: The output will appear as shown in the following image.
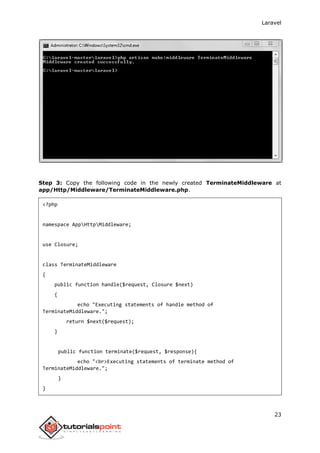
TerminableMiddleware
Terminable middleware performs some task after the response has been sent to the
browser. This can be accomplished by creating a middleware with “terminate” method
in the middleware. Terminable middleware should be registered with global middleware.
The terminate method will receive two arguments $request and $response. Terminate
method can be created as shown in the following code.
Example
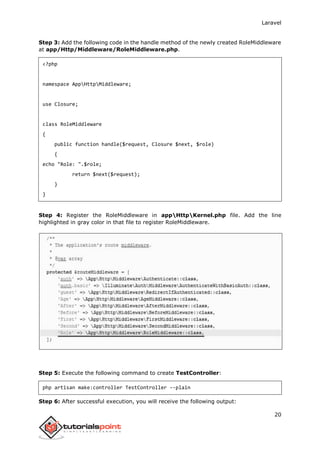
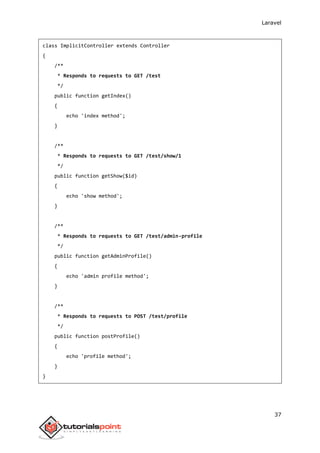
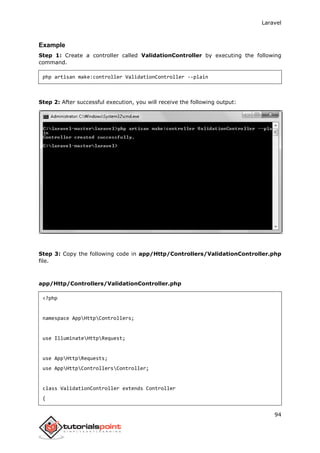
Step 1: Create TerminateMiddleware by executing the below command.
php artisan make:middleware TerminateMiddleware
Step 2: This will produce the following output:](https://image.slidesharecdn.com/laraveltutorial-200907024346/85/Laravel-tutorial-28-320.jpg)

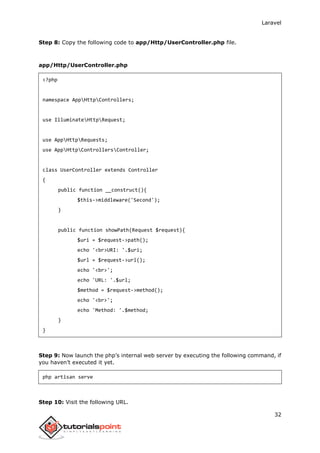
![Laravel
25
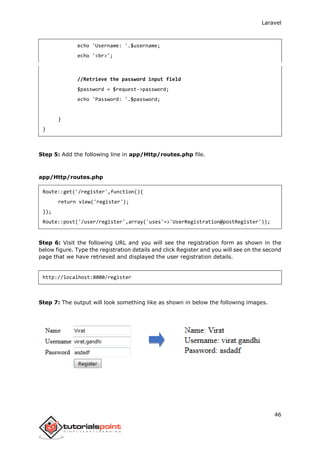
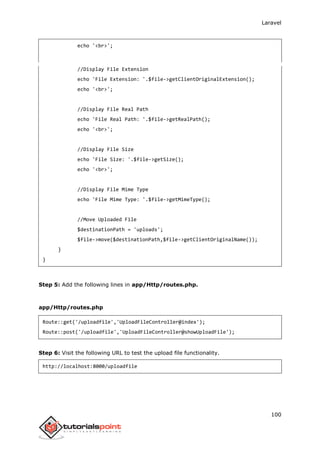
Step 7: Copy the following code to app/Http/ABCController.php file.
app/Http/ABCController.php
<?php
namespace AppHttpControllers;
use IlluminateHttpRequest;
use AppHttpRequests;
use AppHttpControllersController;
class ABCController extends Controller
{
public function index(){
echo "<br>ABC Controller.";
}
}
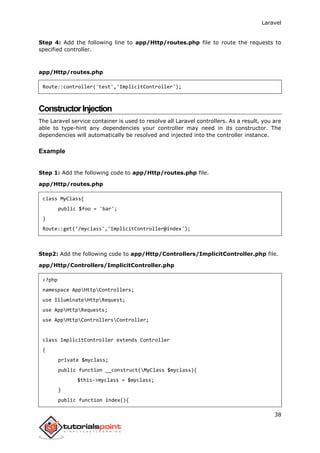
Step 8: Add the following line of code in app/Http/routes.php file.
app/Http/routes.php
Route::get('terminate',[
'middleware' => 'terminate',
'uses' => 'ABCController@index',
]);
Step 9: Visit the following URL to test the Terminable Middleware.
http://localhost:8000/terminate](https://image.slidesharecdn.com/laraveltutorial-200907024346/85/Laravel-tutorial-31-320.jpg)
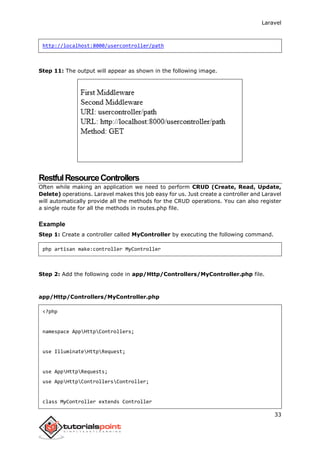
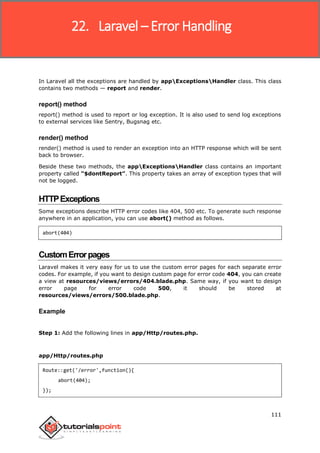
![Laravel
29
Assigning Middleware to Route
Route::get('profile', [
'middleware' => 'auth',
'uses' => 'UserController@showProfile'
]);
Here we are assigning auth middleware to UserController in profile route.
Assigning Middleware within Controller’s constructor:
<?php
namespace AppHttpControllers;
use IlluminateHttpRequest;
use AppHttpRequests;
use AppHttpControllersController;
class UserController extends Controller
{
public function __construct(){
$this->middleware('auth');
}
}
Here we are assigning auth middleware using the middleware method in the
UserController’s constructor.
Example
Step 1: Add the following lines to the app/Http/routes.php file and save it.
routes.php
<?php
Route::get('/usercontroller/path',[
'middleware' => 'First',
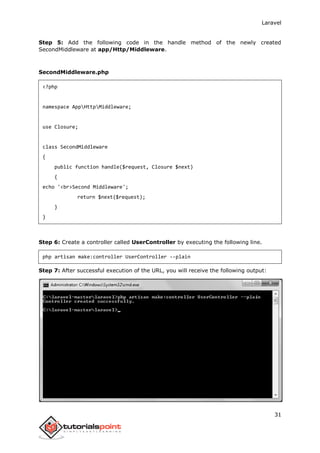
'uses' => 'UserController@showPath'](https://image.slidesharecdn.com/laraveltutorial-200907024346/85/Laravel-tutorial-35-320.jpg)
![Laravel
30
]);
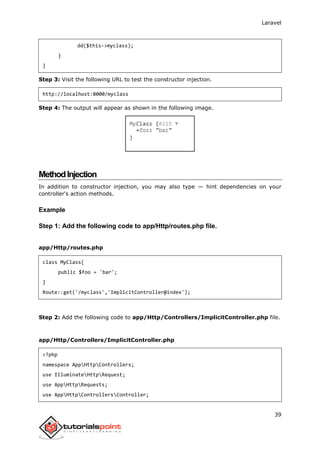
Step 2: Create a middleware called FirstMiddleware by executing the following line.
php artisan make:middleware FirstMiddleware
Step 3: Add the following code in the handle method of the newly created FirstMiddleware
at app/Http/Middleware.
FirstMiddleware.php
<?php
namespace AppHttpMiddleware;
use Closure;
class FirstMiddleware
{
public function handle($request, Closure $next)
{
echo '<br>First Middleware';
return $next($request);
}
}
Step 4: Create a middleware called SecondMiddleware by executing the following line.
php artisan make:middleware SecondMiddleware](https://image.slidesharecdn.com/laraveltutorial-200907024346/85/Laravel-tutorial-36-320.jpg)

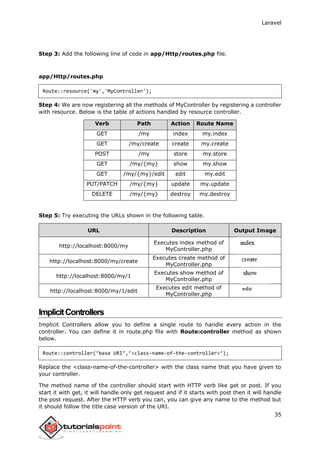
![Laravel
53
JSONResponse
JSON response can be sent using the json method. This method will automatically set the
Content-Type header to application/json. The json method will automatically convert the
array into appropriate json response.
Example
Step 1: Add the following line in app/Http/routes.php file.
app/Http/routes.php
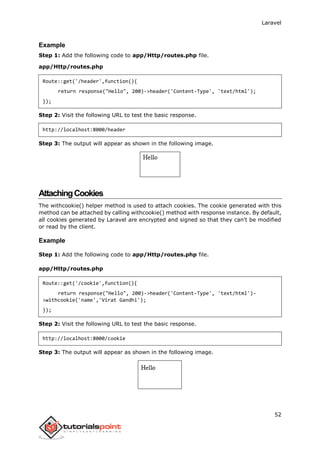
Route::get('json',function(){
return response()->json(['name' => 'Virat Gandhi', 'state' => 'Gujarat']);
});
Step 2: Visit the following URL to test the json response.
http://localhost:8000/json
Step 3: The output will appear as shown in the following image.](https://image.slidesharecdn.com/laraveltutorial-200907024346/85/Laravel-tutorial-59-320.jpg)
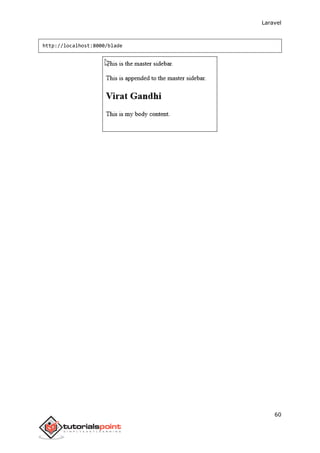
![Laravel
55
PassingDatatoViews
While building application it may be required to pass data to the views. Pass an array to
view helper function. After passing an array, we can use the key to get the value of that
key in the HTML file.
Example
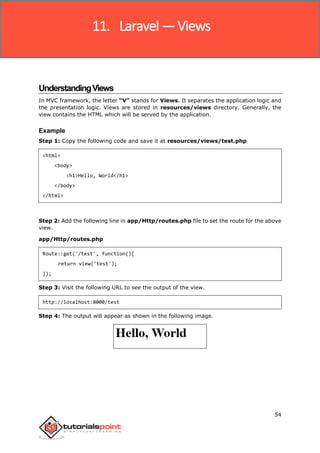
Step 1: Copy the following code and save it at resources/views/test.php
<html>
<body>
<h1><?php echo $name; ?></h1>
</body>
</html>
Step 2: Add the following line in app/Http/routes.php file to set the route for the above
view.
app/Http/routes.php
Route::get('/test', function(){
return view('test',[‘name’=>’Virat Gandhi’]);
});
Step 3: The value of the key name will be passed to test.php file and $name will be
replaced by that value.
Step 4: Visit the following URL to see the output of the view.
http://localhost:8000/test
Step 5: The output will appear as shown in the following image.
SharingDatawithallViews
We have seen how we can pass data to views but at times, there is a need to pass data
to all the views. Laravel makes this simpler. There is a method called “share()” which
can be used for this purpose. The share() method will take two arguments, key and value.
Typically share() method can be called from boot method of service provider. We can use
any service provider, AppServiceProvider or our own service provider.](https://image.slidesharecdn.com/laraveltutorial-200907024346/85/Laravel-tutorial-61-320.jpg)
![Laravel
61
RedirectingtoNamedRoutes
Named route is used to give specific name to a route. The name can be assigned using
the “as” array key.
Route::get('user/profile', ['as' => 'profile', function () {
//
}]);
Note: Here, we have given the name “profile” to a route “user/profile”.
Example
Step 1: Create a view called test.php and save it at resources/views/test.php.
<html>
<body>
<h1>Example of Redirecting to Named Routes</h1>
</body>
</html>
Step 2: In routes.php, we have set up the route for test.php file. We have renamed it to
“testing”. We have also set up another route “redirect” which will redirect the request
to the named route “testing”.
app/Http/routes.php
Route::get('/test', ['as'=>'testing',function(){
return view('test2');
}]);
Route::get('redirect',function(){
return redirect()->route('testing');
});
Step 3: Visit the following URL to test the named route example.
http://localhost:8000/redirect
Step 4: After execution of the above URL, you will be redirected to
http://localhost:8000/test as we are redirecting to the named route “testing”.
12. Laravel — Redirections](https://image.slidesharecdn.com/laraveltutorial-200907024346/85/Laravel-tutorial-67-320.jpg)
![Laravel
62
Step 5: After successful execution of the URL, you will receive the following output:
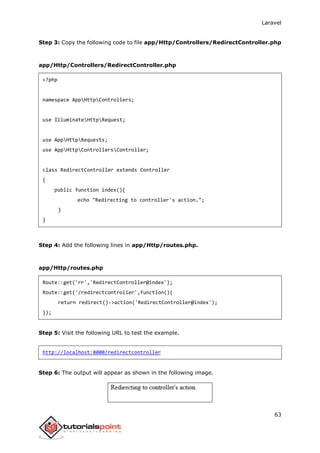
RedirectingtoControllerActions
Not only named route but we can also redirect to controller actions. We need to simply
pass the controller and name of the action to the action method as shown in the following
example. If you want to pass a parameter, you can pass it as second argument of action
method.
return redirect()->action(‘NameOfController@methodName’,[parameters]);
Example
Step 1: Execute the below command to create a controller called RedirectController.
php artisan make:controller RedirectController --plain
Step 2: After successful execution, you will receive the following output:](https://image.slidesharecdn.com/laraveltutorial-200907024346/85/Laravel-tutorial-68-320.jpg)
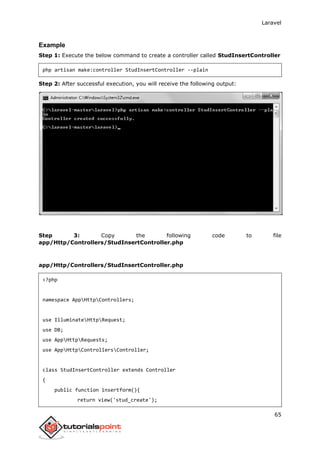
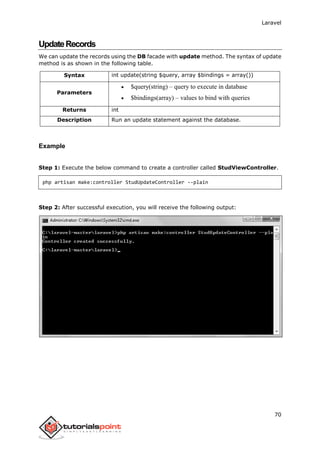
![Laravel
66
}
public function insert(Request $request){
$name = $request->input('stud_name');
DB::insert('insert into student (name) values(?)',[$name]);
echo "Record inserted successfully.<br/>";
echo '<a href="/insert">Click Here</a> to go back.';
}
}
Step 4: Create a view file called resources/views/stud_create.php and copy the
following code in that file.
resources/views/stud_create.php
<html>
<head><title>Student Management | Add</title></head>
<body>
<form action="/create" method="post">
<input type="hidden" name="_token" value="<?php echo csrf_token(); ?>">
<table>
<tr>
<td>Name</td>
<td><input type='text' name='stud_name' /></td>
</tr>
<tr>
<td colspan='2'><input type='submit' value="Add student" /></td>
</tr>
</table>
</form>
</body>
</html>
Step 5: Add the following lines in app/Http/routes.php.](https://image.slidesharecdn.com/laraveltutorial-200907024346/85/Laravel-tutorial-72-320.jpg)
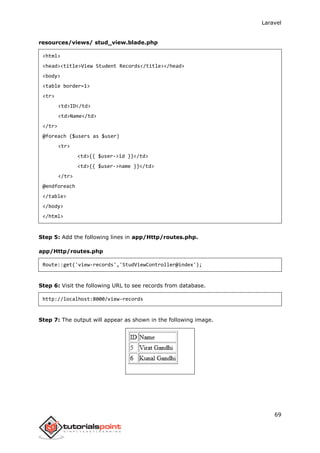
![Laravel
68
Step 3: Copy the following code to file
app/Http/Controllers/StudViewController.php
app/Http/Controllers/StudViewController.php
<?php
namespace AppHttpControllers;
use IlluminateHttpRequest;
use DB;
use AppHttpRequests;
use AppHttpControllersController;
class StudViewController extends Controller
{
public function index(){
$users = DB::select('select * from student');
return view('stud_view',['users'=>$users]);
}
}
Step 4: Create a view file called resources/views/stud_view.blade.php and copy the
following code in that file.](https://image.slidesharecdn.com/laraveltutorial-200907024346/85/Laravel-tutorial-74-320.jpg)
![Laravel
71
Step 3: Copy the following code to file app/Http/Controllers/
StudUpdateController.php
app/Http/Controllers/StudUpdateController.php
<?php
namespace AppHttpControllers;
use IlluminateHttpRequest;
use DB;
use AppHttpRequests;
use AppHttpControllersController;
class StudUpdateController extends Controller
{
public function index(){
$users = DB::select('select * from student');
return view('stud_edit_view',['users'=>$users]);
}
public function show($id)
{
$users = DB::select('select * from student where id = ?',[$id]);
return view('stud_update',['users'=>$users]);
}
public function edit(Request $request,$id)
{
$name = $request->input('stud_name');
DB::update('update student set name = ? where id = ?',[$name,$id]);
echo "Record updated successfully.<br/>";
echo '<a href="/edit-records">Click Here</a> to go back.';
}
}](https://image.slidesharecdn.com/laraveltutorial-200907024346/85/Laravel-tutorial-77-320.jpg)
![Laravel
72
Step 4: Create a view file called resources/views/stud_edit_view.blade.php and
copy the following code in that file.
resources/views/ stud_edit_view.blade.php
<html>
<head><title>View Student Records</title></head>
<body>
<table border="1">
<tr>
<td>ID</td>
<td>Name</td>
<td>Edit</td>
</tr>
@foreach ($users as $user)
<tr>
<td>{{ $user->id }}</td>
<td>{{ $user->name }}</td>
<td><a href='edit/{{ $user->id }}'>Edit</a></td>
</tr>
@endforeach
</table>
</body>
</html>
Step 5: Create another view file called resources/views/stud_update.php and copy
the following code in that file.
resources/views/stud_update.php
<html>
<head><title>Student Management | Edit</title></head>
<body>
<form action="/edit/<?php echo $users[0]->id; ?>" method="post">
<input type="hidden" name="_token" value="<?php echo csrf_token(); ?>">
<table>
<tr>
<td>Name</td>
<td><input type='text' name='stud_name' value='<?php echo
$users[0]->name; ?>' /></td>](https://image.slidesharecdn.com/laraveltutorial-200907024346/85/Laravel-tutorial-78-320.jpg)
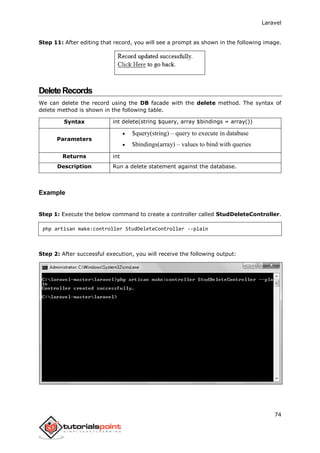
![Laravel
75
Step 3: Copy the following code to file
app/Http/Controllers/StudDeleteController.php
app/Http/Controllers/StudDeleteController.php
<?php
namespace AppHttpControllers;
use IlluminateHttpRequest;
use DB;
use AppHttpRequests;
use AppHttpControllersController;
class StudDeleteController extends Controller
{
public function index(){
$users = DB::select('select * from student');
return view('stud_delete_view',['users'=>$users]);
}
public function destroy($id)
{
DB::delete('delete from student where id = ?',[$id]);
echo "Record deleted successfully.<br/>";
echo '<a href="/delete-records">Click Here</a> to go back.';
}
}
Step 4: Create a view file called resources/views/stud_delete_view.blade.php and
copy the following code in that file.
resources/views/stud_delete_view.blade.php
<html>
<head><title>View Student Records</title></head>
<body>
<table border="1">
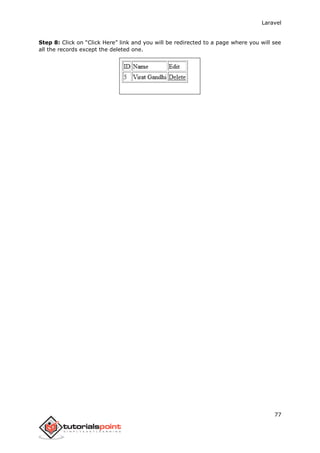
<tr>](https://image.slidesharecdn.com/laraveltutorial-200907024346/85/Laravel-tutorial-81-320.jpg)
![Laravel
85
Localization feature of Laravel supports different language to be used in application. You
need to store all the strings of different language in a file and these files are stored at
resources/views directory. You should create a separate directory for each supported
language. All the language files should return an array of keyed strings as shown below.
<?php
return [
'welcome' => 'Welcome to the application'
];
Example
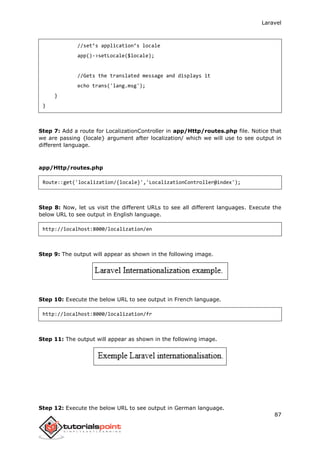
Step 1: Create 3 files for languages — English, French, and German. Save English file
at resources/lang/en/lang.php
<?php
return [
'msg' => 'Laravel Internationalization example.'
];
?>
Step 2: Save French file at resources/lang/fr/lang.php.
<?php
return [
'msg' => 'Exemple Laravel internationalisation.'
];
?>
Step 3: Save German file at resources/lang/de/lang.php.
<?php
return [
'msg' => 'Laravel Internationalisierung Beispiel.'
];
?>
16. Laravel – Localization](https://image.slidesharecdn.com/laraveltutorial-200907024346/85/Laravel-tutorial-91-320.jpg)
![Laravel
95
public function showform(){
return view('login');
}
public function validateform(Request $request){
print_r($request->all());
$this->validate($request,[
'username'=>'required|max:8',
'password'=>'required'
]);
}
}
Step 4: Create a view file called resources/views/login.blade.php and copy the
following code in that file.
resources/views/login.blade.php
<html>
<head>
<title>Login Form</title>
</head>
<body>
@if (count($errors) > 0)
<div class="alert alert-danger">
<ul>
@foreach ($errors->all() as $error)
<li>{{ $error }}</li>
@endforeach
</ul>
</div>
@endif
<?php
echo Form::open(array('url'=>'/validation'));
?>
<table border='1'>
<tr>](https://image.slidesharecdn.com/laraveltutorial-200907024346/85/Laravel-tutorial-101-320.jpg)

![Laravel
102
Laravel uses free feature-rich library “SwiftMailer” to send emails. Using the library
function, we can easily send emails without too many hassles. The e-mail templates are
loaded in the same way as views, which means you can use the Blade syntax and inject
data into your templates. The following is the syntax of the send function.
Syntax void send(string|array $view, array $data, Closure|string $callback)
Parameters
$view(string|array) – name of the view that contains email
message
$data(array) – array of data to pass to view
$callback – a Closure callback which receives a message
instance, allowing you to customize the recipients, subject, and
other aspects of the mail message
Returns nothing
Description Sends email.
In the third argument, the $callback closure received message instance and with that
instance we can also call the following functions and alter the message as shown below.
$message->subject('Welcome to the Tutorials Point');
$message->from('email@example.com', 'Mr. Example');
$message->to('email@example.com', 'Mr. Example');
Some of the less common methods include:
$message->sender('email@example.com', 'Mr. Example');
$message->returnPath('email@example.com');
$message->cc('email@example.com', 'Mr. Example');
$message->bcc('email@example.com', 'Mr. Example');
$message->replyTo('email@example.com', 'Mr. Example');
$message->priority(2);
To attach or embed files, you can use the following methods:
$message->attach('path/to/attachment.txt');
$message->embed('path/to/attachment.jpg');
Mail can be sent as HTML or text. You can indicate the type of mail that you want to send
in the first argument by passing an array as shown below. The default type is HTML. If
you want to send plain text mail then use the following syntax.
Mail::send([‘text’=>’text.view’], $data, $callback);
20. Laravel – Sending Email](https://image.slidesharecdn.com/laraveltutorial-200907024346/85/Laravel-tutorial-108-320.jpg)
![Laravel
104
Step 4: After successful execution, you will receive the following output:
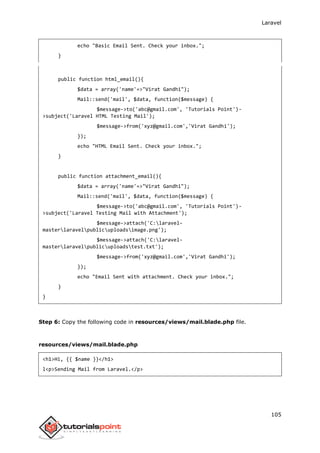
Step 5: Copy the following code in app/Http/Controllers/MailController.php file.
app/Http/Controllers/MailController.php
<?php
namespace AppHttpControllers;
use IlluminateHttpRequest;
use Mail;
use AppHttpRequests;
use AppHttpControllersController;
class MailController extends Controller
{
public function basic_email(){
$data = array('name'=>"Virat Gandhi");
Mail::send(['text'=>'mail'], $data, function($message) {
$message->to('abc@gmail.com', 'Tutorials Point')-
>subject('Laravel Basic Testing Mail');
$message->from('xyz@gmail.com','Virat Gandhi');
});](https://image.slidesharecdn.com/laraveltutorial-200907024346/85/Laravel-tutorial-110-320.jpg)
![Laravel
109
<?php
echo Form::button('Replace Message',['onClick'=>'getMessage()']);
?>
</body>
</html>
Step 2: Create a controller called AjaxController by executing the following command.
php artisan make:controller AjaxController --plain
Step 3: After successful execution, you will receive the following output:
Step 4: Copy the following code in app/Http/Controllers/AjaxController.php file.
app/Http/Controllers/AjaxController.php
<?php
namespace AppHttpControllers;
use IlluminateHttpRequest;
use AppHttpRequests;
use AppHttpControllersController;](https://image.slidesharecdn.com/laraveltutorial-200907024346/85/Laravel-tutorial-115-320.jpg)
![Laravel
116
use Event;
class CreateStudentController extends Controller
{
public function insertform(){
return view('stud_add');
}
public function insert(Request $request){
$name = $request->input('stud_name');
DB::insert('insert into student (name) values(?)',[$name]);
echo "Record inserted successfully.<br/>";
echo '<a href="/event">Click Here</a> to go back.';
//firing an event
Event::fire(new StudentAdded($name));
}
}
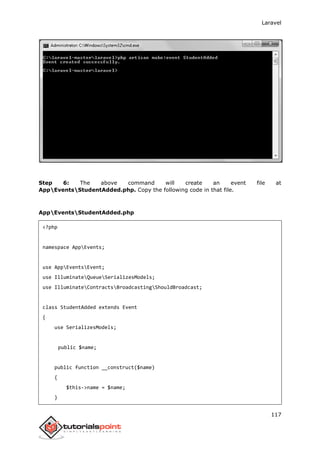
Step 4: Create an event called StudentAdded by executing the following command.
php artisan make:event StudentAdded
Step 5: After successful execution, you will receive the following output:](https://image.slidesharecdn.com/laraveltutorial-200907024346/85/Laravel-tutorial-122-320.jpg)
![Laravel
118
public function broadcastOn()
{
return [];
}
}
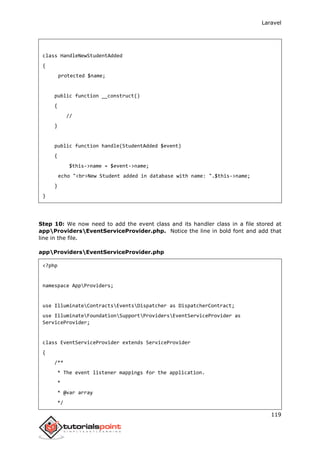
Step 7: Create an event handler called HandleNewStudentAdded by executing the
following command.
php artisan handler:event HandlerNewStudentAdded --event=StudentAdded
Step 8: After successful execution, you will receive the following output:
Step 9: The above command will create an event handler file at
appHandlersEventsHandleNewStudentAdded.php. Copy the following code in
that file.
appHandlersEventsHandleNewStudentAdded.php
<?php
namespace AppHandlersEvents;
use AppEventsStudentAdded;
use IlluminateQueueInteractsWithQueue;
use IlluminateContractsQueueShouldQueue;](https://image.slidesharecdn.com/laraveltutorial-200907024346/85/Laravel-tutorial-124-320.jpg)
![Laravel
120
protected $listen = [
'AppEventsSomeEvent' => [
'AppListenersEventListener',
],
'AppEventsStudentAdded' => [
'AppHandlersEventsHandleNewStudentAdded',
],
];
/**
* Register any other events for your application.
*
* @param IlluminateContractsEventsDispatcher $events
* @return void
*/
public function boot(DispatcherContract $events)
{
parent::boot($events);
//
}
}
Step 11: Add the following lines in app/Http/routes.php.
app/Http/routes.php
Route::get('event','CreateStudentController@insertform');
Route::post('addstudent','CreateStudentController@insert');
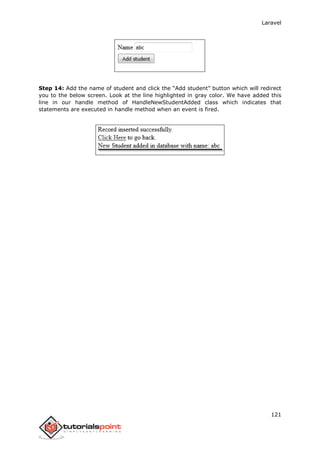
Step 12: Visit the following URL to test the event.
http://localhost:8000/event
Step 13: After visiting the above URL, you will receive the following output:](https://image.slidesharecdn.com/laraveltutorial-200907024346/85/Laravel-tutorial-126-320.jpg)