This document provides instructions for removing a transmission from several tractor models. It details disconnecting various components like lines, hoses, wiring and brackets to separate the transmission from the engine and frame. Lifting fixtures are installed to the transmission so it can be safely raised out of position once the mounting fasteners are removed. Precautions are given to properly support the tractor with a splitting stand before fully separating the transmission.
TOYOTA 8FBEKT16 Forklift Service Repair Manual.pdfxrnn810845
This manual provides service procedures for Toyota forklifts models 8FBET15-20, 8FBEKT16,18, and 8FBMT15-20. It covers topics such as vehicle components, drive unit removal and installation, drive unit disassembly and reassembly procedures, and points of inspection. The manual is intended to enable quick and correct servicing of these forklift models. It notes that specifications and designs may have changed by November 2010 and any updates would be provided in Toyota service newsletters.
Toyota 7FBEF20 Electric Forklift Trucks Service Repair Manual.pdfxrnn810845
The document provides information about the new Toyota 7FBEF 15-20 forklift models, including:
1. The development objectives were to address disparities compared to competitors' models and focus on environmental concerns by adopting an AC drive system.
2. Key features of the new models include the AC motor drive system, power select function, improved efficiency operation hours, easy ingress/egress, reduced maintenance costs, and safety functions from the 7FB series.
3. Major differences from previous models include changes to dimensions, new AC motors and controller, steering synchronizer, increased head clearance, and rear lamp location.
Toyota 7FBEF18 Electric Forklift Trucks Service Repair Manual.pdfxrnn810845
The document provides information about the new Toyota 7FBEF15-20 forklift models, including:
1. The development objectives were to address disparities compared to competitors' models and focus on environmental concerns by adopting an AC drive system.
2. Key features of the new models include the AC drive system, power select function, improved efficiency operation hours, easy ingress/egress, reduced maintenance costs, and safety functions from the 7FB series.
3. Major differences from previous models include changes to dimensions, new AC motors and controller, steering synchronizer, increased head clearance, and rear lamp location.
Toyota 7FBEF16 Electric Forklift Trucks Service Repair Manual.pdfxrnn810845
The document provides information about the new Toyota forklift 7FBEF15 to 20 models, including:
1. The development objectives were to address disparities compared to competitors' models and focus on environmental concerns by adopting an AC drive system.
2. Major features of the new models include the AC motor drive system, power select function, improved efficiency operation hours, easy ingress/egress, and reduced maintenance costs.
3. The new models have larger dimensions than the previous models, AC motors instead of DC, and additional safety functions from the 7FB series.
Toyota 7FBEF15 Electric Forklift Trucks Service Repair Manual.pdfxrnn810845
The document provides information about the new Toyota forklift 7FBEF15 to 20 models, including:
1. The development objectives were to address disparities compared to competitors' models and focus on battery vehicles due to environmental concerns.
2. Key features of the new models include adopting an AC motor drive system for improved performance, a power select function for different operation modes, and a power keep function for longer efficient operation hours.
3. Major differences from previous models include changes to improve ingress/egress, increased maintenance cost reduction due to no motor brushes or contactors, and new safety functions from the 7FB series.
Toyota 2TE18 Electric Powered Towing Tractor Service Repair Manual.pdfxrnn810845
This document provides maintenance and repair procedures for Toyota electric towing tractors models 2TE15 and 2TE18. It includes sections on batteries, chargers, controllers, displays, electrical troubleshooting, motors, drive units, axles, suspension, steering, brakes and bodies. The document outlines operating tips, component weights, torque specifications, lubrication charts and periodic maintenance procedures. Maintenance should be performed according to the procedures outlined to properly service the towing tractors.
Toyota 2TE15 Electric Powered Towing Tractor Service Repair Manual.pdfxrnn810845
This document is a service manual for the Toyota Electric Powered Towing Tractor models 2TE15 and 2TE18. It contains maintenance, specifications, and repair procedures for the chassis, body, and other components of the vehicles. The manual provides instructions for inspection, disassembly, component repair/replacement, and reassembly of the vehicles. It also includes sections on general information, specifications, troubleshooting, lubrication, and periodic maintenance.
Komatsu WA270PT-3 Wheel Loader Service Repair Manual SN WA270H30051 and up.pdfxrnn810845
This document provides instructions for servicing a wheel loader, including:
1) Removing and installing the engine hood, which requires disconnecting wiring, hoses, and other components.
2) Removing and installing the engine, which has many steps including draining fluids, removing wiring, hoses, and other attachments to the engine.
3) Additional sections provide instructions for removing and installing other components like the radiator, fuel tank, and counterweight. Detailed steps are provided for safely supporting and draining components before removal and reinstalling them.
Komatsu WA270-3 Wheel Loader Service Repair Manual SN WA270H20051 and up.pdfxrnn810845
This document provides instructions for servicing a wheel loader, including:
1) Removing and installing the engine hood, which requires disconnecting wiring, hoses, and other components.
2) Removing and installing the engine, which has many steps including draining fluids, removing wiring, hoses, and mounting components.
3) Procedures for removing and installing other major components like the radiator, fuel tank, and counterweight. Detailed safety precautions and instructions are provided.
Komatsu SAA6D102E-2 Diesel Engine Service Repair Manual.pdfxrnn810845
This shop manual provides safety precautions and maintenance techniques for Komatsu diesel engines. Proper service and repair is extremely important for safe machine operation. The manual describes servicing and repair techniques recommended by Komatsu for the current 100E-6 series and describes safety symbols used throughout. Workers should always follow the safety precautions given and take necessary actions to deal with any dangerous situations that may arise.
Komatsu SAA4D102E-2 Diesel Engine Service Repair Manual.pdfxrnn810845
This shop manual provides safety precautions and maintenance techniques for Komatsu diesel engines. Proper service and repair is extremely important for safe machine operation. The manual describes servicing and repair techniques recommended by Komatsu for the current 100E-6 series and describes safety symbols used throughout. Workers should always follow the safety precautions given and take necessary actions to deal with any dangerous situations that may arise.
Komatsu SA6D102E-1 Diesel Engine Service Repair Manual.pdfxrnn810845
This shop manual provides safety precautions and maintenance techniques for Komatsu diesel engines. Proper service and repair is extremely important for safe machine operation. The manual describes servicing and repair techniques recommended by Komatsu for the current 100E-6 series and describes safety symbols used throughout. Workers should always follow the safety precautions given and take necessary actions to deal with any dangerous situations that may arise.
Komatsu S6D102E-1 Diesel Engine Service Repair Manual.pdfxrnn810845
This shop manual provides safety precautions and maintenance techniques for Komatsu diesel engines. Proper service and repair is extremely important for safe machine operation. The manual describes servicing and repair techniques recommended by Komatsu for the current 10E-1 series and adds descriptions for the 100E-1 series. Workers should always wear safety glasses and helmets when carrying out any operations or repairs.
Komatsu S4D102E-1 Diesel Engine Service Repair Manual.pdfxrnn810845
This shop manual provides safety precautions and maintenance techniques for Komatsu diesel engines. Proper service and repair is extremely important for safe machine operation. The manual describes servicing and repair techniques recommended by Komatsu for the current 10E-1 series and adds descriptions for the 100E-1 series. Workers should always follow the safety symbols and carefully read all instructions before operating machines.
KOBELCO 80CS-2 ACERA HYDRAULIC EXCAVATOR Service Repair Manual.pdfxrnn810845
This document is a service manual that provides instructions for maintenance, repair, and troubleshooting of hydraulic excavators. It contains 7 sections: specifications, maintenance, systems, disassembly, troubleshooting, engine, and installation of optional attachments. The outline emphasizes general safety precautions for working on the equipment, including preparing the work area, using proper tools and lifting techniques, relieving hydraulic pressures, and handling electrical components. It also introduces the international system of units used in specifications.
John Deere 8335R Tractors Service Repair Technical Manual (TM110319).pdfxrnn810845
This document provides instructions for removing a transmission from several tractor models. It outlines over 80 steps to disconnect lines, brackets, wiring and other components to separate the transmission from the engine and mid-frame. Precise installation of a splitting stand and lifting fixture are described to safely support the tractor during disassembly.
John Deere 8310R Tractors Service Repair Technical Manual (TM110319).pdfxrnn810845
This document provides instructions for removing a transmission from several tractor models. It outlines over 80 steps to disconnect lines, brackets, wiring and other components to separate the transmission from the engine and mid-frame. Precise installation of a splitting stand and lifting fixture are described to safely support the tractor during disassembly.
John Deere 8285R Tractors Service Repair Technical Manual (TM110319).pdfxrnn810845
This document provides instructions for removing a transmission from several tractor models. It outlines over 80 steps to disconnect lines, brackets, wiring and other components to separate the transmission from the engine and mid-frame. Precise installation of a splitting stand and lifting fixture are described to safely support the tractor during disassembly.
John Deere 8260R Tractors Service Repair Technical Manual (TM110319).pdfxrnn810845
This document provides instructions for removing a transmission from several tractor models. It outlines over 80 steps to disconnect lines, brackets, wiring harnesses and other components to separate the transmission from the engine and mid-frame. Precision tools like a transmission lifting fixture are used to safely support and maneuver the heavy transmission during the removal process. Detailed photos illustrate each step to ensure the transmission can be removed without damage to any surrounding components.
John Deere 8235R Tractors Service Repair Technical Manual (TM110319).pdfxrnn810845
This document provides instructions for removing a transmission from several tractor models. It outlines over 80 steps to disconnect lines, brackets, wiring and other components to separate the transmission from the engine and mid-frame. Precise installation of a splitting stand and lifting fixture are described to safely support the tractor during disassembly.
John Deere 6130D (Tier 0 - Tier 3Stage IIIA) Tractors Service Repair Technica...xrnn810845
The document provides instructions for removing and installing a final drive assembly on a tractor. It involves draining the oil, removing mounting hardware, using lifting eyes to remove the assembly, cleaning mating surfaces, applying sealant, and reinstalling mounting hardware. The process is reversed to install the final drive assembly. Proper torque specifications are listed for fasteners.
John Deere 6125D (Tier 0 - Tier 3Stage IIIA) Tractors Service Repair Technica...xrnn810845
The document provides instructions for removing and installing a final drive assembly on a tractor. It involves draining the oil, removing mounting hardware, using lifting equipment to remove the assembly, cleaning mating surfaces, applying sealant, and reinstalling the assembly. The process is reversed to install the final drive assembly, ensuring proper torque specifications are followed.
John Deere 6115D (Tier 0 - Tier 3Stage IIIA) Tractors Service Repair Technica...xrnn810845
The document provides instructions for removing and installing a final drive assembly on a tractor. It involves draining the oil, removing mounting hardware, using lifting equipment to remove the assembly, cleaning mating surfaces, applying sealant, and reinstalling the assembly. The process is reversed to install the final drive assembly, ensuring proper torque specifications are followed.
John Deere 6110D (Tier 0 - Tier 3Stage IIIA) Tractors Service Repair Technica...xrnn810845
The document provides instructions for removing and installing a final drive assembly on a tractor. It involves draining the oil, removing mounting hardware, using lifting equipment to remove the assembly, cleaning mating surfaces, applying sealant, and reinstalling the assembly. The process is reversed to install the final drive assembly, ensuring proper torque specifications are followed.
John Deere 6100D (Tier 0 - Tier 3Stage IIIA) Tractors Service Repair Technica...xrnn810845
The document provides instructions for removing and installing a final drive assembly on a tractor. It involves draining the oil, removing mounting hardware, using lifting equipment to remove the assembly, cleaning mating surfaces, applying sealant, and reinstalling the assembly. The process is reversed to install the final drive assembly, ensuring proper torque specifications are followed.
John Deere 315D Side Shift Loader Service Repair Technical Manual (TM1497).pdfxrnn810845
This document provides instructions for assembling the input shaft and forward clutch of a backhoe loader reverser. The steps include installing bearings, packings, snap rings, pressure plates, disks, springs, and sealing rings. Clearances and thicknesses are specified. Proper alignment of keys and splines is important. Lubrication with petroleum jelly is noted to prevent damage to sealing rings during assembly.
John Deere 310D Backhoe Loaders Service Repair Technical Manual (TM1497).pdfxrnn810845
This document provides instructions for assembling the input shaft and forward clutch of a backhoe loader reverser. The steps include installing bearings, packings, snap rings, pressure plates, disks, springs, and sealing rings. Clearances and thicknesses are specified. Proper alignment of keys and splines is important. Lubrication with petroleum jelly is noted to prevent damage to sealing rings during assembly.
John Deere 300D Backhoe Loaders Service Repair Technical Manual (TM1497).pdfxrnn810845
This document provides instructions for assembling the input shaft and forward clutch of a backhoe loader reverser. The steps include installing bearings, packings, snap rings, pressure plates, disks, springs, and sealing rings. Clearances and thicknesses are specified. Proper alignment of keys and splines is important. Lubrication with petroleum jelly is noted to prevent damage to sealing rings during assembly.
EV Charging at MFH Properties by Whitaker JamiesonForth
Whitaker Jamieson, Senior Specialist at Forth, gave this presentation at the Forth Addressing The Challenges of Charging at Multi-Family Housing webinar on June 11, 2024.
Expanding Access to Affordable At-Home EV Charging by Vanessa WarheitForth
Vanessa Warheit, Co-Founder of EV Charging for All, gave this presentation at the Forth Addressing The Challenges of Charging at Multi-Family Housing webinar on June 11, 2024.
Charging Fueling & Infrastructure (CFI) Program by Kevin MillerForth
Kevin Miller, Senior Advisor, Business Models of the Joint Office of Energy and Transportation gave this presentation at the Forth and Electrification Coalition CFI Grant Program - Overview and Technical Assistance webinar on June 12, 2024.
Implementing ELDs or Electronic Logging Devices is slowly but surely becoming the norm in fleet management. Why? Well, integrating ELDs and associated connected vehicle solutions like fleet tracking devices lets businesses and their in-house fleet managers reap several benefits. Check out the post below to learn more.
Welcome to ASP Cranes, your trusted partner for crane solutions in Raipur, Chhattisgarh! With years of experience and a commitment to excellence, we offer a comprehensive range of crane services tailored to meet your lifting and material handling needs.
At ASP Cranes, we understand the importance of reliable and efficient crane operations in various industries, from construction and manufacturing to logistics and infrastructure development. That's why we strive to deliver top-notch solutions that enhance productivity, safety, and cost-effectiveness for our clients.
Our services include:
Crane Rental: Whether you need a crawler crane for heavy lifting or a hydraulic crane for versatile operations, we have a diverse fleet of well-maintained cranes available for rent. Our rental options are flexible and can be customized to suit your project requirements.
Crane Sales: Looking to invest in a crane for your business? We offer a wide selection of new and used cranes from leading manufacturers, ensuring you find the perfect equipment to match your needs and budget.
Crane Maintenance and Repair: To ensure optimal performance and safety, regular maintenance and timely repairs are essential for cranes. Our team of skilled technicians provides comprehensive maintenance and repair services to keep your equipment running smoothly and minimize downtime.
Crane Operator Training: Proper training is crucial for safe and efficient crane operation. We offer specialized training programs conducted by certified instructors to equip operators with the skills and knowledge they need to handle cranes effectively.
Custom Solutions: We understand that every project is unique, which is why we offer custom crane solutions tailored to your specific requirements. Whether you need modifications, attachments, or specialized equipment, we can design and implement solutions that meet your needs.
At ASP Cranes, customer satisfaction is our top priority. We are dedicated to delivering reliable, cost-effective, and innovative crane solutions that exceed expectations. Contact us today to learn more about our services and how we can support your project in Raipur, Chhattisgarh, and beyond. Let ASP Cranes be your trusted partner for all your crane needs!
Charging and Fueling Infrastructure Grant: Round 2 by Brandt HertensteinForth
Brandt Hertenstein, Program Manager of the Electrification Coalition gave this presentation at the Forth and Electrification Coalition CFI Grant Program - Overview and Technical Assistance webinar on June 12, 2024.
Charging Fueling & Infrastructure (CFI) Program Resources by Cat PleinForth
Cat Plein, Development & Communications Director of Forth, gave this presentation at the Forth and Electrification Coalition CFI Grant Program - Overview and Technical Assistance webinar on June 12, 2024.
Understanding Catalytic Converter Theft:
What is a Catalytic Converter?: Learn about the function of catalytic converters in vehicles and why they are targeted by thieves.
Why are They Stolen?: Discover the valuable metals inside catalytic converters (such as platinum, palladium, and rhodium) that make them attractive to criminals.
Steps to Prevent Catalytic Converter Theft:
Parking Strategies: Tips on where and how to park your vehicle to reduce the risk of theft, such as parking in well-lit areas or secure garages.
Protective Devices: Overview of various anti-theft devices available, including catalytic converter locks, shields, and alarms.
Etching and Marking: The benefits of etching your vehicle’s VIN on the catalytic converter or using a catalytic converter marking kit to make it traceable and less appealing to thieves.
Surveillance and Monitoring: Recommendations for using security cameras and motion-sensor lights to deter thieves.
Statistics and Insights:
Theft Rates by Borough: Analysis of data to determine which borough in NYC experiences the highest rate of catalytic converter thefts.
Recent Trends: Current trends and patterns in catalytic converter thefts to help you stay aware of emerging hotspots and tactics used by thieves.
Benefits of This Presentation:
Awareness: Increase your awareness about catalytic converter theft and its impact on vehicle owners.
Practical Tips: Gain actionable insights and tips to effectively prevent catalytic converter theft.
Local Insights: Understand the specific risks in different NYC boroughs, helping you take targeted preventive measures.
This presentation aims to equip you with the knowledge and tools needed to protect your vehicle from catalytic converter theft, ensuring you are prepared and proactive in safeguarding your property.
John Deere 8360R Tractors Service Repair Technical Manual (TM110319).pdf
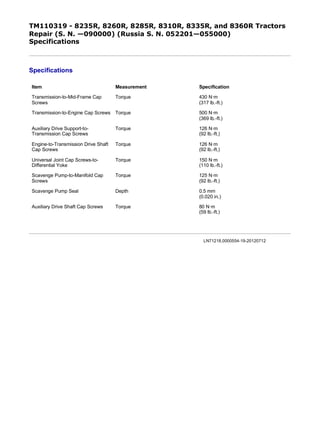
1. TM110319 - 8235R, 8260R, 8285R, 8310R, 8335R, and 8360R Tractors
Repair (S. N. —090000) (Russia S. N. 052201—055000)
Specifications
Specifications
Item Measurement Specification
Transmission-to-Mid-Frame Cap
Screws
Torque 430 N·m
(317 lb.-ft.)
Transmission-to-Engine Cap Screws Torque 500 N·m
(369 lb.-ft.)
Auxiliary Drive Support-to-
Transmission Cap Screws
Torque 126 N·m
(92 lb.-ft.)
Engine-to-Transmission Drive Shaft
Cap Screws
Torque 126 N·m
(92 lb.-ft.)
Universal Joint Cap Screws-to-
Differential Yoke
Torque 150 N·m
(110 lb.-ft.)
Scavenge Pump-to-Manifold Cap
Screws
Torque 125 N·m
(92 lb.-ft.)
Scavenge Pump Seal Depth 0.5 mm
(0.020 in.)
Auxiliary Drive Shaft Cap Screws Torque 80 N·m
(59 lb.-ft.)
LN71218,0000554-19-20120712
1/1
2020/6/27
file:///C:/ProgramData/Service%20ADVISOR/Temp/TM110319_09001faa81c...
2. TM110319 - 8235R, 8260R, 8285R, 8310R, 8335R, and 8360R Tractors Repair (S. N. —090000) (Russia S. N.
052201—055000)
Remove Transmission
Remove Transmission
RXA0119494-UN: Shield and Tool Box
LEGEND:
A - Shield
B - Step
C - Tool Box
D - Battery Cover
1. Position hood forward. (See Optional Forward Hood Position in Section 80, Group 05.)
2. Discharge air conditioning system. (See Discharge Air Conditioning System in Section 90, Group 10.)
3. Drain coolant from engine block and radiator.
4. Remove shield (A) and step (B).
5. Remove tool box (C) and battery cover (D).
6.
RXA0119496-UN: Battery Ground Cable
LEGEND:
A - Battery Ground Cable
B - Batteries (2 used)
C - Single Point Ground
Disconnect battery ground cable (A) from batteries (B) and from single point ground (C).
7.
RXA0119500-UN: Left-Hand Hood Spreader
1/14
2020/6/27
file:///C:/ProgramData/Service%20ADVISOR/Temp/TM110319_09001faa816...
3. RXA0119501-UN: Right-Hand Hood Spreader
LEGEND:
A - Hood Spreaders (2 used)
Remove hood spreaders (A).
8.
RXA0119553-UN: Positive Battery Cable
LEGEND:
A - Clamps (4 used)
B - Positive Battery Cable
Remove clamps (A) and positive battery cable (B).
9. Remove front weights, if equipped.
10. For tractors with Front Hitch: Remove front hitch. (See Remove and Install Front 3-Point Hitch in Section 70, Group 35.)
11. For tractors with Front PTO: Remove front PTO. (See Remove Front PTO in Section 56, Group 40.)
12.
RXA0109012-UN: Transmission Drain Plug
LEGEND:
A - Plug
B - Front Plate
Drain transmission by removing plug (A). (See Drain Hydraulic System in Section 70, Group 05.)
13. Remove access plate (B).
14. If equipped, remove radar sensor. (See Replace Radar Sensor in Section 40, Group 30.)
15. NOTE:
2/14
2020/6/27
file:///C:/ProgramData/Service%20ADVISOR/Temp/TM110319_09001faa816...
4. RXA0107812-UN: Left-Hand Side
RXA0107814-UN: Right-Hand Side
LEGEND:
A - Lines (5 used)
B - Clamp
Some lines use Snap-To-Connect fittings. (See Servicing and Connecting Snap-To-Connect STC™ Fittings in Section 10, Group 10.)
Line and hose configurations vary depending on tractor options.
Disconnect lines (A).
16. Cap and plug lines and ports to prevent contamination.
17. Remove clamp (B).
18.
RXA0107813-UN: Bottom of Transmission
RXA0107811-UN: Bottom of Transmission
LEGEND:
A - Transmission Lines (6 used)
Disconnect transmission lines (A).
19. Cap and plug lines and ports to prevent contamination.
3/14
2020/6/27
file:///C:/ProgramData/Service%20ADVISOR/Temp/TM110319_09001faa816...
5. 20.
RXA0125922-UN: Snap Ring and Line Clamp
LEGEND:
A - Snap Ring
B - Clamp
For tractors equipped with MFWD, perform the following:
a. Loosen MFWD drive shaft shield and remove steering line clamp (B).
b.
CAUTION:
Tractor ignition must be in the "OFF" position when checking position of MFWD drive shaft snap ring (A).
Position tractor with MFWD drive shaft snap ring (A) in downward position.
c. Disengage MFWD shaft snap ring and slide shaft forward to disengage from MFWD clutch.
21.
RXA0056006-UN: Drive Shaft
LEGEND:
A - Drive Shaft Universal Joint
For tractors with ILS™: Disconnect one drive shaft universal joint (A) from differential yoke and support drive shaft on lower control arm.
22.
RXA0111687-UN: Shield and Exhaust
LEGEND:
A - Shield
B - Exhaust Pipe
Remove shield (A).
23. Remove exhaust pipe (B). (See Service Exhaust System in Section 30, Group 25.)
4/14
2020/6/27
file:///C:/ProgramData/Service%20ADVISOR/Temp/TM110319_09001faa816...
6. 24.
RXA0111469-UN: Cab Riser Panel
RXA0111467-UN: Air Conditioner Lines
LEGEND:
A - Cab Riser Panel
B - Cap Screws (2 used)
C - Line Clamp
D - Air Conditioning Line (High Pressure)
E - Air Conditioning Line (Low Pressure)
Remove cab riser panel (A) by removing cap screws (B) under floor mat.
25. Remove line clamp (C).
26. Disconnect and plug air conditioner lines (D and E).
27.
RXA0119554-UN: Alternator
LEGEND:
A - Auxiliary Drive Belt
B - Alternator Wires (3 used)
C - Mounting Cap Screws (2 used)
D - Alternator
Remove auxiliary drive belt (A).
28. Identify, label, and disconnect alternator wires (B).
29. Remove mounting cap screws (C) and alternator (D).
5/14
2020/6/27
file:///C:/ProgramData/Service%20ADVISOR/Temp/TM110319_09001faa816...
7. 30.
RXA0119555-UN: Fan Drive Control Valve
LEGEND:
A - Fan Drive Control Valve
B - Line
C - Lines (2 used)
D - Cap Screws (2 used)
Identify, label, and disconnect harness from fan drive control valve (A).
31. Remove line (B).
32. Disconnect lines (C).
33. Cap and plug lines and ports to prevent contamination.
34. Remove cap screws (D) and fan drive control valve.
35.
RXA0119556-UN: Steering Lines and Vent Hose
LEGEND:
A - Steering Lines (2 used)
B - Vent Hose
Disconnect steering lines (A).
36. Disconnect vent hose (B).
37.
RXA0119557-UN: Heater Hoses
LEGEND:
A - Heater Hoses (2 used)
Remove heater hoses (A).
6/14
2020/6/27
file:///C:/ProgramData/Service%20ADVISOR/Temp/TM110319_09001faa816...
8. 38.
RXA0119558-UN: Fuel Return and Fan Drive Supply
LEGEND:
A - Fuel Return Line
B - Fan Drive Supply Line
Disconnect fuel return hose (A).
39. Disconnect fan drive supply line (B).
40. Cap and plug lines to prevent contamination.
41.
RXA0119560-UN: Fuel Supply Line
LEGEND:
A - Cap Screws (2 used)
B - Fuel Supply Line
Remove cap screws (A).
42. Remove fuel supply line (B).
43.
RXA0119561-UN: Oil Cooler Lines
LEGEND:
A - Oil Cooler Lines (2 used)
B - Air Line
Disconnect oil cooler lines (A).
44. For tractors equipped with Air Trailer Brakes: Remove air line (B).
45.
7/14
2020/6/27
file:///C:/ProgramData/Service%20ADVISOR/Temp/TM110319_09001faa816...
9. RXA0119562-UN: Harness
LEGEND:
A - Connectors (3 used)
B - Cap Screw, Clamp, and Ground Wires
C - Cap Screw
Disconnect harness connectors (A).
46. Remove cap screw, clamp, and ground wires (B).
47. Remove filter housing bracket cap screw (C).
48.
RXA0119559-UN: Auxiliary Drive Bracket
LEGEND:
A - Cap Screw
B - Cap Screws (4 used)
Remove filter housing bracket cap screw (A).
49. Remove auxiliary drive bracket cap screws (B).
50.
RXA0077936-UN: Wiring Connector
LEGEND:
A - Shield
B - Wiring Connector (4 used)
C - Harness Clamps (2 used)
D - Harness
Remove shield (A).
51. Disconnect wiring connectors (B) and remove harness (D) from harness clamps (C).
52. IMPORTANT:
RXA0080844-UN: Left-Hand Transmission Connectors
8/14
2020/6/27
file:///C:/ProgramData/Service%20ADVISOR/Temp/TM110319_09001faa816...
10. RXA0080846-UN: Right-Hand Transmission Connectors
RXA0080849-UN: Lower Half Transmission Connectors
LEGEND:
A - Solenoids (13 used)
B - Sensors (5 used)
C - Harness
D - Clamps (6 used)
Note harness routing and retention. Identify and label connectors for reassembly.
Identify, label, and disconnect solenoid (A) and sensor (B) connectors from transmission.
53. Note harness routing and remove harness (C) from clamps (D).
54. Move harness from mid frame to avoid damage to harness.
55.
RXA0078566-UN: Drive Shaft
LEGEND:
A - JDG861 Torque Wrench Adapter
Disconnect drive shaft using JDG820 Flywheel Rotation Tool and JDG861 Torque Wrench Adapter (A).
56.
CAUTION:
Stand may collapse and cause injury or death if pins are not installed correctly on stand. Each tube on the stand must be pinned together with another tube. One
pin may pass through all three tubes, or each pin may pass through two tubes depending on the tire size.
IMPORTANT:
9/14
2020/6/27
file:///C:/ProgramData/Service%20ADVISOR/Temp/TM110319_09001faa816...
11. Use only stands specified for stability when splitting the tractor.
RXA0079554-UN: Splitting Stand
RXA0079555-UN: Splitting Stand for ILS™
LEGEND:
A - JT07122-6 Rear Adapter Plates
B - JT07122-1 Splitting Stand
C - JDG2061 Front Adapter
D - JT07321 Rear Support Wheels
E - JT07122-7-1 Cross Member
F - JT07122-7-2 Upright Supports
For ALL tractors, perform the following steps: Install JT07122-6 Rear Adapter Plates (A) on JT07122 Splitting Stand (B). DO NOT tighten cap screws.
57. Install JDG2061 Front Adapter (C) on JT07122 Splitting Stand. Tighten cap screws.
58. IMPORTANT:
Front adapter (C) must be installed tight against plate on top of splitting stand to fit correctly on tractor.
NOTE:
JT07122-7-1 Cross Member and JT07122-7-2 Upright Supports are part of JT07122-7 Upright Supports .
Install JT07122-7-1 Cross Member (E). DO NOT tighten cap screws.
59. Install JT07321 Rear Support Wheels (D). DO NOT tighten cap screws.
60. DO NOT install JT07122-7-2 Upright Supports (F) at this time.
61.
RXA0079556-UN: Rear Splitting Stand
10/14
2020/6/27
file:///C:/ProgramData/Service%20ADVISOR/Temp/TM110319_09001faa816...
12. RXA0077253-UN: Front Support
LEGEND:
A - Cap Screws
B - Front Support
C - Front Frame Member
D - Locating Block
Install rear splitting stand on front of mid-frame using cap screws (A). Tighten all cap screws.
62. Adjust splitting stand wheels to properly support tractor.
63. NOTE:
Depending on tractor configuration, front tires will need removed, JDG2061 Front Adapter installed, and front tires installed. (For further information on removing and
installing front tires, see Operator’s Manual.)
Install JDG2061 Front Adapter so front support (B) is tight under front frame member (C) and locating blocks (D) are between front frame member.
64. For tractors with ILS™: Bleed off suspension system. (See Relieve System Pressure—ILS™ in Section 58, Group 05.)
65. NOTE:
RXA0119743-UN: Right-Hand Side
11/14
2020/6/27
file:///C:/ProgramData/Service%20ADVISOR/Temp/TM110319_09001faa816...
13. RXA0119744-UN: Left-Hand Side
LEGEND:
A - JT07122-7-2 Upright Supports (2 used)
B - Cap Screws (4 used)
JT07122-7-2 Upright Supports are part of JT07122-7 Upright Supports .
Install JT07122-7-2 Upright Supports (A) on front splitting stand.
66. Attach upright supports to engine block with cap screws (B).
67. Tighten cross-member cap screws.
68.
RXA0119757-UN: JDG1935 Auxiliary Drive Support
LEGEND:
A - JDG1935 Auxiliary Drive Support
B - Upright Support
C - Cap Screws (2 used)
D - Bracket
E - Lifting Screw
F - Cap Screws (10 used MFWD and 2WD) (16 used ILS)
Install JDG1935 Auxiliary Drive Support (A) to left-hand upright support (B).
69. Attach support (A) to auxiliary drive with cap screws (C).
70. Position bracket (D) under air cleaner and attach to support (A).
71. NOTE:
Use a prybar to assist lifting of auxiliary drive housing off dowel pins
Turn lifting screw (E) to lift auxiliary drive and air cleaner off transmission dowel pins.
72. Lower rear wheel of splitting stand so rear of engine is correctly supported.
73. Remove front frame-to-transmission cap screws (F) from both sides.
74.
CAUTION:
Avoid possible personal injury. DO NOT remove transmission-to-mid-frame cap screws. Doing so will collapse the splitting stand. Remove ONLY the front frame-
to-transmission cap screws.
Carefully roll front of tractor forward approximately 250—300 mm (10—12 in.).
12/14
2020/6/27
file:///C:/ProgramData/Service%20ADVISOR/Temp/TM110319_09001faa816...
14. 75.
RXA0104303-UN: JT07201A Transmission Lifting Fixture and Adapter
LEGEND:
A - JT07201A Transmission Lifting Fixture
B - Cap Screw
C - JDG1883 Adapter
Drill hole in JT07201A Transmission Lifting Fixture (A). (See DFRW210—Hole Drilled in JT07201 in Section 99, Group 05.)
76. Insert JDG1883 Transmission Lifting Fixture Adapter (C) and attach with cap screw (B).
77.
RXA0104302-UN: Transmission Lifting Fixture
LEGEND:
A - Cap Screw
B - MFWD and ILS Line
C - 2WD Line
Loosen cap screw (A) on JT07201A Transmission Lifting Fixture .
78. Align center of cap screw with line (B) for MFWD and ILS™, or line (C) for tractors with 2WD.
79. Tighten cap screw (A).
80.
RXA0119758-UN: Three Cap Screws
RXA0119759-UN: JT07201 Transmission Lifting Fixture
LEGEND:
A - Cap Screws (3 used)
B - JT07201A Transmission Lifting Fixture
C - Cap Screws (4 used)
D - JDG1760 Bushing (2 used)
Remove three transmission-to-mid-frame cap screws (A).
13/14
2020/6/27
file:///C:/ProgramData/Service%20ADVISOR/Temp/TM110319_09001faa816...
15. 81. Attach hoist to JT07201A Transmission Lifting Fixture (B).
82. Install fixture on transmission using cap screws (C) and two spacers from JDG1760 Spacer Kit (D) on front cap screws.
83.
CAUTION:
RXA0119760-UN: Transmission-to-Mid Frame Cap Screws
LEGEND:
A - Cap Screws (9 used)
Ensure that transmission is supported and does not drop off dowel pins or solenoid on left-hand side of transmission will be damaged.
Remove remaining transmission-to-mid-frame cap screws (A).
84. Move transmission forward and slide off drive shafts and mid-frame.
85. Lower transmission, rotate 90°, and remove from left-hand side.
AC20456,0000A59-19-20150414
14/14
2020/6/27
file:///C:/ProgramData/Service%20ADVISOR/Temp/TM110319_09001faa816...
16. TM110319 - 8235R, 8260R, 8285R, 8310R, 8335R, and 8360R Tractors
Repair (S. N. —090000) (Russia S. N. 052201—055000)
Install Transmission
1.
RXA0079536-UN: Mid-Frame Pilot Pins
LEGEND:
A - DFRW231 Guide Pins (2 used)
B - O-rings
Install two DFRW231—Guide Pins (A) in mid-frame.
2. Replace O-rings (B) in drive shafts.
3. Install transmission and tighten transmission-to-mid-frame cap screws to specification [Zinc-Plate Coated] .
4.
Item Measurement Specification
Transmission-to-Mid-Frame Cap
Screws
Torque 430 N·m
(317 lb.-ft.)
1/4
2020/6/27
file:///C:/ProgramData/Service%20ADVISOR/Temp/TM110319_09001faa81c...
17. RXA0108031-UN: Alignment Pins
LEGEND:
A - JDG768 Pilot Pins (2 used)
Install two JDG768 Pilot Pins (A) in transmission.
5. IMPORTANT:
Ensure that gasket between differential case and transmission is oriented correctly.
RXA0107117-UN: ILS O-rings
RXA0107118-UN: ILS Gasket and O-rings
LEGEND:
A - O-rings (2 used)
B - O-rings (2 used)
C - Gasket
For ILS™ Tractors: Install new O-rings (A and B) and new gasket (C).
6. Roll front of tractor to transmission.
7. Install transmission-to-engine cap screws [Zinc-Flake Coated] and tighten to specification.
Item Measurement Specification
Transmission-to-Engine Cap Screws Torque 500 N·m
(369 lb.-ft.)
2/4
2020/6/27
file:///C:/ProgramData/Service%20ADVISOR/Temp/TM110319_09001faa81c...
18. 8. Remove JDG1935 Auxiliary Drive Support .
9. Tighten auxiliary drive support-to-transmission cap screws to specification.
10.
RXA0078566-UN: JDG861 Torque Wrench Adapter
Push engine-to-transmission drive shaft V-ring seal rearward against transmission oil seal.
11. NOTE:
Torque wrench setting will be 103 N·m (76 lb.-ft.) when used with JDG861 Torque Wrench
Adapter and kept straight with torque wrench.
Torque value must be calculated for all other torque wrench adapters. (See Use Torque Wrench
Adapter in Section 10, Group 10).
Use JDG861 Torque Wrench Adapter (A) to tighten engine-to-transmission drive shaft cap screws.
12. IMPORTANT:
If a failure occurred causing contamination of transmission and hydraulic system, cleanup procedures
must be performed. Clean and flush differential housing and clean oil reservoir.
Fill hydraulic system. (See Fill Hydraulic System in Section 70, Group 05.)
13. For tractors with Front PTO: Install front PTO. (See Install Front PTO in Section 56, Group 40.)
14. For tractors with Front Hitch: Install front hitch. (See Remove and Install Front 3-Point Hitch in Section 70, Group
35.)
15. Purge, evacuate, and charge air conditioning system. (See Purge Air Conditioning System , Evacuate Air Conditioning
System , and Charge Air Conditioning System in Section 90, Group 10.)
Item Measurement Specification
Auxiliary Drive Support-to-
Transmission Cap Screws
Torque 126 N·m
(92 lb.-ft.)
Item Measurement Specification
Engine-to-Transmission Drive Shaft
Cap Screws
Torque 126 N·m
(92 lb.-ft.)
3/4
2020/6/27
file:///C:/ProgramData/Service%20ADVISOR/Temp/TM110319_09001faa81c...
19. 16.
RXA0056006-UN: Drive Shaft
LEGEND:
A - Drive Shaft
For tractors with ILS™: Connect drive shaft (A) and tighten universal joint-to-differential yoke cap screws to
specification.
17. NOTE:
Tractor may require jacking to remove splitting stands.
Raise tractor and remove splitting stands.
18. NOTE:
Do not overtighten manual drain valve.
Close ILS™ manual drain valve and tighten nut.
Item Measurement Specification
Universal Joint Cap Screws-to-
Differential Yoke
Torque 150 N·m
(110 lb.-ft.)
LN71218,000054E-19-20120712
4/4
2020/6/27
file:///C:/ProgramData/Service%20ADVISOR/Temp/TM110319_09001faa81c...
20. TM110319 - 8235R, 8260R, 8285R, 8310R, 8335R, and 8360R Tractors
Repair (S. N. —090000) (Russia S. N. 052201—055000)
Remove Scavenge Pump
RXA0125769-UN: Transmission Drain Plug
RXA0125770-UN: Mid-Frame Bottom Plate
LEGEND:
A - Plug
B - Front Shield
C - Radar Sensor Connector
D - Plate
1. Drain transmission by removing plug (A). (See Drain Hydraulic System in Section 70, Group 05.)
2. Remove front shield (B).
3. Disconnect radar sensor connector (C), if equipped.
4. Remove bottom plate (D) from mid-frame.
1/5
2020/6/27
file:///C:/ProgramData/Service%20ADVISOR/Temp/TM110319_09001faa811...
21. 5.
RXA0125771-UN: Lower Drive Shaft
RXA0125772-UN: Oil Line, and Fittings
LEGEND:
A - Lower Drive Shaft
B - Front Yoke
C - Rear Fitting
D - Front Fitting
E - Line
Remove shaft (A).
6. Mark position of lower drive shaft front yoke (B) in relationship to transmission case.
7. NOTE:
Some line or hose connections may be Snap-To-Connect fittings. (See Servicing and
Connecting Snap-To-Connect STC™ Fittings in Section 10, Group 10.)
Disconnect rear fitting (C).
8. Disconnect front fitting (D) and remove line (E).
2/5
2020/6/27
file:///C:/ProgramData/Service%20ADVISOR/Temp/TM110319_09001faa811...
22. Thank you very much for
your reading. Please Click
Here. Then Get COMPLETE
MANUAL. NO WAITING
NOTE:
If there is no response to
click on the link above,
please download the PDF
document first and then
click on it.
23. 9.
RXA0125660-UN: Scavenge Pump Oil Seal
LEGEND:
A - V-ring Seal
B - Oil Seal
Remove V-ring seal (A) and oil seal (B).
10.
RXA0125773-UN: Scavenge Pump Cover
RXA0125774-UN: Scavenge Pump
LEGEND:
3/5
2020/6/27
file:///C:/ProgramData/Service%20ADVISOR/Temp/TM110319_09001faa811...
24. A - Snap Ring
B - Cap Screws (5 Used)
C - Scavenge Pump Cover
Remove snap ring (A).
11. Remove cap screws (B) and scavenge pump cover (C).
12.
RXA0125775-UN: Shaft Seal Rings and Gears
LEGEND:
A - Seal Rings (2 Used)
B - Gears
Remove seal rings (A) from shaft.
13. NOTE:
Some pitting of gears and housing is normal.
Remove and inspect gears (B).
14. NOTE:
Driver disks are part of D01044AA Bushing, Bearing and Seal Driver Set .
RW35222-UN: Idler Gear
LEGEND:
A - Bearings (2 Used)
4/5
2020/6/27
file:///C:/ProgramData/Service%20ADVISOR/Temp/TM110319_09001faa811...
25. Inspect needle roller bearings (A) and remove, if necessary, using a 16 mm (5/8 in.) driver and 13 mm (1/2 in.)
pilot disks.
15. Install new bearings using a 22 mm (7/8 in.) driver and 13 mm (1/2 in.) pilot disks.
16. Install bearings flush with outer surface of pump gear.
17.
RXA0125776-UN: Shaft Bearing
LEGEND:
A - Snap Ring
B - Bearing
Remove snap ring (A) and bearing (B)
18. Inspect bearing (B), replace as necessary and install in reverse order.
OURX985,00001CE-19-20120410
5/5
2020/6/27
file:///C:/ProgramData/Service%20ADVISOR/Temp/TM110319_09001faa811...