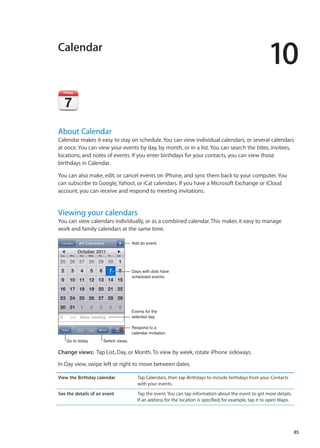
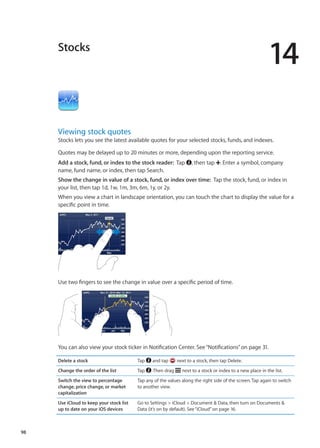
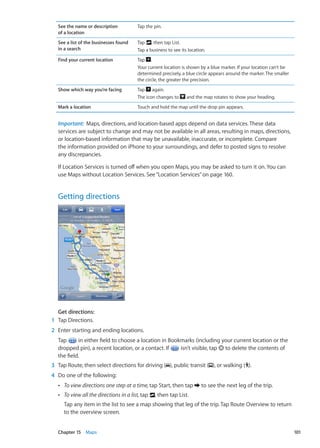
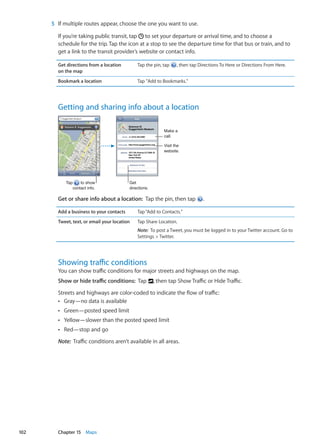
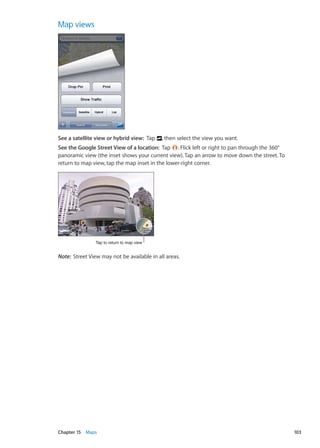
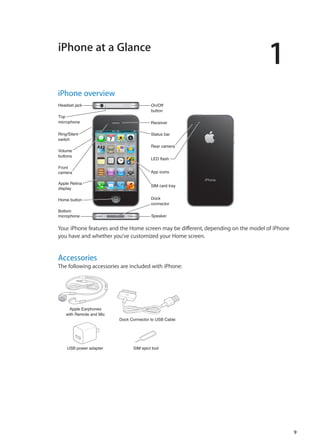
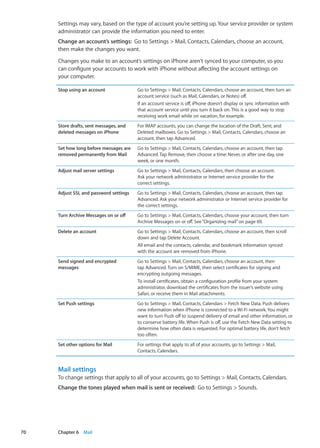
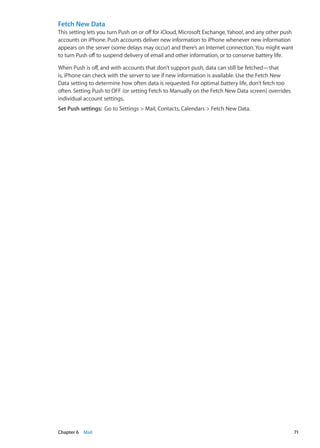
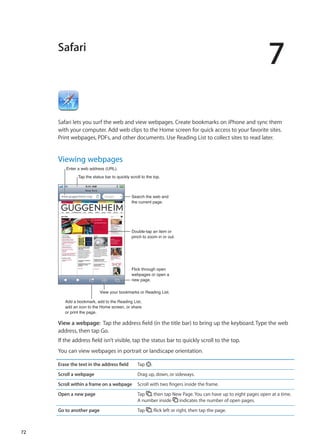
SlideShare a Scribd company logo
1 of 179
Download to read offline
iPhone
User Guide
For iOS 5.1 Software
Contents
9	 Chapter 1:  iPhone at a Glance
9	 iPhone overview
9	 Accessories
10	 Buttons
12	 Status icons
14	 Chapter 2:  Getting Started
14	 Viewing this user guide on iPhone
14	 What you need
14	 Installing the SIM card
15	 Setup and activation
15	 Connecting iPhone to your computer
15	 Connecting to the Internet
16	 Setting up mail and other accounts
16	 Managing content on your iOS devices
16	 iCloud
18	 Syncing with iTunes
19	 Chapter 3:  Basics
19	 Using apps
22	 Customizing the Home screen
24	 Typing
27	 Dictation
28	 Printing
29	 Searching
30	 Voice Control
31	 Notifications
32	 Twitter
33	 Apple Earphones with Remote and Mic
34	 AirPlay
34	 Bluetooth devices
35	 Battery
37	 Security features
38	 Cleaning iPhone
38	 Restarting or resetting iPhone
39	 Chapter 4:  Siri
39	 What is Siri?
40	 Using Siri
43	 Correcting Siri
44	 Siri and apps
55	 Dictation
2
56	 Chapter 5:  Phone
56	 Phone calls
60	 FaceTime
61	 Visual voicemail
62	 Contacts
63	 Favorites
63	 Call forwarding, call waiting, and caller ID
64	 Ringtones, Ring/Silent switch, and vibrate
64	 International calls
65	 Setting options for Phone
66	 Chapter 6:  Mail
66	 Checking and reading email
67	 Working with multiple accounts
67	 Sending mail
68	 Using links and detected data
68	 Viewing attachments
68	 Printing messages and attachments
69	 Organizing mail
69	 Searching mail
69	 Mail accounts and settings
72	 Chapter 7:  Safari
72	 Viewing webpages
73	 Links
73	 Reading List
73	 Reader
73	 Entering text and filling out forms
74	 Searching
74	 Bookmarks and history
74	 Printing webpages, PDFs, and other documents
74	 Web clips
75	 Chapter 8:  Music
75	 Adding music and audio
75	 Playing songs and other audio
77	 Additional audio controls
77	 Podcast and audiobook controls
78	 Using Siri or Voice Control with Music
78	 Browsing album artwork in Cover Flow
78	 Viewing tracks on an album
79	 Searching audio content
79	 iTunes Match
79	 Genius
80	 Playlists
81	 Home Sharing
82	 Chapter 9:  Messages
82	 Sending and receiving messages
83	 Sending messages to a group
83	 Sending photos, videos, and more
3Contents
84	 Editing conversations
84	 Searching messages
85	 Chapter 10:  Calendar
85	 About Calendar
85	 Viewing your calendars
86	 Adding events
86	 Responding to invitations
86	 Searching calendars
87	 Subscribing to calendars
87	 Importing calendar events from Mail
87	 Calendar accounts and settings
88	 Chapter 11:  Photos
88	 Viewing photos and videos
89	 Viewing slideshows
89	 Organizing photos and videos
89	 Sharing photos and videos
90	 Printing photos
91	 Chapter 12:  Camera
91	 About Camera
92	 Taking photos and videos
92	 HDR photos
93	 Viewing, sharing, and printing
93	 Editing photos
93	 Trimming videos
94	 Uploading photos and videos to your computer
94	 Photo Stream
95	 Chapter 13:  YouTube
95	 About YouTube
95	 Browsing and searching for videos
96	 Playing videos
96	 Keeping track of videos you like
97	 Sharing videos, comments, and ratings
97	 Getting information about a video
97	 Sending videos to YouTube
98	 Chapter 14:  Stocks
98	 Viewing stock quotes
99	 Getting more information
100	 Chapter 15:  Maps
100	 Finding locations
101	 Getting directions
102	 Getting and sharing info about a location
102	 Showing traffic conditions
103	Map views
104	 Chapter 16:  Weather
104	 Getting weather information
4 Contents
105	 Chapter 17:  Notes
105	 About Notes
105	 Writing notes
106	 Reading and editing notes
106	 Searching notes
106	 Printing or emailing notes
107	 Chapter 18:  Clock
107	 About Clock
107	 Setting world clocks
108	 Setting alarms
108	 Using the stopwatch
108	 Setting a timer
109	 Chapter 19:  Reminders
109	 About Reminders
110	 Setting a reminder
110	 Managing reminders in List view
111	 Managing reminders in Date view
111	 About location reminders
111	 Managing completed reminders
111	 Searching reminders
112	 Chapter 20:  Game Center
112	 About Game Center
113	 Signing in to Game Center
113	 Purchasing and downloading games
113	 Playing games
113	 Playing with friends
114	 Game Center settings
115	 Chapter 21:  iTunes Store
115	 About the iTunes Store
115	 Finding music, videos, and more
116	 Purchasing music, audiobooks, and tones
116	 Purchasing or renting videos
116	 Following artists and friends
117	 Streaming or downloading podcasts
117	 Checking download status
118	 Changing the browse buttons
118	 Viewing account information
118	 Verifying downloads
119	 Chapter 22:  Newsstand
119	 About Newsstand
119	 Reading the latest issues
120	 Chapter 23:  App Store
120	 About the App Store
121	 Finding and downloading apps
121	 Deleting apps
122	 Store settings
5Contents
123	 Chapter 24:  Contacts
123	 About Contacts
123	 Syncing contacts
124	 Searching contacts
124	 Adding and editing contacts
125	 Unified contacts
125	 Contacts accounts and settings
126	 Chapter 25:  Videos
126	 About Videos
126	 Playing videos
127	 Searching for videos
127	 Watching rented movies
127	 Watching videos on a TV
128	 Deleting videos from iPhone
128	 Using Home Sharing
128	 Setting a sleep timer
129	 Converting videos for iPhone
130	 Chapter 26:  Calculator
130	 Using the calculator
130	 Scientific calculator
131	 Chapter 27:  Compass
131	 About Compass
131	 Calibrating the compass
132	 Finding the direction
132	 Using Compass with Maps
133	 Chapter 28:  Voice Memos
133	 About Voice Memos
133	 Recording
134	 Listening to a recording
134	 Managing and sharing recordings
134	 Sharing voice memos with your computer
135	 Chapter 29:  Nike + iPod
135	 About Nike + iPod
135	 Activating Nike + iPod
135	 Linking a sensor
136	 Working out with Nike + iPod
136	 Calibrating Nike + iPod
136	 Sending workout data to nikeplus.com
137	 Chapter 30:  iBooks
137	 About iBooks
137	 Using the iBookstore
138	 Syncing books and PDFs
138	 Reading books
140	 Changing a book’s appearance
140	 Printing or emailing a PDF
140	 Organizing the bookshelf
6 Contents
142	 Chapter 31:  Accessibility
142	 Universal Access features
143	 VoiceOver
152	 Routing the audio of incoming calls
153	 Siri
153	 Triple-click Home
153	 Zoom
153	 Large Text
154	 White on Black
154	 Speak Selection
154	 Speak Auto-text
154	 Mono Audio
154	 Hearing aid compatibility
155	 Custom Vibrations
155	 LED Flash for Alerts
155	 AssistiveTouch
156	 Universal Access in OS X
156	 TTY support
156	 Minimum font size for mail messages
156	 Assignable ringtones
156	 Visual voicemail
156	 Widescreen keyboards
157	 Large phone keypad
157	 Voice Control
157	 Closed captioning
158	 Chapter 32:  Settings
158	 Airplane mode
158	 Wi-Fi
159	 Notifications
160	 Location Services
160	 VPN
160	 Personal Hotspot
161	 Carrier
161	 Sounds and the Ring/Silent switch
162	 Brightness
162	 Wallpaper
162	 General
168	 Settings for apps
169	 Appendix A:  International Keyboards
169	 Adding and removing keyboards
169	 Switching keyboards
169	 Chinese
171	 Japanese
171	 Typing emoji characters
171	 Using the candidate list
171	 Using shortcuts
172	 Vietnamese
7Contents
173	 Appendix B:  Support and Other Information
173	 iPhone Support site
173	 Restarting or resetting iPhone
173	 Backing up iPhone
175	 Updating and restoring iPhone software
175	 File sharing
175	 Safety, software, and service information
176	 Using iPhone in an enterprise environment
176	 Using iPhone with other carriers
176	 Disposal and recycling information
177	 Apple and the environment
178	 iPhone operating temperature
8 Contents
iPhone at a Glance
1
iPhone overview
Headset jack
Receiver
Ring/Silent
switch
Top
microphone
Volume
buttons
Apple Retina
display
Speaker
Home button
Front
camera
Rear camera
LED flash
SIM card tray
Dock
connector
On/Off
button
Bottom
microphone
App icons
Status bar
iPhone
Your iPhone features and the Home screen may be different, depending on the model of iPhone
you have and whether you’ve customized your Home screen.
Accessories
The following accessories are included with iPhone:
Dock Connector to USB Cable
Apple Earphones
with Remote and Mic
SIM eject toolUSB power adapter
9
Item What you can do with it
Apple Earphones with
Remote and Mic
Listen to music and videos, and make phone calls. See“Apple Earphones
with Remote and Mic” on page 33.
Dock Connector to USB Cable Use this cable to connect iPhone to your computer to sync and charge. The
cable can be used with the optional dock or plugged directly into iPhone.
USB power adapter Connect the power adapter to iPhone using the included cable, then plug it
into a standard power outlet to charge iPhone.
SIM eject tool (not included
in all areas)
Eject the SIM card tray.
Buttons
On/Off button
When you’re not using iPhone, you can lock it to turn off the display and save the battery.
Lock iPhone:  Press the On/Off button.
When iPhone is locked, nothing happens if you touch the screen. iPhone can still receive calls, text
messages, and other updates. You can also:
Listen to musicÂÂ
Adjust the volume using the buttons on the side of iPhone (or on the iPhone earphones) whileÂÂ
you’re on a phone call or listening to music
Use the center button on iPhone earphones to answer or end a call, or to control audioÂÂ
playback (see“Playing songs and other audio” on page 75)
On/Off button
Unlock iPhone Press the Home button or the On/Off button, then drag the slider.
Open Camera when
iPhone is locked
Press the Home button or the On/Off button, then drag up.
Access the audio controls
when iPhone is locked
Double-click the Home button .
Turn iPhone off Press and hold the On/Off button for a few seconds until the red slider
appears, then drag the slider.
Turn iPhone on Press and hold the On/Off button until the Apple logo appears.
By default, if you don’t touch the screen for a minute, iPhone locks automatically. To turn auto-lock
off, or to change how long before iPhone locks, see“Auto-Lock” on page 165. To require a passcode
to unlock iPhone, see“Passcode Lock” on page 165.
Home button
The Home button lets you get back to the Home screen at any time. It also provides other
convenient shortcuts.
Go to the Home screen:  Press the Home button .
10 Chapter 1    iPhone at a Glance
At the Home screen, just a tap opens an app. See“Opening and switching apps” on page 19.
Display the multitasking bar
to see recently used apps
With iPhone unlocked, double-click the Home button .
Display audio playback controls When iPhone is locked: Double-click the Home button . See“Playing songs
and other audio” on page 75.
When using another app: Double-click the Home button , then flick the
app switcher from left to right.
Start Siri (iPhone 4S) or
Voice Control
Press and hold the Home button . See Chapter 4, “Siri,” on page 39 and
“Voice Control” on page 30.
Volume buttons
When you’re on the phone or listening to songs, movies, or other media, the buttons on the side
of iPhone adjust the audio volume. Otherwise, the buttons control the volume for the ringer,
alerts, and other sound effects.
WARNING:  For important information about avoiding hearing loss, see the Important Product
Information Guide at www.apple.com/support/manuals/iphone.
Volume
up
Volume
down
To limit the volume for music and videos, go to Settings  Music.
You can also use the volume up button to take a picture or record a video. See“Taking photos and
videos” on page 92.
Ring/Silent switch
Flip the Ring/Silent switch to put iPhone in ring mode or silent mode .
Ring
Silent
In ring mode, iPhone plays all sounds. In silent mode, iPhone doesn’t ring or play alerts and other
sound effects.
Important:  Clock alarms, audio apps such as Music, and many games still play sounds through the
built-in speaker when iPhone is in silent mode.
For information about changing sound and vibrate settings, see“Sounds and the Ring/Silent
switch” on page 161.
11Chapter 1    iPhone at a Glance
Status icons
The icons in the status bar at the top of the screen give information about iPhone:
Status icon What it means
Cell signal* Shows whether you’re in range of the cellular network and
can make and receive calls. The more bars, the stronger
the signal. If there’s no signal, the bars are replaced with
“No service.”
Airplane mode Shows that airplane mode is on—you cannot use the
phone, access the Internet, or use Bluetooth® devices.
Non-wireless features are available. See“Airplane
mode” on page 158.
UMTS Shows that your carrier’s 4G UMTS (GSM) network is
available, and iPhone can connect to the Internet over
that network. (iPhone 4S only. Not available in all areas.)
See“Network” on page 163.
UMTS/EV-DO Shows that your carrier’s 3G UMTS (GSM) or EV-DO
(CDMA) network is available, and iPhone can connect to
the Internet over that network. See“Network” on page 163.
EDGE Shows that your carrier’s EDGE (GSM) network is available,
and iPhone can connect to the Internet over that network.
See“Network” on page 163.
GPRS/1xRTT Shows that your carrier’s GPRS (GSM) or 1xRTT (CDMA)
network is available, and iPhone can connect to the
Internet over that network. See“Network” on page 163.
Wi-Fi* Shows that iPhone is connected to the Internet over a
Wi-Fi network. The more bars, the stronger the connection.
See“Wi-Fi” on page 158.
Personal Hotspot Shows that iPhone is connected to another iPhone
providing a Personal Hotspot. See“Personal Hotspot” on
page 160.
Syncing Shows that iPhone is syncing with iTunes.
Network activity Shows network activity. Some third-party apps may also
use the icon to show an active process.
Call Forwarding Shows that Call Forwarding is set up on iPhone. See“Call
forwarding” on page 63.
VPN Shows that you’re connected to a network using VPN.
See“Network” on page 163.
Lock Shows that iPhone is locked. See“On/Off button” on
page 10.
TTY Shows that iPhone is set to work with a TTY machine.
See“TTY support” on page 156.
12 Chapter 1    iPhone at a Glance
Status icon What it means
Play Shows that a song, audiobook, or podcast is playing.
See“Playing songs and other audio” on page 75.
Portrait orientation lock Shows that the iPhone screen is locked in portrait
orientation. See“Viewing in portrait or landscape
orientation” on page 21.
Alarm Shows that an alarm is set. See“Setting alarms” on
page 108.
Location Services Shows that an item is using Location Services. See
“Location Services” on page 160.
Bluetooth* Blue or white icon:  Bluetooth is on and paired with
a device.
Gray icon:  Bluetooth is on and paired with a device,
but the device is out of range or turned off.
No icon:  Bluetooth is turned off or not paired with
a device.
See“Bluetooth devices” on page 34.
Bluetooth battery Shows the battery level of a supported paired
Bluetooth device.
Battery Shows battery level or charging status. See“Battery” on
page 35.
* The use of certain accessories with iPhone may affect wireless performance.
13Chapter 1    iPhone at a Glance
Getting Started
2
WARNING:  To avoid injury, read all operating instructions in this guide and safety information
in the iPhone Important Product Information Guide at www.apple.com/support/manuals/iphone
before using iPhone.
·
Viewing this user guide on iPhone
The iPhone User Guide can be viewed on iPhone in Safari, and in the free iBooks app.
View the user guide in Safari:  Tap , then tap the iPhone User Guide bookmark.
To add an icon for the guide to the Home screen, tap , then tap“Add to Home Screen.”To view
it in a different language, tap“Change Language”on the main contents page.
View the user guide in iBooks:  If you haven’t installed iBooks, open App Store, then search for
and install“iBooks.”Open iBooks and tap Store. Search for“iPhone User,”then select and download
the guide.
For more information about iBooks, see Chapter 30, “iBooks,” on page 137.
What you need
To use iPhone, you need:
A wireless service plan with a carrier that provides iPhone service in your areaÂÂ
An Apple ID (for some features), which can be created during setupÂÂ
A Mac or a PC with a USB 2.0 port and one of the following operating systems:ÂÂ
Mac OS X v10.5.8 or laterÂÂ
Windows 7, Windows Vista, or Windows XP Home or Professional (SP3)ÂÂ
An Internet connection for your computer (broadband is recommended)ÂÂ
iTunes 10.5 or later (for some features), available atÂÂ www.itunes.com/download
Installing the SIM card
If you were given a SIM card to install, install it before setting up iPhone.
Important:  A SIM card is required to use cellular services when connecting to GSM networks and
some CDMA networks. An iPhone 4S that has been activated on a CDMA wireless network may
also use a SIM card for connecting to a GSM network, primarily for international roaming. Your
iPhone is subject to your wireless service provider’s policies, which may include restrictions on
switching service providers and roaming, even after conclusion of any required minimum service
contract. Contact your wireless service provider for more details. Availability of cellular capabilities
depends on the wireless network.
14
Installing the SIM Card in iPhone 4S
Micro SIM
card
Micro SIM
card tray
Paper clip
or SIM
eject tool
Install the SIM card:  Insert the end of a small paper clip or SIM eject tool into the hole on the
SIM card tray. Pull out the SIM card tray and place the SIM card in the tray as shown. With the tray
aligned and the SIM card on top, carefully replace the tray.
Setup and activation
To set up and activate iPhone, turn on iPhone and follow the Setup Assistant. The Setup Assistant
steps you through the setup process, including connecting to a Wi-Fi network, signing in with or
creating a free Apple ID, setting up iCloud, turning on recommended features such as Location
Services and Find My iPhone, and activating iPhone with your carrier. You can also restore from an
iCloud or iTunes backup during setup.
Activation can be done over a Wi-Fi network or, with iPhone 4S, over your carrier’s cellular network
(not available in all areas). If neither option is available, you need to connect iPhone to your
computer for activation.
Connecting iPhone to your computer
If you don’t have Wi-Fi or cellular access, you may need to connect iPhone to your computer in
order to complete activation. Connecting iPhone to your computer also lets you sync information,
music, and other content with iTunes. See“Syncing with iTunes” on page 18.
Connect iPhone to your computer:  Use the Dock Connector to USB Cable provided with iPhone.
Connecting to the Internet
iPhone connects to the Internet whenever necessary, using a Wi-Fi connection (if available) or
your carrier’s cellular network. For information about connecting to a Wi-Fi network, see“Wi-Fi” on
page 158.
Note:  If a Wi-Fi connection to the Internet isn’t available, certain iPhone features and services
may transfer data over your carrier’s cellular network, which may result in additional fees. Contact
your carrier for information about your cellular data plan rates. To manage cellular data usage, see
“Network” on page 163.
15Chapter 2    Getting Started
Setting up mail and other accounts
iPhone works with iCloud, Microsoft Exchange, and many of the most popular Internet-based mail,
contacts, and calendar service providers.
If you don’t already have a mail account, you can set up a free iCloud account when you first set
up iPhone, or later in Settings  iCloud. See“iCloud” on page 16.
Set up an iCloud account:  Go to Settings  iCloud.
Set up some other account:  Go to Settings  Mail, Contacts, Calendars.
You can add contacts using an LDAP or CardDAV account, if your company or organization
supports it. See“Syncing contacts” on page 123.
You can add a CalDAV calendar account, and you can subscribe to iCal (.ics) calendars or import
them from Mail. See“Subscribing to calendars” on page 87.
Managing content on your iOS devices
You can transfer information and files between your iOS devices and computers using either
iCloud or iTunes.
ÂÂ iCloud stores content such as music, photos, and more, and wirelessly pushes it to your other
iOS devices and computers, keeping everything up to date. See“iCloud”below.
ÂÂ iTunes syncs music, video, photos, and more between your computer and iPhone. Changes you
make on one device are copied to the other when you sync. You can also use iTunes to copy
a file to iPhone for use with an app, or to copy a document you’ve created on iPhone to your
computer. See“Syncing with iTunes” on page 18.
You can use iCloud or iTunes, or both, depending on your needs. For example, you can use iCloud
Photo Stream to automatically get photos you take on iPhone to your other devices, and use
iTunes to sync photo albums from your computer to iPhone.
Note:  You should not sync items on the Info pane of iTunes (such as contacts, calendars, and
notes) and also use iCloud to keep that information up to date on your devices. Otherwise,
duplicated data may result.
iCloud
iCloud stores your content, including music, photos, contacts, calendars, and supported
documents. Content stored in iCloud is pushed wirelessly to your other iOS devices and
computers set up with the same iCloud account.
iCloud is available on iOS 5 devices, on Macs running OS X Lion v10.7.2 or later, and on PCs with
the iCloud Control Panel for Windows (Windows Vista Service Pack 2 or Windows 7 required).
iCloud features include:
ÂÂ iTunes in the Cloud—Download previous iTunes music and TV show purchases to iPhone for
free, anytime you like.
ÂÂ Apps and Books—Download previous App Store and iBookstore purchases to iPhone for free,
anytime you like.
ÂÂ Photo Stream—Photos you take on one device appear automatically on all your devices. See
“Photo Stream” on page 94.
ÂÂ Documents in the Cloud—For iCloud-enabled apps, keep documents and app data up to date
across all your devices.
16 Chapter 2    Getting Started
ÂÂ Mail, Contacts, Calendars—Keep your mail contacts, calendars, notes, and reminders up to date
across all your devices.
ÂÂ Backup—Back up iPhone to iCloud automatically when connected to power and Wi-Fi. See
“Backing up iPhone” on page 173.
ÂÂ Find My iPhone—Locate your iPhone on a map, display a message, play a sound, lock the screen,
or remotely wipe the data. See“Find My iPhone” on page 37.
ÂÂ Find My Friends—Share your location with people who are important to you. Download the free
app from the App Store.
ÂÂ iTunes Match—With an iTunes Match subscription, all your music, including music you’ve
imported from CDs or purchased somewhere other than iTunes, appears on all of your devices
and can be downloaded and played on demand. See“iTunes Match” on page 79.
With iCloud, you get a free email account and 5 GB of storage for your mail, documents, and
backups. Your purchased music, apps, TV shows, and books, as well as your Photo Stream, don’t
count against your free space.
If you have a MobileMe subscription, you can move it to iCloud from a Mac or PC at
www.me.com/move until June 30, 2012.
Note:  iCloud is not available in all areas, and iCloud features may vary by area.
Sign in or create an iCloud account:  In Settings, tap iCloud.
Enable or disable iCloud services Go to Settings  iCloud.
Enable iCloud backup Go to Settings  iCloud  Storage  Backup.
Find your iPhone Visit www.icloud.com, sign in with your Apple ID, then choose
Find My iPhone.
Important:  On your iPhone, Find My iPhone must be turned on in
Settings  iCloud in order for iPhone to be located.
Purchase additional iCloud storage Go to Settings  iCloud  Storage  Backup, then tap Manage Storage. For
information about purchasing iCloud storage, go to help.apple.com/icloud.
View and download previous
iTunes Store purchases
Go to iTunes, then tap Purchased.
View and download previous
App Store purchases
Go to App Store, tap Updates, then tap Purchased.
View and download previous
iBookstore purchases
Go to iBooks, tap Store, then tap Purchased.
Turn on Automatic Downloads
for music, apps, or books
Go to Settings  Store.
For more information about iCloud, go to www.apple.com/icloud. For support information, go to
www.apple.com/support/icloud.
17Chapter 2    Getting Started
Syncing with iTunes
Syncing with iTunes copies information from your computer to iPhone, and vice versa. You can
sync by connecting iPhone to your computer using the Dock Connector to USB Cable, or you
can set up iTunes to sync wirelessly using Wi-Fi. You can set iTunes to sync music, photos, video,
podcasts, apps, and more. For information about syncing iPhone with a computer, open iTunes,
then select iTunes Help from the Help menu.
Set up wireless iTunes syncing:  Connect iPhone to your computer using the Dock Connector to
USB Cable. In iTunes, turn on“Sync over Wi-Fi connection”in the device’s Summary pane.
When Wi-Fi syncing is turned on, iPhone syncs automatically every day. iPhone must be
connected to a power source, both iPhone and your computer must be on the same wireless
network, and iTunes must be open on your computer. For more information, see“iTunes Wi-Fi
Sync” on page 164.
Tips for syncing with iTunes
If you’re using iCloud to store your contacts, calendars, bookmarks, and notes, don’t also syncÂÂ
them to your device using iTunes.
Purchases you make from the iTunes Store or the App Store on iPhone are synced back to yourÂÂ
iTunes library. You can also purchase or download content and apps from the iTunes Store on
your computer, and then sync them to iPhone.
In the device’s Summary pane, you can set iTunes to automatically sync your device when it’sÂÂ
attached to your computer. To temporarily override this setting, hold down Command and
Option (Mac) or Shift and Control (PC) until you see your iPhone appear in the sidebar.
In the device’s Summary pane, select“EncryptÂÂ iPhone backup”if you want to encrypt the
information stored on your computer when iTunes makes a backup. Encrypted backups are
indicated by a lock icon , and a password is required to restore the backup. If you don’t select
this option, passwords (such as those for mail accounts) aren’t included in the backup and will
have to be reentered if you use the backup to restore the device.
In the device’s Info pane, when you sync mail accounts, only the settings are transferred fromÂÂ
your computer to iPhone. Changes you make to an email account on iPhone don’t affect the
account on your computer.
In the device’s Info pane, click Advanced to select options to let youÂÂ replace the information on
iPhone with the information from your computer during the next sync.
If you listen to part of a podcast or audiobook, your place in the story is included if you sync theÂÂ
content with iTunes. If you started listening to the story on iPhone, you can pick up where you
left off using iTunes on your computer—or vice versa.
In the device’s Photo pane, you can sync photos and videos from a folder on your computer.ÂÂ
18 Chapter 2    Getting Started
Basics
3
Using apps
The high-resolution Multi-Touch screen and simple finger gestures make it easy to use iPhone apps.
Opening and switching apps
Press the Home button to go to the Home screen and see your apps.
Open an app:  Tap it.
To return to the Home screen, press the Home button again. Flick left or right to see another
Home screen.
Flick left or right to switch
to another Home screen.
Double-click the Home button to reveal the multitasking bar, which shows your most recently
used apps. Tap an app to reopen it, or flick to see more apps.
Recently used apps
Remove an app from the
multitasking bar
Touch and hold the app icon until it begins to jiggle, then tap .
Removing an app from the multitasking also forces it to quit.
19
Scrolling
Drag up or down to scroll. On some screens such as webpages, you can also scroll side to side.
Dragging your finger to scroll won’t choose or activate anything on the screen.
Flick to scroll quickly.
You can wait for the scrolling to come to a stop, or touch the screen to stop it immediately.
Touching the screen to stop scrolling won’t choose or activate anything.
To quickly scroll to the top of a page, tap the status bar at the top of the screen.
Drag your finger along
the index to scroll quickly.
Tap a letter to jump to
a section.
Tap an item in a list to choose it. Depending on the list, tapping an item can do different things—
for example, it may open a new list, play a song, open an email, or show someone’s contact
information so you can call that person.
20 Chapter 3    Basics
Zooming in or out
When viewing photos, webpages, email, or maps, you can zoom in and out. Pinch your fingers
together or apart. For photos and webpages, you can double-tap (tap twice quickly) to zoom
in, then double-tap again to zoom out. For maps, double-tap to zoom in and tap once with two
fingers to zoom out.
Zoom is also an accessibility feature that lets you magnify the screen with any app you’re using, to
help you see what’s on the display. See“Zoom” on page 153.
Viewing in portrait or landscape orientation
Many iPhone apps let you view the screen in either portrait or landscape orientation. Rotate
iPhone and the display rotates too, adjusting automatically to fit the new screen orientation.
You may prefer landscape orientation for viewing webpages in Safari, or when entering text,
for example. Webpages scale to the wider screen in landscape orientation, making the text and
images larger. The onscreen keyboard is also larger.
Movies viewed in Videos and YouTube appear only in landscape orientation. Street views in Maps
also appear only in landscape orientation.
Lock the screen in portrait orientation:  Double-click the Home button , flick the bottom of the
screen from left to right, then tap .
The portrait orientation lock icon appears in the status bar when the screen orientation is locked.
21Chapter 3    Basics
Customizing the Home screen
Rearranging apps
You can customize the layout of app icons on the Home screen—including the apps in the Dock
along the bottom of the screen. If you want, arrange them over multiple Home screens. You can
also organize apps by collecting them in folders.
Rearrange icons:
	 1	 Touch and hold any app on the Home screen until it begins to jiggle.
	 2	 Arrange the apps by dragging them.
	 3	 Press the Home button to save your arrangement.
Move an icon to another screen While arranging apps, drag an app to the side of the screen.
Create additional Home screens While arranging apps, flick to the rightmost Home screen, then drag an app
to the right edge of the screen. You can create up to 11 Home screens.
Reset your Home screen to the
default layout
Go to Settings  General  Reset, then tap Reset Home Screen Layout.
Resetting the Home screen removes any folders you’ve created and applies
the default wallpaper to your Home screen.
You can add icons on the Home screen to open your favorite webpages. See“Web clips” on page 74.
When iPhone is physically connected to your computer (with the Dock Connector to USB Cable),
you can customize your Home screens using iTunes. In iTunes, select iPhone in the Devices list,
then click Apps at the top of the screen.
Organizing with folders
Folders let you organize apps on the Home screen. You can put up to 12 apps in a folder. iPhone
names a folder automatically when you create it, based on the category of the apps you use
to create the folder. You can change the name anytime you want. Like apps, folders can be
rearranged by dragging them on the Home screens, or to the Dock.
22 Chapter 3    Basics
Create a folder:  Touch an app until the Home screen apps begin to jiggle, then drag the app onto
another app.
iPhone creates a new folder that includes the two apps, and shows the folder’s name. You can tap
the name field and enter a different name.
Tap a folder to open it, then you can tap to open an app inside. To close a folder, tap outside the
folder, or press the Home button .
While arranging apps:
Add an app to a folder Drag the app onto the folder.
Remove an app from a folder Tap to open the folder, then drag the app out of the folder.
Delete a folder Move all apps out of the folder. The folder is deleted automatically.
Rename a folder Tap to open the folder, then tap the name at the top and use the keyboard
to enter a new name.
When you finish organizing your Home screen, press the Home button to save your changes.
Adding wallpaper
You can set an image or photo as wallpaper for the Lock screen. You can also set wallpaper for
your Home screen. You can choose an image that came with iPhone, a photo from your Camera
Roll or other album on iPhone.
Set wallpaper:
	 1	 In Settings, choose Wallpaper, tap the image of the Lock and Home screens, then tap Wallpaper or
an album.
	 2	 Tap to choose an image or photo. If you choose a photo, drag to position it and pinch to zoom in
or out, until it looks the way you want.
	 3	 Tap Set, then choose whether you want to use the photo as wallpaper for your Lock Screen, Home
screen, or both.
23Chapter 3    Basics
Typing
The onscreen keyboard appears anytime you need to type.
Entering text
Use the keyboard to enter text. The keyboard corrects misspellings, predicts what you’re typing,
and learns as you use it. Depending on the app you’re using, the intelligent keyboard may suggest
corrections as you type, to help prevent mistyped words.
Type text:  Tap a text field to bring up the keyboard, then tap on the keyboard.
As you type, each letter appears above your thumb or finger. If you touch the wrong key, you
can slide your finger to the correct key. The letter isn’t entered until you release your finger
from the key.
Delete the previous character Tap .
Type uppercase Tap the Shift key before tapping a letter. Or touch and hold the Shift key,
then slide to a letter.
Quickly type a period and space Double-tap the space bar. To turn this feature on or off, go to Settings 
General  Keyboard.
Use autocorrection to enter“’ll” Type“lll.”For example, type“youlll”to get“you’ll.”
Turn caps lock on Double-tap the Shift key . Tap the Shift key again to turn caps lock off.
You can turn this feature on or off in Settings  General  Keyboard.
Enter numbers, punctuation,
or symbols
Tap the Number key . Tap the Symbol key to see additional
punctuation and symbols.
Set options for typing Go to Settings  General  Keyboard.
To type an alternate character,
touch and hold a key, then slide
to choose one of the options.
24 Chapter 3    Basics
Auto-correction and spell checking
For many languages, iPhone automatically corrects misspellings or makes suggestions as you type.
When iPhone suggests a word, you can accept the suggestion without interrupting your typing.
Note:  For a list of supported languages, see www.apple.com/iphone/specs.html.
Suggested
word
Accept the suggestion:  Type a space, punctuation mark, or return character.
Reject a suggestion:  Tap the“x”.
Each time you reject a suggestion for the same word, iPhone becomes more likely to accept
the word.
iPhone may also underline words you’ve already typed that might be misspelled.
Replace a misspelled word Tap the word, then tap one of the alternate spellings.
If the word you want doesn’t appear, just retype it.
Turn auto-correction or spell
checking on or off
Go to Settings  General  Keyboard.
Shortcuts and your personal dictionary
Shortcuts lets you type just a few characters instead of a longer word or phrase.The expanded text
appears whenever you type the shortcut. For example, the shortcut“omw”expands to“On my way!”
Create a shortcut:  Go to Settings  General  Keyboard, then tap Add New Shortcut.
Add a word or phrase to your personal dictionary so that iPhone doesn’t try to correct or
replace it:  Create the shortcut, but leave the Shortcut field blank.
Edit a shortcut Go to Settings  Keyboard and tap the shortcut.
25Chapter 3    Basics
Editing text
The touchscreen makes it easy to change text you’ve entered. An onscreen magnifying glass helps
you position the insertion point right where you need it. Grab points let you quickly select more
or less text. You can also cut, copy, and paste text and photos within apps, or across apps.
Position the insertion point:  Touch and hold to bring up the magnifying glass, then drag to
position the insertion point.
Select text:  Tap the insertion point to display the selection buttons.
You can also double-tap to select a word. In read-only documents, such as webpages, or email
messages you’ve received, touch and hold to select a word. Drag the grab points to select more
or less text.
Cut or copy text Select text, then tap Cut or Copy.
Paste text Tap the insertion point and tap Paste. The last text that you cut or copied is
inserted. Or select text and tap Paste to replace the text.
Undo the last edit Shake iPhone and tap Undo.
Make text bold, italic, or underlined When available, tap , then tap B/I/U.
Get the definition of a word When available, tap , then tap Define.
Get alternative words When available, tap Suggest, then tap one of the words.
Keyboard layouts
You can use Settings to set the keyboard layouts for software and hardware keyboards. The
available layouts depend on the keyboard language.
Select a keyboard layout:  Go to Settings  General  Keyboard  International Keyboards, then
select a keyboard.
26 Chapter 3    Basics
For each language, you can make separate selections for both the onscreen software and
any external hardware keyboards. The software keyboard layout determines the layout of the
keyboard on the iPhone screen. The hardware keyboard layout determines the layout of an
Apple Wireless Keyboard connected to iPhone.
Using an Apple Wireless Keyboard
You can use an Apple Wireless Keyboard (available separately) for typing on iPhone. The Apple
Wireless Keyboard connects via Bluetooth. See“Pairing a Bluetooth device with iPhone” on
page 34.
Once the keyboard is paired with iPhone, it connects whenever the keyboard is within range (up
to 30 feet). You can tell that the keyboard is connected if the onscreen keyboard doesn’t appear
when you tap in a text field. To save the battery, turn off or unpair the keyboard when not in use.
Dictation
With dictation, you create and edit text by speaking instead of typing. For example, you can
dictate email messages, text messages, and notes. Dictation even works with third-party apps, so
you can do things like update your Facebook status, post Tweets, or write and send Instagrams.
You can dictate any time the onscreen keyboard appears with the key.
Note:  Turn Siri on in Settings  General  Siri. Dictation is available only on iPhone 4S, and
requires Internet access via a cellular or Wi-Fi connection. Dictation may not be available in all
languages or in all areas, and features may vary by area. Cellular data charges may apply.
Dictate text: Tap on the keyboard. Tap Done when you finish.
Tap to begin dictation.
These appear while Siri
composes the text from
your dictation.
To add text, tap again and continuing dictating.
You can use dictation to insert a word or replace selected text. Place the insertion point where
you want more text, or select the text to replace, then tap and dictate. To change a word,
double-tap the word to select it, tap , then say the word you want.
You can bring iPhone to your ear to start dictation, instead of tapping on the keyboard. To finish,
move iPhone back down in front of you.
Add punctuation: Say the punctuation.
For example,“Dear Mary comma the check is in the mail exclamation mark”results in“Dear Mary,
the check is in the mail!”
27Chapter 3    Basics
Printing
AirPrint
AirPrint lets you print wirelessly to AirPrint-enabled printers. You can print from:
Mail—email messages and attachments that can be viewed in Quick LookÂÂ
Photos and Camera—photosÂÂ
Safari—webpages, PDFs, and other attachments that can be viewed in Quick LookÂÂ
iBooks—PDFsÂÂ
Maps—view of map showing on the screenÂÂ
Notes—currently displayed noteÂÂ
Other apps available from the App Store may also support AirPrint.
An AirPrint-enabled printer doesn’t need setup—just connect it to the same Wi-Fi network as
iPhone. For more information, go to support.apple.com/kb/HT4356.
Printing a document
AirPrint uses your Wi-Fi network to send print jobs wirelessly to your printer. iPhone and the
printer must be on the same Wi-Fi network.
Print a document:  Tap , , or (depending on the app you’re using), then tap Print. Select a
printer and printing options, then tap Print.
See the status of a print job Double-click the Home button , then tap Print Center.
The Print Center app appears as the most recent app when a document is printing. A badge on
the app shows how many documents are queued for printing.
If you’re printing more than one document, select a print job to see its status summary.
Cancel a print job Double-click the Home button , tap Print Center, select the print job (if
you’re printing more than one document), then tap Cancel Printing.
28 Chapter 3    Basics
Searching
You can search many apps on iPhone, including Contacts, Mail, Calendar, Music, Messages, Notes,
and Reminders. You can search an individual app, or all apps at once.
Search iPhone:  Go to the Search screen. (From the first Home screen, flick right or press the
Home button .) Enter text in the Search field.
Search results appear as you type. Tap an item in the list to open it. Tap Search to dismiss the
keyboard and see more results.
Icons next to the search results show which app the results are from.
iPhone may display a top hit for you, based on your previous searches. Safari search results include
options to search the web or to search Wikipedia.
App What’s searched
Contacts First, last, and company names
Mail To, From, and Subject fields and the messages of all accounts
Calendar Event titles, invitees, locations, and notes
Music Music (names of songs, artists, and albums) and the titles of podcasts,
videos, and audiobooks
Messages Names and text of messages
Notes Text of notes
Reminders Titles
Search also searches the names of the native and installed apps on iPhone, so if you have a lot of
apps, you may want to use Search to locate and open apps.
Open apps from Search Enter the app name, then tap to open the app directly from the search
results.
Use the Spotlight Search setting to specify which contents are searched and the order the results
are presented in. See“Spotlight Search” on page 165.
29Chapter 3    Basics
Voice Control
Voice Control lets you make phone calls and control music playback using voice commands. On
iPhone 4S, you can also use Siri to control iPhone by voice. See Chapter 4, “Siri,” on page 39.
Note:  Voice Control may not be available in all languages. Voice Control is not available on
iPhone 4S when Siri is turned on.
Use Voice Control:  Press and hold the Home button until the Voice Control screen appears and
you hear a beep. You can also press and hold the center button on the iPhone earphones.
For best results:
Speak into the iPhone microphone as if you were making a phone call. You can also use theÂÂ
microphone on your Bluetooth headset or compatible Bluetooth car kit.
Speak clearly and naturally.ÂÂ
Say only iPhone commands and names, and numbers. Pause slightly between commands.ÂÂ
Use full names.ÂÂ
For more about using Voice Control, including information about using Voice Control in different
languages, go to support.apple.com/kb/HT3597.
Voice Control normally expects you to speak voice commands in the language that’s set for
iPhone (go to Settings  General  International  Language). Voice Control settings let you
change the language for speaking voice commands. Some languages are available in different
dialects or accents.
Change the language or country:  Go to Settings  General  International  Voice Control and
tap the language or country.
Voice Control for the Music app is always on, but for better security you can prevent voice dialing
when iPhone is locked.
Prevent voice dialing when iPhone is locked:  Go to Settings  General  Passcode Lock and turn
Voice Dial off. Unlock iPhone to use voice dialing.
See“Voice dialing” on page 57 and“Using Siri or Voice Control with Music” on page 78.
30 Chapter 3    Basics
Notifications
Notification Center displays all your alerts in one place, including alerts about:
Missed phone calls and voice messagesÂÂ
New emailÂÂ
New text messagesÂÂ
RemindersÂÂ
Calendar eventsÂÂ
Friend requests (Game Center)ÂÂ
WeatherÂÂ
StocksÂÂ
Show Notification Center:  Drag down from the top of the screen. Scroll the list to see
additional alerts.
Alerts also appear on the lock screen, or briefly at the top of the screen when you’re using iPhone.
You can see all current alerts in Notification Center.
Many apps, such as Phone, Messages, Mail, and the App Store, can display an alert badge on their
Home screen icon with a number (to indicate incoming items) or an exclamation mark (to indicate
a problem). If these apps are contained in a folder, the badge appears on the folder. A badge with
a number shows the total number of items you haven’t attended to, such as incoming phone calls,
email messages, text messages, and updated apps to download. A badge with an exclamation
mark indicates a problem with an app.
Respond to an alert in
Notification Center
Tap the alert.
Respond to an alert on the
lock screen
Swipe the icon displayed in the alert to the right.
Remove alerts from
Notification Center
Tap , then tap Clear.
Set options for notifications Go to Settings  Notifications.
31Chapter 3    Basics
Twitter
Sign in to your Twitter account (or create a new account) in Settings to enable Tweets with
attachments from the following apps:
Camera or Photos—with a photoÂÂ
Safari—with a webpageÂÂ
Maps—with a locationÂÂ
YouTube—with a videoÂÂ
Sign in to or create a Twitter account:  Go to Settings  Twitter. Enter the user name and
password for an existing account, or tap Create New Account.
In Camera or Photos,
tap the Action button
to tweet a photo.
Tweet a photo.
Tweet a photo, video, or webpage View the item, tap , then tap Tweet. If isn’t showing, tap the screen.
To include your location, tap Add Location. Location Services must be on in
Settings  Location Services.
Tweet a location in Maps Tap the location pin, tap , tap Share Location, then tap Tweet.
Add your current location
to a Tweet
Tap . Location Services must be turned on in Settings  Location Services.
Add Twitter user names and
photos to your contacts
Go to Settings  Twitter, then tap Update Contacts.
Turn Twitter on or off for
Photos or Safari
Go to Settings  Twitter.
When you write a Tweet, the number in the lower-right corner of the Tweet screen shows
the number of characters remaining that you can enter. Attachments use some of a Tweet’s
140 characters.
You can also install and use the Twitter app to post a Tweet, view your timeline, search for
trending topics, and more.
Install the Twitter app:  Go to Settings  Twitter, then tap Install.
To learn how to use the Twitter app, open the app, tap the More button (…), tap Accounts 
Settings, tap Settings, then tap Manual.
32 Chapter 3    Basics
Apple Earphones with Remote and Mic
The Apple Earphones with Remote and Mic included with iPhone feature a microphone, volume
buttons, and an integrated button that allows you to answer and end calls easily, and control
audio and video playback.
Center button
Plug in the earphones to listen to music or make a phone call. Press the center button to control
music playback and answer or end calls, even when iPhone is locked.
Pause a song or video Press the center button. Press again to resume playback.
Skip to the next song Press the center button twice quickly.
Return to previous song Press the center button three times quickly.
Fast-forward Press the center button twice quickly and hold.
Rewind Press the center button three times quickly and hold.
Adjust the volume Press the + or – button.
Answer an incoming call Press the center button.
End the current call Press the center button.
Decline an incoming call Press and hold the center button for about two seconds, then let go. Two
low beeps confirm you declined the call.
Switch to an incoming or on-hold
call and put the current call on hold
Press the center button. Press again to switch back to the first call.
Switch to an incoming or on-hold
call and end the current call
Press and hold the center button for about two seconds, then let go. Two
low beeps confirm you ended the first call.
Use Siri or Voice Control Press and hold the center button. See Chapter 4, “Siri,” on page 39 or“Voice
Control” on page 30.
If you get a call while the earphones are plugged in, you can hear the ringtone through both the
iPhone speaker and the earphones.
33Chapter 3    Basics
AirPlay
You can stream music, photos, and video wirelessly to your HDTV using AirPlay and Apple TV. You
can also use AirPlay to stream audio to an Airport Express base station. Other AirPlay-enabled
receivers are available from third-parties. Visit the online Apple Store for details.
Stream content to an AirPlay-enabled device:  Start the video, slideshow, or music, then tap and
choose the AirPlay device. Once streaming starts, you can exit the app that’s playing the content.
iPhone and the AirPlay-enabled device must be on the same Wi-Fi network.
Get quick access to the
AirPlay control
When the screen is on, double-click the Home button and scroll to the
left end of the multitasking bar.
Switch output from AirPlay
back to iPhone
Tap and choose iPhone.
On iPhone 4S, you can mirror the iPhone screen on a TV with Apple TV. Everything on the iPhone
screen appears on the TV.
Mirror the iPhone screen on a TV:  Tap at the left end of the multitasking bar, choose an
Apple TV, and tap the Mirroring button that appears.
A blue bar appears at the top of the iPhone 4S screen when AirPlay mirroring is turned on.
You can also mirror the iPhone screen on a TV using a cable. See“Watching videos on a TV” on
page 127.
Bluetooth devices
You can use iPhone with the Apple Wireless Keyboard and other Bluetooth devices, such as
Bluetooth headsets, car kits, and stereo headphones. Third-party Bluetooth headphones may
support volume and playback controls. See the documentation that came with your Bluetooth
device. For supported Bluetooth profiles, go to support.apple.com/kb/HT3647.
Pairing a Bluetooth device with iPhone
WARNING:  For important information about avoiding hearing loss and about driving safely, see
the Important Product Information Guide at www.apple.com/support/manuals/iphone.
Before you can use a Bluetooth device with iPhone, you must first pair them.
Pair a Bluetooth headset, car kit, or other device with iPhone: 
	 1	 Follow the instructions that came with the device to make it discoverable or to set it to search for
other Bluetooth devices.
	 2	 Go to Settings  General  Bluetooth and turn Bluetooth on.
	 3	 Choose the device on iPhone, and enter its passkey or PIN number. See the instructions about the
passkey or PIN that came with the device.
After you pair a Bluetooth device to work with iPhone, you must make a connection to have
iPhone use the device for your calls. See the documentation that came with the device.
When iPhone is connected to a Bluetooth headset or car kit, outgoing calls are routed through
the device. Incoming calls are routed through the device if you answer using the device, and
through iPhone if you answer using iPhone.
34 Chapter 3    Basics
Pair an Apple Wireless Keyboard with iPhone: 
	 1	 Go to Settings  General  Bluetooth and turn Bluetooth on.
	 2	 Press the power button on the Apple Wireless Keyboard to turn it on.
	 3	 On iPhone, select the keyboard listed under Devices.
	 4	 Type the passkey on the keyboard as instructed, then press Return.
Note:  You can pair only one Apple Wireless Keyboard with iPhone at a time. To pair a different
keyboard, you must first unpair the current one.
For more information, see“Using an Apple Wireless Keyboard” on page 27.
Bluetooth status
The Bluetooth icon appears in the iPhone status bar at the top of the screen:
ÂÂ or :  Bluetooth is on and paired with a device. (The color depends on the current color of the
status bar.)
ÂÂ :  Bluetooth is on and paired with a device, but the device is out of range or turned off.
ÂÂ No Bluetooth icon:  Bluetooth is turned off or not paired with a device.
Unpairing a Bluetooth device from iPhone
You can unpair a Bluetooth device, if you don’t want to use it with iPhone any more.
Unpair a Bluetooth device: 
	 1	 Go to Settings  General  Bluetooth and turn Bluetooth on.
	 2	 Tap next to the device name, then tap“Forget this Device.”
Battery
iPhone has an internal rechargeable battery.
Charging the battery
WARNING:  For important safety information about charging iPhone, see the Important Product
Information Guide at www.apple.com/support/manuals/iphone.
The battery icon in the upper-right corner shows the battery level or charging status. You can also
display the percentage of the battery charge. Go to Settings  General  Usage and turn on the
setting under Battery Usage.
Charging Charged
Charge the battery:  Connect iPhone to a power outlet using the included Dock Connector to
USB Cable and USB power adapter.
35Chapter 3    Basics
Note:  Connecting iPhone to a power outlet can start an iCloud backup or wireless iTunes syncing.
See“Backing up iPhone” on page 173 and“Syncing with iTunes” on page 18.
Charge the battery and sync iPhone:  Connect iPhone to your computer using the included Dock
Connector to USB Cable. Or connect iPhone to your computer using the included cable and the
Dock, available separately.
Unless your keyboard has a high-powered USB 2.0 port, you must connect iPhone to a USB 2.0 port
on your computer.
Important:  The iPhone battery may drain instead of charge if iPhone is connected to a computer
that’s turned off or is in sleep or standby mode.
If you charge the battery while syncing or using iPhone, it may take longer to charge.
Important:  If iPhone is very low on power, it may display one of the following images, indicating
that iPhone needs to charge for up to ten minutes before you can use it. If iPhone is extremely
low on power, the display may be blank for up to two minutes before one of the low-battery
images appears.
or
Maximizing battery life
iPhone uses lithium-ion batteries. To learn more about how to maximize the battery life of iPhone,
go to www.apple.com/batteries.
Replacing the battery
Rechargeable batteries have a limited number of charge cycles and may eventually need to
be replaced. The iPhone battery isn’t user replaceable; it can be replaced only by an authorized
service provider. For more information, go to www.apple.com/batteries/replacements.html.
36 Chapter 3    Basics
Security features
Security features help protect the information on iPhone from being accessed by others.
Passcodes and data protection
You can set a passcode that you must enter each time you turn on or wake up iPhone.
Set a passcode:  Go to Settings  General  Passcode Lock and enter a 4-digit passcode, then
enter the passcode again to verify it. iPhone then requires you to enter the passcode to unlock it
or to display the passcode lock settings.
Setting a passcode turns on data protection. Data protection uses your passcode as the key for
encrypting mail messages and their attachments stored on iPhone. (Data protection may also be
used by some apps available from the App Store.) A notice at the bottom of the Passcode Lock
screen in Settings shows whether data protection is enabled.
To increase iPhone security, turn off Simple Passcode and use a longer passcode with a
combination of numbers, letters, punctuation, and special characters. See“Passcode Lock” on
page 165.
Important:  On an iPhone 3GS that didn’t ship with iOS 4 or later, you must also restore iOS
software to enable data protection. See“Updating and restoring iPhone software” on page 175.
Prevent voice dialing when iPhone is locked:  Go to Settings  General  Passcode Lock and turn
Voice Dial off. Unlock iPhone to use voice dialing.
Find My iPhone
Find My iPhone helps you locate and secure your iPhone using the free Find My iPhone app
on another iPhone, iPad, or iPod touch, or using a Mac or PC web browser signed in to
www.icloud.com or www.me.com.
Find My iPhone includes:
ÂÂ Locate on a map:  View the approximate location of your iPhone on a full-screen map.
ÂÂ Send a Message or Play a Sound:  Lets you compose a message that will appear on your
iPhone screen, or play a sound at full volume for two minutes, even if the Ring/Silent switch is
set to silent.
ÂÂ Remote Passcode Lock:  Lets you remotely lock your iPhone and create a 4-digit passcode, if
you haven’t set one previously.
ÂÂ Remote Wipe:  Lets you protect your privacy by erasing all media and data on iPhone, restoring
it to factory settings.
Important:  Before you can use its features, Find My iPhone must be turned on in either iCloud or
MobileMe settings on your iPhone. Find My iPhone can be turned on only in one account.
Turn on Find My iPhone
using iCloud
Go to Settings  iCloud and turn on Find My iPhone.
Turn on Find My iPhone
using MobileMe
Go to Settings  Mail, Contacts, Calendars, tap your MobileMe account, then
turn on Find My iPhone.
See“iCloud” on page 16 or“Setting up mail and other accounts” on page 16.
37Chapter 3    Basics
Cleaning iPhone
Clean iPhone immediately if it comes in contact with any contaminants that may cause stains,
such as ink, dyes, makeup, dirt, food, oils, or lotions. To clean iPhone, disconnect all cables and
turn off iPhone (press and hold the On/Off button, then slide the onscreen slider). Then use a soft,
slightly damp, lint-free cloth. Avoid getting moisture in openings. Don’t use window cleaners,
household cleaners, compressed air, aerosol sprays, solvents, alcohol, ammonia, or abrasives to
clean iPhone. The front cover of iPhone 3GS and the front and back covers of iPhone 4S and
iPhone 4 are made of glass and have an oleophobic coating. To clean these surfaces, simply
wipe with a soft, lint-free cloth. The ability of this coating to repel oil will diminish over time with
normal usage, and rubbing the screen with an abrasive material will further diminish its effect and
may scratch the glass.
For more information about handling iPhone, see the iPhone Important Product Information Guide
at www.apple.com/support/manuals/iphone.
Restarting or resetting iPhone
If something isn’t working right, try restarting iPhone, force quitting an app, or resetting iPhone.
Restart iPhone:  Press and hold the On/Off button until the red slider appears. Slide your finger
across the slider to turn off iPhone. To turn iPhone back on, press and hold the On/Off button until
the Apple logo appears.
If you can’t turn off iPhone or if the problem continues, you may need to reset iPhone. A reset
should be done only if turning iPhone off and on doesn’t resolve the problem.
Force an app to close:  Press and hold the On/Off button for a few seconds until a red slider
appears, then press and hold the Home button until the app quits.
You can also force an app to quit by removing it from the multitasking bar. See“Opening and
switching apps” on page 19.
Reset iPhone:  Press and hold both the On/Off button and the Home button for at least ten
seconds, until the Apple logo appears.
For more troubleshooting suggestions, see Appendix B, “Support and Other Information,” on
page 173.
38 Chapter 3    Basics
Siri
4
What is Siri?
Siri is the intelligent personal assistant that helps you get things done just by talking. Siri
understands natural speech, so you don’t have to learn specific commands or remember keywords.
You can ask things in different ways. For example, you can say“Set the alarm for 6:30 a.m.”or“Wake
me at 6:30 in the morning.”Either way, Siri gets it.
Siri lets you write and send messages, schedule meetings, place phone calls, get directions, set a
reminder, search the web—and much much more!—simply by talking naturally. Siri understands
what you say and knows what you mean. Siri speaks back to let you know what it heard you
say, and asks a question if it needs clarification or more information. It’s very much like having a
conversation with a person.
For example, ask“Any good burger joints around here?”and Siri may reply“I found a number of
burger restaurants near you.”If you say“Hmm. How about tacos,”Siri remembers that you just
asked about restaurants and then looks for Mexican restaurants in the neighborhood.
In addition to the internal processing power of iPhone, Siri uses Apple’s data centers to
understand what you say and quickly return a response. Siri also uses information from your
contacts, music library, calendars, reminders, and so forth to know what you’re talking about.
Siri works with most of the built-in apps on iPhone 4S, and is smart enough to figure out which
app to use for a request. Siri also uses Search and Location Services to help you with your requests.
There’s so many things you can say to Siri! Here’s a few more examples, for starters:
Call JoeÂÂ
Set the timer for 30 minutesÂÂ
How far to the nearest Apple store?ÂÂ
Is it going to rain tomorrow?ÂÂ
Note:  Siri is available only on iPhone 4S, and it requires Internet access via a cellular or Wi-Fi
connection. Siri may not be available in all languages or in all areas, and features may vary by area.
Cellular data charges may apply.
39
Using Siri
Starting Siri
Siri comes to life with the press of a button.
Start Siri: Press the Home button until Siri appears.
You’ll hear two quick beeps and see“What can I help you with?”on the screen.
Just begin speaking. The microphone icon lights up to let you know that Siri hears you talking.
Once you’ve started a dialogue with Siri, tap the microphone icon to talk to it again.
Siri waits for you to stop talking, but you can also tap the microphone icon to tell Siri you’re done.
This is useful when there’s a lot of background noise. It can also speed up your conversation with
Siri, since Siri won’t have to wait for your pause.
When you finish speaking, Siri displays what it heard and provides a response. Siri often includes
additional, related info that might be useful. If the info is related to an app—for example, a text
message you’ve composed, or a location you asked for—just tap the display to open the app for
details and further action.
What Siri heard you say
Tap to speak to Siri.
Siri’s response
Related info—tap to
open the app.
Siri may ask you if it needs more information to complete a request. For example, tell Siri to
“Remind me to call mom,”and Siri may ask“What time would you like me to remind you?”Don’t
worry about telling Siri everything at once. Siri prompts you for the details it needs.
You can start talking to Siri just by bringing iPhone to your ear, like making a phone call. If the
screen isn’t on—first press the On/Off or Home button. You’ll hear two quick beeps to indicate Siri
is listening. Then start talking.
40 Chapter 4    Siri
If Siri doesn’t respond when you bring iPhone to your ear, start with the screen facing you, so your
hand rotates on the way up.
Cancel a request Say“cancel,”tap , or press the Home button .
Stop a phone call you started
with Siri
Before Phone opens, press the Home button . If Phone is already open,
tap End.
Telling Siri about yourself
The more Siri knows you, the more it can use your information to help you. Siri gets your
information from your personal info card (“My Info”) in Contacts.
Tell Siri who you are: Go to Settings  Siri  My Info, then tap your name.
Put your home and work addresses on your card, so you can say things like“How do I get home?”
and“Remind me to call Bob when I get to work.”
Siri also wants to know about the important people in your life, so specify those relationships on
your personal info card. Siri can set those up for you. For example, the first time you tell Siri to call
your sister, Siri asks you who your sister is (if you don’t already have that info on your card). Siri
adds that relationship to your personal info card so it doesn’t have to ask next time.
Create cards in Contacts for all your important relationships, and include information such as
phone numbers, email addresses, home and work addresses, and nicknames you like to use.
41Chapter 4    Siri
Onscreen guide
Siri gives you examples of things you can say, right on screen. Ask Siri“what can you do”or tap
when Siri first appears.
Handsfree Siri
You can use Siri with the Apple Earphones with Remote and Mic that came with your iPhone, or
with other supported headphones and Bluetooth headsets.
Talk to Siri using earphones: Press and hold the center button.
Talk to Siri using a Bluetooth headset: Press and hold the call button.
To continue a conversation with Siri, press and hold the button each time you want to talk.
When you use earphones or a headset, Siri speaks its responses to you. Siri reads back text messages
and email messages that you’ve dictated before sending them.This gives you a chance to change
the message if you want. Siri also reads back the subjects of reminders before creating them.
Context
Siri pays attention to where you’re at and what you’re doing, so it understands context. If you just
received a text message from Bob, just say“Reply”and Siri knows to send a text message to Bob.
Say“Call him”and Siri knows to call Bob instead. Siri always lets you know what it is about to do.
Setting options for Siri
Turn Siri on or off: Go to Settings  General  Siri.
Note:  Turning Siri off resets Siri, and Siri forgets what it’s learned about your voice.
Set options for Siri: Go to Settings  General  Siri.
Language: Select the language you want to use with Siri.
Voice Feedback: By default, Siri speaks its responses only when you hold iPhone to your ear or
use Siri with earphones or a headset. If you want Siri to always speak its responses, set this option
to Always.
My Info: Let Siri know which card in Contacts contains your personal info. See“Telling Siri about
yourself” on page 41.
Raise to Speak: Talk to Siri by bringing iPhone to your ear when the screen is on.
Allow or prevent access to Siri when iPhone is locked with a passcode: Go to Settings 
General  Passcode Lock.
You can also disable Siri by turning on restrictions. See“Restrictions” on page 166.
42 Chapter 4    Siri
Location Services
Because Siri knows locations like“current,”“home,”and“work,”it can remind you to do a certain
task when you leave a location or arrive at a location. Tell Siri“Remind me to call my wife when I
leave the office,”and Siri does just that.
Location information isn’t tracked or stored outside the phone. You can still use Siri if you turn
Location Services off, but Siri won’t do anything that requires location information.
Turn off Location Services for Siri: Go to Settings  Location Services.
Accessibility
Siri is accessible to blind and visually impaired users through VoiceOver, the screen reader built
into iOS. VoiceOver describes aloud what’s onscreen—including any text in Siri’s responses—so
you can use iPhone without seeing it.
Turn on VoiceOver: Go to Settings  Accessibility.
Turning on VoiceOver causes even your notifications to be read aloud for you. For more
information, see“VoiceOver” on page 143.
Correcting Siri
If Siri is having trouble
Siri may sometimes have trouble understanding you. Noisy environments, for example, can make
it difficult for Siri to hear what you’re saying. If you speak with an accent, it can take Siri some time
to get used to your voice. If Siri doesn’t hear you exactly right, you can make corrections.
Siri shows what it heard you say, along with its response.
Correct what Siri hears you say: Tap the bubble showing what Siri heard you say. Edit your
request by typing, or tap on the keyboard to dictate.
For information about using dictation, see“Dictation” on page 55.
If some of the text is underlined in blue, tap it and Siri suggests some alternatives. Tap one of the
suggestions, or replace the text by typing or dictating.
Correct Siri by voice: Tap , then restate or clarify your request. For example,“I meant Boston.”
When correcting Siri, don’t say what you don’t want—just tell Siri what you do want.
Correct a mail or text message: If Siri asks if you want to send the message, say something like:
“Change it to: Call me tomorrow.”
“Add: See you there question mark.”
“No, send it to Bob.”
“No.”(to keep the message without sending it)
“Cancel.”
To have Siri read the message to you, say“Read it back to me”or“Read me the message.”If it’s
correct, say something like“Yes, send it.”
See“Mail” on page 49 and“Messages” on page 45.
How Siri learns
Siri works right from the start without setup, and gets better over time. Siri learns about your
accent and other characteristics of your voice, and categorizes your voice into one of the dialects
or accents it understands. As more people use Siri and as it’s exposed to more language variations,
recognition will improve and Siri will work even better.
43Chapter 4    Siri
Noisy environments
In a noisy environment, hold iPhone close to your mouth, but don’t talk directly into the bottom
edge. Continue to speak clearly and naturally. Tap when you finish speaking.
You can also try holding iPhone to your ear to speak to Siri.
Network connection
Siri might tell you it’s having trouble connecting to the network. Because Siri relies on Apple
servers for voice recognition and other services, you need to have a good 3G or 4G cellular or
Wi-Fi connection to the Internet.
Siri and apps
Siri works with most of the built-in apps on iPhone 4S, and uses the apps it needs to help you
with your requests. Siri knows when you’re using an app, so you can refer to elements on the
screen. For example, when reading a message in Mail, you can say“Reply, I like it.”
Phone
Use Siri to make a phone call or start a FaceTime call. You can refer to your family, friends, and
associates in Contacts, or say which phone number to use.
For example:
Call Jennifer Wright mobileÂÂ
Call Susan on her work phoneÂÂ
Call 408 555 1212ÂÂ
Call homeÂÂ
FaceTime LisaÂÂ
Saying both the first and last name usually makes it clear who you want to call, but you can say
just one or the other and let Siri figure it out. Siri first checks your Favorites, and if a match is
found, calls that number. Next, Siri checks all your contacts. If there’s more than one person with
the same name, Siri asks which one you want to call. Siri also asks which phone number to use if
there’s more than one listed.
You can also ask Siri to call a business in your contacts.
44 Chapter 4    Siri
So that Siri knows who you’re referring to when you ask to make a call, make sure to introduce
yourself to Siri. See“Telling Siri about yourself” on page 41.
Stop a phone call you started
with Siri
Before Phone opens, press the Home button . If the phone call is in
progress, tap End.
Music
Ask Siri to play a song, album, or playlist. Pause playback, then resume. Set the mood by asking for
a certain type of music.
Or just say“Play”and let Siri choose for you. If you don’t recognize the song, ask Siri“What’s playing?”
Here are some ways you can play music with Siri:
Play The Light of the SunÂÂ
Play TroubleÂÂ
Play Taking Back Sunday shuffledÂÂ
Play Alicia KeysÂÂ
Play some bluesÂÂ
Play my party mixÂÂ
Shuffle my roadtrip playlistÂÂ
PlayÂÂ
PauseÂÂ
ResumeÂÂ
SkipÂÂ
To hear similar songs to the one you’re listening to, say“Genius.”(Siri creates a temporary Genius
playlist, but it’s not saved.)
Messages
You can send text messages, have Siri read new messages to you, and respond to messages
you receive.
Include the name of the person to text, or wait for Siri to ask who you want to send it to. You can
text to a phone number, and you can text more than one person at once.
To send a text, say things like:
Tell Susan I’ll be right thereÂÂ
Send a message to Jason RussellÂÂ
Send a message to Lisa saying how about tomorrow?ÂÂ
Send a message to Susan on her mobile saying I’ll be lateÂÂ
Send a message to 408 555 1212ÂÂ
Text Jason and Lisa where are you?ÂÂ
45Chapter 4    Siri
To see or hear messages you’ve received, you can say:
Read me my messagesÂÂ
Show my new textsÂÂ
Read it againÂÂ
If you’ve just received a text message or if you’re reading one that you received earlier, you can
simply say:
Reply that’s great newsÂÂ
Tell him I’ll be there in 10 minutesÂÂ
Call herÂÂ
Siri understands the context and knows who to address the reply to.
Before sending a message you’ve composed, Siri displays it or reads it back to you to make sure
it’s right. When Siri asks if you want to send the message, you can say:
Change it to: Call me tomorrowÂÂ
Add: See you there question markÂÂ
No, send it to BobÂÂ
No (to keep the message without sending it)ÂÂ
CancelÂÂ
Want to tag your message with a smiley face? Say“smiley face,”of course. :-)
Editing messages
If you’re creating a text message with Siri but it’s not exactly what you wanted to say, you can
ask Siri to change it. If it’s pretty close, you might want to edit it instead. When Siri displays the
message for your review, tap the message bubble to open it in the Messages app. Then you can
edit the message by typing or dictating. See“Dictation” on page 55.
Calendar
Add new events to your calendar, change existing events, or find out what’s on your schedule.
When you create an event, you can specify a time, a place, a title, and the people you want to invite.
46 Chapter 4    Siri
To create an event:
Set up a meeting at 9ÂÂ
Set up a meeting with Michael at 9ÂÂ
Meet with Lisa at noonÂÂ
Set up a meeting about hiring tomorrow at 9 a.m.ÂÂ
New appointment with Susan Park Friday at 3ÂÂ
Schedule a planning meeting at 8:30 today in the boardroomÂÂ
To change or cancel an event:
Move my 3 p.m. meeting to 4:30ÂÂ
Reschedule my appointment with Dr. Manning to next Monday at 9 a.m.ÂÂ
Add Lisa to my meeting with JasonÂÂ
Cancel the budget review meetingÂÂ
To ask Siri about events:
What does the rest of my day look like?ÂÂ
What’s on my calendar for Friday?ÂÂ
When is my next appointment?ÂÂ
When am I meeting with Michael?ÂÂ
Where is my next event?ÂÂ
When you create, change, or ask about an event, Siri displays information about the event. To get
more information, tap the event.
Reminders
Siri’s a great way to set up a quick reminder.
To create a reminder, say things like:
Remind me to call momÂÂ
Remember to take an umbrellaÂÂ
Remind me take my medicine at 6 a.m. tomorrowÂÂ
Remind me when I leave to call JasonÂÂ
Remind me to finish the report by 6ÂÂ
Siri asks for information it needs in order to create the reminder, including date, time, and location.
47Chapter 4    Siri
Including location info lets Siri remind you about the item when you approach or leave a location.
A location can be your current location (“here”), or an address in Contacts. To let Siri know about
your home and work locations, see“Telling Siri about yourself” on page 41.
Remind me to call my mom when I get homeÂÂ
Remind me when I get to the office to call my wifeÂÂ
Remind me to pick up flowers when I leave hereÂÂ
Remind me to check the time when I get back hereÂÂ
Reminders are added to the default reminder list.
Set the default list for Reminders: Go to Settings  Mail, Contacts, Calendars  Default List.
To keep a list without setting a specific time or location to be reminded:
Remember to buy milkÂÂ
Add eggs to my groceries listÂÂ
If Siri asks when you want to be reminded, you can say“never.”
If you have a list visible in Reminders, you can add to it just by saying“Add”:
Add eggsÂÂ
When you create a reminder with Siri, Siri displays it for you to confirm.
You can confirm, cancel, or let Siri know you want to change something:
Change the time to 7ÂÂ
Make it Tuesday insteadÂÂ
Change that to: Get the car washed and waxedÂÂ
Move it to my Work listÂÂ
Move it to my Personal listÂÂ
Once you confirm the reminder, you can tap it to open the Reminder app and see the reminder
and its details.
Maps
Use Siri to find a location, get directions, and see traffic conditions. For example:
How do I get home?ÂÂ
Show 1 Infinite Loop Cupertino CaliforniaÂÂ
Directions to my dad’s workÂÂ
What’s the traffic like getting home?ÂÂ
48 Chapter 4    Siri
Find coffee near meÂÂ
Find some burger joints in BaltimoreÂÂ
Find a gas station within walking distanceÂÂ
Good Mexican restaurants around hereÂÂ
If you ask about a location, Siri displays it on a map. Sometimes Siri goes directly to Maps, but you
can tap the map to open the Maps app if Siri doesn’t open it.
Siri might respond with a list of choices. For example, if you ask about burger joints, Siri looks for
hamburger restaurants in the vicinity and sorts the list by proximity. If you ask for the best burger
joint around, Siri sorts by rank. To sort the list another way, just ask“which is the best?”or“which is
the closest?”
Mail
With Siri, you can send mail, check your mail, and respond to mail you’ve received.
A mail message requires at least one recipient, a subject line (say“about”), and message text. But
don’t worry about getting it all down in one breath—Siri will ask for what’s needed to complete
the email.
To email someone:
Email Lisa about the tripÂÂ
New email to Susan ParkÂÂ
Mail Dad about the rent checkÂÂ
49Chapter 4    Siri
Email Dr. Manning and say I got the forms, thanksÂÂ
Mail Lisa and Jason about the party and say I had a great timeÂÂ
To check your mail:
Check emailÂÂ
Any new email from Michael today?ÂÂ
Show new mail about the leaseÂÂ
Show the email from Lisa yesterdayÂÂ
To respond to email:
Reply Dear Susan sorry about the late paymentÂÂ
Call him at workÂÂ
Before sending an email, Siri displays or reads it back to you so you can make sure it’s right. When
Siri asks if you want to send the email, you can say:
Change it to say: Check’s in the mailÂÂ
Add John (to include another recipient)ÂÂ
Change subject to:This weekendÂÂ
Editing email
If you create an email with Siri but it’s not exactly what you want to say, ask Siri to change it. If
it’s pretty close, you can edit it instead. Tap the message to open it in the Mail app, then edit it by
typing or dictating. See“Dictation” on page 55.
Weather
Use Siri to get weather information. If you don’t give a location, Siri assumes you mean your
current location. If you don’t give a time, Siri shows today’s forecast, but you can ask about the
weather anytime in the coming week.
What’s the weather for today?ÂÂ
What’s the weather for tomorrow?ÂÂ
Will it rain in Cupertino this week?ÂÂ
What’s the forecast for this evening?ÂÂ
How’s the weather in Tampa right now?ÂÂ
How hot will it be in Palm Springs this weekend?ÂÂ
What’s the high for Anchorage on Thursday?ÂÂ
What’s the temperature outside?ÂÂ
50 Chapter 4    Siri
How windy is it out there?ÂÂ
When is sunrise in Paris?ÂÂ
Stocks
Use Siri to quickly get quotes for your favorite stocks. Get market capitalization, or P/E ratios. Ask
about specific indexes, and the situation in general. For example:
What’s Apple’s stock price?ÂÂ
What’s Apple’s P/E ratio?ÂÂ
What did Yahoo close at today?ÂÂ
How’s the Nikkei doing?ÂÂ
How are the markets doing?ÂÂ
What’s the Dow at?ÂÂ
Clock
Use Siri to quickly set an alarm for the morning, a timer for that cake in the oven, or find out what
time it is at your overseas destination.
To set or change alarms:
Wake me up tomorrow at 7 a.m.ÂÂ
Set an alarm for 6:30 a.m.ÂÂ
Wake me up in 8 hoursÂÂ
Change my 6:30 alarm to 6:45ÂÂ
51Chapter 4    Siri
Turn off my 6:30 alarmÂÂ
Delete my 7:30 alarmÂÂ
When you set an alarm, Siri displays the alarm so you can see that it’s correct. You can tap the
switch to turn the alarm on or off. Tap the alarm to open it in the Clock app.
To ask about the date and time:
What time is it?ÂÂ
What time is it in Berlin?ÂÂ
What is today’s date?ÂÂ
What’s the date this Saturday?ÂÂ
Siri displays a clock for you. Tap it to open the Clock app.
To use the timer:
Set the timer for ten minutesÂÂ
Show the timerÂÂ
Pause the timerÂÂ
ResumeÂÂ
Reset the timerÂÂ
Stop itÂÂ
52 Chapter 4    Siri
Siri displays a timer. Tap it to open the Clock app.
Contacts
Siri uses your entries in Contacts to find addresses, look up phone numbers and other information,
or tell you about someone’s birthday. Siri even knows who your relatives are by looking at your
personal contact card. See“Telling Siri about yourself” on page 41.
To ask about contacts, you can say:
What’s Michael’s address?ÂÂ
What is Susan Park’s phone number?ÂÂ
When is my wife’s birthday?ÂÂ
Show Jennifer’s home email addressÂÂ
What’s my brother’s work address?ÂÂ
To find contacts:
Show Jason RussellÂÂ
Find people named ParkÂÂ
Who is Michael Manning?ÂÂ
If you’re not sure which phone number to use for a contact, ask Siri to show the person’s contact
information. To call, just tap a number. Other items are active as well—tap an email address to
start a new email message, or tap the FaceTime button to speak face to face.“Find John”may help
you narrow down the list of possibilities, if you know it’s John but can’t remember the last name.
53Chapter 4    Siri
Notes
Use Siri to verbally jot down notes, or look up notes you’ve already made. Say things like:
Note that I spent $12 on lunchÂÂ
Note: check out that new Alicia Keys albumÂÂ
Find my restaurant noteÂÂ
Create a reading list noteÂÂ
Add Tom Sawyer to my reading list noteÂÂ
Siri displays the note for you to review. To edit the note, tap it. Siri opens the Notes app for you,
and you can edit the note by typing or dictating. See“Dictation” on page 55.
Safari
You can do a web search with Siri—specify which search engine to use, or search a site like
Wikipedia. For example:
Search the web for Bora BoraÂÂ
Search for vegetarian pasta recipesÂÂ
Search the web for best cable plansÂÂ
Google the war of 1812ÂÂ
Search Wikipedia for Abraham LincolnÂÂ
Search for news about the World CupÂÂ
Bing Alicia KeysÂÂ
Siri opens Safari and performs the search you request. If you don’t specify the search engine, Siri
uses the one specified in Safari settings. Go to Settings  Safari.
WolframAlpha
Ask Siri to provide some information or perform a calculation, and Siri might refer to
WolframAlpha (www.wolframalpha.com). Responses often include related info.
Some sample questions and requests:
How many calories in a bagel?ÂÂ
What is an 18% tip on $86.74 for four people?ÂÂ
Who’s buried in Grant’s tomb?ÂÂ
How long do dogs live?ÂÂ
What is the Gossamer Condor?ÂÂ
54 Chapter 4    Siri
What’s the square root of 28?ÂÂ
How many dollars is 45 euros?ÂÂ
What was the Best Picture of 1983?ÂÂ
How many days until Christmas?ÂÂ
How far away is the sun?ÂÂ
When is the next solar eclipse?ÂÂ
Show me the Orion constellationÂÂ
What’s the population of Jamaica?ÂÂ
How high is Mt. Everest?ÂÂ
How deep is the Atlantic Ocean?ÂÂ
What’s the price of gasoline in Chicago?ÂÂ
Dictation
When Siri is turned on, you can also dictate text. See“Dictation” on page 27.
Although you can compose email, text messages, and other text by talking directly with Siri,
you might prefer dictation. Dictation lets you edit a message instead of replacing the entire text.
Dictation also gives you more time to think while composing.
Siri understands pauses to mean you finished talking for the moment, and takes that opportunity
to respond. While this lets you have a natural conversation with Siri, Siri might interrupt you
before you’re really done, because you paused a moment to think. With dictation, you can pause
as frequently as you like, and resume talking when you’re ready.
You can also start composing text using Siri, then continue using dictation. For example, you
can create an email with Siri, then tap the draft to open the message in Mail. In Mail, you can
complete or edit the message and make other changes, such as adding or removing recipients,
revising the subject, or changing the account you’re sending the email from.
55Chapter 4    Siri
Phone
5
Phone calls
Making a call
Making a call on iPhone is as simple as tapping a name or number in your contacts, using Siri
to say“call bob”(iPhone 4S), tapping one of your favorites, or tapping a recent call to return it.
Buttons at the bottom of the Phone screen give you quick access to your favorites, recent calls,
your contacts, and a numeric keypad for dialing manually.
WARNING:  For important information about driving safely, see the Important Product Information
Guide at www.apple.com/support/manuals/iphone.
Number of
missed calls
Call a favorite with a single tap.
View your recent incoming and outgoing
calls to return a call or get more info.
Call, email, or text someone
in your contacts list.
Dial manually.
View a list of
your voicemail
messages.
Number of
unheard messages
Return a missed call Do one of the following:
ÂÂ Phone:  Tap Recents, then tap the name or number.
ÂÂ Locked screen:  Swipe the icon displayed in the alert to the right.
ÂÂ Notification Center:  Tap the missed call.
56
Dialing manually
You can use the keypad to dial a phone number manually.
Dial a number:  Tap Keypad, enter the number, then tap Call.
Paste a number to the keypad Tap the screen above the keyboard, then tap Paste.
Enter a soft (2-second) pause Touch the“*”key until a comma appears.
Enter a hard pause (to pause
dialing until you tap the
Dial button)
Touch the“#”key until a semicolon appears.
Redial the last number Tap Keypad, tap Call, then tap Call again.
Voice dialing
You can use Siri (iPhone 4S) or Voice Control to call someone in your contacts, or to dial a specific
number. See Chapter 4, “Siri,” on page 39 and“Voice Control” on page 30.
Make a phone call by voice:  Activate Siri or Voice Control, say“call”or“dial,”then say the name
or number.
Siri:  If the screen isn’t on, press the On/Off or Home button , then hold iPhone to your ear.
Voice Control or Siri:   Press and hold the Home button until you hear the tone. You can also
press and hold the center button on the iPhone earphones.
For example:
Call John AppleseedÂÂ
Call John Appleseed at homeÂÂ
Call John Appleseed, mobileÂÂ
For best results, speak the full name of the person you’re calling. When voice dialing a number,
speak each digit separately—for example, say“four one five, five five five, one two one two.”
Note:  For the“800”area code in the U.S., you can say“eight hundred.”
Receiving calls
When you receive a call, tap Answer. If iPhone is locked, drag the slider. You can also press the
center button on your iPhone earphones.
Silence a call Press the On/Off button or either volume button. You can still answer the
call after silencing it, until it goes to voicemail.
Decline a call and send it directly
to voicemail
Do one of the following:
ÂÂ Press the On/Off button twice quickly.
ÂÂ Press and hold the center button on the iPhone earphones for about two
seconds. Two low beeps confirm that the call was declined.
ÂÂ Tap Decline (if iPhone is awake when a call comes in).
Block calls and maintain Wi-Fi
access to the Internet
Go to Settings and turn on Airplane Mode, then tap Wi-Fi to turn it on.
If iPhone is turned off or in Airplane Mode, incoming calls go directly to voicemail.
57Chapter 5    Phone
While on a call
When you’re on a call, the screen shows call options.
Mute your line.
iPhone 4 or later: Touch and
hold to put your call on hold.
Dial a number or
enter numbers.
Use the
speakerphone
or a Bluetooth
device.
Get contact info.
iPhone 4 or later:
Make a FaceTime call.
iPhone 3GS (Hold button):
Put a call on hold.
Make another
call.
The call options may vary, depending on which iPhone you’re using.
Use another app during a call Press the Home button , then tap an app icon. To return to the call, tap
the green bar at the top of the screen.
End a call Tap End Call. Or press the center button on your iPhone earphones.
Second calls
During a call, you can make or receive another call. If you receive a second call, iPhone beeps and
shows the caller’s information and a list of options.
Note:  Making and receiving a second call may be an optional service in some areas. Contact your
carrier for more information.
Respond to a second incoming call: 
ÂÂ To ignore the call and send it to voicemail:  Tap Ignore.
ÂÂ To hold the first call and answer the new one:  Tap Hold Call + Answer.
ÂÂ To end the first call and answer the new one:  When using a GSM network, tap End Call + Answer.
With a CDMA network, tap End Call and when the second call rings back, tap Answer, or drag
the slider if the phone is locked.
If you’re on a FaceTime video call, you can either end the video call and answer the incoming call,
or decline the incoming call.
Make a second call Tap Add Call. The first call is put on hold.
Switch between calls Tap Swap. The active call is put on hold.
With CDMA, you can’t switch between calls if the second call was outgoing,
but you can merge the calls. If you end the second call or the merged call,
both calls are terminated.
Merge calls Tap Merge Calls.
With CDMA, you can’t merge calls if the second call was incoming.
58 Chapter 5    Phone
Conference calls
With GSM, you can set up a conference call to talk with up to five people at a time, depending on
your carrier.
Note:  Conference calling may be an optional service in some areas. Contact your carrier for
information.
Create a conference call: 
	 1	 Make a call.
	 2	 Tap Add Call and make another call. The first call is put on hold.
	 3	 Tap Merge Calls. The calls are merged on one line and everyone can hear each other.
	 4	 Repeat steps two and three to add additional calls.
Drop one call Tap Conference and tap next to a call. Then tap End Call.
Talk privately with a call Tap Conference, then tap Private next to a call. Tap Merge Calls to resume
the conference call.
Add an incoming call Tap Hold Call + Answer, then tap Merge Calls.
If your service includes conference calling, iPhone always has a second line available in addition to
the conference call.
Note:  You can’t make a FaceTime video call when you’re on a conference call.
Using a Bluetooth device for calls
You can make and receive calls using a Bluetooth device paired with iPhone. See“Pairing a
Bluetooth device with iPhone” on page 34.
For information about using a Bluetooth device, see the documentation that came with the device.
Bypass your Bluetooth device: 
Answer a call by tapping the iPhone screen.ÂÂ
During a call, tap Audio and choose iPhone or Speaker Phone.ÂÂ
Turn off Bluetooth in Settings  General  Bluetooth.ÂÂ
Turn off the Bluetooth device, or move out of range. You must be within about 30 feet of aÂÂ
Bluetooth device for it to be connected to iPhone.
Emergency calls
If iPhone is locked with a passcode, you may still be able to make an emergency call.
Make an emergency call when iPhone is locked:  On the Enter Passcode screen, tap Emergency
Call, then enter the emergency number and tap the green button.
In the U.S., location information (if available) is provided to emergency service providers when
you dial 911.
With CDMA, when an emergency call ends, iPhone enters Emergency call mode to allow a call back
from emergency services. While in this mode, data transmission and text messages are blocked.
Exit emergency call mode (CDMA):  Do one of the following:
Tap the back button.ÂÂ
Press the On/Off button or the Home buttonÂÂ .
Use the keypad to dial a non-emergency number.ÂÂ
Emergency call mode ends automatically after a few minutes, as determined by your carrier.
59Chapter 5    Phone
Important:  You should not rely on wireless devices for essential communications, such as medical
emergencies. Use of iPhone to call emergency services may not work in all areas or all operating
conditions. Emergency numbers and services vary by area, and sometimes an emergency call
cannot be placed due to network availability or environmental interference. Some cellular
networks may not accept an emergency call from iPhone if iPhone is not activated, if iPhone is not
compatible with or configured to operate on a particular cellular network, or (when applicable) if
iPhone does not have a SIM or if the SIM is PIN-locked. If you’re on a FaceTime video call, you must
end that call before you can call an emergency number.
FaceTime
FaceTime video calls (iPhone 4 or later) let you see as well as hear the person you’re talking to. You
can make a video call to someone with a Mac or iOS device that supports FaceTime. No setup is
needed, but you must have a Wi-Fi connection to the Internet. By default, FaceTime uses the front
camera so the person you call can see your face; switch to the rear camera to share what you see
around you.
Note:  FaceTime may not be available in all areas.
Make a FaceTime call:  In Contacts, choose a name, tap FaceTime, then tap the phone number
or email address the person uses for FaceTime.
To call someone who has an iPhone 4 or later, you can start by making a voice call, then
tap FaceTime.
When the voice call is established, the other person’s image appears on your screen. An inset
shows what the other person sees. Rotate iPhone to use FaceTime in landscape orientation.
Switch cameras.
Drag your image
to any corner.
Mute (you can hear and see;
the caller can see but not hear).
If your Wi-Fi network is unavailable (for example, if you’re out of range), you get an option to redial
the number for a voice call.
Note:  When you make a FaceTime video call, your phone number is displayed even if caller ID is
blocked or turned off.
60 Chapter 5    Phone
Make a FaceTime call using
Siri or Voice Control
Press and hold the Home button until you hear the tone. With Siri
(iPhone 4S), you can also just hold iPhone to your ear while the screen is on.
Say“FaceTime,”followed by the name of the person to call.
Block FaceTime calls Go to Settings  FaceTime and turn off FaceTime. You can also disable
FaceTime in Restrictions. See“Restrictions” on page 166.
Use your Apple ID or an email
address for FaceTime
Go to Settings  FaceTime, then tap“Use your Apple ID for FaceTime”or
Add An Email. See“FaceTime” on page 60.
Visual voicemail
Setting up voicemail
On iPhone, visual voicemail lets you see a list of your messages and choose which ones to listen to
or delete, without having to listen to instructions or prior messages.
Note:  Visual voicemail may not be available in all areas, or may be an optional service. Contact
your carrier for more information. If visual voicemail isn’t available, tap Voicemail and follow the
voice prompts to retrieve your messages.
Number of missed calls and
unheard voicemail messages.
The first time you tap Voicemail, iPhone prompts you to create a voicemail password and record
your voicemail greeting.
Change your greeting:  Tap Voicemail, tap Greeting, then tap Custom. Tap Record and say your
greeting. When you finish, tap Stop.
To review, tap Play. To rerecord, tap Record again. Tap Save when you’re satisfied.
Use your carrier’s default greeting Tap Voicemail, tap Greeting, then tap Default.
Set an alert sound for new
voicemail
Go to Settings  Sounds, then turn New Voicemail on. The alert sounds
once for each new voicemail.
If the Ring/Silent switch is off, iPhone won’t sound alerts.
Change the voicemail password Go to Settings  Phone  Change Voicemail Password.
61Chapter 5    Phone
Checking voicemail
When you tap Phone, iPhone shows the number of missed calls and unheard voicemail messages.
Tap Voicemail to see a list of your messages.
Drag the playhead to skip
to any point in a message.
Unheard
messages Play/Pause
Contact info
Scrubber bar
Speakerphone (Audio,
when a Bluetooth device
is connected. Tap to
choose audio output.)
Return the call.
Listen to a voicemail message:  Tap Voicemail, then tap a message.
If you’ve already heard the message, tap the message again to replay it. Use and to pause and
resume playback.
Once you listen to a message, it’s saved until your carrier erases it.
Check voicemail from
another phone
Dial your own number or your carrier’s remote access number.
Deleting messages
Delete a message:  Swipe or tap the message, then tap Delete.
Note:  In some areas, deleted visual voicemail messages may be permanently erased by your carrier.
Listen to a deleted message Tap Deleted Messages (at the end of the list), then tap the message.
Undelete a message Tap Deleted Messages (at the end of the list), then tap the message and
tap Undelete.
Delete messages permanently Tap Deleted Messages (at the end of the list), then tap Clear All.
Contacts
From a contact’s Info screen, a quick tap lets you make a phone call, create an email message, find
their location, and more. See“Searching contacts” on page 124.
62 Chapter 5    Phone
Iphone user guide for iOS 5.1

More Related Content

Similar to Iphone user guide for iOS 5.1

ipad_user_guide.pdf
ipad_user_guide.pdfipad_user_guide.pdf
ipad_user_guide.pdfempite
 
ipad_user_guide.pdf
ipad_user_guide.pdfipad_user_guide.pdf
ipad_user_guide.pdfempite
 
ipad_user_guide.pdf
ipad_user_guide.pdfipad_user_guide.pdf
ipad_user_guide.pdfempite
 
ipad_user_guide.pdf
ipad_user_guide.pdfipad_user_guide.pdf
ipad_user_guide.pdfempite
 
ipad_user_guide.pdf
ipad_user_guide.pdfipad_user_guide.pdf
ipad_user_guide.pdfempite
 
Ipad user guide
Ipad user guideIpad user guide
Ipad user guideiift59
 
Ipad user guide ios7
Ipad user guide ios7Ipad user guide ios7
Ipad user guide ios7Rose Banioki
 
Ipod touch ios6_user_guide
Ipod touch ios6_user_guideIpod touch ios6_user_guide
Ipod touch ios6_user_guideWaldir Hannemann
 
HTC 10 Manual / User Guide
HTC 10 Manual / User GuideHTC 10 Manual / User Guide
HTC 10 Manual / User Guidemanualsheet
 
Polycom sound station ip4000 user guide
Polycom sound station ip4000 user guidePolycom sound station ip4000 user guide
Polycom sound station ip4000 user guidebest4systems
 
Huawei nova plus manual / user guide
Huawei nova plus manual / user guideHuawei nova plus manual / user guide
Huawei nova plus manual / user guidemanualsheet
 
Alcatel Pop 3 (5.5) LTE Manual / User Guide
Alcatel Pop 3 (5.5) LTE Manual / User GuideAlcatel Pop 3 (5.5) LTE Manual / User Guide
Alcatel Pop 3 (5.5) LTE Manual / User Guidemanualsheet
 
HUAWEI Mate S Manual PDF / User Guide
HUAWEI Mate S Manual PDF / User GuideHUAWEI Mate S Manual PDF / User Guide
HUAWEI Mate S Manual PDF / User Guidemanualsheet
 
Gt i8190 um-dtm_jellybean_eng_rev.1.0_121204
Gt i8190 um-dtm_jellybean_eng_rev.1.0_121204Gt i8190 um-dtm_jellybean_eng_rev.1.0_121204
Gt i8190 um-dtm_jellybean_eng_rev.1.0_121204LostSaint
 

Similar to Iphone user guide for iOS 5.1 (20)

iPhone User Guide iOS 7
iPhone User Guide iOS 7iPhone User Guide iOS 7
iPhone User Guide iOS 7
 
ipad_user_guide.pdf
ipad_user_guide.pdfipad_user_guide.pdf
ipad_user_guide.pdf
 
ipad_user_guide.pdf
ipad_user_guide.pdfipad_user_guide.pdf
ipad_user_guide.pdf
 
ipad_user_guide.pdf
ipad_user_guide.pdfipad_user_guide.pdf
ipad_user_guide.pdf
 
ipad_user_guide.pdf
ipad_user_guide.pdfipad_user_guide.pdf
ipad_user_guide.pdf
 
ipad_user_guide.pdf
ipad_user_guide.pdfipad_user_guide.pdf
ipad_user_guide.pdf
 
iPod touch User Guide iOS 7
iPod touch User Guide iOS 7iPod touch User Guide iOS 7
iPod touch User Guide iOS 7
 
Ipad user guide
Ipad user guideIpad user guide
Ipad user guide
 
iPad Pro Manual
iPad Pro ManualiPad Pro Manual
iPad Pro Manual
 
iPad User Guide iOS 7
iPad User Guide iOS 7iPad User Guide iOS 7
iPad User Guide iOS 7
 
lv88togel
lv88togellv88togel
lv88togel
 
Ipad user guide ios7
Ipad user guide ios7Ipad user guide ios7
Ipad user guide ios7
 
Ipod touch ios6_user_guide
Ipod touch ios6_user_guideIpod touch ios6_user_guide
Ipod touch ios6_user_guide
 
HTC 10 Manual / User Guide
HTC 10 Manual / User GuideHTC 10 Manual / User Guide
HTC 10 Manual / User Guide
 
Polycom sound station ip4000 user guide
Polycom sound station ip4000 user guidePolycom sound station ip4000 user guide
Polycom sound station ip4000 user guide
 
Huawei nova plus manual / user guide
Huawei nova plus manual / user guideHuawei nova plus manual / user guide
Huawei nova plus manual / user guide
 
iPad Academy 2014
iPad Academy 2014iPad Academy 2014
iPad Academy 2014
 
Alcatel Pop 3 (5.5) LTE Manual / User Guide
Alcatel Pop 3 (5.5) LTE Manual / User GuideAlcatel Pop 3 (5.5) LTE Manual / User Guide
Alcatel Pop 3 (5.5) LTE Manual / User Guide
 
HUAWEI Mate S Manual PDF / User Guide
HUAWEI Mate S Manual PDF / User GuideHUAWEI Mate S Manual PDF / User Guide
HUAWEI Mate S Manual PDF / User Guide
 
Gt i8190 um-dtm_jellybean_eng_rev.1.0_121204
Gt i8190 um-dtm_jellybean_eng_rev.1.0_121204Gt i8190 um-dtm_jellybean_eng_rev.1.0_121204
Gt i8190 um-dtm_jellybean_eng_rev.1.0_121204
 

Recently uploaded

Breaking the Kubernetes Kill Chain: Host Path Mount
Breaking the Kubernetes Kill Chain: Host Path MountBreaking the Kubernetes Kill Chain: Host Path Mount
Breaking the Kubernetes Kill Chain: Host Path MountPuma Security, LLC
 
#StandardsGoals for 2024: What’s new for BISAC - Tech Forum 2024
#StandardsGoals for 2024: What’s new for BISAC - Tech Forum 2024#StandardsGoals for 2024: What’s new for BISAC - Tech Forum 2024
#StandardsGoals for 2024: What’s new for BISAC - Tech Forum 2024BookNet Canada
 
Transforming Data Streams with Kafka Connect: An Introduction to Single Messa...
Transforming Data Streams with Kafka Connect: An Introduction to Single Messa...Transforming Data Streams with Kafka Connect: An Introduction to Single Messa...
Transforming Data Streams with Kafka Connect: An Introduction to Single Messa...HostedbyConfluent
 
WhatsApp 9892124323 ✓Call Girls In Kalyan ( Mumbai ) secure service
WhatsApp 9892124323 ✓Call Girls In Kalyan ( Mumbai ) secure serviceWhatsApp 9892124323 ✓Call Girls In Kalyan ( Mumbai ) secure service
WhatsApp 9892124323 ✓Call Girls In Kalyan ( Mumbai ) secure servicePooja Nehwal
 
SQL Database Design For Developers at php[tek] 2024
SQL Database Design For Developers at php[tek] 2024SQL Database Design For Developers at php[tek] 2024
SQL Database Design For Developers at php[tek] 2024Scott Keck-Warren
 
IAC 2024 - IA Fast Track to Search Focused AI Solutions
IAC 2024 - IA Fast Track to Search Focused AI SolutionsIAC 2024 - IA Fast Track to Search Focused AI Solutions
IAC 2024 - IA Fast Track to Search Focused AI SolutionsEnterprise Knowledge
 
Kotlin Multiplatform & Compose Multiplatform - Starter kit for pragmatics
Kotlin Multiplatform & Compose Multiplatform - Starter kit for pragmaticsKotlin Multiplatform & Compose Multiplatform - Starter kit for pragmatics
Kotlin Multiplatform & Compose Multiplatform - Starter kit for pragmaticscarlostorres15106
 
Advanced Test Driven-Development @ php[tek] 2024
Advanced Test Driven-Development @ php[tek] 2024Advanced Test Driven-Development @ php[tek] 2024
Advanced Test Driven-Development @ php[tek] 2024Scott Keck-Warren
 
Tech-Forward - Achieving Business Readiness For Copilot in Microsoft 365
Tech-Forward - Achieving Business Readiness For Copilot in Microsoft 365Tech-Forward - Achieving Business Readiness For Copilot in Microsoft 365
Tech-Forward - Achieving Business Readiness For Copilot in Microsoft 3652toLead Limited
 
Benefits Of Flutter Compared To Other Frameworks
Benefits Of Flutter Compared To Other FrameworksBenefits Of Flutter Compared To Other Frameworks
Benefits Of Flutter Compared To Other FrameworksSoftradix Technologies
 
Next-generation AAM aircraft unveiled by Supernal, S-A2
Next-generation AAM aircraft unveiled by Supernal, S-A2Next-generation AAM aircraft unveiled by Supernal, S-A2
Next-generation AAM aircraft unveiled by Supernal, S-A2Hyundai Motor Group
 
08448380779 Call Girls In Civil Lines Women Seeking Men
08448380779 Call Girls In Civil Lines Women Seeking Men08448380779 Call Girls In Civil Lines Women Seeking Men
08448380779 Call Girls In Civil Lines Women Seeking MenDelhi Call girls
 
FULL ENJOY 🔝 8264348440 🔝 Call Girls in Diplomatic Enclave | Delhi
FULL ENJOY 🔝 8264348440 🔝 Call Girls in Diplomatic Enclave | DelhiFULL ENJOY 🔝 8264348440 🔝 Call Girls in Diplomatic Enclave | Delhi
FULL ENJOY 🔝 8264348440 🔝 Call Girls in Diplomatic Enclave | Delhisoniya singh
 
Snow Chain-Integrated Tire for a Safe Drive on Winter Roads
Snow Chain-Integrated Tire for a Safe Drive on Winter RoadsSnow Chain-Integrated Tire for a Safe Drive on Winter Roads
Snow Chain-Integrated Tire for a Safe Drive on Winter RoadsHyundai Motor Group
 
Understanding the Laravel MVC Architecture
Understanding the Laravel MVC ArchitectureUnderstanding the Laravel MVC Architecture
Understanding the Laravel MVC ArchitecturePixlogix Infotech
 
SIEMENS: RAPUNZEL – A Tale About Knowledge Graph
SIEMENS: RAPUNZEL – A Tale About Knowledge GraphSIEMENS: RAPUNZEL – A Tale About Knowledge Graph
SIEMENS: RAPUNZEL – A Tale About Knowledge GraphNeo4j
 
Pigging Solutions Piggable Sweeping Elbows
Pigging Solutions Piggable Sweeping ElbowsPigging Solutions Piggable Sweeping Elbows
Pigging Solutions Piggable Sweeping ElbowsPigging Solutions
 
How to Remove Document Management Hurdles with X-Docs?
How to Remove Document Management Hurdles with X-Docs?How to Remove Document Management Hurdles with X-Docs?
How to Remove Document Management Hurdles with X-Docs?XfilesPro
 
Injustice - Developers Among Us (SciFiDevCon 2024)
Injustice - Developers Among Us (SciFiDevCon 2024)Injustice - Developers Among Us (SciFiDevCon 2024)
Injustice - Developers Among Us (SciFiDevCon 2024)Allon Mureinik
 

Recently uploaded (20)

Breaking the Kubernetes Kill Chain: Host Path Mount
Breaking the Kubernetes Kill Chain: Host Path MountBreaking the Kubernetes Kill Chain: Host Path Mount
Breaking the Kubernetes Kill Chain: Host Path Mount
 
E-Vehicle_Hacking_by_Parul Sharma_null_owasp.pptx
E-Vehicle_Hacking_by_Parul Sharma_null_owasp.pptxE-Vehicle_Hacking_by_Parul Sharma_null_owasp.pptx
E-Vehicle_Hacking_by_Parul Sharma_null_owasp.pptx
 
#StandardsGoals for 2024: What’s new for BISAC - Tech Forum 2024
#StandardsGoals for 2024: What’s new for BISAC - Tech Forum 2024#StandardsGoals for 2024: What’s new for BISAC - Tech Forum 2024
#StandardsGoals for 2024: What’s new for BISAC - Tech Forum 2024
 
Transforming Data Streams with Kafka Connect: An Introduction to Single Messa...
Transforming Data Streams with Kafka Connect: An Introduction to Single Messa...Transforming Data Streams with Kafka Connect: An Introduction to Single Messa...
Transforming Data Streams with Kafka Connect: An Introduction to Single Messa...
 
WhatsApp 9892124323 ✓Call Girls In Kalyan ( Mumbai ) secure service
WhatsApp 9892124323 ✓Call Girls In Kalyan ( Mumbai ) secure serviceWhatsApp 9892124323 ✓Call Girls In Kalyan ( Mumbai ) secure service
WhatsApp 9892124323 ✓Call Girls In Kalyan ( Mumbai ) secure service
 
SQL Database Design For Developers at php[tek] 2024
SQL Database Design For Developers at php[tek] 2024SQL Database Design For Developers at php[tek] 2024
SQL Database Design For Developers at php[tek] 2024
 
IAC 2024 - IA Fast Track to Search Focused AI Solutions
IAC 2024 - IA Fast Track to Search Focused AI SolutionsIAC 2024 - IA Fast Track to Search Focused AI Solutions
IAC 2024 - IA Fast Track to Search Focused AI Solutions
 
Kotlin Multiplatform & Compose Multiplatform - Starter kit for pragmatics
Kotlin Multiplatform & Compose Multiplatform - Starter kit for pragmaticsKotlin Multiplatform & Compose Multiplatform - Starter kit for pragmatics
Kotlin Multiplatform & Compose Multiplatform - Starter kit for pragmatics
 
Advanced Test Driven-Development @ php[tek] 2024
Advanced Test Driven-Development @ php[tek] 2024Advanced Test Driven-Development @ php[tek] 2024
Advanced Test Driven-Development @ php[tek] 2024
 
Tech-Forward - Achieving Business Readiness For Copilot in Microsoft 365
Tech-Forward - Achieving Business Readiness For Copilot in Microsoft 365Tech-Forward - Achieving Business Readiness For Copilot in Microsoft 365
Tech-Forward - Achieving Business Readiness For Copilot in Microsoft 365
 
Benefits Of Flutter Compared To Other Frameworks
Benefits Of Flutter Compared To Other FrameworksBenefits Of Flutter Compared To Other Frameworks
Benefits Of Flutter Compared To Other Frameworks
 
Next-generation AAM aircraft unveiled by Supernal, S-A2
Next-generation AAM aircraft unveiled by Supernal, S-A2Next-generation AAM aircraft unveiled by Supernal, S-A2
Next-generation AAM aircraft unveiled by Supernal, S-A2
 
08448380779 Call Girls In Civil Lines Women Seeking Men
08448380779 Call Girls In Civil Lines Women Seeking Men08448380779 Call Girls In Civil Lines Women Seeking Men
08448380779 Call Girls In Civil Lines Women Seeking Men
 
FULL ENJOY 🔝 8264348440 🔝 Call Girls in Diplomatic Enclave | Delhi
FULL ENJOY 🔝 8264348440 🔝 Call Girls in Diplomatic Enclave | DelhiFULL ENJOY 🔝 8264348440 🔝 Call Girls in Diplomatic Enclave | Delhi
FULL ENJOY 🔝 8264348440 🔝 Call Girls in Diplomatic Enclave | Delhi
 
Snow Chain-Integrated Tire for a Safe Drive on Winter Roads
Snow Chain-Integrated Tire for a Safe Drive on Winter RoadsSnow Chain-Integrated Tire for a Safe Drive on Winter Roads
Snow Chain-Integrated Tire for a Safe Drive on Winter Roads
 
Understanding the Laravel MVC Architecture
Understanding the Laravel MVC ArchitectureUnderstanding the Laravel MVC Architecture
Understanding the Laravel MVC Architecture
 
SIEMENS: RAPUNZEL – A Tale About Knowledge Graph
SIEMENS: RAPUNZEL – A Tale About Knowledge GraphSIEMENS: RAPUNZEL – A Tale About Knowledge Graph
SIEMENS: RAPUNZEL – A Tale About Knowledge Graph
 
Pigging Solutions Piggable Sweeping Elbows
Pigging Solutions Piggable Sweeping ElbowsPigging Solutions Piggable Sweeping Elbows
Pigging Solutions Piggable Sweeping Elbows
 
How to Remove Document Management Hurdles with X-Docs?
How to Remove Document Management Hurdles with X-Docs?How to Remove Document Management Hurdles with X-Docs?
How to Remove Document Management Hurdles with X-Docs?
 
Injustice - Developers Among Us (SciFiDevCon 2024)
Injustice - Developers Among Us (SciFiDevCon 2024)Injustice - Developers Among Us (SciFiDevCon 2024)
Injustice - Developers Among Us (SciFiDevCon 2024)
 

Iphone user guide for iOS 5.1

  • 2. Contents 9 Chapter 1:  iPhone at a Glance 9 iPhone overview 9 Accessories 10 Buttons 12 Status icons 14 Chapter 2:  Getting Started 14 Viewing this user guide on iPhone 14 What you need 14 Installing the SIM card 15 Setup and activation 15 Connecting iPhone to your computer 15 Connecting to the Internet 16 Setting up mail and other accounts 16 Managing content on your iOS devices 16 iCloud 18 Syncing with iTunes 19 Chapter 3:  Basics 19 Using apps 22 Customizing the Home screen 24 Typing 27 Dictation 28 Printing 29 Searching 30 Voice Control 31 Notifications 32 Twitter 33 Apple Earphones with Remote and Mic 34 AirPlay 34 Bluetooth devices 35 Battery 37 Security features 38 Cleaning iPhone 38 Restarting or resetting iPhone 39 Chapter 4:  Siri 39 What is Siri? 40 Using Siri 43 Correcting Siri 44 Siri and apps 55 Dictation 2
  • 3. 56 Chapter 5:  Phone 56 Phone calls 60 FaceTime 61 Visual voicemail 62 Contacts 63 Favorites 63 Call forwarding, call waiting, and caller ID 64 Ringtones, Ring/Silent switch, and vibrate 64 International calls 65 Setting options for Phone 66 Chapter 6:  Mail 66 Checking and reading email 67 Working with multiple accounts 67 Sending mail 68 Using links and detected data 68 Viewing attachments 68 Printing messages and attachments 69 Organizing mail 69 Searching mail 69 Mail accounts and settings 72 Chapter 7:  Safari 72 Viewing webpages 73 Links 73 Reading List 73 Reader 73 Entering text and filling out forms 74 Searching 74 Bookmarks and history 74 Printing webpages, PDFs, and other documents 74 Web clips 75 Chapter 8:  Music 75 Adding music and audio 75 Playing songs and other audio 77 Additional audio controls 77 Podcast and audiobook controls 78 Using Siri or Voice Control with Music 78 Browsing album artwork in Cover Flow 78 Viewing tracks on an album 79 Searching audio content 79 iTunes Match 79 Genius 80 Playlists 81 Home Sharing 82 Chapter 9:  Messages 82 Sending and receiving messages 83 Sending messages to a group 83 Sending photos, videos, and more 3Contents
  • 4. 84 Editing conversations 84 Searching messages 85 Chapter 10:  Calendar 85 About Calendar 85 Viewing your calendars 86 Adding events 86 Responding to invitations 86 Searching calendars 87 Subscribing to calendars 87 Importing calendar events from Mail 87 Calendar accounts and settings 88 Chapter 11:  Photos 88 Viewing photos and videos 89 Viewing slideshows 89 Organizing photos and videos 89 Sharing photos and videos 90 Printing photos 91 Chapter 12:  Camera 91 About Camera 92 Taking photos and videos 92 HDR photos 93 Viewing, sharing, and printing 93 Editing photos 93 Trimming videos 94 Uploading photos and videos to your computer 94 Photo Stream 95 Chapter 13:  YouTube 95 About YouTube 95 Browsing and searching for videos 96 Playing videos 96 Keeping track of videos you like 97 Sharing videos, comments, and ratings 97 Getting information about a video 97 Sending videos to YouTube 98 Chapter 14:  Stocks 98 Viewing stock quotes 99 Getting more information 100 Chapter 15:  Maps 100 Finding locations 101 Getting directions 102 Getting and sharing info about a location 102 Showing traffic conditions 103 Map views 104 Chapter 16:  Weather 104 Getting weather information 4 Contents
  • 5. 105 Chapter 17:  Notes 105 About Notes 105 Writing notes 106 Reading and editing notes 106 Searching notes 106 Printing or emailing notes 107 Chapter 18:  Clock 107 About Clock 107 Setting world clocks 108 Setting alarms 108 Using the stopwatch 108 Setting a timer 109 Chapter 19:  Reminders 109 About Reminders 110 Setting a reminder 110 Managing reminders in List view 111 Managing reminders in Date view 111 About location reminders 111 Managing completed reminders 111 Searching reminders 112 Chapter 20:  Game Center 112 About Game Center 113 Signing in to Game Center 113 Purchasing and downloading games 113 Playing games 113 Playing with friends 114 Game Center settings 115 Chapter 21:  iTunes Store 115 About the iTunes Store 115 Finding music, videos, and more 116 Purchasing music, audiobooks, and tones 116 Purchasing or renting videos 116 Following artists and friends 117 Streaming or downloading podcasts 117 Checking download status 118 Changing the browse buttons 118 Viewing account information 118 Verifying downloads 119 Chapter 22:  Newsstand 119 About Newsstand 119 Reading the latest issues 120 Chapter 23:  App Store 120 About the App Store 121 Finding and downloading apps 121 Deleting apps 122 Store settings 5Contents
  • 6. 123 Chapter 24:  Contacts 123 About Contacts 123 Syncing contacts 124 Searching contacts 124 Adding and editing contacts 125 Unified contacts 125 Contacts accounts and settings 126 Chapter 25:  Videos 126 About Videos 126 Playing videos 127 Searching for videos 127 Watching rented movies 127 Watching videos on a TV 128 Deleting videos from iPhone 128 Using Home Sharing 128 Setting a sleep timer 129 Converting videos for iPhone 130 Chapter 26:  Calculator 130 Using the calculator 130 Scientific calculator 131 Chapter 27:  Compass 131 About Compass 131 Calibrating the compass 132 Finding the direction 132 Using Compass with Maps 133 Chapter 28:  Voice Memos 133 About Voice Memos 133 Recording 134 Listening to a recording 134 Managing and sharing recordings 134 Sharing voice memos with your computer 135 Chapter 29:  Nike + iPod 135 About Nike + iPod 135 Activating Nike + iPod 135 Linking a sensor 136 Working out with Nike + iPod 136 Calibrating Nike + iPod 136 Sending workout data to nikeplus.com 137 Chapter 30:  iBooks 137 About iBooks 137 Using the iBookstore 138 Syncing books and PDFs 138 Reading books 140 Changing a book’s appearance 140 Printing or emailing a PDF 140 Organizing the bookshelf 6 Contents
  • 7. 142 Chapter 31:  Accessibility 142 Universal Access features 143 VoiceOver 152 Routing the audio of incoming calls 153 Siri 153 Triple-click Home 153 Zoom 153 Large Text 154 White on Black 154 Speak Selection 154 Speak Auto-text 154 Mono Audio 154 Hearing aid compatibility 155 Custom Vibrations 155 LED Flash for Alerts 155 AssistiveTouch 156 Universal Access in OS X 156 TTY support 156 Minimum font size for mail messages 156 Assignable ringtones 156 Visual voicemail 156 Widescreen keyboards 157 Large phone keypad 157 Voice Control 157 Closed captioning 158 Chapter 32:  Settings 158 Airplane mode 158 Wi-Fi 159 Notifications 160 Location Services 160 VPN 160 Personal Hotspot 161 Carrier 161 Sounds and the Ring/Silent switch 162 Brightness 162 Wallpaper 162 General 168 Settings for apps 169 Appendix A:  International Keyboards 169 Adding and removing keyboards 169 Switching keyboards 169 Chinese 171 Japanese 171 Typing emoji characters 171 Using the candidate list 171 Using shortcuts 172 Vietnamese 7Contents
  • 8. 173 Appendix B:  Support and Other Information 173 iPhone Support site 173 Restarting or resetting iPhone 173 Backing up iPhone 175 Updating and restoring iPhone software 175 File sharing 175 Safety, software, and service information 176 Using iPhone in an enterprise environment 176 Using iPhone with other carriers 176 Disposal and recycling information 177 Apple and the environment 178 iPhone operating temperature 8 Contents
  • 9. iPhone at a Glance 1 iPhone overview Headset jack Receiver Ring/Silent switch Top microphone Volume buttons Apple Retina display Speaker Home button Front camera Rear camera LED flash SIM card tray Dock connector On/Off button Bottom microphone App icons Status bar iPhone Your iPhone features and the Home screen may be different, depending on the model of iPhone you have and whether you’ve customized your Home screen. Accessories The following accessories are included with iPhone: Dock Connector to USB Cable Apple Earphones with Remote and Mic SIM eject toolUSB power adapter 9
  • 10. Item What you can do with it Apple Earphones with Remote and Mic Listen to music and videos, and make phone calls. See“Apple Earphones with Remote and Mic” on page 33. Dock Connector to USB Cable Use this cable to connect iPhone to your computer to sync and charge. The cable can be used with the optional dock or plugged directly into iPhone. USB power adapter Connect the power adapter to iPhone using the included cable, then plug it into a standard power outlet to charge iPhone. SIM eject tool (not included in all areas) Eject the SIM card tray. Buttons On/Off button When you’re not using iPhone, you can lock it to turn off the display and save the battery. Lock iPhone:  Press the On/Off button. When iPhone is locked, nothing happens if you touch the screen. iPhone can still receive calls, text messages, and other updates. You can also: Listen to musicÂÂ Adjust the volume using the buttons on the side of iPhone (or on the iPhone earphones) whileÂÂ you’re on a phone call or listening to music Use the center button on iPhone earphones to answer or end a call, or to control audioÂÂ playback (see“Playing songs and other audio” on page 75) On/Off button Unlock iPhone Press the Home button or the On/Off button, then drag the slider. Open Camera when iPhone is locked Press the Home button or the On/Off button, then drag up. Access the audio controls when iPhone is locked Double-click the Home button . Turn iPhone off Press and hold the On/Off button for a few seconds until the red slider appears, then drag the slider. Turn iPhone on Press and hold the On/Off button until the Apple logo appears. By default, if you don’t touch the screen for a minute, iPhone locks automatically. To turn auto-lock off, or to change how long before iPhone locks, see“Auto-Lock” on page 165. To require a passcode to unlock iPhone, see“Passcode Lock” on page 165. Home button The Home button lets you get back to the Home screen at any time. It also provides other convenient shortcuts. Go to the Home screen:  Press the Home button . 10 Chapter 1    iPhone at a Glance
  • 11. At the Home screen, just a tap opens an app. See“Opening and switching apps” on page 19. Display the multitasking bar to see recently used apps With iPhone unlocked, double-click the Home button . Display audio playback controls When iPhone is locked: Double-click the Home button . See“Playing songs and other audio” on page 75. When using another app: Double-click the Home button , then flick the app switcher from left to right. Start Siri (iPhone 4S) or Voice Control Press and hold the Home button . See Chapter 4, “Siri,” on page 39 and “Voice Control” on page 30. Volume buttons When you’re on the phone or listening to songs, movies, or other media, the buttons on the side of iPhone adjust the audio volume. Otherwise, the buttons control the volume for the ringer, alerts, and other sound effects. WARNING:  For important information about avoiding hearing loss, see the Important Product Information Guide at www.apple.com/support/manuals/iphone. Volume up Volume down To limit the volume for music and videos, go to Settings Music. You can also use the volume up button to take a picture or record a video. See“Taking photos and videos” on page 92. Ring/Silent switch Flip the Ring/Silent switch to put iPhone in ring mode or silent mode . Ring Silent In ring mode, iPhone plays all sounds. In silent mode, iPhone doesn’t ring or play alerts and other sound effects. Important:  Clock alarms, audio apps such as Music, and many games still play sounds through the built-in speaker when iPhone is in silent mode. For information about changing sound and vibrate settings, see“Sounds and the Ring/Silent switch” on page 161. 11Chapter 1    iPhone at a Glance
  • 12. Status icons The icons in the status bar at the top of the screen give information about iPhone: Status icon What it means Cell signal* Shows whether you’re in range of the cellular network and can make and receive calls. The more bars, the stronger the signal. If there’s no signal, the bars are replaced with “No service.” Airplane mode Shows that airplane mode is on—you cannot use the phone, access the Internet, or use Bluetooth® devices. Non-wireless features are available. See“Airplane mode” on page 158. UMTS Shows that your carrier’s 4G UMTS (GSM) network is available, and iPhone can connect to the Internet over that network. (iPhone 4S only. Not available in all areas.) See“Network” on page 163. UMTS/EV-DO Shows that your carrier’s 3G UMTS (GSM) or EV-DO (CDMA) network is available, and iPhone can connect to the Internet over that network. See“Network” on page 163. EDGE Shows that your carrier’s EDGE (GSM) network is available, and iPhone can connect to the Internet over that network. See“Network” on page 163. GPRS/1xRTT Shows that your carrier’s GPRS (GSM) or 1xRTT (CDMA) network is available, and iPhone can connect to the Internet over that network. See“Network” on page 163. Wi-Fi* Shows that iPhone is connected to the Internet over a Wi-Fi network. The more bars, the stronger the connection. See“Wi-Fi” on page 158. Personal Hotspot Shows that iPhone is connected to another iPhone providing a Personal Hotspot. See“Personal Hotspot” on page 160. Syncing Shows that iPhone is syncing with iTunes. Network activity Shows network activity. Some third-party apps may also use the icon to show an active process. Call Forwarding Shows that Call Forwarding is set up on iPhone. See“Call forwarding” on page 63. VPN Shows that you’re connected to a network using VPN. See“Network” on page 163. Lock Shows that iPhone is locked. See“On/Off button” on page 10. TTY Shows that iPhone is set to work with a TTY machine. See“TTY support” on page 156. 12 Chapter 1    iPhone at a Glance
  • 13. Status icon What it means Play Shows that a song, audiobook, or podcast is playing. See“Playing songs and other audio” on page 75. Portrait orientation lock Shows that the iPhone screen is locked in portrait orientation. See“Viewing in portrait or landscape orientation” on page 21. Alarm Shows that an alarm is set. See“Setting alarms” on page 108. Location Services Shows that an item is using Location Services. See “Location Services” on page 160. Bluetooth* Blue or white icon:  Bluetooth is on and paired with a device. Gray icon:  Bluetooth is on and paired with a device, but the device is out of range or turned off. No icon:  Bluetooth is turned off or not paired with a device. See“Bluetooth devices” on page 34. Bluetooth battery Shows the battery level of a supported paired Bluetooth device. Battery Shows battery level or charging status. See“Battery” on page 35. * The use of certain accessories with iPhone may affect wireless performance. 13Chapter 1    iPhone at a Glance
  • 14. Getting Started 2 WARNING:  To avoid injury, read all operating instructions in this guide and safety information in the iPhone Important Product Information Guide at www.apple.com/support/manuals/iphone before using iPhone. · Viewing this user guide on iPhone The iPhone User Guide can be viewed on iPhone in Safari, and in the free iBooks app. View the user guide in Safari:  Tap , then tap the iPhone User Guide bookmark. To add an icon for the guide to the Home screen, tap , then tap“Add to Home Screen.”To view it in a different language, tap“Change Language”on the main contents page. View the user guide in iBooks:  If you haven’t installed iBooks, open App Store, then search for and install“iBooks.”Open iBooks and tap Store. Search for“iPhone User,”then select and download the guide. For more information about iBooks, see Chapter 30, “iBooks,” on page 137. What you need To use iPhone, you need: A wireless service plan with a carrier that provides iPhone service in your areaÂÂ An Apple ID (for some features), which can be created during setupÂÂ A Mac or a PC with a USB 2.0 port and one of the following operating systems:ÂÂ Mac OS X v10.5.8 or laterÂÂ Windows 7, Windows Vista, or Windows XP Home or Professional (SP3)ÂÂ An Internet connection for your computer (broadband is recommended)ÂÂ iTunes 10.5 or later (for some features), available atÂÂ www.itunes.com/download Installing the SIM card If you were given a SIM card to install, install it before setting up iPhone. Important:  A SIM card is required to use cellular services when connecting to GSM networks and some CDMA networks. An iPhone 4S that has been activated on a CDMA wireless network may also use a SIM card for connecting to a GSM network, primarily for international roaming. Your iPhone is subject to your wireless service provider’s policies, which may include restrictions on switching service providers and roaming, even after conclusion of any required minimum service contract. Contact your wireless service provider for more details. Availability of cellular capabilities depends on the wireless network. 14
  • 15. Installing the SIM Card in iPhone 4S Micro SIM card Micro SIM card tray Paper clip or SIM eject tool Install the SIM card:  Insert the end of a small paper clip or SIM eject tool into the hole on the SIM card tray. Pull out the SIM card tray and place the SIM card in the tray as shown. With the tray aligned and the SIM card on top, carefully replace the tray. Setup and activation To set up and activate iPhone, turn on iPhone and follow the Setup Assistant. The Setup Assistant steps you through the setup process, including connecting to a Wi-Fi network, signing in with or creating a free Apple ID, setting up iCloud, turning on recommended features such as Location Services and Find My iPhone, and activating iPhone with your carrier. You can also restore from an iCloud or iTunes backup during setup. Activation can be done over a Wi-Fi network or, with iPhone 4S, over your carrier’s cellular network (not available in all areas). If neither option is available, you need to connect iPhone to your computer for activation. Connecting iPhone to your computer If you don’t have Wi-Fi or cellular access, you may need to connect iPhone to your computer in order to complete activation. Connecting iPhone to your computer also lets you sync information, music, and other content with iTunes. See“Syncing with iTunes” on page 18. Connect iPhone to your computer:  Use the Dock Connector to USB Cable provided with iPhone. Connecting to the Internet iPhone connects to the Internet whenever necessary, using a Wi-Fi connection (if available) or your carrier’s cellular network. For information about connecting to a Wi-Fi network, see“Wi-Fi” on page 158. Note:  If a Wi-Fi connection to the Internet isn’t available, certain iPhone features and services may transfer data over your carrier’s cellular network, which may result in additional fees. Contact your carrier for information about your cellular data plan rates. To manage cellular data usage, see “Network” on page 163. 15Chapter 2    Getting Started
  • 16. Setting up mail and other accounts iPhone works with iCloud, Microsoft Exchange, and many of the most popular Internet-based mail, contacts, and calendar service providers. If you don’t already have a mail account, you can set up a free iCloud account when you first set up iPhone, or later in Settings iCloud. See“iCloud” on page 16. Set up an iCloud account:  Go to Settings iCloud. Set up some other account:  Go to Settings Mail, Contacts, Calendars. You can add contacts using an LDAP or CardDAV account, if your company or organization supports it. See“Syncing contacts” on page 123. You can add a CalDAV calendar account, and you can subscribe to iCal (.ics) calendars or import them from Mail. See“Subscribing to calendars” on page 87. Managing content on your iOS devices You can transfer information and files between your iOS devices and computers using either iCloud or iTunes. ÂÂ iCloud stores content such as music, photos, and more, and wirelessly pushes it to your other iOS devices and computers, keeping everything up to date. See“iCloud”below. ÂÂ iTunes syncs music, video, photos, and more between your computer and iPhone. Changes you make on one device are copied to the other when you sync. You can also use iTunes to copy a file to iPhone for use with an app, or to copy a document you’ve created on iPhone to your computer. See“Syncing with iTunes” on page 18. You can use iCloud or iTunes, or both, depending on your needs. For example, you can use iCloud Photo Stream to automatically get photos you take on iPhone to your other devices, and use iTunes to sync photo albums from your computer to iPhone. Note:  You should not sync items on the Info pane of iTunes (such as contacts, calendars, and notes) and also use iCloud to keep that information up to date on your devices. Otherwise, duplicated data may result. iCloud iCloud stores your content, including music, photos, contacts, calendars, and supported documents. Content stored in iCloud is pushed wirelessly to your other iOS devices and computers set up with the same iCloud account. iCloud is available on iOS 5 devices, on Macs running OS X Lion v10.7.2 or later, and on PCs with the iCloud Control Panel for Windows (Windows Vista Service Pack 2 or Windows 7 required). iCloud features include: ÂÂ iTunes in the Cloud—Download previous iTunes music and TV show purchases to iPhone for free, anytime you like. ÂÂ Apps and Books—Download previous App Store and iBookstore purchases to iPhone for free, anytime you like. ÂÂ Photo Stream—Photos you take on one device appear automatically on all your devices. See “Photo Stream” on page 94. ÂÂ Documents in the Cloud—For iCloud-enabled apps, keep documents and app data up to date across all your devices. 16 Chapter 2    Getting Started
  • 17. ÂÂ Mail, Contacts, Calendars—Keep your mail contacts, calendars, notes, and reminders up to date across all your devices. ÂÂ Backup—Back up iPhone to iCloud automatically when connected to power and Wi-Fi. See “Backing up iPhone” on page 173. ÂÂ Find My iPhone—Locate your iPhone on a map, display a message, play a sound, lock the screen, or remotely wipe the data. See“Find My iPhone” on page 37. ÂÂ Find My Friends—Share your location with people who are important to you. Download the free app from the App Store. ÂÂ iTunes Match—With an iTunes Match subscription, all your music, including music you’ve imported from CDs or purchased somewhere other than iTunes, appears on all of your devices and can be downloaded and played on demand. See“iTunes Match” on page 79. With iCloud, you get a free email account and 5 GB of storage for your mail, documents, and backups. Your purchased music, apps, TV shows, and books, as well as your Photo Stream, don’t count against your free space. If you have a MobileMe subscription, you can move it to iCloud from a Mac or PC at www.me.com/move until June 30, 2012. Note:  iCloud is not available in all areas, and iCloud features may vary by area. Sign in or create an iCloud account:  In Settings, tap iCloud. Enable or disable iCloud services Go to Settings iCloud. Enable iCloud backup Go to Settings iCloud Storage Backup. Find your iPhone Visit www.icloud.com, sign in with your Apple ID, then choose Find My iPhone. Important:  On your iPhone, Find My iPhone must be turned on in Settings iCloud in order for iPhone to be located. Purchase additional iCloud storage Go to Settings iCloud Storage Backup, then tap Manage Storage. For information about purchasing iCloud storage, go to help.apple.com/icloud. View and download previous iTunes Store purchases Go to iTunes, then tap Purchased. View and download previous App Store purchases Go to App Store, tap Updates, then tap Purchased. View and download previous iBookstore purchases Go to iBooks, tap Store, then tap Purchased. Turn on Automatic Downloads for music, apps, or books Go to Settings Store. For more information about iCloud, go to www.apple.com/icloud. For support information, go to www.apple.com/support/icloud. 17Chapter 2    Getting Started
  • 18. Syncing with iTunes Syncing with iTunes copies information from your computer to iPhone, and vice versa. You can sync by connecting iPhone to your computer using the Dock Connector to USB Cable, or you can set up iTunes to sync wirelessly using Wi-Fi. You can set iTunes to sync music, photos, video, podcasts, apps, and more. For information about syncing iPhone with a computer, open iTunes, then select iTunes Help from the Help menu. Set up wireless iTunes syncing:  Connect iPhone to your computer using the Dock Connector to USB Cable. In iTunes, turn on“Sync over Wi-Fi connection”in the device’s Summary pane. When Wi-Fi syncing is turned on, iPhone syncs automatically every day. iPhone must be connected to a power source, both iPhone and your computer must be on the same wireless network, and iTunes must be open on your computer. For more information, see“iTunes Wi-Fi Sync” on page 164. Tips for syncing with iTunes If you’re using iCloud to store your contacts, calendars, bookmarks, and notes, don’t also syncÂÂ them to your device using iTunes. Purchases you make from the iTunes Store or the App Store on iPhone are synced back to yourÂÂ iTunes library. You can also purchase or download content and apps from the iTunes Store on your computer, and then sync them to iPhone. In the device’s Summary pane, you can set iTunes to automatically sync your device when it’sÂÂ attached to your computer. To temporarily override this setting, hold down Command and Option (Mac) or Shift and Control (PC) until you see your iPhone appear in the sidebar. In the device’s Summary pane, select“EncryptÂÂ iPhone backup”if you want to encrypt the information stored on your computer when iTunes makes a backup. Encrypted backups are indicated by a lock icon , and a password is required to restore the backup. If you don’t select this option, passwords (such as those for mail accounts) aren’t included in the backup and will have to be reentered if you use the backup to restore the device. In the device’s Info pane, when you sync mail accounts, only the settings are transferred fromÂÂ your computer to iPhone. Changes you make to an email account on iPhone don’t affect the account on your computer. In the device’s Info pane, click Advanced to select options to let youÂÂ replace the information on iPhone with the information from your computer during the next sync. If you listen to part of a podcast or audiobook, your place in the story is included if you sync theÂÂ content with iTunes. If you started listening to the story on iPhone, you can pick up where you left off using iTunes on your computer—or vice versa. In the device’s Photo pane, you can sync photos and videos from a folder on your computer.ÂÂ 18 Chapter 2    Getting Started
  • 19. Basics 3 Using apps The high-resolution Multi-Touch screen and simple finger gestures make it easy to use iPhone apps. Opening and switching apps Press the Home button to go to the Home screen and see your apps. Open an app:  Tap it. To return to the Home screen, press the Home button again. Flick left or right to see another Home screen. Flick left or right to switch to another Home screen. Double-click the Home button to reveal the multitasking bar, which shows your most recently used apps. Tap an app to reopen it, or flick to see more apps. Recently used apps Remove an app from the multitasking bar Touch and hold the app icon until it begins to jiggle, then tap . Removing an app from the multitasking also forces it to quit. 19
  • 20. Scrolling Drag up or down to scroll. On some screens such as webpages, you can also scroll side to side. Dragging your finger to scroll won’t choose or activate anything on the screen. Flick to scroll quickly. You can wait for the scrolling to come to a stop, or touch the screen to stop it immediately. Touching the screen to stop scrolling won’t choose or activate anything. To quickly scroll to the top of a page, tap the status bar at the top of the screen. Drag your finger along the index to scroll quickly. Tap a letter to jump to a section. Tap an item in a list to choose it. Depending on the list, tapping an item can do different things— for example, it may open a new list, play a song, open an email, or show someone’s contact information so you can call that person. 20 Chapter 3    Basics
  • 21. Zooming in or out When viewing photos, webpages, email, or maps, you can zoom in and out. Pinch your fingers together or apart. For photos and webpages, you can double-tap (tap twice quickly) to zoom in, then double-tap again to zoom out. For maps, double-tap to zoom in and tap once with two fingers to zoom out. Zoom is also an accessibility feature that lets you magnify the screen with any app you’re using, to help you see what’s on the display. See“Zoom” on page 153. Viewing in portrait or landscape orientation Many iPhone apps let you view the screen in either portrait or landscape orientation. Rotate iPhone and the display rotates too, adjusting automatically to fit the new screen orientation. You may prefer landscape orientation for viewing webpages in Safari, or when entering text, for example. Webpages scale to the wider screen in landscape orientation, making the text and images larger. The onscreen keyboard is also larger. Movies viewed in Videos and YouTube appear only in landscape orientation. Street views in Maps also appear only in landscape orientation. Lock the screen in portrait orientation:  Double-click the Home button , flick the bottom of the screen from left to right, then tap . The portrait orientation lock icon appears in the status bar when the screen orientation is locked. 21Chapter 3    Basics
  • 22. Customizing the Home screen Rearranging apps You can customize the layout of app icons on the Home screen—including the apps in the Dock along the bottom of the screen. If you want, arrange them over multiple Home screens. You can also organize apps by collecting them in folders. Rearrange icons: 1 Touch and hold any app on the Home screen until it begins to jiggle. 2 Arrange the apps by dragging them. 3 Press the Home button to save your arrangement. Move an icon to another screen While arranging apps, drag an app to the side of the screen. Create additional Home screens While arranging apps, flick to the rightmost Home screen, then drag an app to the right edge of the screen. You can create up to 11 Home screens. Reset your Home screen to the default layout Go to Settings General Reset, then tap Reset Home Screen Layout. Resetting the Home screen removes any folders you’ve created and applies the default wallpaper to your Home screen. You can add icons on the Home screen to open your favorite webpages. See“Web clips” on page 74. When iPhone is physically connected to your computer (with the Dock Connector to USB Cable), you can customize your Home screens using iTunes. In iTunes, select iPhone in the Devices list, then click Apps at the top of the screen. Organizing with folders Folders let you organize apps on the Home screen. You can put up to 12 apps in a folder. iPhone names a folder automatically when you create it, based on the category of the apps you use to create the folder. You can change the name anytime you want. Like apps, folders can be rearranged by dragging them on the Home screens, or to the Dock. 22 Chapter 3    Basics
  • 23. Create a folder:  Touch an app until the Home screen apps begin to jiggle, then drag the app onto another app. iPhone creates a new folder that includes the two apps, and shows the folder’s name. You can tap the name field and enter a different name. Tap a folder to open it, then you can tap to open an app inside. To close a folder, tap outside the folder, or press the Home button . While arranging apps: Add an app to a folder Drag the app onto the folder. Remove an app from a folder Tap to open the folder, then drag the app out of the folder. Delete a folder Move all apps out of the folder. The folder is deleted automatically. Rename a folder Tap to open the folder, then tap the name at the top and use the keyboard to enter a new name. When you finish organizing your Home screen, press the Home button to save your changes. Adding wallpaper You can set an image or photo as wallpaper for the Lock screen. You can also set wallpaper for your Home screen. You can choose an image that came with iPhone, a photo from your Camera Roll or other album on iPhone. Set wallpaper: 1 In Settings, choose Wallpaper, tap the image of the Lock and Home screens, then tap Wallpaper or an album. 2 Tap to choose an image or photo. If you choose a photo, drag to position it and pinch to zoom in or out, until it looks the way you want. 3 Tap Set, then choose whether you want to use the photo as wallpaper for your Lock Screen, Home screen, or both. 23Chapter 3    Basics
  • 24. Typing The onscreen keyboard appears anytime you need to type. Entering text Use the keyboard to enter text. The keyboard corrects misspellings, predicts what you’re typing, and learns as you use it. Depending on the app you’re using, the intelligent keyboard may suggest corrections as you type, to help prevent mistyped words. Type text:  Tap a text field to bring up the keyboard, then tap on the keyboard. As you type, each letter appears above your thumb or finger. If you touch the wrong key, you can slide your finger to the correct key. The letter isn’t entered until you release your finger from the key. Delete the previous character Tap . Type uppercase Tap the Shift key before tapping a letter. Or touch and hold the Shift key, then slide to a letter. Quickly type a period and space Double-tap the space bar. To turn this feature on or off, go to Settings General Keyboard. Use autocorrection to enter“’ll” Type“lll.”For example, type“youlll”to get“you’ll.” Turn caps lock on Double-tap the Shift key . Tap the Shift key again to turn caps lock off. You can turn this feature on or off in Settings General Keyboard. Enter numbers, punctuation, or symbols Tap the Number key . Tap the Symbol key to see additional punctuation and symbols. Set options for typing Go to Settings General Keyboard. To type an alternate character, touch and hold a key, then slide to choose one of the options. 24 Chapter 3    Basics
  • 25. Auto-correction and spell checking For many languages, iPhone automatically corrects misspellings or makes suggestions as you type. When iPhone suggests a word, you can accept the suggestion without interrupting your typing. Note:  For a list of supported languages, see www.apple.com/iphone/specs.html. Suggested word Accept the suggestion:  Type a space, punctuation mark, or return character. Reject a suggestion:  Tap the“x”. Each time you reject a suggestion for the same word, iPhone becomes more likely to accept the word. iPhone may also underline words you’ve already typed that might be misspelled. Replace a misspelled word Tap the word, then tap one of the alternate spellings. If the word you want doesn’t appear, just retype it. Turn auto-correction or spell checking on or off Go to Settings General Keyboard. Shortcuts and your personal dictionary Shortcuts lets you type just a few characters instead of a longer word or phrase.The expanded text appears whenever you type the shortcut. For example, the shortcut“omw”expands to“On my way!” Create a shortcut:  Go to Settings General Keyboard, then tap Add New Shortcut. Add a word or phrase to your personal dictionary so that iPhone doesn’t try to correct or replace it:  Create the shortcut, but leave the Shortcut field blank. Edit a shortcut Go to Settings Keyboard and tap the shortcut. 25Chapter 3    Basics
  • 26. Editing text The touchscreen makes it easy to change text you’ve entered. An onscreen magnifying glass helps you position the insertion point right where you need it. Grab points let you quickly select more or less text. You can also cut, copy, and paste text and photos within apps, or across apps. Position the insertion point:  Touch and hold to bring up the magnifying glass, then drag to position the insertion point. Select text:  Tap the insertion point to display the selection buttons. You can also double-tap to select a word. In read-only documents, such as webpages, or email messages you’ve received, touch and hold to select a word. Drag the grab points to select more or less text. Cut or copy text Select text, then tap Cut or Copy. Paste text Tap the insertion point and tap Paste. The last text that you cut or copied is inserted. Or select text and tap Paste to replace the text. Undo the last edit Shake iPhone and tap Undo. Make text bold, italic, or underlined When available, tap , then tap B/I/U. Get the definition of a word When available, tap , then tap Define. Get alternative words When available, tap Suggest, then tap one of the words. Keyboard layouts You can use Settings to set the keyboard layouts for software and hardware keyboards. The available layouts depend on the keyboard language. Select a keyboard layout:  Go to Settings General Keyboard International Keyboards, then select a keyboard. 26 Chapter 3    Basics
  • 27. For each language, you can make separate selections for both the onscreen software and any external hardware keyboards. The software keyboard layout determines the layout of the keyboard on the iPhone screen. The hardware keyboard layout determines the layout of an Apple Wireless Keyboard connected to iPhone. Using an Apple Wireless Keyboard You can use an Apple Wireless Keyboard (available separately) for typing on iPhone. The Apple Wireless Keyboard connects via Bluetooth. See“Pairing a Bluetooth device with iPhone” on page 34. Once the keyboard is paired with iPhone, it connects whenever the keyboard is within range (up to 30 feet). You can tell that the keyboard is connected if the onscreen keyboard doesn’t appear when you tap in a text field. To save the battery, turn off or unpair the keyboard when not in use. Dictation With dictation, you create and edit text by speaking instead of typing. For example, you can dictate email messages, text messages, and notes. Dictation even works with third-party apps, so you can do things like update your Facebook status, post Tweets, or write and send Instagrams. You can dictate any time the onscreen keyboard appears with the key. Note:  Turn Siri on in Settings General Siri. Dictation is available only on iPhone 4S, and requires Internet access via a cellular or Wi-Fi connection. Dictation may not be available in all languages or in all areas, and features may vary by area. Cellular data charges may apply. Dictate text: Tap on the keyboard. Tap Done when you finish. Tap to begin dictation. These appear while Siri composes the text from your dictation. To add text, tap again and continuing dictating. You can use dictation to insert a word or replace selected text. Place the insertion point where you want more text, or select the text to replace, then tap and dictate. To change a word, double-tap the word to select it, tap , then say the word you want. You can bring iPhone to your ear to start dictation, instead of tapping on the keyboard. To finish, move iPhone back down in front of you. Add punctuation: Say the punctuation. For example,“Dear Mary comma the check is in the mail exclamation mark”results in“Dear Mary, the check is in the mail!” 27Chapter 3    Basics
  • 28. Printing AirPrint AirPrint lets you print wirelessly to AirPrint-enabled printers. You can print from: Mail—email messages and attachments that can be viewed in Quick LookÂÂ Photos and Camera—photosÂÂ Safari—webpages, PDFs, and other attachments that can be viewed in Quick LookÂÂ iBooks—PDFsÂÂ Maps—view of map showing on the screenÂÂ Notes—currently displayed noteÂÂ Other apps available from the App Store may also support AirPrint. An AirPrint-enabled printer doesn’t need setup—just connect it to the same Wi-Fi network as iPhone. For more information, go to support.apple.com/kb/HT4356. Printing a document AirPrint uses your Wi-Fi network to send print jobs wirelessly to your printer. iPhone and the printer must be on the same Wi-Fi network. Print a document:  Tap , , or (depending on the app you’re using), then tap Print. Select a printer and printing options, then tap Print. See the status of a print job Double-click the Home button , then tap Print Center. The Print Center app appears as the most recent app when a document is printing. A badge on the app shows how many documents are queued for printing. If you’re printing more than one document, select a print job to see its status summary. Cancel a print job Double-click the Home button , tap Print Center, select the print job (if you’re printing more than one document), then tap Cancel Printing. 28 Chapter 3    Basics
  • 29. Searching You can search many apps on iPhone, including Contacts, Mail, Calendar, Music, Messages, Notes, and Reminders. You can search an individual app, or all apps at once. Search iPhone:  Go to the Search screen. (From the first Home screen, flick right or press the Home button .) Enter text in the Search field. Search results appear as you type. Tap an item in the list to open it. Tap Search to dismiss the keyboard and see more results. Icons next to the search results show which app the results are from. iPhone may display a top hit for you, based on your previous searches. Safari search results include options to search the web or to search Wikipedia. App What’s searched Contacts First, last, and company names Mail To, From, and Subject fields and the messages of all accounts Calendar Event titles, invitees, locations, and notes Music Music (names of songs, artists, and albums) and the titles of podcasts, videos, and audiobooks Messages Names and text of messages Notes Text of notes Reminders Titles Search also searches the names of the native and installed apps on iPhone, so if you have a lot of apps, you may want to use Search to locate and open apps. Open apps from Search Enter the app name, then tap to open the app directly from the search results. Use the Spotlight Search setting to specify which contents are searched and the order the results are presented in. See“Spotlight Search” on page 165. 29Chapter 3    Basics
  • 30. Voice Control Voice Control lets you make phone calls and control music playback using voice commands. On iPhone 4S, you can also use Siri to control iPhone by voice. See Chapter 4, “Siri,” on page 39. Note:  Voice Control may not be available in all languages. Voice Control is not available on iPhone 4S when Siri is turned on. Use Voice Control:  Press and hold the Home button until the Voice Control screen appears and you hear a beep. You can also press and hold the center button on the iPhone earphones. For best results: Speak into the iPhone microphone as if you were making a phone call. You can also use theÂÂ microphone on your Bluetooth headset or compatible Bluetooth car kit. Speak clearly and naturally.ÂÂ Say only iPhone commands and names, and numbers. Pause slightly between commands.ÂÂ Use full names.ÂÂ For more about using Voice Control, including information about using Voice Control in different languages, go to support.apple.com/kb/HT3597. Voice Control normally expects you to speak voice commands in the language that’s set for iPhone (go to Settings General International Language). Voice Control settings let you change the language for speaking voice commands. Some languages are available in different dialects or accents. Change the language or country:  Go to Settings General International Voice Control and tap the language or country. Voice Control for the Music app is always on, but for better security you can prevent voice dialing when iPhone is locked. Prevent voice dialing when iPhone is locked:  Go to Settings General Passcode Lock and turn Voice Dial off. Unlock iPhone to use voice dialing. See“Voice dialing” on page 57 and“Using Siri or Voice Control with Music” on page 78. 30 Chapter 3    Basics
  • 31. Notifications Notification Center displays all your alerts in one place, including alerts about: Missed phone calls and voice messagesÂÂ New emailÂÂ New text messagesÂÂ RemindersÂÂ Calendar eventsÂÂ Friend requests (Game Center)ÂÂ WeatherÂÂ StocksÂÂ Show Notification Center:  Drag down from the top of the screen. Scroll the list to see additional alerts. Alerts also appear on the lock screen, or briefly at the top of the screen when you’re using iPhone. You can see all current alerts in Notification Center. Many apps, such as Phone, Messages, Mail, and the App Store, can display an alert badge on their Home screen icon with a number (to indicate incoming items) or an exclamation mark (to indicate a problem). If these apps are contained in a folder, the badge appears on the folder. A badge with a number shows the total number of items you haven’t attended to, such as incoming phone calls, email messages, text messages, and updated apps to download. A badge with an exclamation mark indicates a problem with an app. Respond to an alert in Notification Center Tap the alert. Respond to an alert on the lock screen Swipe the icon displayed in the alert to the right. Remove alerts from Notification Center Tap , then tap Clear. Set options for notifications Go to Settings Notifications. 31Chapter 3    Basics
  • 32. Twitter Sign in to your Twitter account (or create a new account) in Settings to enable Tweets with attachments from the following apps: Camera or Photos—with a photoÂÂ Safari—with a webpageÂÂ Maps—with a locationÂÂ YouTube—with a videoÂÂ Sign in to or create a Twitter account:  Go to Settings Twitter. Enter the user name and password for an existing account, or tap Create New Account. In Camera or Photos, tap the Action button to tweet a photo. Tweet a photo. Tweet a photo, video, or webpage View the item, tap , then tap Tweet. If isn’t showing, tap the screen. To include your location, tap Add Location. Location Services must be on in Settings Location Services. Tweet a location in Maps Tap the location pin, tap , tap Share Location, then tap Tweet. Add your current location to a Tweet Tap . Location Services must be turned on in Settings Location Services. Add Twitter user names and photos to your contacts Go to Settings Twitter, then tap Update Contacts. Turn Twitter on or off for Photos or Safari Go to Settings Twitter. When you write a Tweet, the number in the lower-right corner of the Tweet screen shows the number of characters remaining that you can enter. Attachments use some of a Tweet’s 140 characters. You can also install and use the Twitter app to post a Tweet, view your timeline, search for trending topics, and more. Install the Twitter app:  Go to Settings Twitter, then tap Install. To learn how to use the Twitter app, open the app, tap the More button (…), tap Accounts Settings, tap Settings, then tap Manual. 32 Chapter 3    Basics
  • 33. Apple Earphones with Remote and Mic The Apple Earphones with Remote and Mic included with iPhone feature a microphone, volume buttons, and an integrated button that allows you to answer and end calls easily, and control audio and video playback. Center button Plug in the earphones to listen to music or make a phone call. Press the center button to control music playback and answer or end calls, even when iPhone is locked. Pause a song or video Press the center button. Press again to resume playback. Skip to the next song Press the center button twice quickly. Return to previous song Press the center button three times quickly. Fast-forward Press the center button twice quickly and hold. Rewind Press the center button three times quickly and hold. Adjust the volume Press the + or – button. Answer an incoming call Press the center button. End the current call Press the center button. Decline an incoming call Press and hold the center button for about two seconds, then let go. Two low beeps confirm you declined the call. Switch to an incoming or on-hold call and put the current call on hold Press the center button. Press again to switch back to the first call. Switch to an incoming or on-hold call and end the current call Press and hold the center button for about two seconds, then let go. Two low beeps confirm you ended the first call. Use Siri or Voice Control Press and hold the center button. See Chapter 4, “Siri,” on page 39 or“Voice Control” on page 30. If you get a call while the earphones are plugged in, you can hear the ringtone through both the iPhone speaker and the earphones. 33Chapter 3    Basics
  • 34. AirPlay You can stream music, photos, and video wirelessly to your HDTV using AirPlay and Apple TV. You can also use AirPlay to stream audio to an Airport Express base station. Other AirPlay-enabled receivers are available from third-parties. Visit the online Apple Store for details. Stream content to an AirPlay-enabled device:  Start the video, slideshow, or music, then tap and choose the AirPlay device. Once streaming starts, you can exit the app that’s playing the content. iPhone and the AirPlay-enabled device must be on the same Wi-Fi network. Get quick access to the AirPlay control When the screen is on, double-click the Home button and scroll to the left end of the multitasking bar. Switch output from AirPlay back to iPhone Tap and choose iPhone. On iPhone 4S, you can mirror the iPhone screen on a TV with Apple TV. Everything on the iPhone screen appears on the TV. Mirror the iPhone screen on a TV:  Tap at the left end of the multitasking bar, choose an Apple TV, and tap the Mirroring button that appears. A blue bar appears at the top of the iPhone 4S screen when AirPlay mirroring is turned on. You can also mirror the iPhone screen on a TV using a cable. See“Watching videos on a TV” on page 127. Bluetooth devices You can use iPhone with the Apple Wireless Keyboard and other Bluetooth devices, such as Bluetooth headsets, car kits, and stereo headphones. Third-party Bluetooth headphones may support volume and playback controls. See the documentation that came with your Bluetooth device. For supported Bluetooth profiles, go to support.apple.com/kb/HT3647. Pairing a Bluetooth device with iPhone WARNING:  For important information about avoiding hearing loss and about driving safely, see the Important Product Information Guide at www.apple.com/support/manuals/iphone. Before you can use a Bluetooth device with iPhone, you must first pair them. Pair a Bluetooth headset, car kit, or other device with iPhone:  1 Follow the instructions that came with the device to make it discoverable or to set it to search for other Bluetooth devices. 2 Go to Settings General Bluetooth and turn Bluetooth on. 3 Choose the device on iPhone, and enter its passkey or PIN number. See the instructions about the passkey or PIN that came with the device. After you pair a Bluetooth device to work with iPhone, you must make a connection to have iPhone use the device for your calls. See the documentation that came with the device. When iPhone is connected to a Bluetooth headset or car kit, outgoing calls are routed through the device. Incoming calls are routed through the device if you answer using the device, and through iPhone if you answer using iPhone. 34 Chapter 3    Basics
  • 35. Pair an Apple Wireless Keyboard with iPhone:  1 Go to Settings General Bluetooth and turn Bluetooth on. 2 Press the power button on the Apple Wireless Keyboard to turn it on. 3 On iPhone, select the keyboard listed under Devices. 4 Type the passkey on the keyboard as instructed, then press Return. Note:  You can pair only one Apple Wireless Keyboard with iPhone at a time. To pair a different keyboard, you must first unpair the current one. For more information, see“Using an Apple Wireless Keyboard” on page 27. Bluetooth status The Bluetooth icon appears in the iPhone status bar at the top of the screen: ÂÂ or :  Bluetooth is on and paired with a device. (The color depends on the current color of the status bar.) ÂÂ :  Bluetooth is on and paired with a device, but the device is out of range or turned off. ÂÂ No Bluetooth icon:  Bluetooth is turned off or not paired with a device. Unpairing a Bluetooth device from iPhone You can unpair a Bluetooth device, if you don’t want to use it with iPhone any more. Unpair a Bluetooth device:  1 Go to Settings General Bluetooth and turn Bluetooth on. 2 Tap next to the device name, then tap“Forget this Device.” Battery iPhone has an internal rechargeable battery. Charging the battery WARNING:  For important safety information about charging iPhone, see the Important Product Information Guide at www.apple.com/support/manuals/iphone. The battery icon in the upper-right corner shows the battery level or charging status. You can also display the percentage of the battery charge. Go to Settings General Usage and turn on the setting under Battery Usage. Charging Charged Charge the battery:  Connect iPhone to a power outlet using the included Dock Connector to USB Cable and USB power adapter. 35Chapter 3    Basics
  • 36. Note:  Connecting iPhone to a power outlet can start an iCloud backup or wireless iTunes syncing. See“Backing up iPhone” on page 173 and“Syncing with iTunes” on page 18. Charge the battery and sync iPhone:  Connect iPhone to your computer using the included Dock Connector to USB Cable. Or connect iPhone to your computer using the included cable and the Dock, available separately. Unless your keyboard has a high-powered USB 2.0 port, you must connect iPhone to a USB 2.0 port on your computer. Important:  The iPhone battery may drain instead of charge if iPhone is connected to a computer that’s turned off or is in sleep or standby mode. If you charge the battery while syncing or using iPhone, it may take longer to charge. Important:  If iPhone is very low on power, it may display one of the following images, indicating that iPhone needs to charge for up to ten minutes before you can use it. If iPhone is extremely low on power, the display may be blank for up to two minutes before one of the low-battery images appears. or Maximizing battery life iPhone uses lithium-ion batteries. To learn more about how to maximize the battery life of iPhone, go to www.apple.com/batteries. Replacing the battery Rechargeable batteries have a limited number of charge cycles and may eventually need to be replaced. The iPhone battery isn’t user replaceable; it can be replaced only by an authorized service provider. For more information, go to www.apple.com/batteries/replacements.html. 36 Chapter 3    Basics
  • 37. Security features Security features help protect the information on iPhone from being accessed by others. Passcodes and data protection You can set a passcode that you must enter each time you turn on or wake up iPhone. Set a passcode:  Go to Settings General Passcode Lock and enter a 4-digit passcode, then enter the passcode again to verify it. iPhone then requires you to enter the passcode to unlock it or to display the passcode lock settings. Setting a passcode turns on data protection. Data protection uses your passcode as the key for encrypting mail messages and their attachments stored on iPhone. (Data protection may also be used by some apps available from the App Store.) A notice at the bottom of the Passcode Lock screen in Settings shows whether data protection is enabled. To increase iPhone security, turn off Simple Passcode and use a longer passcode with a combination of numbers, letters, punctuation, and special characters. See“Passcode Lock” on page 165. Important:  On an iPhone 3GS that didn’t ship with iOS 4 or later, you must also restore iOS software to enable data protection. See“Updating and restoring iPhone software” on page 175. Prevent voice dialing when iPhone is locked:  Go to Settings General Passcode Lock and turn Voice Dial off. Unlock iPhone to use voice dialing. Find My iPhone Find My iPhone helps you locate and secure your iPhone using the free Find My iPhone app on another iPhone, iPad, or iPod touch, or using a Mac or PC web browser signed in to www.icloud.com or www.me.com. Find My iPhone includes: ÂÂ Locate on a map:  View the approximate location of your iPhone on a full-screen map. ÂÂ Send a Message or Play a Sound:  Lets you compose a message that will appear on your iPhone screen, or play a sound at full volume for two minutes, even if the Ring/Silent switch is set to silent. ÂÂ Remote Passcode Lock:  Lets you remotely lock your iPhone and create a 4-digit passcode, if you haven’t set one previously. ÂÂ Remote Wipe:  Lets you protect your privacy by erasing all media and data on iPhone, restoring it to factory settings. Important:  Before you can use its features, Find My iPhone must be turned on in either iCloud or MobileMe settings on your iPhone. Find My iPhone can be turned on only in one account. Turn on Find My iPhone using iCloud Go to Settings iCloud and turn on Find My iPhone. Turn on Find My iPhone using MobileMe Go to Settings Mail, Contacts, Calendars, tap your MobileMe account, then turn on Find My iPhone. See“iCloud” on page 16 or“Setting up mail and other accounts” on page 16. 37Chapter 3    Basics
  • 38. Cleaning iPhone Clean iPhone immediately if it comes in contact with any contaminants that may cause stains, such as ink, dyes, makeup, dirt, food, oils, or lotions. To clean iPhone, disconnect all cables and turn off iPhone (press and hold the On/Off button, then slide the onscreen slider). Then use a soft, slightly damp, lint-free cloth. Avoid getting moisture in openings. Don’t use window cleaners, household cleaners, compressed air, aerosol sprays, solvents, alcohol, ammonia, or abrasives to clean iPhone. The front cover of iPhone 3GS and the front and back covers of iPhone 4S and iPhone 4 are made of glass and have an oleophobic coating. To clean these surfaces, simply wipe with a soft, lint-free cloth. The ability of this coating to repel oil will diminish over time with normal usage, and rubbing the screen with an abrasive material will further diminish its effect and may scratch the glass. For more information about handling iPhone, see the iPhone Important Product Information Guide at www.apple.com/support/manuals/iphone. Restarting or resetting iPhone If something isn’t working right, try restarting iPhone, force quitting an app, or resetting iPhone. Restart iPhone:  Press and hold the On/Off button until the red slider appears. Slide your finger across the slider to turn off iPhone. To turn iPhone back on, press and hold the On/Off button until the Apple logo appears. If you can’t turn off iPhone or if the problem continues, you may need to reset iPhone. A reset should be done only if turning iPhone off and on doesn’t resolve the problem. Force an app to close:  Press and hold the On/Off button for a few seconds until a red slider appears, then press and hold the Home button until the app quits. You can also force an app to quit by removing it from the multitasking bar. See“Opening and switching apps” on page 19. Reset iPhone:  Press and hold both the On/Off button and the Home button for at least ten seconds, until the Apple logo appears. For more troubleshooting suggestions, see Appendix B, “Support and Other Information,” on page 173. 38 Chapter 3    Basics
  • 39. Siri 4 What is Siri? Siri is the intelligent personal assistant that helps you get things done just by talking. Siri understands natural speech, so you don’t have to learn specific commands or remember keywords. You can ask things in different ways. For example, you can say“Set the alarm for 6:30 a.m.”or“Wake me at 6:30 in the morning.”Either way, Siri gets it. Siri lets you write and send messages, schedule meetings, place phone calls, get directions, set a reminder, search the web—and much much more!—simply by talking naturally. Siri understands what you say and knows what you mean. Siri speaks back to let you know what it heard you say, and asks a question if it needs clarification or more information. It’s very much like having a conversation with a person. For example, ask“Any good burger joints around here?”and Siri may reply“I found a number of burger restaurants near you.”If you say“Hmm. How about tacos,”Siri remembers that you just asked about restaurants and then looks for Mexican restaurants in the neighborhood. In addition to the internal processing power of iPhone, Siri uses Apple’s data centers to understand what you say and quickly return a response. Siri also uses information from your contacts, music library, calendars, reminders, and so forth to know what you’re talking about. Siri works with most of the built-in apps on iPhone 4S, and is smart enough to figure out which app to use for a request. Siri also uses Search and Location Services to help you with your requests. There’s so many things you can say to Siri! Here’s a few more examples, for starters: Call JoeÂÂ Set the timer for 30 minutesÂÂ How far to the nearest Apple store?ÂÂ Is it going to rain tomorrow?ÂÂ Note:  Siri is available only on iPhone 4S, and it requires Internet access via a cellular or Wi-Fi connection. Siri may not be available in all languages or in all areas, and features may vary by area. Cellular data charges may apply. 39
  • 40. Using Siri Starting Siri Siri comes to life with the press of a button. Start Siri: Press the Home button until Siri appears. You’ll hear two quick beeps and see“What can I help you with?”on the screen. Just begin speaking. The microphone icon lights up to let you know that Siri hears you talking. Once you’ve started a dialogue with Siri, tap the microphone icon to talk to it again. Siri waits for you to stop talking, but you can also tap the microphone icon to tell Siri you’re done. This is useful when there’s a lot of background noise. It can also speed up your conversation with Siri, since Siri won’t have to wait for your pause. When you finish speaking, Siri displays what it heard and provides a response. Siri often includes additional, related info that might be useful. If the info is related to an app—for example, a text message you’ve composed, or a location you asked for—just tap the display to open the app for details and further action. What Siri heard you say Tap to speak to Siri. Siri’s response Related info—tap to open the app. Siri may ask you if it needs more information to complete a request. For example, tell Siri to “Remind me to call mom,”and Siri may ask“What time would you like me to remind you?”Don’t worry about telling Siri everything at once. Siri prompts you for the details it needs. You can start talking to Siri just by bringing iPhone to your ear, like making a phone call. If the screen isn’t on—first press the On/Off or Home button. You’ll hear two quick beeps to indicate Siri is listening. Then start talking. 40 Chapter 4    Siri
  • 41. If Siri doesn’t respond when you bring iPhone to your ear, start with the screen facing you, so your hand rotates on the way up. Cancel a request Say“cancel,”tap , or press the Home button . Stop a phone call you started with Siri Before Phone opens, press the Home button . If Phone is already open, tap End. Telling Siri about yourself The more Siri knows you, the more it can use your information to help you. Siri gets your information from your personal info card (“My Info”) in Contacts. Tell Siri who you are: Go to Settings Siri My Info, then tap your name. Put your home and work addresses on your card, so you can say things like“How do I get home?” and“Remind me to call Bob when I get to work.” Siri also wants to know about the important people in your life, so specify those relationships on your personal info card. Siri can set those up for you. For example, the first time you tell Siri to call your sister, Siri asks you who your sister is (if you don’t already have that info on your card). Siri adds that relationship to your personal info card so it doesn’t have to ask next time. Create cards in Contacts for all your important relationships, and include information such as phone numbers, email addresses, home and work addresses, and nicknames you like to use. 41Chapter 4    Siri
  • 42. Onscreen guide Siri gives you examples of things you can say, right on screen. Ask Siri“what can you do”or tap when Siri first appears. Handsfree Siri You can use Siri with the Apple Earphones with Remote and Mic that came with your iPhone, or with other supported headphones and Bluetooth headsets. Talk to Siri using earphones: Press and hold the center button. Talk to Siri using a Bluetooth headset: Press and hold the call button. To continue a conversation with Siri, press and hold the button each time you want to talk. When you use earphones or a headset, Siri speaks its responses to you. Siri reads back text messages and email messages that you’ve dictated before sending them.This gives you a chance to change the message if you want. Siri also reads back the subjects of reminders before creating them. Context Siri pays attention to where you’re at and what you’re doing, so it understands context. If you just received a text message from Bob, just say“Reply”and Siri knows to send a text message to Bob. Say“Call him”and Siri knows to call Bob instead. Siri always lets you know what it is about to do. Setting options for Siri Turn Siri on or off: Go to Settings General Siri. Note:  Turning Siri off resets Siri, and Siri forgets what it’s learned about your voice. Set options for Siri: Go to Settings General Siri. Language: Select the language you want to use with Siri. Voice Feedback: By default, Siri speaks its responses only when you hold iPhone to your ear or use Siri with earphones or a headset. If you want Siri to always speak its responses, set this option to Always. My Info: Let Siri know which card in Contacts contains your personal info. See“Telling Siri about yourself” on page 41. Raise to Speak: Talk to Siri by bringing iPhone to your ear when the screen is on. Allow or prevent access to Siri when iPhone is locked with a passcode: Go to Settings General Passcode Lock. You can also disable Siri by turning on restrictions. See“Restrictions” on page 166. 42 Chapter 4    Siri
  • 43. Location Services Because Siri knows locations like“current,”“home,”and“work,”it can remind you to do a certain task when you leave a location or arrive at a location. Tell Siri“Remind me to call my wife when I leave the office,”and Siri does just that. Location information isn’t tracked or stored outside the phone. You can still use Siri if you turn Location Services off, but Siri won’t do anything that requires location information. Turn off Location Services for Siri: Go to Settings Location Services. Accessibility Siri is accessible to blind and visually impaired users through VoiceOver, the screen reader built into iOS. VoiceOver describes aloud what’s onscreen—including any text in Siri’s responses—so you can use iPhone without seeing it. Turn on VoiceOver: Go to Settings Accessibility. Turning on VoiceOver causes even your notifications to be read aloud for you. For more information, see“VoiceOver” on page 143. Correcting Siri If Siri is having trouble Siri may sometimes have trouble understanding you. Noisy environments, for example, can make it difficult for Siri to hear what you’re saying. If you speak with an accent, it can take Siri some time to get used to your voice. If Siri doesn’t hear you exactly right, you can make corrections. Siri shows what it heard you say, along with its response. Correct what Siri hears you say: Tap the bubble showing what Siri heard you say. Edit your request by typing, or tap on the keyboard to dictate. For information about using dictation, see“Dictation” on page 55. If some of the text is underlined in blue, tap it and Siri suggests some alternatives. Tap one of the suggestions, or replace the text by typing or dictating. Correct Siri by voice: Tap , then restate or clarify your request. For example,“I meant Boston.” When correcting Siri, don’t say what you don’t want—just tell Siri what you do want. Correct a mail or text message: If Siri asks if you want to send the message, say something like: “Change it to: Call me tomorrow.” “Add: See you there question mark.” “No, send it to Bob.” “No.”(to keep the message without sending it) “Cancel.” To have Siri read the message to you, say“Read it back to me”or“Read me the message.”If it’s correct, say something like“Yes, send it.” See“Mail” on page 49 and“Messages” on page 45. How Siri learns Siri works right from the start without setup, and gets better over time. Siri learns about your accent and other characteristics of your voice, and categorizes your voice into one of the dialects or accents it understands. As more people use Siri and as it’s exposed to more language variations, recognition will improve and Siri will work even better. 43Chapter 4    Siri
  • 44. Noisy environments In a noisy environment, hold iPhone close to your mouth, but don’t talk directly into the bottom edge. Continue to speak clearly and naturally. Tap when you finish speaking. You can also try holding iPhone to your ear to speak to Siri. Network connection Siri might tell you it’s having trouble connecting to the network. Because Siri relies on Apple servers for voice recognition and other services, you need to have a good 3G or 4G cellular or Wi-Fi connection to the Internet. Siri and apps Siri works with most of the built-in apps on iPhone 4S, and uses the apps it needs to help you with your requests. Siri knows when you’re using an app, so you can refer to elements on the screen. For example, when reading a message in Mail, you can say“Reply, I like it.” Phone Use Siri to make a phone call or start a FaceTime call. You can refer to your family, friends, and associates in Contacts, or say which phone number to use. For example: Call Jennifer Wright mobileÂÂ Call Susan on her work phoneÂÂ Call 408 555 1212ÂÂ Call homeÂÂ FaceTime LisaÂÂ Saying both the first and last name usually makes it clear who you want to call, but you can say just one or the other and let Siri figure it out. Siri first checks your Favorites, and if a match is found, calls that number. Next, Siri checks all your contacts. If there’s more than one person with the same name, Siri asks which one you want to call. Siri also asks which phone number to use if there’s more than one listed. You can also ask Siri to call a business in your contacts. 44 Chapter 4    Siri
  • 45. So that Siri knows who you’re referring to when you ask to make a call, make sure to introduce yourself to Siri. See“Telling Siri about yourself” on page 41. Stop a phone call you started with Siri Before Phone opens, press the Home button . If the phone call is in progress, tap End. Music Ask Siri to play a song, album, or playlist. Pause playback, then resume. Set the mood by asking for a certain type of music. Or just say“Play”and let Siri choose for you. If you don’t recognize the song, ask Siri“What’s playing?” Here are some ways you can play music with Siri: Play The Light of the SunÂÂ Play TroubleÂÂ Play Taking Back Sunday shuffledÂÂ Play Alicia KeysÂÂ Play some bluesÂÂ Play my party mixÂÂ Shuffle my roadtrip playlistÂÂ PlayÂÂ PauseÂÂ ResumeÂÂ SkipÂÂ To hear similar songs to the one you’re listening to, say“Genius.”(Siri creates a temporary Genius playlist, but it’s not saved.) Messages You can send text messages, have Siri read new messages to you, and respond to messages you receive. Include the name of the person to text, or wait for Siri to ask who you want to send it to. You can text to a phone number, and you can text more than one person at once. To send a text, say things like: Tell Susan I’ll be right thereÂÂ Send a message to Jason RussellÂÂ Send a message to Lisa saying how about tomorrow?ÂÂ Send a message to Susan on her mobile saying I’ll be lateÂÂ Send a message to 408 555 1212ÂÂ Text Jason and Lisa where are you?ÂÂ 45Chapter 4    Siri
  • 46. To see or hear messages you’ve received, you can say: Read me my messagesÂÂ Show my new textsÂÂ Read it againÂÂ If you’ve just received a text message or if you’re reading one that you received earlier, you can simply say: Reply that’s great newsÂÂ Tell him I’ll be there in 10 minutesÂÂ Call herÂÂ Siri understands the context and knows who to address the reply to. Before sending a message you’ve composed, Siri displays it or reads it back to you to make sure it’s right. When Siri asks if you want to send the message, you can say: Change it to: Call me tomorrowÂÂ Add: See you there question markÂÂ No, send it to BobÂÂ No (to keep the message without sending it)ÂÂ CancelÂÂ Want to tag your message with a smiley face? Say“smiley face,”of course. :-) Editing messages If you’re creating a text message with Siri but it’s not exactly what you wanted to say, you can ask Siri to change it. If it’s pretty close, you might want to edit it instead. When Siri displays the message for your review, tap the message bubble to open it in the Messages app. Then you can edit the message by typing or dictating. See“Dictation” on page 55. Calendar Add new events to your calendar, change existing events, or find out what’s on your schedule. When you create an event, you can specify a time, a place, a title, and the people you want to invite. 46 Chapter 4    Siri
  • 47. To create an event: Set up a meeting at 9ÂÂ Set up a meeting with Michael at 9ÂÂ Meet with Lisa at noonÂÂ Set up a meeting about hiring tomorrow at 9 a.m.ÂÂ New appointment with Susan Park Friday at 3ÂÂ Schedule a planning meeting at 8:30 today in the boardroomÂÂ To change or cancel an event: Move my 3 p.m. meeting to 4:30ÂÂ Reschedule my appointment with Dr. Manning to next Monday at 9 a.m.ÂÂ Add Lisa to my meeting with JasonÂÂ Cancel the budget review meetingÂÂ To ask Siri about events: What does the rest of my day look like?ÂÂ What’s on my calendar for Friday?ÂÂ When is my next appointment?ÂÂ When am I meeting with Michael?ÂÂ Where is my next event?ÂÂ When you create, change, or ask about an event, Siri displays information about the event. To get more information, tap the event. Reminders Siri’s a great way to set up a quick reminder. To create a reminder, say things like: Remind me to call momÂÂ Remember to take an umbrellaÂÂ Remind me take my medicine at 6 a.m. tomorrowÂÂ Remind me when I leave to call JasonÂÂ Remind me to finish the report by 6ÂÂ Siri asks for information it needs in order to create the reminder, including date, time, and location. 47Chapter 4    Siri
  • 48. Including location info lets Siri remind you about the item when you approach or leave a location. A location can be your current location (“here”), or an address in Contacts. To let Siri know about your home and work locations, see“Telling Siri about yourself” on page 41. Remind me to call my mom when I get homeÂÂ Remind me when I get to the office to call my wifeÂÂ Remind me to pick up flowers when I leave hereÂÂ Remind me to check the time when I get back hereÂÂ Reminders are added to the default reminder list. Set the default list for Reminders: Go to Settings Mail, Contacts, Calendars Default List. To keep a list without setting a specific time or location to be reminded: Remember to buy milkÂÂ Add eggs to my groceries listÂÂ If Siri asks when you want to be reminded, you can say“never.” If you have a list visible in Reminders, you can add to it just by saying“Add”: Add eggsÂÂ When you create a reminder with Siri, Siri displays it for you to confirm. You can confirm, cancel, or let Siri know you want to change something: Change the time to 7ÂÂ Make it Tuesday insteadÂÂ Change that to: Get the car washed and waxedÂÂ Move it to my Work listÂÂ Move it to my Personal listÂÂ Once you confirm the reminder, you can tap it to open the Reminder app and see the reminder and its details. Maps Use Siri to find a location, get directions, and see traffic conditions. For example: How do I get home?ÂÂ Show 1 Infinite Loop Cupertino CaliforniaÂÂ Directions to my dad’s workÂÂ What’s the traffic like getting home?ÂÂ 48 Chapter 4    Siri
  • 49. Find coffee near meÂÂ Find some burger joints in BaltimoreÂÂ Find a gas station within walking distanceÂÂ Good Mexican restaurants around hereÂÂ If you ask about a location, Siri displays it on a map. Sometimes Siri goes directly to Maps, but you can tap the map to open the Maps app if Siri doesn’t open it. Siri might respond with a list of choices. For example, if you ask about burger joints, Siri looks for hamburger restaurants in the vicinity and sorts the list by proximity. If you ask for the best burger joint around, Siri sorts by rank. To sort the list another way, just ask“which is the best?”or“which is the closest?” Mail With Siri, you can send mail, check your mail, and respond to mail you’ve received. A mail message requires at least one recipient, a subject line (say“about”), and message text. But don’t worry about getting it all down in one breath—Siri will ask for what’s needed to complete the email. To email someone: Email Lisa about the tripÂÂ New email to Susan ParkÂÂ Mail Dad about the rent checkÂÂ 49Chapter 4    Siri
  • 50. Email Dr. Manning and say I got the forms, thanksÂÂ Mail Lisa and Jason about the party and say I had a great timeÂÂ To check your mail: Check emailÂÂ Any new email from Michael today?ÂÂ Show new mail about the leaseÂÂ Show the email from Lisa yesterdayÂÂ To respond to email: Reply Dear Susan sorry about the late paymentÂÂ Call him at workÂÂ Before sending an email, Siri displays or reads it back to you so you can make sure it’s right. When Siri asks if you want to send the email, you can say: Change it to say: Check’s in the mailÂÂ Add John (to include another recipient)ÂÂ Change subject to:This weekendÂÂ Editing email If you create an email with Siri but it’s not exactly what you want to say, ask Siri to change it. If it’s pretty close, you can edit it instead. Tap the message to open it in the Mail app, then edit it by typing or dictating. See“Dictation” on page 55. Weather Use Siri to get weather information. If you don’t give a location, Siri assumes you mean your current location. If you don’t give a time, Siri shows today’s forecast, but you can ask about the weather anytime in the coming week. What’s the weather for today?ÂÂ What’s the weather for tomorrow?ÂÂ Will it rain in Cupertino this week?ÂÂ What’s the forecast for this evening?ÂÂ How’s the weather in Tampa right now?ÂÂ How hot will it be in Palm Springs this weekend?ÂÂ What’s the high for Anchorage on Thursday?ÂÂ What’s the temperature outside?ÂÂ 50 Chapter 4    Siri
  • 51. How windy is it out there?ÂÂ When is sunrise in Paris?ÂÂ Stocks Use Siri to quickly get quotes for your favorite stocks. Get market capitalization, or P/E ratios. Ask about specific indexes, and the situation in general. For example: What’s Apple’s stock price?ÂÂ What’s Apple’s P/E ratio?ÂÂ What did Yahoo close at today?ÂÂ How’s the Nikkei doing?ÂÂ How are the markets doing?ÂÂ What’s the Dow at?ÂÂ Clock Use Siri to quickly set an alarm for the morning, a timer for that cake in the oven, or find out what time it is at your overseas destination. To set or change alarms: Wake me up tomorrow at 7 a.m.ÂÂ Set an alarm for 6:30 a.m.ÂÂ Wake me up in 8 hoursÂÂ Change my 6:30 alarm to 6:45ÂÂ 51Chapter 4    Siri
  • 52. Turn off my 6:30 alarmÂÂ Delete my 7:30 alarmÂÂ When you set an alarm, Siri displays the alarm so you can see that it’s correct. You can tap the switch to turn the alarm on or off. Tap the alarm to open it in the Clock app. To ask about the date and time: What time is it?ÂÂ What time is it in Berlin?ÂÂ What is today’s date?ÂÂ What’s the date this Saturday?ÂÂ Siri displays a clock for you. Tap it to open the Clock app. To use the timer: Set the timer for ten minutesÂÂ Show the timerÂÂ Pause the timerÂÂ ResumeÂÂ Reset the timerÂÂ Stop itÂÂ 52 Chapter 4    Siri
  • 53. Siri displays a timer. Tap it to open the Clock app. Contacts Siri uses your entries in Contacts to find addresses, look up phone numbers and other information, or tell you about someone’s birthday. Siri even knows who your relatives are by looking at your personal contact card. See“Telling Siri about yourself” on page 41. To ask about contacts, you can say: What’s Michael’s address?ÂÂ What is Susan Park’s phone number?ÂÂ When is my wife’s birthday?ÂÂ Show Jennifer’s home email addressÂÂ What’s my brother’s work address?ÂÂ To find contacts: Show Jason RussellÂÂ Find people named ParkÂÂ Who is Michael Manning?ÂÂ If you’re not sure which phone number to use for a contact, ask Siri to show the person’s contact information. To call, just tap a number. Other items are active as well—tap an email address to start a new email message, or tap the FaceTime button to speak face to face.“Find John”may help you narrow down the list of possibilities, if you know it’s John but can’t remember the last name. 53Chapter 4    Siri
  • 54. Notes Use Siri to verbally jot down notes, or look up notes you’ve already made. Say things like: Note that I spent $12 on lunchÂÂ Note: check out that new Alicia Keys albumÂÂ Find my restaurant noteÂÂ Create a reading list noteÂÂ Add Tom Sawyer to my reading list noteÂÂ Siri displays the note for you to review. To edit the note, tap it. Siri opens the Notes app for you, and you can edit the note by typing or dictating. See“Dictation” on page 55. Safari You can do a web search with Siri—specify which search engine to use, or search a site like Wikipedia. For example: Search the web for Bora BoraÂÂ Search for vegetarian pasta recipesÂÂ Search the web for best cable plansÂÂ Google the war of 1812ÂÂ Search Wikipedia for Abraham LincolnÂÂ Search for news about the World CupÂÂ Bing Alicia KeysÂÂ Siri opens Safari and performs the search you request. If you don’t specify the search engine, Siri uses the one specified in Safari settings. Go to Settings Safari. WolframAlpha Ask Siri to provide some information or perform a calculation, and Siri might refer to WolframAlpha (www.wolframalpha.com). Responses often include related info. Some sample questions and requests: How many calories in a bagel?ÂÂ What is an 18% tip on $86.74 for four people?ÂÂ Who’s buried in Grant’s tomb?ÂÂ How long do dogs live?ÂÂ What is the Gossamer Condor?ÂÂ 54 Chapter 4    Siri
  • 55. What’s the square root of 28?ÂÂ How many dollars is 45 euros?ÂÂ What was the Best Picture of 1983?ÂÂ How many days until Christmas?ÂÂ How far away is the sun?ÂÂ When is the next solar eclipse?ÂÂ Show me the Orion constellationÂÂ What’s the population of Jamaica?ÂÂ How high is Mt. Everest?ÂÂ How deep is the Atlantic Ocean?ÂÂ What’s the price of gasoline in Chicago?ÂÂ Dictation When Siri is turned on, you can also dictate text. See“Dictation” on page 27. Although you can compose email, text messages, and other text by talking directly with Siri, you might prefer dictation. Dictation lets you edit a message instead of replacing the entire text. Dictation also gives you more time to think while composing. Siri understands pauses to mean you finished talking for the moment, and takes that opportunity to respond. While this lets you have a natural conversation with Siri, Siri might interrupt you before you’re really done, because you paused a moment to think. With dictation, you can pause as frequently as you like, and resume talking when you’re ready. You can also start composing text using Siri, then continue using dictation. For example, you can create an email with Siri, then tap the draft to open the message in Mail. In Mail, you can complete or edit the message and make other changes, such as adding or removing recipients, revising the subject, or changing the account you’re sending the email from. 55Chapter 4    Siri
  • 56. Phone 5 Phone calls Making a call Making a call on iPhone is as simple as tapping a name or number in your contacts, using Siri to say“call bob”(iPhone 4S), tapping one of your favorites, or tapping a recent call to return it. Buttons at the bottom of the Phone screen give you quick access to your favorites, recent calls, your contacts, and a numeric keypad for dialing manually. WARNING:  For important information about driving safely, see the Important Product Information Guide at www.apple.com/support/manuals/iphone. Number of missed calls Call a favorite with a single tap. View your recent incoming and outgoing calls to return a call or get more info. Call, email, or text someone in your contacts list. Dial manually. View a list of your voicemail messages. Number of unheard messages Return a missed call Do one of the following: ÂÂ Phone:  Tap Recents, then tap the name or number. ÂÂ Locked screen:  Swipe the icon displayed in the alert to the right. ÂÂ Notification Center:  Tap the missed call. 56
  • 57. Dialing manually You can use the keypad to dial a phone number manually. Dial a number:  Tap Keypad, enter the number, then tap Call. Paste a number to the keypad Tap the screen above the keyboard, then tap Paste. Enter a soft (2-second) pause Touch the“*”key until a comma appears. Enter a hard pause (to pause dialing until you tap the Dial button) Touch the“#”key until a semicolon appears. Redial the last number Tap Keypad, tap Call, then tap Call again. Voice dialing You can use Siri (iPhone 4S) or Voice Control to call someone in your contacts, or to dial a specific number. See Chapter 4, “Siri,” on page 39 and“Voice Control” on page 30. Make a phone call by voice:  Activate Siri or Voice Control, say“call”or“dial,”then say the name or number. Siri:  If the screen isn’t on, press the On/Off or Home button , then hold iPhone to your ear. Voice Control or Siri:   Press and hold the Home button until you hear the tone. You can also press and hold the center button on the iPhone earphones. For example: Call John AppleseedÂÂ Call John Appleseed at homeÂÂ Call John Appleseed, mobileÂÂ For best results, speak the full name of the person you’re calling. When voice dialing a number, speak each digit separately—for example, say“four one five, five five five, one two one two.” Note:  For the“800”area code in the U.S., you can say“eight hundred.” Receiving calls When you receive a call, tap Answer. If iPhone is locked, drag the slider. You can also press the center button on your iPhone earphones. Silence a call Press the On/Off button or either volume button. You can still answer the call after silencing it, until it goes to voicemail. Decline a call and send it directly to voicemail Do one of the following: ÂÂ Press the On/Off button twice quickly. ÂÂ Press and hold the center button on the iPhone earphones for about two seconds. Two low beeps confirm that the call was declined. ÂÂ Tap Decline (if iPhone is awake when a call comes in). Block calls and maintain Wi-Fi access to the Internet Go to Settings and turn on Airplane Mode, then tap Wi-Fi to turn it on. If iPhone is turned off or in Airplane Mode, incoming calls go directly to voicemail. 57Chapter 5    Phone
  • 58. While on a call When you’re on a call, the screen shows call options. Mute your line. iPhone 4 or later: Touch and hold to put your call on hold. Dial a number or enter numbers. Use the speakerphone or a Bluetooth device. Get contact info. iPhone 4 or later: Make a FaceTime call. iPhone 3GS (Hold button): Put a call on hold. Make another call. The call options may vary, depending on which iPhone you’re using. Use another app during a call Press the Home button , then tap an app icon. To return to the call, tap the green bar at the top of the screen. End a call Tap End Call. Or press the center button on your iPhone earphones. Second calls During a call, you can make or receive another call. If you receive a second call, iPhone beeps and shows the caller’s information and a list of options. Note:  Making and receiving a second call may be an optional service in some areas. Contact your carrier for more information. Respond to a second incoming call:  ÂÂ To ignore the call and send it to voicemail:  Tap Ignore. ÂÂ To hold the first call and answer the new one:  Tap Hold Call + Answer. ÂÂ To end the first call and answer the new one:  When using a GSM network, tap End Call + Answer. With a CDMA network, tap End Call and when the second call rings back, tap Answer, or drag the slider if the phone is locked. If you’re on a FaceTime video call, you can either end the video call and answer the incoming call, or decline the incoming call. Make a second call Tap Add Call. The first call is put on hold. Switch between calls Tap Swap. The active call is put on hold. With CDMA, you can’t switch between calls if the second call was outgoing, but you can merge the calls. If you end the second call or the merged call, both calls are terminated. Merge calls Tap Merge Calls. With CDMA, you can’t merge calls if the second call was incoming. 58 Chapter 5    Phone
  • 59. Conference calls With GSM, you can set up a conference call to talk with up to five people at a time, depending on your carrier. Note:  Conference calling may be an optional service in some areas. Contact your carrier for information. Create a conference call:  1 Make a call. 2 Tap Add Call and make another call. The first call is put on hold. 3 Tap Merge Calls. The calls are merged on one line and everyone can hear each other. 4 Repeat steps two and three to add additional calls. Drop one call Tap Conference and tap next to a call. Then tap End Call. Talk privately with a call Tap Conference, then tap Private next to a call. Tap Merge Calls to resume the conference call. Add an incoming call Tap Hold Call + Answer, then tap Merge Calls. If your service includes conference calling, iPhone always has a second line available in addition to the conference call. Note:  You can’t make a FaceTime video call when you’re on a conference call. Using a Bluetooth device for calls You can make and receive calls using a Bluetooth device paired with iPhone. See“Pairing a Bluetooth device with iPhone” on page 34. For information about using a Bluetooth device, see the documentation that came with the device. Bypass your Bluetooth device:  Answer a call by tapping the iPhone screen.ÂÂ During a call, tap Audio and choose iPhone or Speaker Phone.ÂÂ Turn off Bluetooth in Settings General Bluetooth.ÂÂ Turn off the Bluetooth device, or move out of range. You must be within about 30 feet of aÂÂ Bluetooth device for it to be connected to iPhone. Emergency calls If iPhone is locked with a passcode, you may still be able to make an emergency call. Make an emergency call when iPhone is locked:  On the Enter Passcode screen, tap Emergency Call, then enter the emergency number and tap the green button. In the U.S., location information (if available) is provided to emergency service providers when you dial 911. With CDMA, when an emergency call ends, iPhone enters Emergency call mode to allow a call back from emergency services. While in this mode, data transmission and text messages are blocked. Exit emergency call mode (CDMA):  Do one of the following: Tap the back button.ÂÂ Press the On/Off button or the Home buttonÂÂ . Use the keypad to dial a non-emergency number.ÂÂ Emergency call mode ends automatically after a few minutes, as determined by your carrier. 59Chapter 5    Phone
  • 60. Important:  You should not rely on wireless devices for essential communications, such as medical emergencies. Use of iPhone to call emergency services may not work in all areas or all operating conditions. Emergency numbers and services vary by area, and sometimes an emergency call cannot be placed due to network availability or environmental interference. Some cellular networks may not accept an emergency call from iPhone if iPhone is not activated, if iPhone is not compatible with or configured to operate on a particular cellular network, or (when applicable) if iPhone does not have a SIM or if the SIM is PIN-locked. If you’re on a FaceTime video call, you must end that call before you can call an emergency number. FaceTime FaceTime video calls (iPhone 4 or later) let you see as well as hear the person you’re talking to. You can make a video call to someone with a Mac or iOS device that supports FaceTime. No setup is needed, but you must have a Wi-Fi connection to the Internet. By default, FaceTime uses the front camera so the person you call can see your face; switch to the rear camera to share what you see around you. Note:  FaceTime may not be available in all areas. Make a FaceTime call:  In Contacts, choose a name, tap FaceTime, then tap the phone number or email address the person uses for FaceTime. To call someone who has an iPhone 4 or later, you can start by making a voice call, then tap FaceTime. When the voice call is established, the other person’s image appears on your screen. An inset shows what the other person sees. Rotate iPhone to use FaceTime in landscape orientation. Switch cameras. Drag your image to any corner. Mute (you can hear and see; the caller can see but not hear). If your Wi-Fi network is unavailable (for example, if you’re out of range), you get an option to redial the number for a voice call. Note:  When you make a FaceTime video call, your phone number is displayed even if caller ID is blocked or turned off. 60 Chapter 5    Phone
  • 61. Make a FaceTime call using Siri or Voice Control Press and hold the Home button until you hear the tone. With Siri (iPhone 4S), you can also just hold iPhone to your ear while the screen is on. Say“FaceTime,”followed by the name of the person to call. Block FaceTime calls Go to Settings FaceTime and turn off FaceTime. You can also disable FaceTime in Restrictions. See“Restrictions” on page 166. Use your Apple ID or an email address for FaceTime Go to Settings FaceTime, then tap“Use your Apple ID for FaceTime”or Add An Email. See“FaceTime” on page 60. Visual voicemail Setting up voicemail On iPhone, visual voicemail lets you see a list of your messages and choose which ones to listen to or delete, without having to listen to instructions or prior messages. Note:  Visual voicemail may not be available in all areas, or may be an optional service. Contact your carrier for more information. If visual voicemail isn’t available, tap Voicemail and follow the voice prompts to retrieve your messages. Number of missed calls and unheard voicemail messages. The first time you tap Voicemail, iPhone prompts you to create a voicemail password and record your voicemail greeting. Change your greeting:  Tap Voicemail, tap Greeting, then tap Custom. Tap Record and say your greeting. When you finish, tap Stop. To review, tap Play. To rerecord, tap Record again. Tap Save when you’re satisfied. Use your carrier’s default greeting Tap Voicemail, tap Greeting, then tap Default. Set an alert sound for new voicemail Go to Settings Sounds, then turn New Voicemail on. The alert sounds once for each new voicemail. If the Ring/Silent switch is off, iPhone won’t sound alerts. Change the voicemail password Go to Settings Phone Change Voicemail Password. 61Chapter 5    Phone
  • 62. Checking voicemail When you tap Phone, iPhone shows the number of missed calls and unheard voicemail messages. Tap Voicemail to see a list of your messages. Drag the playhead to skip to any point in a message. Unheard messages Play/Pause Contact info Scrubber bar Speakerphone (Audio, when a Bluetooth device is connected. Tap to choose audio output.) Return the call. Listen to a voicemail message:  Tap Voicemail, then tap a message. If you’ve already heard the message, tap the message again to replay it. Use and to pause and resume playback. Once you listen to a message, it’s saved until your carrier erases it. Check voicemail from another phone Dial your own number or your carrier’s remote access number. Deleting messages Delete a message:  Swipe or tap the message, then tap Delete. Note:  In some areas, deleted visual voicemail messages may be permanently erased by your carrier. Listen to a deleted message Tap Deleted Messages (at the end of the list), then tap the message. Undelete a message Tap Deleted Messages (at the end of the list), then tap the message and tap Undelete. Delete messages permanently Tap Deleted Messages (at the end of the list), then tap Clear All. Contacts From a contact’s Info screen, a quick tap lets you make a phone call, create an email message, find their location, and more. See“Searching contacts” on page 124. 62 Chapter 5    Phone