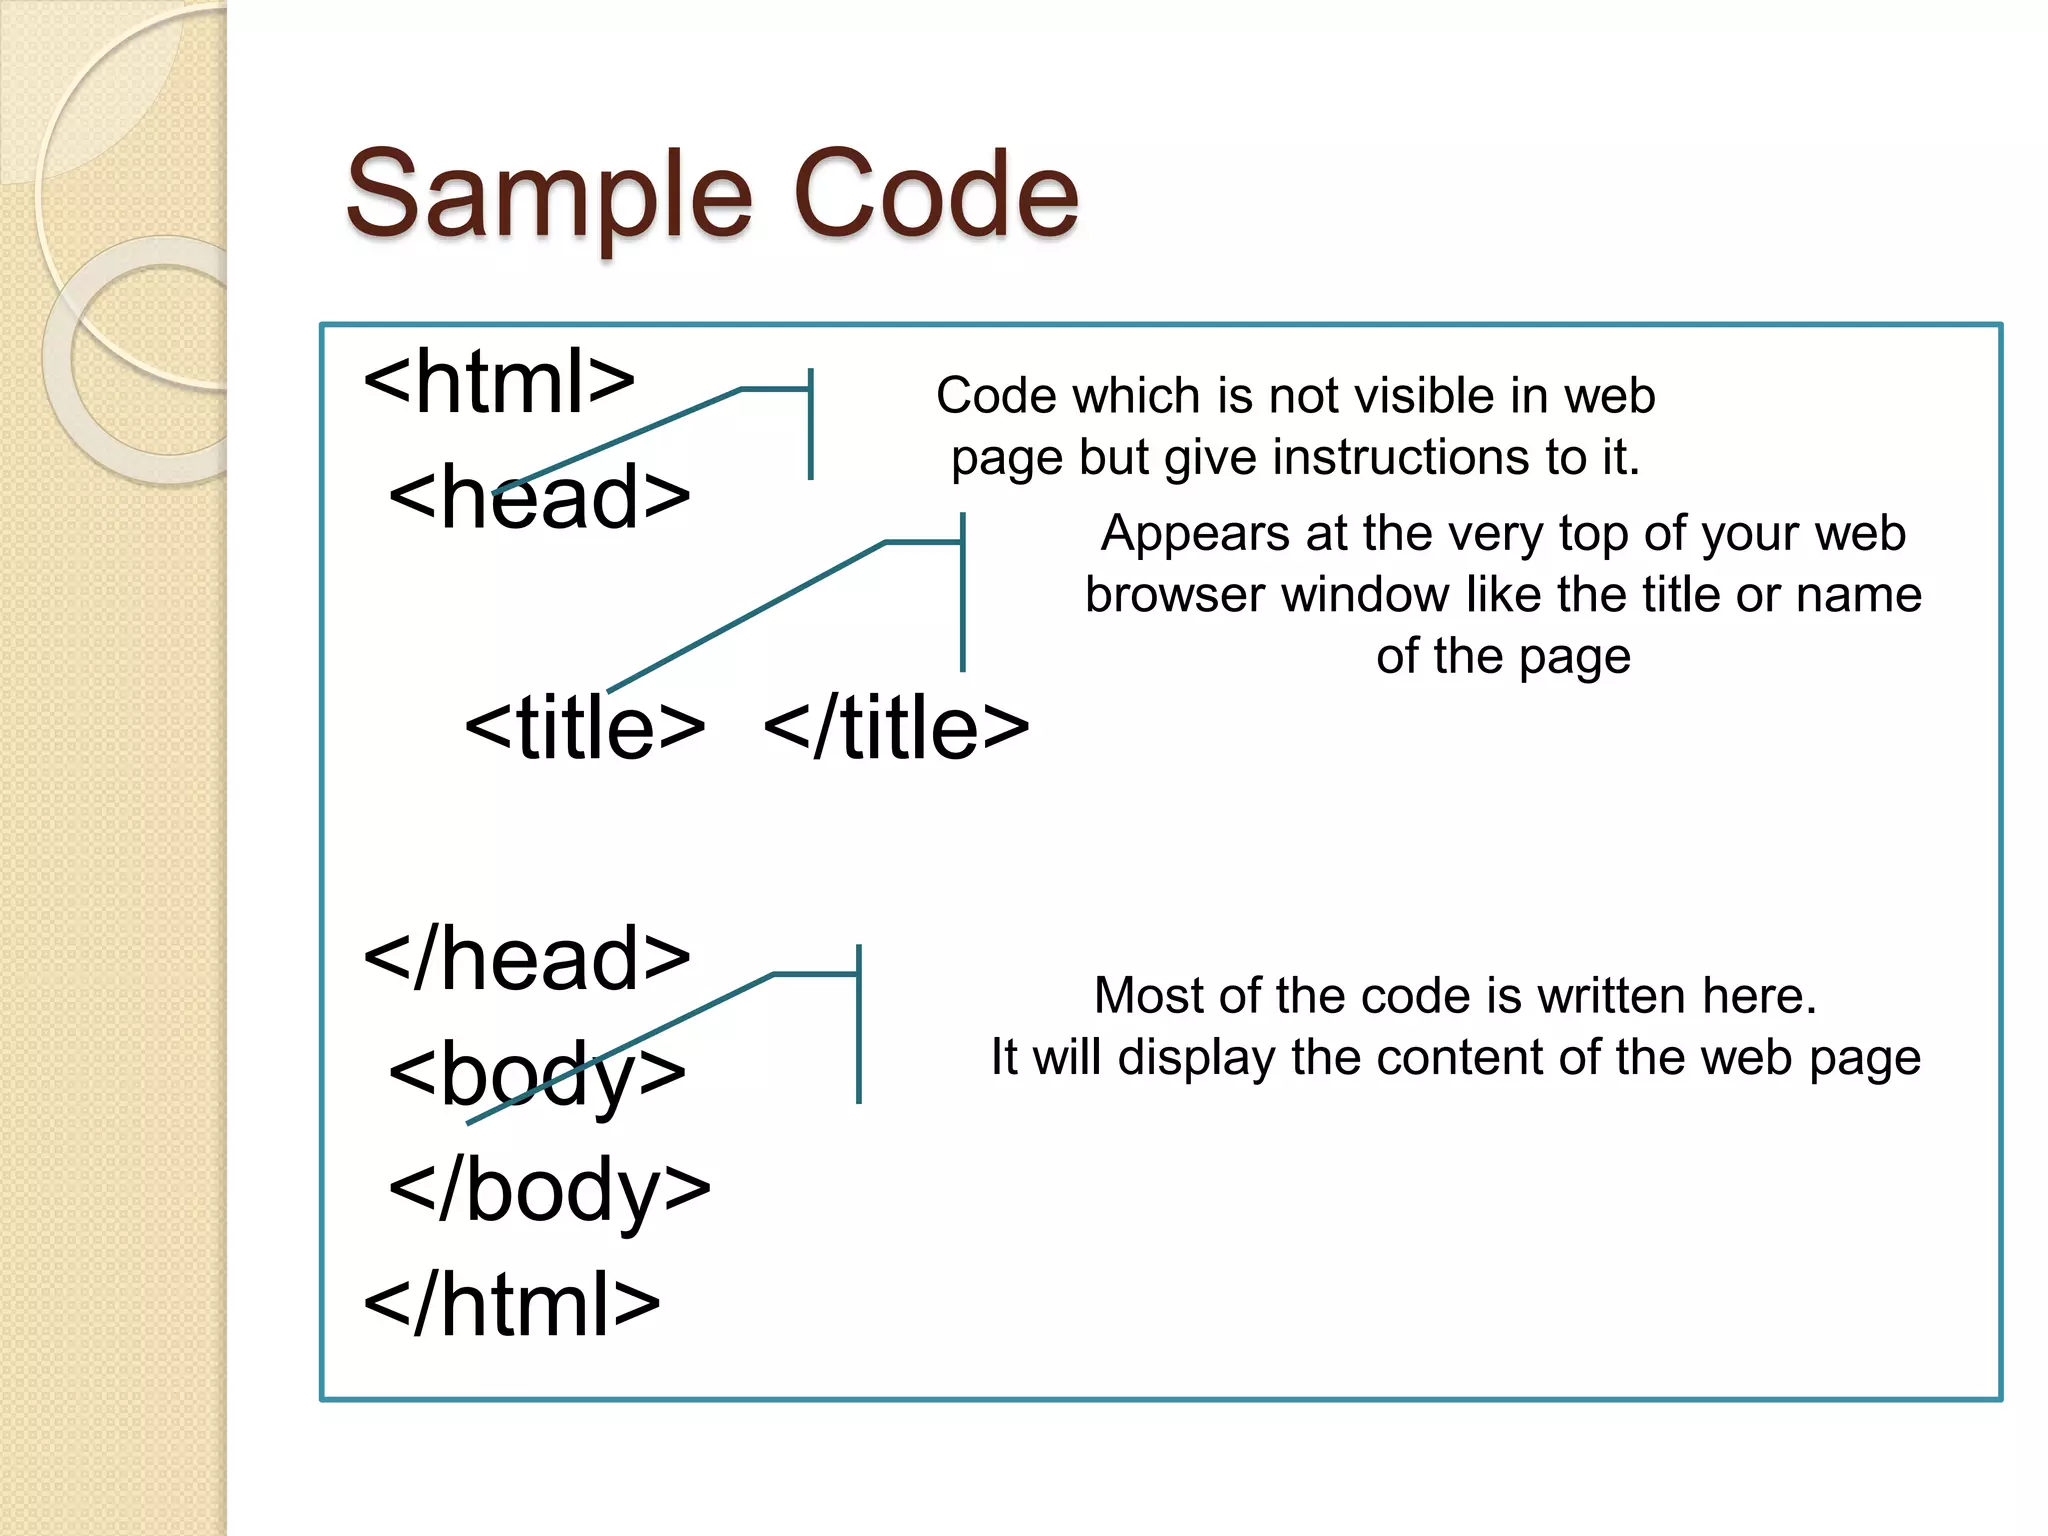
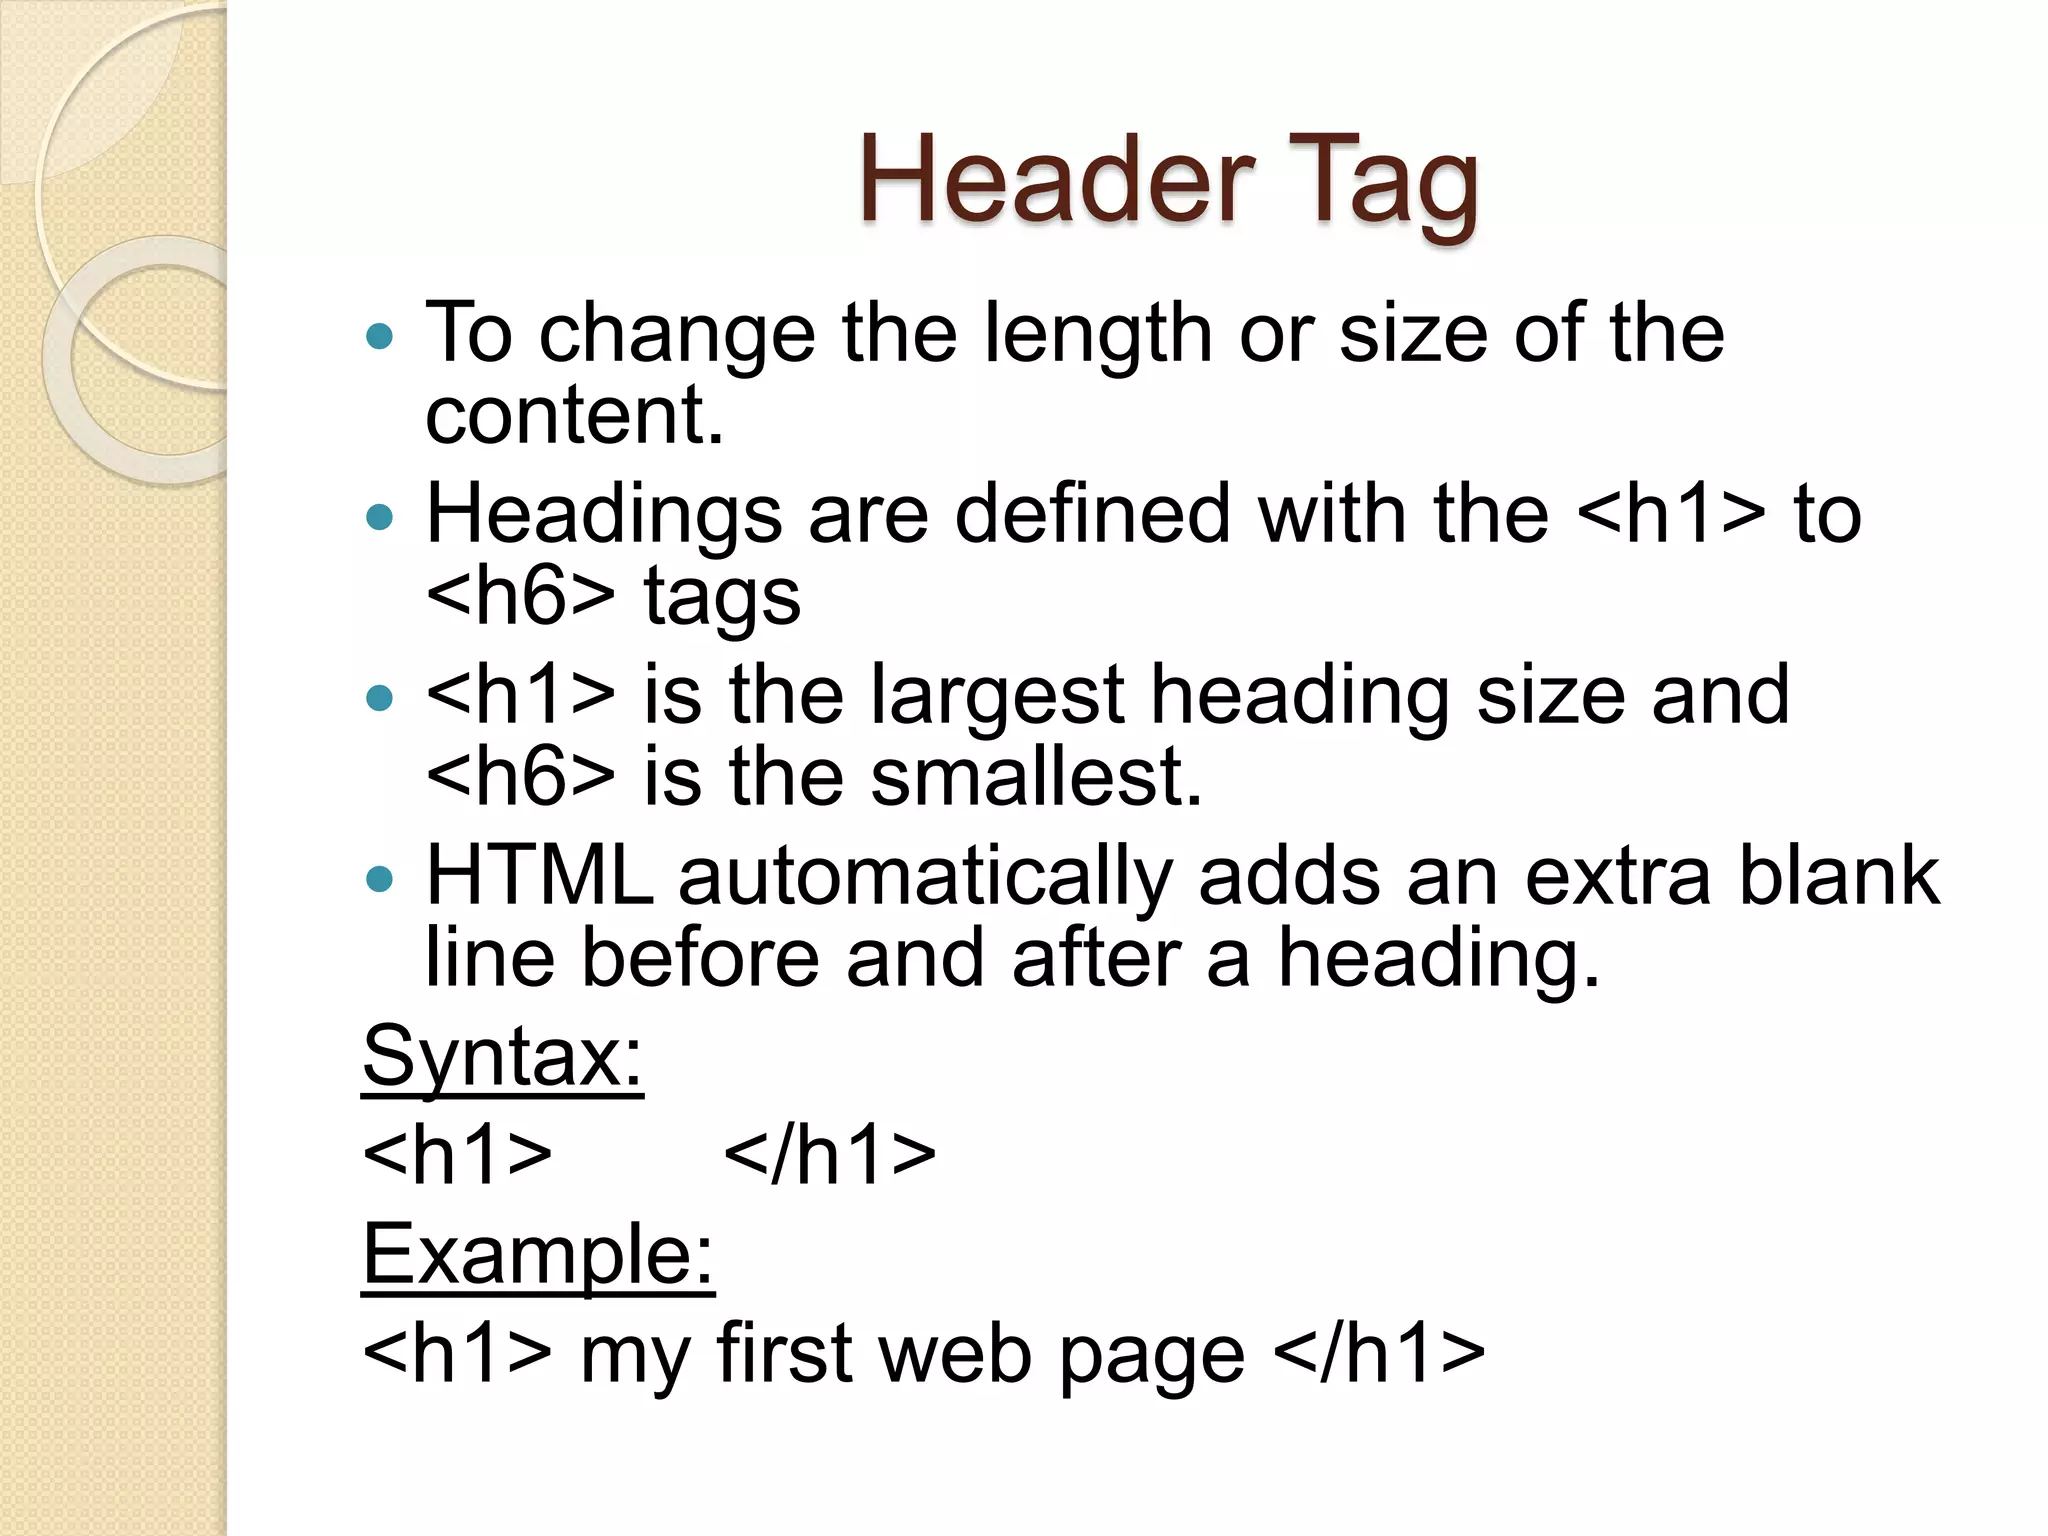
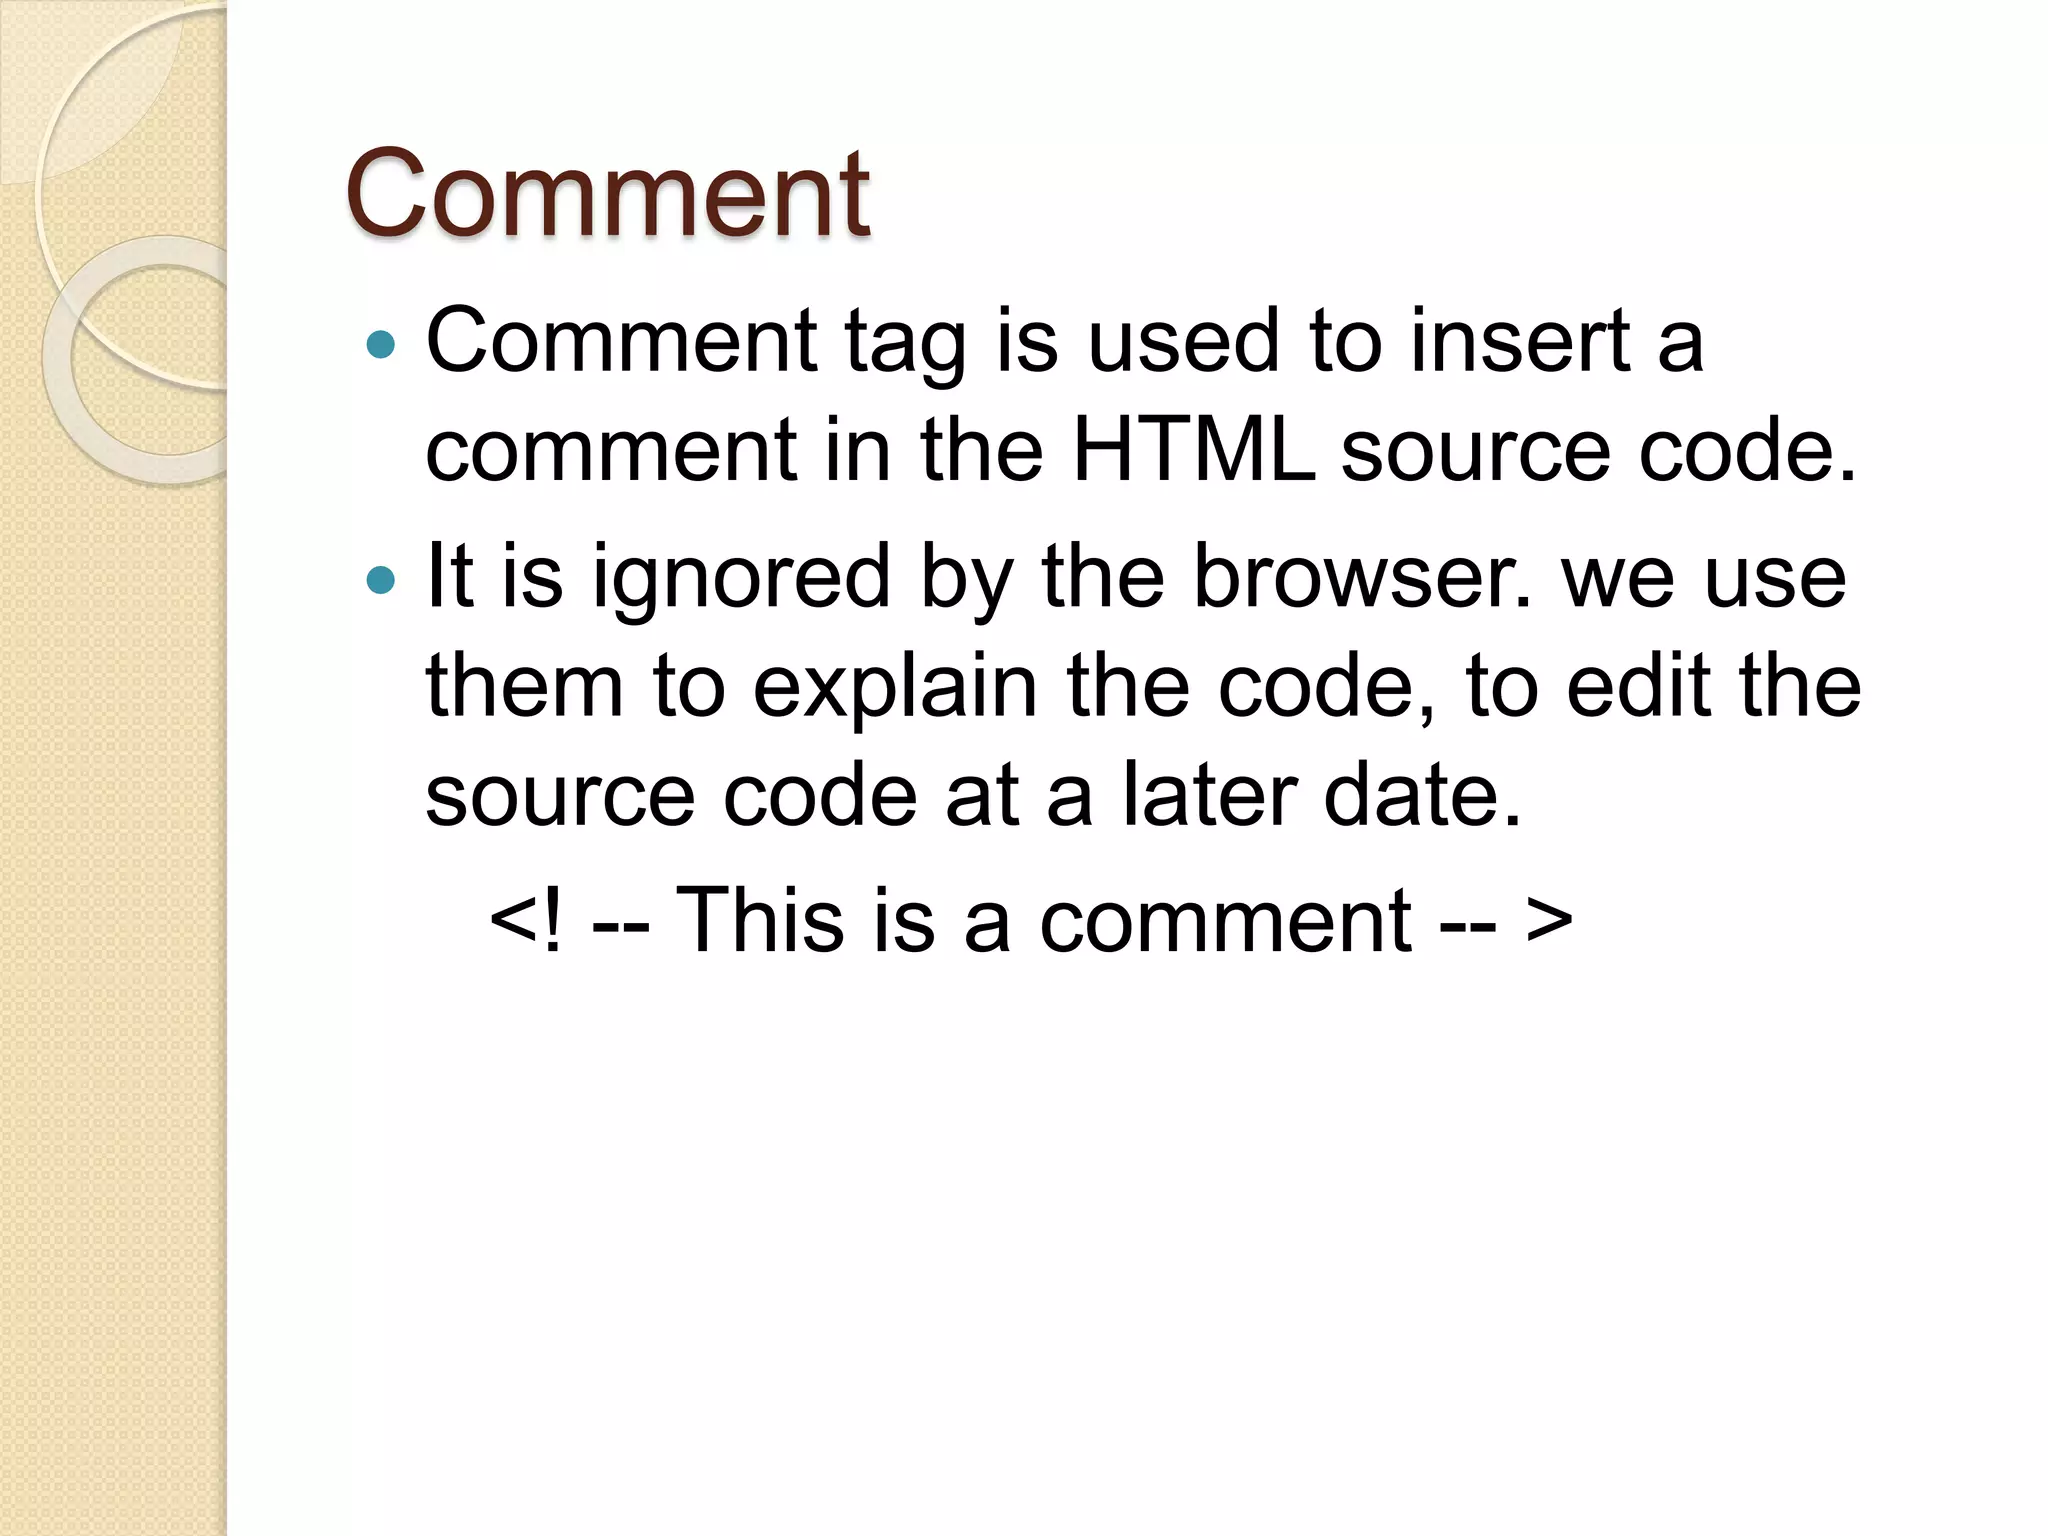
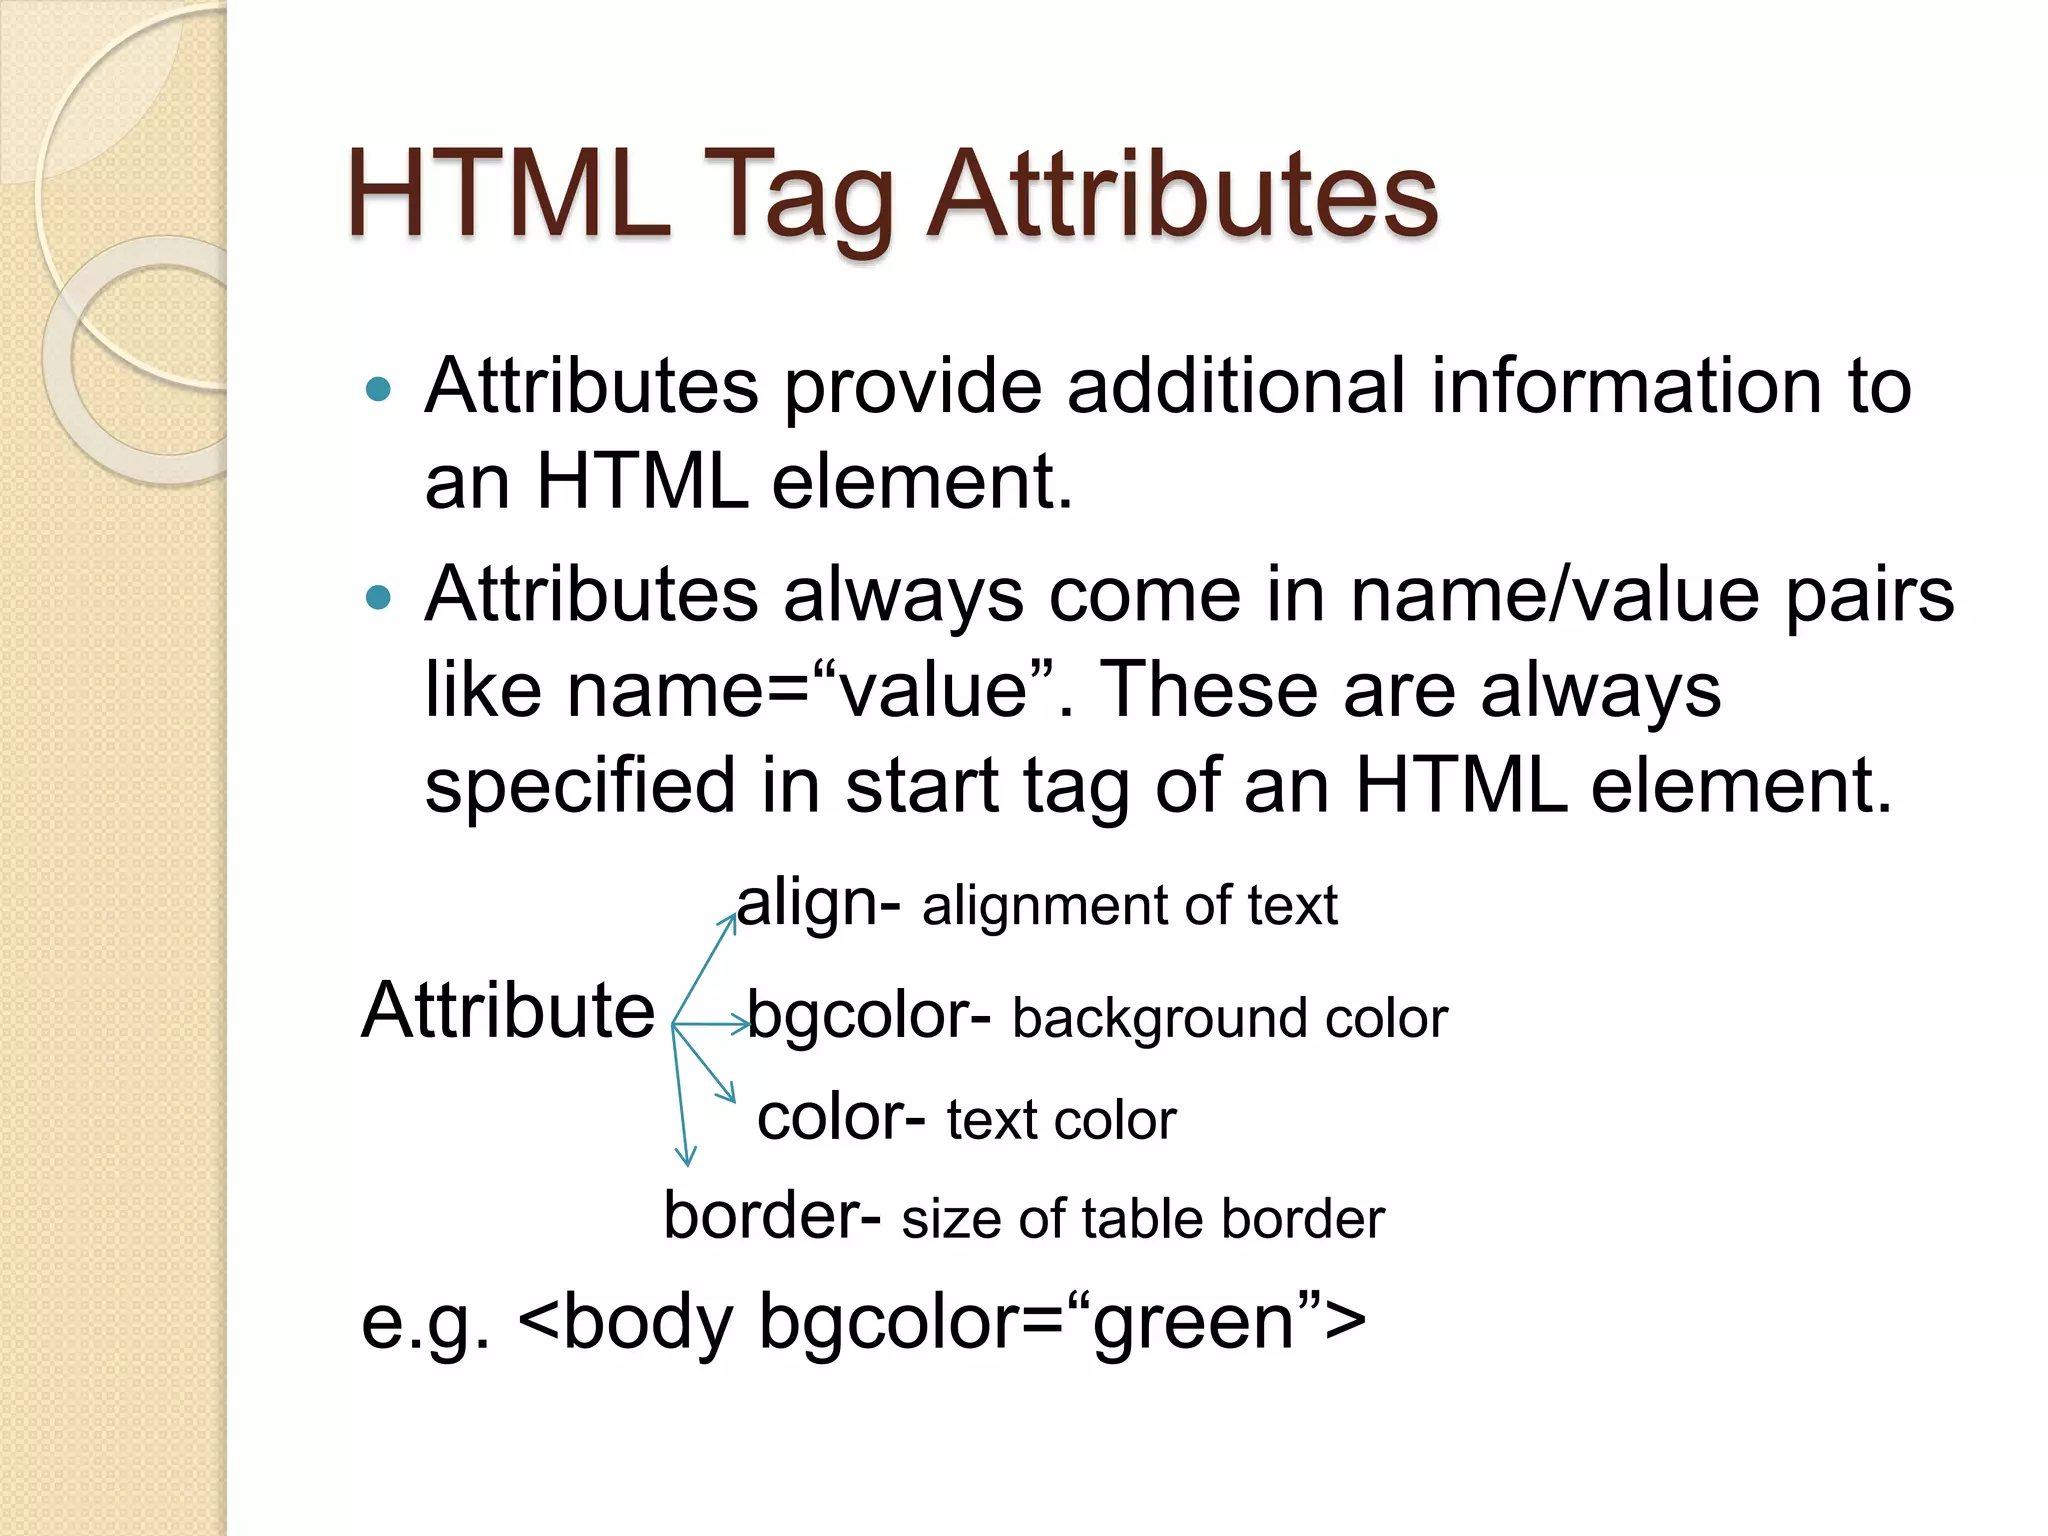
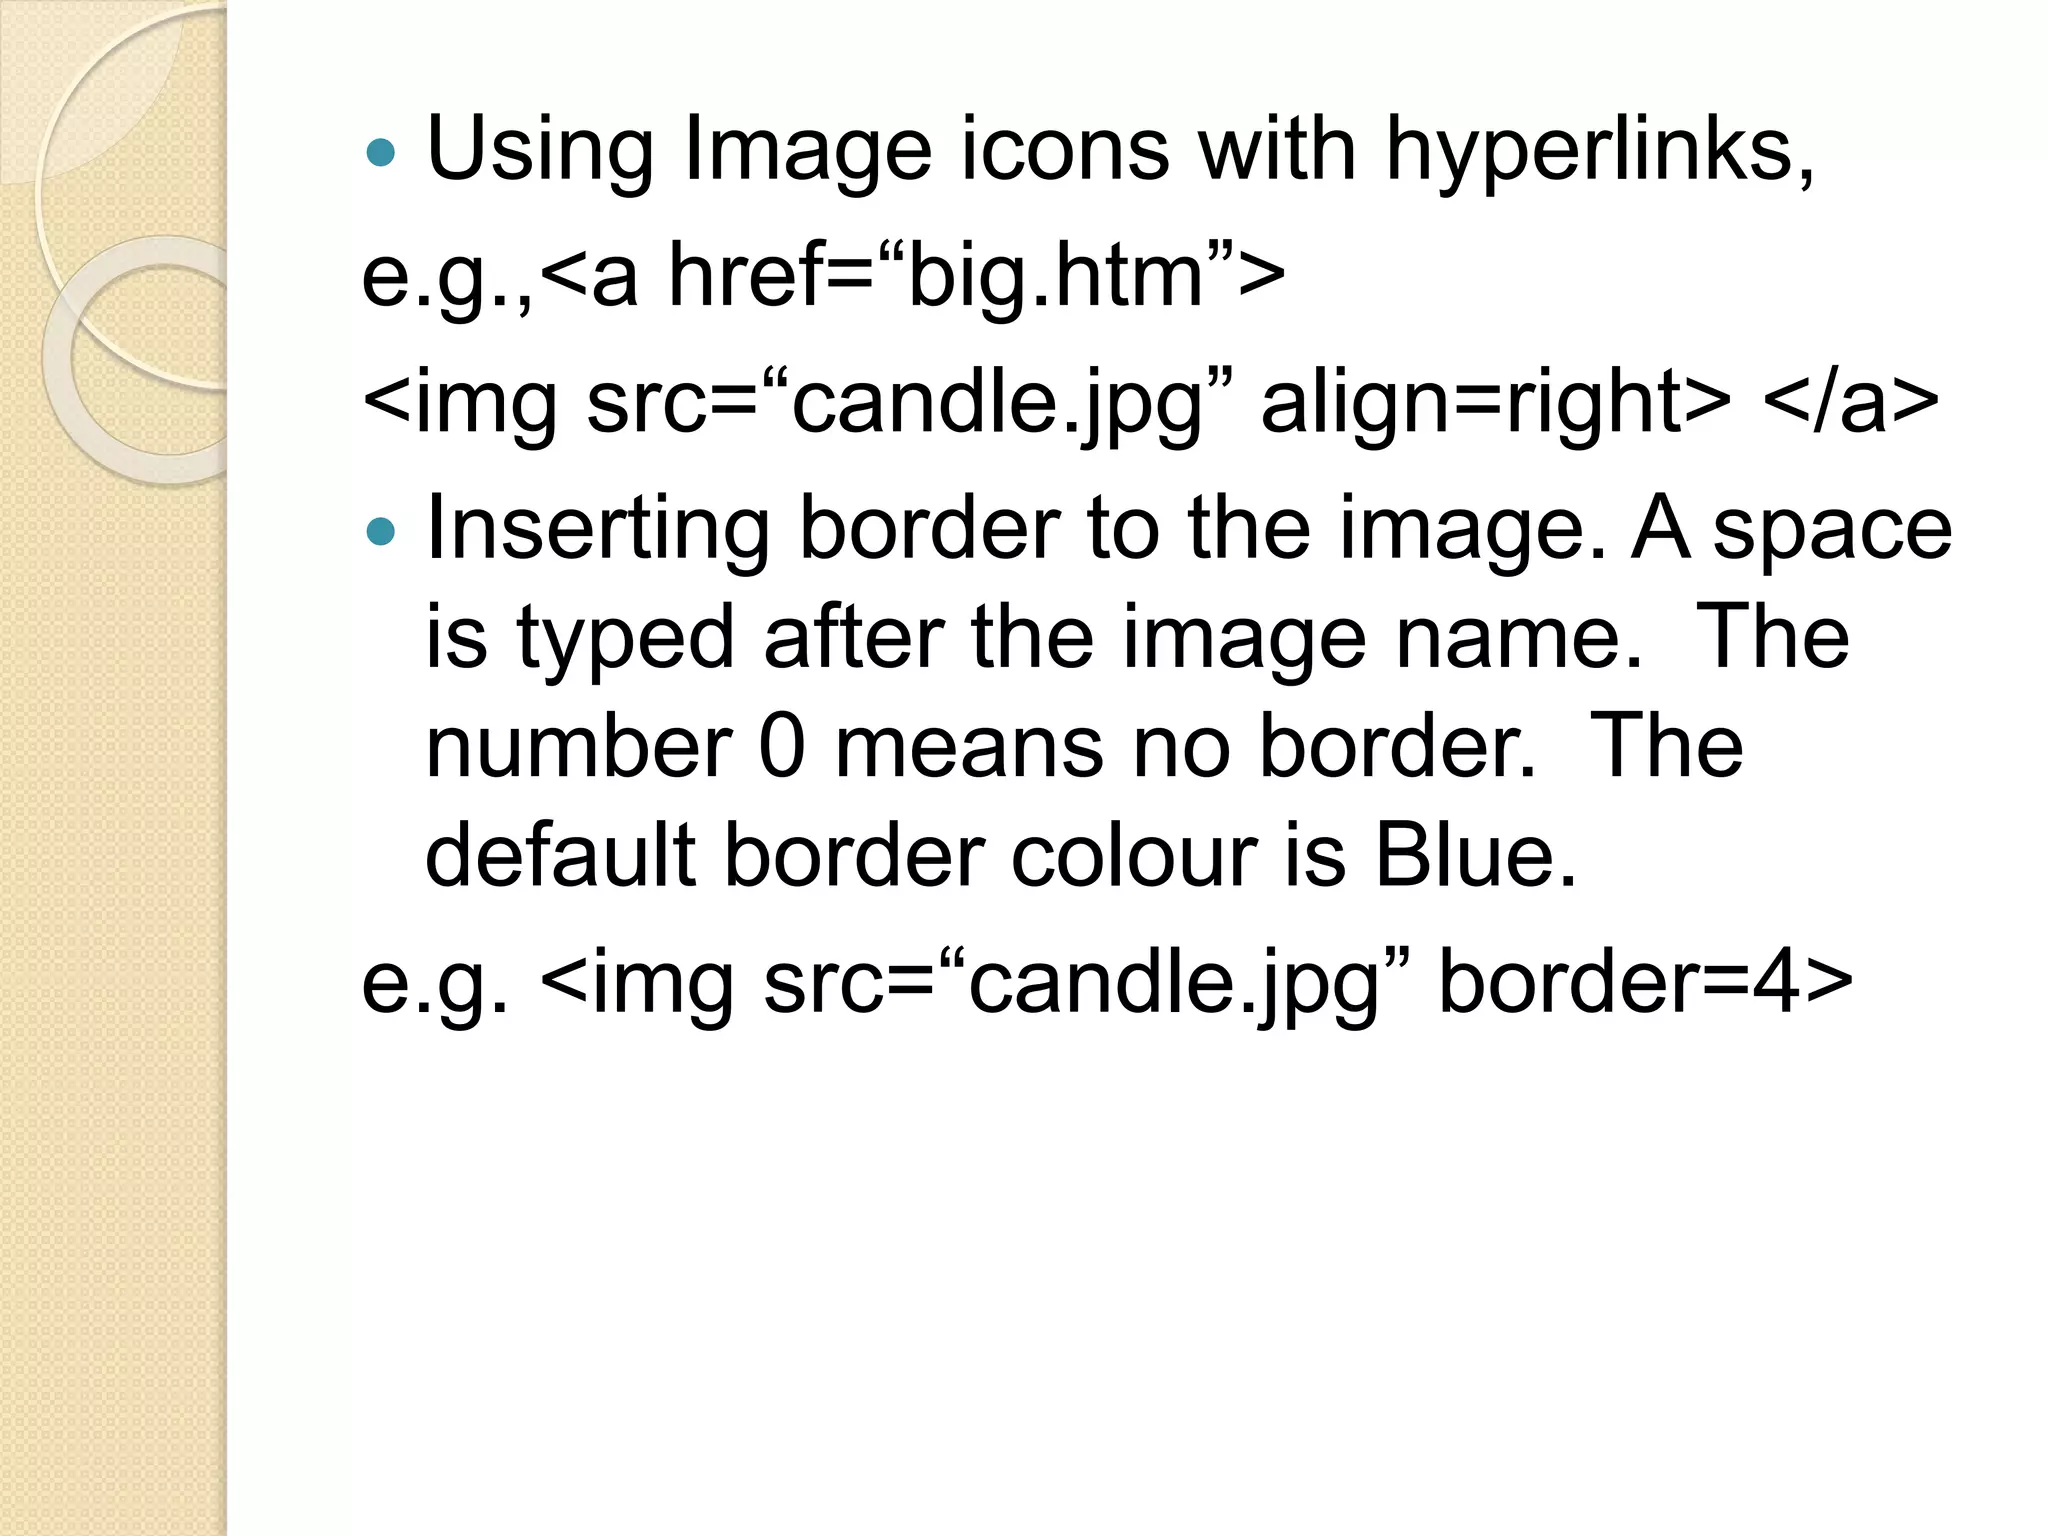
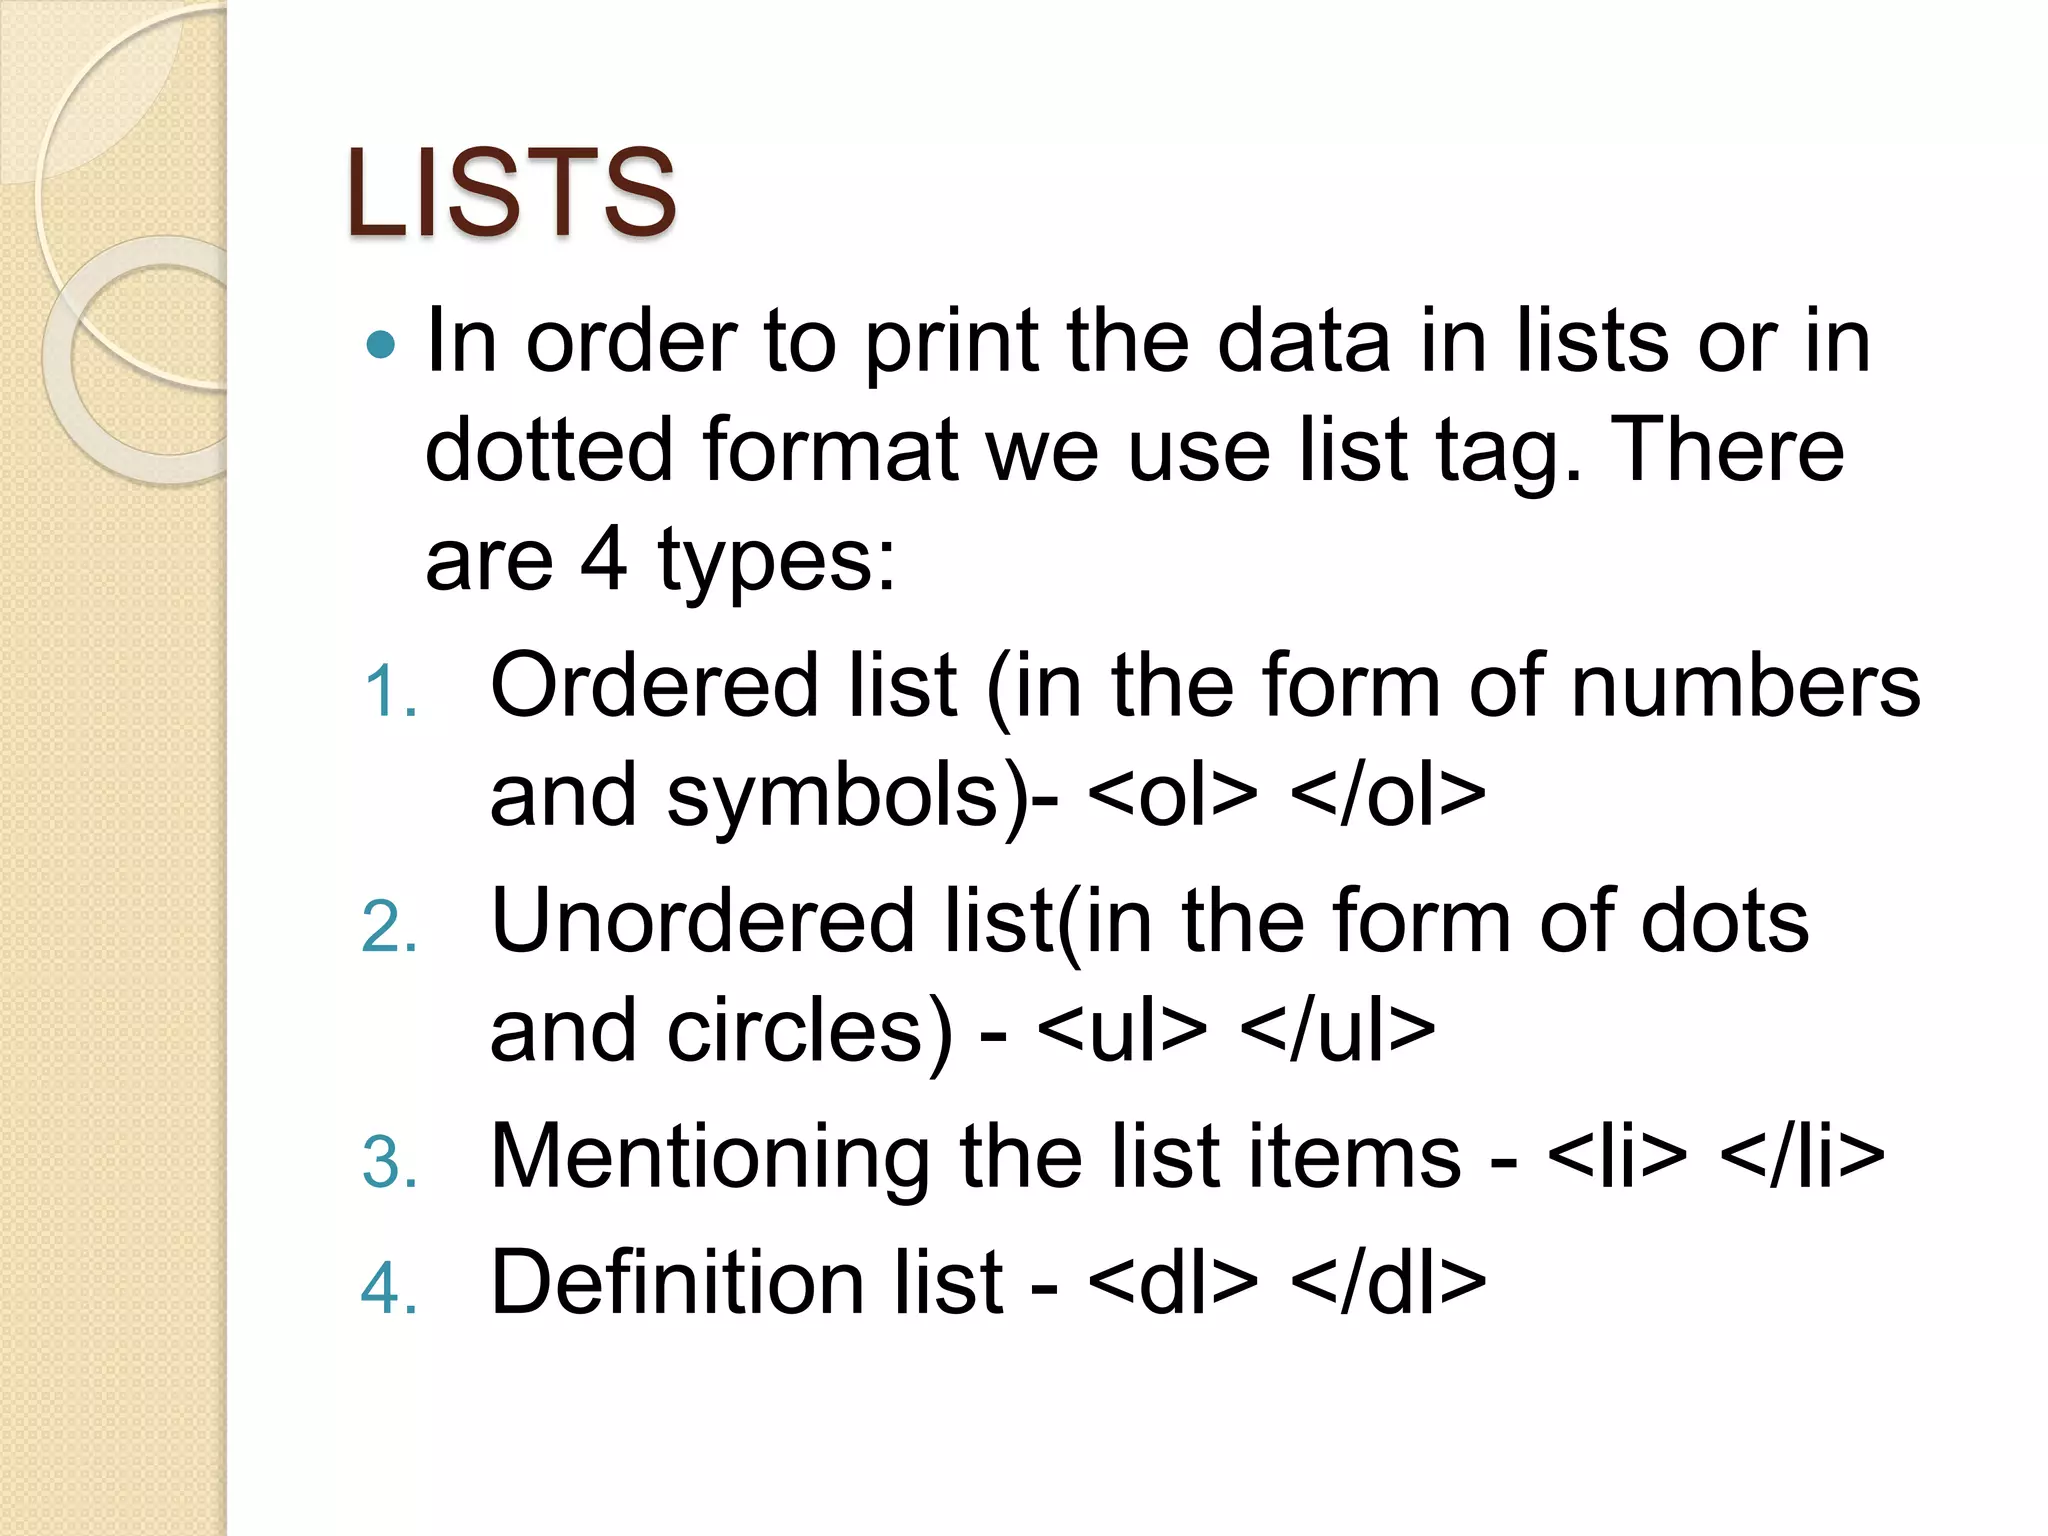
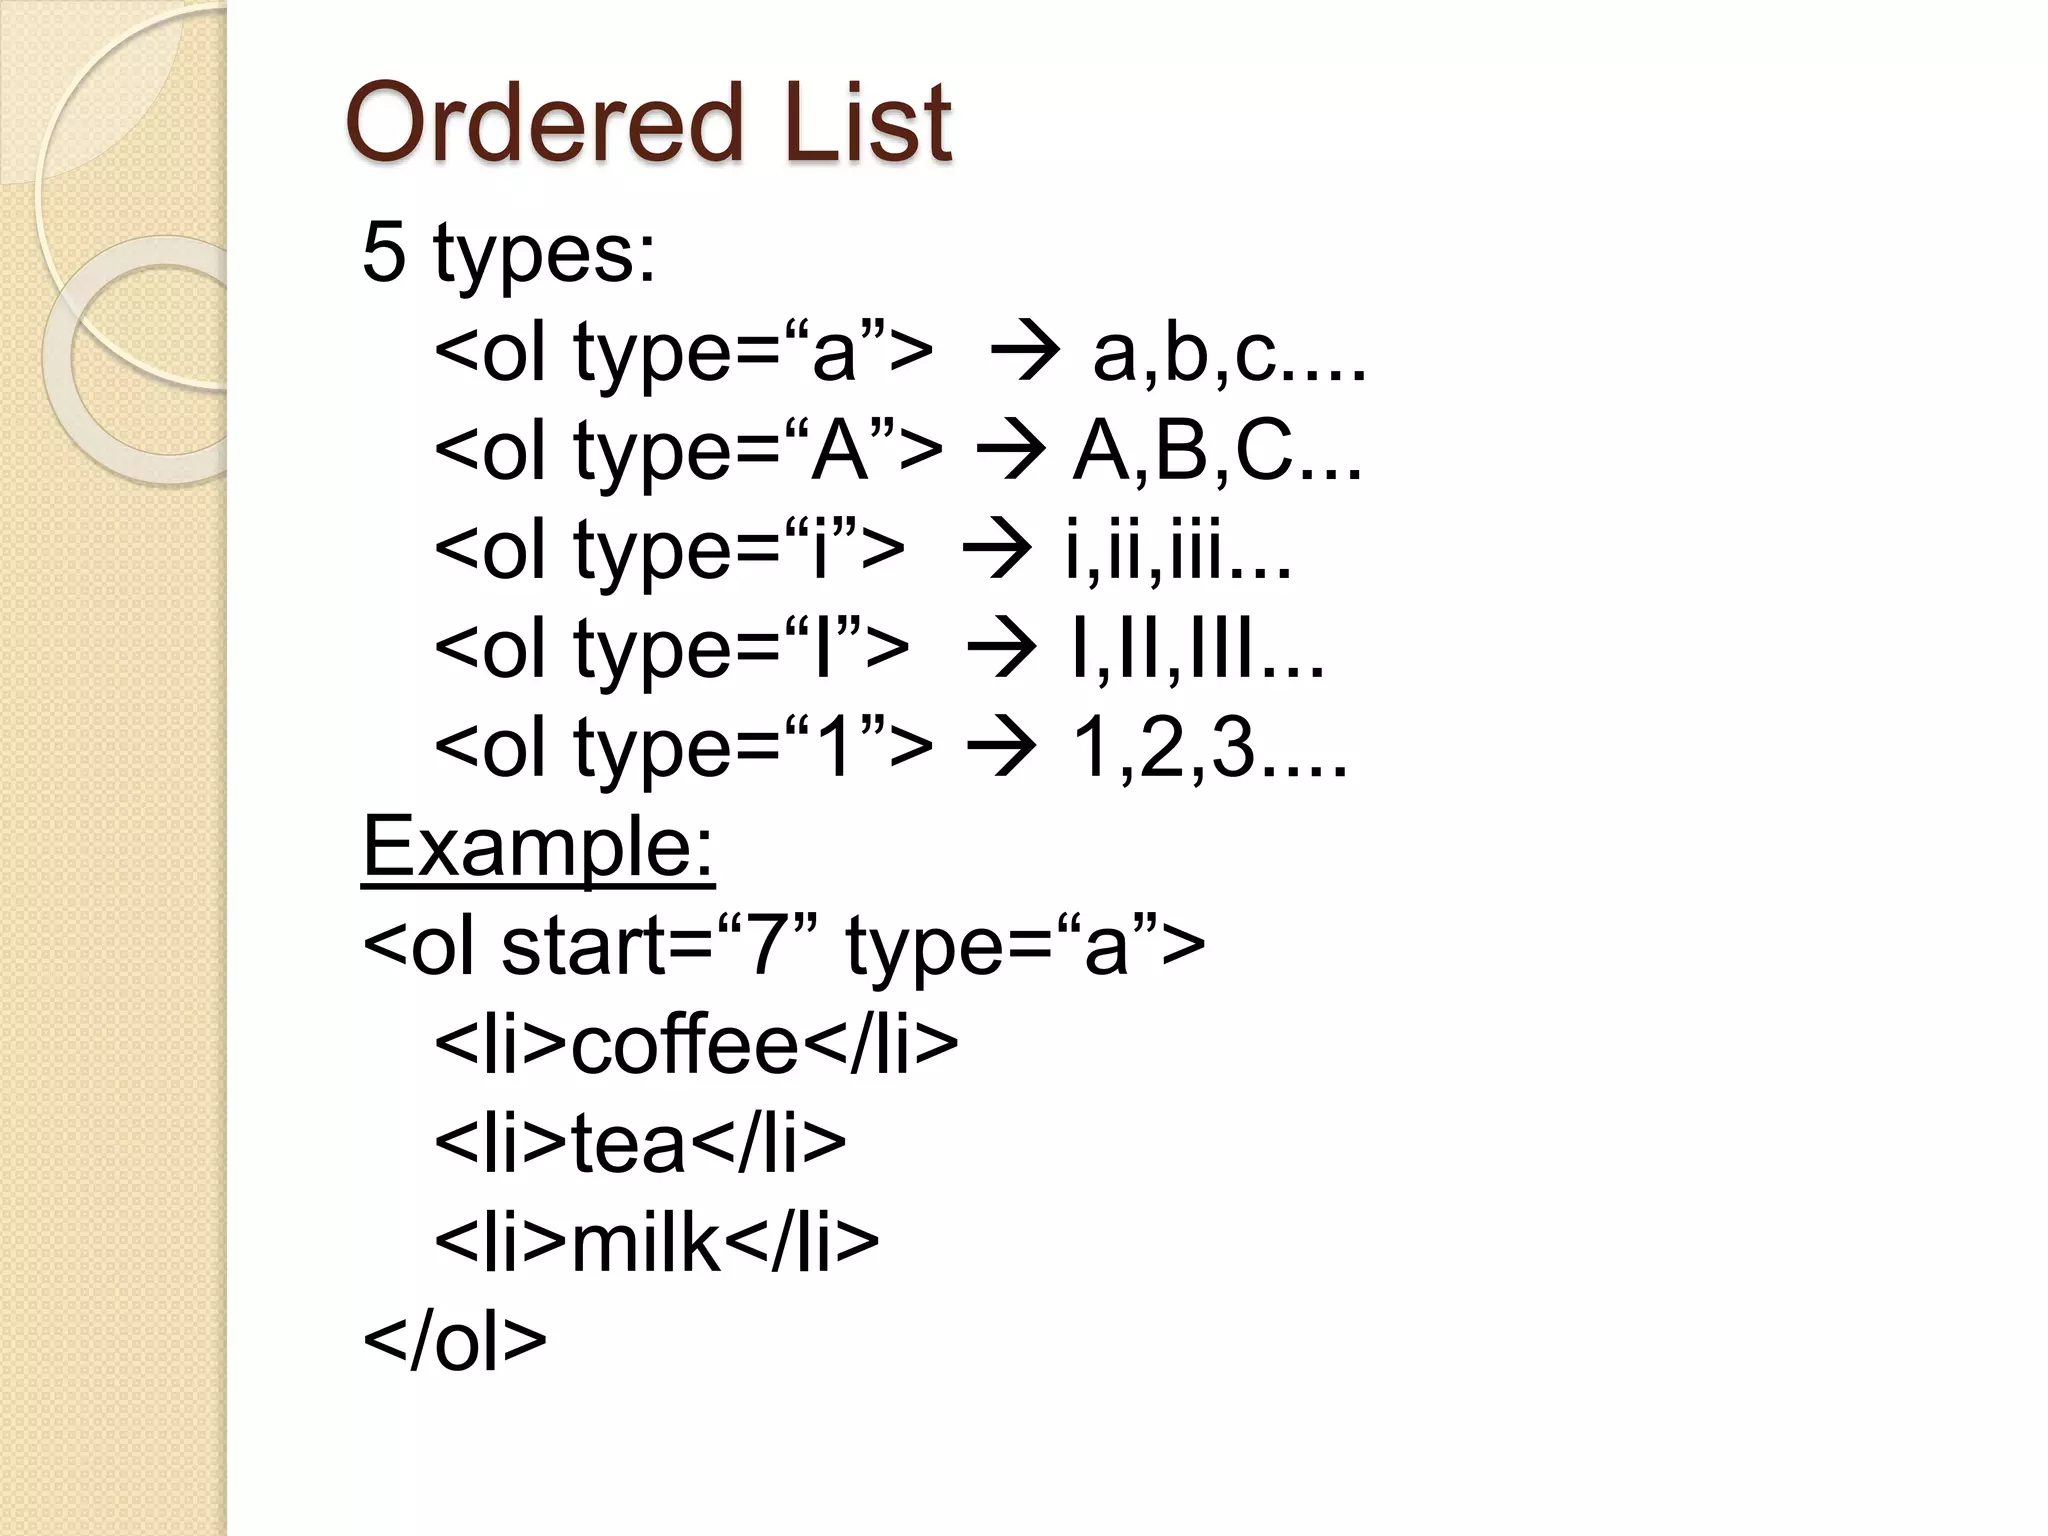
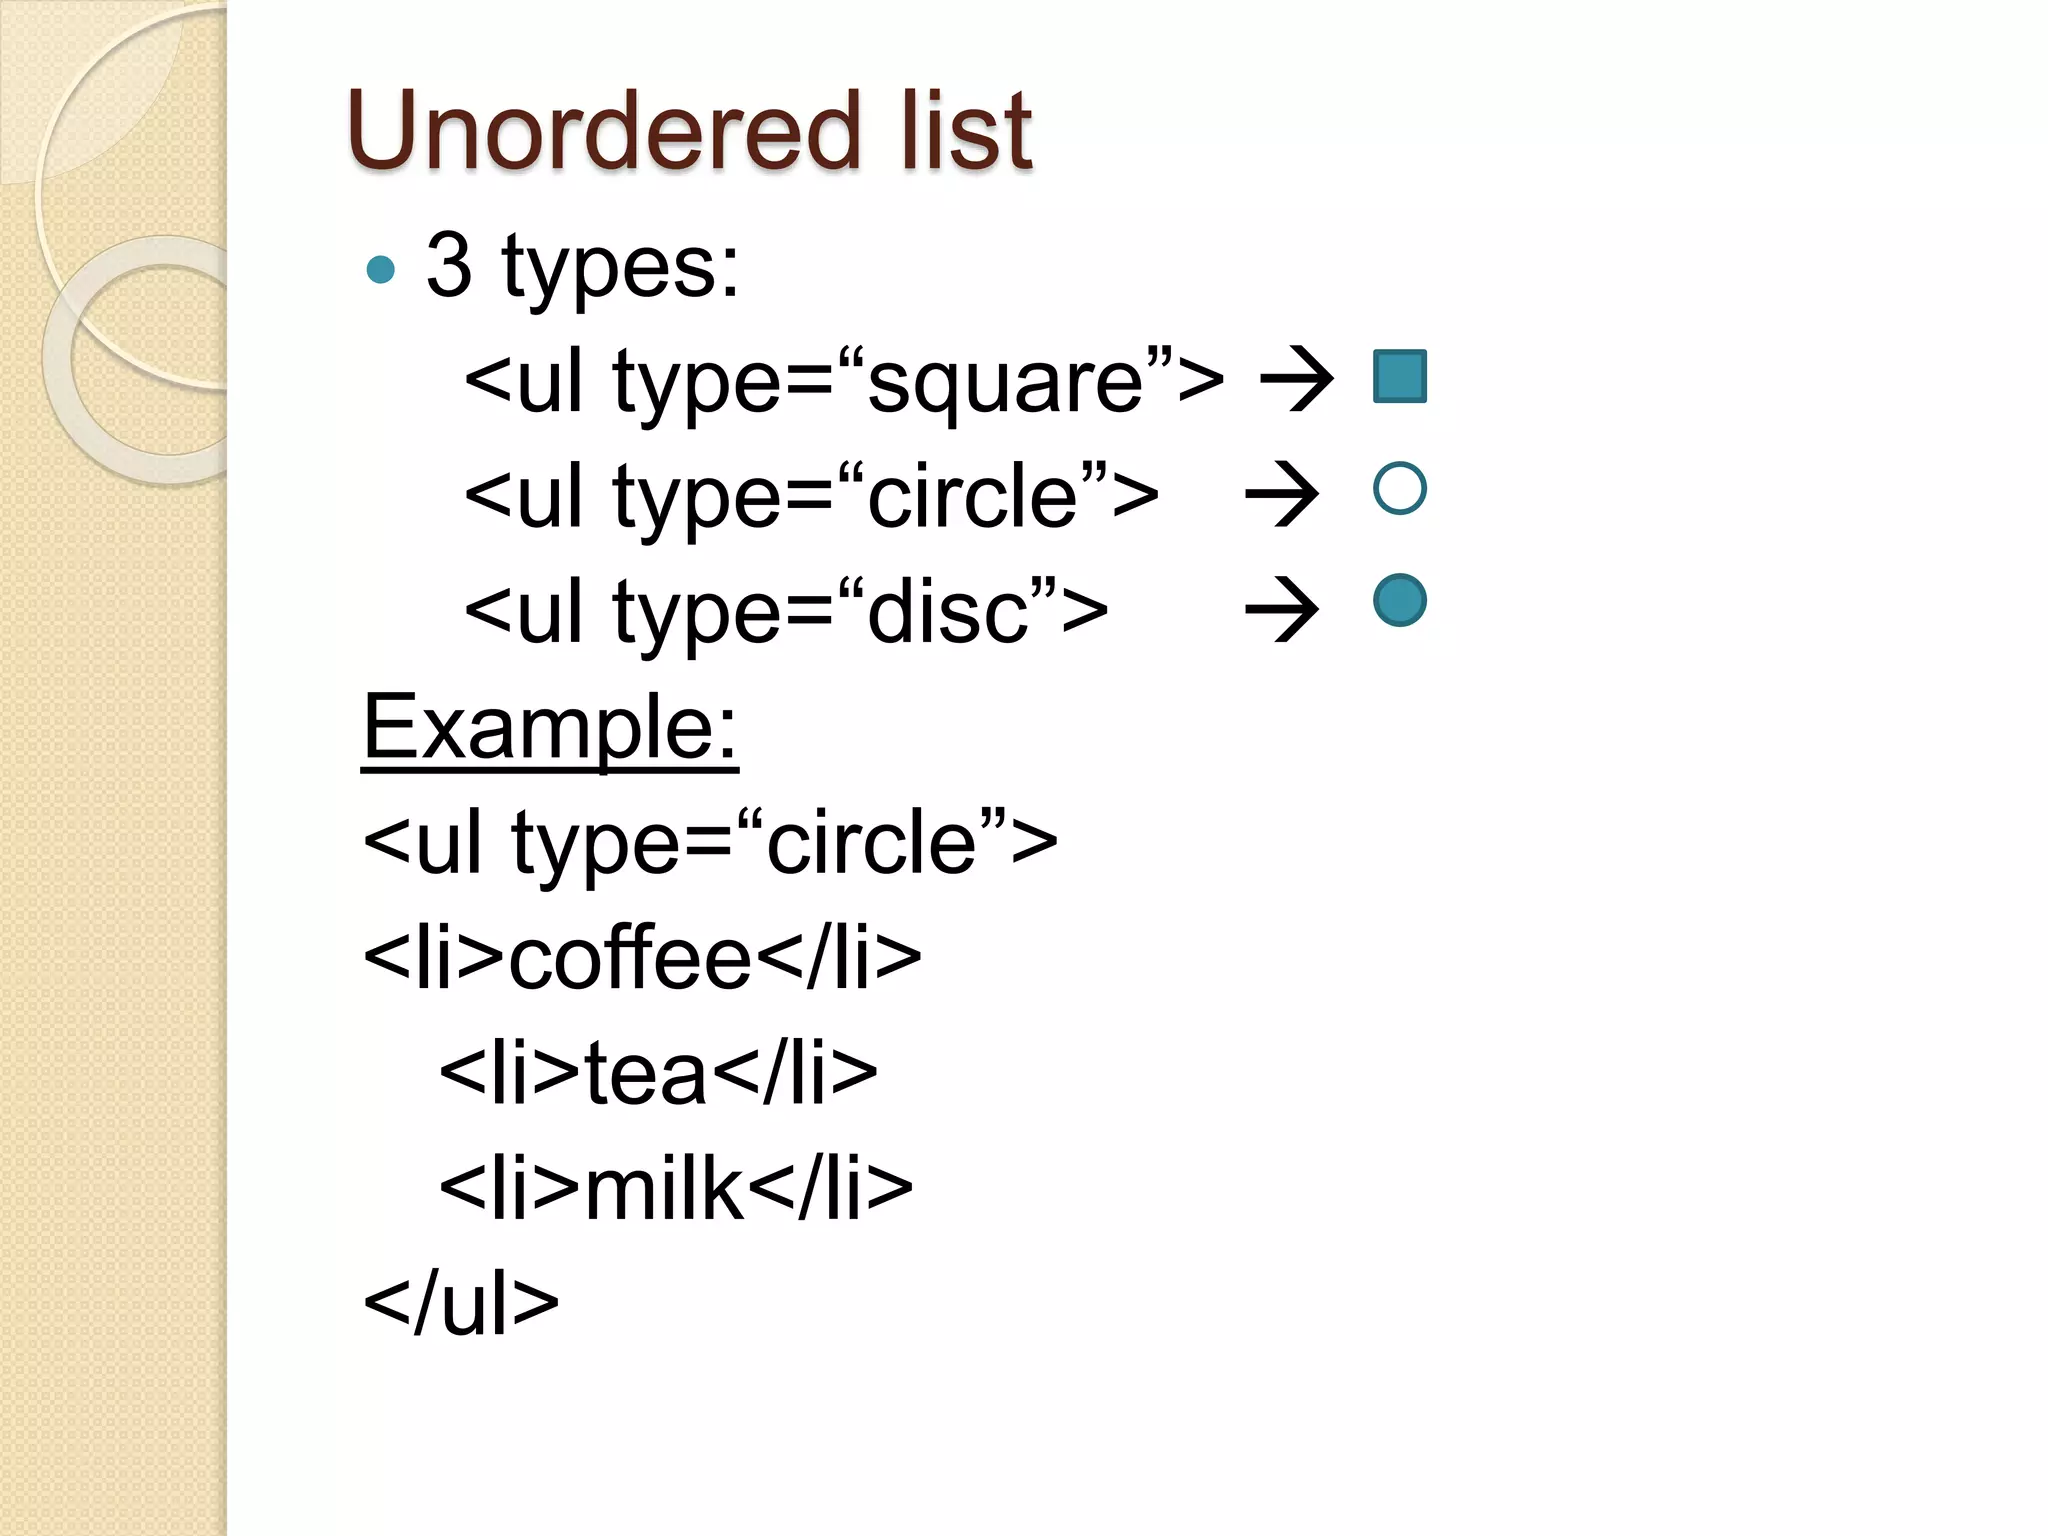
HTML PRESENTATION
By
Mamidisetty Prashanti
M.Tech
Introduction
• HTML is a language for describing web pages
• It stands for Hyper Text Markup Language
• HTML was first introduced by Tim Berners-Lee in
1989.
• In 1997, HTML was standardized to HTML4.
• HTML lets you format text, add graphics, create
links, input forms, frames and tables etc and save it
all in a text file that any browser can read and
display.
• HTML is the Universal Mark-up language for the
web
• HTML documents describe Static WebPages
• These are Platform Independent and not case
sensitive.
Introduction continued....
 HTML is written in something called tags. Tags
come in pairs, an opening one and a closing one.
i.e., <HTML>
</HTML>
Implementation
 Where we write code
 Text Editor – Notepad, WordPad
 Front page or Dreamweaver
 Saving or its Extension
“.htm” or “.html”
 how we execute
 Double click the html file or right
click and open with IE or any
browser
Sample Code
<html>
<head>
<title> </title>
</head>
<body>
</body>
</html>
Code which is not visible in web
page but give instructions to it.
Appears at the very top of your web
browser window like the title or name
of the page
Most of the code is written here.
It will display the content of the web page
Header Tag
 To change the length or size of the
content.
 Headings are defined with the <h1> to
<h6> tags
 <h1> is the largest heading size and
<h6> is the smallest.
 HTML automatically adds an extra blank
line before and after a heading.
Syntax:
<h1> </h1>
Example:
<h1> my first web page </h1>
Paragraphs
 Paragraphs are defined with <p> tag
e.g. <p> this is paragraph </p>
 HTML automatically adds an extra blank
line before and after a paragraph
 The <br> tag is used to break a line, but
don’t want to start a new paragraph.
 The <br> tag forces a line break wherever it
is placed.
e.g. <br> this is break <br/>
Line Break
Comment
 Comment tag is used to insert a
comment in the HTML source code.
 It is ignored by the browser. we use
them to explain the code, to edit the
source code at a later date.
<! -- This is a comment -- >
HTML Tag Attributes
 Attributes provide additional information to
an HTML element.
 Attributes always come in name/value pairs
like name=“value”. These are always
specified in start tag of an HTML element.
align- alignment of text
Attribute bgcolor- background color
color- text color
border- size of table border
e.g. <body bgcolor=“green”>
Text Formatting
 Text formatting, in html terms, is when you give the
browser instructions on how your text should look.
These instructions come in the form of tags.
<html>
<body>
<b> this text is bold </b>
<br>
This text contains
<sub> subscript </sub>
<br>
This text contains
<sup> superscript </sup>
</body>
</html>
Hyperlink
 Hyperlinks are the backbone of the web.
They provide a means to connect one piece
of information to another piece of
information. We can easily navigate from
one page or part to another.
Adding hyperlinks to your web pages
 Linking in HTML code is done with the
anchor tag, the <A> tag.
i.e., <a href=“http://www.google.com”>google
search engine </a>
Images
 For displaying of the Images, pictures we
use a tag called Image Tag.
 In image no closing tag
i.e., </img>
Syntax:
<img src=“book.jpg”/>
source name of the image
 In order to reduce or set the size of the
image we use height and weight
attributes. These are in the form of pixels.
Example
<html>
<body>
<img src=“E:picturesbook.jpg” alt=“this is
book”/>
Some text or paragraph<br>
<img src=“candle.jpg” align=“right”
width=“200” height=“300”/>
</body>
</html>
 In the above example if the image is
deleted by any then it will display the text
y default as alternatively.
 Using Image icons with hyperlinks,
e.g.,<a href=“big.htm”>
<img src=“candle.jpg” align=right> </a>
 Inserting border to the image. A space
is typed after the image name. The
number 0 means no border. The
default border colour is Blue.
e.g. <img src=“candle.jpg” border=4>
LISTS
 In order to print the data in lists or in
dotted format we use list tag. There
are 4 types:
1. Ordered list (in the form of numbers
and symbols)- <ol> </ol>
2. Unordered list(in the form of dots
and circles) - <ul> </ul>
3. Mentioning the list items - <li> </li>
4. Definition list - <dl> </dl>
Ordered List
5 types:
<ol type=“a”>  a,b,c....
<ol type=“A”>  A,B,C...
<ol type=“i”>  i,ii,iii...
<ol type=“I”>  I,II,III...
<ol type=“1”>  1,2,3....
Example:
<ol start=“7” type=“a”>
<li>coffee</li>
<li>tea</li>
<li>milk</li>
</ol>
Unordered list
 3 types:
<ul type=“square”> 
<ul type=“circle”> 
<ul type=“disc”> 
Example:
<ul type=“circle”>
<li>coffee</li>
<li>tea</li>
<li>milk</li>
</ul>
Definition list
 A definition is not a list of items. This is a
list of terms and explanation of the
terms.
<dl>  starting definition list
<dt>  definition term
<dd>  defining definition
 Example :
<dl>
<dt>shanthi</dt>
<dd>this is my name</dd>
<dt> mtech</dt>
<dd> this is my qualification</dd>
</dl>
Tables
 Tables were introduced to HTML as a
way to make textual data look more
presentable on the screen.
 Things like statistics should be
presented in neat rows and columns,
making them easier to read. Tables
are still used for that purpose.
 The fact that cells in table can be
coloured, height and width can be
changed, images are placed in cells.
Syntax:
<table>
<tr>
<td> </td>
</tr>
</table>
 In place of <td> we use <th> for table
header.
 If you don’t specify a border attribute the
table will be displayed without any
borders. To display a table with borders,
use the border attribute:
<table border=“1”>
To setup
table
Table row
Table
column
Example:
<html>
<body>
<table border=“3” bgcolor=“#3F21A6”>
<tr>
<th>sno</th> <th>name</th><th>course</th>
</tr>
<tr>
<td> 1</td> <td> shanthi</td><td>Java</td>
</tr>
<tr>
<td> 2</td> <td> krishna</td><td> HTML</td>
</tr>
</table>
</body>
</html>
FRAMES
 With Frames one can display more than one
HTML document in the same browser
window. Each HTML document is called a
frame, and each frame is independent of the
others.
 We don’t use body tag here, only html code.
 The <frameset> tag defines how to divide the
window into frames. Each frameset defines a
set of rows or columns
 The <frame> tag defines what HTML
document to put into each frame.
 The frameset column size value can also be
set in pixels (cols=“200,500”),and one of the
columns can e set to use the remaining
space(cols=“25%,*”).
Example
<html>
<frameset rows=“40%,*”>
<frame src=“first.html”
name=“welcome”/>
<frameset cols=“30%,*>
<frame src=“second.html”
name=“contact”/>
<frame src=“third.html”
name=“contact”/>
</frameset>
</frameset>
</html>
Forms
 A form is an area that can contain form
elements. Form elements allow user to
enter information(like text fields, text
area fields, check boxes, radio buttons,
etc.) in a form.
 The form itself is not visible.
 A form is defined with the <form> tag.
 Syntax
<form>
<input> </input>
</form>
 Text field : used to type letters, numbers, etc., in a
form
Syntax: <form>
Username:<input type=“text” name=“usr”/>
</form>
 Password: This is identical to a text box in its
appearance. When you type in the characters are
replaced by asterisks(*).
Syntax:
<input type=“password” name=“pwd”/>
 Radio buttons: Used to select one of a limited
number of choices.
Syntax:
<input type=“radio” name=“sex”
value=“male”>male <br>
 Checkbox: used when you want the user to select
one or more options of a limited number of choices
Syntax:
<input type=“checkbox” name=“color” value=“red”/>
 Dropdown box: It is a selectable list.
Syntax:
<select name=“degree”>
<option>btech</option>
</select>
 Button: form’s action i.e., when the user clicks on the
submit button, the content of the form is sent to another
file.
Syntax:
<input type=“submit” value=“submit/click”>
Example:
<form>
Username:<input type=“text”
name=“usr” size=“8” maxlength=“40”/>
Password:<input type=“password”
name=“pwd”/>
<input type=“submit”
value=“submit/click”>
</form>
Html presentation

Html presentation

  • 1.
  • 2.
    Introduction • HTML isa language for describing web pages • It stands for Hyper Text Markup Language • HTML was first introduced by Tim Berners-Lee in 1989. • In 1997, HTML was standardized to HTML4. • HTML lets you format text, add graphics, create links, input forms, frames and tables etc and save it all in a text file that any browser can read and display. • HTML is the Universal Mark-up language for the web • HTML documents describe Static WebPages • These are Platform Independent and not case sensitive.
  • 3.
    Introduction continued....  HTMLis written in something called tags. Tags come in pairs, an opening one and a closing one. i.e., <HTML> </HTML>
  • 4.
    Implementation  Where wewrite code  Text Editor – Notepad, WordPad  Front page or Dreamweaver  Saving or its Extension “.htm” or “.html”  how we execute  Double click the html file or right click and open with IE or any browser
  • 5.
    Sample Code <html> <head> <title> </title> </head> <body> </body> </html> Codewhich is not visible in web page but give instructions to it. Appears at the very top of your web browser window like the title or name of the page Most of the code is written here. It will display the content of the web page
  • 6.
    Header Tag  Tochange the length or size of the content.  Headings are defined with the <h1> to <h6> tags  <h1> is the largest heading size and <h6> is the smallest.  HTML automatically adds an extra blank line before and after a heading. Syntax: <h1> </h1> Example: <h1> my first web page </h1>
  • 7.
    Paragraphs  Paragraphs aredefined with <p> tag e.g. <p> this is paragraph </p>  HTML automatically adds an extra blank line before and after a paragraph  The <br> tag is used to break a line, but don’t want to start a new paragraph.  The <br> tag forces a line break wherever it is placed. e.g. <br> this is break <br/> Line Break
  • 8.
    Comment  Comment tagis used to insert a comment in the HTML source code.  It is ignored by the browser. we use them to explain the code, to edit the source code at a later date. <! -- This is a comment -- >
  • 9.
    HTML Tag Attributes Attributes provide additional information to an HTML element.  Attributes always come in name/value pairs like name=“value”. These are always specified in start tag of an HTML element. align- alignment of text Attribute bgcolor- background color color- text color border- size of table border e.g. <body bgcolor=“green”>
  • 10.
    Text Formatting  Textformatting, in html terms, is when you give the browser instructions on how your text should look. These instructions come in the form of tags. <html> <body> <b> this text is bold </b> <br> This text contains <sub> subscript </sub> <br> This text contains <sup> superscript </sup> </body> </html>
  • 11.
    Hyperlink  Hyperlinks arethe backbone of the web. They provide a means to connect one piece of information to another piece of information. We can easily navigate from one page or part to another. Adding hyperlinks to your web pages  Linking in HTML code is done with the anchor tag, the <A> tag. i.e., <a href=“http://www.google.com”>google search engine </a>
  • 12.
    Images  For displayingof the Images, pictures we use a tag called Image Tag.  In image no closing tag i.e., </img> Syntax: <img src=“book.jpg”/> source name of the image  In order to reduce or set the size of the image we use height and weight attributes. These are in the form of pixels.
  • 13.
    Example <html> <body> <img src=“E:picturesbook.jpg” alt=“thisis book”/> Some text or paragraph<br> <img src=“candle.jpg” align=“right” width=“200” height=“300”/> </body> </html>  In the above example if the image is deleted by any then it will display the text y default as alternatively.
  • 14.
     Using Imageicons with hyperlinks, e.g.,<a href=“big.htm”> <img src=“candle.jpg” align=right> </a>  Inserting border to the image. A space is typed after the image name. The number 0 means no border. The default border colour is Blue. e.g. <img src=“candle.jpg” border=4>
  • 15.
    LISTS  In orderto print the data in lists or in dotted format we use list tag. There are 4 types: 1. Ordered list (in the form of numbers and symbols)- <ol> </ol> 2. Unordered list(in the form of dots and circles) - <ul> </ul> 3. Mentioning the list items - <li> </li> 4. Definition list - <dl> </dl>
  • 16.
    Ordered List 5 types: <oltype=“a”>  a,b,c.... <ol type=“A”>  A,B,C... <ol type=“i”>  i,ii,iii... <ol type=“I”>  I,II,III... <ol type=“1”>  1,2,3.... Example: <ol start=“7” type=“a”> <li>coffee</li> <li>tea</li> <li>milk</li> </ol>
  • 17.
    Unordered list  3types: <ul type=“square”>  <ul type=“circle”>  <ul type=“disc”>  Example: <ul type=“circle”> <li>coffee</li> <li>tea</li> <li>milk</li> </ul>
  • 18.
    Definition list  Adefinition is not a list of items. This is a list of terms and explanation of the terms. <dl>  starting definition list <dt>  definition term <dd>  defining definition  Example : <dl> <dt>shanthi</dt> <dd>this is my name</dd> <dt> mtech</dt> <dd> this is my qualification</dd> </dl>
  • 19.
    Tables  Tables wereintroduced to HTML as a way to make textual data look more presentable on the screen.  Things like statistics should be presented in neat rows and columns, making them easier to read. Tables are still used for that purpose.  The fact that cells in table can be coloured, height and width can be changed, images are placed in cells.
  • 20.
    Syntax: <table> <tr> <td> </td> </tr> </table>  Inplace of <td> we use <th> for table header.  If you don’t specify a border attribute the table will be displayed without any borders. To display a table with borders, use the border attribute: <table border=“1”> To setup table Table row Table column
  • 21.
    Example: <html> <body> <table border=“3” bgcolor=“#3F21A6”> <tr> <th>sno</th><th>name</th><th>course</th> </tr> <tr> <td> 1</td> <td> shanthi</td><td>Java</td> </tr> <tr> <td> 2</td> <td> krishna</td><td> HTML</td> </tr> </table> </body> </html>
  • 22.
    FRAMES  With Framesone can display more than one HTML document in the same browser window. Each HTML document is called a frame, and each frame is independent of the others.  We don’t use body tag here, only html code.  The <frameset> tag defines how to divide the window into frames. Each frameset defines a set of rows or columns  The <frame> tag defines what HTML document to put into each frame.  The frameset column size value can also be set in pixels (cols=“200,500”),and one of the columns can e set to use the remaining space(cols=“25%,*”).
  • 23.
    Example <html> <frameset rows=“40%,*”> <frame src=“first.html” name=“welcome”/> <framesetcols=“30%,*> <frame src=“second.html” name=“contact”/> <frame src=“third.html” name=“contact”/> </frameset> </frameset> </html>
  • 24.
    Forms  A formis an area that can contain form elements. Form elements allow user to enter information(like text fields, text area fields, check boxes, radio buttons, etc.) in a form.  The form itself is not visible.  A form is defined with the <form> tag.  Syntax <form> <input> </input> </form>
  • 25.
     Text field: used to type letters, numbers, etc., in a form Syntax: <form> Username:<input type=“text” name=“usr”/> </form>  Password: This is identical to a text box in its appearance. When you type in the characters are replaced by asterisks(*). Syntax: <input type=“password” name=“pwd”/>  Radio buttons: Used to select one of a limited number of choices. Syntax: <input type=“radio” name=“sex” value=“male”>male <br>
  • 26.
     Checkbox: usedwhen you want the user to select one or more options of a limited number of choices Syntax: <input type=“checkbox” name=“color” value=“red”/>  Dropdown box: It is a selectable list. Syntax: <select name=“degree”> <option>btech</option> </select>  Button: form’s action i.e., when the user clicks on the submit button, the content of the form is sent to another file. Syntax: <input type=“submit” value=“submit/click”>
  • 27.
    Example: <form> Username:<input type=“text” name=“usr” size=“8”maxlength=“40”/> Password:<input type=“password” name=“pwd”/> <input type=“submit” value=“submit/click”> </form>