How to photograph lightning.
•Download as PPSX, PDF•
1 like•432 views

A brief, helpful tutorial for amatuer and professional photographers alike. Lightning tips and tricks - photography is easy and fun.

Recommended
Recommended
More Related Content
What's hot
What's hot (20)
Similar to How to photograph lightning.
Similar to How to photograph lightning. (20)
Recently uploaded
Recently uploaded (20)
How to photograph lightning.
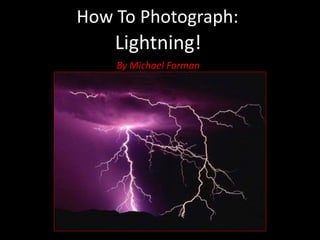
- 1. How To Photograph: Lightning! By Michael Forman
- 2. IT’S SIMPLE ONLY 3 THINGS NEEDED • Manually Operated Camera (SLR or DSLR with Bulb setting) • Tripod • Low light (or no light at all. ie Night time)
- 3. Manually Operated Camera This is an SLR or DSLR with a shutter value = • Bulb or; • Bu or; • B Check your owners manual if you’re not sure. It will be listed in the specifications section – see next slide. [AUTHOR]
- 4. [AUTHOR]
- 5. Tripod Inexpensive tripods tend to move a little in a breeze. Spend a little more to get a quality tripod. You won’t be sorry! [AUTHOR]
- 6. Low Light or Night Time Long exposure photography (which this is going to be) would overexpose daytime shots. In order to reduce exposure, we need to wait until the light in the sky diminishes. [AUTHOR]
- 7. SETTINGS NEEDED 1. ISO = 100 2. Aperture = f5.6 – f11 3. Focus = Infinity (manual setting) 4. Shutter = 30secs to 16 minutes Practice without lightning to measure the ‘glow’ and jot down the results. Refer later when your storm arrives! [AUTHOR] Choosing timing: Atmospheric glow given off by city lights (or the moon) will affect the finished image thereby helping you determine how long an exposure should be. Good lightning is contrasted against a dark background so if you find the images you’re taking are too pale, shorten the exposure. Start at 30 seconds and then increase the times by doubling. Ie: 1 min, 2mins, 4mins, 8mins, etc, until you find a satisfactory result.
- 8. METHOD 1. Attach camera to tripod and arrange those settings described in the previous slide. 2. Look for the most active part of the storm. 3. Press the shutter button and let the camera do its thing without touching it. 4. Lightning will occur while the shutter is open. 5. Bingo! A picture of lightning! [AUTHOR]
- 9. [AUTHOR]
- 10. MORE LIKE DUCK HUNTING? [AUTHOR] Wait for lightning to appear in the sky and then quickly shoot it?
- 11. [AUTHOR]
- 12. [AUTHOR] Of course it can be done that way but… •Lightning is fast •The brain is comparatively slow to signal a finger to move a button •A shutter button is comparatively slow to activate a shutter •A shutter is comparatively slow to open and then close •The total action has too many links in it to beat lightning! That doesn’t include the auto-focus lag time (if using it).
- 13. [AUTHOR] Capturing lightning is like waiting for a bus or hitchhiking
- 14. [AUTHOR] We know several things: •Which direction lightning is likely to appear •When it’s likely to arrive So wait, open up the camera’s shutter and let the lightning to come on by!
- 15. [AUTHOR] This explains why some photographers manage to capture several strikes in a shot! Longer shutter times combined with and active storm can accumulate many strikes in one photo. They didn’t happen all at once but one at a time over 10 or more minutes. 10-20 minutes of exposure requires no other light to appear anywhere in the scene. Take a look – it’s night time, there are no streetlights, no ambient light whatsoever. It’s in the country far away from the city lights and traffic.
- 16. [AUTHOR] So THAT’S how they do it!!!!
- 17. [AUTHOR] The trick is to be patient
- 18. [AUTHOR] Let’s look at that checklist again
- 19. ONLY 3 BASIC THINGS NEEDED • Manually Operated Camera (SLR or DSLR with Bulb setting) • Tripod • Low light (or no light at all. ie Night time)
- 20. SETTINGS FOR LIGHTNING 1. ISO = 100 2. Aperture = f5.6 – f11 3. Focus = Infinity (manual setting) 4. Shutter = 30secs to 16 minutes [AUTHOR]
- 21. WHY NO AUTO-FOCUS? [AUTHOR] Many cameras have trouble finding the right focus point when looking into the blackness of night AND when fixed to a tripod. Sometimes they take too long to decide what to focus on - so turn the auto-focus off, set the lens to infinity and leave it there. All lightning strikes will appear closer to infinity than say inside 12 metres (40 feet) so there’s no need to have the camera figure that part out.
- 22. Q. WHAT ABOUT USING A SHUTTER REMOTE? [AUTHOR] Sure but it’s not needed Night exposures ranging between 30 seconds and 16 minutes tend to absorb an initial button- press vibration because the movement only represents a small part of the overall picture time. Vibrations in a camera during shutter movements do cause blurry pictures but it’s most problematic in shutter speeds between 1/30th second and 5 seconds.
- 23. ‘Other Vibrations’ [AUTHOR] Wind-shaken camera strap Storms generate wind causing a camera strap to rattle back and forth. The result is a blurry picture. I take mine off. Problem solved. Flimsy Tripod Inexpensive tripods bend and sway in the wind, especially those with quick-release blocks and thin legs. To check: Set up your tripod, mount the camera and then place you hand on top of it. Give the camera a twist. If it moves easily, you have a problem.
- 24. [AUTHOR]
- 25. [AUTHOR]
- 26. WHEN ON LOCATION 1. Safety Issues 2. Which Lens? (Angle) 3. Direction of Storm 4. Which Aperture? [AUTHOR] HELPFUL THINGS TO KNOW
- 27. ON LOCATION (Safety) • Shoot approaching storms only, never one that’s in progress overhead! • Wear Sturdy Shoes • Take a Flashlight [AUTHOR]
- 28. ON LOCATION (Which Lens Angle?) • Slightly Wider Than The Area Being Photographed • Crop Correction Can Be Applied Afterwards • Include Interesting Detail in Foreground • Reflections are even better! [AUTHOR]
- 29. ON LOCATION (Direction Of Storm) • Be aware of the front’s direction • Use forecasts as a guide only • Abandon shoot when the storm’s front reaches a point of about 70 degrees in the sky. [AUTHOR]
- 30. ON LOCATION (The Aperture) Do you like your lightning thick and ‘chunky’? Or thin and with lots of detail and ‘spider-webbing’? [AUTHOR]
- 31. READ THIS BOOK A lightning photographer witnesses a rape and murder while hunting down the perfect storm photograph. It’s true to the craft of photography, tense with psychological twists to thrill. If you’re into photography, storms, lightning, this is the novel for you! -Michael Forman Author - Educator - Photographer