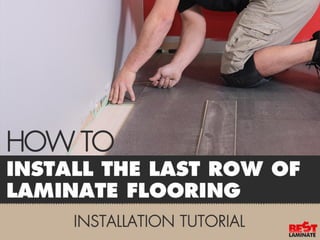
How to Install the Last Row of Laminate Flooring

How to Install the Last Row of Laminate Flooring - Installation Tutorial - Universal Installation: This tutorial walks you a universal installation of the last row of laminate flooring. It can be used in any type of room including one that may have obstacles, cabinets or tight spaces. Step 1: Measure the Gap: In most cases, the last row of flooring will need to be cut in order to fit the space. You will need to measure the gap between the last installed plank and the wall. Remember to factor in the expansion gap! Tip: Measure the gap at each end of the plank to get an accurate measurement. Walls can bow in or out causing a slightly different measurement at the beginning and end of a plank. Step 2: Expansion Gap: Be sure to exclude the expansion gap in your measurement! .25” for a room under 30 ft. in length, .5” for over 30 ft. in length. Your moldings should cover this gap. Step 3: Mark your Plank: Once the width of the plank is determined, mark the plank with a pencil according to the cut needed. Use another plank as your straight edge guide. Tip: If the side of the plank with a locking system is against the wall, you will want to trim the plank so it has a smooth, solid edge butting against the wall. Step 4: Cut your Plank: Use a saw to cut the plank with the decorative side up. We recommend using a jigsaw or table saw. Jigsaw: Use a laminate cutting blade, which has a medium tooth, downstroke blade. Table Saw: Use a medium tooth carbide blade with upside down teeth. Step 5: Lock in the Plank: Add spacers to the end of the plank. Tilt the plank into the locking system at a 45 degree angle. Tip: Before installing, check to make sure the plank fits. You may have to cut more of the plank to fit if your previous cut wasn’t as precise. Step 6: Use a Pull Bar: Use a pull bar along the side of the plank, pushing the plank down and into the locking system securely Do this along the full plank. Hint: Depending on the locking system, you may need to connect several planks together and install all at one time. The ends may not be able to connect plank by plank. Step 7: The Next Plank: Repeat steps 1-4 to measure and cut the next plank for installation. Step 8: Trim the Track: In most cases, it will be hard to lock your plank in two both locking systems. You can trim the track down with a blade or end of the pull bar to prepare for gluing the planks together. Step 9: Glue the Planks: After the track is trimmed, apply woodworkers glue on the joint. Position the next plank on an angle to connect into the locking system without lowering the edge onto the glue. Step 10: Tap Together: Use the pull bar on the side of the plank like previously stated. To secure the first and second plank, use a tapping block to connect the ends of the first and second plank in the last row. Step 11 – Continue Installing: Continue installing the planks until you are at the end of the row. Now you’re ready to install your moldings!

Recommended
Recommended
More Related Content
What's hot
What's hot (20)
Similar to How to Install the Last Row of Laminate Flooring
Similar to How to Install the Last Row of Laminate Flooring (20)
Recently uploaded
Recently uploaded (9)
How to Install the Last Row of Laminate Flooring
- 1. Laminate Flooring Installation Tutorial • How to install the last row of laminate flooring
- 2. Universal Installation • This tutorial walks you a universal installation of the last row of laminate flooring. It can be used in any type of room including one that may have obstacles, cabinets or tight spaces.
- 3. Step 1: Measure the Gap • In most cases, the last row of flooring will need to be cut in order to fit the space. You will need to measure the gap between the last installed plank and the wall. Remember to factor in the expansion gap! • Tip: Measure the gap at each end of the plank to get an accurate measurement. Walls can bow in or out causing a slightly different measurement at the beginning and end of a plank.
- 4. Step 2: Expansion Gap • Be sure to exclude the expansion gap in your measurement! .25” for a room under 30 ft. in length, .5” for over 30 ft. in length. Your moldings should cover this gap.
- 5. Step 3: Mark your Plank • Once the width of the plank is determined, mark the plank with a pencil according to the cut needed. Use another plank as your straight edge guide. • Tip: If the side of the plank with a locking system is against the wall, you will want to trim the plank so it has a smooth, solid edge butting against the wall.
- 6. Step 4: Cut your Plank • Use a saw to cut the plank with the decorative side up. We recommend using a jigsaw or table saw. • Jigsaw: Use a laminate cutting blade, which has a medium tooth, downstroke blade. • Table Saw: Use a medium tooth carbide blade with upside down teeth.
- 7. Step 5: Lock in the Plank • Add spacers to the end of the plank. Tilt the plank into the locking system at a 45 degree angle. • Tip: Before installing, check to make sure the plank fits. You may have to cut more of the plank to fit if your previous cut wasn’t as precise.
- 8. Step 6: Use a Pull Bar • Use a pull bar along the side of the plank, pushing the plank down and into the locking system securely Do this along the full plank. • Hint: Depending on the locking system, you may need to connect several planks together and install all at one time. The ends may not be able to connect plank by plank.
- 9. Step 7: The Next Plank • Repeat steps 1-4 to measure and cut the next plank for installation.
- 10. Step 8: Trim the Track • In most cases, it will be hard to lock your plank in two both locking systems. You can trim the track down with a blade or end of the pull bar to prepare for gluing the planks together.
- 11. Step 9: Glue the Planks • After the track is trimmed, apply woodworkers glue on the joint. Position the next plank on an angle to connect into the locking system without lowering the edge onto the glue.
- 12. Step 10: Tap Together • Use the pull bar on the side of the plank like previously stated. To secure the first and second plank, use a tapping block to connect the ends of the first and second plank in the last row.
- 13. Step 11 – Continue Installing • Continue installing the planks until you are at the end of the row. Now you’re ready to install your moldings!
- 14. Learn More! • Find more DIY tutorials at http://www.slideshare.net/Bestlaminate/presentati ons Click Here!
- 15. Connect with us! • Find this tutorial useful? • Visit www.bestlaminate.com for more details! • Connect with us on Facebook at Facebook/Bestlaminate • Connect with us on Twitter @Bestlaminate www.bestlaminate.com Facebook.com/Bestlaminate @Bestlaminate www.bestlaminate.com Facebook.com/Bestlaminate @Bestlaminate