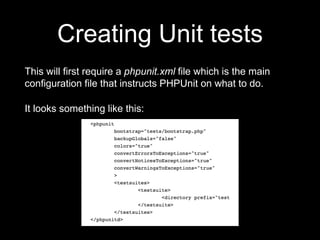
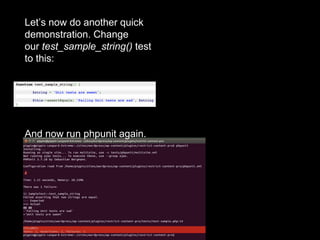
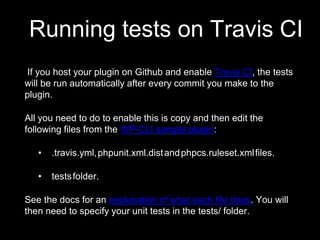
Getting started with
PHPUnit
Importance of Early Testing
• Early testing keeps you away from unexpected, cringe
bugs before you make your product live.
• It makes sure all the features of your product are working
properly before you release the product.
• It helps in making sure your core product features are
working as expected with the new features you have build.
• It helps to make everyone’s life easier.
Aspects of Testing
There are a few aspects we always need to remember when starting to
test a product:
• Always create the test case first.
• Communicate with the developers.
• Test new functionality first.
• Check dependent features.
• Don’t forget the core features of your product.
• Record all the issues found.
Ways of Testing
• Manual Testing
• Automated Testing
Both the ways are
interdependent. Neither can
suffice individually.
PHPUnit
- What is PHPUnit?
“PHPUnit is a programmer-oriented testing framework for PHP.
It is an instance of the xUnit architecture for unit testing
frameworks.”
- It was built by Sebastian Bergmann and many
contributors.
- It is available in more than one language like French,
Brazilian Portuguese, Japanese, Simplified Chinese and
of course English.
- You can find the whole package here: https://phpunit.de/
- It basically means testing each unit of your code.
Things required before
installing PHPUnit
• A local server setup.
• PHPUnit 6.5 requires PHP 7; using the latest version of PHP is highly
recommended.
• PHPUnit requires the dom and json extensions, which are normally
enabled by default.
• PHPUnit also requires the pcre, reflection, and spl extensions. These
standard extensions are enabled by default and cannot be disabled
without patching PHP's build system and/or C sources.
• The code coverage report feature requires the Xdebug (2.5.0 or later)
and tokenizer extensions. Generating XML reports requires
the xmlwriter extension.
Installing PHPUnit
There are a few ways you can install PHPUnit:
1.Using Composer &
2.Downloading globally.
3.And maybe a few more that I am not aware of.
You will require the .phar file to install PHPUnit, you can find it from here:
https://phar.phpunit.de/phpunit.phar OR download it from CLI, by running this
command
➜ wget https://phar.phpunit.de/phpunit.phar
Once downloaded, make it executable, and put it into your $PATH.
Follow these commands to make it executable:
Once the .phar file is executable, you will require to install WP-CLI.
Steps to install WP-CLI:
1. Before installing WP-CLI, please make sure your environment meets the minimum
requirements:
- UNIX-like environment (OS X, Linux, FreeBSD, Cygwin); limited support in Windows
environment.
- PHP 5.3.29 or later
- WordPress 3.7 or later. Install WordPress, it can be the latest live version or the Beta
version.
2. Install WP-CLI by using this command or directly download the .phar file:
$ curl -O https://raw.githubusercontent.com/wp-cli/builds/gh-pages/phar/wp-cli.phar
3. Once installed check if it working by running this command:
$ wp —info
To use WP-CLI from the command line by typing wp, you will need to
make the file executable and move it to somewhere in your PATH. For
example:
$ chmod +x wp-cli.phar
$ sudo mv wp-cli.phar /usr/local/bin/wp
For adding the folder to your PATH variable, follow these steps from your
terminal:
$ export PATH=$PATH:/opt/lampp/bin
To see the PATH variable, run command in your terminal: echo $PATH.
PHPUnit is installed.
Testing a plugin with
PHPUnit
You will need to setup test environment for the plugin for which you are
setting up unit test. Run this command from your WordPress’ directory:
$ wp scaffold plugin-tests my-plugin
This command will generate all the files needed for running tests, including
a .travis.yml file. If you host your plugin on Github and enable Travis CI, the
tests will be run automatically after every commit you make to the plugin.
For initialize the testing environment locally, you will need to follow these
steps :
(you’ll need to already have svn and wget available)
To install svn run this command: $sudo apt-get install subversion
Go to your plugin directory’s bin in your terminal and then run the bash script.
$ cd woocommerce/bin
$ ./bash install-wp-tests.sh wordpress_test root '' localhost latest
Note: Here add the port number by adding ‘localhost:PORT_NUMBER’ while running the bash script
eg: khyati@khyati: /opt/lamp/htdocs/wordpress/wp-content/plugins/woocommerce/bin$: ./install-wp-tests.sh
wordpress_test root ‘’localhost:3307 latest
where:
wordpress_test: is the name of the test database (all data will be deleted!)
root: is the MySQL user name
'': is the MySQL user password. Here my password is blank so I have kept empty quotes.
localhost: is the MySQL server host
latest: is the WordPress version; could also be 3.7, 3.6.2 etc.
This script does a couple things. First it installs a copy of WordPress in the tmp/ directory (by default) as well as
the WordPress unit testing tools. Then it creates a database to be used while running tests.
Make sure all the files are downloaded: ‘includes’ folder and ‘wp-tests-config.php’ file in the ‘wordpress-tests-lib’
folder. Also a database will be created named ‘wordpress_test’
Note: You will need to add the WordPress folder's path to your Environment PATH variable, so that phpunit can
be run from anywhere.
Creating Unit tests
This will first require a phpunit.xml file which is the main
configuration file that instructs PHPUnit on what to do.
It looks something like this:
• This tells PHPUnit where to look for the PHP file that gets
everything running (tests/bootstrap.php),
• Defines a few options, and then also tells PHPUnit where
the actual unit tests live. In this case, the unit tests live in
the tests directory and
• All of the .php files prefixed with test-. This means that any
file we place in the tests directory and name test-
something.php will be considered unit tests.
Note: only methods prefixed with “test” will be considered a
unit test. All other methods will be skip
To write a new test, all we need
to do is create a new method
inside the SampleTest class,
like this.
This does nothing more than
setup a variable called $string,
set its value to “Unit tests are
sweet”, and then checks that
“Unit tests are sweet” is indeed
equal to the $string variable. If
we now run PHPUnit, we will
see that we have two tests and
both are passing successfully:
Let’s now do another quick
demonstration. Change
our test_sample_string() test
to this:
And now run phpunit again.
Running the unit tests
Go to the folder where your unit test is written. Then on the
terminal run this command:
$phpunit –bootstrap path-of-your-bootstrap.php-
file/bootstrap.php phpunit-file.php
Eg: khyati@khyati: /opt/lamp/htdocs/wordpress/wp-
content/plugins/woocommerce/tests/unit-tests/product$
phpunit –bootstrap ../../bootstrap.php product-simple.php
Note: '.' will denote assertion passed, 'F' denoted assertion failed,
'W' denotes there is a Warning & 'E' denotes Error in the code.
If there is any error/ failure in the code then there below the result,
there will be a description of the same.
IMPORTANT Note: You will always need to run the bash
command for creating the wordpress-tests-lib as it will be deleted
once you shut down your machine as it is located in the tmp folder.
Running tests on Travis CI
If you host your plugin on Github and enable Travis CI, the tests
will be run automatically after every commit you make to the
plugin.
All you need to do to enable this is copy and then edit the
following files from the WP-CLI sample plugin:
• .travis.yml,phpunit.xml.distandphpcs.ruleset.xmlfiles.
• testsfolder.
See the docs for an explanation of what each file does. You will
then need to specify your unit tests in the tests/ folder.
Reference:
• https://pippinsplugins.com/unit-tests-wordpress-plugins-
setting-up-testing-suite/
• https://phpunit.de/
• http://wp-cli.org/docs/plugin-unit-tests/
• https://make.wordpress.org/cli/handbook/plugin-unit-tests/
• http://woeiyu.com/software/php/installing-phpunit/
Thank you.
-Khyati Gala
Happiness Engineer at Automattic Inc.
Email: galakhyati9206@gmail.com
Twitter: @galakhyati

Getting started with PHPUnit

  • 1.
  • 2.
    Importance of EarlyTesting • Early testing keeps you away from unexpected, cringe bugs before you make your product live. • It makes sure all the features of your product are working properly before you release the product. • It helps in making sure your core product features are working as expected with the new features you have build. • It helps to make everyone’s life easier.
  • 3.
    Aspects of Testing Thereare a few aspects we always need to remember when starting to test a product: • Always create the test case first. • Communicate with the developers. • Test new functionality first. • Check dependent features. • Don’t forget the core features of your product. • Record all the issues found.
  • 4.
    Ways of Testing •Manual Testing • Automated Testing Both the ways are interdependent. Neither can suffice individually.
  • 5.
    PHPUnit - What isPHPUnit? “PHPUnit is a programmer-oriented testing framework for PHP. It is an instance of the xUnit architecture for unit testing frameworks.” - It was built by Sebastian Bergmann and many contributors. - It is available in more than one language like French, Brazilian Portuguese, Japanese, Simplified Chinese and of course English. - You can find the whole package here: https://phpunit.de/ - It basically means testing each unit of your code.
  • 6.
    Things required before installingPHPUnit • A local server setup. • PHPUnit 6.5 requires PHP 7; using the latest version of PHP is highly recommended. • PHPUnit requires the dom and json extensions, which are normally enabled by default. • PHPUnit also requires the pcre, reflection, and spl extensions. These standard extensions are enabled by default and cannot be disabled without patching PHP's build system and/or C sources. • The code coverage report feature requires the Xdebug (2.5.0 or later) and tokenizer extensions. Generating XML reports requires the xmlwriter extension.
  • 7.
    Installing PHPUnit There area few ways you can install PHPUnit: 1.Using Composer & 2.Downloading globally. 3.And maybe a few more that I am not aware of. You will require the .phar file to install PHPUnit, you can find it from here: https://phar.phpunit.de/phpunit.phar OR download it from CLI, by running this command ➜ wget https://phar.phpunit.de/phpunit.phar Once downloaded, make it executable, and put it into your $PATH. Follow these commands to make it executable:
  • 8.
    Once the .pharfile is executable, you will require to install WP-CLI. Steps to install WP-CLI: 1. Before installing WP-CLI, please make sure your environment meets the minimum requirements: - UNIX-like environment (OS X, Linux, FreeBSD, Cygwin); limited support in Windows environment. - PHP 5.3.29 or later - WordPress 3.7 or later. Install WordPress, it can be the latest live version or the Beta version. 2. Install WP-CLI by using this command or directly download the .phar file: $ curl -O https://raw.githubusercontent.com/wp-cli/builds/gh-pages/phar/wp-cli.phar 3. Once installed check if it working by running this command: $ wp —info
  • 9.
    To use WP-CLIfrom the command line by typing wp, you will need to make the file executable and move it to somewhere in your PATH. For example: $ chmod +x wp-cli.phar $ sudo mv wp-cli.phar /usr/local/bin/wp For adding the folder to your PATH variable, follow these steps from your terminal: $ export PATH=$PATH:/opt/lampp/bin To see the PATH variable, run command in your terminal: echo $PATH. PHPUnit is installed.
  • 10.
    Testing a pluginwith PHPUnit You will need to setup test environment for the plugin for which you are setting up unit test. Run this command from your WordPress’ directory: $ wp scaffold plugin-tests my-plugin This command will generate all the files needed for running tests, including a .travis.yml file. If you host your plugin on Github and enable Travis CI, the tests will be run automatically after every commit you make to the plugin. For initialize the testing environment locally, you will need to follow these steps : (you’ll need to already have svn and wget available) To install svn run this command: $sudo apt-get install subversion
  • 11.
    Go to yourplugin directory’s bin in your terminal and then run the bash script. $ cd woocommerce/bin $ ./bash install-wp-tests.sh wordpress_test root '' localhost latest Note: Here add the port number by adding ‘localhost:PORT_NUMBER’ while running the bash script eg: khyati@khyati: /opt/lamp/htdocs/wordpress/wp-content/plugins/woocommerce/bin$: ./install-wp-tests.sh wordpress_test root ‘’localhost:3307 latest where: wordpress_test: is the name of the test database (all data will be deleted!) root: is the MySQL user name '': is the MySQL user password. Here my password is blank so I have kept empty quotes. localhost: is the MySQL server host latest: is the WordPress version; could also be 3.7, 3.6.2 etc. This script does a couple things. First it installs a copy of WordPress in the tmp/ directory (by default) as well as the WordPress unit testing tools. Then it creates a database to be used while running tests. Make sure all the files are downloaded: ‘includes’ folder and ‘wp-tests-config.php’ file in the ‘wordpress-tests-lib’ folder. Also a database will be created named ‘wordpress_test’ Note: You will need to add the WordPress folder's path to your Environment PATH variable, so that phpunit can be run from anywhere.
  • 12.
    Creating Unit tests Thiswill first require a phpunit.xml file which is the main configuration file that instructs PHPUnit on what to do. It looks something like this:
  • 13.
    • This tellsPHPUnit where to look for the PHP file that gets everything running (tests/bootstrap.php), • Defines a few options, and then also tells PHPUnit where the actual unit tests live. In this case, the unit tests live in the tests directory and • All of the .php files prefixed with test-. This means that any file we place in the tests directory and name test- something.php will be considered unit tests. Note: only methods prefixed with “test” will be considered a unit test. All other methods will be skip
  • 14.
    To write anew test, all we need to do is create a new method inside the SampleTest class, like this. This does nothing more than setup a variable called $string, set its value to “Unit tests are sweet”, and then checks that “Unit tests are sweet” is indeed equal to the $string variable. If we now run PHPUnit, we will see that we have two tests and both are passing successfully:
  • 15.
    Let’s now doanother quick demonstration. Change our test_sample_string() test to this: And now run phpunit again.
  • 16.
    Running the unittests Go to the folder where your unit test is written. Then on the terminal run this command: $phpunit –bootstrap path-of-your-bootstrap.php- file/bootstrap.php phpunit-file.php Eg: khyati@khyati: /opt/lamp/htdocs/wordpress/wp- content/plugins/woocommerce/tests/unit-tests/product$ phpunit –bootstrap ../../bootstrap.php product-simple.php
  • 17.
    Note: '.' willdenote assertion passed, 'F' denoted assertion failed, 'W' denotes there is a Warning & 'E' denotes Error in the code. If there is any error/ failure in the code then there below the result, there will be a description of the same. IMPORTANT Note: You will always need to run the bash command for creating the wordpress-tests-lib as it will be deleted once you shut down your machine as it is located in the tmp folder.
  • 18.
    Running tests onTravis CI If you host your plugin on Github and enable Travis CI, the tests will be run automatically after every commit you make to the plugin. All you need to do to enable this is copy and then edit the following files from the WP-CLI sample plugin: • .travis.yml,phpunit.xml.distandphpcs.ruleset.xmlfiles. • testsfolder. See the docs for an explanation of what each file does. You will then need to specify your unit tests in the tests/ folder.
  • 19.
    Reference: • https://pippinsplugins.com/unit-tests-wordpress-plugins- setting-up-testing-suite/ • https://phpunit.de/ •http://wp-cli.org/docs/plugin-unit-tests/ • https://make.wordpress.org/cli/handbook/plugin-unit-tests/ • http://woeiyu.com/software/php/installing-phpunit/
  • 20.
    Thank you. -Khyati Gala HappinessEngineer at Automattic Inc. Email: galakhyati9206@gmail.com Twitter: @galakhyati