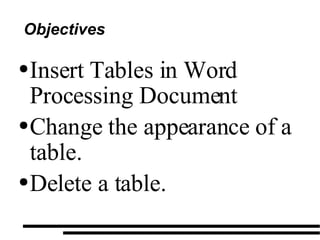
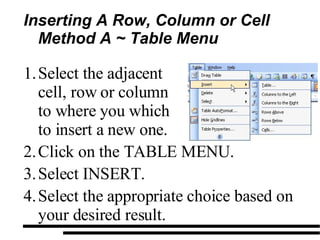
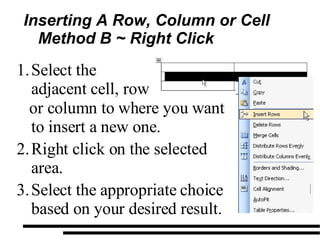
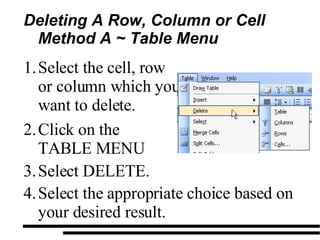
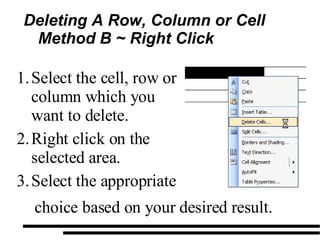
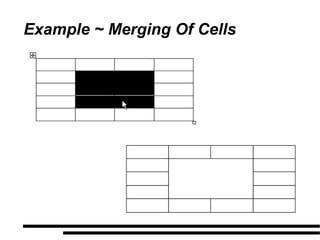
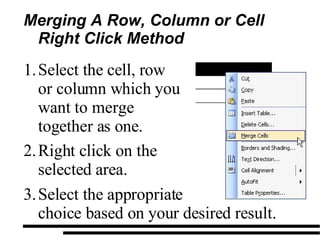
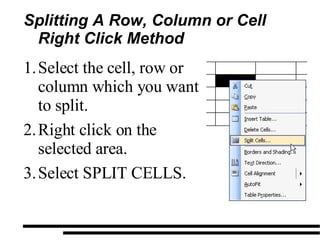
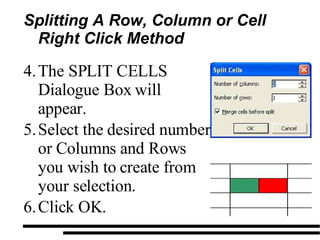
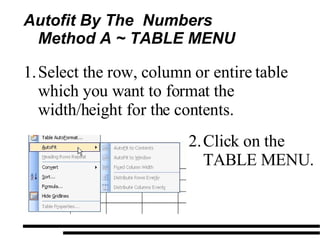
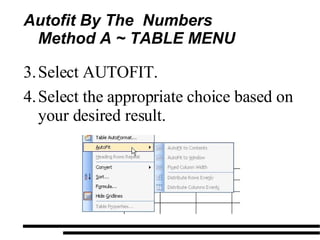
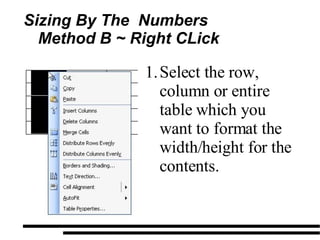
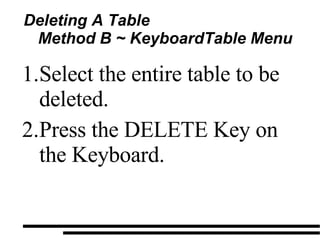
INFORMATION COMMUNICATION TECHNOLOGY Term 3 ~ Week 3.2 Specific Objective ~ 1.4.1
Objectives Insert Tables in Word Processing Document Change the appearance of a table. Delete a table.
REVIEW c reate, save and edit a Word Processor Document. formatting tools within a Word Processor.
Insert Tables into a Word Processing Document
REVIEW  HOW TO INSERT A TABLE INTO A MICROSOFT WORD  DOCUMENT
ADD CONTENT
INSERTING CELLS, ROWS, AND COLUMNS.
Inserting A Row, Column or Cell Method A ~ Table Menu Click on the TABLE MENU. Select INSERT. Select the appropriate choice based on your desired result. Select the adjacent cell, row or column to where you which to insert a new one.
Inserting A Row, Column or Cell Method B ~ Right Click or column to where you want to insert a new one. Right click on the selected area. Select the appropriate choice based on your desired result. Select the adjacent cell, row
DELETING CELLS, ROWS, AND COLUMNS
Deleting A Row, Column or Cell Method A ~ Table Menu Select DELETE. Select the appropriate choice based on your desired result. Select the cell, row or column which you want to delete. Click on the TABLE MENU
Deleting A Row, Column or Cell Method B ~ Right Click choice based on your desired result. Select the cell, row or column which you want to delete. Right click on the selected area. Select the appropriate
MERGING AND SPLITTING OF CELLS, ROWS, AND COLUMNS
Example ~ Merging Of Cells
Merging A Row, Column or Cell Right Click Method Select the appropriate  choice based on your desired result. Select the cell, row or column which you want to merge together as one. Right click on the selected area.
Splitting A Row, Column or Cell Right Click Method Select the cell, row or column which you want to split. Right click on the selected area. Select SPLIT CELLS.
Splitting A Row, Column or Cell Right Click Method The SPLIT CELLS Dialogue Box will appear. Select the desired number or Columns and Rows you wish to create from your selection. Click OK.
Adjusting Columns and Rows Size (1 of 2) When you want to adjust the width of a column or a row there are three (3) different methods that can be used: AutoFit  ~ Changes the width of a table column to accommodate the width of the text without changing the way text wraps in the cells.
Adjusting Columns and Rows Size (2 of 2) Distribute Space Evenly  ~ Adjusts the size of the selected columns/rows to match the width of the widest column in the selection.  Specify a Specific Size  ~ You set the physical dimension of each column and rows
ADJUSTING THE WIDTH OF A COLUMN AND  HEIGHT OF A ROW
Autofit By The  Numbers Method A ~ TABLE MENU  Select the row, column or entire table which you want to format the width/height for the contents. Click on the TABLE MENU.
Autofit By The  Numbers Method A ~ TABLE MENU  Select AUTOFIT. Select the appropriate choice based on your desired result.
Sizing By The  Numbers Method B ~ Right CLick  Select the row, column or entire table which you want to format the width/height for the contents.
Sizing By The  Numbers Method B ~ Right CLick  Right Click on the selected cell or row. Select AUTOFIT, DISTRIBUTE ROWS EVENLY, or DISTRIBUTE COLUMNS EVENLY.
Sizing By The  Numbers Method C ~ Ruler  Select the row or column or entire table which you want to format the width/height for the contents. Ensure that the ruler is turned on with Microsoft Word.
Sizing By The  Numbers Method C ~ Ruler  You will observe on the ruler that for each of the rows and columns on the ruler there is a slider on the ruler to adjust the height and width respectfully. To do click on the blue symbol and drag it to the desired location to create the size column or row you want.
DELETING A TABLE
Deleting A Table Method A ~ Table Menu Select the entire table to be deleted Click on the  TABLE MENU Select DELETE. Select TABLE.
Deleting A Table Method B ~ KeyboardTable Menu Select the entire table to be deleted. Press the DELETE Key on the Keyboard.
QUESTIONS

Form 1 Term 2 Week 3.2

  • 1.
    INFORMATION COMMUNICATION TECHNOLOGYTerm 3 ~ Week 3.2 Specific Objective ~ 1.4.1
  • 2.
    Objectives Insert Tablesin Word Processing Document Change the appearance of a table. Delete a table.
  • 3.
    REVIEW c reate,save and edit a Word Processor Document. formatting tools within a Word Processor.
  • 4.
    Insert Tables intoa Word Processing Document
  • 5.
    REVIEW HOWTO INSERT A TABLE INTO A MICROSOFT WORD DOCUMENT
  • 6.
  • 7.
  • 8.
    Inserting A Row,Column or Cell Method A ~ Table Menu Click on the TABLE MENU. Select INSERT. Select the appropriate choice based on your desired result. Select the adjacent cell, row or column to where you which to insert a new one.
  • 9.
    Inserting A Row,Column or Cell Method B ~ Right Click or column to where you want to insert a new one. Right click on the selected area. Select the appropriate choice based on your desired result. Select the adjacent cell, row
  • 10.
  • 11.
    Deleting A Row,Column or Cell Method A ~ Table Menu Select DELETE. Select the appropriate choice based on your desired result. Select the cell, row or column which you want to delete. Click on the TABLE MENU
  • 12.
    Deleting A Row,Column or Cell Method B ~ Right Click choice based on your desired result. Select the cell, row or column which you want to delete. Right click on the selected area. Select the appropriate
  • 13.
    MERGING AND SPLITTINGOF CELLS, ROWS, AND COLUMNS
  • 14.
  • 15.
    Merging A Row,Column or Cell Right Click Method Select the appropriate choice based on your desired result. Select the cell, row or column which you want to merge together as one. Right click on the selected area.
  • 16.
    Splitting A Row,Column or Cell Right Click Method Select the cell, row or column which you want to split. Right click on the selected area. Select SPLIT CELLS.
  • 17.
    Splitting A Row,Column or Cell Right Click Method The SPLIT CELLS Dialogue Box will appear. Select the desired number or Columns and Rows you wish to create from your selection. Click OK.
  • 18.
    Adjusting Columns andRows Size (1 of 2) When you want to adjust the width of a column or a row there are three (3) different methods that can be used: AutoFit ~ Changes the width of a table column to accommodate the width of the text without changing the way text wraps in the cells.
  • 19.
    Adjusting Columns andRows Size (2 of 2) Distribute Space Evenly ~ Adjusts the size of the selected columns/rows to match the width of the widest column in the selection. Specify a Specific Size ~ You set the physical dimension of each column and rows
  • 20.
    ADJUSTING THE WIDTHOF A COLUMN AND HEIGHT OF A ROW
  • 21.
    Autofit By The Numbers Method A ~ TABLE MENU Select the row, column or entire table which you want to format the width/height for the contents. Click on the TABLE MENU.
  • 22.
    Autofit By The Numbers Method A ~ TABLE MENU Select AUTOFIT. Select the appropriate choice based on your desired result.
  • 23.
    Sizing By The Numbers Method B ~ Right CLick Select the row, column or entire table which you want to format the width/height for the contents.
  • 24.
    Sizing By The Numbers Method B ~ Right CLick Right Click on the selected cell or row. Select AUTOFIT, DISTRIBUTE ROWS EVENLY, or DISTRIBUTE COLUMNS EVENLY.
  • 25.
    Sizing By The Numbers Method C ~ Ruler Select the row or column or entire table which you want to format the width/height for the contents. Ensure that the ruler is turned on with Microsoft Word.
  • 26.
    Sizing By The Numbers Method C ~ Ruler You will observe on the ruler that for each of the rows and columns on the ruler there is a slider on the ruler to adjust the height and width respectfully. To do click on the blue symbol and drag it to the desired location to create the size column or row you want.
  • 27.
  • 28.
    Deleting A TableMethod A ~ Table Menu Select the entire table to be deleted Click on the TABLE MENU Select DELETE. Select TABLE.
  • 29.
    Deleting A TableMethod B ~ KeyboardTable Menu Select the entire table to be deleted. Press the DELETE Key on the Keyboard.
  • 30.