Evaluation question 6 :What have you learnt about technologies from the process of constructing this product
•Download as RTF, PDF•
1 like•198 views


Recommended
More Related Content
What's hot
What's hot (12)
Viewers also liked
Similar to Evaluation question 6 :What have you learnt about technologies from the process of constructing this product
Similar to Evaluation question 6 :What have you learnt about technologies from the process of constructing this product (20)
Evaluation question 6 :What have you learnt about technologies from the process of constructing this product
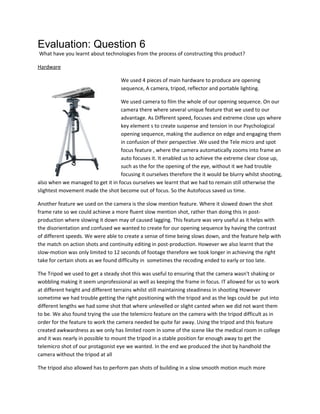
- 1. Evaluation: Question 6 What have you learnt about technologies from the process of constructing this product? Hardware We used 4 pieces of main hardware to produce are opening sequence, A camera, tripod, reflector and portable lighting. We used camera to film the whole of our opening sequence. On our camera there where several unique feature that we used to our advantage. As Different speed, focuses and extreme close ups where key element s to create suspense and tension in our Psychological opening sequence, making the audience on edge and engaging them in confusion of their perspective .We used the Tele micro and spot focus feature , where the camera automatically zooms into frame an auto focuses it. It enabled us to achieve the extreme clear close up, such as the for the opening of the eye, without it we had trouble focusing it ourselves therefore the it would be blurry whilst shooting, also when we managed to get it in focus ourselves we learnt that we had to remain still otherwise the slightest movement made the shot become out of focus. So the Autofocus saved us time. Another feature we used on the camera is the slow mention feature. Where it slowed down the shot frame rate so we could achieve a more fluent slow mention shot, rather than doing this in post- production where slowing it down may of caused lagging. This feature was very useful as it helps with the disorientation and confused we wanted to create for our opening sequence by having the contrast of different speeds. We were able to create a sense of time being slows down, and the feature help with the match on action shots and continuity editing in post-production. However we also learnt that the slow-motion was only limited to 12 seconds of footage therefore we took longer in achieving the right take for certain shots as we found difficulty in sometimes the recoding ended to early or too late. The Tripod we used to get a steady shot this was useful to ensuring that the camera wasn't shaking or wobbling making it seem unprofessional as well as keeping the frame in focus. IT allowed for us to work at different height and different terrains whilst still maintaining steadiness in shooting However sometime we had trouble getting the right positioning with the tripod and as the legs could be put into different lengths we had some shot that where unlevelled or slight canted when we did not want them to be. We also found trying the use the telemicro feature on the camera with the tripod difficult as in order for the feature to work the camera needed be quite far away. Using the tripod and this feature created awkwardness as we only has limited room in some of the scene like the medical room in college and it was nearly in possible to mount the tripod in a stable position far enough away to get the telemicro shot of our protagonist eye we wanted. In the end we produced the shot by handhold the camera without the tripod at all The tripod also allowed has to perform pan shots of building in a slow smooth motion much more
- 2. conveniently that by hand. Although we did achieve the pan, we couldn't anticipate whether or not the tripod was going to stick and not move fluently therefore making our pan shot jitter and not be a consistent motion, so it took several take before we achieve what we want. The Portable torch came in very handy for create the right shadows and lighting we wanted in our film. It enabled us to ensure that are shot where brightly lit in the hospital scene from our opening sequence to create a clinical nervous atmosphere. Also in the Dark television room it helps us light up just our protagonist face and not anything else as we want that to be the main focus of the shot. Although sometime it created unwanted background light in the camera and getting the position light was difficult at times as it was quite big. Despite this it did feature a tilting mechanism where we could place it at different degrees of angles enabling for lighting to come from underneath are protagonist face. Sometime we had to hold the light in order to use it with the camera, this was sometimes difficult as the light was heavy and holding it for extensive lengths of time proved tiring. For example, the lighting of the eye through the door. By holding the light it meant that sometimes when we shot the light would sway and create shadows in the wrong places and only half the eye was shown in the frame. Whilst we did had trouble keeping it still, it did prove useful to be able to hold the light with a hand as it enabled us to get the correct lighting in tight spots. We did use the reflector at all as we found it hard to work with. You had to have a fourth person to hold it in Order to use it successfully in lighting the shot by bouncing the handhold light of it. However we only has 3 people and with one of us as the protagonist in the short the other working the camera and me holding the light there wasn't anyone left to hold it. We did try just one person holding it with the handheld light but that did not create the look we were looking for and just made the light less bright and duller. Then we tried propping it up against an object however it just kept falling over, therefore ruining the lighting and the shot and having the hassle of repositioning it again overtime it happened slowed us down drastically. We used several websites for research in constructing this project these where: http://www.youtube.comto find videos examples of existing thriller opening sequences and also to upload any video footage like is preliminary task and rough cut video http://www.wikipedia.org/ and http://www.imdb.com/ provided information on most of the opening sequences that we researched into, provided us with the cast, directors, production companies etc. Also how the films was received and marketed and basic information on what they were about. Also help with sub genres of thrillers task Film company website such as http://www.warnerbros.com/ gives us ideas on what type of films the distributed http://www.slideshare.net/ and http://getrevising.co.uk/ had thousands of presentation and other digital material that other people have posted. For us to use to our advantage, all we had to do his search for a topic. For example I used it to look for examples of The 360 rule and match on action, It provided me with information that help me define what both these where in my own words
- 3. Search engine such as https://www.google.co.uk where also used by us to search the internet. IT made research quicker and simpler but sometime not all the information it gave us was relevant to what we want. Like if your search for a certain film title it would come up with several films that shared the same name. http://www.artofthetitle.com/, this provided us with hundreds of opening titles for us look through. It helps us see what element make up a good open sequences and what conventional thriller opens feature. Like Dexter opening, that has lots of extreme close ups of object to make the audience feel squeamish and uncomfortable, we used this to as influence for the extreme close up of objects like the meat being cut to get a similar effects and also the close up of someone tying their shoes to create the miss-en scene of preparation where the protagonist is readying himself for whatever happens next. We used the research and posted them on a blog, this is used to track all the preparations etc. up to the final cut of our opening sequence. At first we used Posterous.com, which was straightforward to use, the layout was simple editing and creating each blog post was easy as it enabled us to embed YouTube videos, PowerPoint’s and other document and images automatically as it supported much of these already. You could also change the times and dates of post, so we can chronically order the process of our blog so that it is a clear process. Even when some of the posts where weeks apart. However due to complications that website shut down so we had to convert all our work onto another blogging site.
- 4. http://wordpress.com/, this was a very confusing. I didn’t like using word press as I find it quite hard to work with. It doesn’t allow for power point to be uploaded therefore I had to use slideshare.net to upload them and then post a link. Even this proved un-simple as it took me a while to learn how to create links and that only after I researched it on a website. Despite this once I got used to using the site it did provide some nice features like the ability to preview a blog post before posting it and being able to access all you post at once in a list form. However the inability to view power points and pdf without downloading them or using a secondary party website link made me prefer the easiness of using Posterous. Communication We used iPhone’s and phones and communicated by text for the preparation in constructing our opening sequence. This was good as all of us keep our phones on as most of time therefore if we need to get hold of each other quickly we could. We also used our email accounts to contact addenbrookes hospital to see if we were able use their location for filming. This help us as they had several email addressed for us to contact and we could email them in ahead of filming. Also many people check their email regularly therefore we had some confidence in a quick response. I also used email to send documents to myself so I could access them from other computer as well as my memory stick. I used outlook express and yahoo mail
- 5. https://login.yahoo.com/config/login_verify2?.intl=uk&.src=ym Although the only problem with this is that they have a maximum capacity size for the attachment of 10mb in the amount you can send. Therefore I was limited so I had to send something is several email to avoid this problem. We also used www.facebook.com communicate with each other. This allowed us to have group conversation and arrange to film at certain times and locations. Also if one of us has taken the camera home or worked on the film alone which sometimes happened because others were busy, we could contacted the other to tell them what we had done and what we had left to do. We https://vimeo.com/, http://prezi.com and http://www.slideshare.net/ to upload presentation and videos of some research we did for our opening sequence and then posted them on our blog. These provided different useful way of present information on our blog, rather than the started blog post. Also sometime it was easier to present work this way than on the post as it got the information across clearer. Like our We also use Microsoft Power point to present some of our work. It has comes with some interesting templates that we used in order to make are presentation more visually appealing and clearer when showing them in front of the class.
- 6. Using iPhone does provide useful as many of the technologies and website we were using has free apps. As we could keep up to date with our work whilst on the go, and it provided more convenient way to make a quick blog post or quickly search for something. Credits and music https://soundcloud.com/ we used sound cloud to get one of the main soundtracks, however searching for the music proved at time difficult as we were not sure what we were actually looking for. However sounds cloud provides an advance search engine where you can search for several different options at once and it filters the results for you. There for we could be more precise in what we were looking for. Also they provided a tags option where you can search several words at once and sounds with the same tags would be shown. Therefore we could search for music with the tags tension and suspense, and the sound results would have both these qualities. However some of the clips weren’t available to download therefore we found that we had to keep looking when we thought we found one we like. We also used http://www.freesound.org/ for sound clips, and they have similar feature as sound cloud.
- 7. We got our credit fonts from http://www.dafont.com/, it has thousands to choose from, despite this was good but we found that we had too much choice and we were overwhelmed, making the font we wanted harder to choose. However they do have a good search engine and the feature in enabling you to preview what your text would look like in all the fonts was a good feature as it helped narrowing down the choice quicker. Also the website provides clear instruction on how to down load and use the font on your computer.
- 8. Final Cut
- 9. We used final cut to edit all our video footage together. Final cut was very useful. We easily imported all our music, footage sounds etc. without any problems. Each time we cut a clip in out opening sequence, it was split into two clips. You can make cuts with the Razor Blade tool, or you can make cuts during playback by pressing Control-V. Razor Blade: Ads an edit point to a sequence clip by cutting a single clip item, along with any clip items linked to it in the Timeline, into two pieces. This edit point is added at the frame of the clip item in the Timeline that you click
- 10. This was useful for quickly rearranging pieces of out opening sequence, for deleting a section of a clip, for applying an effect to a specific part of a clip, or for moving a piece of one of our clips to the same location on another track. We also applied a black and white filter to certain clips by using the filter options, you select the clip and then choose effects video filter and then select the type. Then a box like this will be displayed and we can edit via the many different options.
- 11. We also used the pen tool to create fades in and out of sequences and change the audio levels of sound clips. We learnt that when you adjust audio levels and pan settings in the Timeline and Viewer, you mainly use the Selection and Pen tools. The Pen tools allow you to add, move, and delete audio level and pan key frames in our clip overlays in the Timeline as well as in the Viewer. The key frame appears as a diamond and then you can drag that point around to create the desired effect, dragging it down would make the sound or clip fade out and become more transparent or quiet and up more bold and louder. The undo option by pressing Command-Saved us plenty of times if we made mistake it meant we didn’t have to start keep over.
- 12. We also used the pen tool to create fades in and out of sequences and change the audio levels of sound clips. We learnt that when you adjust audio levels and pan settings in the Timeline and Viewer, you mainly use the Selection and Pen tools. The Pen tools allow you to add, move, and delete audio level and pan key frames in our clip overlays in the Timeline as well as in the Viewer. The key frame appears as a diamond and then you can drag that point around to create the desired effect, dragging it down would make the sound or clip fade out and become more transparent or quiet and up more bold and louder. The undo option by pressing Command-Saved us plenty of times if we made mistake it meant we didn’t have to start keep over.
- 13. We also used the pen tool to create fades in and out of sequences and change the audio levels of sound clips. We learnt that when you adjust audio levels and pan settings in the Timeline and Viewer, you mainly use the Selection and Pen tools. The Pen tools allow you to add, move, and delete audio level and pan key frames in our clip overlays in the Timeline as well as in the Viewer. The key frame appears as a diamond and then you can drag that point around to create the desired effect, dragging it down would make the sound or clip fade out and become more transparent or quiet and up more bold and louder. The undo option by pressing Command-Saved us plenty of times if we made mistake it meant we didn’t have to start keep over.