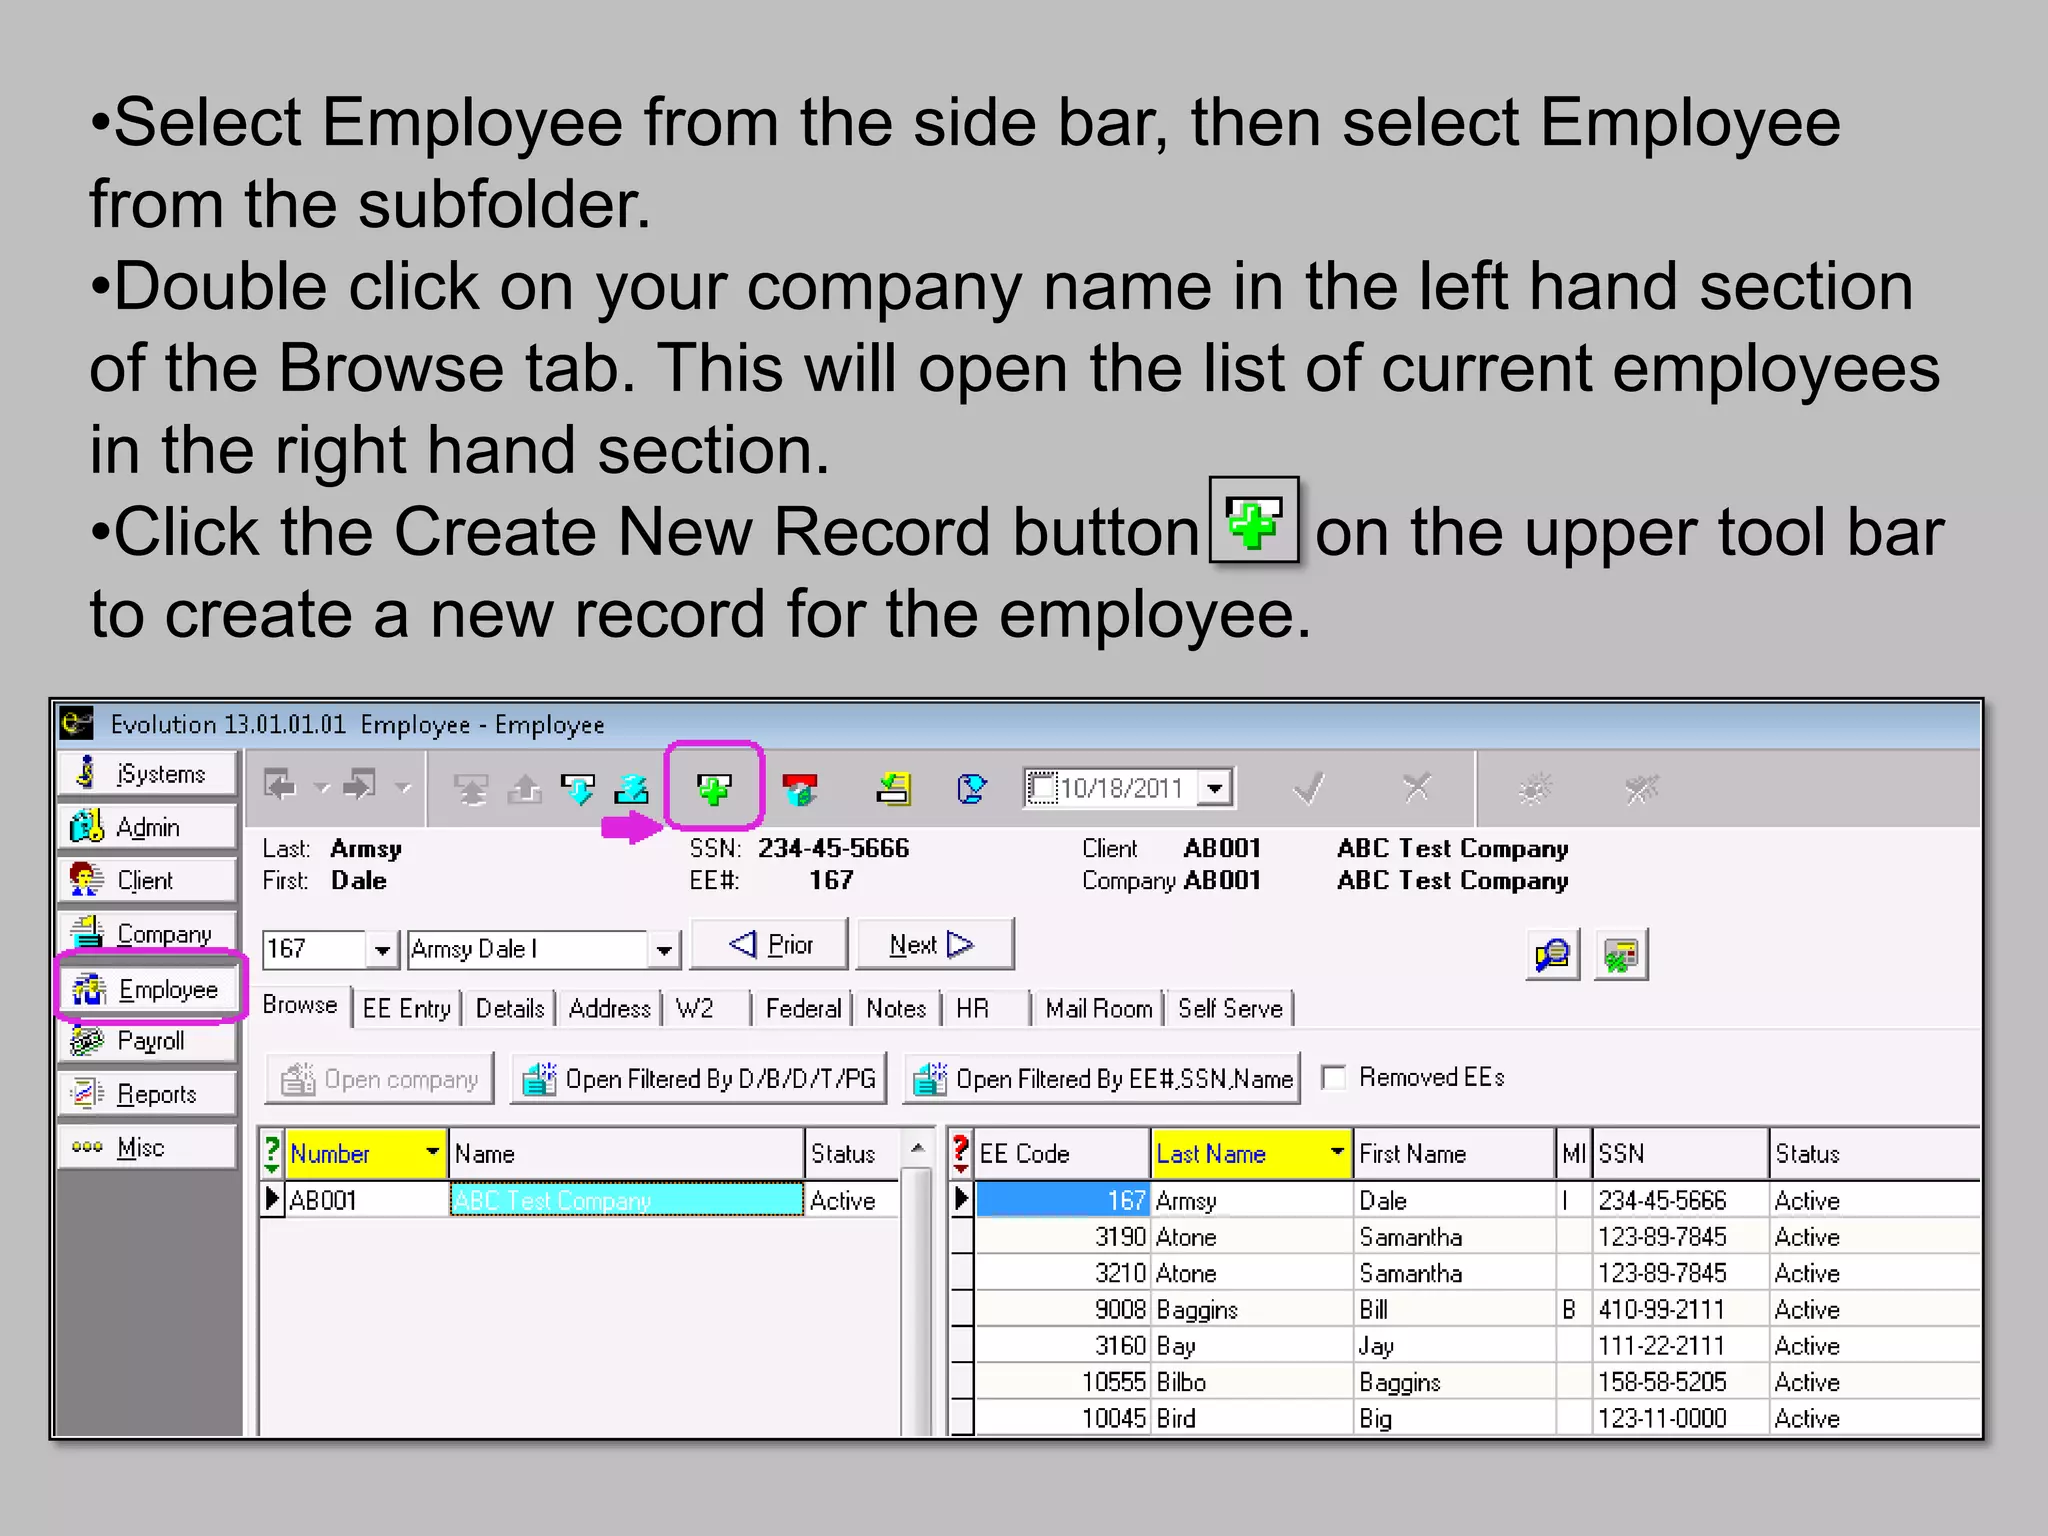
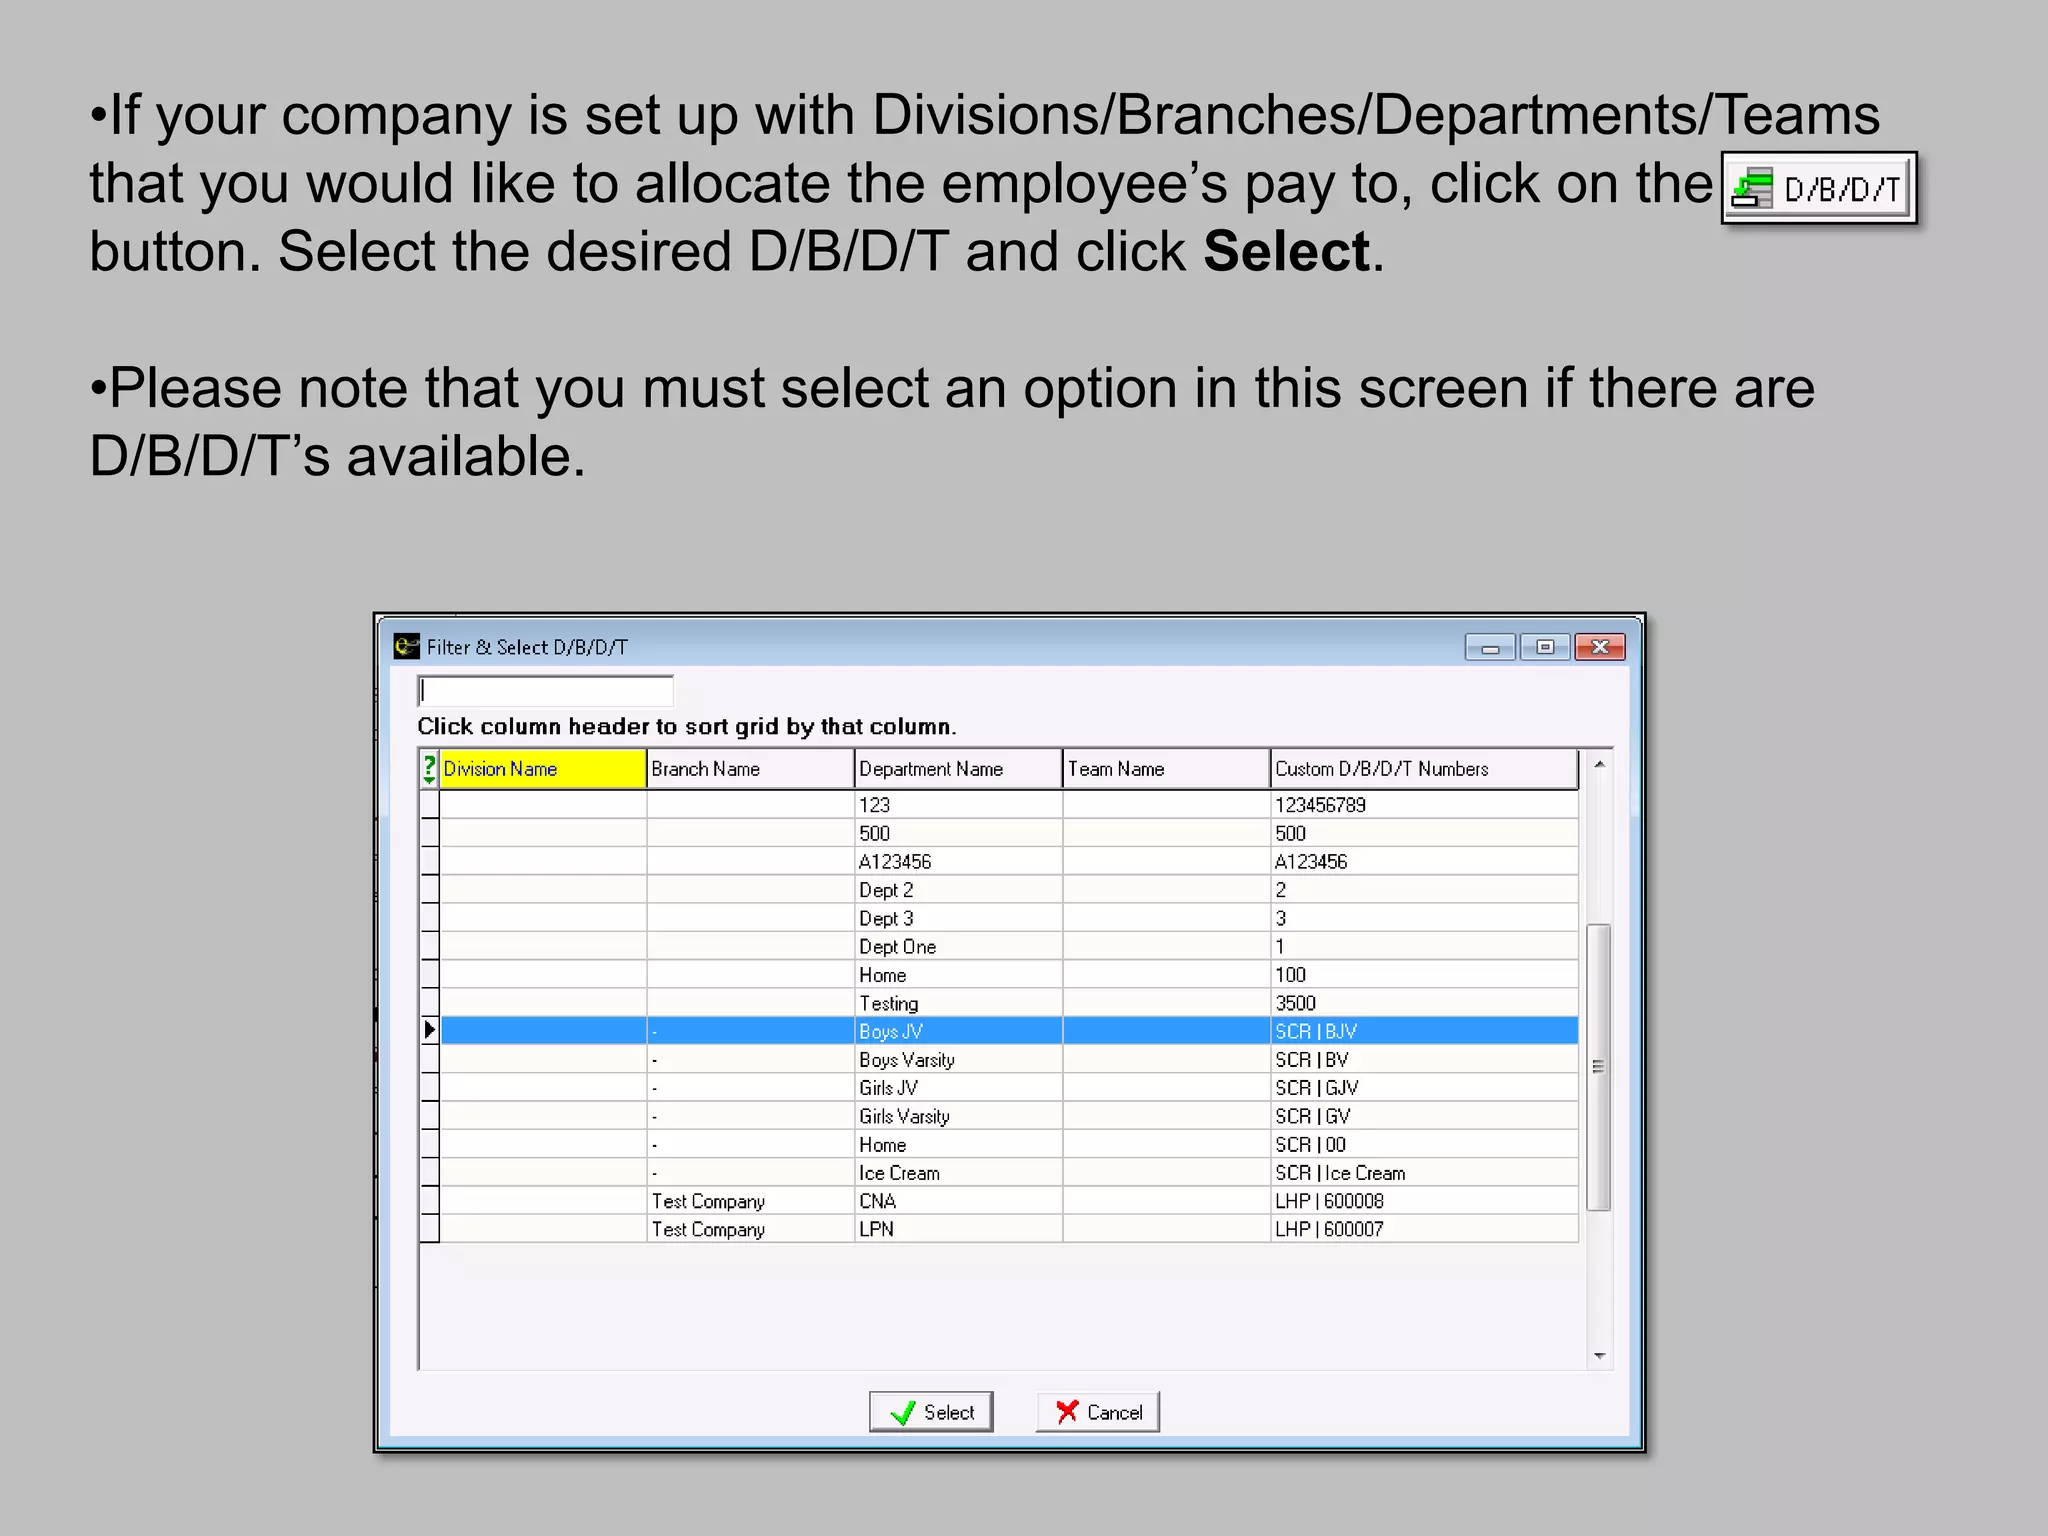
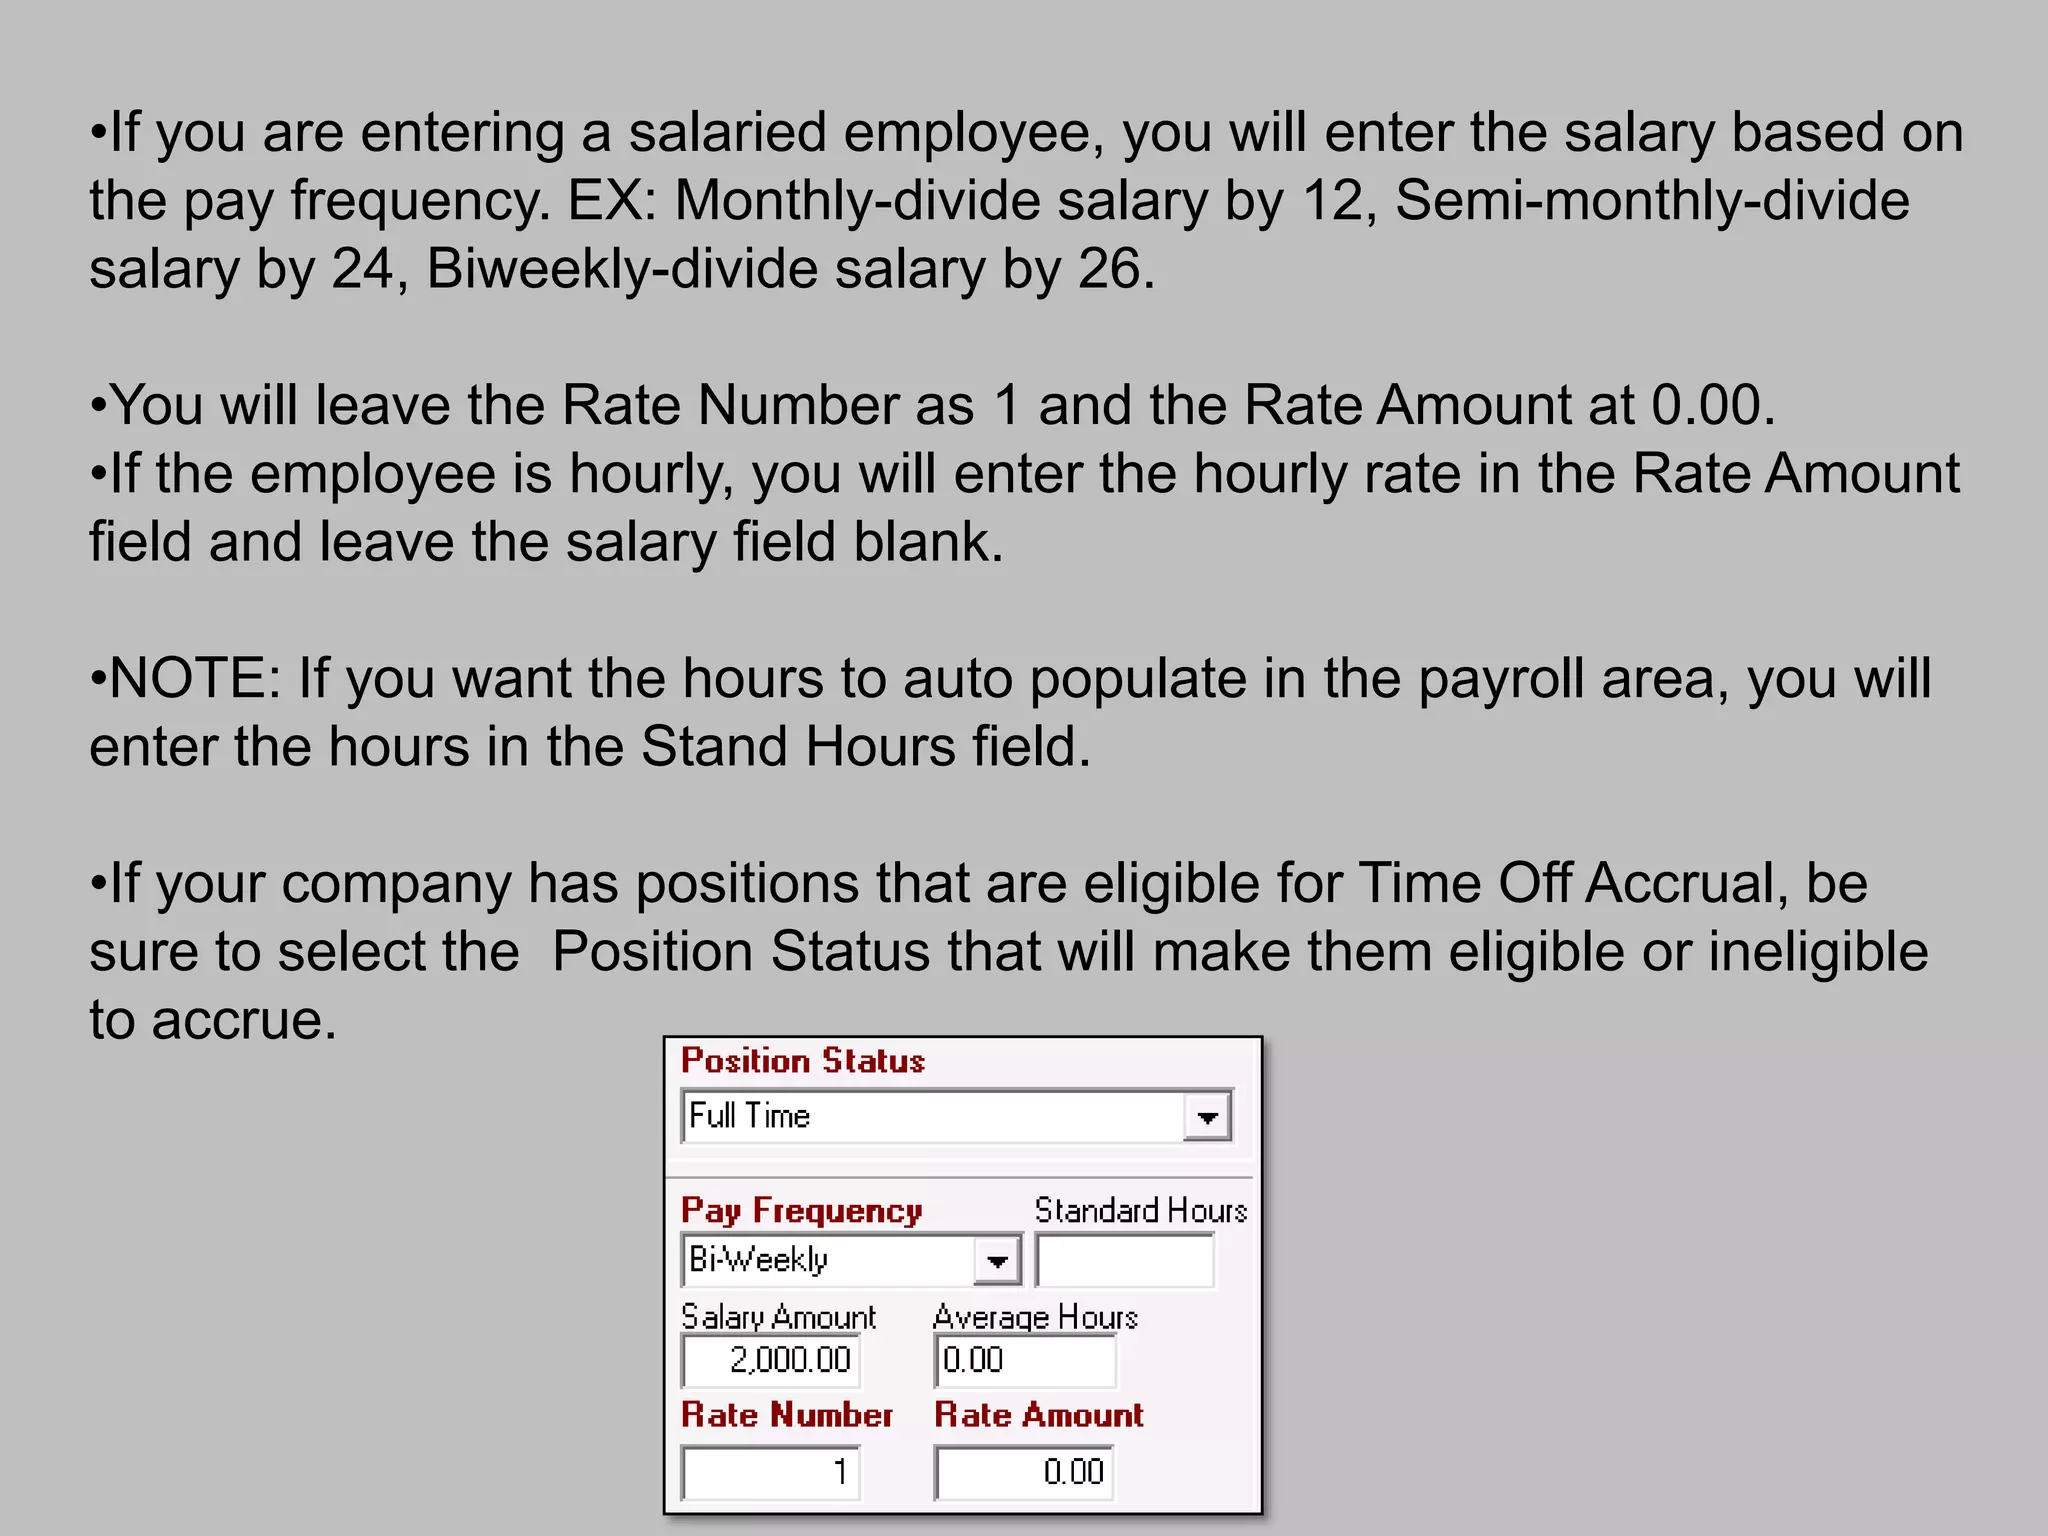
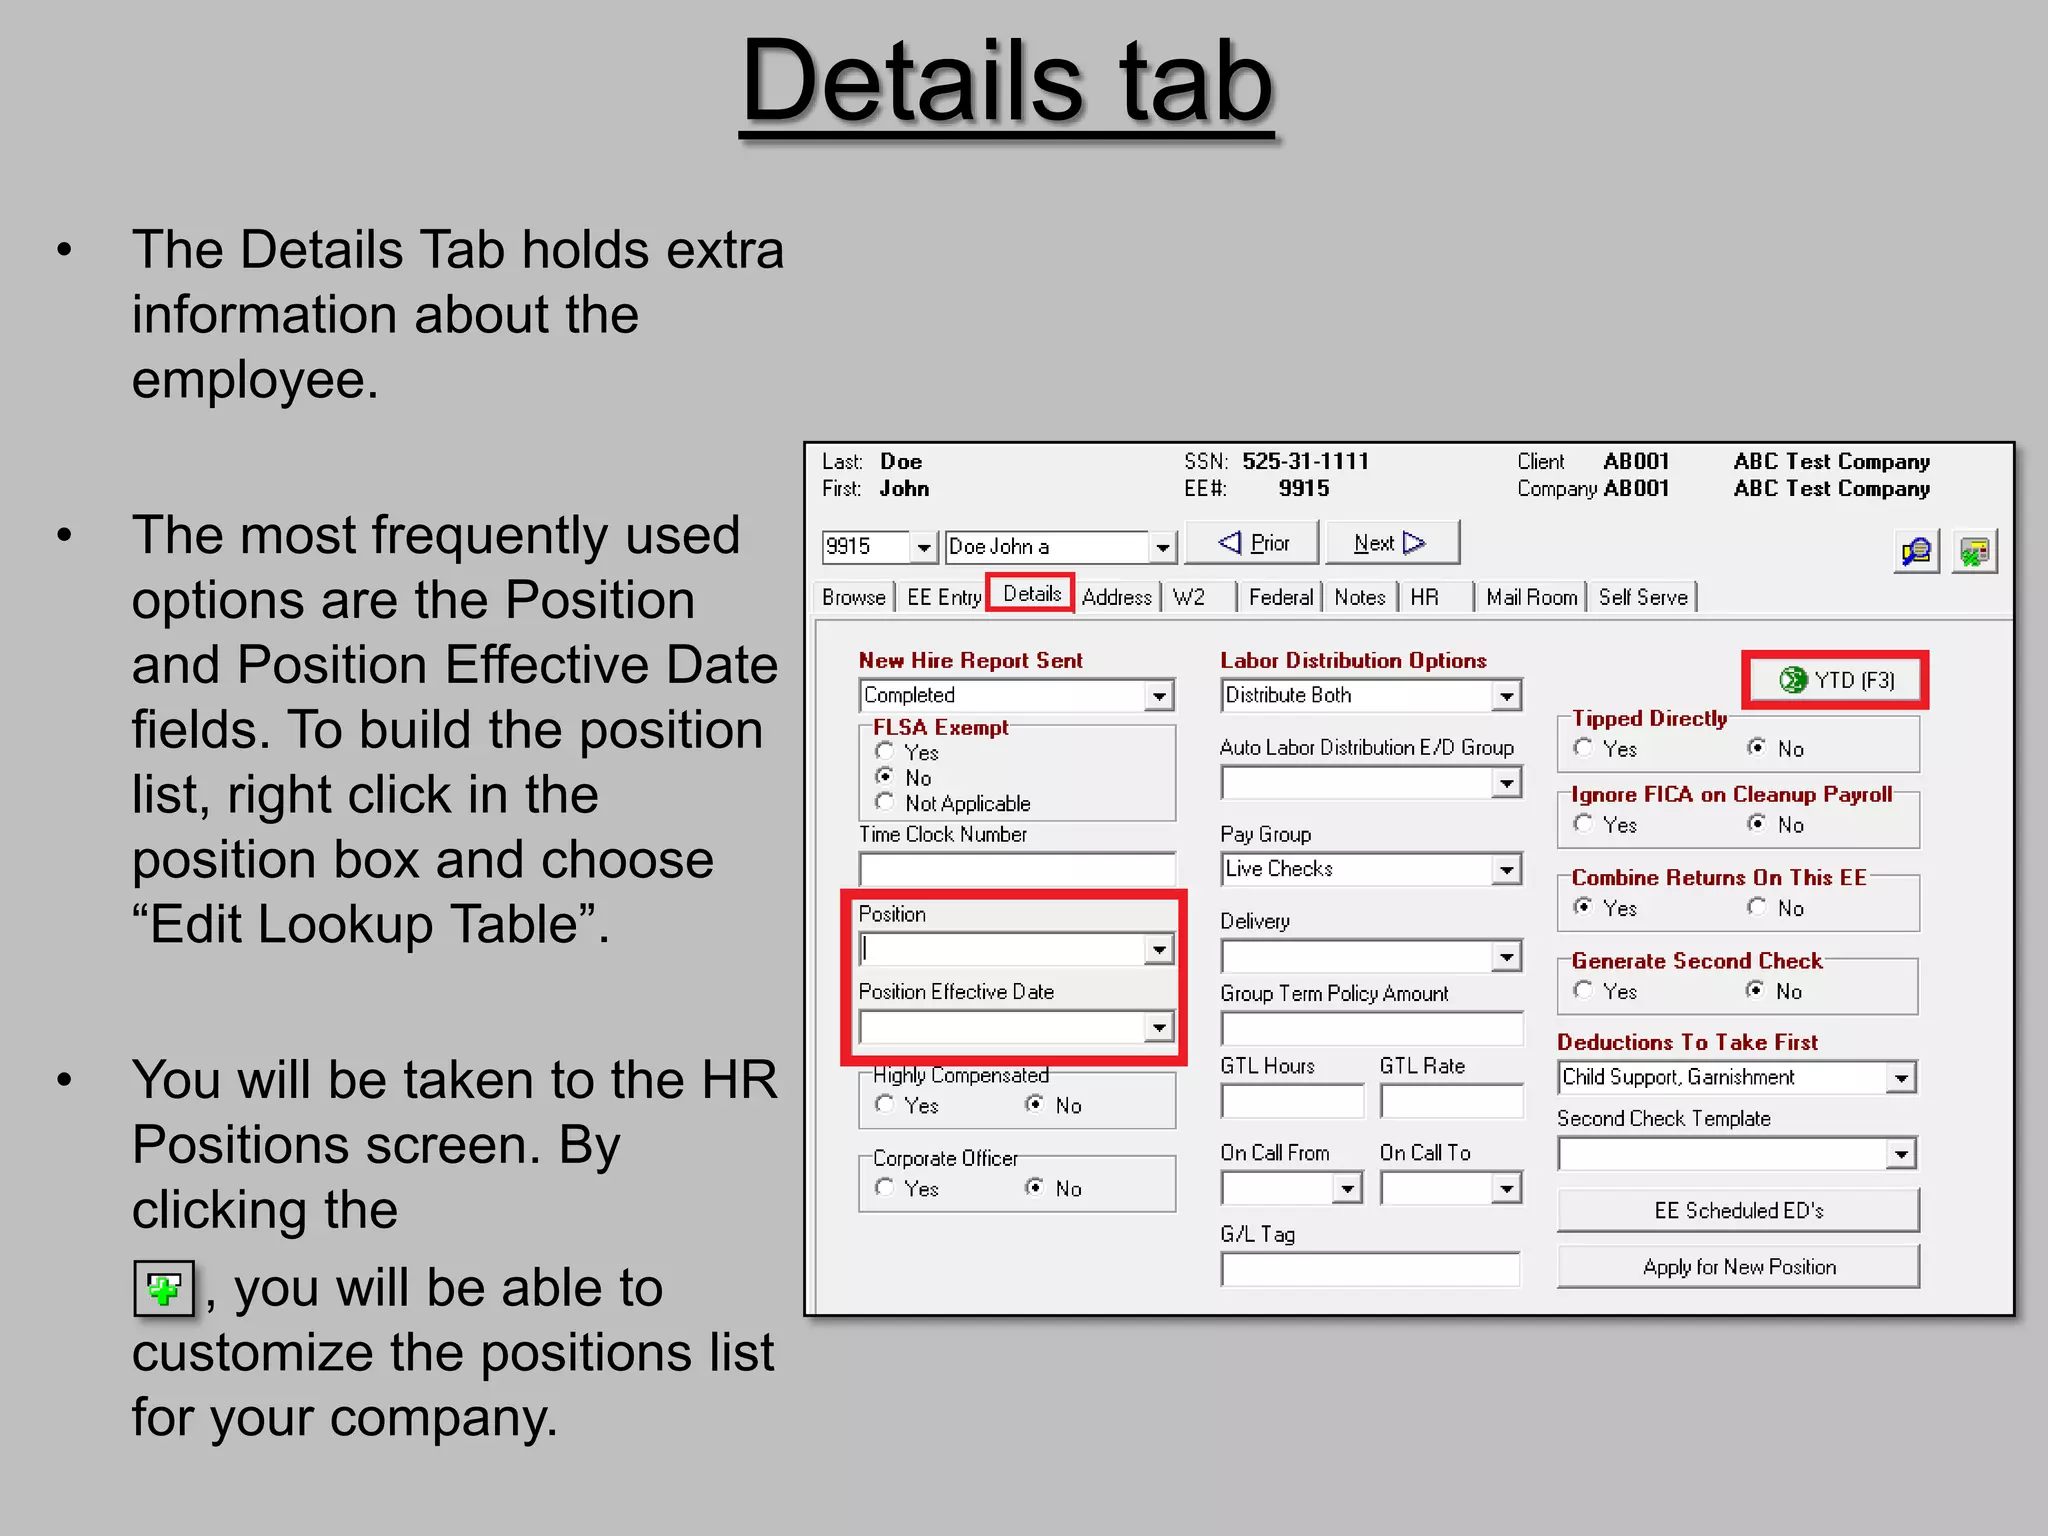
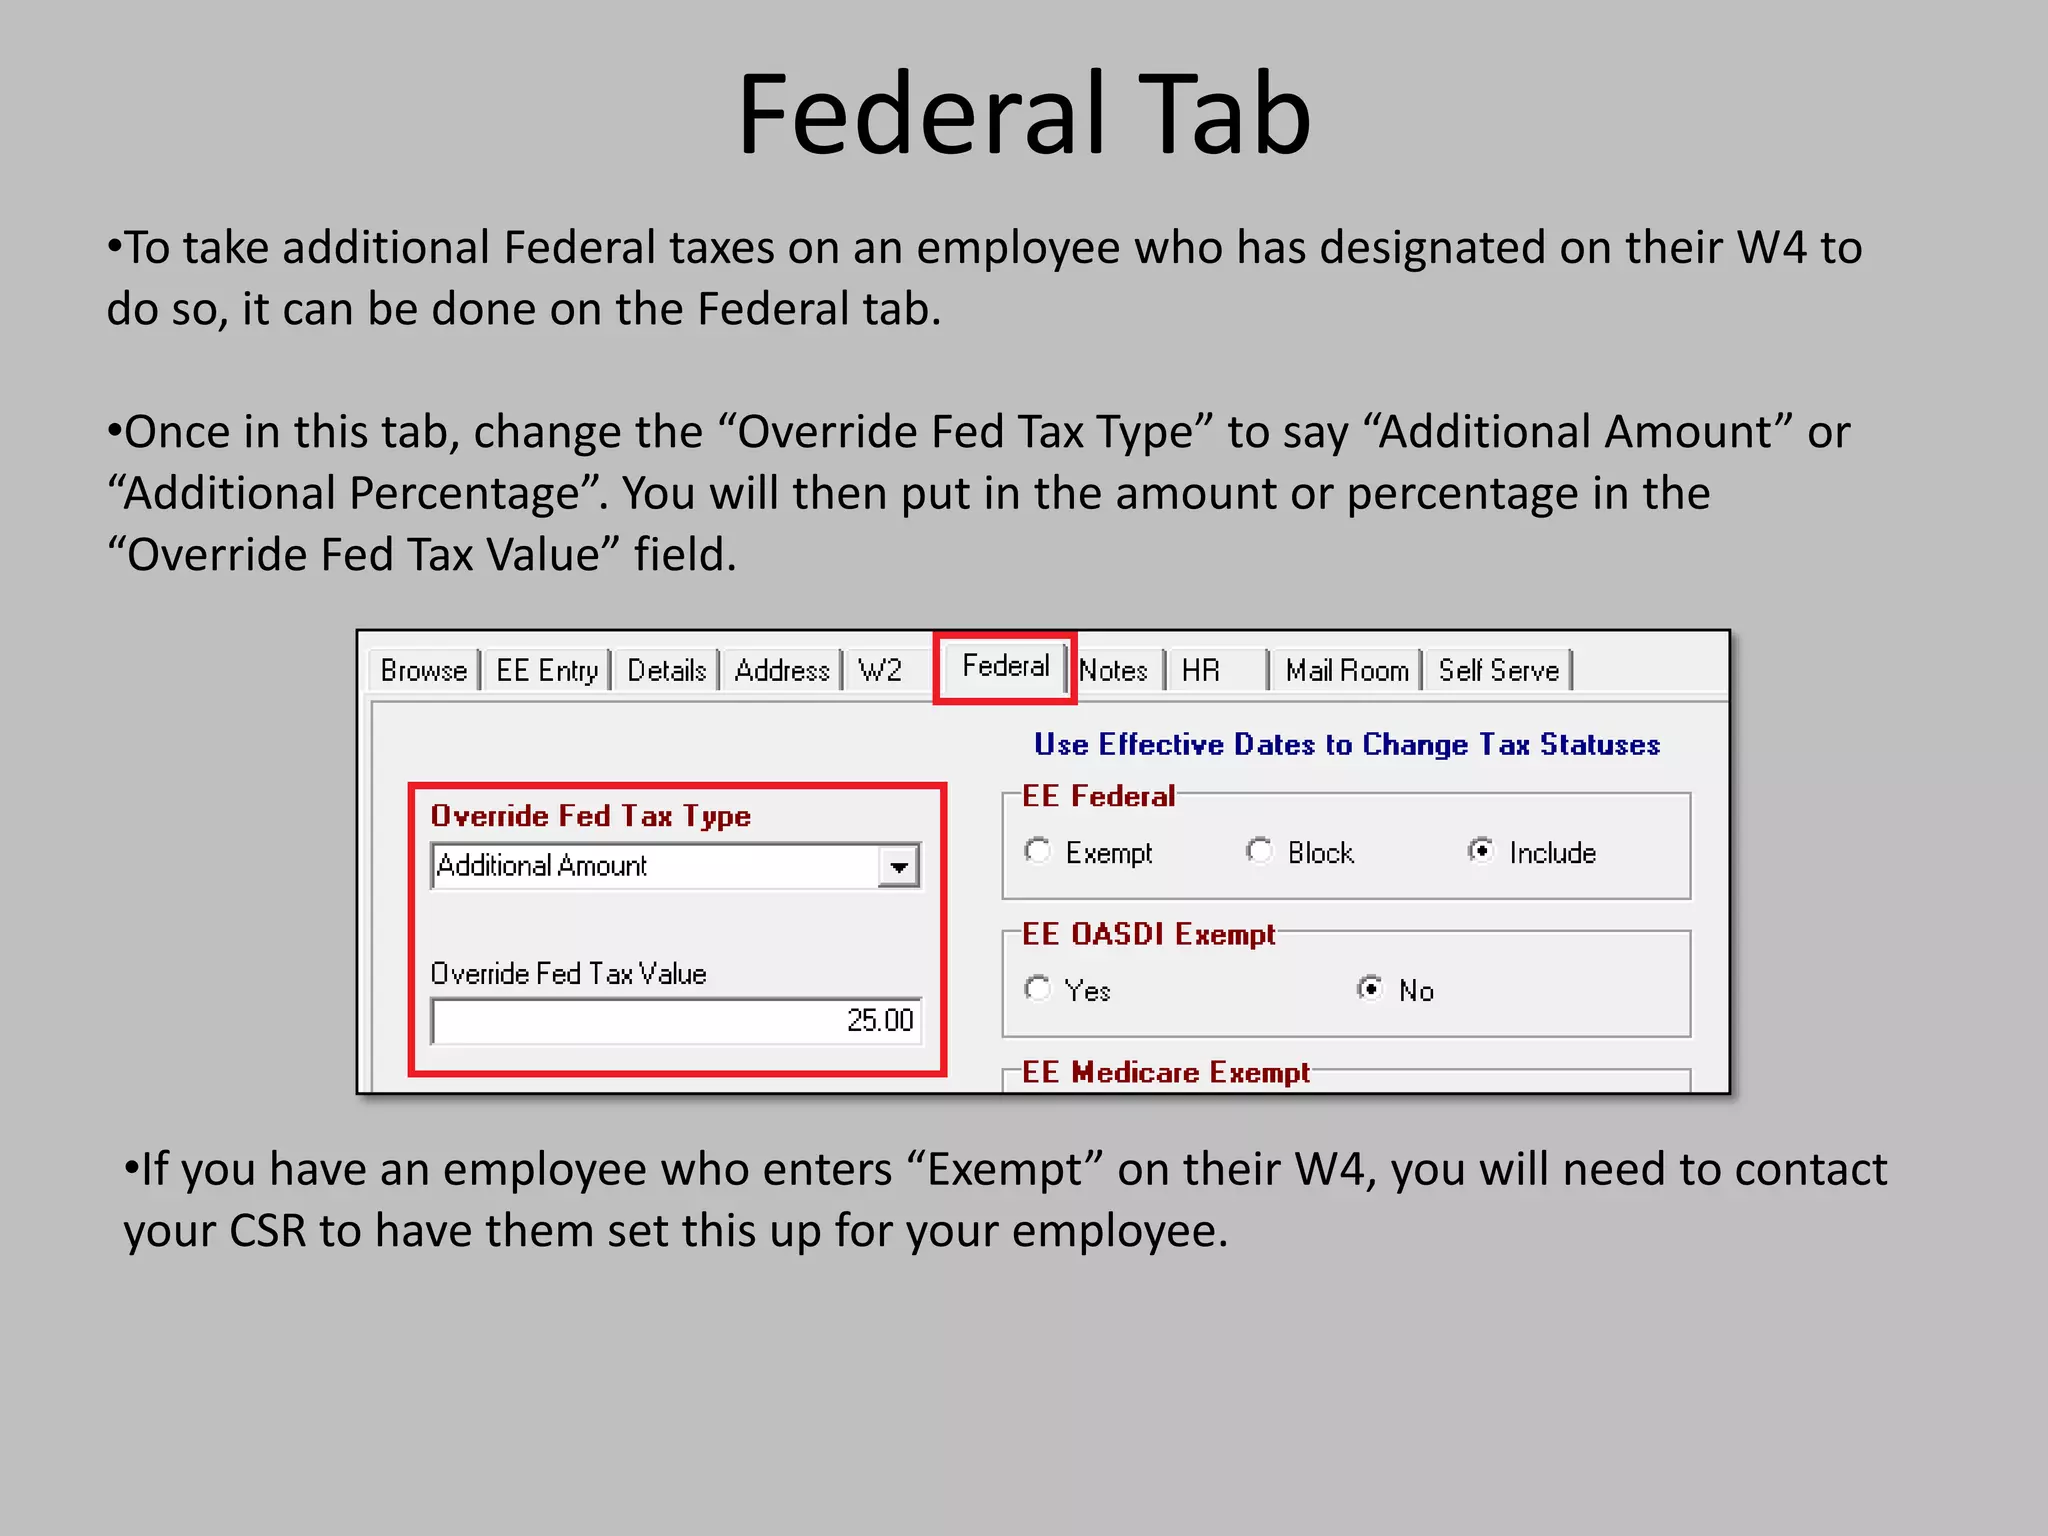
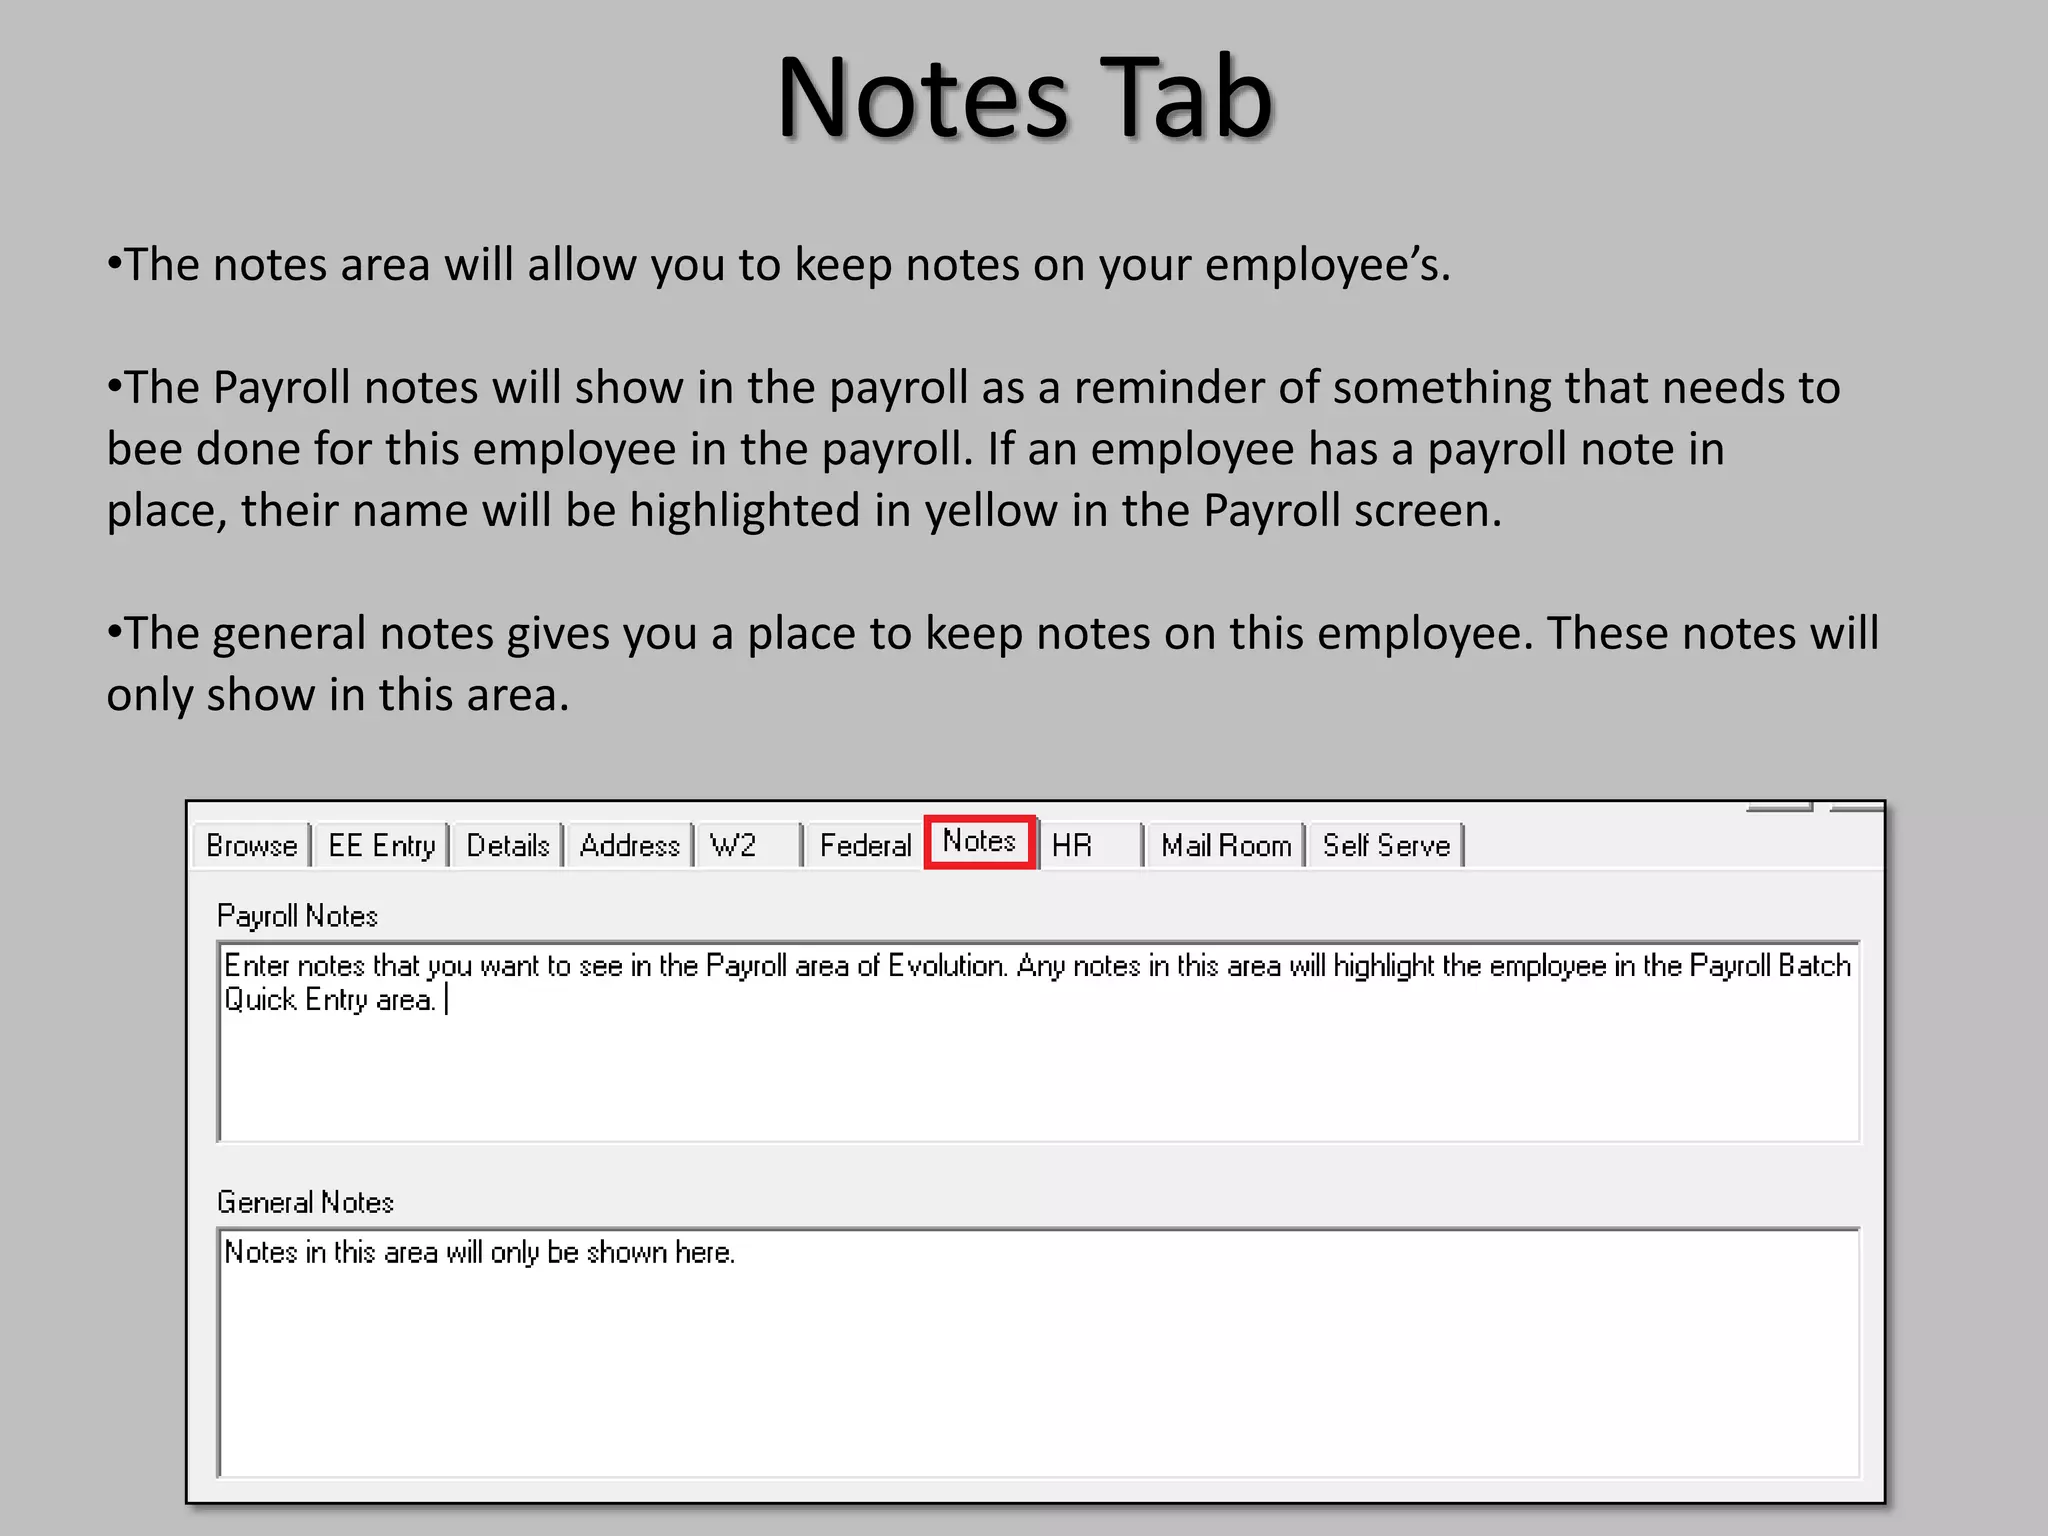
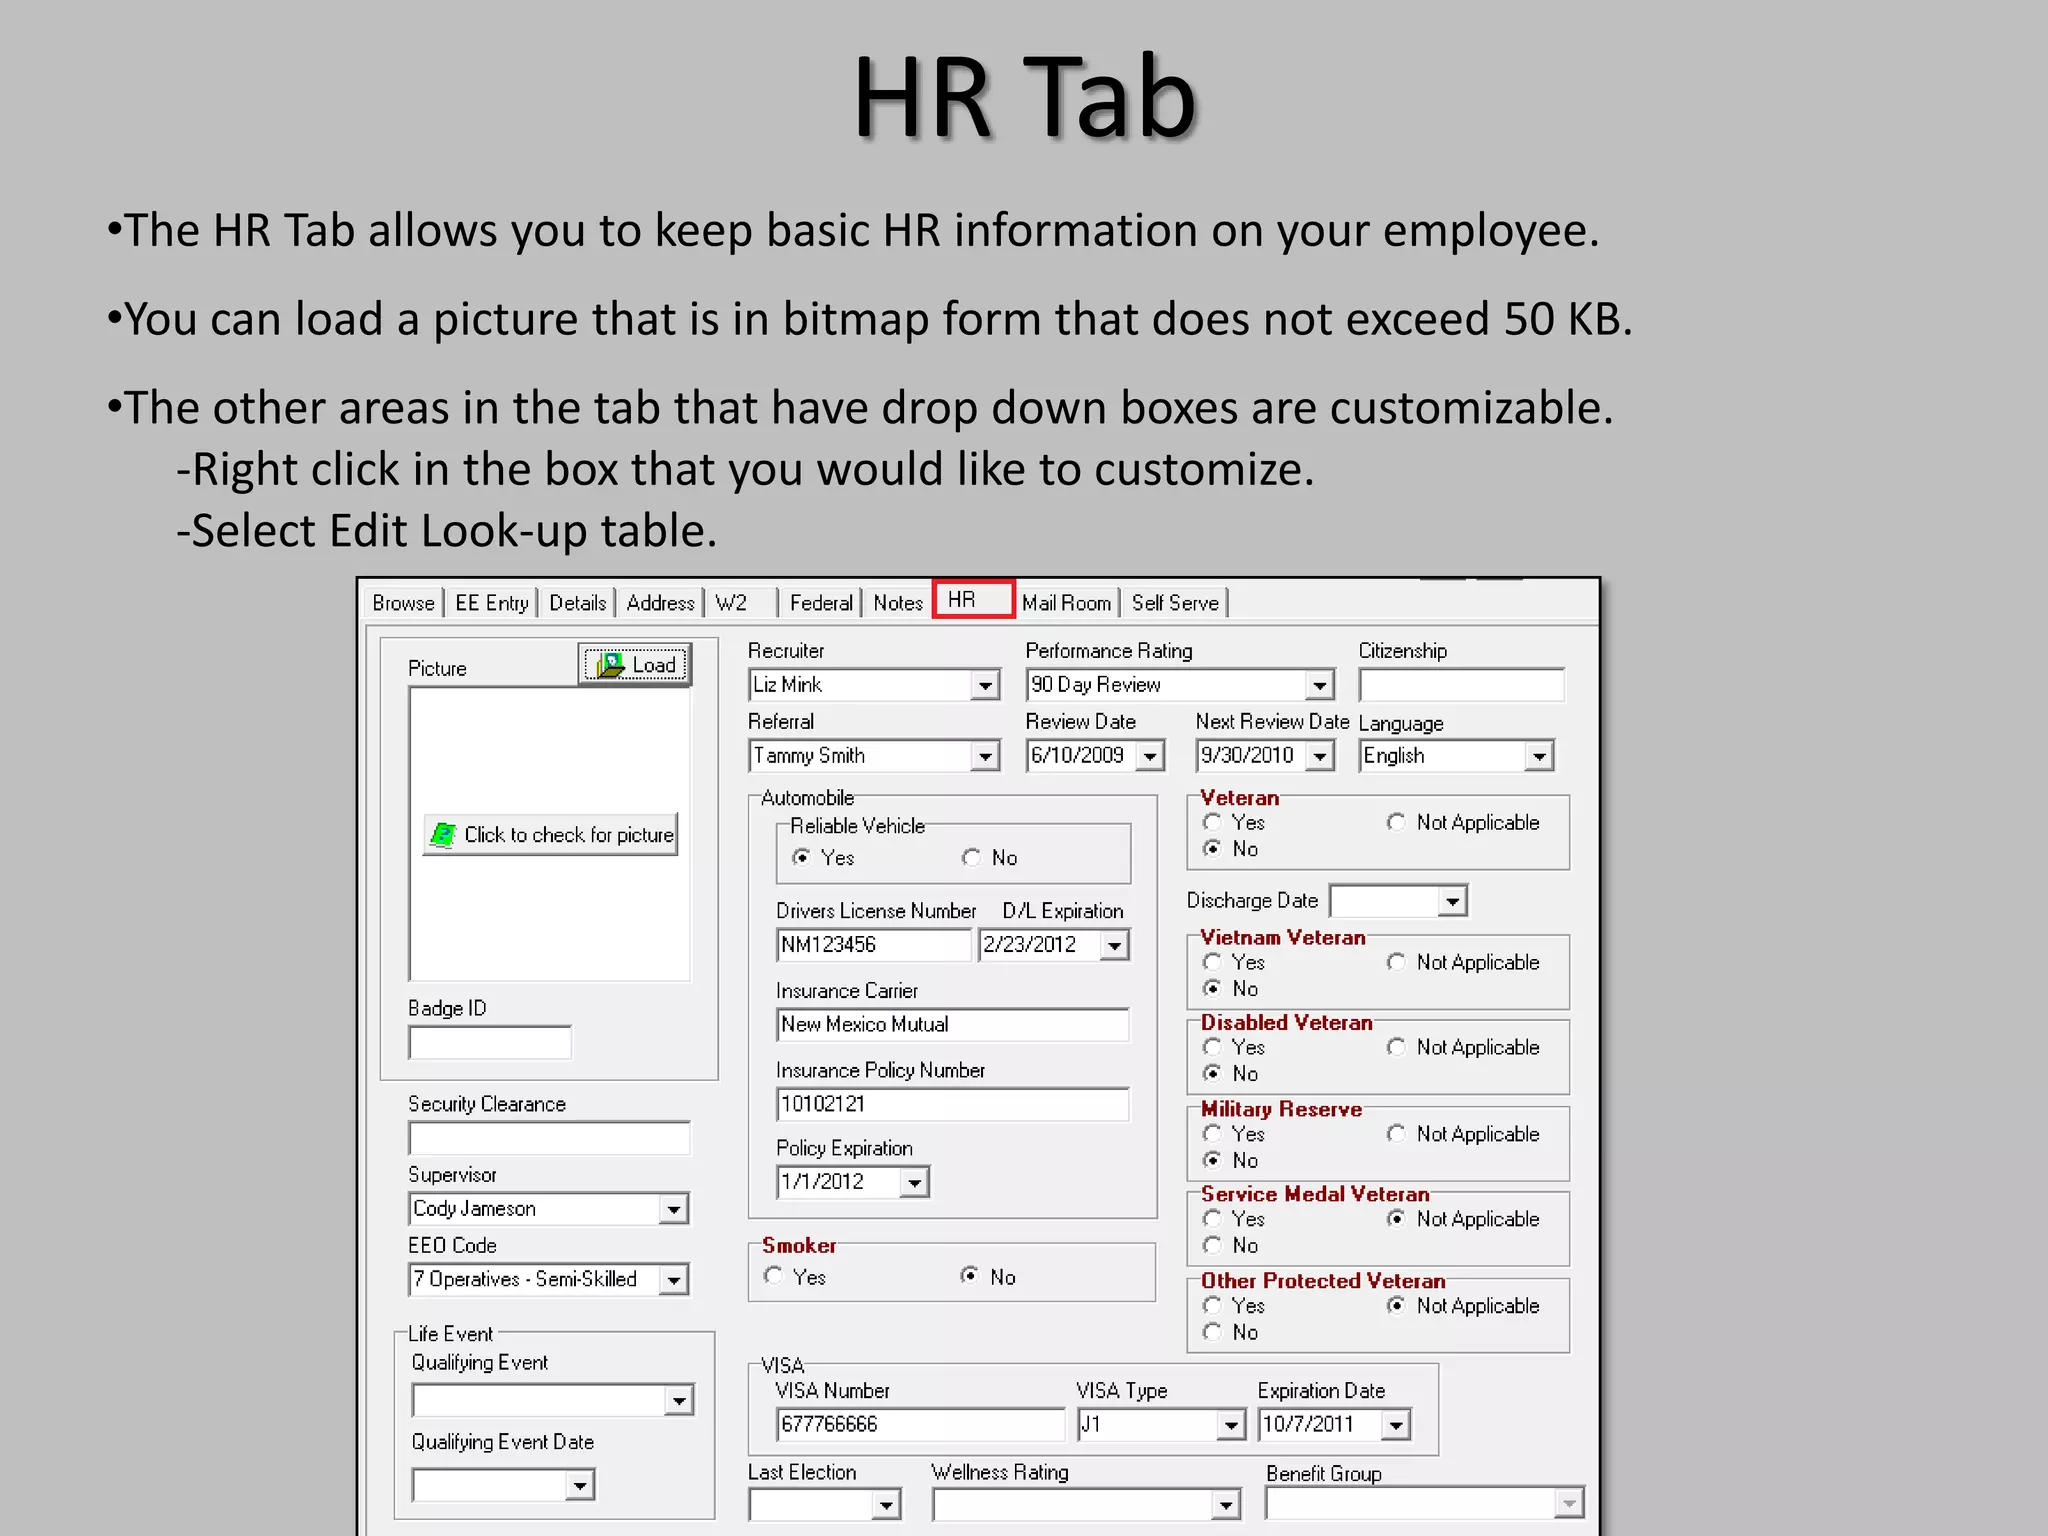
Evolution Training: Creating a
New Employee


           End User Training
•Select Employee from the side bar, then select Employee
from the subfolder.
•Double click on your company name in the left hand section
of the Browse tab. This will open the list of current employees
in the right hand section.
•Click the Create New Record button        on the upper tool bar
to create a new record for the employee.
EE Entry tab
•   A new employee will be
    created in the EE Entry
    tab. This is where you can
    begin to create a new
    record for the employee by
    keying in the personal
    information.

•   Starting at the upper left of
    the page, use your tab key
    or mouse to enter all of the
    employee’s information.
    The SSN is required to be
    entered first.

•   All of the fields highlighted
    in dark red must be
    entered in order to save
    the record.
•If your company is set up with Divisions/Branches/Departments/Teams
that you would like to allocate the employee’s pay to, click on the
button. Select the desired D/B/D/T and click Select.

•Please note that you must select an option in this screen if there are
D/B/D/T’s available.
•If you are entering a salaried employee, you will enter the salary based on
the pay frequency. EX: Monthly-divide salary by 12, Semi-monthly-divide
salary by 24, Biweekly-divide salary by 26.

•You will leave the Rate Number as 1 and the Rate Amount at 0.00.
•If the employee is hourly, you will enter the hourly rate in the Rate Amount
field and leave the salary field blank.

•NOTE: If you want the hours to auto populate in the payroll area, you will
enter the hours in the Stand Hours field.

•If your company has positions that are eligible for Time Off Accrual, be
sure to select the Position Status that will make them eligible or ineligible
to accrue.
•If your company has different Workers Comp codes for separate
departments or positions, you can choose the code at the bottom of the
middle section of the EE Entry tab.


•Notice that the Employee > Employee screen has multiple tabs.
Additional information may be entered in these tabs. Review all tabs to
ensure that all of you desired information is added to the employee
record.


•Remember to save changes by selecting the green check         and yellow
sun  .
Details tab
•   The Details Tab holds extra
    information about the
    employee.

•   The most frequently used
    options are the Position
    and Position Effective Date
    fields. To build the position
    list, right click in the
    position box and choose
    “Edit Lookup Table”.

•   You will be taken to the HR
    Positions screen. By
    clicking the
        , you will be able to
    customize the positions list
    for your company.
•   In the upper right hand area, you will see the YTD button. This will open a new
    window that shows the year to date for the employee. You can also choose the
    year you want to look at by choosing the year and clicking Apply.

•   The Preview button will generate an actual report that can be saved to your
    computer or printed out.
Address Tab
•The Alternate Address section allows you to keep more than one address in the system.

•The E-mail and VMR Password section is where you would set up where the check stub
will go to (In order to have the voucher emailed to them, they must have direct deposit).
The VMR Password is typically the last four of the SSN. This will be required for the
employee to open the PDF document that is emailed to them.

•NOTE: Make sure to let your CSR know that you set up an employee to receive their
check stubs through email. The CSR has the final step that they must do to make this
work properly.
W2 Tab
•The W2 Tab allows you to control the information for the W2. This tab is mostly used if
you are paying 1099 employees.


 •If paying a 1099 employee through Evolution, you must change the “Annual Form
 Type” to 1099 and choose the 1099 radio button in the “1099 or Employee” section.

 •It is important to check the Employee > Scheduled E/Ds section to make sure there
 are no Worker’s Comp codes for that employee. (This only effects NM employees)

 •If this will be the first time you are paying a 1099 employee, contact your CSR to
 have a non-taxable 1099 earnings code added to the system for your company.

 •The other area used on this tab is the Name area. This is used to override the name
 that will appear on the W2.
Federal Tab
•To take additional Federal taxes on an employee who has designated on their W4 to
do so, it can be done on the Federal tab.

•Once in this tab, change the “Override Fed Tax Type” to say “Additional Amount” or
“Additional Percentage”. You will then put in the amount or percentage in the
“Override Fed Tax Value” field.


•If you have an employee who enters “Exempt” on their W4, you will need to contact
your CSR to have them set this up for your employee.
Notes Tab
•The notes area will allow you to keep notes on your employee’s.

•The Payroll notes will show in the payroll as a reminder of something that needs to
bee done for this employee in the payroll. If an employee has a payroll note in
place, their name will be highlighted in yellow in the Payroll screen.

•The general notes gives you a place to keep notes on this employee. These notes will
only show in this area.
HR Tab
•The HR Tab allows you to keep basic HR information on your employee.
•You can load a picture that is in bitmap form that does not exceed 50 KB.
•The other areas in the tab that have drop down boxes are customizable.
   -Right click in the box that you would like to customize.
   -Select Edit Look-up table.
There are additional steps that you may need to do in
order to complete the addition of your new hire.

The following presentations may be helpful:
•Earnings and deductions
•Multiple Pay rates
•Time off accrual

End user training creating a new employee

  • 1.
    Evolution Training: Creatinga New Employee End User Training
  • 2.
    •Select Employee fromthe side bar, then select Employee from the subfolder. •Double click on your company name in the left hand section of the Browse tab. This will open the list of current employees in the right hand section. •Click the Create New Record button on the upper tool bar to create a new record for the employee.
  • 3.
    EE Entry tab • A new employee will be created in the EE Entry tab. This is where you can begin to create a new record for the employee by keying in the personal information. • Starting at the upper left of the page, use your tab key or mouse to enter all of the employee’s information. The SSN is required to be entered first. • All of the fields highlighted in dark red must be entered in order to save the record.
  • 4.
    •If your companyis set up with Divisions/Branches/Departments/Teams that you would like to allocate the employee’s pay to, click on the button. Select the desired D/B/D/T and click Select. •Please note that you must select an option in this screen if there are D/B/D/T’s available.
  • 5.
    •If you areentering a salaried employee, you will enter the salary based on the pay frequency. EX: Monthly-divide salary by 12, Semi-monthly-divide salary by 24, Biweekly-divide salary by 26. •You will leave the Rate Number as 1 and the Rate Amount at 0.00. •If the employee is hourly, you will enter the hourly rate in the Rate Amount field and leave the salary field blank. •NOTE: If you want the hours to auto populate in the payroll area, you will enter the hours in the Stand Hours field. •If your company has positions that are eligible for Time Off Accrual, be sure to select the Position Status that will make them eligible or ineligible to accrue.
  • 6.
    •If your companyhas different Workers Comp codes for separate departments or positions, you can choose the code at the bottom of the middle section of the EE Entry tab. •Notice that the Employee > Employee screen has multiple tabs. Additional information may be entered in these tabs. Review all tabs to ensure that all of you desired information is added to the employee record. •Remember to save changes by selecting the green check and yellow sun .
  • 7.
    Details tab • The Details Tab holds extra information about the employee. • The most frequently used options are the Position and Position Effective Date fields. To build the position list, right click in the position box and choose “Edit Lookup Table”. • You will be taken to the HR Positions screen. By clicking the , you will be able to customize the positions list for your company.
  • 8.
    In the upper right hand area, you will see the YTD button. This will open a new window that shows the year to date for the employee. You can also choose the year you want to look at by choosing the year and clicking Apply. • The Preview button will generate an actual report that can be saved to your computer or printed out.
  • 9.
    Address Tab •The AlternateAddress section allows you to keep more than one address in the system. •The E-mail and VMR Password section is where you would set up where the check stub will go to (In order to have the voucher emailed to them, they must have direct deposit). The VMR Password is typically the last four of the SSN. This will be required for the employee to open the PDF document that is emailed to them. •NOTE: Make sure to let your CSR know that you set up an employee to receive their check stubs through email. The CSR has the final step that they must do to make this work properly.
  • 10.
    W2 Tab •The W2Tab allows you to control the information for the W2. This tab is mostly used if you are paying 1099 employees. •If paying a 1099 employee through Evolution, you must change the “Annual Form Type” to 1099 and choose the 1099 radio button in the “1099 or Employee” section. •It is important to check the Employee > Scheduled E/Ds section to make sure there are no Worker’s Comp codes for that employee. (This only effects NM employees) •If this will be the first time you are paying a 1099 employee, contact your CSR to have a non-taxable 1099 earnings code added to the system for your company. •The other area used on this tab is the Name area. This is used to override the name that will appear on the W2.
  • 11.
    Federal Tab •To takeadditional Federal taxes on an employee who has designated on their W4 to do so, it can be done on the Federal tab. •Once in this tab, change the “Override Fed Tax Type” to say “Additional Amount” or “Additional Percentage”. You will then put in the amount or percentage in the “Override Fed Tax Value” field. •If you have an employee who enters “Exempt” on their W4, you will need to contact your CSR to have them set this up for your employee.
  • 12.
    Notes Tab •The notesarea will allow you to keep notes on your employee’s. •The Payroll notes will show in the payroll as a reminder of something that needs to bee done for this employee in the payroll. If an employee has a payroll note in place, their name will be highlighted in yellow in the Payroll screen. •The general notes gives you a place to keep notes on this employee. These notes will only show in this area.
  • 13.
    HR Tab •The HRTab allows you to keep basic HR information on your employee. •You can load a picture that is in bitmap form that does not exceed 50 KB. •The other areas in the tab that have drop down boxes are customizable. -Right click in the box that you would like to customize. -Select Edit Look-up table.
  • 14.
    There are additionalsteps that you may need to do in order to complete the addition of your new hire. The following presentations may be helpful: •Earnings and deductions •Multiple Pay rates •Time off accrual