SlideShare a Scribd company logo
1 of 106
Download to read offline
1 | 106
E-Compact Medium Power
Operation Manual
UHF Digital TV Transmitters
ATSC 3.0: 150 to 300 Watts RMS
ATSC 1.0: 170 to 350 Watts RMS
E-Compact Medium Power Series
Read before handling the equipment.
EC702MP
EC704MP
2 | 106
E-Compact Medium Power
Operation Manual
UHF Digital TV Transmitters
ATSC 3.0 • 150 to 300 Watts RMS
ATSC 1.0 • 170 to 350 Watts RMS
E-Compact Medium Power Series
EC702MP • EC704MP
Rev R00 – EN-US
All rights reserved
Hitachi Kokusai Linear Equipamentos Eletrônicos S/A
CNPJ: 19.690.445/0001-79
Rodovia BR 459, Km 121, 121A – Córrego Raso -
Santa Rita do Sapucaí - MG - Brazil – CEP 37540-000
Phone: +55 35 3473 3473 - linear@linear.com.br
www.hitachi-linear.com.br
W A R N I N G
All rights are reserved to Hitachi Kokusai Linear
Electronic Equipment S/A, thus any reproduction,
adaptation, translation or misuse of this Manual
without prior written permission is prohibited,
except as permitted by copyright laws.
3 | 106
E-Compact Medium Power
CONTENTS
1. Index
CONTENTS...........................................................................................................3
1. Index ................................................................................................................................................................3
1. About this Manual ..........................................................................................................................................8
2. Basic Knowledge Required...........................................................................................................................9
3. Structure..........................................................................................................................................................9
Section 1 - Care, Warranty, and
Service ...............................................................................................................10
1. Care and Safety ............................................................................................................................................10
2. Warranty........................................................................................................................................................11
3. Technical Assistance...................................................................................................................................12
Section 2 - Minimum Installation
Requirements ....................................................................................................13
1. Introduction...................................................................................................................................................14
2. Minimum Requirements...............................................................................................................................14
2.1. AC Mains - Wire Gauge........................................................................................................................14
2.2. Grounding. ............................................................................................................................................14
2.3. Stability..................................................................................................................................................15
2.4. Insulation...............................................................................................................................................15
2.5. Atmospheric Discharge Protection System. .....................................................................................18
2.5.1 Lightning rods. .............................................................................................................................18
2.5.2 Protectors. ....................................................................................................................................18
2.6 Air Conditioning. ..................................................................................................................................18
2.6.1 Temperature..................................................................................................................................18
2.6.2 Humidity. .......................................................................................................................................19
2.6.3 Cooling. .........................................................................................................................................19
Section 3 – E-Compact Medium
Power Series UHF Digital TV
Transmitters.......................................................................................................20
1. Overview........................................................................................................................................................20
2. Specifications ...............................................................................................................................................21
3. Construction .................................................................................................................................................23
4. Footprint........................................................................................................................................................26
2.1 FCC Compliance...................................................................................................................................11
4 | 106
E-Compact Medium Power
5. Block Diagram ..............................................................................................................................................27
6. Main Modules................................................................................................................................................29
6.1. CM8001 Control Module (MOD GV 40056) .........................................................................................29
6.1.1. RF Input.........................................................................................................................................29
6.1.2. Interfaces ......................................................................................................................................30
6.1.3. Control System Functional Description.....................................................................................31
6.1.4. Control System Operation...........................................................................................................32
6.1.4.1. Navigation .................................................................................................................................32
6.1.4.2. System Structure......................................................................................................................34
[1000] - Main Menu ⇨ Setup Menu......................................................................................................34
[2000] - Main Menu ⇨ Measurements.................................................................................................35
[3000] - Main Menu ⇨ System Alarms/Log ........................................................................................38
EQUIPMENT ALARMS......................................................................................................................39
POWER AMPLIFIERS DRAWERS ALARMS...................................................................................41
BROWSER ALARMS STATUS.........................................................................................................45
[4000] - Main Menu ⇨ Remote Access ...............................................................................................46
6.1.5. Frontal Led Alarms.......................................................................................................................47
6.2. PA704MP / PA702MP Power Amplifier Module .................................................................................48
6.2.1. Interfaces ......................................................................................................................................49
6.2.2. Specifications ...............................................................................................................................50
6.2.3. Power Amplifier Block Diagram..................................................................................................51
6.2.4. Signaling LEDs .............................................................................................................................55
6.2.5. Communication interface (COMM) .............................................................................................56
6.2.6. 1200 Watts Powers Supplies.......................................................................................................56
6.2.7. Power Supply 1200Watts – MOD 40241:....................................................................................58
6.3. EIA 1-5/8” low pass filter .....................................................................................................................59
6.3.1. Features.........................................................................................................................................59
6.4. MOD 40215 EIA RF Output Line with Sample Probe ........................................................................60
6.4.1. Features.........................................................................................................................................60
6.5. AC Mains Protection Unit ....................................................................................................................62
6.5.1. Sparkover - Phase Surge Protection Device (SPD). ................................................................62
6.5.2. M208 Mains Protection Unit – 208VAC WILD LEG....................................................................64
6.5.3. B240 Mains Protection Unit –SINGLE PHASE 240 VAC ...........................................................65
6.5.4. Changing AC Mains .....................................................................................................................66
6.6. Exciter Interface ...................................................................................................................................67
Section 4 – Installation......................................................................................68
1. Overview........................................................................................................................................................68
2. Inspection......................................................................................................................................................68
3. Installation Recommendations. ..................................................................................................................68
3.1. Preventive Protection ..........................................................................................................................68
3.2. Tower.....................................................................................................................................................68
3.3. Fastening of cables, antennas and connectors................................................................................69
3.4. Indoors Equipment Installation...........................................................................................................70
3.5. Equipment Grounding .........................................................................................................................70
5 | 106
E-Compact Medium Power
3.6. Electric Installation Grounding...........................................................................................................71
3.7. Power Supply........................................................................................................................................71
4. Equipment Assembly...................................................................................................................................72
4.1. Assembly...............................................................................................................................................72
4.2. Ethernet Connections ..........................................................................................................................81
4.3. Internal Ground Connections..............................................................................................................81
4.4. AC Electrical Line Connection............................................................................................................82
4.4.1. Electrical line connection (EC70xMP) ........................................................................................82
Section 5 - Initial Activation..............................................................................83
1. Overview........................................................................................................................................................83
2. Activation. .....................................................................................................................................................84
3. Main Operations. ..........................................................................................................................................86
3.1. Power Changing ...................................................................................................................................86
3.2. Communication ....................................................................................................................................86
4. Forbidden operations ..................................................................................................................................86
5. Protections....................................................................................................................................................87
5.1. Reflected Power ...................................................................................................................................87
5.2. Over-excitation .....................................................................................................................................87
5.3. AC Mains Line Protection....................................................................................................................87
5.4. Transmitter Operating Temperature Configuration..........................................................................88
Section 6 - WEB Interface .................................................................................89
1. Overview........................................................................................................................................................89
2. Configuring the System...............................................................................................................................90
3. Browsing the System...................................................................................................................................90
3.1. Access Password.................................................................................................................................90
3.2. Startup...................................................................................................................................................91
3.3. Alarms ...................................................................................................................................................91
3.3.1. Alarms ...........................................................................................................................................91
3.3.2. Alarm Log......................................................................................................................................92
3.3.3. Download Alarm Log ...................................................................................................................93
3.4. Setup......................................................................................................................................................94
3.4.1. Power Setup..................................................................................................................................94
3.4.2. Transmitter....................................................................................................................................95
3.4.3. Exciter............................................................................................................................................95
3.4.4. File .................................................................................................................................................95
3.5. Measurements ......................................................................................................................................96
3.6. Power.....................................................................................................................................................97
3.6.1. Measurements ..............................................................................................................................97
3.6.2. Cur. Alarms ...................................................................................................................................98
6 | 106
E-Compact Medium Power
3.6.3. Past Alarms...................................................................................................................................98
3.7. Remote ..................................................................................................................................................99
3.8. User......................................................................................................................................................100
Section 7 – Preventive
Maintenance.....................................................................................................101
1. Overview......................................................................................................................................................101
2. Preventive Maintenance ............................................................................................................................101
2.1. Cleaning ..............................................................................................................................................101
2.2. Visual Inspection................................................................................................................................102
2.3. Reading Verification...........................................................................................................................102
Section 8 - Attachments..................................................................................103
1. USA AC Mains Types for E-Compact Series ...........................................................................................103
7 | 106
E-Compact Medium Power
Abbreviations
1PPS One Pulse per Second
A Amperes
AC Alternating Current
A-DPD Adaptive Digital Pre-distortion
AF After Filter
A.N.M. Acima do Nível do Mar
ALC Automatic Level Control
ASI Asynchronous serial interface
ASL Above Sea Level
ATSC Advanced Television System
Committee
BF Before filter
BISS Basic Interoperable
Scrambling System
BTS Broadcast Transport Stream
BTU British Thermal Unit
CAM Conditional Access Module
dB Decibel
DC Direct current
DDP Potential Difference
DPD Digital Pre distortion
DSP Digital Signal Processing
DVB-S Digital Video Broadcasting –
Satellite
DVB-S2 Digital Video Broadcasting –
Satellite – 2nd generation
FPGA Field Programmable Gate
Array
FWR Forward
HKL Hitachi Kokusai Linear
IP Internet Protocol
ISDB-T Integrated Services Digital
Broadcasting Terrestrial
(Brazil)
ISDB-Tb Integrated Services Digital
Broadcasting Terrestrial
LCD Liquid Crystal Display.
LPC Linear Pre correction
MCCB Molded Case Circuit
Breakers
MER Modulation Error Rate
MFN Multiple Frequency Network
MSps Million Sample per Seconds
N/A Not/Apply
NLPC Non-Linear Pre Correction
PA Power Amplifier
PCMCIA Personal Computer Memory
Card International
Association
PFC Power Factor Correction
PID Packet Identifier
PLL Phase Locked Loop
PS Power Supply
PSI Program-specific information
PSU Power Supply Unit
PW Power
RPM Rotations Per Minute
RTP Real-time Transport Protocol
RU Rack Unit
SFN Single Frequency Network
SI Service Information
SNMP Simple Network Management
Protocol
SNR Signal to Noise Ratio
TMCC Transmission and
Multiplexing Configuration
Control
TS Transport Stream
TSoIP Transport Stream over
Internet Protocol
U RU - Rack Unit
UDP User Datagram Protocol
UHF Ultra High Frequency
UPS Uninterruptable Power
Supply
V Volts
VAC Volts Alternating Current
VGA Variable Gain Amplifier
VGS Voltage Gate Source
VSWR Voltage Standing Wave Ratio
WxDxH Width x Depth x Height
8 | 106
E-Compact Medium Power
1. About this Manual
The purpose of this manual is to provide technical information required for the installation
and operation of Medium Power E-Compact series UHF TV signal transmitters (digital
ATSC).
EC702MP
150 W UHF ATSC 3.0 Transmitter (6-poles filter)
170 W UHF ATSC 1.0 Transmitter (6-poles filter)
EC704MP
300 W UHF ATSC 3.0 Transmitter (6-poles filter)
350 W UHF ATSC 1.0 Transmitter (6-poles filter)
Hitachi Kokusai Linear Electronic Equipment S/A recommends that you carefully read the
sections of this manual before installing or operating this equipment.
This manual is intended for use by qualified, trained installers.
Read this manual before working with the product. For personal and system safety,
as well as for optimum product performance, one must be sure to thoroughly
understand the contents before installing, operating, or maintaining this product.
9 | 106
E-Compact Medium Power
2. Basic Knowledge Required
The mandatory knowledge and skills to operate the equipment are as follow:
• Knowledge of electronic circuits of Radio Frequency;
• Knowledge of electricity and electrical systems;
• Knowledge of digital electronics;
• Conducting tests and Digital TV signals measurements in ATSC standard;
• Knowledge of transmission antenna;
• Experience operating radio frequency measurement equipment;
• Practice in the management of radio frequency measures equipment (spectrum Analyzer,
RF power meter, Vector Network Analyzer, couplers, attenuators, etc).
3. Structure
This manual is comprised of seven (8) sections, which provide the following information:
Section 1 - Care, Warranty, and Service
This section indicates the necessary care with the equipment, warranty criteria and
how to proceed if technical assistance is needed.
Section 2 - Minimum Installation Requirements
Comprises the minimum infrastructure requirements for installing these devices, such
as AC power, protection against lightning and air conditioning.
Section 3 –E-Compact Medium Power Series UHF Digital TV Transmitter
Present all equipment characteristics, such as description, models, functional
description and technical specifications of all models of E-Compact series Medium
Power Transmitters.
Section 4 - Installation
This section provides procedures for physical and electrical installation.
Section 5 - Initial Activation
This section describes which steps to perform in the initial activation of the equipment.
Section 6 – WEB Interface
This section describes how the transmitter can be controlled and monitored remotely,
using a Web GUI interface.
Section 7 – Preventive Maintenance
Provides information for preventive maintenance.
Section 8 - Attachments
Additional information for this document.
10 | 106
E-Compact Medium Power
Section 1 - Care, Warranty, and Service
1. Care and Safety
Never open the device: there is a risk of electric shock. If necessary, contact Hitachi
Service.
Before Connecting the Machine to the AC Mains, one must ensure that the grid
Voltage meets the equipment’s settings.
Never expose the equipment to rain, moisture or direct sunlight, in order to avoiding risk of
fire or electric shock.
Avoid risks of accidents at heights and with electricity. Always install or maintain
this equipment by qualified technicians.
Never turn on the equipment without connecting it to an Antenna or RF Load. May cause
serious damage to the Equipment.
Never unplug any Power Amplifier Drawer while the Transmitter is on. Risk of
equipment damage.
11 | 106
E-Compact Medium Power
2. Warranty.
1. All equipment shall have warranty coverage by the supplier against manufacturing or assembly faults conducted by the
supplier, for the period of 12 months, counting from the issuing of the sales invoice. The period is irrevocable except in cases of
extended warranty previously noted in contract.
2. During warranty time, the supplier will repair, with no additional charge, the faulty products, providing adjustments, replacing
or re-manufacturing, of all the equipment or its modules and components that present unusual behavior;
2.1. The repaired/replaced products are covered for an additional period of 3 (three) months or up to the end of the original
warranty time, taking into count the longer period;
2.2. If the additional 3 (three) months term, referred above, is higher than the original warranty term, the warranty will only
extend to the repaired/replaced modules or components;
2.3. The warranty will become effective in the supplier’s factory; therefore, it is not a responsibility of the supplier: the
shipment of any modules, components or any other equipment or accessory. These expenses will be, when due,
a responsibility of the Purchaser.
2.4. The Purchaser may choose a visit of the supplier’s technical personnel, instead of submitting the goods for
factory repair, although the expenses relative to transportation, lodge and nourishment of the supplier’s technicians will occur
at sole expense of the Purchaser, upon budget approval.
3. The supplier is relieved of the warranty terms in the hereinafter situations:
3.1. Faults or defects caused by AC Mains variation, atmospheric phenomena or accidental;
3.2. Faults or defects caused by inadequate installation of the goods, not complying with the OPERATING MANUAL(S) or by
negligence of the minimum infrastructure requirements in the installation site, which is referred in the ANNEX 1 herein
attached.
3.3. Faults or defects caused by inadequate usage of the products, not complying with the OPERATING MANUAL(S) or
by lack of proper preventive maintenance recommended in the product’s manual.
3.4. In event of the goods and its accessories are submitted to 3rd Party maintenance, unauthorized by the supplier, as
well as removal or violation of its serial number.
4. The supplier shall employ, during warranty term, original parts and components listed by the product’s manufacturer.
5. The technical assistance must be held by the SUPPLIER or its accredited personnel or companies, failing which will result
in warranty voidance.
1. This equipment has been tested and found to comply with the limits for a Class A Digital device, pursuant to
part 15 of the FCC Rules. These limits are designed to provide reasonable protection against harmful interference
when the equipment is operated in a commercial environment. This equipment generates, uses, and can radiate
radio frequency energy and, if not installed and used in accordance with the instruction manual, may cause harmful
interference to radio communications. Operation of this equipment in a residential area is likely to cause harmful
interference in which case the user will be required to correct the interference at his own expense. The antenna(s) used for
this transmitter must be fixed-mounted on the outdoor permanent structures. RF exposure compliance is addressed
at the time of licensing, as required by the responsible FCC Bureau(s), including antenna co-location requirements of
§1.1307(b)(3).
2. Changes or modifications not expressly approved by Hitachi Kokusai Electric Comark LLC could void the user's authority
to operate the equipment.
3. This device complies with part 15 of the FCC Rules. Operation is subject to the following two conditions: (1) This device
may not cause harmful interference, and (2) this device must accept any interference received, including interference that
may cause undesired operation.
2.1 FCC Compliance
12 | 106
E-Compact Medium Power
3. Technical Assistance.
In our Quality Management System, since several devices are received without proper
identification and explanations; we are now working with previous approval for
maintenance devolution.
Therefore, in case of maintenance please contact:
Hitachi Kokusai Linear Equipamentos Eletrônicos S/A
Phone: 55 35 3473-3473 / Fax: 55 35 3473-3474 E-mail: manutencao@linear.com.br
And inform: Customer, Equipment Part Number, Serial Number and a brief explanation of
the occurrence.
With this intel we shall send the ARM number (Authorization for Return of Material), which
is mandatory to appear in the invoice.
13 | 106
E-Compact Medium Power
Section 2 - Minimum Installation
Requirements
1. Proper grounding;
2. Proper lightning-rod;
3. Shelter with ventilation, footprint, and
temperature in compliance with the
transmitter’s standards.
4. Voltage regulator in compliance with
transmitter’s consumption.
W A R N I N G
MANDATORY CONDITIONS FOR TRANSMITTER
INSTALATION, FOR VALIDATING THE WARRANTY
TERMS
Noncompliance with any of above-mentioned terms
will automatically result in the hereinafter
suspension of the warranty terms.
14 | 106
E-Compact Medium Power
1. Introduction.
This section provides information on the minimum installation requirements for E-Compact
Series transmitters with recommendations on shelter, tower, antennas, cables, grounding,
mains, transient preventions, etc.
2. Minimum Requirements.
2.1.AC Mains - Wire Gauge.
Consumption with the equipment running at its maximum power.
Current (A) on each wire:
About AC MAINS TYPE, see Section 8 – Attachments, USA AC Mains Types for E-
Compact Series.
The current quoted in the table is more loaded phase to sizing effect of conductors and
protection.
Said gauge is the minimum recommended for the transmitter in question, if the cable
length is large, consider voltage drop in the cable maximum of 5%
The section of the neutral conductor should be the same as the phase.
The section of the ground conductor has to be the same as the conductors phase.
2.2.Grounding.
The grounding system to which the Hitachi Kokusai Linear TV transmitter will be attached
must be designed and implemented by a qualified professional. An improper grounding
system may jeopardize the equipment as well as the lives-of the professionals working in
the shelter. To be considered proper, the grounding must have a resistance of no more than
5 Ohms.
E-Compact Series - ATSC
MODELO
M120 M208 / B240 T208 / T240 T380
(A)
Typical
Wire diameter (A)
Typical
Wire diameter (A)
Typical
Wire diameter (A)
Typical
Wire diameter
mm² AWG mm² AWG mm² AWG mm² AWG
EC702MP 6,3 4,17 11 3,6 3,31 12
EC704MP 7,2 4,17 11
Not available or uncommon use
15 | 106
E-Compact Medium Power
It is important to establish that all the devices involved in the transmission system are that
the same potential, so that there is no DDP, favoring the equilibrium of the flow of the
atmospheric load.
It is important to state that if there is a need for chemical alteration of the soil, in order to
provide the lowest impedance, it establishes a temporary condition for not being part of the
natural chemistry of the place, thus being naturally absorbed. In this condition, preventive
soil analyzes should be conducted as preventive maintenance procedure.
2.3.Stability.
The voltages in each TV Transmitter phase must be stabilized. Use voltage stabilizers or
stabilized uninterruptible power systems (UPSs) is necessary since these devices are
capable of protecting the TV transmitter from power surges. The voltage stabilizer or UPS
design must be of exclusive use to the Hitachi Kokusai Linear TV transmitter, and shall be
sized to operate at least 30% above the kVA consumption specified by the TV transmitter.
For example, for the TV transmitter with maximum consumption of 38kVA, a voltage
stabilizer or 50kVA UPS should be used.
Input voltage variations above 15% of the rated values specified for the Hitachi Kokusai
Linear TV transmitter may cause damage to the equipment and in this case will not be
covered by the factory warranty. In addition, it is important to check the potential difference
between the ground and neutral terminals (if any) that will be connected to the Hitachi
Kokusai Linear TV transmitter. This potential difference should be at most 3V.
2.4.Insulation.
It is important to have isolation between energy stations of the shelter and the TV
transmitter, which is achieved with the usage of isolator transformers. Thus guarantee that
no AC Mains’ transient coming from the shelter will be passed on to the TV transmitter or
vice-versa. Besides, Hitachi Kokusai Linear’ TV transmitter features switching power
supplies that require purely sinusoidal power input, and voltage regulators or no-breaks
without isolator transformers have no assurance of a purely sinusoidal outputs. The isolator
transformer must also be exclusive to the TV transmitter and its dimensioning must use the
same standards employed in the dimensioning of the voltage regulator or no-break, ie, at
least 30% higher than the specified consumption TV transmitter’s (KVA).
Recommendations.
1- We recommend that the transmitter "never see" the power grid directly.
2- We recommend the use of online double-conversion UPS and / or Delta-
conversion online UPS built with transformer insulation and with power factor
correction (PFC).
16 | 106
E-Compact Medium Power
No break Example with Isolating Transformer
Benefits:
- These types of UPS bring great protection and insulation to the transmitter due to its mode
of operation and design.
- The double conversion occurs because the AC network convert to DC and the DC voltage
convert back to AC, which eliminates any disturbance in the AC mains when converted to
DC, thus protecting the transmitter.
It is important to note that UPSs do not necessarily need to have a battery bank, thus
minimizing the cost of the final product. This solution is much better than a conventional
stabilizer due to double conversion as already explained.
- The correction of the power factor (PFC) in the no break is necessary to reduce the
cost of the electric energy, because it reduces the reactive power (VAr), reducing the
total power (VA).
It is important to emphasize that it is not efficient to have a transmitter with power factor
correction (PFC) powered by a no-break without PFC, because all the advantage
achieved by the transmitter is lost in the UPS, not resulting in energy savings. When
this type of connection made, you actually have an excellent load (resistive behavior)
for the no-break, but your power grid will see the entrance of the no break (without PFC,
high consumption).
When we have a power factor correction (PFC) UPS, it will present an excellent
behavior (low reactive power, low power consumption) to the network even if it is
connected to a PFC-free transmitter, that is, it will correct the power factor of the entire
system .
Nobreak capatibity.
Nobreak Power= PTX * (cos Φ * η (nobreak) )
PTX: Potência Real [ W]
cos Φ : Power Factor Correciton
η (nobreak) : Nobreak efficiency
17 | 106
E-Compact Medium Power
Double Conversion Online Nobreak
Delta Conversion Online Nobreak
Static Bypass Switch
C
A C
C
C
A
RECTIFIER INVERTER
BATERY
CHAVE DE BYPA
SS
TRANSFORMADO
R DELTA
CONVERSOR
DELTA
INVERSOR
PRINCIPAL
BATERI
A
18 | 106
E-Compact Medium Power
2.5.Atmospheric Discharge Protection System.
2.5.1 Lightning rods.
The Atmospheric Discharge Protection System consists of the lightning rods and their
elements. The tower and shelter where the equipment will be installed must be protected
against atmospheric discharges by means of lightning arresters.
It is important to determine that all ferrous parts and accessories that make up the
Atmospheric Discharge Protection System should be galvanized.
In the path comprised of the lightning rod to the drainage well, no splicing is allowed,
much less pathways with acute angles (angles of less than 90º).
2.5.2 Protectors.
The use of coaxial protectors is advisable for cables connecting external devices (antennas,
microwave heads, tower inverters) to the internal ones. These protectors are devices
equipped with gas spark plug which shortens to earth any discharge occurred in the coaxial
cable. They should kept in the shelter near the equipment and with the ground wire
connected to the ground of the equipment rack.
It is favorable in hilltops and areas of many transmission sources, the use of Faraday's Ring
or Cage, which in turn isolates the transmitter from the electromagnetic fields avoiding
interference caused by induction.
2.6 Air Conditioning.
2.6.1 Temperature.
For better performance and longer equipment life, it is important that, under the shelter, the
temperature is controlled strictly by means of air conditioners. For the shelter’s design, one
should consider the thermal dissipation specified for the transmitter (reported in BTU / h),
the dissipation of the other devices inside the shelter, the thermal load generated by the
solar incident and other thermal loads present in the shelter. In addition, it’s recommended
that the shelter’s internal pressure be slightly positive to prevent the entry of contaminants.
According to the transmission power, the internal temperature of the shelter should be:
• E-COMPACT LOW POWER TV TRANSMITTERS: from 0º to 35ºC
• E-COMPACT MEDIUM POWER TV TRANSMITTERS: from 0º to 30ºC
• E-COMPACT HIGH POWER TV TRANSMITTERS: 0º to 25ºC
If Hitachi Kokusai Linear equipment is damaged by the lack or inefficiency of the HVAC
system, it will NOT be covered by the factory warranty.
19 | 106
E-Compact Medium Power
2.6.2 Humidity.
Relative air humidity inside the shelter is also considered a critical factor for improved
performance and longer equipment life. Hitachi Kokusai Linear equipment should operate
in dry environments, which can also be achieved by the use of air conditioners. According
to the transmission power, the relative humidity inside the shelter should be:
• E-COMPACT LOW POWER TV TRANSMITTERS: 0 to 90%
• E-COMPACT MEDIUM POWER AND HIGH POWER TV TRANSMITTERS: 0 to 80%
There must never be condensation since water can damage the internal circuits of the
transmitter.
2.6.3 Cooling.
Cooling has to be always in "recirculate", with the air conditioning lowering the temperature
of the room, without external air intake. For better performance of the cooling system, the
air conditioner be installed in series with the transmitter cooling cycle, direct the output air
conditioning flow to the front of the Hitachi Kokusai Linear TV Transmitter.
The physical installation of the transmitter should protect a free area around it for better
cooling efficiency and access to maintenance.
20 | 106
E-Compact Medium Power
Section 3 – E-Compact Medium Power
Series UHF Digital TV Transmitters
1. Overview.
The E-Compact Medium Power family of air cooled Doherty solid-state transmitters from Hitachi
Kokusai Linear was designed specifically for the repack market place. Its design is simple, rugged,
reliable, and ultra-efficient. Advanced standard features are included to ensure:
• ensure maximum transmitter efficiency using Doherty amplifiers
• ensure maximum flexibility with broadband amplifier technology (470-806MHz)
• ensure optimum signal performance in all operating modes
• ensure maximum reliability for 100% power output
• ensure ease of initial setup and operation
• ensure ease of monitoring and diagnostics
• ensure flexible solutions for all installations
The E-Compact Medium Power Family of solid-state DTV transmitters includes two models that
provide transmitter power outputs (TPO) from 150 to 300 watts ATSC 3.0. Each power amplifier
module has an excellent power density, with 2RU and 19". Featuring high gain Broadband Doherty
LDMOS configured for transmitting provides high efficiency and consumption cost reduction of up
to 60% when compared to conventional transmitters. The final power amplifier configuration in
parallel depending on output power level required. The transmitters are compliant with all FCC
and ATSC requirements.
We recommend the use of the EXACT-V2 DTV driver with linearization circuits to compensate for
linear and non-linear distortions for the E-Compact Medium Power line transmitters. EXACT-V2 is
software upgradeable for compatibility with ATSC 3.0.
The E-Compact family of solid-state TV transmitters includes a human-machine interface via an
LCD display on the front panel and menus activated by programmable keys. Alarm indicators and
normal controls, as well as power readouts, are available on the LCD.
There are two basic E-Compact Medium Power transmitter equipment configurations available:
1) Single Drive = One exciter driving the amplifier chain (SD)
2) Dual Drive = Two exciters {main/standby selectable} driving the amplifier chain (DD)
21 | 106
E-Compact Medium Power
2. Specifications
⇨ IP Input
⇨ Control Module present
⇨ Switcher Module present
⇨ Power amplifier drawer (one power module);
⇨ High efficiency with Doherty technology;
⇨ Air cooled;
⇨ Automatic Fan Speed Control providing low noise levels, energy saving and increased lifespan;
⇨ Power supplies featuring Power Factor Correction better than 0.95;
⇨ Measures and alarms through front display and keypad or remotely.
⇨ VSWR and Overdrive protection via hardware with power reduction;
⇨ Software oriented overheating protection for internal modules;
⇨ Adaptive Digital Pre-correction (Linear and No-Linear);
⇨ Telemetry: WEB Server/SNMP, for local or remote management;
⇨ AGING transistor compensation via exciter's front panel;
⇨ Automatic GM compensation with temperature;
⇨ Main Control Software, WEB Server and SNMP;
⇨ USB communication Drivers;
⇨ Passive elements: Low-pass filter, before and after-filter probes.
Optional:
⇨ Telemetry through GPRS interface;
⇨ Exciter
⇨ Exciter Redundancy;
⇨ Control Module Redundancy;
⇨ GPS time base (exciter's internal module).
⇨ EC702MP has redundant power supply option.
General RF Performance
Modulation Standard ATSC 3.0 A/300 / ATSC 1.0 A/53
RF Output Regulation ≤± 0.1 dB
UHF Operation Frequency
470MHz to 806MHz
Ch14 to Ch69
Bandwidth 6 MHz
RF Input Level 0dBm
MER Performance
ATSC 3.0
ATSC 1.0
≥33dB
≥36dB
Harmonics/Spurious better than -60dBc
50Ω RF Output Connector
N-Female
DIN 7/16”
EIA 7/8” (flanged / unflanged)
EIA 1-5/8” (flanged / unflanged)
General Electrical Features
Power Requirement
(specify configuration at
equipment purchase order)
Single Phase 240Vac:
180~254VAC Between Both wire.
Single Phase 208Vac Wild Leg⁹:
180~254VAC Between Phases to Neutral
(using Delta Three Phase 240Vac).
Frequency AC mains 43 to 63Hz
Power Factor Correction Typical 0.95, minimum 0.9
22 | 106
E-Compact Medium Power
¹A.F.: After Filter
²B.F.: Before Filter
³May change depending on MER value, channel and output power.
Interfaces
Communication Interfaces USB / Ethernet / SNMP
Format Ethernet (IEEE 802.3u) 10Base-
T/100Base-TX
Environment Features
Operation altitude up to 8200ft ASL
Environment temperature
range
+32°F to +113ºF (+77°F recommended)
0ºC to +45ºC (+25°C recommended)
Environment humidity
range
0 to 95% (non-condensing)
Power Amplifier Cooling Forced ambient air, front to back flow using
integral high volume fans
Model: EC702MP EC704MP
Output power (W)³ B.F.¹ A.F.² B.F.¹ A.F.²
ATSC 3.0 215 150 400 300
ATSC 1.0 225 170 450 350
Minimum operation power (W)
ATSC 3.0
ATSC 1.0
10
20
30
40
AC mains
Single Phase
240Vac
Single Phase
208Vac Wild
Leg
AC typical consumption (W)³
ATSC 3.0 600 1200
ATSC 1.0 750 1500
Typical heat dissipation (BTU/h)³
ATSC 3.0 1400 2800
ATSC 1.0 1750 3500
Width (in) 22.44
Depth (in) 35.43
Weight (pound) 143
23 | 106
E-Compact Medium Power
3. Construction
The E-Compact family of medium power solid-state DTV transmitters provides maximum flexibility
for site layout and installation. Transmitters are installed in custom designed 22” wide (19” panel
opening) cabinets. Being available in two configurations depending on the output power: EC702MP
ATSC Transmitter 170 W and EC704MP ATSC Transmistter 350 W.
The transmitter controller is contained in a 1RU chassis and the RF amplifier is contained in a
separate 2RU chassis. The digital exciter is 1RU (not provided) for a total of 4RU or 8.75” of vertical
panel space (single exciter version). An equipment rack cabinet (8RU) is supplied.
The power supply redundancy option implemented only in EC702MP
EC702MP
ATSC 3.0: 150W RMS BEFORE FILTER
ATSC 1.0: 170W RMS BEFORE FILTER
PA702MP Power Amplifier (MOD GV 40033A)
EC704MP
ATSC 3.0: 300W RMS BEFORE FILTER
ATSC 1.0: 350W RMS BEFORE FILTER
PA704MP Power Amplifier (MOD GV 40010)
Power
Amplifier
24 | 106
E-Compact Medium Power
H
G
F
E
D
C
B
A
8 7 6 5 4 3 2 1
H
G
F
E
D
C
B
A
8 7 6 5 4 3 2 1
REF DESCRIPTION
01 Cabinet 8RU
02 1U slot void
03 Ethernet switch
04 Main CM8001 control module
05 Backup CM8001 Control Module
06
PA702MP – Power amplifier (EC702MP)
PA704MP – Power amplifier (EC704MP)
07 MOD 40243 - EIA 1-5/8” low pass filter
08 MOD 40215 – RF sample EIA 1+5/8”
09 RF Spliter 1:2
10 MOD 40090A – Flyback 15/8V 25W
11 MOD 40032 – RF coaxial relay
12 AC mains protection unit
08
07
07
10
03
12
11
09
02
02
06
04
05
08
01
02
Construction EC702MP / EC704MP
DOUBLE EXCITER
25 | 106
E-Compact Medium Power
H
G
F
E
D
C
B
A
8 7 6 5 4 3 2 1
H
G
F
E
D
C
B
A
8 7 6 5 4 3 2 1
REF DESCRIPTION
01 Cabinet 8RU
02 1U slot void
03 Ethernet switch
04 Main CM8001 control module
06
PA702MP – Power amplifier (EC702MP)
PA704MP – Power amplifier (EC704MP)
07 MOD 40243 - EIA 1-5/8” low pass filter
08 MOD 40215 – RF sample EIA 1+5/8”
12 AC mains protection unit
Construction EC702MP / EC704MP
SINGLE EXCITER
07
07
03
02
02
12
04
08
06
01
02
02
26 | 106
E-Compact Medium Power
H
G
F
E
D
C
B
A
8 7 6 5 4 3 2 1
H
G
F
E
D
C
B
A
8 7 6 5 4 3 2 1
4. Footprint
Footprint EC702MP / EC704MP
DOUBLE EXCITER
SINGLE EXCITER
27 | 106
E-Compact Medium Power
H
G
F
E
D
C
B
A
8 7 6 5 4 3 2 1
H
G
F
E
D
C
B
A
8 7 6 5 4 3 2 1
5. Block Diagram
Block Diagram EC702MP / EC704MP
DOUBLE EXCITER
GND
AC INPUT
AC in
AC in
AC in
AC in
AC in
Backup ATSC Exciter
(NOT INCLUDED)
Ethernet Switch
(OPTIONAL)
Main CM8001 Control Module
Backup CM8001 Control Module
(OPTIONAL)
PA702MP / PA704MP
Power Amplifier
MOD 40090A – Flyback 15/8V 25W
MOD 40032 – RF Coaxial Relay
(OPTIONAL)
Ethernet
comm.
Ethernet
comm.
Ethernet
comm.
Comm. I/O
Comm.
I/O
Comm. I/O
AC Supply
UHF
UHF
UHF
UHF
PA710MP – Power Amplifier
MOD 40243
EIA 1-5/8"
Low Pass Filter
MOD
40215
RF
Sample
EIA
1
5/8"
ANTENNA
RF OUT
RF IN
RF OUT
RF OUT
TS IN
TS IN
RF SAMPLE
B. FILTER
Exc. Backup
RF Spliter 1:2
(OPTIONAL)
Mask Filter
(NOT INCLUDED)
RF Input switch
Main ATSC Exciter
(NOT INCLUDED)
AC in
Ethernet
comm.
B. FILTER
Exc. Main
B. FILTER
B. FILTER
UHF
RF OUT
RF OUT
RF IN
RF IN
UHF
UHF
AC
in
AC
Mains
Protection
Unit
10dB
Attenuator
RF
Sample
Power
Amplifier
(+10dBm)
RF
Sample
Power
Amplifier
(+10dBm)
10dB
Attenuator
(NOT INCLUDED)
(NOT INCLUDED)
28 | 106
E-Compact Medium Power
H
G
F
E
D
C
B
A
8 7 6 5 4 3 2 1
H
G
F
E
D
C
B
A
8 7 6 5 4 3 2 1
Block Diagram EC702MP / EC704MP
SINGLE EXCITER
GND
AC INPUT
AC in
AC in
AC in
ATSC Exciter
(NOT INCLUDED)
Ethernet Switch
CM8001 Control Module
PA702MP / PA704MP
Power Amplifier
Ethernet
comm.
Comm. I/O
Comm.
I/O
AC Supply
UHF
UHF
UHF
PA710MP – Power Amplifier
MOD 40243
EIA 1-5/8"
Low Pass Filter
MOD
40215
Sonda
RF
EIA
1
5/8"
ANTENNA
RF IN
RF OUT
RF OUT
TS IN
RF SAMPLE
(+10dBm)
Mask
Filter
(NOT
INCLUDED)
B. FILTER
Exciter
UHF
RF OUT
RF IN
UHF
AC
in
AC
Mains
Protection
Unit
Before Filter
Exciter
RF
Sample
Power
Amplifier
(+10dBm)
10dB
Attenuator
(NOT
INCLUDED)
29 | 106
E-Compact Medium Power
6. Main Modules
6.1.CM8001 Control Module (MOD GV 40056)
The E-Compact series of transmitters utilize a dedicated 1RU controller chassis, CM8001. The
controller chassis has several functions including:
Access to exciter setup / monitoring
• AC mains power monitoring
• RF drive signal monitoring
• RF Exciter Level Control to RF Splitters
• RF power amplifier metrics
• RF output signal monitoring (FWD & RFL)
• Local user interface
• USB port for software diagnostics / updates
• External Web GUI status monitoring and control interface
The CM8001 controller gathers the status monitoring of all the transmitter subassemblies to provide to
the operator transmitter status information, either locally or remotely. The controller provides transmitter
telemetry including RF power monitoring. A user-friendly man/machine interface on the transmitter
controller chassis includes:
• A front panel LCD screen provides transmitter status information.
• A front-panel control interface for menu driven commands (up/down/right/left navigation, escape,
& OK buttons).
• LED status indicators
The CM8001 transmitter controller is paired with the TV exciter. For transmitter systems configured
optionally with dual drive, the transmitter is equipped two / redundant controllers, one for each exciter
eliminating single point failures for even higher system reliability.
6.1.1. RF Input
The CM8001 Control Module redistributes the RF signal received from the Exciter by controlling its level
of distribution to the Power Amplifiers Drawers as a function of the transmitter's rated nominal power. For
this, the CM8001 is set at the factory to receive an RF signal level of 0dBm, with minimum / maximum
tolerances of -1dBm / + 1dBm.
EXCITER(NOT INCLUDED) CONTROL MODULECM8001
RF: 0dBm (Typical)
+1dBm (max)
-1dBm (min)
30 | 106
E-Compact Medium Power
H
G
F
E
D
C
B
A
8 7 6 5 4 3 2 1
H
G
F
E
D
C
B
A
8 7 6 5 4 3 2 1
6.1.2. Interfaces
01 LCD Display (2 Lines x 40 Coluns) 10 USB 2.0 Port Type B Jack
02 Signaling LEDs 11 USB 2.0 Port Type A Jack
03 Up Key (▲) 12 Power On Key
04 Down Key (▼) 13 AC Input
05 Left Key (◀) 14 NOT USED / NOT APPLY
06 Right Key (▶) 15 “Tuner IN” – RF Input From Exciter
07 Enter Key (Enter) 16 Interface Control I/O
08 Esc Key (Esc) 17 Grounding
09 Ethernet Port 18 RF Output
Front Panel
Rear Panel
01
02
03
06
05
04
07
08
12 17
13
14
15
16
18
09 10
11
31 | 106
E-Compact Medium Power
6.1.3. Control System Functional Description
COAXIAL RELAY
Communication
Control I/O
MAIN CM8001
CONTROL MODULE
MAIN EXCITER (NOT INCLUDED)
Exciter Status
RF: +1dBm
RF RF
BACKUP CM8001
CONTROL MODULE
(OPTIONAL)
BACKUP EXCITER (NOT INCLUDED)
Exciter Status
RF: +1dBm
RF
PA702MP / PA704MP
POWER AMPLIFIER
A1 +8Vcc from MCCB (NOT USED TO MEDIUM POWER SERIES)
A2 +15VCC - MCCB Source Monitor
(NOT USED TO MEDIUM POWER SERIES)
A3 +50VCC - MCCB Source Monitor
(NOT USED TO MEDIUM POWER SERIES)
A4 Forward Output Power Measure - Analog signal, from 0 to 4.5v
A5 Remote Control Data In
A6 Reflected Output Power Measure - Analog signal, from 0 to 4.5v
A7 Power Amplifier On/Off (5V means normal operation)
A8 RS-485A Communication
A9 GND
A10 RS-485B Communication
B1 Mask Filter Alarm Temperature (5Vcc)
B2 +8Vcc (Main Control Address) – 0Vcc (Backup Control Address)
B3 Control I/O
B4 AC Phase Alarm - 5V means normal operation
B5 Dummy Load Drawer Fan Alarm - 5V means normal operation
B6 Remote Control Data Out
B7 Exciter Status - Digital signal - 5V means normal operation
B8 Remote Control Clock
B9 Control I/O
B10 Coaxial Relay Control
Control I/O Connector
MOD Control Rear Panel
B1 B10
CONTROL
I/O
A1 A10
A1 A2 A3 A4 A5 A6 A7 A8 A9 A10
B10
B1 B2 B3 B4 B5 B6 B7 B8 B9 B10
B10
32 | 106
E-Compact Medium Power
6.1.4. Control System Operation
6.1.4.1. Navigation
The Control Module CM8001 has a system of configuration, measurements, alarms and remote
management (TELESUPERVISION), that controls all the modules of the transmitter.
The configuration of the transmitter might be done either by its front panel, of the transmitter or the web
interface using a browser of your choice or SNMP.
When the device is turned on, or when it enters in stand-by mode (idle for 5 minutes), the display
switches between the following status screens:
01
Current date
06
Transmission System:
02
Current time
ATSC 1.0
03
Operation UHF channel number
ATSC 3.0
04
Real Output Power Value (Watts)
07
Power Equipment Model
05
Equipment Model:
08
Double Exciter Status
EC702MP EC704MP CM8001 Main “Ctr A”:
Active / Standby
CM8001 Backup “Ctr B”:
Active / Standby
01 02
05 06 07 08
03 04
33 | 106
E-Compact Medium Power
When navigating through the different functions (status and setup), take into consideration the
keyboard symbols and the descriptions below (See 5.1.1 Interfaces):
▲ Moves the arrow UP to the next function shown on LCD screen
▶ Moves the arrow to the next RIGHT position
▼ Moves the arrow DOWN to the next function shown on LCD screen.
◀ Moves the arrow to the next LEFT position.
ENTER - Confirms the chosen selection.
ESC - Cancel the selection and return to the previous screen.
When browsing the LCD screen, you will have access to status reading or settings changes. In order to
orient yourself in this interface, attention should be paid to the menu structure as follows:
09 Parameter Menu or Parameter in the 12 Current Menu or Current Parameter
Screen. 13 Changing Parameter Value
10 Number of Parameter Menu or 14 Current Parameter Value
Parameter in the Screen / Total 15 When show “ * “ indicates that the
Number of Parameter or Menu. changes is not yet active. For this
11 4 digit numbers represents the screen It’ s necessary to press “ENTER” key
position on the command menu
For change any parameter, used ◀ for decrease or ▶ to increase.
09 10 11
09 10 11
12 14 15
13
12
34 | 106
E-Compact Medium Power
6.1.4.2. System Structure
The system consists of the Root Menu "Main Menu" that gives access to four categories of Menu:
[0000]
Main Menu
[1000]
Setup Menu
[2000]
Measurements
[3000]
System Alarms/
Log
[4000]
Remote Acces
⇨ Main Menu ⇨Setup Menu: Access to configure the equipment parameters.
⇨ Main Menu ⇨Measurements: Access to consult the parameters of the equipment.
⇨ Main Menu ⇨System Alarms/Log Alarms: Access to query alerts and history of Alarms.
⇨ Main Menu ⇨Remote Access: Access to configure the equipment to operate on ethernet network.
[1000] - Main Menu ⇨ Setup Menu
[0000]
Main Menu
[1000]
Setup Menu
[2000]
Measurements
[3000]
System Alarms/
Log
[4000]
Remote Acces
The "Setup Menu” allows access to alter machine's parameter setting functions.
The Transmitter is delivered to the customer with the parameters that were provided at
the time of purchase, so it is not necessary to change the settings of the Equipment.
35 | 106
E-Compact Medium Power
# Parameter Position # Description / Functionality
1/9 Power Setup 1100 1/1 Changes the output power of the Equipment.
2/9 Transmitter Setup 1200
1/2 Automatic Level Control: On/Off
2/2 Ctr Mode: Active / Standby
3/9 Time and Date Setup 1300 1/1
Change the date, time and date format (dd/mm/yy or
mm/dd/yy)
4/9 Password Setup 1400
1/2 Enable / Choose new password
2/2 Disable Password
5/9 Alarms Mask 1500 1/1 Reflected Power – Set de Alarm Mask for Reflected Power
6/9 USB Host Access 1600 1/1 System Upgrade – Used to system upgrade via USB card.
7/9
Transistor Bias
Adjustment
1700
1/4 LDMOS Drain Voltage - The values are pre-set at the factory.
2/4 Carrier Amp. Current - The values are pre-set at the factory.
3/4
Peak Amp. Gate Voltage - The values are pre-set at the
factory.
4/4 Status: show the status exciter: (Active / Standby)
8/9
PA Temperature
Control
1800 1/1
Allows to set the operating temperature of the Powers
Amplifiers.
9/9 Control Mode 1900 1/1 Enable control module acess remote
[2000] - Main Menu ⇨ Measurements
[0000]
Main Menu
[1000]
Setup Menu
[2000]
Measurements
[3000]
System Alarms/
Log
[4000]
Remote Acces
The "Measurements" menu allows access to read the operating parameters of the equipment (read
only).
# Parameter Position # Description / Functionality
1/7 Power 2100
1/3 Programmed: Show the Programmed power measurement.
2/3
Forward: Show the value of Forward Output Power (Watts).
Reflected: Show the value of Reflected Output Power (Watts).
3/3 ALC Reference Voltage: Show the value (Volts).
2/7 Exciter Status - - Active / Fail
3/7 Drawers 2300 1/3 Drawers Measurements
36 | 106
E-Compact Medium Power
The [2300] Drawers Measurements parameter allows to view the main status of all Power Amplifiers
Drawers:
1/3 Power Supply: Voltage measure of all Power Amplifier Drawers Sources
Position # Description / Functionality
2310
1/3 Power Supply 1: [V]
2/3 Power Supply 2: [V]
3/3 Driver Power Supply: [V]
01
(◀ or ▶) Selects the Power Amplifier Drawer: EC70xMP: 1 Power
Amplifier Drawer.
02
(▲ or ▼) Selects the Power Supply:
Main Power Supply 1/2
Driver Power Supply 2/2
03 Measured value (Volts) in each Power Supply
01
02 03
DRAWERS IDENTIFICATIONS
4
PA704MP - POWER AMPLIFIER
Top View
1
2
3
D
PA IDENTIFICATIONS
2
PA702MP - POWER AMPLIFIER
Top View
1
D
PA IDENTIFICATIONS
Power Supply 1 Power Supply 2
Power Amplifier
Drawer
37 | 106
E-Compact Medium Power
2/3 Current: Current measure (Amper) in all Power Amplifier Drawers Transistors and Drive (Eight
Power Transistors and one Drive per Power Amplifier Drawer):
Position # Description / Functionality
2320
1/3 I1: [A] I2: [A] - Transistor 1 and Transistor 2 Current
2/3 I3: [A] I4: [A] - Transistor 3 and Transistor 4 Current
3/3 ID: [A] - Driver Current
05
(▲ or ▼) Selects the Power Transistors or Driver of each Power Amplifier
Drawer
06 Measured value (Amper) in each Power Transistor
3/3 Temperature: Temperature measure (°F or ºC) in all Power Amplifier Drawers Transistors and Drive
(Eight Power Transistors and one Drive per Power Amplifier Drawer):
Position # Description / Functionality
2330
1/3 T1: [ºC or ºF] T2: [ºC or ºF] - Transistor 1 / Transistor 2
2/3 T3: [ºC or ºF] T4: [ºC or ºF] - Transistor 3 / Transistor 4
3/3
TD: [ºC or ºF] TAir: [ºC or ºF] - Drive Temperature / air
Temperature
05
(◀ or ▶) Selects the Power Amplifier Drawer: EC70xMP: 1 Power
Amplifier Drawer.
06 Hold ▲ or ▼ to change between ºC and ºF
07
(▲ or ▼) Selects the Power Transistors or Driver of each Power
Amplifier Drawer
08 Measured value (°C or °F) in each Power Transistor
05 06 05 06
05 06
07 08 07 08
38 | 106
E-Compact Medium Power
# Parameter Position # Description / Functionality
4/7
Control Module
Power Supply
2400
1/2
+3,3V : OK - Check de +3,3Vcc Ctrl Module Power Supply
+15V : OK - Check de +15Vcc Ctrl Module Power Supply
2/2
+5V : OK - Check de +5Vcc Ctrl Module Power Supply
+28V : OK - Check de +28Vcc Ctrl Module Power Supply
5/7
Communication
Status
2500
1/3
Drawers Communication Status (OK / Fail / -- “not present”)
P01 / P02 / P03 / P04 – Power Drawer 1 / 2 / 3 / 4
2/3
Drawers Communication Status (OK / Fail / -- “not present”)
P05 / P06 / P07 / P08 – Power Drawer 5 / 6 / 7 / 8
3/3
Control Module Communication Status
(OK / Fail / -- “not present”)
6/7
Software/Hardware
Version
2600
1/4 Control: Control Module Version
2/4 Drawers Version. (◀ or ▶) Selects the Power Drawer
3/4 Digi: Ethernet Module Version
4/4 CIP Version / CIM Version
7/7 Eqp. Power Supply 2700 1/1
Eqp. Power Supply Measurements (OK / Fail)
15V / 8V 50V
[3000] - Main Menu ⇨ System Alarms/Log
[0000]
Main Menu
[1000]
Setup Menu
[2000]
Measurements
[3000]
System
Alarms/Log
[4000]
Remote Acces
This menu provides information on current and past alarms for preventive/corrective maintenance
purposes.
Before detailing access to the Sub-menus of this item, it is important to know what the alarms are and
their possible solutions..
There are two alarm lists; "Equipment Alarms", which refers to faults in the equipment as a whole and
"Drawers Alarms", which refers to faults in power amplifier drawers and thus impact the transmitter’s
operation reflected in the operation of the equipment.
39 | 106
E-Compact Medium Power
EQUIPMENT ALARMS
ALARM DESCRIPTION
+15V Control Module Failure
Indicates failure in any of the Control Module Sources
(+15V, +3,3V, +28V +5V).
The sources that are inside the Control Module.
+3.3V Control Module Failure
+28V Control Module Failure
+5V Control Module Failure
+15V Equipment Failure
Indicates failure in any of the Equipment Sources (+15V,
+50V, +8V).
The sources that are at the rack bottom.
+50V Equipment Failure
+8V Equipment Failure
ALARM ALARM DESCRIPTION
AC Failure
Drawer Comm.
Failure
There is no communication between the power drawers.
Check the RS485 cable connections in the rear panel of the excitation
drawer and power drawers. Check the internal interconnections of
connectors. Get in contact with Hitachi Kokusai Linear's technical support
service. Check the power drawers for proper operation using the
HyperTerminal.
Drawers Alarms Failure in any of the Power Drawers.
Equipment Info Error
Indicates lack of information for the selected ID.
and thus impact the transmitter’s operation 1PPS or 10MHz reference
OR Wrong EQP ID.
Exciter Failure
Indicates transmitter exciter failure and prompts excitation exchange
between Main and Backup (if was available).
Other Control Module
Failure
Indicates failure in the communication between Control Modules A and B
(if was available).
40 | 106
E-Compact Medium Power
Output High Power
The Output Power Transmitter outstripped 10% of the maximum power
limit.
Output Power Zero
The Transmitter has the programmed power, but without power reading
at the output.
Power Amp. OFF Indicates that the ON/OFF switch in the front panel is off.
Reduced Power
The Transmitter is not operating at rated power. May occur due to power
loss in one or more Power Amplifier Drawers.
Reflected Power
Indicates presence of reflected power at the transmitter’s output at the
output of transmitter. Check the current alarm list to list other possible
alarms that could help better assess the situation of the equipment as a
whole. Check the connections of the equipment to filter and filter the
antenna. Get in contact with Hitachi Kokusai Linear's technical support
service.
Remote Ctrl Failure Indicates communication failure in the Remote Control Drawer.
ALARM ALARM DESCRIPTION
Remote Mute
Indicates that the equipment output power was remotely reduced to zero.
No measure needs to be taken, as this alarm is intentionally caused by
the system operator.
RF Load FAN Failure
Occurs when the Dummy Load Module Drawer fan fails and the internal
temperature exceeds 90 °C
Too Few Drawers
Indicates that the Transmitter does not have the minimum number of
Drawers to operate under reduced power condition.
41 | 106
E-Compact Medium Power
POWER AMPLIFIERS DRAWERS ALARMS
This list is directly related to the alarms that occur in the Power Drawers. When there is an alarm LED lit
(see item 5.2.6 - Signaling Leds - Power Amplifier Module) the alarm detail is displayed when accessing
the "System Alarms / Log" of the Control Module CM8001. Alarms can be a Notification (irregular
operation that generates no fault containment action) or a Critical alarm (Shutdown the device or reduces
its operational capability)
Usually when the alarm occurs, it is indicated in which device it happened:
Devices Identification:
“D” – Driver / Pré Driver
Alarms List:
Device
Identification Alarm
DRAWERS IDENTIFICATIONS
4
PA704MP - POWER AMPLIFIER
Top View
1
2
3
D
PA IDENTIFICATIONS
2
PA702MP - POWER AMPLIFIER
Top View
1
D
PA IDENTIFICATIONS
Power Supply 1 Power Supply 2
Power Amplifier
Drawer
42 | 106
E-Compact Medium Power
ALARM ALARM DESCRIPTION
Critical High Forward Power
Power Amplifier Drawer forward output power is greater than
1300Watts.
Default system action: Shutdown.
Critical High Reflected Power
Drawer reflected output power is greater than 184Watts.
Default system action: Shutdown.
Critical High Input Air Temperature
Ambient air temperature used in the reflow of the equipment is
greater than 48°C (118,4ºF).
Default system action: Shutdown.
High Input Air Temperature
Ambient air temperature used in the reflow of the equipment is
greater than 35°C (95ºF).
Default system action: Notification.
Low RF Input Level
RF Input Level is less than -8dBm
Default system action: Notification.
High RF Input Level
RF Input Level is greater than 10dBm
Default system action: Notification.
PA__ High Current
Current at the indicated PA is greater than 10A.
Default system action: Notification.
PA__ Critical High Current
Current at the indicated PA is greater than 10A.
Default system action: Shutdown.
PA__ Low Current
Current at the indicated PA is less than 0.2A.
Default system action: Shutdown.
PA__ Unbalance Current
Current in the indicated PA is 2.5A is higher or lower than the
others.
Default system action: Notification.
PA__ High Temperature
Temperature at the indicated PA is greater than 75ºC (167ºF).
Default system action: Notification.
PA__ Critical High Temperature
Temperature at the indicated PA is greater than 80ºC (176ºF).
Default system action: Shutdown.
PA__ Low Gain
Indicated PA Gain is Less than 49dB.
Default system action: Notification
43 | 106
E-Compact Medium Power
ALARM ALARM DESCRIPTION
PA__ Failure
VGS (Voltage Gate Source) of the indicated PA is less than
2/3 of the programmed VGS.
Default system action: Shutdown.
PA__ Comm Failure No communication with the indicated PA.
Driver Low Gain
Gain in the driver is less than 30dB.
Default system action: Notification
Driver Low Voltage
Voltage in the driver is less than 5.0V of programmed.
Default system action: Notification
Driver Critical High Current
Consumption current in the driver is greater than 4.9A.
Default system action: Shutdown.
Driver High Current
Consumption current in the driver is between 4.5A and 4.9A.
Default system action: Notification
Driver Low Current
Consumption current in the driver is less than 0.4A.
Default system action: Notification
Driver High Temperature
Temperature Driver is greater than 75°C (167ºF).
Default system action: Notification
Driver High Output Power
Output Power Driver is greater than 46dBm.
Default system action: Notification
Driver Comm Failure No communication with the Driver.
Pre-Driver Low Current
Consumption current in the pre-driver is less than 0.1A.
Default system action: Notification
Pre-Driver High Current
Consumption current in the pre-driver is greater than 0.35A.
Default system action: Notification
PSU __ High AC Line Voltage
AC Voltage at PSU is greater than 240Vac
Default system action: Notification
PSU __ Critical High AC Line
Voltage
AC Voltage at PSU is greater than 250Vac
Default system action: Shutdown
44 | 106
E-Compact Medium Power
ALARM ALARM DESCRIPTION
PSU __ Critical Low AC Line Voltage
AC Voltage at PSU is less than 170Vac
Default system action: Shutdown
PSU __ Critical High Current
Power at PSU indicate exceeds 1300Watts
Default system action: Shutdown
PSU __ High Temperature
Temperature at PSU is greater than 60°C (140ºF).
Default system action: Notification
PSU __ Critical High Temperature
Temperature at PSU is greater than 63°C (145.4ºF).
Default system action: Shutdown
PSU __ High Current
Current at PSU is greater than 24A.
Default system action: Notification
PSU __ Low Voltage
DC Output Voltage at PSU is less than 3V of the programmed.
Default system action: Shutdown
PSU __ High Voltage
DC Output Voltage at PSU is greater than 3V of the
programmed.
Default system action: Shutdown
PSU __ Low AC Line Voltage
AC Voltage at PSU is less than 180Vac
Default system action: Notification
PSU __ Shutdown The PSU is Shutdown.
FAN __ Warning
Fan rotation reaches ±1000RPM in relation to software
programmed value.
Default system action: Notification
FAN __ Failure
Fan rotation reaches ±2000RPM in relation to software
programmed value.
Default system action: Notification
45 | 106
E-Compact Medium Power
BROWSER ALARMS STATUS
# Parameter Position # Description / Functionality
1/4 Current Alarms 3100 --- Show the list of currents Alarms in the Equipment.
01 Number of Alarm of Total Alarms
02 ▲ or ▼ to view the Alarms List
When there is no alarm, it will display: “Alarm List Empy”
# Parameter Position # Description / Functionality
2/4 Alarm Log 3200 --- Show the list of past Alarms in the Equipment.
01 Date and time the first alarm occurred
02 Date of the alarm occurred
03 Time of the alarm occurred
04 Alarm List
Press ▲ or ▼ to browse in the Alarm List.
# Parameter Position # Description / Functionality
3/4 Drawers Alarms 3300
1/2 Current Drawers Alarms [3310]
2/2 Past Drawers Alarms [3320]
01
02
01 01
02 03 04
46 | 106
E-Compact Medium Power
01 Indicates which Drawer/Module indication
02 Indicates “Current Alarms [3310] or “past Alarms [3320]
03 Number of Alarm of Total Alarms
04 Alarm List
Press ▲ or ▼ to browse in the Alarm List.
# Parameter Position # Description / Functionality
4/4 Clear Alarm Log --- --- Show the list of past Alarms
Select this option to clear all alarm logs.
[4000] - Main Menu ⇨ Remote Access
[0000]
Main Menu
[1000]
Setup Menu
[2000]
Measurements
[3000]
System Alarms/
Log
[4000]
Remote Acces
This menu allows the configuration of the Ethernet network parameters so that you have remote access
via a network connection.
All equipment parameters such as transmit power, source measurements, alarms check and all possible
functional selections can be accessed remotely through a PC Browser or any Smartphone Browser by
connecting to the embedded WEB page server of the Equipment.
# Parameter Position # Description / Functionality
1/3 IP Address --- --- Set the IP Address
2/3 Subnetwork Mask --- --- Set the Subnetwork Mask
3/3 Gateway --- --- Set the gateway
04
01 02 03
47 | 106
E-Compact Medium Power
6.1.5. Frontal Led Alarms
CURRENT ALARM: When a fault occurs, the equipment will
automatically take containment and protection actions (Power
Off or Power Reduce) and signal by the "CURRENT ALARM" led
on the front panel.
These may be checked via the display in the menu: [3000]
System Alarms / Log.
PAST ALARM: When signaling, indicates that there have been malfunctions in the past. These alarms
may be checked via the display in the menu: [3000] System Alarms / Log.
48 | 106
E-Compact Medium Power
6.2.PA704MP / PA702MP Power Amplifier Module
This is an air-cooled UHF power amplifier drawer composed of an RF block with until four power transistors
that utilize Doherty's high efficiency technology. Each Drawer can provide up to 450 Watts RMS (ATSC
1.0) or up to 400 Watts RMS (ATSC 3.0) with efficiency between 34% and 41% depending on the operating
channel.
The Power Drawers are mounted in the 2U rack and avaliable em two models:
PA702MP Power Amplifier (MOD GV 40033A) – 215 Watts @ATSC3.0 / 225 Watts @ATSC1.0
PA704MP Power Amplifier (MOD GV 40010) – 400 Watts @ATSC3.0 / 450 Watts @ATSC1.0
Main features:
⇨ High efficiency.
⇨ Power Supply redundancy – avaliable on PA702MP model.
⇨ Doherty Configuration.
⇨ Standing fans accessible from the front panel.
⇨ Removable power supply at the front panel of the drawer.
⇨ 2U Power Drawer for 19" rack.
⇨ Power transistors LDMOS Ampleon BLF-888A.
⇨ Automatic control of the quiescent currents of the power transistors depending on the
temperature.
⇨ Automatic fan speed control according to power transistor’s temperature.
⇨ Protection against VSWR and Overdrive
⇨ Power Factor Corrector (PFC) at power supply (PFC).
⇨ Protection against over current in the power supply.
⇨ Settings and measures via terminal.
⇨ Automatic restart after alarm event.
⇨ Matched sample of the output signal.
⇨ Integrated MOD bus Control.
Never unplug any Power Amplifier Drawer while the Transmitter is on. Risk of
equipment damage.
49 | 106
E-Compact Medium Power
H
G
F
E
D
C
B
A
8 7 6 5 4 3 2 1
H
G
F
E
D
C
B
A
8 7 6 5 4 3 2 1
6.2.1. Interfaces
Rear Panel – PA704MP
09 10
12
13
14
11
Rear Panel – PA702MP
08 09
11
12
13
10
Interfaces PA702MP / PA704MP
POWER AMPLIFIERS FRONT /
REAR VIEW
REF DESCRIPTION
01 Signaling LEDs
02 USB Interface
03 Removable front panel
04 Fan Air Filter
05 Power Source 1 (PS1)
06 On/Off Power Source 1 (PS1)
07 Slot for Redundant Power Source (Only PA702MP)
08 AC Power input
09 GND connector
10 RF INPUT – SMA female 50Ω
11 RF SAMPLE – SMA female 50Ω
12 RF OUTPUT – DIN 7/16” female 50Ω
13 COMM – DB9 communication
01
04 04 04 05
07
Front Panel – PA702MP
02 06
03
01
04 04 04 05 07
02
Front Panel – PA704MP
06 08
03
REF DESCRIPTION
01 Signaling LEDs
02 USB Interface
03 Removable front panel
04 Fan Air Filter
05 Power Source 1 (PS1)
06 On/Off Power Source 1 (PS1)
07 Power Source 2 (PS2)
08 On/Off Power Source 2 (PS2)
09 AC Power input
10 GND connector
11 RF INPUT – SMA female 50Ω
12 RF SAMPLE – SMA female 50Ω
13 RF OUTPUT – DIN 7/16” female 50Ω
14 COMM – DB9 communication
PA702MP
PA704MP
50 | 106
E-Compact Medium Power
6.2.2. Specifications
Characteristic
Specification
PA702MP PA704MP
Input
Frequency
Range
470 to 806 MHz
See PA702MP / PA704MP Channel Range Table
Level 0.0 to 8.0 dBm (±1dB)
Connector /
Impedance
SMA female / 50 Ohms
Return Loss -20dB typical ( -18dB Max)
Output
Frequency
Range
470 to 806 MHz
Output Power
215 Wrms (ATSC 3.0)
225 Wrms (ATSC 1.0)
400 Wrms (ATSC 3.0)
450 Wrms (ATSC 1.0)
RF Sample 470 to 806 MHz / +10dBm
Connector /
Impedance
DIN 7/16” female – 50 Ω
Return Loss -20dB typical ( -18dB Max) - measured with the drawer off
Harmonics /
Spurious
-30dBc
Average MER
Better than 33dB:
Pout = 215Wrms@ ATSC 3.0
Better than 36dB:
Pout= 225Wrms @ATSC 1.0
Better than 33dB:
Pout = 400Wrms@ ATSC 3.0
Better than 36dB:
Pout= 450Wrms @ATSC 1.0
General
Communication
Interface
USB / RS-485
AC Mains 100Vac to 254VAC / 43 to 63Hz 180Vac to 254VAC / 43 to 63Hz
Power Factor > 0.92
Gain 52dB (± 4.0dB)
Average
Efficiency
32% typical @ ATSC 3.0 Pout: 215W 32% typical @ ATSC 3.0 Pout: 400W
51 | 106
E-Compact Medium Power
H
G
F
E
D
C
B
A
8 7 6 5 4 3 2 1
H
G
F
E
D
C
B
A
8 7 6 5 4 3 2 1
6.2.3. Power Amplifier Block Diagram
Block Diagram
PA702MP
Power Supply 1
Power Supply 2
(OPTIONAL)
PA 1
PA 2
Alarms Led
Driver
FAN 1
FAN 2
FAN 3
Control
Fan Control
Alarms Led
PA Control
REF Power
FWD Power
Drive Control
Control Module / Exciter Interface
Communication – Drawer Address
Power Supplies Interface
Communication
USB Comm
+5Vcc
Power Supplies Comm.
USB Comm
DC Power Line
42 ~50VDC
2400 Watts MAX
Control Module / Exciter
Comm. – Drawer Address
Power Amplifiers
FWD
REF
SAMPLE
+5Vcc
Control
Module
/
Exciter
Comm.
–
Drawer
Address
Comm
RF SAMPLE
+10dBm (-43dB)
RF IN
0.0 ~ 8.0 dBm
AC Line
AC Input
AC Input
DC Power Line Output 42
~50VDC
DC Power Line Output 42
~50VDC
Power Supplies Comm.
Communication.
Communication.
+5VCC
+5VCC
+5VCC
+5VCC
Reflectometer
Peak
Carrier
470 ~ 806MHz
GAIN = +52dB ±4dB
POUT: 215 W @ ATSC3.0
POUT: 225 W @ ATSC1.0
PA702MP
RF OUT
53.30 to 53.52 dBm
1
1
NOTES:
1 – See PA702MP
Channel Range
Table
52 | 106
E-Compact Medium Power
H
G
F
E
D
C
B
A
8 7 6 5 4 3 2 1
H
G
F
E
D
C
B
A
8 7 6 5 4 3 2 1
Channel RangeTable
PA702MP
CHANEL RANGE PA702MP DOHERTY COMBINER PA702MP COMBINER 1:1
14 ~ 17 HKL1001100 - MOD CIM 30238 470-494MHZ MP HKL1003777 - MOD 40176 SOM 1:1 470-570MHZ MP
18 ~ 21 HKL1001101 - MOD CIM 30239 494-518MHZ MP HKL1003777 - MOD 40176 SOM 1:1 470-570MHZ MP
22 ~ 24 HKL1001102 - MOD CIM 30240 518-534MHZ MP HKL1003777 - MOD 40176 SOM 1:1 470-570MHZ MP
25 ~ 26 HKL1001103 - MOD CIM 30241 534-550MHZ MP HKL1003777 - MOD 40176 SOM 1:1 470-570MHZ MP
27 ~ 29 HKL1001104 - MOD CIM 30242 550-566MHZ MP HKL1003777 - MOD 40176 SOM 1:1 470-570MHZ MP
30 ~ 33 HKL1001105 - MOD CIM 30243 566-590MHZ MP HKL1003779 - MOD 40177 SOM 1:1 570-670MHZ MP
34 ~ 37 HKL1001107 - MOD CIM 30244 590-614MHZ MP HKL1003779 - MOD 40177 SOM 1:1 570-670MHZ MP
38 ~ 41 HKL1001108 - MOD CIM 30245 614-638MHZ MP HKL1003779 - MOD 40177 SOM 1:1 570-670MHZ MP
42 ~ 45 HKL1001109 - MOD CIM 30246 638-662MHZ MP HKL1003779 - MOD 40177 SOM 1:1 570-670MHZ MP
46 HKL1001110 - MOD CIM 30247 662-686MHZ MP HKL1003779 - MOD 40177 SOM 1:1 570-670MHZ MP
47 ~ 49 HKL1001110 - MOD CIM 30247 662-686MHZ MP HKL1003781 - MOD 40178 SOM 1:1 670-770MHZ MP
50 ~ 53 HKL1001111 - MOD CIM 30248 686-710MHZ MPP HKL1003781 - MOD 40178 SOM 1:1 670-770MHZ MP
54 ~ 57 HKL1001112 - MOD CIM 30249 710-734MHZ MP HKL1003781 - MOD 40178 SOM 1:1 670-770MHZ MP
58 ~ 61 HKL1001113 - MOD CIM 30250 734-758MHZ MP HKL1003781 - MOD 40178 SOM 1:1 670-770MHZ MP
62 ~ 63 HKL1001114 - MOD CIM 30251 758-782MHZ MP HKL1003781 - MOD 40178 SOM 1:1 670-770MHZ MP
64 ~ 65 HKL1001114 - MOD CIM 30251 758-782MHZ MP HKL1003783 - MOD 40179 SOM 1:1 770-806MHZ MP
66 ~ 69 HKL1001115 - MOD CIM 30252 782-806MHZ MP HKL1003783 - MOD 40179 SOM 1:1 770-806MHZ MP
53 | 106
E-Compact Medium Power
H
G
F
E
D
C
B
A
8 7 6 5 4 3 2 1
H
G
F
E
D
C
B
A
8 7 6 5 4 3 2 1
Block Diagram
PA704MP
Power Supply 1
Power Supply 2
PA 1
PA 2
PA 3
PA 4
Alarms Led
Driver
FAN 1
FAN 2
FAN 3
Control
Fan Control
Alarms Led
PA Control
REF Power
FWD Power
Drive Control
Control Module / Exciter Interface
Communication – Drawer Address
Power Supplies Interface
Communication
USB Comm
+5Vcc
Power Supplies Comm.
USB Comm
DC Power Line
42 ~50VDC
2400 Watts MAX
RF OUT
56.00 to 56.53 dBm
Control Module / Exciter
Comm. – Drawer Address
Power Amplifiers
470 ~ 806MHz
GAIN = +52dB ±4dB
POUT: 400 W @ ATSC3.0
POUT: 450 W @ ATSC1.0
FWD
REF
SAMPLE
+5Vcc
Control
Module
/
Exciter
Comm.
–
Drawer
Address
Comm
RF SAMPLE
+10dBm (-46dB)
RF IN
0.0 ~ 8.0 dBm
AC Line
1
AC Input
AC Input
DC Power Line Output 42
~50VDC
DC Power Line Output 42
~50VDC
Power Supplies Comm.
Communication.
Communication.
+5VCC
+5VCC
+5VCC
+5VCC
Reflectometer
Peak
Carrier
Peak
Carrier
PA704MP
1
NOTES:
1 – See PA704MP
Channel Range
Table
54 | 106
E-Compact Medium Power
H
G
F
E
D
C
B
A
8 7 6 5 4 3 2 1
H
G
F
E
D
C
B
A
8 7 6 5 4 3 2 1
CHANEL RANGE PA704MP DOHERTY COMBINER
14 ~ 17 HKL1000524 - MOD CIM 30146 470-494MHZ MP
18 ~ 21 HKL1000525 - MOD CIM 30147 494-518MHZ MP
22 ~ 24 HKL1000526 - MOD CIM 30148 518-534MHZ MP
25 ~ 26 HKL1000527 - MOD CIM 30149 534-550MHZ MP
27 ~ 29 HKL1000528 - MOD CIM 30161 550-566MHZ MP
30 ~ 33 HKL1000529 - MOD CIM 30150 566-590MHZ MP
34 ~ 37 HKL1000530 - MOD CIM 30151 590-614MHZ MP
38 ~ 41 HKL1000531 - MOD CIM 30152 614-638MHZ MP
42 ~ 45 HKL1000532 - MOD CIM 30153 638-662MHZ MP
46 ~ 49 HKL1000533 - MOD CIM 30154 662-686MHZ MP
50 ~ 53 HKL1000534 - MOD CIM 30155 686-710MHZ MP
54 ~ 57 HKL1000535 - MOD CIM 30156 710-734MHZ MP
58 ~ 61 HKL1000536 - MOD CIM 30157 734-758MHZ MP
62 ~ 65 HKL1000537 - MOD CIM 30158 758-782MHZ MP
66 ~ 69 HKL1000538 - MOD CIM 30159 782-806MHZ MP
Channel RangeTable
PA704MP
55 | 106
E-Compact Medium Power
6.2.4. Signaling LEDs
Each Power Amplifier Drawer Features a LED bank that indicates the situation of its operation according
to the color As shown below::
Green Normal operation.
Orange Orange light indicates That a failure has occurred.
Red Flashing Red light indicates an ongoing failure.
LED ALARM
PWR N/A - This LED lights only GREEN indicating that is POWERED ON.
SHDN Power Supply Shutdown
FWD Over Forward Power (Overdrive)
RFD Reflected Power
PA
PA Failure, High Current on PA, Low Current on PA, Current UNBAL on PA, Low
Gain on PA, High Temperature on PA, Communication Failure on PA.
DRV
High Current on Driver, Low Current on Driver, Low Current on Pre Driver, High
Current on Pre Driver, Low Gain on Driver, High Temperature on Driver, Low
Voltage on Driver, Communication Failure on Driver, High Input Signal, High
Driver Output Level.
PSU
Low AC Line Voltage, High AC Line Voltage, Low PSU Voltage, High PSU Voltage,
High PSU Current, High PFC Temperature, High DC/DC Temperature, PSU
Communication Failure.
FAN/TEMP
When detected slow speed of rotation or complete failure in any of the fans.
High temperature input air of the power drawer (greater than 35ºC).
Alarm details are displayed by accessing the keyboard-display interface of the Control Module CM8001
in the menus:
⇨ Main Menu ⇨ System Alarms/Log [3000] ⇨ Drawers Alarms ⇨ Current Drawers Alarms [3310]
⇨ Main Menu ⇨ System Alarms/Log [3000] ⇨ Drawers Alarms ⇨ Past Drawers Alarms [3320]
PWR
SHDN
FWD
RFD
PA
DRV
PSU
FAN/
TEMP
56 | 106
E-Compact Medium Power
6.2.5. Communication interface (COMM)
6.2.6. 1200 Watts Powers Supplies
The Power Amplifiers Drawers use two 1200 Watts plug-in power supplies. Each of the power
supplies in the power amplifier converts 180-240VAC single-phase line voltage to 40-50VDC to power the
RF pallets.
Never unplug any Power Supplies while the Transmitter is on. Risk of equipment
damage.
The power supplies feature a quick-connect system that allows the unit to be easily removed
through the front of the power amplifier chassis. The power supply includes power factor correction, built-
in I-rush protection as well as overload protection (over-temperature, voltage, and current). The
configuration of 2-PS per power amplifier provides a soft-fail mode.
COMM
57 | 106
E-Compact Medium Power
H
G
F
E
D
C
B
A
8 7 6 5 4 3 2 1
H
G
F
E
D
C
B
A
8 7 6 5 4 3 2 1
Power Supply Replacement
PA702MP / PA704MP
58 | 106
E-Compact Medium Power
6.2.7. Power Supply 1200Watts – MOD 40241:
AC/DC Converter - PFC
AC Mains Input 180 ~240 VAC
AC Mains Frequency 50 ~ 60Hz
Switching Frequency 100kHz
DC Output 375VDC
Power DC Output 1.32kW
Power Factor > 0.92%
DC/DC Converter
DC Input 350 ~400vdc
Switching Frequency 50kHz
DC Output
40 ~50vdc
Adjustable
Power DC Output 1.2kW
Max Current 24A
Ripple <400mVpp
Flyback
AC Mains Input 180 ~240 VAC
AC Mains Frequency 50 ~ 60Hz
Switching Frequency 65kHz
DC Output +5VDC
Power DC Output 18W
Connection:
Rear View
59 | 106
E-Compact Medium Power
6.3.EIA 1-5/8” low pass filter
The Low Pass Filter is installed between the Power Amplifier Drawer RF Output and the Mask Filter
attenuating unwanted harmonic products so that they do not return as reflected wave to the PA.
Low Pass Filter Frequency Range and Models:
6.3.1. Features
Operation Frequency
470 to 608MHz CH14 to CH36 (MOD 40243)
608 to 710MHz CH37 to CH53 (MOD 40055)
710 to 806MHz CH54 to CH69 (MOD 40055)
Connector / Impedance
INPUT: DIN 7/16” 50 Ω
OUTRPUT: EIA 1-5/8” / 50 Ω
Max Power 3300 Watts
Return Loss
-26dB (min)
-30dB (typical)
Insertion Loss
-0,06dB (max)
-0,05dB (typical)
Second Harmonic
Attenuation
Better than -30dB
RF IN
RF OUT
CHANNEL RANGE MODEL
14 to 36 HKL1007123 - MOD 40243 Fil PB 470-608MHz
37 to 53 00057663 - MOD 40055 FIL PB 590-710
54 to 69 HKL1007123 - MOD 40243 Fil PB 470-608MHz
60 | 106
E-Compact Medium Power
6.4.MOD 40215 EIA RF Output Line with Sample Probe
The 4.5. EIA RF Output Line with Sample Probe is a passive coaxial RF sample installed in the
Mask Filter RF output and has four independent RF outputs samples.
It has two signal samples for use in the non-linear adjustment, a sample for the reflected power
monitoring and a direct power monitoring sample.
6.4.1. Features
RF DIRECTION
RF IN RF OUT
D - FWD
A - FWD B - FWD
C - REF
Operation Frequency 470 to 806MHz CH14 to CH69
Max Power 5500 Watts
Insertion Loss (RF IN – RF OUT) -0.13dB (MAX); -0.10dB (MIN)
RF OUT
Connection: 1-5/8” EIA Flange
Return Loss: -36dB (TYPICAL); -31dB (MIN)
Impedance: 50Ω
RF IN
Connection: 1-5/8” EIA Flange
Return Loss: -36dB (TYPICAL); -31dB (MIN)
Impedance: 50Ω
61 | 106
E-Compact Medium Power
Check on the Sample output connectors labels the coupling curve for the corresponding
frequency of the equipment.
A – FWD Sample Use for Non-Linear Correction
Forward Power Sample
Connection: N
Coupling: -52dB (MAX); -61dB (MIN)
Impedance: 50Ω
B – FWD Sample
C – REF Sample
To monitor Reflected Power Output.
Reflected Power Sample
Connection: N
Coupling: -52dB (MAX); -61dB (MIN)
Impedance: 50Ω
D – FWD Sample
To monitor Forward Power Output.
Forward Power Sample
Connection: N
Coupling: -52dB (MAX); -61dB (MIN)
Impedance: 50Ω
Samples Return Loss -28dB (TYPICAL); -27dB (MIN)
Insulation between RF OUT And
FWD Samples A, B and D
-30dB (TYPICAL); -27dB (MIN)
Insulation between RF IN And REF
Sample C
-30dB (TYPICAL); -27dB (MIN
Label Coupling Curve
62 | 106
E-Compact Medium Power
6.5.AC Mains Protection Unit
The AC Protection Unit is responsible for the AC Power distribution and Equipment AC Power
protection.
Characteristics:
⇨ Surge Protection Device (SPD).
⇨ Circuit Breaker.
⇨ AC Line Input.
⇨ AC Mains Internal distribution.
⇨ AC Mains Available:
6.5.1. Sparkover - Phase Surge Protection Device (SPD).
It is a device that limits overvoltages in the mains by diverting the current line to ground, in order to limit
the amplitude of this overvoltage to a value that is not dangerous to the equipment. It is connected in
parallel between the line and the ground and has high impedance. Once the transient overvoltage appears
in the system, the impedance of the device decreases and directs the current to earth protecting the
equipment. When this occurs, the device signals a red flag, needing for its replacement:
Sparkover Changing
RED:
Fault
Warning
M208
1 Φ 190~240VAC
Neutral
GND
B240
2 Φ 190~240VAC
GND
T208 / T240
3 Φ 190~240VAC
GND
T380
3 Φ 190~240VAC
Neutral
GND
EC Medium Power – Rear View
Mains
Protection
Unit
63 | 106
E-Compact Medium Power
Sparkovers types:
PHASE
2807586
150VAC SURGE
PROTECTION VARISTOR
Ground Ground
B240
PHASE PHASE
PHASE
PHASE
2798844
275VAC SURGE
PROTECTION VARISTOR
Ground Ground
M208
NEUTRAL NEUTRAL
PHASE
2817990
260VAC SURGE
PROTECTION SPARKLER
Never open the device: there is a risk of electric shock. If necessary, contact Hitachi
Service.
Before Connecting the Machine to the AC Mains, one must ensure that the grid
Voltage meets the equipment’s settings.
Never expose the equipment to rain, moisture or direct sunlight, in order to avoiding risk of
fire or electric shock.
2798844 – 275VAC SURGE PROTECTION VARISTOR
2817990 – 260VAC SURGE PROTECTION SPARKLER
2807586 – 150VAC SURGE PROTECTION VARISTOR
About AC MAINS TYPE, see Section 8 –
Attachments, USA AC Mains Types for E-
Compact Series.
64 | 106
E-Compact Medium Power
H
G
F
E
D
C
B
A
8 7 6 5 4 3 2 1
H
G
F
E
D
C
B
A
8 7 6 5 4 3 2 1
6.5.2. M208 Mains Protection Unit – 208VAC WILD LEG
1 Φ 208VAC
Neutral
GND
1 Bipolar Circuit Breaker 25A 5SL1 225-7MB
2 Sparkler F-MS 12 ST- TVS 260 VAC
3 Varistor VAL-MS 230 ST - 275Vac
4 GND / Neutral Input Connector
5 GND / Neutral Protection Connector
3
2
1
5
4
Neutral (Grey)
Phase (Red)
Ground (yelow/green)
65 | 106
E-Compact Medium Power
H
G
F
E
D
C
B
A
8 7 6 5 4 3 2 1
H
G
F
E
D
C
B
A
8 7 6 5 4 3 2 1
6.5.3. B240 Mains Protection Unit –SINGLE PHASE 240 VAC
2 Φ 240VAC
GND
1 Bipolar Circuit Breaker 25A 5SL1 225-7MB
2 Varistor VAL-MS 120 ST - 150Vac
3 Varistor VAL-MS 120 ST - 150Vac
4 GND / Neutral Input Connector
5 GND / Neutral Protection Connector
2
3
1
4
5
Phase (Grey)
Phase (Red)
Ground (yelow/green)
66 | 106
E-Compact Medium Power
6.5.4. Changing AC Mains
Once the mains power is set at the factory, there is the possibility to change its input type feature for the
following cases:
For Not Available cases, it is necessary to replace the complete AC Mains Module
for the compatible electrical grid. Contact Hitachi Kokusai Linear Service.
When replacing the AC Mains type, pay attention to circuit breakers, varistors and
sparklers models for their characteristics. Each type of AC Mains uses different
values of these protection components.
Using these protection components outside the features described in this manual
may cause damage to the equipment.
AC Main Factory Set
Setup Change Possibility
M208 B240 T208 / T240 T380
M208 Factory Set
USE B220 Setup
See 6.5.3
Not Available Not Available
B240
USE M220 Setup
See 6.5.2
Factory Set Not Available Not Available
67 | 106
E-Compact Medium Power
6.6.Exciter Interface
The transmitters of the E-Compact Medium Power family have a monitoring interface for external exciters
to communicate with the CM8001 Control Module. There are two interfaces, one for the main driver and
one for the backup:
Control I/O In Parameters Status
P4 Exciter Status
Exciter Status to respective
CM 8001 Controler.
P9 VCC +5 VCC
P9
P4
DB9 Male – Exciter Communication
68 | 106
E-Compact Medium Power
Section 4 – Installation
1. Overview.
This section provides general information for planning the installation of the E-Compact Medium Power
Line Transmitters, such as recommendations regarding Shelter, Tower, Antennas, Cables, Grounding,
Power Line, Prevention against Transients, etc.
2. Inspection.
The package and the equipment must be inspected upon delivery in order to detect eventual visible
damages. If there are signs of violation or physical damage (which points to transportation problems), the
corresponding evidences should be described in the delivery documentation provided by the transport
company. Such notice would be used to establish the responsibilities for the product integrity.
Hitachi Kokusai Linear carries out operating tests at the factory on every transmitter in order to ensure
proper operation after delivery to the user. Nevertheless, if the equipment does not operate after the start-
up and there is no evidence of transportation damage, it might be necessary to send the equipment back
to the factory for repair or replacement. In such a case, please get in contact with Hitachi Kokusai Linear
Equipamentos Eletrônicos S/A's Technical Support Department.
3. Installation Recommendations.
3.1.Preventive Protection
Voltage transients with a duration of micro and nano-seconds are a constant challenge for solid state
circuits. The downtime and the equipment maintenance make the preventive protection the best warranty
against these surges. This protection can be in many forms, from isolation transformers and no-breaks to
the more efficient but more expensive AC Voltage Protectors. Since lightning is the most common cause
of transients, AC Voltage Protectors are the best choice.
An efficient AC Voltage Protection must be able to dissipate the energy to a low voltage, sufficient to
guarantee the protection of the electronic components. The protection Must always be placed transversely
to the AC line, even during blackout periods. In addition, it must be immediately and automatically turned-
on and ready in case of repeated transients.
3.2.Tower
For the installation of the TV transmission and reception system, the tower must be made with hot-dip
galvanized steel. A lightning protection system should be installed in the tower as well as nocturnal
beacons bulbs with red glass.
The following information about the tower must be obtained:
69 | 106
E-Compact Medium Power
a) It feature of special insulator supports for descent of cordage of lightning rod, with a space of 1,5m
maximum between them.
b) There must be a lightning signaling system in every 20m along the tower.
c) It must be painted with orange and white stripes in every 2m with a special paint that complies with
local regulations.
d) It must endure winds of up to 150 Km/h.
In a retransmission station the tower is the highest and therefore, the most vulnerable device to be hit by
lightning and because of it, the tower is used as a part of the protection system. The lightning protection
device used in these cases is called lightning rod and has the function of guiding the electrical discharge
safely, avoiding other parts of the system to be hit and damaged by it.
The use of a lightning rod is MANDATORY. The project and installation of grounding and lightning
protection systems must be performed by specialized companies. Eventual damage to the equipment
caused by missing or malfunctioning arrester is not covered by warranty.
3.3.Fastening of cables, antennas and connectors
Please observe the following items when installing antennas:
Direction of Antennas and Aperture Angles
Use a pocket compass when directing the antenna. Use a field strength meter for the fine adjustment of
the reception antenna.
Height
It mainly depends on the receiving signal and the transmission conditions (obstructions, attended area,
etc). It’s very important to verify how far the antenna is from the lightning protection device, since the
antenna must stay inside its cone protection.
Distance between the Rx and Tx Antennas
They should be placed as far as possible from each other in order to isolate the transmitted signal from
the received signal.
Polarization
It is very important to verify the polarization of the received signal, which can be vertical, horizontal or
circular.
Phasing
When receiving a signal with vertical polarization, the system must be mounted vertically, otherwise the
gain of the antenna will be drastically reduced, likewise in case of a signal with horizontal polarization.
To receive a signal with circular polarization with a non-circular antenna, the system can be mounted either
vertically or horizontally.
70 | 106
E-Compact Medium Power
Stacking antennas
When using this system, the distance between them depends on the kinds of antenna used and the kind
of stacking used. This must be studied thoroughly in order to obtain the best solution for each case.
Cables and Connectors
All cables must be carefully installed in order not to be twisted during the installation process. When using
7/8" or 1/2" cables, please pay attention to their bending that must not be made in spaces smaller than
80cm. The cables can't force the connectors in the Input/Output of the equipment. The entry holes for the
cables in the shelter must be done in a way to avoid the water that runs along them to get inside.
Follow the manufacturer 's instructions when assembling them. All splices done outside the shelter must
be isolated with a special plastic tape and/or a plastic insulation material.
Avoid using silicon to coat the isolation made with auto-fusion tape. It has been verified that the silicon
chemical characteristics may provoke the drying of the auto-fusion tape.
3.4.Indoors Equipment Installation
Small equipment must be placed on a table in a way to provide easy access from all sides and be at
least one meter far from the walls.
Do not compromise the equipment’s air flow by placing objects on its top panel. Its natural ventilation.
The equipment must be placed directly on the shelter's floor as long as it is flat and they must be placed
at least one meter far from the walls to avoid obstruction of its ventilation system.
Some of these air outlet must be connected to the outside of the shelter through PVC tubing.
The AC cable has two terminations to be used exclusively in the equipment.
3.5.Equipment Grounding
Assemble the grounding separately from the power supply, with a rig and a grounding terminal that
come with the equipment.
Normally, the retransmission sites are located in the highest spot of the chosen location, making them
more vulnerable to lightning strikes.
These discharges carry a great amount of electric energy, putting at risk not only the antenna and its
structure but also the equipment in the shelters. In order to minimize this effect and guarantee their
protection and continuous service during thunderstorms with lightning, the use of a reliable grounding
system is mandatory.
Lightning is a transient, high-current electric discharge that happens between the ground and the clouds
therefore the most important part of a lightning protection system are the parts that are on the ground. In
order to maintain the low impedance of the technical grounding system, it must be carefully executed in
a way that the electric field energy is drained away without affecting the equipment. In order to define a
system, the characteristics of the soil resistivity must be taken into consideration.
71 | 106
E-Compact Medium Power
To determine the behavior of the soil capacity to drain the currents, its resistivity has to be measured.
For an adequate protection this value should not exceed 5 , being zero the ideal value
Generally, the grounding method used for TV retransmitters is a system with a single vertical electrode
made with copper measuring 2.5 meters or more.
In case the conditions and characteristics of the soil are of high resistivity or high incidence of lightning
discharges, the grounding system must be thoroughly analyzed.
It is very important to notice that the grounding systems of the equipment and the lightning rod are
independent and should never be connected to each other. A poorly elaborated grounding system can
cause damages to the equipment that won't be covered by the warranty.
3.6.Electric Installation Grounding
The shelter installations receive power through an aerial power line. Moreover, because of it, the
lightning discharges that might hit the power lines generate power surges that can reach the shelter and
consequently the equipment.
To protect the equipment against eventual power surges, we recommend the use of gas filled surge
protectors, after an isolation transformer with electrostatic shield.
When installing the grounding system, please observe the following items:
Connect all equipment carcasses to the grounding system using the grounding rig
that comes with them.
Connect the gate and all the wires from the fence to the grounding system.
Connect the neutral wire from the public power line to the grounding system.
Connect the rig from the lightning rod to the grounding system with the shortest
connection possible avoiding cable splices.
The tower’s structure must also be connected to the grounding system. Use
porcelain isolators to insulate the lightning rod rig.
3.7.Power Supply
Before plugging the equipment to the power supply, verify the voltage in the outlet to make sure that is
correct.If its variation is greater than 10%, it is necessary to use a power stabilizer to correct the voltage.
The power provided by the stabilizer must be at least 30% greater than the consumption of the
equipment
Ecompact medium power_series

More Related Content

Similar to Ecompact medium power_series

New Holland TC5080 Combine Harvesters Service Repair Manual Instant Download ...
New Holland TC5080 Combine Harvesters Service Repair Manual Instant Download ...New Holland TC5080 Combine Harvesters Service Repair Manual Instant Download ...
New Holland TC5080 Combine Harvesters Service Repair Manual Instant Download ...taishang3939
 
New Holland TC5060 Combine Harvesters Service Repair Manual.pdf
New Holland TC5060 Combine Harvesters Service Repair Manual.pdfNew Holland TC5060 Combine Harvesters Service Repair Manual.pdf
New Holland TC5060 Combine Harvesters Service Repair Manual.pdfhmc151121
 
New Holland TC5070 Hillside Combine Harvesters Service Repair Manual Instant ...
New Holland TC5070 Hillside Combine Harvesters Service Repair Manual Instant ...New Holland TC5070 Hillside Combine Harvesters Service Repair Manual Instant ...
New Holland TC5070 Hillside Combine Harvesters Service Repair Manual Instant ...taishang3939
 
New Holland TC5070 Hillside Combine Harvesters Service Repair Manual 1.pdf
New Holland TC5070 Hillside Combine Harvesters Service Repair Manual 1.pdfNew Holland TC5070 Hillside Combine Harvesters Service Repair Manual 1.pdf
New Holland TC5070 Hillside Combine Harvesters Service Repair Manual 1.pdfhmc151121
 
New Holland TC5060 Combine Harvesters Service Repair Manual Instant Download ...
New Holland TC5060 Combine Harvesters Service Repair Manual Instant Download ...New Holland TC5060 Combine Harvesters Service Repair Manual Instant Download ...
New Holland TC5060 Combine Harvesters Service Repair Manual Instant Download ...taishang3939
 
New Holland TC5040 Combine Harvesters Service Repair Manual.pdf
New Holland TC5040 Combine Harvesters Service Repair Manual.pdfNew Holland TC5040 Combine Harvesters Service Repair Manual.pdf
New Holland TC5040 Combine Harvesters Service Repair Manual.pdfhmc151121
 
New Holland TC5050 Combine Harvesters Service Repair Manual.pdf
New Holland TC5050 Combine Harvesters Service Repair Manual.pdfNew Holland TC5050 Combine Harvesters Service Repair Manual.pdf
New Holland TC5050 Combine Harvesters Service Repair Manual.pdfhmc151121
 
New Holland TC5080 Hillside Combine Harvesters Service Repair Manual 1.pdf
New Holland TC5080 Hillside Combine Harvesters Service Repair Manual 1.pdfNew Holland TC5080 Hillside Combine Harvesters Service Repair Manual 1.pdf
New Holland TC5080 Hillside Combine Harvesters Service Repair Manual 1.pdfhmc151121
 
New Holland TC5070 Combine Harvesters Service Repair Manual.pdf
New Holland TC5070 Combine Harvesters Service Repair Manual.pdfNew Holland TC5070 Combine Harvesters Service Repair Manual.pdf
New Holland TC5070 Combine Harvesters Service Repair Manual.pdfhmc151121
 
New Holland TC5070 Hillside Combine Harvesters Service Repair Manual Instant ...
New Holland TC5070 Hillside Combine Harvesters Service Repair Manual Instant ...New Holland TC5070 Hillside Combine Harvesters Service Repair Manual Instant ...
New Holland TC5070 Hillside Combine Harvesters Service Repair Manual Instant ...taishang3939
 
New Holland TC5070 Combine Harvesters Service Repair Manual Instant Download ...
New Holland TC5070 Combine Harvesters Service Repair Manual Instant Download ...New Holland TC5070 Combine Harvesters Service Repair Manual Instant Download ...
New Holland TC5070 Combine Harvesters Service Repair Manual Instant Download ...taishang3939
 
New Holland TC5080 Combine Harvesters Service Repair Manual Instant Download ...
New Holland TC5080 Combine Harvesters Service Repair Manual Instant Download ...New Holland TC5080 Combine Harvesters Service Repair Manual Instant Download ...
New Holland TC5080 Combine Harvesters Service Repair Manual Instant Download ...taishang3939
 
New holland tc5080 hillside combine harvesters service repair manual
New holland tc5080 hillside combine harvesters service repair manualNew holland tc5080 hillside combine harvesters service repair manual
New holland tc5080 hillside combine harvesters service repair manualuudfjjjskkemmd
 
New holland tc5050 combine harvesters service repair manual
New holland tc5050 combine harvesters service repair manualNew holland tc5050 combine harvesters service repair manual
New holland tc5050 combine harvesters service repair manualfujsjefwekskemm
 
New holland tc5080 hillside combine harvesters service repair manual
New holland tc5080 hillside combine harvesters service repair manualNew holland tc5080 hillside combine harvesters service repair manual
New holland tc5080 hillside combine harvesters service repair manualujjfdjkjskkmdm
 
New Holland TC5060 Combine Harvesters Service Repair Manual.pdf
New Holland TC5060 Combine Harvesters Service Repair Manual.pdfNew Holland TC5060 Combine Harvesters Service Repair Manual.pdf
New Holland TC5060 Combine Harvesters Service Repair Manual.pdfzui07gang
 
New Holland TC5080 Combine Harvesters Service Repair Manual.pdf
New Holland TC5080 Combine Harvesters Service Repair Manual.pdfNew Holland TC5080 Combine Harvesters Service Repair Manual.pdf
New Holland TC5080 Combine Harvesters Service Repair Manual.pdfzui07gang
 
New Holland TC5070 Hillside Combine Harvesters Service Repair Manual 1.pdf
New Holland TC5070 Hillside Combine Harvesters Service Repair Manual 1.pdfNew Holland TC5070 Hillside Combine Harvesters Service Repair Manual 1.pdf
New Holland TC5070 Hillside Combine Harvesters Service Repair Manual 1.pdfzui07gang
 
New Holland TC5080 Hillside Combine Harvesters Service Repair Manual 1.pdf
New Holland TC5080 Hillside Combine Harvesters Service Repair Manual 1.pdfNew Holland TC5080 Hillside Combine Harvesters Service Repair Manual 1.pdf
New Holland TC5080 Hillside Combine Harvesters Service Repair Manual 1.pdfzui07gang
 
New Holland TC5040 Combine Harvesters Service Repair Manual.pdf
New Holland TC5040 Combine Harvesters Service Repair Manual.pdfNew Holland TC5040 Combine Harvesters Service Repair Manual.pdf
New Holland TC5040 Combine Harvesters Service Repair Manual.pdfzui07gang
 

Similar to Ecompact medium power_series (20)

New Holland TC5080 Combine Harvesters Service Repair Manual Instant Download ...
New Holland TC5080 Combine Harvesters Service Repair Manual Instant Download ...New Holland TC5080 Combine Harvesters Service Repair Manual Instant Download ...
New Holland TC5080 Combine Harvesters Service Repair Manual Instant Download ...
 
New Holland TC5060 Combine Harvesters Service Repair Manual.pdf
New Holland TC5060 Combine Harvesters Service Repair Manual.pdfNew Holland TC5060 Combine Harvesters Service Repair Manual.pdf
New Holland TC5060 Combine Harvesters Service Repair Manual.pdf
 
New Holland TC5070 Hillside Combine Harvesters Service Repair Manual Instant ...
New Holland TC5070 Hillside Combine Harvesters Service Repair Manual Instant ...New Holland TC5070 Hillside Combine Harvesters Service Repair Manual Instant ...
New Holland TC5070 Hillside Combine Harvesters Service Repair Manual Instant ...
 
New Holland TC5070 Hillside Combine Harvesters Service Repair Manual 1.pdf
New Holland TC5070 Hillside Combine Harvesters Service Repair Manual 1.pdfNew Holland TC5070 Hillside Combine Harvesters Service Repair Manual 1.pdf
New Holland TC5070 Hillside Combine Harvesters Service Repair Manual 1.pdf
 
New Holland TC5060 Combine Harvesters Service Repair Manual Instant Download ...
New Holland TC5060 Combine Harvesters Service Repair Manual Instant Download ...New Holland TC5060 Combine Harvesters Service Repair Manual Instant Download ...
New Holland TC5060 Combine Harvesters Service Repair Manual Instant Download ...
 
New Holland TC5040 Combine Harvesters Service Repair Manual.pdf
New Holland TC5040 Combine Harvesters Service Repair Manual.pdfNew Holland TC5040 Combine Harvesters Service Repair Manual.pdf
New Holland TC5040 Combine Harvesters Service Repair Manual.pdf
 
New Holland TC5050 Combine Harvesters Service Repair Manual.pdf
New Holland TC5050 Combine Harvesters Service Repair Manual.pdfNew Holland TC5050 Combine Harvesters Service Repair Manual.pdf
New Holland TC5050 Combine Harvesters Service Repair Manual.pdf
 
New Holland TC5080 Hillside Combine Harvesters Service Repair Manual 1.pdf
New Holland TC5080 Hillside Combine Harvesters Service Repair Manual 1.pdfNew Holland TC5080 Hillside Combine Harvesters Service Repair Manual 1.pdf
New Holland TC5080 Hillside Combine Harvesters Service Repair Manual 1.pdf
 
New Holland TC5070 Combine Harvesters Service Repair Manual.pdf
New Holland TC5070 Combine Harvesters Service Repair Manual.pdfNew Holland TC5070 Combine Harvesters Service Repair Manual.pdf
New Holland TC5070 Combine Harvesters Service Repair Manual.pdf
 
New Holland TC5070 Hillside Combine Harvesters Service Repair Manual Instant ...
New Holland TC5070 Hillside Combine Harvesters Service Repair Manual Instant ...New Holland TC5070 Hillside Combine Harvesters Service Repair Manual Instant ...
New Holland TC5070 Hillside Combine Harvesters Service Repair Manual Instant ...
 
New Holland TC5070 Combine Harvesters Service Repair Manual Instant Download ...
New Holland TC5070 Combine Harvesters Service Repair Manual Instant Download ...New Holland TC5070 Combine Harvesters Service Repair Manual Instant Download ...
New Holland TC5070 Combine Harvesters Service Repair Manual Instant Download ...
 
New Holland TC5080 Combine Harvesters Service Repair Manual Instant Download ...
New Holland TC5080 Combine Harvesters Service Repair Manual Instant Download ...New Holland TC5080 Combine Harvesters Service Repair Manual Instant Download ...
New Holland TC5080 Combine Harvesters Service Repair Manual Instant Download ...
 
New holland tc5080 hillside combine harvesters service repair manual
New holland tc5080 hillside combine harvesters service repair manualNew holland tc5080 hillside combine harvesters service repair manual
New holland tc5080 hillside combine harvesters service repair manual
 
New holland tc5050 combine harvesters service repair manual
New holland tc5050 combine harvesters service repair manualNew holland tc5050 combine harvesters service repair manual
New holland tc5050 combine harvesters service repair manual
 
New holland tc5080 hillside combine harvesters service repair manual
New holland tc5080 hillside combine harvesters service repair manualNew holland tc5080 hillside combine harvesters service repair manual
New holland tc5080 hillside combine harvesters service repair manual
 
New Holland TC5060 Combine Harvesters Service Repair Manual.pdf
New Holland TC5060 Combine Harvesters Service Repair Manual.pdfNew Holland TC5060 Combine Harvesters Service Repair Manual.pdf
New Holland TC5060 Combine Harvesters Service Repair Manual.pdf
 
New Holland TC5080 Combine Harvesters Service Repair Manual.pdf
New Holland TC5080 Combine Harvesters Service Repair Manual.pdfNew Holland TC5080 Combine Harvesters Service Repair Manual.pdf
New Holland TC5080 Combine Harvesters Service Repair Manual.pdf
 
New Holland TC5070 Hillside Combine Harvesters Service Repair Manual 1.pdf
New Holland TC5070 Hillside Combine Harvesters Service Repair Manual 1.pdfNew Holland TC5070 Hillside Combine Harvesters Service Repair Manual 1.pdf
New Holland TC5070 Hillside Combine Harvesters Service Repair Manual 1.pdf
 
New Holland TC5080 Hillside Combine Harvesters Service Repair Manual 1.pdf
New Holland TC5080 Hillside Combine Harvesters Service Repair Manual 1.pdfNew Holland TC5080 Hillside Combine Harvesters Service Repair Manual 1.pdf
New Holland TC5080 Hillside Combine Harvesters Service Repair Manual 1.pdf
 
New Holland TC5040 Combine Harvesters Service Repair Manual.pdf
New Holland TC5040 Combine Harvesters Service Repair Manual.pdfNew Holland TC5040 Combine Harvesters Service Repair Manual.pdf
New Holland TC5040 Combine Harvesters Service Repair Manual.pdf
 

Recently uploaded

Slack Application Development 101 Slides
Slack Application Development 101 SlidesSlack Application Development 101 Slides
Slack Application Development 101 Slidespraypatel2
 
Presentation on how to chat with PDF using ChatGPT code interpreter
Presentation on how to chat with PDF using ChatGPT code interpreterPresentation on how to chat with PDF using ChatGPT code interpreter
Presentation on how to chat with PDF using ChatGPT code interpreternaman860154
 
Artificial Intelligence: Facts and Myths
Artificial Intelligence: Facts and MythsArtificial Intelligence: Facts and Myths
Artificial Intelligence: Facts and MythsJoaquim Jorge
 
The Codex of Business Writing Software for Real-World Solutions 2.pptx
The Codex of Business Writing Software for Real-World Solutions 2.pptxThe Codex of Business Writing Software for Real-World Solutions 2.pptx
The Codex of Business Writing Software for Real-World Solutions 2.pptxMalak Abu Hammad
 
08448380779 Call Girls In Civil Lines Women Seeking Men
08448380779 Call Girls In Civil Lines Women Seeking Men08448380779 Call Girls In Civil Lines Women Seeking Men
08448380779 Call Girls In Civil Lines Women Seeking MenDelhi Call girls
 
Understanding Discord NSFW Servers A Guide for Responsible Users.pdf
Understanding Discord NSFW Servers A Guide for Responsible Users.pdfUnderstanding Discord NSFW Servers A Guide for Responsible Users.pdf
Understanding Discord NSFW Servers A Guide for Responsible Users.pdfUK Journal
 
IAC 2024 - IA Fast Track to Search Focused AI Solutions
IAC 2024 - IA Fast Track to Search Focused AI SolutionsIAC 2024 - IA Fast Track to Search Focused AI Solutions
IAC 2024 - IA Fast Track to Search Focused AI SolutionsEnterprise Knowledge
 
Scaling API-first – The story of a global engineering organization
Scaling API-first – The story of a global engineering organizationScaling API-first – The story of a global engineering organization
Scaling API-first – The story of a global engineering organizationRadu Cotescu
 
CNv6 Instructor Chapter 6 Quality of Service
CNv6 Instructor Chapter 6 Quality of ServiceCNv6 Instructor Chapter 6 Quality of Service
CNv6 Instructor Chapter 6 Quality of Servicegiselly40
 
A Domino Admins Adventures (Engage 2024)
A Domino Admins Adventures (Engage 2024)A Domino Admins Adventures (Engage 2024)
A Domino Admins Adventures (Engage 2024)Gabriella Davis
 
Mastering MySQL Database Architecture: Deep Dive into MySQL Shell and MySQL R...
Mastering MySQL Database Architecture: Deep Dive into MySQL Shell and MySQL R...Mastering MySQL Database Architecture: Deep Dive into MySQL Shell and MySQL R...
Mastering MySQL Database Architecture: Deep Dive into MySQL Shell and MySQL R...Miguel Araújo
 
Breaking the Kubernetes Kill Chain: Host Path Mount
Breaking the Kubernetes Kill Chain: Host Path MountBreaking the Kubernetes Kill Chain: Host Path Mount
Breaking the Kubernetes Kill Chain: Host Path MountPuma Security, LLC
 
TrustArc Webinar - Stay Ahead of US State Data Privacy Law Developments
TrustArc Webinar - Stay Ahead of US State Data Privacy Law DevelopmentsTrustArc Webinar - Stay Ahead of US State Data Privacy Law Developments
TrustArc Webinar - Stay Ahead of US State Data Privacy Law DevelopmentsTrustArc
 
Data Cloud, More than a CDP by Matt Robison
Data Cloud, More than a CDP by Matt RobisonData Cloud, More than a CDP by Matt Robison
Data Cloud, More than a CDP by Matt RobisonAnna Loughnan Colquhoun
 
Finology Group – Insurtech Innovation Award 2024
Finology Group – Insurtech Innovation Award 2024Finology Group – Insurtech Innovation Award 2024
Finology Group – Insurtech Innovation Award 2024The Digital Insurer
 
The Role of Taxonomy and Ontology in Semantic Layers - Heather Hedden.pdf
The Role of Taxonomy and Ontology in Semantic Layers - Heather Hedden.pdfThe Role of Taxonomy and Ontology in Semantic Layers - Heather Hedden.pdf
The Role of Taxonomy and Ontology in Semantic Layers - Heather Hedden.pdfEnterprise Knowledge
 
GenCyber Cyber Security Day Presentation
GenCyber Cyber Security Day PresentationGenCyber Cyber Security Day Presentation
GenCyber Cyber Security Day PresentationMichael W. Hawkins
 
Driving Behavioral Change for Information Management through Data-Driven Gree...
Driving Behavioral Change for Information Management through Data-Driven Gree...Driving Behavioral Change for Information Management through Data-Driven Gree...
Driving Behavioral Change for Information Management through Data-Driven Gree...Enterprise Knowledge
 
The 7 Things I Know About Cyber Security After 25 Years | April 2024
The 7 Things I Know About Cyber Security After 25 Years | April 2024The 7 Things I Know About Cyber Security After 25 Years | April 2024
The 7 Things I Know About Cyber Security After 25 Years | April 2024Rafal Los
 
A Year of the Servo Reboot: Where Are We Now?
A Year of the Servo Reboot: Where Are We Now?A Year of the Servo Reboot: Where Are We Now?
A Year of the Servo Reboot: Where Are We Now?Igalia
 

Recently uploaded (20)

Slack Application Development 101 Slides
Slack Application Development 101 SlidesSlack Application Development 101 Slides
Slack Application Development 101 Slides
 
Presentation on how to chat with PDF using ChatGPT code interpreter
Presentation on how to chat with PDF using ChatGPT code interpreterPresentation on how to chat with PDF using ChatGPT code interpreter
Presentation on how to chat with PDF using ChatGPT code interpreter
 
Artificial Intelligence: Facts and Myths
Artificial Intelligence: Facts and MythsArtificial Intelligence: Facts and Myths
Artificial Intelligence: Facts and Myths
 
The Codex of Business Writing Software for Real-World Solutions 2.pptx
The Codex of Business Writing Software for Real-World Solutions 2.pptxThe Codex of Business Writing Software for Real-World Solutions 2.pptx
The Codex of Business Writing Software for Real-World Solutions 2.pptx
 
08448380779 Call Girls In Civil Lines Women Seeking Men
08448380779 Call Girls In Civil Lines Women Seeking Men08448380779 Call Girls In Civil Lines Women Seeking Men
08448380779 Call Girls In Civil Lines Women Seeking Men
 
Understanding Discord NSFW Servers A Guide for Responsible Users.pdf
Understanding Discord NSFW Servers A Guide for Responsible Users.pdfUnderstanding Discord NSFW Servers A Guide for Responsible Users.pdf
Understanding Discord NSFW Servers A Guide for Responsible Users.pdf
 
IAC 2024 - IA Fast Track to Search Focused AI Solutions
IAC 2024 - IA Fast Track to Search Focused AI SolutionsIAC 2024 - IA Fast Track to Search Focused AI Solutions
IAC 2024 - IA Fast Track to Search Focused AI Solutions
 
Scaling API-first – The story of a global engineering organization
Scaling API-first – The story of a global engineering organizationScaling API-first – The story of a global engineering organization
Scaling API-first – The story of a global engineering organization
 
CNv6 Instructor Chapter 6 Quality of Service
CNv6 Instructor Chapter 6 Quality of ServiceCNv6 Instructor Chapter 6 Quality of Service
CNv6 Instructor Chapter 6 Quality of Service
 
A Domino Admins Adventures (Engage 2024)
A Domino Admins Adventures (Engage 2024)A Domino Admins Adventures (Engage 2024)
A Domino Admins Adventures (Engage 2024)
 
Mastering MySQL Database Architecture: Deep Dive into MySQL Shell and MySQL R...
Mastering MySQL Database Architecture: Deep Dive into MySQL Shell and MySQL R...Mastering MySQL Database Architecture: Deep Dive into MySQL Shell and MySQL R...
Mastering MySQL Database Architecture: Deep Dive into MySQL Shell and MySQL R...
 
Breaking the Kubernetes Kill Chain: Host Path Mount
Breaking the Kubernetes Kill Chain: Host Path MountBreaking the Kubernetes Kill Chain: Host Path Mount
Breaking the Kubernetes Kill Chain: Host Path Mount
 
TrustArc Webinar - Stay Ahead of US State Data Privacy Law Developments
TrustArc Webinar - Stay Ahead of US State Data Privacy Law DevelopmentsTrustArc Webinar - Stay Ahead of US State Data Privacy Law Developments
TrustArc Webinar - Stay Ahead of US State Data Privacy Law Developments
 
Data Cloud, More than a CDP by Matt Robison
Data Cloud, More than a CDP by Matt RobisonData Cloud, More than a CDP by Matt Robison
Data Cloud, More than a CDP by Matt Robison
 
Finology Group – Insurtech Innovation Award 2024
Finology Group – Insurtech Innovation Award 2024Finology Group – Insurtech Innovation Award 2024
Finology Group – Insurtech Innovation Award 2024
 
The Role of Taxonomy and Ontology in Semantic Layers - Heather Hedden.pdf
The Role of Taxonomy and Ontology in Semantic Layers - Heather Hedden.pdfThe Role of Taxonomy and Ontology in Semantic Layers - Heather Hedden.pdf
The Role of Taxonomy and Ontology in Semantic Layers - Heather Hedden.pdf
 
GenCyber Cyber Security Day Presentation
GenCyber Cyber Security Day PresentationGenCyber Cyber Security Day Presentation
GenCyber Cyber Security Day Presentation
 
Driving Behavioral Change for Information Management through Data-Driven Gree...
Driving Behavioral Change for Information Management through Data-Driven Gree...Driving Behavioral Change for Information Management through Data-Driven Gree...
Driving Behavioral Change for Information Management through Data-Driven Gree...
 
The 7 Things I Know About Cyber Security After 25 Years | April 2024
The 7 Things I Know About Cyber Security After 25 Years | April 2024The 7 Things I Know About Cyber Security After 25 Years | April 2024
The 7 Things I Know About Cyber Security After 25 Years | April 2024
 
A Year of the Servo Reboot: Where Are We Now?
A Year of the Servo Reboot: Where Are We Now?A Year of the Servo Reboot: Where Are We Now?
A Year of the Servo Reboot: Where Are We Now?
 

Ecompact medium power_series

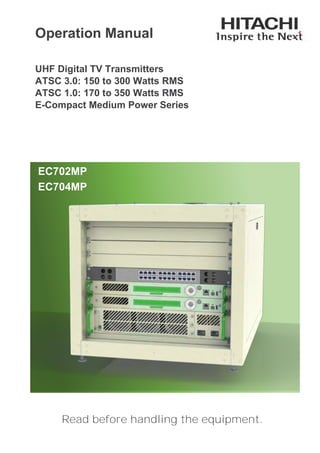
  • 1. 1 | 106 E-Compact Medium Power Operation Manual UHF Digital TV Transmitters ATSC 3.0: 150 to 300 Watts RMS ATSC 1.0: 170 to 350 Watts RMS E-Compact Medium Power Series Read before handling the equipment. EC702MP EC704MP
  • 2. 2 | 106 E-Compact Medium Power Operation Manual UHF Digital TV Transmitters ATSC 3.0 • 150 to 300 Watts RMS ATSC 1.0 • 170 to 350 Watts RMS E-Compact Medium Power Series EC702MP • EC704MP Rev R00 – EN-US All rights reserved Hitachi Kokusai Linear Equipamentos Eletrônicos S/A CNPJ: 19.690.445/0001-79 Rodovia BR 459, Km 121, 121A – Córrego Raso - Santa Rita do Sapucaí - MG - Brazil – CEP 37540-000 Phone: +55 35 3473 3473 - linear@linear.com.br www.hitachi-linear.com.br W A R N I N G All rights are reserved to Hitachi Kokusai Linear Electronic Equipment S/A, thus any reproduction, adaptation, translation or misuse of this Manual without prior written permission is prohibited, except as permitted by copyright laws.
  • 3. 3 | 106 E-Compact Medium Power CONTENTS 1. Index CONTENTS...........................................................................................................3 1. Index ................................................................................................................................................................3 1. About this Manual ..........................................................................................................................................8 2. Basic Knowledge Required...........................................................................................................................9 3. Structure..........................................................................................................................................................9 Section 1 - Care, Warranty, and Service ...............................................................................................................10 1. Care and Safety ............................................................................................................................................10 2. Warranty........................................................................................................................................................11 3. Technical Assistance...................................................................................................................................12 Section 2 - Minimum Installation Requirements ....................................................................................................13 1. Introduction...................................................................................................................................................14 2. Minimum Requirements...............................................................................................................................14 2.1. AC Mains - Wire Gauge........................................................................................................................14 2.2. Grounding. ............................................................................................................................................14 2.3. Stability..................................................................................................................................................15 2.4. Insulation...............................................................................................................................................15 2.5. Atmospheric Discharge Protection System. .....................................................................................18 2.5.1 Lightning rods. .............................................................................................................................18 2.5.2 Protectors. ....................................................................................................................................18 2.6 Air Conditioning. ..................................................................................................................................18 2.6.1 Temperature..................................................................................................................................18 2.6.2 Humidity. .......................................................................................................................................19 2.6.3 Cooling. .........................................................................................................................................19 Section 3 – E-Compact Medium Power Series UHF Digital TV Transmitters.......................................................................................................20 1. Overview........................................................................................................................................................20 2. Specifications ...............................................................................................................................................21 3. Construction .................................................................................................................................................23 4. Footprint........................................................................................................................................................26 2.1 FCC Compliance...................................................................................................................................11
  • 4. 4 | 106 E-Compact Medium Power 5. Block Diagram ..............................................................................................................................................27 6. Main Modules................................................................................................................................................29 6.1. CM8001 Control Module (MOD GV 40056) .........................................................................................29 6.1.1. RF Input.........................................................................................................................................29 6.1.2. Interfaces ......................................................................................................................................30 6.1.3. Control System Functional Description.....................................................................................31 6.1.4. Control System Operation...........................................................................................................32 6.1.4.1. Navigation .................................................................................................................................32 6.1.4.2. System Structure......................................................................................................................34 [1000] - Main Menu ⇨ Setup Menu......................................................................................................34 [2000] - Main Menu ⇨ Measurements.................................................................................................35 [3000] - Main Menu ⇨ System Alarms/Log ........................................................................................38 EQUIPMENT ALARMS......................................................................................................................39 POWER AMPLIFIERS DRAWERS ALARMS...................................................................................41 BROWSER ALARMS STATUS.........................................................................................................45 [4000] - Main Menu ⇨ Remote Access ...............................................................................................46 6.1.5. Frontal Led Alarms.......................................................................................................................47 6.2. PA704MP / PA702MP Power Amplifier Module .................................................................................48 6.2.1. Interfaces ......................................................................................................................................49 6.2.2. Specifications ...............................................................................................................................50 6.2.3. Power Amplifier Block Diagram..................................................................................................51 6.2.4. Signaling LEDs .............................................................................................................................55 6.2.5. Communication interface (COMM) .............................................................................................56 6.2.6. 1200 Watts Powers Supplies.......................................................................................................56 6.2.7. Power Supply 1200Watts – MOD 40241:....................................................................................58 6.3. EIA 1-5/8” low pass filter .....................................................................................................................59 6.3.1. Features.........................................................................................................................................59 6.4. MOD 40215 EIA RF Output Line with Sample Probe ........................................................................60 6.4.1. Features.........................................................................................................................................60 6.5. AC Mains Protection Unit ....................................................................................................................62 6.5.1. Sparkover - Phase Surge Protection Device (SPD). ................................................................62 6.5.2. M208 Mains Protection Unit – 208VAC WILD LEG....................................................................64 6.5.3. B240 Mains Protection Unit –SINGLE PHASE 240 VAC ...........................................................65 6.5.4. Changing AC Mains .....................................................................................................................66 6.6. Exciter Interface ...................................................................................................................................67 Section 4 – Installation......................................................................................68 1. Overview........................................................................................................................................................68 2. Inspection......................................................................................................................................................68 3. Installation Recommendations. ..................................................................................................................68 3.1. Preventive Protection ..........................................................................................................................68 3.2. Tower.....................................................................................................................................................68 3.3. Fastening of cables, antennas and connectors................................................................................69 3.4. Indoors Equipment Installation...........................................................................................................70 3.5. Equipment Grounding .........................................................................................................................70
  • 5. 5 | 106 E-Compact Medium Power 3.6. Electric Installation Grounding...........................................................................................................71 3.7. Power Supply........................................................................................................................................71 4. Equipment Assembly...................................................................................................................................72 4.1. Assembly...............................................................................................................................................72 4.2. Ethernet Connections ..........................................................................................................................81 4.3. Internal Ground Connections..............................................................................................................81 4.4. AC Electrical Line Connection............................................................................................................82 4.4.1. Electrical line connection (EC70xMP) ........................................................................................82 Section 5 - Initial Activation..............................................................................83 1. Overview........................................................................................................................................................83 2. Activation. .....................................................................................................................................................84 3. Main Operations. ..........................................................................................................................................86 3.1. Power Changing ...................................................................................................................................86 3.2. Communication ....................................................................................................................................86 4. Forbidden operations ..................................................................................................................................86 5. Protections....................................................................................................................................................87 5.1. Reflected Power ...................................................................................................................................87 5.2. Over-excitation .....................................................................................................................................87 5.3. AC Mains Line Protection....................................................................................................................87 5.4. Transmitter Operating Temperature Configuration..........................................................................88 Section 6 - WEB Interface .................................................................................89 1. Overview........................................................................................................................................................89 2. Configuring the System...............................................................................................................................90 3. Browsing the System...................................................................................................................................90 3.1. Access Password.................................................................................................................................90 3.2. Startup...................................................................................................................................................91 3.3. Alarms ...................................................................................................................................................91 3.3.1. Alarms ...........................................................................................................................................91 3.3.2. Alarm Log......................................................................................................................................92 3.3.3. Download Alarm Log ...................................................................................................................93 3.4. Setup......................................................................................................................................................94 3.4.1. Power Setup..................................................................................................................................94 3.4.2. Transmitter....................................................................................................................................95 3.4.3. Exciter............................................................................................................................................95 3.4.4. File .................................................................................................................................................95 3.5. Measurements ......................................................................................................................................96 3.6. Power.....................................................................................................................................................97 3.6.1. Measurements ..............................................................................................................................97 3.6.2. Cur. Alarms ...................................................................................................................................98
  • 6. 6 | 106 E-Compact Medium Power 3.6.3. Past Alarms...................................................................................................................................98 3.7. Remote ..................................................................................................................................................99 3.8. User......................................................................................................................................................100 Section 7 – Preventive Maintenance.....................................................................................................101 1. Overview......................................................................................................................................................101 2. Preventive Maintenance ............................................................................................................................101 2.1. Cleaning ..............................................................................................................................................101 2.2. Visual Inspection................................................................................................................................102 2.3. Reading Verification...........................................................................................................................102 Section 8 - Attachments..................................................................................103 1. USA AC Mains Types for E-Compact Series ...........................................................................................103
  • 7. 7 | 106 E-Compact Medium Power Abbreviations 1PPS One Pulse per Second A Amperes AC Alternating Current A-DPD Adaptive Digital Pre-distortion AF After Filter A.N.M. Acima do Nível do Mar ALC Automatic Level Control ASI Asynchronous serial interface ASL Above Sea Level ATSC Advanced Television System Committee BF Before filter BISS Basic Interoperable Scrambling System BTS Broadcast Transport Stream BTU British Thermal Unit CAM Conditional Access Module dB Decibel DC Direct current DDP Potential Difference DPD Digital Pre distortion DSP Digital Signal Processing DVB-S Digital Video Broadcasting – Satellite DVB-S2 Digital Video Broadcasting – Satellite – 2nd generation FPGA Field Programmable Gate Array FWR Forward HKL Hitachi Kokusai Linear IP Internet Protocol ISDB-T Integrated Services Digital Broadcasting Terrestrial (Brazil) ISDB-Tb Integrated Services Digital Broadcasting Terrestrial LCD Liquid Crystal Display. LPC Linear Pre correction MCCB Molded Case Circuit Breakers MER Modulation Error Rate MFN Multiple Frequency Network MSps Million Sample per Seconds N/A Not/Apply NLPC Non-Linear Pre Correction PA Power Amplifier PCMCIA Personal Computer Memory Card International Association PFC Power Factor Correction PID Packet Identifier PLL Phase Locked Loop PS Power Supply PSI Program-specific information PSU Power Supply Unit PW Power RPM Rotations Per Minute RTP Real-time Transport Protocol RU Rack Unit SFN Single Frequency Network SI Service Information SNMP Simple Network Management Protocol SNR Signal to Noise Ratio TMCC Transmission and Multiplexing Configuration Control TS Transport Stream TSoIP Transport Stream over Internet Protocol U RU - Rack Unit UDP User Datagram Protocol UHF Ultra High Frequency UPS Uninterruptable Power Supply V Volts VAC Volts Alternating Current VGA Variable Gain Amplifier VGS Voltage Gate Source VSWR Voltage Standing Wave Ratio WxDxH Width x Depth x Height
  • 8. 8 | 106 E-Compact Medium Power 1. About this Manual The purpose of this manual is to provide technical information required for the installation and operation of Medium Power E-Compact series UHF TV signal transmitters (digital ATSC). EC702MP 150 W UHF ATSC 3.0 Transmitter (6-poles filter) 170 W UHF ATSC 1.0 Transmitter (6-poles filter) EC704MP 300 W UHF ATSC 3.0 Transmitter (6-poles filter) 350 W UHF ATSC 1.0 Transmitter (6-poles filter) Hitachi Kokusai Linear Electronic Equipment S/A recommends that you carefully read the sections of this manual before installing or operating this equipment. This manual is intended for use by qualified, trained installers. Read this manual before working with the product. For personal and system safety, as well as for optimum product performance, one must be sure to thoroughly understand the contents before installing, operating, or maintaining this product.
  • 9. 9 | 106 E-Compact Medium Power 2. Basic Knowledge Required The mandatory knowledge and skills to operate the equipment are as follow: • Knowledge of electronic circuits of Radio Frequency; • Knowledge of electricity and electrical systems; • Knowledge of digital electronics; • Conducting tests and Digital TV signals measurements in ATSC standard; • Knowledge of transmission antenna; • Experience operating radio frequency measurement equipment; • Practice in the management of radio frequency measures equipment (spectrum Analyzer, RF power meter, Vector Network Analyzer, couplers, attenuators, etc). 3. Structure This manual is comprised of seven (8) sections, which provide the following information: Section 1 - Care, Warranty, and Service This section indicates the necessary care with the equipment, warranty criteria and how to proceed if technical assistance is needed. Section 2 - Minimum Installation Requirements Comprises the minimum infrastructure requirements for installing these devices, such as AC power, protection against lightning and air conditioning. Section 3 –E-Compact Medium Power Series UHF Digital TV Transmitter Present all equipment characteristics, such as description, models, functional description and technical specifications of all models of E-Compact series Medium Power Transmitters. Section 4 - Installation This section provides procedures for physical and electrical installation. Section 5 - Initial Activation This section describes which steps to perform in the initial activation of the equipment. Section 6 – WEB Interface This section describes how the transmitter can be controlled and monitored remotely, using a Web GUI interface. Section 7 – Preventive Maintenance Provides information for preventive maintenance. Section 8 - Attachments Additional information for this document.
  • 10. 10 | 106 E-Compact Medium Power Section 1 - Care, Warranty, and Service 1. Care and Safety Never open the device: there is a risk of electric shock. If necessary, contact Hitachi Service. Before Connecting the Machine to the AC Mains, one must ensure that the grid Voltage meets the equipment’s settings. Never expose the equipment to rain, moisture or direct sunlight, in order to avoiding risk of fire or electric shock. Avoid risks of accidents at heights and with electricity. Always install or maintain this equipment by qualified technicians. Never turn on the equipment without connecting it to an Antenna or RF Load. May cause serious damage to the Equipment. Never unplug any Power Amplifier Drawer while the Transmitter is on. Risk of equipment damage.
  • 11. 11 | 106 E-Compact Medium Power 2. Warranty. 1. All equipment shall have warranty coverage by the supplier against manufacturing or assembly faults conducted by the supplier, for the period of 12 months, counting from the issuing of the sales invoice. The period is irrevocable except in cases of extended warranty previously noted in contract. 2. During warranty time, the supplier will repair, with no additional charge, the faulty products, providing adjustments, replacing or re-manufacturing, of all the equipment or its modules and components that present unusual behavior; 2.1. The repaired/replaced products are covered for an additional period of 3 (three) months or up to the end of the original warranty time, taking into count the longer period; 2.2. If the additional 3 (three) months term, referred above, is higher than the original warranty term, the warranty will only extend to the repaired/replaced modules or components; 2.3. The warranty will become effective in the supplier’s factory; therefore, it is not a responsibility of the supplier: the shipment of any modules, components or any other equipment or accessory. These expenses will be, when due, a responsibility of the Purchaser. 2.4. The Purchaser may choose a visit of the supplier’s technical personnel, instead of submitting the goods for factory repair, although the expenses relative to transportation, lodge and nourishment of the supplier’s technicians will occur at sole expense of the Purchaser, upon budget approval. 3. The supplier is relieved of the warranty terms in the hereinafter situations: 3.1. Faults or defects caused by AC Mains variation, atmospheric phenomena or accidental; 3.2. Faults or defects caused by inadequate installation of the goods, not complying with the OPERATING MANUAL(S) or by negligence of the minimum infrastructure requirements in the installation site, which is referred in the ANNEX 1 herein attached. 3.3. Faults or defects caused by inadequate usage of the products, not complying with the OPERATING MANUAL(S) or by lack of proper preventive maintenance recommended in the product’s manual. 3.4. In event of the goods and its accessories are submitted to 3rd Party maintenance, unauthorized by the supplier, as well as removal or violation of its serial number. 4. The supplier shall employ, during warranty term, original parts and components listed by the product’s manufacturer. 5. The technical assistance must be held by the SUPPLIER or its accredited personnel or companies, failing which will result in warranty voidance. 1. This equipment has been tested and found to comply with the limits for a Class A Digital device, pursuant to part 15 of the FCC Rules. These limits are designed to provide reasonable protection against harmful interference when the equipment is operated in a commercial environment. This equipment generates, uses, and can radiate radio frequency energy and, if not installed and used in accordance with the instruction manual, may cause harmful interference to radio communications. Operation of this equipment in a residential area is likely to cause harmful interference in which case the user will be required to correct the interference at his own expense. The antenna(s) used for this transmitter must be fixed-mounted on the outdoor permanent structures. RF exposure compliance is addressed at the time of licensing, as required by the responsible FCC Bureau(s), including antenna co-location requirements of §1.1307(b)(3). 2. Changes or modifications not expressly approved by Hitachi Kokusai Electric Comark LLC could void the user's authority to operate the equipment. 3. This device complies with part 15 of the FCC Rules. Operation is subject to the following two conditions: (1) This device may not cause harmful interference, and (2) this device must accept any interference received, including interference that may cause undesired operation. 2.1 FCC Compliance
  • 12. 12 | 106 E-Compact Medium Power 3. Technical Assistance. In our Quality Management System, since several devices are received without proper identification and explanations; we are now working with previous approval for maintenance devolution. Therefore, in case of maintenance please contact: Hitachi Kokusai Linear Equipamentos Eletrônicos S/A Phone: 55 35 3473-3473 / Fax: 55 35 3473-3474 E-mail: manutencao@linear.com.br And inform: Customer, Equipment Part Number, Serial Number and a brief explanation of the occurrence. With this intel we shall send the ARM number (Authorization for Return of Material), which is mandatory to appear in the invoice.
  • 13. 13 | 106 E-Compact Medium Power Section 2 - Minimum Installation Requirements 1. Proper grounding; 2. Proper lightning-rod; 3. Shelter with ventilation, footprint, and temperature in compliance with the transmitter’s standards. 4. Voltage regulator in compliance with transmitter’s consumption. W A R N I N G MANDATORY CONDITIONS FOR TRANSMITTER INSTALATION, FOR VALIDATING THE WARRANTY TERMS Noncompliance with any of above-mentioned terms will automatically result in the hereinafter suspension of the warranty terms.
  • 14. 14 | 106 E-Compact Medium Power 1. Introduction. This section provides information on the minimum installation requirements for E-Compact Series transmitters with recommendations on shelter, tower, antennas, cables, grounding, mains, transient preventions, etc. 2. Minimum Requirements. 2.1.AC Mains - Wire Gauge. Consumption with the equipment running at its maximum power. Current (A) on each wire: About AC MAINS TYPE, see Section 8 – Attachments, USA AC Mains Types for E- Compact Series. The current quoted in the table is more loaded phase to sizing effect of conductors and protection. Said gauge is the minimum recommended for the transmitter in question, if the cable length is large, consider voltage drop in the cable maximum of 5% The section of the neutral conductor should be the same as the phase. The section of the ground conductor has to be the same as the conductors phase. 2.2.Grounding. The grounding system to which the Hitachi Kokusai Linear TV transmitter will be attached must be designed and implemented by a qualified professional. An improper grounding system may jeopardize the equipment as well as the lives-of the professionals working in the shelter. To be considered proper, the grounding must have a resistance of no more than 5 Ohms. E-Compact Series - ATSC MODELO M120 M208 / B240 T208 / T240 T380 (A) Typical Wire diameter (A) Typical Wire diameter (A) Typical Wire diameter (A) Typical Wire diameter mm² AWG mm² AWG mm² AWG mm² AWG EC702MP 6,3 4,17 11 3,6 3,31 12 EC704MP 7,2 4,17 11 Not available or uncommon use
  • 15. 15 | 106 E-Compact Medium Power It is important to establish that all the devices involved in the transmission system are that the same potential, so that there is no DDP, favoring the equilibrium of the flow of the atmospheric load. It is important to state that if there is a need for chemical alteration of the soil, in order to provide the lowest impedance, it establishes a temporary condition for not being part of the natural chemistry of the place, thus being naturally absorbed. In this condition, preventive soil analyzes should be conducted as preventive maintenance procedure. 2.3.Stability. The voltages in each TV Transmitter phase must be stabilized. Use voltage stabilizers or stabilized uninterruptible power systems (UPSs) is necessary since these devices are capable of protecting the TV transmitter from power surges. The voltage stabilizer or UPS design must be of exclusive use to the Hitachi Kokusai Linear TV transmitter, and shall be sized to operate at least 30% above the kVA consumption specified by the TV transmitter. For example, for the TV transmitter with maximum consumption of 38kVA, a voltage stabilizer or 50kVA UPS should be used. Input voltage variations above 15% of the rated values specified for the Hitachi Kokusai Linear TV transmitter may cause damage to the equipment and in this case will not be covered by the factory warranty. In addition, it is important to check the potential difference between the ground and neutral terminals (if any) that will be connected to the Hitachi Kokusai Linear TV transmitter. This potential difference should be at most 3V. 2.4.Insulation. It is important to have isolation between energy stations of the shelter and the TV transmitter, which is achieved with the usage of isolator transformers. Thus guarantee that no AC Mains’ transient coming from the shelter will be passed on to the TV transmitter or vice-versa. Besides, Hitachi Kokusai Linear’ TV transmitter features switching power supplies that require purely sinusoidal power input, and voltage regulators or no-breaks without isolator transformers have no assurance of a purely sinusoidal outputs. The isolator transformer must also be exclusive to the TV transmitter and its dimensioning must use the same standards employed in the dimensioning of the voltage regulator or no-break, ie, at least 30% higher than the specified consumption TV transmitter’s (KVA). Recommendations. 1- We recommend that the transmitter "never see" the power grid directly. 2- We recommend the use of online double-conversion UPS and / or Delta- conversion online UPS built with transformer insulation and with power factor correction (PFC).
  • 16. 16 | 106 E-Compact Medium Power No break Example with Isolating Transformer Benefits: - These types of UPS bring great protection and insulation to the transmitter due to its mode of operation and design. - The double conversion occurs because the AC network convert to DC and the DC voltage convert back to AC, which eliminates any disturbance in the AC mains when converted to DC, thus protecting the transmitter. It is important to note that UPSs do not necessarily need to have a battery bank, thus minimizing the cost of the final product. This solution is much better than a conventional stabilizer due to double conversion as already explained. - The correction of the power factor (PFC) in the no break is necessary to reduce the cost of the electric energy, because it reduces the reactive power (VAr), reducing the total power (VA). It is important to emphasize that it is not efficient to have a transmitter with power factor correction (PFC) powered by a no-break without PFC, because all the advantage achieved by the transmitter is lost in the UPS, not resulting in energy savings. When this type of connection made, you actually have an excellent load (resistive behavior) for the no-break, but your power grid will see the entrance of the no break (without PFC, high consumption). When we have a power factor correction (PFC) UPS, it will present an excellent behavior (low reactive power, low power consumption) to the network even if it is connected to a PFC-free transmitter, that is, it will correct the power factor of the entire system . Nobreak capatibity. Nobreak Power= PTX * (cos Φ * η (nobreak) ) PTX: Potência Real [ W] cos Φ : Power Factor Correciton η (nobreak) : Nobreak efficiency
  • 17. 17 | 106 E-Compact Medium Power Double Conversion Online Nobreak Delta Conversion Online Nobreak Static Bypass Switch C A C C C A RECTIFIER INVERTER BATERY CHAVE DE BYPA SS TRANSFORMADO R DELTA CONVERSOR DELTA INVERSOR PRINCIPAL BATERI A
  • 18. 18 | 106 E-Compact Medium Power 2.5.Atmospheric Discharge Protection System. 2.5.1 Lightning rods. The Atmospheric Discharge Protection System consists of the lightning rods and their elements. The tower and shelter where the equipment will be installed must be protected against atmospheric discharges by means of lightning arresters. It is important to determine that all ferrous parts and accessories that make up the Atmospheric Discharge Protection System should be galvanized. In the path comprised of the lightning rod to the drainage well, no splicing is allowed, much less pathways with acute angles (angles of less than 90º). 2.5.2 Protectors. The use of coaxial protectors is advisable for cables connecting external devices (antennas, microwave heads, tower inverters) to the internal ones. These protectors are devices equipped with gas spark plug which shortens to earth any discharge occurred in the coaxial cable. They should kept in the shelter near the equipment and with the ground wire connected to the ground of the equipment rack. It is favorable in hilltops and areas of many transmission sources, the use of Faraday's Ring or Cage, which in turn isolates the transmitter from the electromagnetic fields avoiding interference caused by induction. 2.6 Air Conditioning. 2.6.1 Temperature. For better performance and longer equipment life, it is important that, under the shelter, the temperature is controlled strictly by means of air conditioners. For the shelter’s design, one should consider the thermal dissipation specified for the transmitter (reported in BTU / h), the dissipation of the other devices inside the shelter, the thermal load generated by the solar incident and other thermal loads present in the shelter. In addition, it’s recommended that the shelter’s internal pressure be slightly positive to prevent the entry of contaminants. According to the transmission power, the internal temperature of the shelter should be: • E-COMPACT LOW POWER TV TRANSMITTERS: from 0º to 35ºC • E-COMPACT MEDIUM POWER TV TRANSMITTERS: from 0º to 30ºC • E-COMPACT HIGH POWER TV TRANSMITTERS: 0º to 25ºC If Hitachi Kokusai Linear equipment is damaged by the lack or inefficiency of the HVAC system, it will NOT be covered by the factory warranty.
  • 19. 19 | 106 E-Compact Medium Power 2.6.2 Humidity. Relative air humidity inside the shelter is also considered a critical factor for improved performance and longer equipment life. Hitachi Kokusai Linear equipment should operate in dry environments, which can also be achieved by the use of air conditioners. According to the transmission power, the relative humidity inside the shelter should be: • E-COMPACT LOW POWER TV TRANSMITTERS: 0 to 90% • E-COMPACT MEDIUM POWER AND HIGH POWER TV TRANSMITTERS: 0 to 80% There must never be condensation since water can damage the internal circuits of the transmitter. 2.6.3 Cooling. Cooling has to be always in "recirculate", with the air conditioning lowering the temperature of the room, without external air intake. For better performance of the cooling system, the air conditioner be installed in series with the transmitter cooling cycle, direct the output air conditioning flow to the front of the Hitachi Kokusai Linear TV Transmitter. The physical installation of the transmitter should protect a free area around it for better cooling efficiency and access to maintenance.
  • 20. 20 | 106 E-Compact Medium Power Section 3 – E-Compact Medium Power Series UHF Digital TV Transmitters 1. Overview. The E-Compact Medium Power family of air cooled Doherty solid-state transmitters from Hitachi Kokusai Linear was designed specifically for the repack market place. Its design is simple, rugged, reliable, and ultra-efficient. Advanced standard features are included to ensure: • ensure maximum transmitter efficiency using Doherty amplifiers • ensure maximum flexibility with broadband amplifier technology (470-806MHz) • ensure optimum signal performance in all operating modes • ensure maximum reliability for 100% power output • ensure ease of initial setup and operation • ensure ease of monitoring and diagnostics • ensure flexible solutions for all installations The E-Compact Medium Power Family of solid-state DTV transmitters includes two models that provide transmitter power outputs (TPO) from 150 to 300 watts ATSC 3.0. Each power amplifier module has an excellent power density, with 2RU and 19". Featuring high gain Broadband Doherty LDMOS configured for transmitting provides high efficiency and consumption cost reduction of up to 60% when compared to conventional transmitters. The final power amplifier configuration in parallel depending on output power level required. The transmitters are compliant with all FCC and ATSC requirements. We recommend the use of the EXACT-V2 DTV driver with linearization circuits to compensate for linear and non-linear distortions for the E-Compact Medium Power line transmitters. EXACT-V2 is software upgradeable for compatibility with ATSC 3.0. The E-Compact family of solid-state TV transmitters includes a human-machine interface via an LCD display on the front panel and menus activated by programmable keys. Alarm indicators and normal controls, as well as power readouts, are available on the LCD. There are two basic E-Compact Medium Power transmitter equipment configurations available: 1) Single Drive = One exciter driving the amplifier chain (SD) 2) Dual Drive = Two exciters {main/standby selectable} driving the amplifier chain (DD)
  • 21. 21 | 106 E-Compact Medium Power 2. Specifications ⇨ IP Input ⇨ Control Module present ⇨ Switcher Module present ⇨ Power amplifier drawer (one power module); ⇨ High efficiency with Doherty technology; ⇨ Air cooled; ⇨ Automatic Fan Speed Control providing low noise levels, energy saving and increased lifespan; ⇨ Power supplies featuring Power Factor Correction better than 0.95; ⇨ Measures and alarms through front display and keypad or remotely. ⇨ VSWR and Overdrive protection via hardware with power reduction; ⇨ Software oriented overheating protection for internal modules; ⇨ Adaptive Digital Pre-correction (Linear and No-Linear); ⇨ Telemetry: WEB Server/SNMP, for local or remote management; ⇨ AGING transistor compensation via exciter's front panel; ⇨ Automatic GM compensation with temperature; ⇨ Main Control Software, WEB Server and SNMP; ⇨ USB communication Drivers; ⇨ Passive elements: Low-pass filter, before and after-filter probes. Optional: ⇨ Telemetry through GPRS interface; ⇨ Exciter ⇨ Exciter Redundancy; ⇨ Control Module Redundancy; ⇨ GPS time base (exciter's internal module). ⇨ EC702MP has redundant power supply option. General RF Performance Modulation Standard ATSC 3.0 A/300 / ATSC 1.0 A/53 RF Output Regulation ≤± 0.1 dB UHF Operation Frequency 470MHz to 806MHz Ch14 to Ch69 Bandwidth 6 MHz RF Input Level 0dBm MER Performance ATSC 3.0 ATSC 1.0 ≥33dB ≥36dB Harmonics/Spurious better than -60dBc 50Ω RF Output Connector N-Female DIN 7/16” EIA 7/8” (flanged / unflanged) EIA 1-5/8” (flanged / unflanged) General Electrical Features Power Requirement (specify configuration at equipment purchase order) Single Phase 240Vac: 180~254VAC Between Both wire. Single Phase 208Vac Wild Leg⁹: 180~254VAC Between Phases to Neutral (using Delta Three Phase 240Vac). Frequency AC mains 43 to 63Hz Power Factor Correction Typical 0.95, minimum 0.9
  • 22. 22 | 106 E-Compact Medium Power ¹A.F.: After Filter ²B.F.: Before Filter ³May change depending on MER value, channel and output power. Interfaces Communication Interfaces USB / Ethernet / SNMP Format Ethernet (IEEE 802.3u) 10Base- T/100Base-TX Environment Features Operation altitude up to 8200ft ASL Environment temperature range +32°F to +113ºF (+77°F recommended) 0ºC to +45ºC (+25°C recommended) Environment humidity range 0 to 95% (non-condensing) Power Amplifier Cooling Forced ambient air, front to back flow using integral high volume fans Model: EC702MP EC704MP Output power (W)³ B.F.¹ A.F.² B.F.¹ A.F.² ATSC 3.0 215 150 400 300 ATSC 1.0 225 170 450 350 Minimum operation power (W) ATSC 3.0 ATSC 1.0 10 20 30 40 AC mains Single Phase 240Vac Single Phase 208Vac Wild Leg AC typical consumption (W)³ ATSC 3.0 600 1200 ATSC 1.0 750 1500 Typical heat dissipation (BTU/h)³ ATSC 3.0 1400 2800 ATSC 1.0 1750 3500 Width (in) 22.44 Depth (in) 35.43 Weight (pound) 143
  • 23. 23 | 106 E-Compact Medium Power 3. Construction The E-Compact family of medium power solid-state DTV transmitters provides maximum flexibility for site layout and installation. Transmitters are installed in custom designed 22” wide (19” panel opening) cabinets. Being available in two configurations depending on the output power: EC702MP ATSC Transmitter 170 W and EC704MP ATSC Transmistter 350 W. The transmitter controller is contained in a 1RU chassis and the RF amplifier is contained in a separate 2RU chassis. The digital exciter is 1RU (not provided) for a total of 4RU or 8.75” of vertical panel space (single exciter version). An equipment rack cabinet (8RU) is supplied. The power supply redundancy option implemented only in EC702MP EC702MP ATSC 3.0: 150W RMS BEFORE FILTER ATSC 1.0: 170W RMS BEFORE FILTER PA702MP Power Amplifier (MOD GV 40033A) EC704MP ATSC 3.0: 300W RMS BEFORE FILTER ATSC 1.0: 350W RMS BEFORE FILTER PA704MP Power Amplifier (MOD GV 40010) Power Amplifier
  • 24. 24 | 106 E-Compact Medium Power H G F E D C B A 8 7 6 5 4 3 2 1 H G F E D C B A 8 7 6 5 4 3 2 1 REF DESCRIPTION 01 Cabinet 8RU 02 1U slot void 03 Ethernet switch 04 Main CM8001 control module 05 Backup CM8001 Control Module 06 PA702MP – Power amplifier (EC702MP) PA704MP – Power amplifier (EC704MP) 07 MOD 40243 - EIA 1-5/8” low pass filter 08 MOD 40215 – RF sample EIA 1+5/8” 09 RF Spliter 1:2 10 MOD 40090A – Flyback 15/8V 25W 11 MOD 40032 – RF coaxial relay 12 AC mains protection unit 08 07 07 10 03 12 11 09 02 02 06 04 05 08 01 02 Construction EC702MP / EC704MP DOUBLE EXCITER
  • 25. 25 | 106 E-Compact Medium Power H G F E D C B A 8 7 6 5 4 3 2 1 H G F E D C B A 8 7 6 5 4 3 2 1 REF DESCRIPTION 01 Cabinet 8RU 02 1U slot void 03 Ethernet switch 04 Main CM8001 control module 06 PA702MP – Power amplifier (EC702MP) PA704MP – Power amplifier (EC704MP) 07 MOD 40243 - EIA 1-5/8” low pass filter 08 MOD 40215 – RF sample EIA 1+5/8” 12 AC mains protection unit Construction EC702MP / EC704MP SINGLE EXCITER 07 07 03 02 02 12 04 08 06 01 02 02
  • 26. 26 | 106 E-Compact Medium Power H G F E D C B A 8 7 6 5 4 3 2 1 H G F E D C B A 8 7 6 5 4 3 2 1 4. Footprint Footprint EC702MP / EC704MP DOUBLE EXCITER SINGLE EXCITER
  • 27. 27 | 106 E-Compact Medium Power H G F E D C B A 8 7 6 5 4 3 2 1 H G F E D C B A 8 7 6 5 4 3 2 1 5. Block Diagram Block Diagram EC702MP / EC704MP DOUBLE EXCITER GND AC INPUT AC in AC in AC in AC in AC in Backup ATSC Exciter (NOT INCLUDED) Ethernet Switch (OPTIONAL) Main CM8001 Control Module Backup CM8001 Control Module (OPTIONAL) PA702MP / PA704MP Power Amplifier MOD 40090A – Flyback 15/8V 25W MOD 40032 – RF Coaxial Relay (OPTIONAL) Ethernet comm. Ethernet comm. Ethernet comm. Comm. I/O Comm. I/O Comm. I/O AC Supply UHF UHF UHF UHF PA710MP – Power Amplifier MOD 40243 EIA 1-5/8" Low Pass Filter MOD 40215 RF Sample EIA 1 5/8" ANTENNA RF OUT RF IN RF OUT RF OUT TS IN TS IN RF SAMPLE B. FILTER Exc. Backup RF Spliter 1:2 (OPTIONAL) Mask Filter (NOT INCLUDED) RF Input switch Main ATSC Exciter (NOT INCLUDED) AC in Ethernet comm. B. FILTER Exc. Main B. FILTER B. FILTER UHF RF OUT RF OUT RF IN RF IN UHF UHF AC in AC Mains Protection Unit 10dB Attenuator RF Sample Power Amplifier (+10dBm) RF Sample Power Amplifier (+10dBm) 10dB Attenuator (NOT INCLUDED) (NOT INCLUDED)
  • 28. 28 | 106 E-Compact Medium Power H G F E D C B A 8 7 6 5 4 3 2 1 H G F E D C B A 8 7 6 5 4 3 2 1 Block Diagram EC702MP / EC704MP SINGLE EXCITER GND AC INPUT AC in AC in AC in ATSC Exciter (NOT INCLUDED) Ethernet Switch CM8001 Control Module PA702MP / PA704MP Power Amplifier Ethernet comm. Comm. I/O Comm. I/O AC Supply UHF UHF UHF PA710MP – Power Amplifier MOD 40243 EIA 1-5/8" Low Pass Filter MOD 40215 Sonda RF EIA 1 5/8" ANTENNA RF IN RF OUT RF OUT TS IN RF SAMPLE (+10dBm) Mask Filter (NOT INCLUDED) B. FILTER Exciter UHF RF OUT RF IN UHF AC in AC Mains Protection Unit Before Filter Exciter RF Sample Power Amplifier (+10dBm) 10dB Attenuator (NOT INCLUDED)
  • 29. 29 | 106 E-Compact Medium Power 6. Main Modules 6.1.CM8001 Control Module (MOD GV 40056) The E-Compact series of transmitters utilize a dedicated 1RU controller chassis, CM8001. The controller chassis has several functions including: Access to exciter setup / monitoring • AC mains power monitoring • RF drive signal monitoring • RF Exciter Level Control to RF Splitters • RF power amplifier metrics • RF output signal monitoring (FWD & RFL) • Local user interface • USB port for software diagnostics / updates • External Web GUI status monitoring and control interface The CM8001 controller gathers the status monitoring of all the transmitter subassemblies to provide to the operator transmitter status information, either locally or remotely. The controller provides transmitter telemetry including RF power monitoring. A user-friendly man/machine interface on the transmitter controller chassis includes: • A front panel LCD screen provides transmitter status information. • A front-panel control interface for menu driven commands (up/down/right/left navigation, escape, & OK buttons). • LED status indicators The CM8001 transmitter controller is paired with the TV exciter. For transmitter systems configured optionally with dual drive, the transmitter is equipped two / redundant controllers, one for each exciter eliminating single point failures for even higher system reliability. 6.1.1. RF Input The CM8001 Control Module redistributes the RF signal received from the Exciter by controlling its level of distribution to the Power Amplifiers Drawers as a function of the transmitter's rated nominal power. For this, the CM8001 is set at the factory to receive an RF signal level of 0dBm, with minimum / maximum tolerances of -1dBm / + 1dBm. EXCITER(NOT INCLUDED) CONTROL MODULECM8001 RF: 0dBm (Typical) +1dBm (max) -1dBm (min)
  • 30. 30 | 106 E-Compact Medium Power H G F E D C B A 8 7 6 5 4 3 2 1 H G F E D C B A 8 7 6 5 4 3 2 1 6.1.2. Interfaces 01 LCD Display (2 Lines x 40 Coluns) 10 USB 2.0 Port Type B Jack 02 Signaling LEDs 11 USB 2.0 Port Type A Jack 03 Up Key (▲) 12 Power On Key 04 Down Key (▼) 13 AC Input 05 Left Key (◀) 14 NOT USED / NOT APPLY 06 Right Key (▶) 15 “Tuner IN” – RF Input From Exciter 07 Enter Key (Enter) 16 Interface Control I/O 08 Esc Key (Esc) 17 Grounding 09 Ethernet Port 18 RF Output Front Panel Rear Panel 01 02 03 06 05 04 07 08 12 17 13 14 15 16 18 09 10 11
  • 31. 31 | 106 E-Compact Medium Power 6.1.3. Control System Functional Description COAXIAL RELAY Communication Control I/O MAIN CM8001 CONTROL MODULE MAIN EXCITER (NOT INCLUDED) Exciter Status RF: +1dBm RF RF BACKUP CM8001 CONTROL MODULE (OPTIONAL) BACKUP EXCITER (NOT INCLUDED) Exciter Status RF: +1dBm RF PA702MP / PA704MP POWER AMPLIFIER A1 +8Vcc from MCCB (NOT USED TO MEDIUM POWER SERIES) A2 +15VCC - MCCB Source Monitor (NOT USED TO MEDIUM POWER SERIES) A3 +50VCC - MCCB Source Monitor (NOT USED TO MEDIUM POWER SERIES) A4 Forward Output Power Measure - Analog signal, from 0 to 4.5v A5 Remote Control Data In A6 Reflected Output Power Measure - Analog signal, from 0 to 4.5v A7 Power Amplifier On/Off (5V means normal operation) A8 RS-485A Communication A9 GND A10 RS-485B Communication B1 Mask Filter Alarm Temperature (5Vcc) B2 +8Vcc (Main Control Address) – 0Vcc (Backup Control Address) B3 Control I/O B4 AC Phase Alarm - 5V means normal operation B5 Dummy Load Drawer Fan Alarm - 5V means normal operation B6 Remote Control Data Out B7 Exciter Status - Digital signal - 5V means normal operation B8 Remote Control Clock B9 Control I/O B10 Coaxial Relay Control Control I/O Connector MOD Control Rear Panel B1 B10 CONTROL I/O A1 A10 A1 A2 A3 A4 A5 A6 A7 A8 A9 A10 B10 B1 B2 B3 B4 B5 B6 B7 B8 B9 B10 B10
  • 32. 32 | 106 E-Compact Medium Power 6.1.4. Control System Operation 6.1.4.1. Navigation The Control Module CM8001 has a system of configuration, measurements, alarms and remote management (TELESUPERVISION), that controls all the modules of the transmitter. The configuration of the transmitter might be done either by its front panel, of the transmitter or the web interface using a browser of your choice or SNMP. When the device is turned on, or when it enters in stand-by mode (idle for 5 minutes), the display switches between the following status screens: 01 Current date 06 Transmission System: 02 Current time ATSC 1.0 03 Operation UHF channel number ATSC 3.0 04 Real Output Power Value (Watts) 07 Power Equipment Model 05 Equipment Model: 08 Double Exciter Status EC702MP EC704MP CM8001 Main “Ctr A”: Active / Standby CM8001 Backup “Ctr B”: Active / Standby 01 02 05 06 07 08 03 04
  • 33. 33 | 106 E-Compact Medium Power When navigating through the different functions (status and setup), take into consideration the keyboard symbols and the descriptions below (See 5.1.1 Interfaces): ▲ Moves the arrow UP to the next function shown on LCD screen ▶ Moves the arrow to the next RIGHT position ▼ Moves the arrow DOWN to the next function shown on LCD screen. ◀ Moves the arrow to the next LEFT position. ENTER - Confirms the chosen selection. ESC - Cancel the selection and return to the previous screen. When browsing the LCD screen, you will have access to status reading or settings changes. In order to orient yourself in this interface, attention should be paid to the menu structure as follows: 09 Parameter Menu or Parameter in the 12 Current Menu or Current Parameter Screen. 13 Changing Parameter Value 10 Number of Parameter Menu or 14 Current Parameter Value Parameter in the Screen / Total 15 When show “ * “ indicates that the Number of Parameter or Menu. changes is not yet active. For this 11 4 digit numbers represents the screen It’ s necessary to press “ENTER” key position on the command menu For change any parameter, used ◀ for decrease or ▶ to increase. 09 10 11 09 10 11 12 14 15 13 12
  • 34. 34 | 106 E-Compact Medium Power 6.1.4.2. System Structure The system consists of the Root Menu "Main Menu" that gives access to four categories of Menu: [0000] Main Menu [1000] Setup Menu [2000] Measurements [3000] System Alarms/ Log [4000] Remote Acces ⇨ Main Menu ⇨Setup Menu: Access to configure the equipment parameters. ⇨ Main Menu ⇨Measurements: Access to consult the parameters of the equipment. ⇨ Main Menu ⇨System Alarms/Log Alarms: Access to query alerts and history of Alarms. ⇨ Main Menu ⇨Remote Access: Access to configure the equipment to operate on ethernet network. [1000] - Main Menu ⇨ Setup Menu [0000] Main Menu [1000] Setup Menu [2000] Measurements [3000] System Alarms/ Log [4000] Remote Acces The "Setup Menu” allows access to alter machine's parameter setting functions. The Transmitter is delivered to the customer with the parameters that were provided at the time of purchase, so it is not necessary to change the settings of the Equipment.
  • 35. 35 | 106 E-Compact Medium Power # Parameter Position # Description / Functionality 1/9 Power Setup 1100 1/1 Changes the output power of the Equipment. 2/9 Transmitter Setup 1200 1/2 Automatic Level Control: On/Off 2/2 Ctr Mode: Active / Standby 3/9 Time and Date Setup 1300 1/1 Change the date, time and date format (dd/mm/yy or mm/dd/yy) 4/9 Password Setup 1400 1/2 Enable / Choose new password 2/2 Disable Password 5/9 Alarms Mask 1500 1/1 Reflected Power – Set de Alarm Mask for Reflected Power 6/9 USB Host Access 1600 1/1 System Upgrade – Used to system upgrade via USB card. 7/9 Transistor Bias Adjustment 1700 1/4 LDMOS Drain Voltage - The values are pre-set at the factory. 2/4 Carrier Amp. Current - The values are pre-set at the factory. 3/4 Peak Amp. Gate Voltage - The values are pre-set at the factory. 4/4 Status: show the status exciter: (Active / Standby) 8/9 PA Temperature Control 1800 1/1 Allows to set the operating temperature of the Powers Amplifiers. 9/9 Control Mode 1900 1/1 Enable control module acess remote [2000] - Main Menu ⇨ Measurements [0000] Main Menu [1000] Setup Menu [2000] Measurements [3000] System Alarms/ Log [4000] Remote Acces The "Measurements" menu allows access to read the operating parameters of the equipment (read only). # Parameter Position # Description / Functionality 1/7 Power 2100 1/3 Programmed: Show the Programmed power measurement. 2/3 Forward: Show the value of Forward Output Power (Watts). Reflected: Show the value of Reflected Output Power (Watts). 3/3 ALC Reference Voltage: Show the value (Volts). 2/7 Exciter Status - - Active / Fail 3/7 Drawers 2300 1/3 Drawers Measurements
  • 36. 36 | 106 E-Compact Medium Power The [2300] Drawers Measurements parameter allows to view the main status of all Power Amplifiers Drawers: 1/3 Power Supply: Voltage measure of all Power Amplifier Drawers Sources Position # Description / Functionality 2310 1/3 Power Supply 1: [V] 2/3 Power Supply 2: [V] 3/3 Driver Power Supply: [V] 01 (◀ or ▶) Selects the Power Amplifier Drawer: EC70xMP: 1 Power Amplifier Drawer. 02 (▲ or ▼) Selects the Power Supply: Main Power Supply 1/2 Driver Power Supply 2/2 03 Measured value (Volts) in each Power Supply 01 02 03 DRAWERS IDENTIFICATIONS 4 PA704MP - POWER AMPLIFIER Top View 1 2 3 D PA IDENTIFICATIONS 2 PA702MP - POWER AMPLIFIER Top View 1 D PA IDENTIFICATIONS Power Supply 1 Power Supply 2 Power Amplifier Drawer
  • 37. 37 | 106 E-Compact Medium Power 2/3 Current: Current measure (Amper) in all Power Amplifier Drawers Transistors and Drive (Eight Power Transistors and one Drive per Power Amplifier Drawer): Position # Description / Functionality 2320 1/3 I1: [A] I2: [A] - Transistor 1 and Transistor 2 Current 2/3 I3: [A] I4: [A] - Transistor 3 and Transistor 4 Current 3/3 ID: [A] - Driver Current 05 (▲ or ▼) Selects the Power Transistors or Driver of each Power Amplifier Drawer 06 Measured value (Amper) in each Power Transistor 3/3 Temperature: Temperature measure (°F or ºC) in all Power Amplifier Drawers Transistors and Drive (Eight Power Transistors and one Drive per Power Amplifier Drawer): Position # Description / Functionality 2330 1/3 T1: [ºC or ºF] T2: [ºC or ºF] - Transistor 1 / Transistor 2 2/3 T3: [ºC or ºF] T4: [ºC or ºF] - Transistor 3 / Transistor 4 3/3 TD: [ºC or ºF] TAir: [ºC or ºF] - Drive Temperature / air Temperature 05 (◀ or ▶) Selects the Power Amplifier Drawer: EC70xMP: 1 Power Amplifier Drawer. 06 Hold ▲ or ▼ to change between ºC and ºF 07 (▲ or ▼) Selects the Power Transistors or Driver of each Power Amplifier Drawer 08 Measured value (°C or °F) in each Power Transistor 05 06 05 06 05 06 07 08 07 08
  • 38. 38 | 106 E-Compact Medium Power # Parameter Position # Description / Functionality 4/7 Control Module Power Supply 2400 1/2 +3,3V : OK - Check de +3,3Vcc Ctrl Module Power Supply +15V : OK - Check de +15Vcc Ctrl Module Power Supply 2/2 +5V : OK - Check de +5Vcc Ctrl Module Power Supply +28V : OK - Check de +28Vcc Ctrl Module Power Supply 5/7 Communication Status 2500 1/3 Drawers Communication Status (OK / Fail / -- “not present”) P01 / P02 / P03 / P04 – Power Drawer 1 / 2 / 3 / 4 2/3 Drawers Communication Status (OK / Fail / -- “not present”) P05 / P06 / P07 / P08 – Power Drawer 5 / 6 / 7 / 8 3/3 Control Module Communication Status (OK / Fail / -- “not present”) 6/7 Software/Hardware Version 2600 1/4 Control: Control Module Version 2/4 Drawers Version. (◀ or ▶) Selects the Power Drawer 3/4 Digi: Ethernet Module Version 4/4 CIP Version / CIM Version 7/7 Eqp. Power Supply 2700 1/1 Eqp. Power Supply Measurements (OK / Fail) 15V / 8V 50V [3000] - Main Menu ⇨ System Alarms/Log [0000] Main Menu [1000] Setup Menu [2000] Measurements [3000] System Alarms/Log [4000] Remote Acces This menu provides information on current and past alarms for preventive/corrective maintenance purposes. Before detailing access to the Sub-menus of this item, it is important to know what the alarms are and their possible solutions.. There are two alarm lists; "Equipment Alarms", which refers to faults in the equipment as a whole and "Drawers Alarms", which refers to faults in power amplifier drawers and thus impact the transmitter’s operation reflected in the operation of the equipment.
  • 39. 39 | 106 E-Compact Medium Power EQUIPMENT ALARMS ALARM DESCRIPTION +15V Control Module Failure Indicates failure in any of the Control Module Sources (+15V, +3,3V, +28V +5V). The sources that are inside the Control Module. +3.3V Control Module Failure +28V Control Module Failure +5V Control Module Failure +15V Equipment Failure Indicates failure in any of the Equipment Sources (+15V, +50V, +8V). The sources that are at the rack bottom. +50V Equipment Failure +8V Equipment Failure ALARM ALARM DESCRIPTION AC Failure Drawer Comm. Failure There is no communication between the power drawers. Check the RS485 cable connections in the rear panel of the excitation drawer and power drawers. Check the internal interconnections of connectors. Get in contact with Hitachi Kokusai Linear's technical support service. Check the power drawers for proper operation using the HyperTerminal. Drawers Alarms Failure in any of the Power Drawers. Equipment Info Error Indicates lack of information for the selected ID. and thus impact the transmitter’s operation 1PPS or 10MHz reference OR Wrong EQP ID. Exciter Failure Indicates transmitter exciter failure and prompts excitation exchange between Main and Backup (if was available). Other Control Module Failure Indicates failure in the communication between Control Modules A and B (if was available).
  • 40. 40 | 106 E-Compact Medium Power Output High Power The Output Power Transmitter outstripped 10% of the maximum power limit. Output Power Zero The Transmitter has the programmed power, but without power reading at the output. Power Amp. OFF Indicates that the ON/OFF switch in the front panel is off. Reduced Power The Transmitter is not operating at rated power. May occur due to power loss in one or more Power Amplifier Drawers. Reflected Power Indicates presence of reflected power at the transmitter’s output at the output of transmitter. Check the current alarm list to list other possible alarms that could help better assess the situation of the equipment as a whole. Check the connections of the equipment to filter and filter the antenna. Get in contact with Hitachi Kokusai Linear's technical support service. Remote Ctrl Failure Indicates communication failure in the Remote Control Drawer. ALARM ALARM DESCRIPTION Remote Mute Indicates that the equipment output power was remotely reduced to zero. No measure needs to be taken, as this alarm is intentionally caused by the system operator. RF Load FAN Failure Occurs when the Dummy Load Module Drawer fan fails and the internal temperature exceeds 90 °C Too Few Drawers Indicates that the Transmitter does not have the minimum number of Drawers to operate under reduced power condition.
  • 41. 41 | 106 E-Compact Medium Power POWER AMPLIFIERS DRAWERS ALARMS This list is directly related to the alarms that occur in the Power Drawers. When there is an alarm LED lit (see item 5.2.6 - Signaling Leds - Power Amplifier Module) the alarm detail is displayed when accessing the "System Alarms / Log" of the Control Module CM8001. Alarms can be a Notification (irregular operation that generates no fault containment action) or a Critical alarm (Shutdown the device or reduces its operational capability) Usually when the alarm occurs, it is indicated in which device it happened: Devices Identification: “D” – Driver / Pré Driver Alarms List: Device Identification Alarm DRAWERS IDENTIFICATIONS 4 PA704MP - POWER AMPLIFIER Top View 1 2 3 D PA IDENTIFICATIONS 2 PA702MP - POWER AMPLIFIER Top View 1 D PA IDENTIFICATIONS Power Supply 1 Power Supply 2 Power Amplifier Drawer
  • 42. 42 | 106 E-Compact Medium Power ALARM ALARM DESCRIPTION Critical High Forward Power Power Amplifier Drawer forward output power is greater than 1300Watts. Default system action: Shutdown. Critical High Reflected Power Drawer reflected output power is greater than 184Watts. Default system action: Shutdown. Critical High Input Air Temperature Ambient air temperature used in the reflow of the equipment is greater than 48°C (118,4ºF). Default system action: Shutdown. High Input Air Temperature Ambient air temperature used in the reflow of the equipment is greater than 35°C (95ºF). Default system action: Notification. Low RF Input Level RF Input Level is less than -8dBm Default system action: Notification. High RF Input Level RF Input Level is greater than 10dBm Default system action: Notification. PA__ High Current Current at the indicated PA is greater than 10A. Default system action: Notification. PA__ Critical High Current Current at the indicated PA is greater than 10A. Default system action: Shutdown. PA__ Low Current Current at the indicated PA is less than 0.2A. Default system action: Shutdown. PA__ Unbalance Current Current in the indicated PA is 2.5A is higher or lower than the others. Default system action: Notification. PA__ High Temperature Temperature at the indicated PA is greater than 75ºC (167ºF). Default system action: Notification. PA__ Critical High Temperature Temperature at the indicated PA is greater than 80ºC (176ºF). Default system action: Shutdown. PA__ Low Gain Indicated PA Gain is Less than 49dB. Default system action: Notification
  • 43. 43 | 106 E-Compact Medium Power ALARM ALARM DESCRIPTION PA__ Failure VGS (Voltage Gate Source) of the indicated PA is less than 2/3 of the programmed VGS. Default system action: Shutdown. PA__ Comm Failure No communication with the indicated PA. Driver Low Gain Gain in the driver is less than 30dB. Default system action: Notification Driver Low Voltage Voltage in the driver is less than 5.0V of programmed. Default system action: Notification Driver Critical High Current Consumption current in the driver is greater than 4.9A. Default system action: Shutdown. Driver High Current Consumption current in the driver is between 4.5A and 4.9A. Default system action: Notification Driver Low Current Consumption current in the driver is less than 0.4A. Default system action: Notification Driver High Temperature Temperature Driver is greater than 75°C (167ºF). Default system action: Notification Driver High Output Power Output Power Driver is greater than 46dBm. Default system action: Notification Driver Comm Failure No communication with the Driver. Pre-Driver Low Current Consumption current in the pre-driver is less than 0.1A. Default system action: Notification Pre-Driver High Current Consumption current in the pre-driver is greater than 0.35A. Default system action: Notification PSU __ High AC Line Voltage AC Voltage at PSU is greater than 240Vac Default system action: Notification PSU __ Critical High AC Line Voltage AC Voltage at PSU is greater than 250Vac Default system action: Shutdown
  • 44. 44 | 106 E-Compact Medium Power ALARM ALARM DESCRIPTION PSU __ Critical Low AC Line Voltage AC Voltage at PSU is less than 170Vac Default system action: Shutdown PSU __ Critical High Current Power at PSU indicate exceeds 1300Watts Default system action: Shutdown PSU __ High Temperature Temperature at PSU is greater than 60°C (140ºF). Default system action: Notification PSU __ Critical High Temperature Temperature at PSU is greater than 63°C (145.4ºF). Default system action: Shutdown PSU __ High Current Current at PSU is greater than 24A. Default system action: Notification PSU __ Low Voltage DC Output Voltage at PSU is less than 3V of the programmed. Default system action: Shutdown PSU __ High Voltage DC Output Voltage at PSU is greater than 3V of the programmed. Default system action: Shutdown PSU __ Low AC Line Voltage AC Voltage at PSU is less than 180Vac Default system action: Notification PSU __ Shutdown The PSU is Shutdown. FAN __ Warning Fan rotation reaches ±1000RPM in relation to software programmed value. Default system action: Notification FAN __ Failure Fan rotation reaches ±2000RPM in relation to software programmed value. Default system action: Notification
  • 45. 45 | 106 E-Compact Medium Power BROWSER ALARMS STATUS # Parameter Position # Description / Functionality 1/4 Current Alarms 3100 --- Show the list of currents Alarms in the Equipment. 01 Number of Alarm of Total Alarms 02 ▲ or ▼ to view the Alarms List When there is no alarm, it will display: “Alarm List Empy” # Parameter Position # Description / Functionality 2/4 Alarm Log 3200 --- Show the list of past Alarms in the Equipment. 01 Date and time the first alarm occurred 02 Date of the alarm occurred 03 Time of the alarm occurred 04 Alarm List Press ▲ or ▼ to browse in the Alarm List. # Parameter Position # Description / Functionality 3/4 Drawers Alarms 3300 1/2 Current Drawers Alarms [3310] 2/2 Past Drawers Alarms [3320] 01 02 01 01 02 03 04
  • 46. 46 | 106 E-Compact Medium Power 01 Indicates which Drawer/Module indication 02 Indicates “Current Alarms [3310] or “past Alarms [3320] 03 Number of Alarm of Total Alarms 04 Alarm List Press ▲ or ▼ to browse in the Alarm List. # Parameter Position # Description / Functionality 4/4 Clear Alarm Log --- --- Show the list of past Alarms Select this option to clear all alarm logs. [4000] - Main Menu ⇨ Remote Access [0000] Main Menu [1000] Setup Menu [2000] Measurements [3000] System Alarms/ Log [4000] Remote Acces This menu allows the configuration of the Ethernet network parameters so that you have remote access via a network connection. All equipment parameters such as transmit power, source measurements, alarms check and all possible functional selections can be accessed remotely through a PC Browser or any Smartphone Browser by connecting to the embedded WEB page server of the Equipment. # Parameter Position # Description / Functionality 1/3 IP Address --- --- Set the IP Address 2/3 Subnetwork Mask --- --- Set the Subnetwork Mask 3/3 Gateway --- --- Set the gateway 04 01 02 03
  • 47. 47 | 106 E-Compact Medium Power 6.1.5. Frontal Led Alarms CURRENT ALARM: When a fault occurs, the equipment will automatically take containment and protection actions (Power Off or Power Reduce) and signal by the "CURRENT ALARM" led on the front panel. These may be checked via the display in the menu: [3000] System Alarms / Log. PAST ALARM: When signaling, indicates that there have been malfunctions in the past. These alarms may be checked via the display in the menu: [3000] System Alarms / Log.
  • 48. 48 | 106 E-Compact Medium Power 6.2.PA704MP / PA702MP Power Amplifier Module This is an air-cooled UHF power amplifier drawer composed of an RF block with until four power transistors that utilize Doherty's high efficiency technology. Each Drawer can provide up to 450 Watts RMS (ATSC 1.0) or up to 400 Watts RMS (ATSC 3.0) with efficiency between 34% and 41% depending on the operating channel. The Power Drawers are mounted in the 2U rack and avaliable em two models: PA702MP Power Amplifier (MOD GV 40033A) – 215 Watts @ATSC3.0 / 225 Watts @ATSC1.0 PA704MP Power Amplifier (MOD GV 40010) – 400 Watts @ATSC3.0 / 450 Watts @ATSC1.0 Main features: ⇨ High efficiency. ⇨ Power Supply redundancy – avaliable on PA702MP model. ⇨ Doherty Configuration. ⇨ Standing fans accessible from the front panel. ⇨ Removable power supply at the front panel of the drawer. ⇨ 2U Power Drawer for 19" rack. ⇨ Power transistors LDMOS Ampleon BLF-888A. ⇨ Automatic control of the quiescent currents of the power transistors depending on the temperature. ⇨ Automatic fan speed control according to power transistor’s temperature. ⇨ Protection against VSWR and Overdrive ⇨ Power Factor Corrector (PFC) at power supply (PFC). ⇨ Protection against over current in the power supply. ⇨ Settings and measures via terminal. ⇨ Automatic restart after alarm event. ⇨ Matched sample of the output signal. ⇨ Integrated MOD bus Control. Never unplug any Power Amplifier Drawer while the Transmitter is on. Risk of equipment damage.
  • 49. 49 | 106 E-Compact Medium Power H G F E D C B A 8 7 6 5 4 3 2 1 H G F E D C B A 8 7 6 5 4 3 2 1 6.2.1. Interfaces Rear Panel – PA704MP 09 10 12 13 14 11 Rear Panel – PA702MP 08 09 11 12 13 10 Interfaces PA702MP / PA704MP POWER AMPLIFIERS FRONT / REAR VIEW REF DESCRIPTION 01 Signaling LEDs 02 USB Interface 03 Removable front panel 04 Fan Air Filter 05 Power Source 1 (PS1) 06 On/Off Power Source 1 (PS1) 07 Slot for Redundant Power Source (Only PA702MP) 08 AC Power input 09 GND connector 10 RF INPUT – SMA female 50Ω 11 RF SAMPLE – SMA female 50Ω 12 RF OUTPUT – DIN 7/16” female 50Ω 13 COMM – DB9 communication 01 04 04 04 05 07 Front Panel – PA702MP 02 06 03 01 04 04 04 05 07 02 Front Panel – PA704MP 06 08 03 REF DESCRIPTION 01 Signaling LEDs 02 USB Interface 03 Removable front panel 04 Fan Air Filter 05 Power Source 1 (PS1) 06 On/Off Power Source 1 (PS1) 07 Power Source 2 (PS2) 08 On/Off Power Source 2 (PS2) 09 AC Power input 10 GND connector 11 RF INPUT – SMA female 50Ω 12 RF SAMPLE – SMA female 50Ω 13 RF OUTPUT – DIN 7/16” female 50Ω 14 COMM – DB9 communication PA702MP PA704MP
  • 50. 50 | 106 E-Compact Medium Power 6.2.2. Specifications Characteristic Specification PA702MP PA704MP Input Frequency Range 470 to 806 MHz See PA702MP / PA704MP Channel Range Table Level 0.0 to 8.0 dBm (±1dB) Connector / Impedance SMA female / 50 Ohms Return Loss -20dB typical ( -18dB Max) Output Frequency Range 470 to 806 MHz Output Power 215 Wrms (ATSC 3.0) 225 Wrms (ATSC 1.0) 400 Wrms (ATSC 3.0) 450 Wrms (ATSC 1.0) RF Sample 470 to 806 MHz / +10dBm Connector / Impedance DIN 7/16” female – 50 Ω Return Loss -20dB typical ( -18dB Max) - measured with the drawer off Harmonics / Spurious -30dBc Average MER Better than 33dB: Pout = 215Wrms@ ATSC 3.0 Better than 36dB: Pout= 225Wrms @ATSC 1.0 Better than 33dB: Pout = 400Wrms@ ATSC 3.0 Better than 36dB: Pout= 450Wrms @ATSC 1.0 General Communication Interface USB / RS-485 AC Mains 100Vac to 254VAC / 43 to 63Hz 180Vac to 254VAC / 43 to 63Hz Power Factor > 0.92 Gain 52dB (± 4.0dB) Average Efficiency 32% typical @ ATSC 3.0 Pout: 215W 32% typical @ ATSC 3.0 Pout: 400W
  • 51. 51 | 106 E-Compact Medium Power H G F E D C B A 8 7 6 5 4 3 2 1 H G F E D C B A 8 7 6 5 4 3 2 1 6.2.3. Power Amplifier Block Diagram Block Diagram PA702MP Power Supply 1 Power Supply 2 (OPTIONAL) PA 1 PA 2 Alarms Led Driver FAN 1 FAN 2 FAN 3 Control Fan Control Alarms Led PA Control REF Power FWD Power Drive Control Control Module / Exciter Interface Communication – Drawer Address Power Supplies Interface Communication USB Comm +5Vcc Power Supplies Comm. USB Comm DC Power Line 42 ~50VDC 2400 Watts MAX Control Module / Exciter Comm. – Drawer Address Power Amplifiers FWD REF SAMPLE +5Vcc Control Module / Exciter Comm. – Drawer Address Comm RF SAMPLE +10dBm (-43dB) RF IN 0.0 ~ 8.0 dBm AC Line AC Input AC Input DC Power Line Output 42 ~50VDC DC Power Line Output 42 ~50VDC Power Supplies Comm. Power Supplies Comm. Communication. Communication. +5VCC +5VCC +5VCC +5VCC Reflectometer Peak Carrier 470 ~ 806MHz GAIN = +52dB ±4dB POUT: 215 W @ ATSC3.0 POUT: 225 W @ ATSC1.0 PA702MP RF OUT 53.30 to 53.52 dBm 1 1 NOTES: 1 – See PA702MP Channel Range Table
  • 52. 52 | 106 E-Compact Medium Power H G F E D C B A 8 7 6 5 4 3 2 1 H G F E D C B A 8 7 6 5 4 3 2 1 Channel RangeTable PA702MP CHANEL RANGE PA702MP DOHERTY COMBINER PA702MP COMBINER 1:1 14 ~ 17 HKL1001100 - MOD CIM 30238 470-494MHZ MP HKL1003777 - MOD 40176 SOM 1:1 470-570MHZ MP 18 ~ 21 HKL1001101 - MOD CIM 30239 494-518MHZ MP HKL1003777 - MOD 40176 SOM 1:1 470-570MHZ MP 22 ~ 24 HKL1001102 - MOD CIM 30240 518-534MHZ MP HKL1003777 - MOD 40176 SOM 1:1 470-570MHZ MP 25 ~ 26 HKL1001103 - MOD CIM 30241 534-550MHZ MP HKL1003777 - MOD 40176 SOM 1:1 470-570MHZ MP 27 ~ 29 HKL1001104 - MOD CIM 30242 550-566MHZ MP HKL1003777 - MOD 40176 SOM 1:1 470-570MHZ MP 30 ~ 33 HKL1001105 - MOD CIM 30243 566-590MHZ MP HKL1003779 - MOD 40177 SOM 1:1 570-670MHZ MP 34 ~ 37 HKL1001107 - MOD CIM 30244 590-614MHZ MP HKL1003779 - MOD 40177 SOM 1:1 570-670MHZ MP 38 ~ 41 HKL1001108 - MOD CIM 30245 614-638MHZ MP HKL1003779 - MOD 40177 SOM 1:1 570-670MHZ MP 42 ~ 45 HKL1001109 - MOD CIM 30246 638-662MHZ MP HKL1003779 - MOD 40177 SOM 1:1 570-670MHZ MP 46 HKL1001110 - MOD CIM 30247 662-686MHZ MP HKL1003779 - MOD 40177 SOM 1:1 570-670MHZ MP 47 ~ 49 HKL1001110 - MOD CIM 30247 662-686MHZ MP HKL1003781 - MOD 40178 SOM 1:1 670-770MHZ MP 50 ~ 53 HKL1001111 - MOD CIM 30248 686-710MHZ MPP HKL1003781 - MOD 40178 SOM 1:1 670-770MHZ MP 54 ~ 57 HKL1001112 - MOD CIM 30249 710-734MHZ MP HKL1003781 - MOD 40178 SOM 1:1 670-770MHZ MP 58 ~ 61 HKL1001113 - MOD CIM 30250 734-758MHZ MP HKL1003781 - MOD 40178 SOM 1:1 670-770MHZ MP 62 ~ 63 HKL1001114 - MOD CIM 30251 758-782MHZ MP HKL1003781 - MOD 40178 SOM 1:1 670-770MHZ MP 64 ~ 65 HKL1001114 - MOD CIM 30251 758-782MHZ MP HKL1003783 - MOD 40179 SOM 1:1 770-806MHZ MP 66 ~ 69 HKL1001115 - MOD CIM 30252 782-806MHZ MP HKL1003783 - MOD 40179 SOM 1:1 770-806MHZ MP
  • 53. 53 | 106 E-Compact Medium Power H G F E D C B A 8 7 6 5 4 3 2 1 H G F E D C B A 8 7 6 5 4 3 2 1 Block Diagram PA704MP Power Supply 1 Power Supply 2 PA 1 PA 2 PA 3 PA 4 Alarms Led Driver FAN 1 FAN 2 FAN 3 Control Fan Control Alarms Led PA Control REF Power FWD Power Drive Control Control Module / Exciter Interface Communication – Drawer Address Power Supplies Interface Communication USB Comm +5Vcc Power Supplies Comm. USB Comm DC Power Line 42 ~50VDC 2400 Watts MAX RF OUT 56.00 to 56.53 dBm Control Module / Exciter Comm. – Drawer Address Power Amplifiers 470 ~ 806MHz GAIN = +52dB ±4dB POUT: 400 W @ ATSC3.0 POUT: 450 W @ ATSC1.0 FWD REF SAMPLE +5Vcc Control Module / Exciter Comm. – Drawer Address Comm RF SAMPLE +10dBm (-46dB) RF IN 0.0 ~ 8.0 dBm AC Line 1 AC Input AC Input DC Power Line Output 42 ~50VDC DC Power Line Output 42 ~50VDC Power Supplies Comm. Power Supplies Comm. Communication. Communication. +5VCC +5VCC +5VCC +5VCC Reflectometer Peak Carrier Peak Carrier PA704MP 1 NOTES: 1 – See PA704MP Channel Range Table
  • 54. 54 | 106 E-Compact Medium Power H G F E D C B A 8 7 6 5 4 3 2 1 H G F E D C B A 8 7 6 5 4 3 2 1 CHANEL RANGE PA704MP DOHERTY COMBINER 14 ~ 17 HKL1000524 - MOD CIM 30146 470-494MHZ MP 18 ~ 21 HKL1000525 - MOD CIM 30147 494-518MHZ MP 22 ~ 24 HKL1000526 - MOD CIM 30148 518-534MHZ MP 25 ~ 26 HKL1000527 - MOD CIM 30149 534-550MHZ MP 27 ~ 29 HKL1000528 - MOD CIM 30161 550-566MHZ MP 30 ~ 33 HKL1000529 - MOD CIM 30150 566-590MHZ MP 34 ~ 37 HKL1000530 - MOD CIM 30151 590-614MHZ MP 38 ~ 41 HKL1000531 - MOD CIM 30152 614-638MHZ MP 42 ~ 45 HKL1000532 - MOD CIM 30153 638-662MHZ MP 46 ~ 49 HKL1000533 - MOD CIM 30154 662-686MHZ MP 50 ~ 53 HKL1000534 - MOD CIM 30155 686-710MHZ MP 54 ~ 57 HKL1000535 - MOD CIM 30156 710-734MHZ MP 58 ~ 61 HKL1000536 - MOD CIM 30157 734-758MHZ MP 62 ~ 65 HKL1000537 - MOD CIM 30158 758-782MHZ MP 66 ~ 69 HKL1000538 - MOD CIM 30159 782-806MHZ MP Channel RangeTable PA704MP
  • 55. 55 | 106 E-Compact Medium Power 6.2.4. Signaling LEDs Each Power Amplifier Drawer Features a LED bank that indicates the situation of its operation according to the color As shown below:: Green Normal operation. Orange Orange light indicates That a failure has occurred. Red Flashing Red light indicates an ongoing failure. LED ALARM PWR N/A - This LED lights only GREEN indicating that is POWERED ON. SHDN Power Supply Shutdown FWD Over Forward Power (Overdrive) RFD Reflected Power PA PA Failure, High Current on PA, Low Current on PA, Current UNBAL on PA, Low Gain on PA, High Temperature on PA, Communication Failure on PA. DRV High Current on Driver, Low Current on Driver, Low Current on Pre Driver, High Current on Pre Driver, Low Gain on Driver, High Temperature on Driver, Low Voltage on Driver, Communication Failure on Driver, High Input Signal, High Driver Output Level. PSU Low AC Line Voltage, High AC Line Voltage, Low PSU Voltage, High PSU Voltage, High PSU Current, High PFC Temperature, High DC/DC Temperature, PSU Communication Failure. FAN/TEMP When detected slow speed of rotation or complete failure in any of the fans. High temperature input air of the power drawer (greater than 35ºC). Alarm details are displayed by accessing the keyboard-display interface of the Control Module CM8001 in the menus: ⇨ Main Menu ⇨ System Alarms/Log [3000] ⇨ Drawers Alarms ⇨ Current Drawers Alarms [3310] ⇨ Main Menu ⇨ System Alarms/Log [3000] ⇨ Drawers Alarms ⇨ Past Drawers Alarms [3320] PWR SHDN FWD RFD PA DRV PSU FAN/ TEMP
  • 56. 56 | 106 E-Compact Medium Power 6.2.5. Communication interface (COMM) 6.2.6. 1200 Watts Powers Supplies The Power Amplifiers Drawers use two 1200 Watts plug-in power supplies. Each of the power supplies in the power amplifier converts 180-240VAC single-phase line voltage to 40-50VDC to power the RF pallets. Never unplug any Power Supplies while the Transmitter is on. Risk of equipment damage. The power supplies feature a quick-connect system that allows the unit to be easily removed through the front of the power amplifier chassis. The power supply includes power factor correction, built- in I-rush protection as well as overload protection (over-temperature, voltage, and current). The configuration of 2-PS per power amplifier provides a soft-fail mode. COMM
  • 57. 57 | 106 E-Compact Medium Power H G F E D C B A 8 7 6 5 4 3 2 1 H G F E D C B A 8 7 6 5 4 3 2 1 Power Supply Replacement PA702MP / PA704MP
  • 58. 58 | 106 E-Compact Medium Power 6.2.7. Power Supply 1200Watts – MOD 40241: AC/DC Converter - PFC AC Mains Input 180 ~240 VAC AC Mains Frequency 50 ~ 60Hz Switching Frequency 100kHz DC Output 375VDC Power DC Output 1.32kW Power Factor > 0.92% DC/DC Converter DC Input 350 ~400vdc Switching Frequency 50kHz DC Output 40 ~50vdc Adjustable Power DC Output 1.2kW Max Current 24A Ripple <400mVpp Flyback AC Mains Input 180 ~240 VAC AC Mains Frequency 50 ~ 60Hz Switching Frequency 65kHz DC Output +5VDC Power DC Output 18W Connection: Rear View
  • 59. 59 | 106 E-Compact Medium Power 6.3.EIA 1-5/8” low pass filter The Low Pass Filter is installed between the Power Amplifier Drawer RF Output and the Mask Filter attenuating unwanted harmonic products so that they do not return as reflected wave to the PA. Low Pass Filter Frequency Range and Models: 6.3.1. Features Operation Frequency 470 to 608MHz CH14 to CH36 (MOD 40243) 608 to 710MHz CH37 to CH53 (MOD 40055) 710 to 806MHz CH54 to CH69 (MOD 40055) Connector / Impedance INPUT: DIN 7/16” 50 Ω OUTRPUT: EIA 1-5/8” / 50 Ω Max Power 3300 Watts Return Loss -26dB (min) -30dB (typical) Insertion Loss -0,06dB (max) -0,05dB (typical) Second Harmonic Attenuation Better than -30dB RF IN RF OUT CHANNEL RANGE MODEL 14 to 36 HKL1007123 - MOD 40243 Fil PB 470-608MHz 37 to 53 00057663 - MOD 40055 FIL PB 590-710 54 to 69 HKL1007123 - MOD 40243 Fil PB 470-608MHz
  • 60. 60 | 106 E-Compact Medium Power 6.4.MOD 40215 EIA RF Output Line with Sample Probe The 4.5. EIA RF Output Line with Sample Probe is a passive coaxial RF sample installed in the Mask Filter RF output and has four independent RF outputs samples. It has two signal samples for use in the non-linear adjustment, a sample for the reflected power monitoring and a direct power monitoring sample. 6.4.1. Features RF DIRECTION RF IN RF OUT D - FWD A - FWD B - FWD C - REF Operation Frequency 470 to 806MHz CH14 to CH69 Max Power 5500 Watts Insertion Loss (RF IN – RF OUT) -0.13dB (MAX); -0.10dB (MIN) RF OUT Connection: 1-5/8” EIA Flange Return Loss: -36dB (TYPICAL); -31dB (MIN) Impedance: 50Ω RF IN Connection: 1-5/8” EIA Flange Return Loss: -36dB (TYPICAL); -31dB (MIN) Impedance: 50Ω
  • 61. 61 | 106 E-Compact Medium Power Check on the Sample output connectors labels the coupling curve for the corresponding frequency of the equipment. A – FWD Sample Use for Non-Linear Correction Forward Power Sample Connection: N Coupling: -52dB (MAX); -61dB (MIN) Impedance: 50Ω B – FWD Sample C – REF Sample To monitor Reflected Power Output. Reflected Power Sample Connection: N Coupling: -52dB (MAX); -61dB (MIN) Impedance: 50Ω D – FWD Sample To monitor Forward Power Output. Forward Power Sample Connection: N Coupling: -52dB (MAX); -61dB (MIN) Impedance: 50Ω Samples Return Loss -28dB (TYPICAL); -27dB (MIN) Insulation between RF OUT And FWD Samples A, B and D -30dB (TYPICAL); -27dB (MIN) Insulation between RF IN And REF Sample C -30dB (TYPICAL); -27dB (MIN Label Coupling Curve
  • 62. 62 | 106 E-Compact Medium Power 6.5.AC Mains Protection Unit The AC Protection Unit is responsible for the AC Power distribution and Equipment AC Power protection. Characteristics: ⇨ Surge Protection Device (SPD). ⇨ Circuit Breaker. ⇨ AC Line Input. ⇨ AC Mains Internal distribution. ⇨ AC Mains Available: 6.5.1. Sparkover - Phase Surge Protection Device (SPD). It is a device that limits overvoltages in the mains by diverting the current line to ground, in order to limit the amplitude of this overvoltage to a value that is not dangerous to the equipment. It is connected in parallel between the line and the ground and has high impedance. Once the transient overvoltage appears in the system, the impedance of the device decreases and directs the current to earth protecting the equipment. When this occurs, the device signals a red flag, needing for its replacement: Sparkover Changing RED: Fault Warning M208 1 Φ 190~240VAC Neutral GND B240 2 Φ 190~240VAC GND T208 / T240 3 Φ 190~240VAC GND T380 3 Φ 190~240VAC Neutral GND EC Medium Power – Rear View Mains Protection Unit
  • 63. 63 | 106 E-Compact Medium Power Sparkovers types: PHASE 2807586 150VAC SURGE PROTECTION VARISTOR Ground Ground B240 PHASE PHASE PHASE PHASE 2798844 275VAC SURGE PROTECTION VARISTOR Ground Ground M208 NEUTRAL NEUTRAL PHASE 2817990 260VAC SURGE PROTECTION SPARKLER Never open the device: there is a risk of electric shock. If necessary, contact Hitachi Service. Before Connecting the Machine to the AC Mains, one must ensure that the grid Voltage meets the equipment’s settings. Never expose the equipment to rain, moisture or direct sunlight, in order to avoiding risk of fire or electric shock. 2798844 – 275VAC SURGE PROTECTION VARISTOR 2817990 – 260VAC SURGE PROTECTION SPARKLER 2807586 – 150VAC SURGE PROTECTION VARISTOR About AC MAINS TYPE, see Section 8 – Attachments, USA AC Mains Types for E- Compact Series.
  • 64. 64 | 106 E-Compact Medium Power H G F E D C B A 8 7 6 5 4 3 2 1 H G F E D C B A 8 7 6 5 4 3 2 1 6.5.2. M208 Mains Protection Unit – 208VAC WILD LEG 1 Φ 208VAC Neutral GND 1 Bipolar Circuit Breaker 25A 5SL1 225-7MB 2 Sparkler F-MS 12 ST- TVS 260 VAC 3 Varistor VAL-MS 230 ST - 275Vac 4 GND / Neutral Input Connector 5 GND / Neutral Protection Connector 3 2 1 5 4 Neutral (Grey) Phase (Red) Ground (yelow/green)
  • 65. 65 | 106 E-Compact Medium Power H G F E D C B A 8 7 6 5 4 3 2 1 H G F E D C B A 8 7 6 5 4 3 2 1 6.5.3. B240 Mains Protection Unit –SINGLE PHASE 240 VAC 2 Φ 240VAC GND 1 Bipolar Circuit Breaker 25A 5SL1 225-7MB 2 Varistor VAL-MS 120 ST - 150Vac 3 Varistor VAL-MS 120 ST - 150Vac 4 GND / Neutral Input Connector 5 GND / Neutral Protection Connector 2 3 1 4 5 Phase (Grey) Phase (Red) Ground (yelow/green)
  • 66. 66 | 106 E-Compact Medium Power 6.5.4. Changing AC Mains Once the mains power is set at the factory, there is the possibility to change its input type feature for the following cases: For Not Available cases, it is necessary to replace the complete AC Mains Module for the compatible electrical grid. Contact Hitachi Kokusai Linear Service. When replacing the AC Mains type, pay attention to circuit breakers, varistors and sparklers models for their characteristics. Each type of AC Mains uses different values of these protection components. Using these protection components outside the features described in this manual may cause damage to the equipment. AC Main Factory Set Setup Change Possibility M208 B240 T208 / T240 T380 M208 Factory Set USE B220 Setup See 6.5.3 Not Available Not Available B240 USE M220 Setup See 6.5.2 Factory Set Not Available Not Available
  • 67. 67 | 106 E-Compact Medium Power 6.6.Exciter Interface The transmitters of the E-Compact Medium Power family have a monitoring interface for external exciters to communicate with the CM8001 Control Module. There are two interfaces, one for the main driver and one for the backup: Control I/O In Parameters Status P4 Exciter Status Exciter Status to respective CM 8001 Controler. P9 VCC +5 VCC P9 P4 DB9 Male – Exciter Communication
  • 68. 68 | 106 E-Compact Medium Power Section 4 – Installation 1. Overview. This section provides general information for planning the installation of the E-Compact Medium Power Line Transmitters, such as recommendations regarding Shelter, Tower, Antennas, Cables, Grounding, Power Line, Prevention against Transients, etc. 2. Inspection. The package and the equipment must be inspected upon delivery in order to detect eventual visible damages. If there are signs of violation or physical damage (which points to transportation problems), the corresponding evidences should be described in the delivery documentation provided by the transport company. Such notice would be used to establish the responsibilities for the product integrity. Hitachi Kokusai Linear carries out operating tests at the factory on every transmitter in order to ensure proper operation after delivery to the user. Nevertheless, if the equipment does not operate after the start- up and there is no evidence of transportation damage, it might be necessary to send the equipment back to the factory for repair or replacement. In such a case, please get in contact with Hitachi Kokusai Linear Equipamentos Eletrônicos S/A's Technical Support Department. 3. Installation Recommendations. 3.1.Preventive Protection Voltage transients with a duration of micro and nano-seconds are a constant challenge for solid state circuits. The downtime and the equipment maintenance make the preventive protection the best warranty against these surges. This protection can be in many forms, from isolation transformers and no-breaks to the more efficient but more expensive AC Voltage Protectors. Since lightning is the most common cause of transients, AC Voltage Protectors are the best choice. An efficient AC Voltage Protection must be able to dissipate the energy to a low voltage, sufficient to guarantee the protection of the electronic components. The protection Must always be placed transversely to the AC line, even during blackout periods. In addition, it must be immediately and automatically turned- on and ready in case of repeated transients. 3.2.Tower For the installation of the TV transmission and reception system, the tower must be made with hot-dip galvanized steel. A lightning protection system should be installed in the tower as well as nocturnal beacons bulbs with red glass. The following information about the tower must be obtained:
  • 69. 69 | 106 E-Compact Medium Power a) It feature of special insulator supports for descent of cordage of lightning rod, with a space of 1,5m maximum between them. b) There must be a lightning signaling system in every 20m along the tower. c) It must be painted with orange and white stripes in every 2m with a special paint that complies with local regulations. d) It must endure winds of up to 150 Km/h. In a retransmission station the tower is the highest and therefore, the most vulnerable device to be hit by lightning and because of it, the tower is used as a part of the protection system. The lightning protection device used in these cases is called lightning rod and has the function of guiding the electrical discharge safely, avoiding other parts of the system to be hit and damaged by it. The use of a lightning rod is MANDATORY. The project and installation of grounding and lightning protection systems must be performed by specialized companies. Eventual damage to the equipment caused by missing or malfunctioning arrester is not covered by warranty. 3.3.Fastening of cables, antennas and connectors Please observe the following items when installing antennas: Direction of Antennas and Aperture Angles Use a pocket compass when directing the antenna. Use a field strength meter for the fine adjustment of the reception antenna. Height It mainly depends on the receiving signal and the transmission conditions (obstructions, attended area, etc). It’s very important to verify how far the antenna is from the lightning protection device, since the antenna must stay inside its cone protection. Distance between the Rx and Tx Antennas They should be placed as far as possible from each other in order to isolate the transmitted signal from the received signal. Polarization It is very important to verify the polarization of the received signal, which can be vertical, horizontal or circular. Phasing When receiving a signal with vertical polarization, the system must be mounted vertically, otherwise the gain of the antenna will be drastically reduced, likewise in case of a signal with horizontal polarization. To receive a signal with circular polarization with a non-circular antenna, the system can be mounted either vertically or horizontally.
  • 70. 70 | 106 E-Compact Medium Power Stacking antennas When using this system, the distance between them depends on the kinds of antenna used and the kind of stacking used. This must be studied thoroughly in order to obtain the best solution for each case. Cables and Connectors All cables must be carefully installed in order not to be twisted during the installation process. When using 7/8" or 1/2" cables, please pay attention to their bending that must not be made in spaces smaller than 80cm. The cables can't force the connectors in the Input/Output of the equipment. The entry holes for the cables in the shelter must be done in a way to avoid the water that runs along them to get inside. Follow the manufacturer 's instructions when assembling them. All splices done outside the shelter must be isolated with a special plastic tape and/or a plastic insulation material. Avoid using silicon to coat the isolation made with auto-fusion tape. It has been verified that the silicon chemical characteristics may provoke the drying of the auto-fusion tape. 3.4.Indoors Equipment Installation Small equipment must be placed on a table in a way to provide easy access from all sides and be at least one meter far from the walls. Do not compromise the equipment’s air flow by placing objects on its top panel. Its natural ventilation. The equipment must be placed directly on the shelter's floor as long as it is flat and they must be placed at least one meter far from the walls to avoid obstruction of its ventilation system. Some of these air outlet must be connected to the outside of the shelter through PVC tubing. The AC cable has two terminations to be used exclusively in the equipment. 3.5.Equipment Grounding Assemble the grounding separately from the power supply, with a rig and a grounding terminal that come with the equipment. Normally, the retransmission sites are located in the highest spot of the chosen location, making them more vulnerable to lightning strikes. These discharges carry a great amount of electric energy, putting at risk not only the antenna and its structure but also the equipment in the shelters. In order to minimize this effect and guarantee their protection and continuous service during thunderstorms with lightning, the use of a reliable grounding system is mandatory. Lightning is a transient, high-current electric discharge that happens between the ground and the clouds therefore the most important part of a lightning protection system are the parts that are on the ground. In order to maintain the low impedance of the technical grounding system, it must be carefully executed in a way that the electric field energy is drained away without affecting the equipment. In order to define a system, the characteristics of the soil resistivity must be taken into consideration.
  • 71. 71 | 106 E-Compact Medium Power To determine the behavior of the soil capacity to drain the currents, its resistivity has to be measured. For an adequate protection this value should not exceed 5 , being zero the ideal value Generally, the grounding method used for TV retransmitters is a system with a single vertical electrode made with copper measuring 2.5 meters or more. In case the conditions and characteristics of the soil are of high resistivity or high incidence of lightning discharges, the grounding system must be thoroughly analyzed. It is very important to notice that the grounding systems of the equipment and the lightning rod are independent and should never be connected to each other. A poorly elaborated grounding system can cause damages to the equipment that won't be covered by the warranty. 3.6.Electric Installation Grounding The shelter installations receive power through an aerial power line. Moreover, because of it, the lightning discharges that might hit the power lines generate power surges that can reach the shelter and consequently the equipment. To protect the equipment against eventual power surges, we recommend the use of gas filled surge protectors, after an isolation transformer with electrostatic shield. When installing the grounding system, please observe the following items: Connect all equipment carcasses to the grounding system using the grounding rig that comes with them. Connect the gate and all the wires from the fence to the grounding system. Connect the neutral wire from the public power line to the grounding system. Connect the rig from the lightning rod to the grounding system with the shortest connection possible avoiding cable splices. The tower’s structure must also be connected to the grounding system. Use porcelain isolators to insulate the lightning rod rig. 3.7.Power Supply Before plugging the equipment to the power supply, verify the voltage in the outlet to make sure that is correct.If its variation is greater than 10%, it is necessary to use a power stabilizer to correct the voltage. The power provided by the stabilizer must be at least 30% greater than the consumption of the equipment