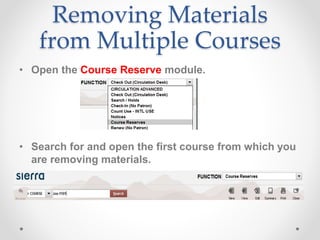
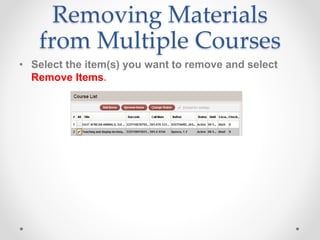
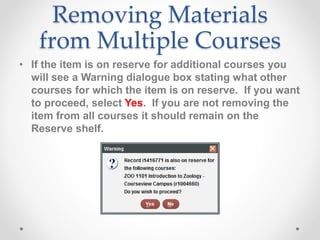
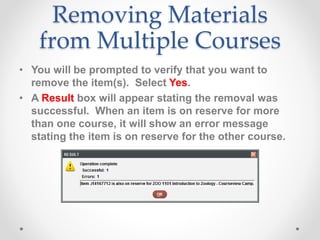
Course
Reserves:
7. Removing Materials from Multiple Courses
Sinclair Community College
Library
How This Lesson Works
• You will be given step-by-step instruction.
• You will see a slide with a video box.
• When pressed, this video will show you the process
step-by-step in Sierra.
• If you have questions at the end, there is contact
information on the last slide.
Removing Materials
from Multiple Courses
• Open the Course Reserve module.
• Search for and open the first course from which you
are removing materials.
Removing Materials
from Multiple Courses
• Select the item(s) you want to remove and select
Remove Items.
Removing Materials
from Multiple Courses
• If the item is on reserve for additional courses you
will see a Warning dialogue box stating what other
courses for which the item is on reserve. If you want
to proceed, select Yes. If you are not removing the
item from all courses it should remain on the
Reserve shelf.
Removing Materials
from Multiple Courses
• You will be prompted to verify that you want to
remove the item(s). Select Yes.
• A Result box will appear stating the removal was
successful. When an item is on reserve for more
than one course, it will show an error message
stating the item is on reserve for the other course.
Removing Materials
from Multiple Courses
• Once a library item is removed from reserve, the
location code and item type automatically return to
their original designation. It can be returned to the
shelves after removing the Reserve labels.
• If the item is a department- or instructor-owned item
that is to be returned, change its status to Withdrawn
before returning it to the department or instructor.
Removing Materials
from Multiple Courses
• The item has been removed from reserve.
• Repeat this process with the next course you need
to remove the item(s) from.
See next slide for video
Course reserves   7 Removing Items from Multiple Courses

Course reserves 7 Removing Items from Multiple Courses

  • 1.
    Course Reserves: 7. Removing Materialsfrom Multiple Courses Sinclair Community College Library
  • 2.
    How This LessonWorks • You will be given step-by-step instruction. • You will see a slide with a video box. • When pressed, this video will show you the process step-by-step in Sierra. • If you have questions at the end, there is contact information on the last slide.
  • 3.
    Removing Materials from MultipleCourses • Open the Course Reserve module. • Search for and open the first course from which you are removing materials.
  • 4.
    Removing Materials from MultipleCourses • Select the item(s) you want to remove and select Remove Items.
  • 5.
    Removing Materials from MultipleCourses • If the item is on reserve for additional courses you will see a Warning dialogue box stating what other courses for which the item is on reserve. If you want to proceed, select Yes. If you are not removing the item from all courses it should remain on the Reserve shelf.
  • 6.
    Removing Materials from MultipleCourses • You will be prompted to verify that you want to remove the item(s). Select Yes. • A Result box will appear stating the removal was successful. When an item is on reserve for more than one course, it will show an error message stating the item is on reserve for the other course.
  • 7.
    Removing Materials from MultipleCourses • Once a library item is removed from reserve, the location code and item type automatically return to their original designation. It can be returned to the shelves after removing the Reserve labels. • If the item is a department- or instructor-owned item that is to be returned, change its status to Withdrawn before returning it to the department or instructor.
  • 8.
    Removing Materials from MultipleCourses • The item has been removed from reserve. • Repeat this process with the next course you need to remove the item(s) from. See next slide for video