Cool templates 3d
•Download as PPTX, PDF•
0 likes•604 views

This document provides instructions for reproducing, printing, and removing the reproduction instructions for slides in PowerPoint. The slide notes include steps to reproduce each slide. To print, select the slide, copy the text in the notes, paste into a Word document and print. To remove instructions, go to the slide notes, select all text and delete. This allows printing the instructions or clearing them if they cause performance issues.

Recommended
Recommended
More Related Content
Similar to Cool templates 3d
Similar to Cool templates 3d (20)
Recently uploaded
Recently uploaded (20)
Cool templates 3d
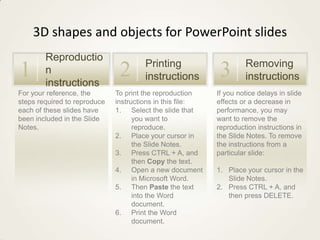
- 1. 3D shapes and objects for PowerPoint slides Reproductio Printing Removing 1 n instructions 2 instructions 3 instructions For your reference, the To print the reproduction If you notice delays in slide steps required to reproduce instructions in this file: effects or a decrease in each of these slides have 1. Select the slide that performance, you may been included in the Slide you want to want to remove the Notes. reproduce. reproduction instructions in 2. Place your cursor in the Slide Notes. To remove the Slide Notes. the instructions from a 3. Press CTRL + A, and particular slide: then Copy the text. 4. Open a new document 1. Place your cursor in the in Microsoft Word. Slide Notes. 5. Then Paste the text 2. Press CTRL + A, and into the Word then press DELETE. document. 6. Print the Word document.
- 24. Introduction
- 25. Type your text here. Type your text here. Type your text here. Type your text here. Type your text here. Type your text here. Type your text here. Type your text here. I Type your text here. Type yourntroductio text here. Type your text here. Type your text here. n Type your text here. Type your text here. Type your text here. Type your text here. Type your text here. Type your text here. Type your text here. Type your text here. Type your text here. Type your text here. Type your text here. Type your text here. Type your text here. Type your text here. Type your text here. Type your text here. Type your text here. Type your text here. Type your text here. Type your text here. Type your text here. Type your text here. Type your text here. Type your text here.
Editor's Notes
- For reproduction steps for this slide, refer to the PowerPoint template titled “Combined picture and text effects for PowerPoint slides” (ANI_TEXT.potx), slide number 8.
- Floating, transparent 3-D rectangles(Basic)To reproduce the shape effects on this slide, do the following:On the Home tab, in theSlides group, click Layout, and then click Blank.On the Home tab, in the Drawing group, click Shapes, and then under Rectangles, click Rectangle (first option from the left). On the slide, drag to draw a rectangle. Repeat the process to create multiple rectangles. On the Home tab, in the Editing group, click Select, and then click Select All. On the Home tab, in the bottom right corner of the Drawing group, click the FormatShape dialog box launcher. In the Format Shape dialog box, click Fill in the left pane, and then select No fill in the Fill pane. Also in the Format Shape dialog box, click Line Color in the left pane, and then in the Line Color pane, select No line. Also in the Format Shape dialog box, click 3-D Format in the left pane, and then do the following in the 3-D Format pane:Under Depth, click the button next to Color, and then under Theme Colors, click Blue, Accent 1, Lighter 40% (fourth row, fifth option from the left). In the Depth box, enter 50 pt.Under Surface, click the button next to Material, and then under Translucent, click Clear (third option from the left). Click the button next to Lighting, and then under Special, click Two Point (second option from the left). In the Angle box, enter 290°.Also in the Format Shape dialog box, click 3-D Rotation in the left pane. In the 3-D Rotation pane, click the button next to Presets, under Perspective, click Perspective Heroic Extreme Left (third row, second option from the left), and then do the following:In the X box, enter 333°.In the Y box, enter 25.8°.In the Z box, enter 160°.In the Perspective box, enter 90°.To reproduce the background effects on this slide, do the following:Right-click the slide background area, and then click Format Background. In the Format Background dialog box, click Fill in the left pane, select Gradient fill in the Fill pane, and then do the following:In the Type list, select Linear.Click the button next to Direction, and then click Linear Down (first row, second option from the left).Under Gradient stops, click Add or Remove until three stops appear in the drop-down list.Also under Gradient stops, customize the gradient stops that you added as follows:Select Stop 1 from the list, and then do the following:In the Stop position box, enter 58%.Click the button next to Color, and then under Theme Colors click Dark Blue, Text 2, Lighter 60% (third row, fourth option from the left).Select Stop 2 from the list, and then do the following: In the Stop position box, enter 87%.Click the button next to Color, and then under Theme Colors click Dark Blue, Text 2, Lighter 80% (second row, fourth option from the left).Select Stop 3 from the list, and then do the following: In the Stop position box, enter 100%.Click the button next to Color, and then under Theme Colors click White, Background 1 (first row, first option from the left).
- Wire outline triangles(Basic)To reproduce the shape effects on this slide, do the following:On the Home tab, in theSlides group, click Layout, and then click Blank.On the Home tab, in the Drawing group, click Shapes, and then under Basic Shapes click Right Triangle (first row, fourth option from the left). On the slide, drag to draw a triangle. Repeat the process to create multiple triangles. On the Home tab, in the Editing group, click Select, and then click Select All. On the Home tab, in the bottom right corner of the Drawing group, click the FormatShape dialog box launcher. In the Format Shape dialog box, click Fill in the left pane, and then in the Fill pane, click No fill. Also in the Format Shape dialog box, click Line Color in the left pane, and then in the Line Color pane, select No line. Also in the Format Shape dialog box, click 3-D Format in the left pane, and then do the following in the 3-D Format pane:Under Depth, in the Depth box, enter 500 pt. Under Contour, click the button next to Color, and then underTheme Colors click White, Background1 (first row, first option from the left). In the Size box, enter 3.5 pt. Under Surface, click the button next to Material, and then under Special Effect click Wireframe (fourth option from the left). Also in the Format Shape dialog box, click 3-D Rotation in the left pane. In the 3-D Rotation pane, click the button next to Presets, and then under Parallel click Isometric Top Up (first row, third option from the left). To reproduce the background effects on this slide, do the following:Right-click the slide background area, and then click Format Background. In the Format Background dialog box, click Fill in the left pane, select Gradient fill in the Fill pane, and then do the following:In the Type list, select Linear.Click the button next to Direction, and then click Linear Down (first row, second option from the left). Under Gradient stops, click Add or Remove until three stops appear in the drop-down list.Also under Gradient stops, customize the gradient stops that you added as follows:Select Stop 1 from the list, and then do the following:In the Stop position box, enter 0%.Click the button next to Color, and then under Theme Colorsclick Dark Blue, Text 2, Lighter 60% (third row, fourth option from the left).Select Stop 2 from the list, and then do the following: In the Stop position box, enter 50%.Click the button next to Color, and then under Theme Colors click Dark Blue, Text 2, Lighter 80% (second row, fourth option from the left).Select Stop 3 from the list, and then do the following: In the Stop position box, enter 91%.Click the button next to Color, and then under Theme Colors click White, Background 1 (first row, first option from the left).
- Wire outline rectangles and angles(Basic)Tip: These instructions include five different shapes: half frame (2), L-shape (2), rectangle (2), right triangle (2), and frame (1).To reproduce the half frames on this slide, do the following:On the Home tab, in theSlides group, click Layout, and then click Blank.On the Home tab, in the Drawing group, click Shapes, and then under BasicShapes click HalfFrame (second row, sixth option from the left). On the slide, drag to draw a half frame.Select the half frame. Under DrawingTools, on the Format tab, in theSize group, do the following:In the ShapeHeight box, enter1.83”.In the ShapeWidth box, enter1.83”.With the half frame still selected, on the Home tab, in the Clipboard group, click the arrow under Paste, and then click Duplicate. Select the second half frame, and then drag one of the adjustment handles to decrease the size slightly.Drag the half frame to the bottom of the slide.To reproduce the L-shapes on this slide, do the following:On the Home tab, in the Drawing group, click Shapes, and then underBasicShapes click L-Shape(second row, seventh option from the left). On the slide, drag to draw an L-shape.Select the L-shape. Under DrawingTools, on the Format tab, in theSize group, do the following:In the ShapeHeight box, enter2”.In the ShapeWidth box, enter2”.Drag the L-shape to the bottom of the slide.Select the L-shape. On the Home tab, in the Clipboard group, click the arrow under Paste, and then clickDuplicate.Select the second L-shape. Drag one of the adjustment handles to decrease the size slightly. Drag the second L-shape to the right side of the slide.To reproduce the rectangles on this slide, do the following:On the Home tab, in the Drawing group, click Shapes, and then under Rectangles click Rectangle (first option from the left). On the slide, drag to draw a rectangle.Select the rectangle. Under DrawingTools, on the Format tab, in theSize group, do the following:In the ShapeHeight box, enter2”.In the ShapeWidth box, enter2”.Drag the rectangle to the upper left part of the slide.Select the rectangle. On the Home tab, in the Clipboard group, click the arrow under Paste, and then click Duplicate.Select the second rectangle. Drag one of the adjustment handles to decrease the size slightly. Drag the second rectangle to the upper right part of the slide.To reproduce the right triangles on this slide, do the following:On the Home tab, in the Drawing group, click Shapes, and then under BasicShapes click RightTriangle (first row, fourth option from the left). On the slide, drag to draw a right triangle.Select the right triangle. On the Home tab, in the Drawing group, click Arrange, point to Rotate, and then click FlipHorizontal. Drag the right triangle to the center of the slide.Select the right triangle. On the Home tab, in the Clipboard group, click the arrow under Paste, and then click Duplicate. Select the second right triangle. Drag one of the adjustment handles to decrease the size slightly. Drag the second right triangle to the lower right part of the slide.To reproduce the frame on this slide, do the following:On the Home tab, in the Drawing group, click Shapes, and then under BasicShapes click Frame (second row, fifth option from the left). On the slide, drag to draw a frame.Drag the frame to the right side of the slide.On the Home tab, in the Editing group, click Select, and then click SelectAll. On the Home tab, in the bottom right corner of the Drawing group, click the FormatShape dialog box launcher. In the FormatShape dialog box, click 3-DRotation in the left pane, and in the3-DRotation pane, in the Presets list, under Parallel, select IsometricTopUp (first row, third option from the left).Also in the FormatShape dialog box, click 3-DFormat in the left pane, and then do the following in the 3-DFormat pane:Under Depth, in the Depth box, enter 200pt.Under Surface, click the button next to Material, and then under SpecialEffect click Wireframe (fourth option from the left).To reproduce the background effects on this slide, do the following:Right-click the slide background area, and then click Format Background. In the Format Background dialog box, click Fill in the left pane, select Gradient fill in the Fill pane, and then do the following:In the Type list, select Radial.In the Direction list, click From Center (the third option from the left).Under Gradient stops, click Add or Remove until two stops appear in the drop-down list.Also under Gradient stops, customize the gradient stops as follows:Select Stop 1 from the list, and then do the following:In the Stop position box, enter 40%.Click the button next to Color, and thenunderThemeColors click White, Background 1 (first row, first option from the left).Select Stop 2 from the list, and then do the following: In the Stop position box, enter 100%.Click the button next to Color, and thenunderThemeColors click Black, Text 1, Lighter 25%(fourth row, second option from the left).
- Text wrapped around a cylinder(Basic)To reproduce the shape effects on this slide, do the following:On the Home tab, in theSlides group, click Layout, and then click Blank.On the Home tab, in the Drawing group, click Shapes, and then under Basic Shapes click Oval (first row, second option from the left). Press and hold SHIFT to constrain the shape to a circle, and then on the slide, drag to draw a circle.Select the circle. Under DrawingTools, on the Format tab, in the Size group, do the following:In the Shape Height box, enter 3.21”.In the Shape Width box, enter 3.21”.Under Drawing Tools, on the Format tab, in the Shape Styles group, click Shape Fill, clickMore Fill Colors, and then in the Colors dialog box, on the Custom tab, enter values for Red: 170, Green: 180, Blue: 194.Under Drawing Tools, on the Format tab, in the Shape Styles group, clickShape Outline, and then click No outline. Under Drawing Tools, on the Format tab, in the Shape Styles group, clickShape Effects, and then do the following:Point to Bevel, and then under Bevel click Slope (second row, fourth option from the left). Point to 3-D Rotation, and then under Parallel click Off Axis 1 Top (second row, third option from the left). On the Home tab, in the bottom right corner of the Drawing group, click the Format Shape dialog box launcher. In the Format Shape dialog box, click 3-D Format in the left pane, and then do the following in the right pane:Under Bevel, click the button next to Bottom, and then under Bevel click Slope (second row, fourth option from the left). Under Depth, in the Depth box, enter 250 pt. Under Surface, click the button next to Material, and then under Special Effect click Dark Edge (first row, first option from the left). Under Drawing Tools, on the Format tab, in the Shape Styles group, clickShape Effects, point to Shadow, and then under Perspective click Perspective Diagonal Upper Right (first row, second option from the left). On the Home tab, in the bottom right corner of the Drawing group, click the Format Shape dialog box launcher. In the Format Shape dialog box, click Shadow in the left pane, and then do the following in the right pane:In the Transparencybox, enter 51%. In the Sizebox, enter 121%. In the Blurbox, enter 28 pt. To reproduce the text effects on this slide, do the following:On the Insert tab, in the Text group, click Text Box, and then on the slide, drag to draw the text box.Enter text in the text box, select the text, and then on the Home tab, in the Font group, select Franklin Gothic Medium Cond from the Font list, and then select 32 from the Font Size list.Select the text box. Under DrawingTools, on the Format tab, in the Size group, do the following:In the Shape Height box, enter 1.43”.In the Shape Width box, enter 2.75”.Select the text. On the Home tab, in the Paragraph group, click Center to center the text in the text box.On the Home tab, in the Paragraph group, click Center to center the text on the slide.Under Drawing Tools, on the Format tab, in the WordArt Styles group, click Text Effects, point to Transform, and then under Warp click Can Down (fourth row, fourth option from the left). Drag the pink diamond adjustment handle at the top of the text box to adjust the amount of text warp.Under Drawing Tools, on the Format tab, in the WordArt Styles group, click the arrow next to Text Fill, point to Gradient, and then click More Gradients.In the Format Text Effects dialog box, click Text Fill in the left pane, select Gradient Fill in the right pane, and then do the following:In the Type list, select Linear. Click the button next to Direction, and then clickLinear Right (first row, fourth option from the left).In the Angle box, enter 0°.Under Gradient stops, click Add or Remove until three stops appear in the drop-down list. Also under Gradient stops, customize the gradient stops that you added as follows:Select Stop 1 from the list, and then do the following:In the Stop position box, enter 0%. Click the button next to Color, and then under Theme Colorsclick White, Background 1, Darker 25% (fourth row, first option from the left). Select Stop 2 from the list, and then do the following:In the Stop position box, enter 50%. Click the button next to Color, and then under Theme Colorsclick White, Background 1 (first row, first option from the left).Select Stop 3 from the list, and then do the following:In the Stop position box, enter 100%. Click the button next to Color, and then under Theme Colorsclick White, Background 1, Darker 35% (fifth row, first option from the left).To reproduce the background effects on this slide, do the following:Right-click the slide background area, and then clickFormat Background.In the Format Background dialog box, click Fill in the left pane, select Gradient fill in the right pane, and then do the following:In the Type list, select Linear.Click the button next to Direction, and then clickLinear Down (first row, second option from the left).Under Gradient stops, click Add or Remove until three stops appear in the drop-down list.Also under Gradient stops, customize the gradient stops that you added as follows:Select Stop 1 from the list, and then do the following:In the Stop position box, enter0%.Click the button next to Color, and then under Theme Colorsclick Black, Text 1 (first row, second option from the left).Select Stop 2 from the list, and then do the following:In the Stop position box, enter81%.Click the button next to Color, and then under Theme Colorsclick Dark Blue, Text 2, Darker 25% (fifth row, fourth option from the left).Select Stop 3 from the list, and then do the following:In the Stop position box, enter100%.Click the button next to Color, and then under Theme Colorsclick Dark Blue, Text 2, Darker 25% (fifth row, fourth option from the left).
- Glowing 3-D buttons(Intermediate)To reproduce the shape effects on this slide, do the following:On the Home tab, in theSlides group, click Layout, and then click Blank.On the Home tab, in the Drawing group, click Shapes, and then under Basic Shapes click Oval (first row, second option from the left). Press and hold SHIFT to constrain the shape to a circle, and then on the slide, drag to draw a circle. Select the circle. Under DrawingTools, on the Format tab, in the Size group, do the following:In the Shape Height box, enter 0.88”.In the Shape Width box, enter 0.88”.On the Home tab, in the Drawing group, click the arrow next to Shape Fill, point to Gradient, and then click More Gradients. In the Format Shape dialog box, click Fill in the left pane, select Gradient fill in the Fill pane, and then do the following:In the Type list, select Radial. Click the button next to Direction, and then click From Center (third option from the left). Under Gradient stops, click Add or Remove until three stops appear in the drop-down list. Also under Gradient stops, customize the gradient stops that you added as follows:Select Stop 1 from the list, and then do the following:In the Stop position box, enter 0%. Click the button next to Color, and then under Theme Colorsclick Olive Green, Accent 3, Lighter 80% (second row, seventh option from the left). Select Stop 2 from the list, and then do the following:In the Stop position box, enter 41%. Click the button next to Color, click More Colors, and then in the Colors dialog box, on the Custom tab, enter values for Red: 124, Green: 220, Blue: 52.Select Stop 3 from the list, and then do the following:In the Stop position box, enter 100%. Click the button next to Color, and then under Theme Colorsclick Black, Text 1, Lighter 5% (sixth row, second option from the left). Also in the Format Shape dialog box, click Line Color in the left pane, and then in the Line Color pane, select No line. Also in the Format Shape dialog box, click Shadow in the left pane, and then do the following in the Shadow pane:Click the button next to Presets, and then under Outer click Offset Center (second row, second option from the left).In the Transparency box, enter 60%.In the Size box, enter 102%.In the Blur box, enter 5 pt. In the Angle box, enter 0⁰.In the Distance box, enter 0 pt. Also in the Format Shape dialog box, click 3-D Format in the left pane, and then do the following in the 3-D Format pane:Under Bevel, click the button next to Top, and then under Bevel click Soft Round (second row, second option from the left). Next to Top, in the Width box, enter 18.5 pt, and in the Height box, enter 6.5 pt.Under Surface, click the button next to Material, and under Translucent click Powder (first option from the left). Click the button next to Lighting, and under Special, click Flat (first option from the left). In the Angle box, enter 310°.On the Home tab, in the Drawing group, click Shape Effects, point to Glow, and then do the following:ClickAccentcolor1, 8 pt glow (second row, first option from the left). Point to More Glow Colors, and then click White, Background 1, Darker 35% (fifth row, first option from the left).Select the circle. On the Home tab, in the Clipboard group, click the button under Paste, and then click Duplicate. On the slide, drag the duplicate circle away from the first circle. Select the duplicate circle. Under Drawing Tools, on the Format tab, in the bottom right corner of the Shape Styles group, click the Format Shape dialog box launcher. In the Format Shape dialog box, click Fill in the left pane, select Gradient fill in the Fill pane, and then do the following:Under Gradient stops, click Add or Remove until three stops appear in the drop-down list. Also under Gradient stops, customize the gradient stops that you added as follows:Select Stop 1 from the list, and then do the following:In the Stop position box, enter 0%. Click the button next to Color, and then under Theme Colorsclick Olive Green, Accent 3, Lighter 80% (second row, seventh option from the left). Select Stop 2 from the list, and then do the following:In the Stop position box, enter 41%. Click the button next to Color, click More Colors, and then in the Colors dialog box, on the Custom tab, enter values for Red: 11, Green: 189, Blue: 245.Select Stop 3 from the list, and then do the following:In the Stop position box, enter 100%. Click the button next to Color, and then under Theme Colorsclick Black, Text 1, Lighter 5% (sixth row, second option from the left). Select the duplicate circle. On the Home tab, in the Clipboard group, click the button under Paste, and then click Duplicate. On the slide, drag the new duplicate circle away from the second circle. Select the new duplicate circle. Under Drawing Tools, on the Format tab, in the bottom right corner of the Shape Styles group, click the Format Shape dialog box launcher. In the Format Shape dialog box, click Fill in the left pane, select Gradient fill in the right pane, and then do the following:Under Gradient stops, click Add or Remove until three stops appear in the drop-down list. Also under Gradient stops, customize the gradient stops that you added as follows:Select Stop 1 from the list, and then do the following:In the Stop position box, enter 0%. Click the button next to Color, click More Colors, and then in the Colors dialog box, on the Custom tab, enter values for Red: 255, Green: 209, Blue: 159.Select Stop 2 from the list, and then do the following:In the Stop position box, enter 41%. Click the button next to Color, click More Colors, and then in the Colors dialog box, on the Custom tab, enter values for Red: 255, Green: 134, Blue: 1.Select Stop 3 from the list, and then do the following:In the Stop position box, enter 100%. Click the button next to Color, and then under Theme Colorsclick Black, Text 1, Lighter 5% (sixth row, second option from the left). Press and hold SHIFT and select all three circles. On the Home tab, in the Drawing group, click Arrange, and then do the following:Point to Align, and then click Align to Slide.Point to Align, and then click Align Middle.Point to Align, and then click Align Horizontally. Click Group.Point to Align, and then click Align Center. To reproduce the background effects on this slide, do the following:Right-click the slide background area, and then clickFormat Background.In the Format Background dialog box, click Fill in the left pane, select Gradient fill in the Fill pane, and then do the following:In the Type list, select Radial.Click the button next to Direction, and then clickFrom Center (third option from the left).Under Gradient stops, click Add or Remove until two stops appear in the drop-down list.Also under Gradient stops, customize the gradient stops that you added as follows:Select Stop 1 from the list, and then do the following:In the Stop position box, enter0%.Click the button next to Color, and then under Theme Colorsclick White, Background 1(first row, first option from the left).Select Stop 2 from the list, and then do the following:In the Stop position box, enter100%.Click the button next to Color, and then under Theme Colorsclick White, Background 1, Darker 50%(sixth row, first option from the left).
- Transparent 3-D pyramid(Intermediate)To reproduce the shape effects on this slide, do the following:On the Home tab, in theSlides group, click Layout, and then click BlankOn the Home tab, in the Drawing group, click Shapes, and then under BasicShapes click IsoscelesTriangle (first row, third option from the left). On the slide, drag to draw a triangle.Select the triangle. Under Drawing Tools, on the Format tab, in the Size group, do the following:In the Shape Height box, enter 5.09”.In the Shape Width box, enter 2.78”.On the Home tab, in the bottom right corner of the Drawing group, click the Format Shape dialog box launcher. In the Format Shape dialog box, click Fill in the left pane, select Gradient fill in the Fill pane, and then do the following:Click the button next to Preset colors, and then click Silver (fifth row, third option from the left).Under Gradient stops, click Add or Remove until six stops appear in the drop-down list. Also under Gradient stops, customize the gradient stops that you added as follows:Select Stop 1 from the list, and then in the Transparency box, enter 50%.Select Stop 2 from the list, and then in the Transparency box, enter 50%.Select Stop 3 from the list, and then in the Transparency box, enter 50%.Select Stop 4 from the list, and then in the Transparency box, enter 30%.Select Stop 5 from the list, and then in the Transparency box, enter 50%.Select Stop 6 from the list, and then in the Transparency box, enter 0%.Also in the Format Shape dialog box, click Line Color in the left pane, and then select No line in the LineColor pane. Also in the Format Shape dialog box, click 3-D Format in the left pane, and then do the following in the 3-D Format pane:Under Bevel, click the button next to Top, and then under Bevel click Angle (second row, first option from the left). Next to Top, in the Width box, enter 77 pt, and in the Height box, enter 240 pt.Under Contour, click the button next to Color, and then under Theme Colors click Black, Text 1 (first row, second option from the left). In the Size box, enter 1 pt. Under Surface, click the button next to Material, and then under Translucent click Clear (third option from the left). Click the button next to Lighting, and then under Neutral click Balance (first row, second option from the left). Also in the Format Shape dialog box, click 3-D Rotation in the left pane, and then do the following in the 3-D Rotation pane:In the X box, enter 65°.In the Y box, enter 315°.In the Z box, enter 280°.In the Distance from ground box, enter 100 pt.Also in the Format Shape dialog box, click Shadow in the left pane, and then do the following in the Shadow pane:Click the button next to Presets, and then under Outer click Offset Diagonal Bottom Right (first row, first option from the left).In the Blur box, enter 40 pt.In the Distance box, enter 23 pt. To reproduce the background effects on this slide, do the following:Right-click the slide background area, and then click Format Background. In the Format Background dialog box, click Fill in the left pane, select Gradient fill in the Fill pane, and then do the following:In the Type list, select Linear.Click the button next to Direction, and then click Linear Down (first row, second option from the left).Under Gradient stops, click Add or Remove until two stops appear in the drop-down list.Also under Gradient stops, customize the gradient stops that you added as follows:Select Stop 1 from the list, and then do the following:In the Stop position box, enter 50%.Click the button next to Color, and then underTheme Colorsclick Black, Text 1, Lighter 5% (sixth row, second option from the left). Select Stop 2 from the list, and then do the following: In the Stop position box, enter 100%.Click the button next to Color, click More Colors, and then in the Colors dialog box, on the Custom tab, enter values for Red: 107, Green: 123, Blue: 191.
- Outline with three-color gradient and arrows(Intermediate)Tip: In these instructions, blue and green were chosen for the colors in the outlined box (enclosing the text) because of the blue background in the picture. If you choose another background picture, experiment with the colors in the box to suit the picture. To reproduce the shape effects on this slide, do the following:On the Home tab, in theSlides group, click Layout, and then click Blank.On the View tab, in the Show/Hide group, select Gridlines. On the Home tab, in the Drawing group, click Shapes, and then under Lines click Freeform (11th option from the left). On the slide, click six points to draw a line that matches the example above (one point for each end of the line, and one point for each corner); use the gridlines as a guide to draw straight vertical and horizontal segments; double-click the last point to end the line. To turn a curved segment into a straight segment, right-click the line, click Edit Points, right-click the segment, and then click Straight Segment. To change the position of a point, right-click the line, click Edit Points, and then drag the point on the slide. Select the line. Under Drawing Tools, on the Format tab, in the Size group, do the following:In the Shape Height box, enter 2.17”.In the Shape Width box, enter 5.08”.On the View tab, in the Show/Hide group, clear Gridlines. Select the line. On the Home tab, in the bottom right corner of the Drawing group, click the Format Shape dialog box launcher. In the Format Shape dialog box, click Fill in the left pane, and then select No fill in the Fill pane. Also in the Format Shape dialog box, click Line Color in the left pane, select Gradient line in the Line Color pane, and then do the following:In the Type list, select Linear.Click the button next to Direction, and then click Linear Right (first row, fourth option from the left). Under Gradient stops, click Add or Remove until three stops appear in the drop-down list.Also under Gradient stops, customize the gradient stops that you added as follows:Select Stop 1 from the list, and then do the following:In the Stop position box, enter 0%.Click the button next to Color, click More Colors, and then in the Colors dialog box, on the Custom tab, enter values for Red: 146, Green: 208, Blue: 80.Select Stop 2 from the list, and then do the following:In the Stop position box, enter 50%.Click the button next to Color, click More Colors, and then in the Colors dialog box, on the Custom tab, enter values for Red: 120, Green: 227, Blue: 248.Select Stop 3 from the list, and then do the following:In the Stop position box, enter 100%.Click the button next to Color, click More Colors, and then in the Colors dialog box, on the Custom tab, enter values for Red: 245, Green: 244, Blue: 237.Also in the Format Shape dialog box, click Line Style in the left pane, and then do the following in the Line Style pane:In the Width box, enter 5 pt.In the Compound type list, select Simple (first option from the top).In the Cap type list, select Round.In the Join type list, select Round. Under Arrow Settings, click the button next to Begin type, and then click Open Arrow (first row, third option from the left). Click the button next to Begin size, and then click Arrow L Size 4 (second row, first option from the left). Click the button next to End type, and then click Open Arrow (first row, third option from the left). Click the button next to End size, and then click Arrow R Size 4 (second row, first option from the left). Drag the shape to the lower right part of the slide.To reproducethe text effects on this slide, do the following:On the Insert tab, in the Text group, click Text Box, and then on the slide, drag to draw the text box.Enter text in the text box, select the text, and then on the Home tab, in the Font group, select Calibri from the Font list, select 18 from the Font Size list, and then click the arrow next to Font Color and click Black, Text 1 (first row, second option from the left).On the Home tab, in the Paragraph group, click Center to center the text in the text box.Select the text box and position it inside the shape in the lower right side.To reproduce the background effects on this slide, do the following: Right-click the slide background area, and then click Format Background. In the Format Background dialog box, click Fill in the left pane, select Picturefill in the Fill pane, and then under Insert from click File. In the Insert Picture dialog box, select a picture, and then click Insert.
- Rows of monitors fading into the background(Intermediate)To reproduce the shape effects on this slide, do the following:On the Home tab, in theSlides group, click Layout, and then click Blank.On the Home tab, in the Drawing group, click Shapes, and then under Basic Shapes click Rounded Rectangle (second option from the left). On the slide, drag to draw a rectangle. Drag the yellow diamond adjustment handle to the left to decrease the amount of rounding on the corners of the rectangle. Select the rectangle. Under Drawing Tools, on the Format tab, in the Size group, do the following:In the Shape Height box, enter 1.38”.In the Shape Width box, enter 1.75”.On the Home tab, in the bottom right corner of the Drawing group, click the Format Shape dialog box launcher. In the Format Shape dialog box, click Fill in the left pane, select Solid fill in the Fill pane, and then do the following:Click the button next to Color, click More Colors, and then in the Colors dialog box, on the Custom tab, enter values for Red: 54, Green: 65, Blue: 118.In the Transparency box, enter 45%.Also in the Format Shape dialog box, click Line Color in the left pane, and then in the Line Color pane select No line. Also in the Format Shape dialog box, click 3-D Format in the left pane. In the 3-D Format pane, under Bevel, click the button next to Top, and then under Bevel click Relaxed Inset (first row, second option from the left). Next to Top, in the Width box, enter 6 pt, and in the Height box, enter 6 pt. On the Home tab, in the Drawing group, click Shape Effects, point to Reflection, and then under Reflection Variations click Tight Reflection, touching (first row, first option from the left). On the Home tab, in the Clipboard group, click the arrow under Paste, and then click Duplicate. Repeat this process to create a total of five rectangles. On the View tab, in the Show/Hide group, select Ruler. Using the ruler as a guide, drag the rectangles into a row across the slide so that the left and right margins are approximately 0.25”.On the Home tab, in the Editing group, click Select, and then click Select All. On the Home tab, in the Drawing group, click Arrange, and then do the following:Point to Align, and then click Align to Slide. Point to Align, and then click Align Middle.Point to Align, and then click Distribute Horizontally. Click Group.Point to Align, and then click Align to Slide. Point to Align, and then click Align Bottom. Select the group. On the Home tab, in the bottom right corner of the Drawing group, click the Format Shape dialog box launcher. In the Format Shape dialog box, click 3-D Rotation in the left pane. In the 3-D Rotation pane, click the button next to Presets, and then under Perspective, click Perspective Below (first row, fourth option from the left). Select the group. On the Home tab, in the Clipboard group, click the arrow under Paste, and then click Duplicate. On the slide, drag the second group above the first group. Under Drawing Tools, on the Format tab, in the bottom right corner of the Size group, click the Size and Position dialog box launcher. On the Size tab, under Scale, do the following:Select Lock aspect ratio. In the Height box, enter 85%.On the Home tab, in the bottom right corner of the Drawing group, click the Format Shape dialog box launcher. In the Format Shape dialog box, click Fill in the left pane. In the Fill pane, select Solid fill, and then in the Transparency box, enter 55%.Select the second group. On the Home tab, in the Clipboard group, click the arrow under Paste, and then click Duplicate. On the slide, drag the third group above the second group. Under Drawing Tools, on the Format tab, in the bottom right corner of the Size group, click the Size and Position dialog box launcher. On the Size tab, under Scale, do the following:Select Lock aspect ratio. In the Height box, enter 85%.On the Home tab, in the bottom right corner of the Drawing group, click the Format Shape dialog box launcher. In the Format Shape dialog box, click Fill in the left pane. In the Fill pane, select Solid fill, and then in the Transparency box, enter 65%.Select the third group. On the Home tab, in the Clipboard group, click the arrow under Paste, and then click Duplicate. On the slide, drag the fourth group above the third group. Under Drawing Tools, on the Format tab, in the bottom right corner of the Size group, click the Size and Position dialog box launcher. On the Size tab, under Scale, do the following:Select Lock aspect ratio. In the Height box, enter 85%.On the Home tab, in the bottom right corner of the Drawing group, click the Format Shape dialog box launcher. In the Format Shape dialog box, click Fill in the left pane. In the Fill pane, select Solid fill, and then in the Transparency box, enter 75%.Select the fourth group. On the Home tab, in the Clipboard group, click the arrow under Paste, and then click Duplicate. On the slide, drag the fifth group above the fourth group. Under Drawing Tools, on the Format tab, in the bottom right corner of the Size group, click the Size and Position dialog box launcher. On the Size tab, under Scale, do the following:Select Lock aspect ratio. In the Height box, enter 85%.On the Home tab, in the bottom right corner of the Drawing group, click the Format Shape dialog box launcher. In the Format Shape dialog box, click Fill in the left pane. In the Fill pane, select Solid fill, and then in the Transparency box, enter 85%.Select the fifth group. On the Home tab, in the Clipboard group, click the arrow under Paste, and then click Duplicate. On the slide, drag the sixth group above the fifth group. Under Drawing Tools, on the Format tab, in the bottom right corner of the Size group, click the Size and Position dialog box launcher. On the Size tab, under Scale, do the following:Select Lock aspect ratio. In the Height box, enter 85%.On the Home tab, in the bottom right corner of the Drawing group, click the Format Shape dialog box launcher. In the Format Shape dialog box, click Fill in the left pane. In the Fill pane, select Solid fill, and then in the Transparency box, enter 95%.Using the ruler as a guide, drag the groups into rows on the slide so that the top and bottom margins are approximately 1.75”. On the View tab, in the Show/Hide group, clear Ruler. Press and hold SHIFT and select all of the groups. On the Home tab, in the Drawing group, click Arrange, and then do the following:Point to Align, and then clickAlign Selected Objects.Point to Align, and then clickDistributeVertically.Click Group. Point to Align, and then clickAlign to Slide.Point to Align, and then clickAlign Middle.Point to Align, and then clickAlignCenter.To reproduce the background effects on this slide, do the following:Right-click the slide background area, and then click Format Background. In the Format Background dialog box, click Fill in the left pane, select Gradient fill in the Fill pane, and then do the following:In the Type list, select Radial.Click the button next to Direction, and then click From Center (third option from the left). Under Gradient stops, click Add or Remove until three stops appear in the drop-down list.Also under Gradient stops, customize the gradient stops that you added as follows:Select Stop 1 from the list, and then do the following:In the Stop position box, enter 33%.Click the button next to Color, and then under Theme Colors click White, Background 1 (first row, first option from the left).Select Stop 2 from the list, and then do the following: In the Stop position box, enter 67%.Click the button next to Color, click More Colors, and then in the Colors dialog box, on the Custom tab, enter values for Red: 228, Green: 233, Blue: 236.Select Stop 3 from the list, and then do the following: In the Stop position box, enter 100%.Click the button next to Color, click More Colors, and then in the Colors dialog box, on the Custom tab, enter values for Red: 178, Green: 186, Blue: 210.
- 3-D tiles with texture(Intermediate)To reproduce the first rectangleon this slide, do the following:On the Home tab, in theSlides group, click Layout, and then click Blank.On the Home tab, in the Drawing group, click Shapes, and then under Rectangles click Rectangle (first option from the left). On the slide, drag to draw a rectangle. Select the rectangle. Under DrawingTools, on the Format tab, in theSize group, do the following:In the ShapeHeight box, enter2.22”.In the ShapeWidth box, enter2.68”.Right-click the rectangle and select EditText. Enter 1, and then select the text. On the Home tab, in the Font group, in the Font list select Calibri, and in the FontSize box enter 100 pt. On the Home tab, in the Paragraph group, click Center.Under DrawingTools, on the Format tab, in the WordArtStyles group, in the bottom right corner, click the FormatTextEffects dialog box launcher.In the FormatTextEffects dialog box, click TextFill in the left pane. In the TextFill pane, select Solidfill, click the button next toColor, and then under Theme Colors clickTan, Background 2, Darker 25% (third row, third option from the left).Also in the FormatTextEffects dialog box, click Shadow in the left pane, and in the Shadow pane, under Presets , under Inner, click InsideDiagonalTopLeft (first row, first option from the left).Select the rectangle.On the Home tab, in the bottom right corner of the Drawing group, click the Format Shape dialog box launcher. In the Format Shape dialog box, click Fill in the left pane. Select Picture or texture fill in the Fill pane, click the button next to Texture, and then click RecycledPaper (third row, fourth option from the left).Also in the same dialog box (now the Format Picture dialog box), click Line Color in the left pane, and then in the Line Color pane, select No line. Also in the FormatPicture dialog box, click Shadow in the left pane. In the Shadow pane, click the button next toPresets, and then under Outer click Offset Diagonal Bottom Right (first row, first option from the left). Also in the FormatPicture dialog box, click 3-D Format in the left pane, and then in the 3-D Format pane do the following:Under Bevel, in the Top list, selectAngle (second row, first option from the left). Next to Top, in the Width box, enter 6 pt, and in the Height box, enter 6 pt. Under Bevel, in the Bottom list, select Circle (first row, first option from the left).Next to Bottom, in the Width box, enter 6 pt, and in the Height box, enter 6 pt.Under Depth, in the Depth box, enter 4.5 pt.Under Surface, in the Material list, under Standard, select WarmMatte (second option from the left).Under Surface, in the Lighting list, under Neutral, select Soft (first row, third option from the left), and in the Angle box, enter 280°.Also in the FormatPicture dialog box, click 3-D Rotation in the left pane. In the 3-D Rotation pane, in thePresets list, under Perspective, selectPerspectiveAbove (second row, first option from the left), and then do the following:In the Y box, enter 300°. In the Perspective box, enter60°.Drag the rectangle to the left side of the slide.To reproduce the other rectangles on this slide, do the following:Select the rectangle. On the Home tab, in the Clipboard group, click the arrow under Paste and select Duplicate.Select the text in the second rectangle, and enter 2. On the Home tab, in the Font group, click the arrow next to FontColor and then under Theme Colors select Black, Text 1, Lighter 50% (second row, second option from the left).Select the second rectangle. On the Home tab, in the bottom right corner of the Drawing group, click the FormatShape dialog box launcher. In the FormatShape dialog box, click Fill in the left pane, and in the Fill pane select Picture or texture fill. In the Texture list select Granite (third row, second option from the left).Also in the same dialog box (now the FormatPicture dialog box), click 3-DRotation in the left pane, and in the 3-DRotation pane, in the Presets list, under Perspective selectPerspectiveContrastingRight (third row, first option from the left).Also in the FormatPicture dialog box, click Shadow in the left pane, and in the Shadow pane, in the Presets list, under Perspective, select PerspectiveDiagonalUpperLeft (first row, first option from the left).Drag the second rectangle to the center of the slide.Select the first rectangle. On the Home tab, in the Clipboard group, click the arrow below Paste and select Duplicate.Select the text in the third rectangle and enter 3. On the Home tab, in the Font group, click the arrow next to FontColor, and then under Theme Colors select White, Background 1, Darker 50% (sixth row, first option from the left).Select the third rectangle. Under DrawingTools, on the Format tab, in theSize group, do the following:In the ShapeHeight box, enter3.0”.In the ShapeWidth box, enter3.26”.With the third rectangle still selected, on the Home tab, in the bottom right corner of the Drawing group, click the FormatShape dialog box launcher. In the FormatShape dialog box, click Fill in the left pane, and in the Fill pane select Picture or texture fill. In the Texture list select White Marble (second row, fifth option from the left).Also in the same dialog box (now the FormatPicture dialog box), click 3-DRotation in the left pane, and in the 3-DRotation pane, under Rotation, do the following:In the X box, enter 63.7°.In the Y box, enter 319.3°.In the Z box, enter 289.4°.In the Perspective box, enter 90°.Drag the third rectangle to the right side of the slide.To reproduce the background effects on this slide, do the following:Right-click the slide background area, and then click Format Background. In the Format Background dialog box, click Fill in the left pane, select Gradient fill in the right pane, and then do the following:In the Type list, select Linear.In the Direction list, click Linear Up (second row, second option from the left).Under Gradient stops, click Add or Remove until two stops appear in the drop-down list.Also under Gradient stops, customize the gradient stops as follows:Select Stop 1 from the list, and then do the following:In the Stop position box, enter 0%.Click the button next to Color, and then click More Colors, and then in the Colors dialog box, on the Custom tab, enter values for Red: 162, Green: 152, Blue: 138.Select Stop 2 from the list, and then do the following: In the Stop position box, enter 54%.Click the button next to Color, and then click Black, Text 1, Lighter 15% (fifth row, second option from the left).
- 3-D rings(Intermediate)To reproduce the effects on this slide, do the following:On the Home tab, in theSlides group, click Layout, and then click Blank.On the Home tab, in the Drawing group, click Shapes, and then under Basic Shapes click Donut (third row, second option from the left). On the slide, drag to draw a donut shape. Select the donut shape. Drag the yellow diamond adjustment handle to the left to decrease the width of the donut shape. Under Drawing Tools, on the Format tab, in the Size group, do the following:In the Shape Height box, click 4.17”.In the Shape Width box, click 4.17”.Under Drawing Tools, on the Format tab, in the Shape Styles group, click the arrow next to Shape Fill, and then under Theme Colors click Aqua, Accent 5, Darker 25% (fifth row, ninth option from the left).Under Drawing Tools, on the Format tab, in the Shape Styles group, click the arrow next to Shape Outline, and then click No Outline. Under Drawing Tools, on the Format tab, in the bottom right corner of the Shape Styles group, click the Format Shape dialog box launcher. In the Format Shape dialog box, click 3-D Format in the left pane, and then do the following in the 3-D Format pane:Under Bevel, click the button next to Top, and then under Bevel click Convex (second row, third option from the left). Next to Top, in the Width box, enter 5pt, and then in the Height box, enter 5 pt. Click the button next to Bottom, and then under Bevel click Convex (second row, third option from the left). Next to Bottom, in the Width box, enter 5 pt, and then in the Height box, enter 5 pt.Under Depth, click the button next to Color, and then under Theme Colors click Aqua, Accent 5, Darker 25% (fifth row, ninth option from the left). In the Depth box, enter 30 pt. Under Surface, click the button next to Material, and then under Special Effect click Soft Edge (second option from the left). Click the button next to Lighting, and then under Neutral click Three Point (first row, first option from the left). In the Angle box, enter 30°.Also in the Format Shape dialog box, click Shadow in the left pane, and then do the following in the Shadow pane:Click the button next to Presets, and then under Outer click Offset Diagonal Bottom Left (first row, third option from the left).In the Blur box, enter 11 pt. In the Angle box, enter 90°.Also in the Format Shape dialog box, click 3-D Rotation in the left pane. In the 3-D Rotation pane, click the button next to Presets, and then under Parallel click OffAxis 1 Top (second row, third option from the left). On the Insert tab, in the Text group, click Text Box. On the slide, drag to draw a text box. Enter text in the text box (Note: Enter three spaces before and after the text), select the text, and then on the Home tab, in the Font group, select Franklin Gothic Medium from the Font list and then select 24 from the Font Size list. On the Home tab, in the Paragraph group, click Center to center the text in the text box.Select the text box. Under Drawing Tools, on the Format tab, in the WordArt Styles group, click Text Effects, point to Transform, and then under Warp click Can Down (fourth row, fourth option from the left). Drag the text box onto the donut shape.On the text box, drag the pink diamond and blue adjustment handles to adjust the amount of text warp so that it matches the curve of the donut shape. Under Drawing Tools, on the Format tab, in the WordArt Styles group, click the arrow next to Text Fill, point to Gradient, and then click More Gradients. In the Format Text Effects dialog box, click Text Fill in the left pane, select Gradient fill in the Text Fill pane, and then do the following:In the Type list, select Linear.Click the button next to Direction, and then click Linear Right (first row, fourth option from the left).In the Angle box, enter 0°.Under Gradient stops, click Add or Remove until three stops appear in the drop-down list.Also under Gradient stops, customize the gradient stops that you added as follows:Select Stop 1 from the list, and then do the following:In the Stop position box, enter 0%.Click the button next to Color, and then under Theme Colors click White, Background 1 (first row, first option from the left).In the Transparency box, enter 30%.Select Stop 2 from the list, and then do the following: In the Stop position box, enter 77%.Click the button next to Color, and then under Theme Colors click White, Background 1 Darker 15% (third row, first option from the left).In the Transparency box, enter 0%.Select Stop 3 from the list, and then do the following: In the Stop position box, enter 100%.Click the button next to Color, and then under Theme Colors click White, Background 1, Darker 35% (fifthrow, first option from the left).In the Transparency box, enter 0%.Press and hold CTRL, and then select the donut shape and the text box. On the Home tab, in the Clipboard group, click the arrow under Paste, and then click Duplicate. Press and hold CTRL, select the second donut shape and text box, and then drag on the slide slightly above and to the right of the first donut shape.Click in the second text box and edit the text.Select the second donut shape. Under Drawing Tools, on the Format tab, in the Size group, do the following:In the Shape Height box, enter 3.75”.In the Shape Width box, enter 3.75”.Drag the second text box onto the second donut shape.On the second text box, drag the pink diamond and blue adjustment handles to adjust the amount of text warp so that it matches the curve of the second donut shape. Select the second donut shape. Under Drawing Tools, on the Format tab, in the Shape Styles group, click the arrow next to Shape Fill, and then under Theme Colors click Purple, Accent 4, Darker 25% (fifth row, eighth option from the left).On the Home tab, in the bottom right corner of the Drawing group, click the Format Shape dialog box launcher. In the Format Shape dialog box, click 3-D Format in the left pane. In the 3-D Format pane, under Depth, click the button next to Color, and then under Theme Colors click Purple, Accent 4, Darker 25% (fifth row, eighth option from the left).Press and hold CTRL, and then select the second donut shape and text box. On the Home tab, in the Clipboard group, click the arrow under Paste, and then click Duplicate. Drag the third donut shape and text box slightly above and to the left of the second donut shape. Click the third text box and edit the text.Press and hold CTRL, and then select the third donut shape and text box. Under Drawing Tools, on the Format tab, in the Size group, do the following:In the Shape Height box, enter 3.33”.In the Shape Width box, enter 3.33”.Drag the third text box onto the third donut shape.On the third text box, drag the pink diamond and blueadjustment handles to adjust the amount of text warp so that it matches the curve of the third donut shape. Select the third donut shape. Under Drawing Tools, on the Format tab, in the Shape Styles group, click the arrow next to Shape Fill, and then under Theme Colors click Olive Green, Accent 3, Darker 25% (fifth row, seventh option from the left). On the Home tab, in the bottom right corner of the Drawing group, click the Format Shape dialog box launcher. In the Format Shape dialog box, click 3-D Format in the left pane. In the 3-D Format pane, under Depth, click the button next to Color, and then under Theme Colors click Olive Green, Accent 3, Darker 25% (fifth row, seventh option from the left). Select the first donut shape. On the Home tab, in the Drawing group, click Arrange, and then click Send to Back.To reproduce the background effects on this slide, do the following:Right-click the slide background area, and then click Format Background. In the Format Background dialog box, click Fill in the left pane, select Gradient fill in the Fill pane, and then do the following:In the Type list, select Linear.Click the button next to Direction, and then click Linear Up (second row, second option from the left). Under Gradient stops, click Add or Remove until two stops appear in the drop-down list.Also under Gradient stops, customize the gradient stops that you added as follows:Select Stop 1 from the list, and then do the following:In the Stop position box, enter 31%.Click the button next to Color, and then under Theme Colors click White, Background 1 (first row, first option from the left).Select Stop 2 from the list, and then do the following: In the Stop position box, enter 100%.Click the button next to Color, click More Colors, and then in the Colors dialog box, on the Custom tab, enter values for Red: 200, Green: 201, Blue: 193.
- Stacked blocks with text(Intermediate) To reproduce the effects on this slide, do the following:On the Home tab, in theSlides group, click Layout, and then click Blank.On the Home tab, in the Drawing group, click Shapes, and then under Rectangles click Rectangle (first option from the left). On the slide, drag to draw a rectangle. Under DrawingTools, on the Format tab, in the Size group, do the following:In the Shape Height box, enter 1.75”.In the Shape Width box, enter 1.75”.Under Drawing Tools, on the Format tab, in the bottom right corner of the Size group, click the Size and Position dialog box launcher. In the Size and Position dialog box, on the Positiontab, do the following:In the Horizontal box, enter 1.76”.In the Vertical box, enter 3.17”.On the Home tab, in the bottom right corner of the Drawing group, click the Format Shapedialog box launcher. In the Format Shapedialog box, click Fill in the left pane. In the Fill pane, select Solid fill, click the button next to Colors, and then clickMore Colors. In the Colors dialog box, on the Custom tab, enter values for Red: 223, Green: 96, Blue: 93.Also in the Format Shapedialog box, click Line Color in the left pane, and then select No line. Also in the Format Shapedialog box, click Shadow in the left pane, and then do the following in the Shadow pane:Click the button next to Presets, and then under Outer click Offset Diagonal Bottom Left (first row, third option from the left). In the Transparency box, enter 70%.In the Size box, enter 110%.In the Blur box, enter 28 pt. In the Angle box, enter 190°.In the Distance box, enter 20 pt. Also in the Format Shapedialog box, click 3-D Format in the left pane, and then do the following in the 3-D Format pane:Under Depth, in the Depth box, enter 130 pt. Under Surface, click the button next to Material, and then under Standard click Warm Matte (second option from the left). Click the button next to Lighting, and then under Neutral click Three Point (first row, first option from the left). Also in the Format Shapedialog box, click 3-D Rotation in the left pane. In the 3-D Rotation pane, click the button next to Presets, and then under Parallel click Isometric Top Up (first row, third option from the left). Select the first rectangle. Press and hold CTRL and SHIFT (to duplicate and constrain the duplicate shape), and then drag the rectangle to the right on the slide to create a duplicate. Select the second (duplicate) rectangle. Under Drawing Tools, on the Format tab, in the bottom right corner of the Size group, click the Size and Position dialog box launcher. In the Size and Position dialog box, on the Positiontab, do the following:In the Horizontal box, enter 4.23”.In the Vertical box, enter 3.17”. On the Home tab, in the Drawing group, click the arrow next to Shape Fill, and then click More Fill Colors. In the Colors dialog box, on the Custom tab, enter values for Red: 247, Green: 154, and Blue: 91.Select the second rectangle. On the Home tab, in the Clipboard group, click the arrow under Paste, and then click Duplicate. Select the third rectangle. Under Drawing Tools, on the Format tab, in the bottom right corner of the Size group, click the Size and Position dialog box launcher. In the Size and Position dialog box, on the Positiontab, do the following:In the Horizontal box, enter 3”.In the Vertical box, enter 1”.On the Home tab, in the Drawing group, click the arrow next to Shape Fill, and then click More FillColors. In the Colors dialog box, on the Custom tab, enter values for Red: 93, Green: 199, and Blue: 217.On the Home tab, in the Drawing group, click Shape Effects, point to Shadow, and then under No Shadow click No Shadow. On the Insert tab, in the Text group, click Text Box. Enter text in the text box, select the text, and then on the Home tab, in the Font group, select Franklin Gothic Medium Cond from the Font list and then select 40 from the Font Size list.On the Home tab, in the Paragraph group, click Center to center the text in the text box.Select the text box. Under Drawing Tools, on the Format tab, in the bottom right corner of the WordArt Styles group, click the FormatTextEffects dialog box launcher. In the FormatTextEffects dialog box, click Text Fill in the left pane. In the Text Fill pane, select Solid fill, click the button next to Color, and then under Theme Colors click Black, Text 1 (first row, second option from the left).Also in the FormatTextEffects dialog box, click Text Box in the left pane. In the Text Box pane, under Text layout, in the Text direction list, select Rotate all text 90°.Also in the FormatTextEffects dialog box, click 3-D Rotation in the left pane. In the 3-D Rotation pane, click the button next to Presets, and then under Parallel click Isometric Top Up (first row, third option from the left). Under Drawing Tools, on the Format tab, in the bottom right corner of the Size group, click the Size and Position dialog box launcher. In the Size and Position dialog box, on the Positiontab, do the following:In the Horizontal box, enter 2.21”.In the Vertical box, enter 3.35”.Drag the blue square adjustment handles on the top and bottom of the text box to adjust the height so that the text is centered on the top face of the red cube. Select the text box. On the Home tab, in the Clipboard group, click the arrow under Paste, and then click Duplicate. Click in the second text box and edit the text.Select the second text box. Under Drawing Tools, on the Format tab, in the bottom right corner of the WordArt Styles group, click the FormatTextEffects dialog box launcher. In the FormatTextEffects dialog box, click Text Box in the left pane. In the Text Box pane, under Text layout, in the Text direction list, select Horizontal.Also in the FormatTextEffects dialog box, click 3-D Rotation in the left pane. In the 3-D Rotation pane, click the button next to Presets, and then under Parallel click Isometric Left Down (first row, first option from the left). Under Drawing Tools, on the Format tab, in the bottom right corner of the Size group, click the Size and Position dialog box launcher. In the Size and Position dialog box, on the Positiontab, do the following:In the Horizontal box, enter 3.75”.In the Vertical box, enter 4.77”.Drag the blue square adjustment handles on the left and right of the second text box to adjust the width so that the text is centered on the bottom left face of the orange cube. Select the second text box. On the Home tab, in the Clipboard group, click the arrow under Paste, and then click Duplicate. Click in the third text box and edit the text.Select the third text box. Under Drawing Tools, on the Format tab, in the bottom right corner of the WordArt Styles group, click the FormatTextEffects dialog box launcher. In the FormatTextEffects dialog box, click 3-D Rotation in the left pane. In the 3-D Rotation pane, click the button next to Presets, and then under Parallel click Isometric Right Up (first row, second option from the left). Under Drawing Tools, on the Format tab, in the bottom right corner of the Size group, click the Size and Position dialog box launcher. In the Size and Position dialog box, on the Positiontab, do the following:In the Horizontal box, enter 3.81”.In the Vertical box, enter 2.59”. Drag the blue square adjustment handles on the left and right of the third text box to adjust the width so that the text is centered on the bottom right face of the blue cube. To reproduce the background effects on this slide, do the following:Right-click the slide background area, and then click Format Background. In the Format Background dialog box, click Fill in the left pane, select Gradient fill in the Fill pane, and then do the following:In the Type list, select Radial.Click the button next to Direction, and then click From Center (third option from the left).Under Gradient stops, click Add or Remove until two stops appear in the drop-down list.Also under Gradient stops, customize the gradient stops that you added as follows:Select Stop 1 from the list, and then do the following:In the Stop position box, enter 0%.Click the button next to Color, and then underThemeColorsclick White, Background 1 (first row, first option from the left).Select Stop 2 from the list, and then do the following: In the Stop position box, enter 100%.Click the button next to Color, and then underThemeColorsclick White, Background 1, Darker 35% (fifth row, first option from the left).
- Custom animation effects: floating bubbles(Intermediate)To reproduce the bubble shape effects on this slide, do the following:On the Home tab, in the Slides group, click Layout, and then click Blank.On the Home tab, in the Drawing group, click Shapes, and then under Basic Shapes select Oval (second option from the left). Press and hold SHIFT, and then click and drag to draw the oval shape.Select the circle (oval shape). On the Home tab, in the Drawing group, in the lower right corner, click the Format Shape dialog box launcher. In the Format Shape dialog box in the left pane, click Fill. In the Fill pane, click Gradient fill, and then do the following:Click the button next to Preset Colors, and then select Calm Water (second row, third option from the left).In the Type box, select Radial. Click the button next to Direction,and then select From Corner (first option from the left).Also in the Format Shape pane, in the left pane, click Line Color. In the Line Color pane, click Gradient Line, and then do the following:Click the button next to Preset Colors, and select Calm Water (second row, third option from the left).In the Type box, select Linear. Click the button next to Direction,and then select Linear Down (second option from the left).Also in the Format Shape pane, in the left pane, click 3-D Format and then in the 3-D Format pane, do the following:Under Bevel, click the button next to Top,and then select Circle (first option from the left). Next to Top, in the Width box, enter 50pt, and in the Height box, enter 50pt.Under Surface, click the button next to Material, and then under Translucent, select Clear. Click the button next to Lighting, and then under Special, select Glow (third option from the left). In the Angle box, enter 110°.To reproduce the animation effects on this slide, do the following:Drag the bubble off the bottom right corner of the slide. On the Animations tab, in the Animations group, click Custom Animation.In the CustomAnimation task pane, click AddEffect, point to Entrance, and then click MoreEffects. In the Add Entrance Effect dialog box,under Basic, select Appear, and then click OK.In the CustomAnimation task pane, select the entrance animation effect, and under Modify: Appear, in the Start list, select With Previous.In the CustomAnimation task pane, click AddEffect, point to Motion Path, point to Draw Custom Path, and then click Curve.Click a point below the bottom right corner of the slide, and then click several more points to draw a curve. Press ESC to end the curve.In the CustomAnimation task pane, click the arrow next to the motion path animation effect, and then click Timing. In the Custom Path dialog box, on the Timing tab, in the Start list, select With Previous. In the Speed box, enter 8.0 seconds, and then click OK.Select the bubble. In the CustomAnimation task pane, click AddEffect, point to Emphasis, and then click More Effects.In the Add Emphasis Effect dialog box, under Basic, click Grow/Shrink, and then click OK.In the CustomAnimation task pane, select the Grow/Shrink animation. Under Modify: Grow/Shrink, in the Size list, select Larger. Also in the Size list, in the Custom box, enter 150%, and then press ENTER. Click arrow next to the Grow/Shrink animation effect, and then click Timing. In the Grow/Shrink dialog box, on the Timing tab, in the Delay box, enter 6 seconds. In the Speed box, enter 0.1 seconds, and then click OK.Select the bubble. In the CustomAnimation task pane, click AddEffect, point to Exit, click More Effects. In the Add Exit Effect dialog box, under Subtle, select Fade,and then click OK.In the CustomAnimation task pane, with the Fade animation effect selected, under Modify: Fade,in the Start list, select With Previous.In the CustomAnimation task pane, click the arrow next to the Fade animation, and then click Timing. In the Fade dialog box, on the Timing tab, in the Delay box, enter 6 seconds. In the Speed list, enter 0.1 seconds, and then click OK.To duplicate the bubble on this slide, do the following:Select the bubble. On the Home tab, in the Clipboard group, click the arrow under Paste, and then click Duplicate.Select the new bubble. Press and hold SHIFT, and then drag the adjustment handle to resize the shape.On the slide, right-click the motion math for the new bubble, and then click EditPoints. Select the points on the motion path and drag them to create a different motion path.Do the following to reproduce the background effects on this slide, using the water background picture from the exampleabove:Right-click the water background on the original template, and then click Save Background.Save the file as a JPEG (.jpg) file format.Right-click the slide that you are creating, and then click Format Background. In the Format Background dialog box, click Fill in the left pane, select Picturefill in the Fill pane, and then under Insert from click File. In the Insert Picture dialog box, select the saved water picture (.jpg), and then click Insert. Do the following to reproduce the background effects on this slide, using a different picture:Right-click the slide background area, and then click Format Background. In the Format Background dialog box, click Fill in the left pane, select Picturefill in the Fill pane, and then under Insert from click File. In the Insert Picture dialog box, select another picture, and then click Insert.
- Brushed aluminum shape with gradient spheres(Advanced)To reproduce the circles on this slide, do the following:On the Home tab, in theSlides group, click Layout, and then click Blank.On the Home tab, in the Drawing group, click Shapes, and then under Basic Shapes click Oval (first row, second option from the left). Press and hold SHIFT to constrain the shape to a circle, and then on the slide, drag to draw a circle. Select the circle. Under DrawingTools, on the Format tab, in the Size group, do the following:In the Shape Height box, enter 0.46”.In the Shape Width box, enter 0.46”.On the Home tab, in the Drawing group, click the arrow next to Shape Fill, point to Gradient, and then click More Gradients. In the Format Shape dialog box, click Fill in the left pane, select Gradient fill in the Fill pane, and then do the following:In the Type list, select Radial. Click the button next to Direction, and then click From Center (third option from the left). Under Gradient stops, click Add or Remove until three stops appear in the drop-down list. Also under Gradient stops, customize the gradient stops that you added as follows:Select Stop 1 from the list, and then do the following:In the Stop position box, enter 0%. Click the button next to Color, and then under Theme Colorsclick Olive Green, Accent 3, Lighter 80% (second row, seventh option from the left). Select Stop 2 from the list, and then do the following:In the Stop position box, enter 41%. Click the button next to Color, click More Colors, and then in the Colors dialog box, on the Custom tab, enter values for Red: 124, Green: 220, Blue: 52.Select Stop 3 from the list, and then do the following:In the Stop position box, enter 100%. Click the button next to Color, and then under Theme Colorsclick Black, Text 1, Lighter 5% (sixth row, second option from the left). Also in the Format Shape dialog box, click Line Color in the left pane, and then in the Line Color pane, select No line. Also in the Format Shape dialog box, click Shadow in the left pane. In the Shadow pane, click the button next to Presets, under Outer click Offset Center (second row, second option from the left, and then do the following:In the Transparency box, enter 60%.In the Size box, enter 102%.In the Blur box, enter 5 pt. In the Angle box, enter 0⁰.In the Distance box, enter 0 pt. Also in the Format Shape dialog box, click 3-D Format in the left pane, and then do the following in the 3-D Format pane:Under Bevel, click the button next to Top, and then under Bevel click Soft Round (second row, second option from the left). Next to Top, in the Width box, enter 18.5 pt, and in the Height box, enter 6.5 pt.Under Surface, click the button next to Material, and then under Translucent click Powder (first option from the left). Click the button next to Lighting, and then under Special click Flat (first option from the left). In the Angle box, enter 310°.On the Home tab, in the Drawing group, click Shape Effects, point to Glow, and then do the following:ClickAccentcolor1, 8 pt glow (second row, first option from the left). Point to More Glow Colors, and then click White, Background 1, Darker 35% (fifth row, first option from the left).Select the circle. On the Home tab, in the Clipboard group, click the button under Paste, and then click Duplicate. On the slide, drag the second, duplicate circle away from the first circle. Select the second circle. Under Drawing Tools, on the Format tab, in the bottom right corner of the Shape Styles group, click the Format Shape dialog box launcher. In the Format Shape dialog box, click Fill in the left pane, select Gradient fill in the Fill pane, and then do the following:In the Type list, select Radial. Click the button next to Direction, and then click From Center (third option from the left). Under Gradient stops, click Add or Remove until three stops appear in the drop-down list. Also under Gradient stops, customize the gradient stops that you added as follows:Select Stop 1 from the list, and then do the following:In the Stop position box, enter 0%. Click the button next to Color, and then under Theme Colorsclick Olive Green, Accent 3, Lighter 80% (second row, seventh option from the left). Select Stop 2 from the list, and then do the following:In the Stop position box, enter 41%. Click the button next to Color, click More Colors, and then in the Colors dialog box, on the Custom tab, enter values for Red: 11, Green: 189, Blue: 245.Select Stop 3 from the list, and then do the following:In the Stop position box, enter 100%. Click the button next to Color, and then under Theme Colorsclick Black, Text 1, Lighter 5% (sixth row, second option from the left). Select the second circle. On the Home tab, in the Clipboard group, click the button under Paste, and then click Duplicate. On the slide, drag the third circle away from the second circle. Select the third circle. Under Drawing Tools, on the Format tab, in the bottom right corner of the Shape Styles group, click the Format Shape dialog box launcher. In the Format Shape dialog box, click Fill in the left pane, select Gradient fill in the right pane, and then do the following:In the Type list, select Radial. Click the button next to Direction, and then click From Center (third option from the left). Under Gradient stops, click Add or Remove until three stops appear in the drop-down list. Also under Gradient stops, customize the gradient stops that you added as follows:Select Stop 1 from the list, and then do the following:In the Stop position box, enter 0%. Click the button next to Color, click More Colors, and then in the Colors dialog box, on the Custom tab, enter values for Red: 255, Green: 209, Blue: 159.Select Stop 2 from the list, and then do the following:In the Stop position box, enter 41%. Click the button next to Color, click More Colors, and then in the Colors dialog box, on the Custom tab, enter values for Red: 255, Green: 134, Blue: 1.Select Stop 3 from the list, and then do the following:In the Stop position box, enter 100%. Click the button next to Color, and then under Theme Colorsclick Black, Text 1, Lighter 5% (sixth row, second option from the left). On the slide, drag the three circles to form a row. Press and hold SHIFT and select all three circles. On the Home tab, in the Drawing group, click Arrange, and then do the following:Point to Align, and then click Align Selected Objects.Point to Align, and then click Align Middle.Point to Align, and then click Align Horizontally. Click Group.On the Home tab, in the Editing group, click Select, and then click Selection Pane. In the Selection and Visibility pane, to edit the name of the group, double-click the group and enter Circle Group.To reproduce the large rounded rectangle on this slide, do the following:On the Home tab, in the Drawing group, click Shapes, and then under Rectangles, click Rounded Rectangle (second option from the left). On the slide, drag to draw a rounded rectangle.Drag the yellow diamond adjustment handle to the left to reduce the rounding on the corners of the rectangle.Select the rectangle. Under DrawingTools, on the Format tab, in the Size group, do the following:In the Shape Height box, enter 4.26”.In the Shape Width box, enter 5”.On the Home tab, in the Drawing group, click the arrow next to Shape Fill, point to Gradient, and then click More Gradients. In the Format Shape dialog box, click Fill in the left pane, select Gradient fill in the Fill pane, and then do the following:In the Type list, select Linear.Click the button next to Direction, and then click Linear Down (first row, second option from the left).Under Gradient stops, click Add or Remove until two stops appear in the drop-down list.Also under Gradient stops, customize the gradient stops that you added as follows:Select Stop 1 from the list, and then do the following:In the Stop position box, enter 0%. Click the button next to Color, and then under Theme Colors click White, Background 1, Darker 5% (second row, first option from the left).Select Stop 2 from the list, and then do the following:In the Stop position box, enter 100%. Click the button next to Color, and then under Theme Colorsclick White, Background 1, Darker 35% (fifth row, first option from the left).Also in the Format Shape dialog box, click Line Color in the left pane, and then select No line in the Line Color pane.Also in the Format Shape dialog box, click 3-D Format in the left pane, and then do the following in the 3-D Format pane:Under Bevel, click the button next to Top, and then under Bevel, click Cool Slant (first row, fourth option from the left). Under Surface, click the button next to Material, and then under Standard, click Metal (fourth option from the left). Click the button next to Lighting, and then under Neutral, click Three Point (first row, first option from the left).On the Home tab, in the Drawing group, click Shape Effects, point to Reflection, and then under Reflection Variations, click Tight Reflection, touching (first row, first option from the left).On the Home tab, in the Drawing group, click Arrange, and then do the following:Point to Align, and then clickAlign to Slide.Point to Align, and then click Align Middle.Point to Align, and then click Align Center. Click Send to Back. In the Selection and Visibilitypane, select Circle Group. Drag the group on the slide to position it in the top right corner of the rounded rectangle. To reproducethe raised rectangle on this slide, do the following:Select the large rectangle on the slide, and then on the Home tab, in the Clipboard group, click the arrow under Paste, and then click Duplicate. Select the duplicate rectangle. Under DrawingTools, on the Format tab, in the Size group, do the following:In the Shape Height box, enter 2.31”.In the Shape Width box, enter 4.58”.On the Home tab, in the Drawing group, click the arrow next to Shape Fill, point to Gradient, and then click More Gradient Options.In the Format Shape dialog box, click Fill in the left pane, click Gradient fill in the Fill pane, and then under Gradient stops, click Add or Remove until two stops appear in the drop-down list.Also under Gradient stops, customize the gradient stops that you added as follows:Select Stop 1 from the drop-down menu, and then do the following:Click the button next to Color, and then under Theme Colors click Black, Text 1, Lighter 5% (sixth row, second option from the left). In the Transparencybox, enter100%. Select Stop 2 from the drop-down menu, and then do the following:Click the button next to Color, and then under Theme Colors click Black, Text 1, Lighter 15% (fifth row, second option from the left).In the Transparencybox, enter70%. Drag the duplicate rectangle onto the bottom of the larger rectangle. To create the two embossed lines on this slide, do the following: On the Home tab, in the Drawing group, click Shapes, and then under Rectangles click Rounded Rectangle (first row, second option from the left). Drag to draw a rectangle on the slide. Select the new duplicate rectangle. Under DrawingTools, on the Format tab, in the Size group, do the following:In the Shape Height box, enter 0.1”.In the Shape Width box, enter 4.51”.Drag the yellow diamond adjustment handle to the right to increase the rounding on the corners of the rectangle. (Note: If the yellow diamond is not visible, click the View tab and then in the Zoom group click Zoom. In the Zoom dialog box, click 400%.)On the Home tab, in the Drawing group, click the arrow next to Shape Fill, and then under Theme Colors click White, Background 1, Darker 5% (second row, first option from the left).On the Home tab, in the Drawing group, click the arrow next to Shape Outline, and then click No Outline.On the Home tab, in the Drawing group, click Shape Effects, point to Shadow, and then click Shadow Options.In the Format Shape dialog box, click Shadow in the left pane, and then do the following in the Shadow pane:Click the button next to Presets, and then under Inner, click Inside Diagonal Top Left(first row, first option from the left).In the Transparency box, enter 80%.On the Home tab, in the Drawing group, click Shape Effects, point to Reflection, and then under Reflection Variations, click Tight Reflection, touching (first row, first option from the left).On the Home tab, in the Clipboard group, click the arrow under Paste, and then click Duplicate. Drag the duplicate rectangle underneath the other long, thin, rounded rectangle. Press and hold SHIFT and select both of the long, thin, rounded rectangles. On the Home tab, in the Drawing group, click Arrange, and then do the following:Point to Align, and then click Align Selected Objects.Point to Align, and then click Align Center.Click Group.In the Selection and Visibility pane, double-click the group to edit the name, and then enter Embossed Line Group.To align the shapes on the slide, do the following:In the Selection and Visibility pane, select Embossed Line Group. On the slide, drag the group onto the large rectangle, between the circles and the raised area. In the Selection and Visibility pane, press and hold CTRL, and then select Circle Group, Embossed Line Group, and the raised rectangle. On the Home tab, in the Drawing group, click Arrange, point to Align,and then do the following:Click Align Selected Objects.Click Distribute Vertically.Also in the Selectionand Visibility pane, press and hold CTRL, select the large rectangle, and cancel the selection of Circle Group, keeping Embossed Line Group and the raised rectangle selected. On the Home tab, in the Drawing group, click Arrange, point to Align, and then do the following:Click Align Selected Objects.Click Align Center.To reproduce the background effects on this slide, do the following:Right-click the slide background area, and then click Format Background. In the Format Background dialog box, click Fill in the left pane, select Gradient fill in the Fill pane, and then do the following:In the Type list, select Linear.Click the button next to Direction, and then click Linear Down (first row, second option from the left).Under Gradient stops, click Add or Remove until two stops appear in the drop-down list.Also under Gradient stops, customize the gradient stops that you added as follows:Select Stop 1 from the list, and then do the following:In the Stop position box, enter 46%.Click the button next to Color, and then under Theme Colors click White, Background 1 (first row, first option from the left). Select Stop 2 from the list, and then do the following: In the Stop position box, enter 100%.Click the button next to Color, and then under Theme Colors click Blue, Accent 1, Lighter 60% (third row, fifth option from the left).
- Compass with highlights(Advanced)To reproduce the shape effects on this slide, do the following:On the Home tab, in theSlides group, click Layout, and then click Blank.On the Home tab, in the Drawing group, click Shapes, and then under Basic Shapes click Diamond (first row, seventh option from the left). On the slide, drag to draw a diamond.Select the diamond. Under Drawing Tools, on the Format tab, in the Size group, do the following:In the Shape Height box, enter 6.4”.In the Shape Width box, enter 0.66”.On the Home tab, in the bottom right corner of the Drawing group, click the Format Shape dialog box launcher. In the Format Shape dialog box, click Fill in the left pane, select Solid fill in the Fill pane, and then do the following:Click the button next to Color, and then under Theme Colors click Tan, Background 2, Darker 25% (third row, third option from the left). In the Transparency box, enter 50%.Also in the Format Shape dialog box, click Line Color in the left pane, and then in the Line Color pane, select No line. On the Home tab, in the Drawing group, click Shapes, and then under Basic Shapes click Right Triangle (first row, fourth option from the left). On the slide, drag to draw a triangle.Select the triangle. Under Drawing Tools, on the Format tab, in the Size group, do the following:In the Shape Height box, enter 3.2”.In the Shape Width box, enter 0.33”.On the Home tab, in the bottom right corner of the Drawing group, click the Format Shape dialog box launcher. In the Format Shape dialog box, click Fill in the left pane, select Solid fill in the Fill pane, and then do the following:Click the button next to Color, and then under Theme Colors click Tan, Background 2, Darker 25% (third row, third option from the left). In the Transparency box, enter 50%. Also in the Format Shape dialog box, click Line Color in the left pane, and then in the Line Color pane, select No line. On the slide, drag the triangle into the top right quarter of the diamond. Select the triangle. On the Home tab, in the Clipboard group, click the arrow under Paste, and then click Duplicate.Select the duplicate triangle. On the Home tab, in the Drawing group, click Arrange, point to Rotate, and then do the following:Click Flip Vertical.Click Flip Horizontal. Drag the duplicate triangle to the bottom left quarter of the diamond. Press and hold SHIFT and select all three shapes. On the Home tab, in the Drawing group, click Arrange, and then click Group. Select the group. On the Home tab, in the Clipboard group, click the arrow under Paste, and then click Duplicate.On the Home tab, in the Drawing group, click Arrange, point to Rotate, and then click Rotate Right 90°.On the Home tab, in the Drawing group, click Shapes, and then under Basic Shapes click Oval (first row, second option from the left).Press and hold SHIFT to constrain the shape to a circle, and then on the slide, drag to draw a circle. Select the circle. Under Drawing Tools, on the Format tab, in the Size group, do the following:In the Shape Height box, enter 0.67”.In the Shape Width box, enter 0.67”.On the Home tab, in the bottom right corner of the Drawing group, click the Format Shape dialog box launcher. In the Format Shape dialog box, click Fill. In the Fill pane, select Solid fill. Click the button next to Color, and then under Theme Colors, click Tan, Background 2, Darker 10% (second row, third option from the left). Also in the Format Shape dialog box, click Line Color in the left pane, and then in the Line Color pane, select No line. Also in the Format Shape dialog box, click 3-D Format in the left pane, and then in the 3-D Format pane, do the following:Under Bevel, click the button next to Top, and then under Bevel, click Circle (first row, first option from the left). Next to Top, in the Width box, enter 11 pt, and in the Height box, enter 11 pt. Under Surface, click the button next to Material, and then under Standard click Warm Matte (second option from the left). Click the button next to Lighting, and then under Neutral, click Contrasting (second row, second option from the left). In the Angle box, enter 130°.On the Home tab, in the Drawing group, click Shapes, and then under Basic Shapes, click Donut (third row, second option from the left). On the slide, drag to draw a donut.Select the donut. Under Drawing Tools, on the Format tab, in the Size group, do the following:In the Shape Height box, enter 4.67”.In the Shape Width box, enter 4.67”.Drag the center yellow diamond adjustment handle to the left, to decrease the width of the donut. On the Home tab, in the bottom right corner of the Drawing group, click the Format Shape dialog box launcher. In the Format Shape dialog box, click Fill. In the Fill pane, select Solid fill,and then do the following:Click the button next to Color, and then under Theme Colors, click Tan, Background 2, Darker 10% (second row, third option from the left).In the Transparency box, enter 15%.Also in the Format Shape dialog box, click Line Color in the left pane, and then in the Line Color pane, select No line. Also in the Format Shape dialog box, click 3-D Format in the left pane, and then in the 3-D Format pane, do the following:Under Bevel, click the button next to Top, and then under Bevel, click Circle (first row, first option from the left). Next to Top, in the Width box, enter 11 pt, and in the Height box, enter 11 pt. Under Surface, click the button next to Material, and then under Standard click Warm Matte (second option from the left). Click the button next to Lighting, and then under Neutral click Contrasting (second row, second option from the left). In the Angle box, enter 130°.Select the donut. On the Home tab, in the Drawing group, click Arrange, and then click Send to Back. Drag the shapes on the slide to form a compass. On the Home tab, in the Editing group, click Select, and then click Select All. On the Home tab, in the Drawing group, click Arrange, point to Align, and then do the following:Click Align to Slide.Click Align Center.Click Align Middle. To reproduce the text on this slide, do the following:On the Insert tab, in the Text group, click Text Box, and then on the slide, drag to draw the text box.Enter North in the text box, select the text, and then on the Home tab, in the Font group, select Agency FB from the Font list, enter 22 in the Font Size box, click Bold, click the arrow next to Font Color,and then under Theme Colors click White, Background 1 (first row, first option from the left).On the Home tab, in the Paragraph group, click Center to center the text in the text box.Select the text box. On the Home tab, in the Font group, click Character Spacing, and then click Very Loose.Under Drawing Tools, on the Format tab, in the WordArt Styles group, click Text Effects, point to Transform, and then under Follow Path, click Arch Up (first option from the left). Drag the “North” text box to position it at the top of the donut. Drag the pink diamond adjustment handle to adjust the text to match the curvature of the donut. If the text is still not curved enough, drag the blue adjustment handles to adjust the size of the text box, then drag the text box on the slide to reposition it on the compass. Select the “North” text box. On the Home tab, in the Clipboard group, click the arrow under Paste, and then click Duplicate. Click in the duplicate text box, delete North, and enter West. On the Home tab, in the Drawing group, click Arrange, point to Rotate, and then click Rotate Left 90⁰.Drag the “West” text box onto the left side of the donut. Drag the pink diamond adjustment handle to adjust the text to match the curvature of the donut. Select the “West” text box. On the Home tab, in the Clipboard group, click the arrow under Paste, and then click Duplicate. Click in the duplicate text box, delete West, and enter South. On the Home tab, in the Drawing group, click Arrange, point to Rotate, and then click Rotate Right 90⁰.Under Drawing Tools, on the Format tab, in the WordArt Styles group, click Text Effects, point to Transform, and then under Follow Path, click Arch Down (second option from the left). Drag the “South” text box onto the bottom of the donut. Drag the pink diamond adjustment handle to adjust the text to match the curvature of the donut. Select the “South” text box. On the Home tab, in the Clipboard group, click the arrow under Paste, and then click Duplicate. Click in the duplicate text box, delete South, and enter East. On the Home tab, in the Drawing group, click Arrange, point to Rotate, and then click Rotate Left 90⁰.Drag the “East” text box onto the right side of the donut. Drag the pink diamond adjustment handle to adjust the text to match the curvature of the donut. Press and hold SHIFT and select the “North” and “South” text boxes. On the Home tab, in the Drawing group, click Arrange, point to Align, and then do the following:Click Align Selected Objects.Click Align Center.Press and hold SHIFT and select the “East” and “West” text boxes. On the Home tab, in the Drawing group, click Arrange, point to Align, and then do the following:Click Align Selected Objects.Click Align Middle. To reproduce the background effects on this slide, do the following:Right-click the slide background area, and then click Format Background. In the Format Background dialog box, click Fill in the left pane, select Gradient fill in the Fill pane, and then do the following:In the Type list, select Radial.Click the button next to Direction, and then click From Center (third option from the left).Under Gradient stops, click Add or Remove until two stops appear in the drop-down list.Also under Gradient stops, customize the gradient stops that you added as follows:Select Stop 1 from the list, and then do the following:In the Stop position box, enter 0%.Click the button next to Color, and then under Theme Colors click White, Background 1 (first row, first option from the left).Select Stop 2 from the list, and then do the following: In the Stop position box, enter 100%.Click the button next to Color, and then under Theme Colors click Tan, Background 2, Darker 10% (second row, third option from the left).
- Colorful clip art with shape effects(Advanced)To reproduce the shape effects on this slide, do the following:On the Home tab, in theSlides group, click Layout, and then click Blank.On the Insert tab, click Clip Art.In the Clip Art pane, in the Search for box, enter j0435542. In the Search in list, select Everywhere, and then click Go. Select the clip art file in the pane to insert it into the slide. (Note: If you choose another clip art file, the clip art must be in the Windows Metafile format [.wmf].)On the slide, select the clip art. Under Drawing Tools, on the Format tab, in the Size group, do the following:In the Shape Height box, enter 5.83”.In the Shape Width box, enter 8.12”.On the Home tab, in the Drawing group, click Arrange, and then click Ungroup.In the Microsoft Office PowerPoint dialog box, click Yes. On the slide, select the converted clip art. On the Home tab, in the Editing group, click Select, and then click Selection Pane. In the Selection and Visibility pane, select the top-level group. On the Home tab, in the Drawing group, click Arrange, and then click Ungroup. Also in the Selection and Visibility pane, select the Autoshape object, and then press DELETE. Press CTRL+A to select all of the objects on the slide. On the Home tab, in the Drawing group, click Arrange, and then click Group. Select the group. On the Home tab, in the Drawing group, click Shape Effects, point to Preset, and then under Presets click Preset 10 (third row, second option from the left). On the Home tab, in the Drawing group, click Arrange, point to Align, and then do the following:Click Align to Slide.Click Align Middle.Click Align Center.This drawing object may cause the performance of PowerPoint to slow. If you would like to increase the speed of PowerPoint, do the following:Select the group. On the Home tab, in the Clipboard group, click Cut.On the Home tab, in the Clipboard group, click the arrow under Paste, and then click Paste Special. In the Paste Special dialog box, select Paste, and then under As select Picture (PNG).If the picture is no longer centered on the slide, drag to align as needed. To reproduce the background effects on this slide, do the following:Right-click the slide background area, and then click Format Background. In the Format Background dialog box, click Fill in the left pane, select Gradient fill in the Fill pane, and then do the following:In the Type list, select Linear.Click the button next to Direction, and then click Linear Down (first row, second option from the left).Under Gradient stops, click Add or Remove until two stops appear in the drop-down list.Also under Gradient stops, customize the gradient stops that you added as follows:Select Stop 1 from the list, and then do the following:In the Stop position box, enter 63%.Click the button next to Color, and then click Black, Text 1 (first row, second option from the left).Select Stop 2 from the list, and then do the following: In the Stop position box, enter 100%.Click the button next to Color, and then click Black, Text 1, Lighter 50% (second row, second option from the left).
- Custom animation effects: motion path and grow/shrink(Advanced)To reproduce the balloon on this slide, do the following:On the Home tab, in the Slides group, click Layout, and then click Blank. On the Home tab, in the Drawing group, click Shapes, under Basic Shapes, click Teardrop (second row, fourth from the left). On the slide, drag to draw the teardrop.Under Drawing Tools, on the Format tab, in the Size group, click the Size and Position dialog box launcher, and then in the Size and Position dialog box on the Size tab under Size and rotate, do the following:In the Height box, enter 1.66”.In the Width box, enter 1.7”.In the Rotation box, enter 133⁰.Under Drawing Tools, on the Format tab, in the ShapeStyles group, click the FormatShape dialog box launcher.In the Format Shape dialog box in the left pane, click Fill, andin the Fill pane, click Gradientfill.In the Type list, select Linear. Click the button next to Direction, and then click Linear Down (second option from the left).Under Gradient stops, click Add or Remove until three stops appear in the drop-down list and then under Gradient stops, customize the gradient stops as follows:Select Stop 1 from the list, and then do the following:In the Stop position box, enter 13%.Click the button next to Color, and then under Theme Colors click Red, Accent 2, Darker 25% (fifth row, sixth option from the left).Select Stop 2 from the list, and then do the following:In the Stop position box, enter 66%.Click the button next to Color, and then under Theme Colors click Red, Accent 2, Lighter 40% (fourth row, sixth option from the left).Select Stop 3 from the list, and then do the following:In the Stop position box, enter 100%.Click the button next to Color, and then under Theme Colors click White, Background 1 (first row, first option from the left).Also in the Format Shape dialog box in the left pane, click LineColor, and in the Line Color pane, select No line.On the Home tab, in the Drawing group, click Shapes, and then under BasicShapes, click Isosceles Triangle (third option from the left). On the slide, drag to draw the isosceles triangle.Select the isosceles triangle. Under Drawing Tools, on the Format tab, in the Size group, click the SizeandPosition dialog box launcher. In the Size and Position dialog box in the Size tab, under Sizeandrotate, do the following:In the Height box, enter 0.16”.Inthe Width box,enter 0.11”.In the Rotation box, enter 8⁰.Under Drawing Tools, on the Format tab, click the Format Shape dialog box launcher. In the Format Shape dialog box in the left pane, click Fill. In the Fill pane, click Solid Fill. Click the button next to Color, and then under Theme Colorsclick Red, Accent 2, Darker 25% (fifth row, sixth option from the left).Also in the Format Shape dialog box in the left pane, click LineColor, and then in the Line Color pane select No line.Position the isosceles triangle on the slide so that the sharp angle touches the point of the teardrop.On the Home tab, in the Drawing group, click Shapes, and under Lines click Curve (tenth option from the right). On the slide, draw a curve (for, example, one that has four points). Press ESCto end the curve.Select the curved line. On the Home tab, in the Drawing group, click the arrow next toShapeOutline, and then underTheme Colors, click White, Background 1, Darker 15%(third row, first option from the left).On the Home, in the Drawing group, click ShapeOutline, point to Weight, and then click 1 pt.Position the curve on your slide so that one end is touching the bottom edge of the isosceles triangle.On the Home tab, in the Drawing group, click Shapes, and under BasicShapes, select Oval (second option from the left). On the slide, drag to draw an oval.Select the oval. Under Drawing Tools, on the Format tab, in the Size group do the following:In the Shape Height box, enter 1.2”. In the Shape Width box, enter 1.2”.Under Drawing Tools, on the Format tab, in the ShapeStyles group, click the arrow next to Shape Fill, point to Gradient, and then click MoreGradients.In the FormatShape dialog box, in the left pane click Fill. In the Fill pane, select Gradientfill, and then do the following:In the Type list, select Radial. Click the button next to Direction, and then click From Center (third option from the left).Under Gradient stops, click Add or Remove until three stops appear in the drop-down list.Also under Gradient stops, customize the gradient stops as follows: Select Stop 1 from the list, and then do the following:In the Stop position box, enter 0%.Click the button next to Color, and then under Theme Colors click White, Background 1 (first row, first option from the left).Select Stop 2 from the list, and then do the following:In the Stop position box, enter 50%Click the button next to Color, and then under Theme Colors click White, Background 1 (first row, first option from the left).In the Transparency box, enter 81%.Select Stop 3 from the list, and then do the following:In the Stop position box, enter 71%.Click the button next to Color, and then under Theme Colors click White, Background 1(first row, first option from the left).In the Transparency box, enter 100%.Also in the Format Shape dialog box, in the left pane,click LineColor, and then in the Line Color pane, click No line.Position the oval at the top left edge of the teardrop to create a lighting effect. Press and hold CTRL, and then select all four objects.On the Home tab, in the Drawing group, click Arrange, and then click Group.To reproduce the animation effects on this slide, do the following:On the slide, select the balloon and drag it off the bottom left cornerof the slide.With the balloon still selected, on the Animations tab, in the Animations group, click CustomAnimation.In the CustomAnimation task pane, click AddEffect, point to MotionPaths, and then select Diagonal Up Right.On the slide, select the motion path and then drag the endpoint (red arrow) across the slide and off the top right corner.In the CustomAnimation task pane, under Modify: Diagonal Up Right, in the Start list, select With Previous. Select the balloon.In the CustomAnimation task pane, click AddEffect,point to Emphasis, click More Effects.In the Add Emphasis Effect dialog box,under Basic, select Grow/Shrink, and then click OK.In the CustomAnimation task pane, under Modify: Grow/Shrink, in the Start list, select With Previous. In the Size list, in the Custom box, enter 2%, and then press ENTER.In the Custom Animation task pane, press and hold SHIFT and select both animation effects (motion path and grow/shrink). Click the arrow next to one of the animation effects, and then click Timing. In the Effect Options dialog box, do the following:On the Timing tab, in the Speed box, enter 32 seconds.On the Effect tab, under Settings,clear the Smooth start check box.Click OK. Do the following to reproduce the background effects on this slide, using the sky background picture from the example above:Right-click the sky background on the original template, and then click Save Background.Save the file as a JPEG (.jpg) file format.Right-click the slide that you are creating, and then click Format Background. In the Format Background dialog box, click Fill in the left pane, select Picturefill in the Fill pane, and then under Insert from click File. In the Insert Picture dialog box, select the saved sky picture (.jpg), and then click Insert. Do the following to reproduce the background effects on this slide, using a different picture:Right-click the slide background area, and then click Format Background. In the Format Background dialog box, click Fill in the left pane, select Picturefill in the Fill pane, and then under Insert from click File. In the Insert Picture dialog box, select another picture, and then click Insert.
- Custom animation effects: motion paths with auto-reverse, varying speeds(Advanced)To reproduce the shape effects on this slide, do the following:On the Home tab, in the Slides group, click Layout, and then click Blank.On the Home tab, in the Drawing group, click Shapes, and then under Rectangles, select Rectangle (first option from the left). On the slide, drag to draw the first rectangle.Select the rectangle. Under Drawing Tools, on the Format tab, in the Size group, do the following:In the Shape Height box, enter 0.86”.In the Shape Width box, enter 10.5”.Under Drawing Tools, on the Format tab, in the ShapeStyles group, click the FormatShape dialog box launcher. In the Format Shape dialog box, in the left pane, click Fill. In the Fill pane, click Solid fill,and then do the following:Click the button next to Color, and click MoreColors.In the Colors dialog box, on the Custom tab, enter values for Red: 86, Green: 113, Blue: 118.In the Transparency box, enter 40%. Also in the Format Shape dialog box, in the left pane, click Line Color, and then inthe Line Color pane, click No line.Select the rectangle.On the Home tab, in the Clipboard group, click the arrow underPaste, and then click Duplicate. Select the duplicate rectangle. Under Drawing Tools, on the Format tab, in the Size group, do the following:In the Shape Height box, enter 0.86”.In the Shape Width box, enter 4.96”.Under Drawing Tools, on the Format tab, in the ShapeStyles group, click the FormatShape dialog box launcher.In the Format Shape dialog box, in the left pane, click Fill. In the Fill pane, select Solid fill. Click the button next to Color,and then under Theme Colorsselect Red, Accent 2, Darker 50% (sixth row, sixth option from the left). In the Transparency box, enter 40%.Press and hold SHIFT and select both rectangles. On the Home tab, in the Drawing group, click Arrange,point to Align, and then do the following:Click Align to Slide.Click Align Center.Click Align Middle.To reproduce the animation effects for the second rectangle on this slide, do the following:Select the second rectangle (smaller, red).On the Animations tab, in the Animations group, click CustomAnimation. (Note: For this animation effect, the first (largest, blue) rectangle remains stationary on the slide.)In the Custom Animation task pane, click Add Effect, point to Motion Paths, and then click Right. On the slide, select motion path endpoint (red arrow), and drag the end of the path beyond the right edge of the slide. Select the motion path starting point (green arrow), and drag the starting point of the path beyond the left edge of the slide. In the CustomAnimationtask pane, click the motion path animation effect,and then under Modify: Right,in the Start list,select With Previous. Also in the CustomAnimationtask pane, click the arrow next to the motion path animation effect, and click Effect Options. In the Right dialog box, do the following:On the Effect tab, under Settings, select Auto-Reverse.On the Timing tab, in the Speed box, enter 3.55 seconds, and thenin the Repeat list, select Until End of Slide.To reproduce the animation effects for the third rectangle on this slide, do the following:Select the second (small, red) rectangle.On the Home tab, in the Clipboard group, click the arrow under Paste, click Duplicate, and then drag the new rectangle (along with the new motion path) above the other rectangles. Repeat this step three more times until there is a total of six rectangles (including the original two).Select the third rectangle. Under Drawing Tools, on the Format tab, in the Size group, do the following:In the Shape Height box, enter 0.86”.In the Shape Width box, enter 3.16”.Under Drawing Tools, on the Format tab, in the ShapeStyles group, click the FormatShape dialog box launcher. In the Format Shape dialog box, in the left pane, click Fill. In the Fill pane, click Solid fill,and then do the following:Click the button next to Color, and then click MoreColors.In the Colors dialog box, on the Custom tab, enter values for Red: 79, Green: 129, Blue: 189.In the Transparency box, enter 40%. On the Animations tab, in the Animations group, click CustomAnimation. In the CustomAnimation task pane, click the third rectangle motion path animation effect, and then under Modify: Right, in the Start list,select With Previous. Also in the CustomAnimationtask pane, click the arrow next to the third rectangle motion path animation effect, and then click Effect Options. In the Effect Options dialog box, do the following:On the Effect tab, under Settings, select Auto-Reverse.On the Timing tab, in the Repeat list,select Until End of Slide, and in the Speed box, enter 3.1 seconds.On the slide, position the third rectangle on the first (and longest) rectangle, lining up the top and bottom edges.To reproduce the animation effects for the fourth rectangle on this slide, do the following:Select the fourth rectangle. Under Drawing Tools, on the Format tab, in the Size group, do the following:In the Shape Height box, enter 0.86”.In the Shape Width box, enter 1.68”.Under Drawing Tools, on the Format tab, in the ShapeStyles group, click the FormatShape dialog box launcher. In the Format Shape dialog box in the left pane, click Fill. In the Fill pane, click Solid fill,and then do the following:Click the button next to Color, and then under Theme Colors click Olive Green, Accent 3, Darker 50% (sixth row, seventh option from the left).In the Transparency box, enter 40%. On the Animations tab, in the Animations group, click CustomAnimation. In the CustomAnimation task pane, select the fourthrectangle motion path animation effect, and under Modify: Right, in the Start box, select With Previous. Also in the CustomAnimationtask pane, click the arrow next to the fourth rectangle motion path animation effect, and then click Effect Options. In the Effect Options dialog box, do the following:On the Effect tab, under Settings, select Auto-Reverse.On the Timing tab, in the Repeat list,select Until End of Slide, and in the Speed box, enter 3.95 seconds.On the slide, position the fourth rectangle on the first (and longest) rectangle, lining up the top and bottom edges.To reproduce the animation effects for the fifth rectangle on this slide, do the following:Select the fifthrectangle. Under Drawing Tools, on the Format tab, in the Size group, do the following:In the Shape Height box, enter 0.86”.In the Shape Width box, enter 1.5”.Under Drawing Tools, on the Format tab, in the ShapeStyles group, click the FormatShape dialog box launcher. In the Format Shape dialog box in the left pane, click Fill. In the Fill pane, click Solid fill,and then do the following:Click the button next to Color, and then click MoreColors.In the Colors dialog box, on the Custom tab, enter values for Red: 127, Green:140, Blue: 60.In the Transparency box, enter 40%. On the Animations tab, in the Animations group, click CustomAnimation. In the CustomAnimation task pane, select the fifthrectangle motion path animation effect, and then under Modify: Right, in the Start list,select With Previous. Also in the CustomAnimationtask pane, click the arrow next to the fifth rectangle motion path animation effect, and then click Effect Options. In the Effect Options dialog box, do the following:On the Effect tab, under Settings, select Auto-Reverse.On the Timing tab, in the Repeat list, select Until End of Slide, and in the Speed box, enter 5.3 seconds.On the slide, position the fifth rectangle on the first (and longest) rectangle, lining up the top and bottom edges. To reproduce the animation effects for the sixth rectangle on this slide, do the following:Select the sixth rectangle. Under Drawing Tools, on the Format tab, in the Size group, do the following:In the Shape Height box, enter 0.86”.In the Shape Width box, enter 0.98”.Under Drawing Tools, on the Format tab, in the ShapeStyles group, click the FormatShape dialog box launcher. In the Format Shape dialog box in the left pane, click Fill. In the Fill pane, click Solid fill,and then do the following:Click the button next to Color, and then under Theme Colors click Olive Green, Accent 3, Darker 25% (fifth row, seventh option from the left).In the Transparency box, enter 40%. On the Animations tab, in the Animations group, click CustomAnimation. In the CustomAnimation task pane, select the sixth rectangle motion path animation effect, and under Modify: Right, in the Start box, select With Previous. Also in the CustomAnimationtask pane, click the arrow next to the sixth rectangle motion path animation effect, and then click Effect Options. In the Effect Options dialog box, do the following:On the Effect tab, under Settings, select Auto-Reverse.On the Timing tab, in the Repeat list, select Until End of Slide, and in the Speed box, enter 4.2 seconds.On the slide, position the sixth rectangle on the first (and longest) rectangle, lining up the top and bottom edges. To reproduce the background effects on this slide, do the following:Right-click the slide background area, and then click Format Background. In the Format Background dialog box, click Fill in the left pane, select Gradient fill in the right pane, and then do the following:In the Type list, select Radial.Click the button next to Direction, and then click From Center (third option from the left). Under Gradient stops, click Add or Remove until two stops appear in the drop-down list.Also under Gradient stops, customize the gradient stops that you added as follows:Select Stop 1 from the list, and then do the following:In the Stop position box, enter 40%.Click the button next to Color, and then under Theme Colors click Black, Text 1, Lighter 50% (second row, second option from the left).Select Stop 2 from the list, and then do the following: In the Stop position box, enter 100%.Click the button next to Color, and then under Theme Colors click Black, Text 1 (first row, second option from the left).
- Graphic shapes in 3-D perspective(Advanced)To reproduce the ring effects on this slide, do the following:On the Home tab, in the Slides group, click Layout, and then click Blank.On the Home tab, in the Drawing group, click Shapes, and under BasicShapes, select Donut (third row, second option from the left). Press and hold SHIFT to constrain the shape to a circle, and then on the slide, drag to draw a donut. Select the donut. On the Home tab, in the Drawing group, click the arrow next to ShapeFill, and under ThemeColors select Orange, Accent 6 (first row, 10th option from the left).Also on the Home tab, in the Drawing group, click the arrow next to ShapeOutline, and selectNoOutline.Under DrawingTools, on the Format tab, in the Size group, do the following:In the ShapeHeight box, enter 0.83” In the ShapeWidth box, enter 0.83”.On the Home tab, in the Drawing group, click Arrange, point toAlign, and then do the following:Click Align to Slide.ClickAlignCenter.Click AlignMiddle.Select the donut. On the Home tab, in the Clipboard group, click the arrow below Paste, and select Duplicate.Select the second donut. On the Home tab, in the Drawing group, click the arrow next to ShapeFill, and under ThemeColors select Olive Green, Accent 3 (first row, seventh option from the left).Under DrawingTools, on the Format tab, in the Size group, do the following:In the ShapeHeight box, enter 4.17” In the ShapeWidth box, enter 4.17”.On the second donut, drag the yellow adjustment diamond to the left so that the donut is shaped like a ring. On the Home tab, in the Drawing group, click Arrange, point toAlign, and then do the following:Click Align to Slide.ClickAlignCenter.Click AlignMiddle.To reproduce the triangle effects on this slide, do the following:On the Home tab, in the Drawing group, clickShapes, and under BasicShapes select IsoscelesTriangle (first row, third option from the left). On the slide, drag to draw an isosceles triangle.On the Home tab, in the Drawing group, click the arrow next to ShapeFill, and under ThemeColors select Blue, Accent 1 (first row, fifth option from the left).On the Home tab, in the Drawing group, click the arrow next to ShapeOutline and select NoOutline. Under Drawing Tools, on the Format tab, in the Size group, do the following:In the ShapeHeight box, enter1.08”.In the ShapeWidth box, enter 0.42”.On the slide, position the triangle above the orange center donut.Select the isosceles triangle.On the Home tab, in the Clipboard group, click the arrow below Paste and select DuplicateSelect the second isosceles triangle. On the Home tab, in the Drawing group, clickArrange, point to Rotate, and select FlipVertical.Position the second, duplicate triangle below the orange center donut.Press and hold the CTRL key and then select both triangles.On the Home tab, in the Drawing group, click Arrange, and then do the following:Point to Align, and then click AlignCenter.Click Group.Select the group of two isosceles triangles. On the Home tab, in the Clipboard group, click the arrow below Paste and select Duplicate.Select the second group of isosceles triangles. On the Home tab, in the Drawing group, click Arrange, and then do the following:Point to Rotate, and then click RotateRight 90°.Point to Align, and then clickAlignCenter.Point to Align, and then clickAlignMiddle.Press and hold the CTRL key and select both groups of triangles. On the Home tab, in the Drawing group, click Arrange, and then click Group. With both groups of triangles still selected, on the Home tab, in the Clipboard group, click the arrow below Paste, and then select Duplicate. Select the second group of triangles. On the Home tab, in the Drawing group, click Arrange, point to Rotate, and select MoreRotationOptions.In the Size and Position dialog box, on the Size tab, under Size and rotate, in the Rotation box, enter 45°.On the Home tab, in theDrawing group, click Arrange,point to Align, and then do the following:ClickAlignCenter.Click AlignMiddle.On the Home tab, in the Drawing group, click Shapes, and then under BasicShapes select IsoscelesTriangle (first row, third option from the left). On the slide, drag to draw an isosceles triangle.Select the new triangle. On the Home tab, in the Drawing group, click the arrow next to ShapeFill, and then under ThemeColors select Blue, Accent 1 (first row, fifth option from the left).On the Home tab, in the Drawing group, click the arrow next to ShapeOutline and select NoOutline. Under Drawing Tools, on the Format tab, in the Size group, do the following:In the ShapeHeight box, enter0.25”.In the ShapeWidth box, enter 0.33”.Position the small triangle above the larger donut.Select the small triangle. On the Home tab, in the Clipboard group, click the arrow below Paste and select Duplicate. Select the second, small triangle. On the Home tab, in the Drawing group, click Arrange, point to Rotate, and select FlipVertical. Position the second, small triangle below the large donut.Press and hold the CTRL key and select both small triangles. On the Home tab, in the Drawing group, click Arrange, and then do the following:Point to Align, and then click AlignCenterClick Group.Select the group of smaller triangles.On the Home tab, in the Clipboard group, click the arrow below Paste and select Duplicate.Select the second group of smaller triangles. On the Home tab, in the Drawing group, click Arrange, and then do the following:Point to Rotate,and then click RotateRight 90°. Point to Align, and then click AlignCenter.Point to Align, and then click AlignMiddle.To reproduce the tilted effect on this slide, do the following:On the Home tab, in the Editing group, click Select, and then click SelectAll.On the Home tab, in the Drawing group, click Arrange, and then click Group. On the Home tab, in the Drawing group, click ShapeEffects, point to Preset, and then under Presets select Preset11 (third row, third option from the left). To reproduce the lines on this slide, do the following:On the Home tab, in the Drawing group, click Shapes, and then under Lines select Line (first options). On the slide, drag to draw a horizontal line on the slide.Select the line. Under DrawingTools, on the Format tab, in the Size group, in the ShapeWidth box, enter 8.0”. On the Home tab, in the bottom right corner of the Drawing group, click the FormatShape dialog box launcher. In the FormatShape dialog box, click LineColor in the left pane, select Gradient line in the LineColor pane, and then do the following:In the Type list, select Linear.In the Direction list, select LinearRight (first row, fourth option from the left).Under Gradientstops, click Add or Remove until three stops appear in the drop-down list.Also under Gradient stops, customize the gradient stops as follows:Select Stop 1 from the list, and then do the following:In the Stop position box, enter 0%.Click the button next to Color, and then under Theme Colors click Blue, Accent 1 (first row, fifth option from the left).In the Transparency box, enter 100%.Select Stop 2 from the list, and then do the following: In the Stop position box, enter 50%.Click the button next to Color, and then under Theme Colors click Blue, Accent 1 (first row, fifth option from the left).In the Transparency box, enter 50%.Select Stop 3 from the list, and then do the following: In the Stop position box, enter 100%.Click the button next to Color, and then under Theme Colors click Blue, Accent 1 (first row, fifth option from the left).In the Transparency box, enter 100%.Also in the FormatShape dialog box, click LineStyle in the left pane, and in the LineStyle pane, do the following:In the Dashtype list, select RoundDot (second option from the top). In the Captype list, select Round. In the Jointype list, select Round. With the line still selected, on the Home tab, in the Drawing group, click Arrange, point to Align, and then do the following: SelectAlignCenter.Select AlignMiddle. On the Home tab, in the Drawing group, click Arrange, point to Rotate, and select MoreRotationOptions. In the Sizeand Position dialog box, on the Size tab, under Size and rotate, in the Rotation box, enter 12°.Select the dashed line. On the Home tab, in the Clipboard group, click the arrow below Paste and select Duplicate.Select the second dashed line.On the Home tab, in the Drawing group, click Arrange, point to Rotate, and then select MoreRotationOptions. In the Size and Position dialog box, on the Size tab, under Size and rotate, in the Rotation box, enter 114°.Position the second duplicate dashed line so that it is even with the top and bottom triangles.To reproduce the background effects on this slide, do the following:Right-click the slide background area, and then click Format Background. In the Format Background dialog box, click Fill in the left pane, select Gradient fill in the right pane, and then do the following:In the Type list, select Linear.In the Direction list, click Linear Diagonal (first row, first option from the left).Under Gradient stops, click Add or Remove until two stops appear in the drop-down list.Also under Gradient stops, customize the gradient stops as follows:Select Stop 1 from the list, and then do the following:In the Stop position box, enter 0%.Click the button next to Color, and then click Blue, Accent 1, Lighter 60% (third row, fifth option from the left).Select Stop 2 from the list, and then do the following: In the Stop position box, enter 100%.Click the button next to Color, and then click White, Background 1 (first row, first option from the left).
- Clear disk with floating text(Advanced)To reproduce the shape effects on this slide, do the following:On the Home tab, in theSlides group, click Layout, and then click Blank.On the Home tab, in the Drawing group, click Shapes, and then under Basic Shapes click Oval (first row, second option from the left). Press and hold SHIFT to constrain the shape to a circle, and then on the slide, drag to draw a circle. Select the circle. Under DrawingTools, on the Format tab, in the Size group, do the following:In the Shape Height box, enter 4.07”.In the Shape Width box, enter 4.54”.Under Drawing Tools, on the Format tab, in the Shape Styles group, click Shape Fill, clickMore Fill Colors, and then in the Colors dialog box, on the Custom tab, enter values for Red: 204, Green: 255, Blue: 153.Under Drawing Tools, on the Format tab, in the Shape Styles group, clickShape Outline, and then click No Outline. Under Drawing Tools, on the Format tab, in the Shape Styles group, clickShape Effects, and then do the following:Point to Bevel, and then under Bevel click Convex (second row, third option from the left). Point to 3-D Rotation, and then under Perspective click Perspective Relaxed (second row, third option from the left). On the Home tab, in the bottom right corner of the Drawing group, click the Format Shape dialog box launcher. In the Format Shape dialog box, click 3-D Rotationin the left pane, and then do the following in the right pane under Rotation:In the Y box, enter 289.6°.In the Perspective box, enter 30°.Also in the Format Shape dialog box, click 3-D Formatin the left pane, and then do the following in the right pane:Under Bevel, click the button next to Bottom, and then under Bevel click Circle (first row, first option from the left). Under Depth, in the Depth box, enter 25 pt. Under Surface, click the button next to Material, and then under Translucent click Clear (third option from the left). Click the button next to Lighting, and then under Neutral click Balance (first row, second option from the left). Also in the Format Shape dialog box, click Shadow in the left pane, and then do the following in the right pane:In the Transparency box, enter 85%.In the Size box, enter 100%. In the Blur box, enter 21 pt.In the Angle box, enter 90%.In the Distance box, enter 27 pt. To reproduce the text effects on this slide, do the following:On the Insert tab, in the Text group, click Text Box, and then on the slide, drag to draw the text box.Enter text in the text box, select the text, and then on the Home tab, in the Font group, select Gill Sans MT Condensedfrom the Font list, select 80 from the Font Size list, click the arrow next to Font Color,and then under Theme Colors click White, Background 1, Darker 50% (sixth row, first option from the left).On the Home tab, in the Paragraph group, click Center to center the text in the text box. Under Drawing Tools, on the Format tab, in the WordArt Styles group, click Text Effects, and then do the following:Point to Reflection, and then under Reflection Variations click Tight Reflection, 4 pt offset (second row, first option from the left). Point to 3-D Rotation, and then under Parallel click Off Axis 2 Left (second row, fourth option from the left). Under Drawing Tools, on the Format tab, in the bottom right corner of the WordArt Styles group, click the Format Text Effects dialog box launcher. In the Format Text Effects dialog box, click 3-D Format in the left pane, and then do the following in the right pane:Under Depth, click the button next to Color and under Theme Colorsthen click White, Background 1 (first row, first option from the left). In the Depth box, enter 6.5 pt. Under Surface, click the button next to Material and then under Standard click Warm Matte (second option from the left). Click the button next to Lighting, and then under Neutral click Soft (first row, third option from the left). To reproduce the background effects on this slide, do the following:Right-click the slide background area, and then clickFormat Background.In the Format Background dialog box, click Fill in the left pane, select Gradient fill in the right pane, and then do the following:In the Type list, select Linear.Click the button next to Direction, and then clickLinear Down (first row, second option from the left).Under Gradient stops, click Add or Remove until two stops appear in the drop-down list.Also under Gradient stops, customize the gradient stops that you added as follows:Select Stop 1 from the list, and then do the following:In the Stop position box, enter46%.Click the button next to Color, and then under Theme Colorsclick White, Background 1 (first row, first option from the left).Select Stop 2 from the list, and then do the following:In the Stop position box, enter100%.Click the button next to Color, click More Colors, and then in the Colors dialog box, on the Custom tab, enter values for Red: 228, Green: 245, Blue: 193.
- Transparent 3-D steps with labels(Advanced)To reproduce the bottom rectangle with text effects on this slide, do the following:On the Home tab, in theSlides group, click Layout, and then click Blank.On the Home tab, in the Drawing group, click Shapes, and then under Rectangles, click Rectangle (first option from the left). On the slide, drag to draw a rectangle.Under Drawing Tools, on the Format tab, in the Size group, do the following:In the Shape Height box, enter 1.5”.In the Shape Width box, enter 3”.On the Home tab, in the bottom right corner of the Drawing group, click the Format Shape dialog box launcher. In the Format Shape dialog box, click Fill in the left pane, and then do the following in the right pane:Select Solid fill. Click the button next to Color, and then under Theme Colors click White, Background 1 (first row, first option from the left). In the Transparency box, enter 0%. Also in the Format Shape dialog box, click Line Color in the left pane, and then select No line in the right pane. Also in the Format Shape dialog box, click 3-D Rotation in the left pane. In the right pane, click the button next to Presets, and then under Parallelclick Off Axis 2 Top (third row, second option from the left). Also in the Format Shape dialog box, click 3-D Format in the left pane, and then do the following in the right pane:Under Bevel, click the button next to Top, and then under Bevel click Circle (first row, first option from the left). Next to Top, in the Width box, enter 7 pt, and in the Height box,enter7 pt. Under Depth, click the button next to Color, and then under Theme Colors click White, Background 1 (first row, first option from the left). In the Depth box, enter 40 pt. Under Surface, click the button next to Material, and then under Translucent click Clear (third option from the left). Click the button next to Lighting, and then under Special click Two Point (second option from the left). In the Angle box, enter 70°.On the Insert tab, in the Text group, click Text Box, and then on the slide, drag to draw the text box.Enter text in the text box, select the text, and then on the Home tab, in the Font group, select TW Cen MT Condensedfrom the Font list and then select 36 from the Font Size list.On the Home tab, in the Paragraph group, click Align Text Right to align the text right on the slide.Drag the text box and position it over the rectangle.Under Drawing Tools, on the Format tab, in the WordArt Styles group, click the arrow next toText Fill, and then under Theme Colors click White, Background 1 (first row, first option from the left).Select the text box. Under Drawing Tools, on the Format tab, click Text Effects point to 3-D Rotation, and then click 3-D Rotation Options. In the Format Text Effects dialog box, click 3-D Rotation in the left pane. In the right pane, click the button next to Presets, and then under Parallel click Off Axis 2 Left (second row, fourth option from the left). To reproduce the background on this slide, do the following:Right-click the slide background area, then click Format Background. In the Format Background dialog box, click Fill in the left pane, select Gradient fill in the right pane, and then do the following:In the Type list, select Linear.Click the button next to Direction, and then clickLinear Diagonal (first row, third option from the left).In the Angle box, enter 135%. Under Gradient stops, click Add or Remove until two stops appear in the drop-down list.Also under Gradient stops, customize the gradient stops that you added as follows:Select Stop 1 from the list, and then do the following:In the Stop position box, enter0%. Click the button next to Color, and then under Theme Colorsclick White, Background 1 (first row, first option from the left).Select Stop 2 from the list, and then do the following:In the Stop position box, enter100%. Click the button next to Color, and then under Theme Colorsclick White, Background 1, Darker 15% (third row, first option from the left).On the Home tab, in the Drawing group, click Shapes, and then under Rectangles, click Rectangle (first option from the left). On the slide, drag to draw a rectangle. Select the rectangle. Under Drawing Tools, on the Format tab, in the Size group, do the following:In the Shape Height box, enter 0.33”.In the Shape Width box, enter 10”.On the Home tab, in the Drawing group, click the arrow next toShape Fill, and then under Theme Colors click White, Background 1, Darker 15% (third row, first option from the left).On the Home tab, in the Drawing group, click the arrow next toShape Outline, and then click No Outline.On the Home tab, in the Drawing group, click Shapes, and then under Basic Shapes, click Right Triangle (first row, fourth option from the left).On the slide, drag to draw a triangle. Select the triangle. Under Drawing Tools, on the Format tab, in the Size group, do the following:In the Shape Height box, enter 1.33”.In the Shape Width box, enter 10”.On the Home tab, in the Drawing group, click the arrow next toShape Fill, and then click White, Background 1, Darker 15% (third row, first option from the left).On the Home tab, in the Drawing group, click the arrow next toShape Outline, and then click No Outline. Position the rectangle and the triangle so that the bottom edge of the triangle and the top edge of the rectangle are touching. Press and hold SHIFT and select both the rectangle and the triangle.On the Home tab, in the Drawing group, click Arrange, and then do the following:Under Group Objects,click Group.Point to Align, and then click Align Center.Point to Align, and then click Align Bottom.On the Home tab, in the Clipboard group, click the arrow under Paste, and then click Duplicate.Under Drawing Tools, on the Format tab, in the Arrange group, click the arrow next to Rotate, and then click More Rotation Options.In the Size and Position dialog box, on the Size tab, under Size and rotate, in the Rotation box, enter 180°.On the Home tab, in the Drawing group, click Arrange, point to Align, and then do the following:Click Align Center.Click Align Top.On the Home tab, in the Drawing group, click the arrow next toShape Fill, and then under Theme Colors click White, Background 1 (first row, first option from the left). To reproduce the other rectangles with text effects on this slide, do the following:Press and hold SHIFT and select the originaltext box and rectangle.On the Home tab, in the Drawing group, click Arrange, and then under Group Objects click Group.On the Home tab, in the Clipboard group, click the arrow under Paste, and then click Duplicate. Repeat this step until you have a total of five groups of shapes.On the Home tab, in the Editing group, click Select, and then click Selection Pane. In the Selection and Visibility pane, select each of the groups and drag on the slide to form a series of steps. Also in the Selection and Visibility pane, press and hold CTRL and select all five groups of rectangles and text boxes. On the Home tab, in the Drawing group, click Arrange, point to Align, and then click Distribute Horizontally.On the Home tab, in the Drawing group, click Arrange, point to Align, and then click Distribute Vertically. To change the text on the duplicate rectangles, click in each text box and edit the text.
- 3-D block with texture and engraved text(Advanced)To reproduce the shape effects on this slide, do the following:On the Home tab, in theSlides group, click Layout, and then click Blank.On the Home tab, in the Drawing group, click Shapes, and then under Rectangles, click Rectangle (first option from the left). On the slide, drag to draw a rectangle.Under Drawing Tools, on the Format tab, in the Size group, do the following:In the Shape Height box, enter 3”.In the Shape Width box, enter 3”.On the Home tab, in the bottom right corner of the Drawing group, click the Format Shape dialog box launcher. In the Format Shape dialog box, click Fill in the left pane, and then select Picture or texture fill. Click the button next to Texture, and then click Oak(fifth row, third option from the left).Also in the Format Shape dialog box, click Line Color in the left pane, and then select No line. Also in the Format Shape dialog box, click 3-D Rotation in the left pane, and then do the following:Click the button next to Presets, and then under Perspective click Perspective Left (first row, second option from the left).In the X box, enter 40°.In the Y box, enter 10°.In the Perspective box, enter 20°.Also in the Format Shape dialog box, click 3-D Format in the left pane, and then do the following in the right pane:Under Bevel, click the button next to Top, and then under Bevel click Circle (first row, first option from the left). Click the button next to Bottom, and then under Bevel click Circle (first row, first option from the left). Under Depth, in the Depth box, enter 200 pt. Under Surface, click the button next to Material, and then under Standard click Warm Matte (second option from the left). Click the button next to Lighting, and then under Neutral click Soft (first row, third option from the left). In the Angle box, enter 270°.Also in the Format Shape dialog box, click Shadow in the left pane. In the right pane, click the button next to Presets, and then under Perspective click Perspective Diagonal Upper Right (first row, second option from the left). To reproduce the text effects on this slide, do the following:On the slide, right-click the rounded rectangle, click Edit Text, then enter text. Select the text. On the Home tab, in the Font group, select Arial Rounded MT Bold from the Font list, and then select 36 from the Font Size list.On the Home tab, in the Paragraph group, click Center to center the text within the rectangle.Under Drawing Tools, on the Format tab, in the bottom right corner of the WordArt Styles group, click the Format Text Effects dialog box launcher. In the Format Text Effects dialog box, click Text Fill in the left pane, and then do the following in the right pane:Select Solid fill. Click the button next to Color, click More Colors, and then in the Colors dialog box, on the Custom tab, enter values for Red: 130, Green: 101, and Blue: 58.Also in the Format Text Effects dialog box, click Shadow in the left pane, and then do the following:Click the button next to Presets, and then under Inner click Inside Diagonal Top Left (first row, first option from the left).In the Transparency box, enter 25%.In the Distance box, enter 5 pt. To reproduce the background effects on this slide, do the following:Right-click the slide background area, and then clickFormat Background.In the Format Background dialog box, click Fill in the left pane, select Gradient fill in the right pane, and then do the following:In the Type list, select Linear.Click the button next to Direction, and then clickLinear Down (first row, second option from the left).Under Gradient stops, click Add or Remove until four stops appear in the drop-down list.Also under Gradient stops, customize the gradient stops that you added as follows:Select Stop 1 from the list, and then do the following:In the Stop position box, enter0%.Click the button next to Color, click More Colors, and then in the Colors dialog box, on the Custom tab, enter values for Red: 196, Green: 178, and Blue: 152.Select Stop 2 from the list, and then do the following:In the Stop position box, enter45%.Click the button next to Color, and then under Theme Colorsclick Tan, Background 2, Darker 90% (sixth row, third option from the left).Select Stop 3 from the list, and then do the following:In the Stop position box, enter72%.Click the button next to Color, click More Colors, and then in the Colors dialog box, on the Custom tab, enter values for Red: 66, Green: 62, and Blue: 50.Select Stop 4 from the list, and then do the following:In the Stop position box, enter100%.Click the button next to Color, click More Colors, and then in the Colors dialog box, on the Custom tab, enter values for Red: 149, Green: 128, and Blue: 107.
- 3-D hexagon with 3-D text(Advanced)To reproduce the shape effects on this slide, do the following:On the Home tab, in theSlides group, click Layout, and then click Blank.On the Home tab, in the Drawing group, click Shapes, and then under Basic Shapes click Hexagon (first row, ninth option from the left).Press and hold SHIFT, and then on the slide, drag to draw a hexagon.Select the hexagon. On the Home tab, in the bottom right corner of the Drawing group, click the Format Shape dialog box launcher. In the Format Shape dialog box, click Fill in the left pane. In the Fill pane, select Gradient fill, and then do the following:Click the button next to Preset Colors, and then click Fog (second row, fifth option from the left).In the Type list, select Linear.Click the button next to Direction, and then click Linear Down (first row, second option from the left).Also in the Format Shape dialog box, click Line Color in the left pane. In the Line Color pane, select No line. Also in the Format Shape dialog box, click 3-D Format in the left pane. In the 3-D Format pane, do the following:Under Bevel, click the button next to Top, and then under Bevel click Angle (second row, first option from the left). Next to Top, in the Width box, enter 6 pt, and in the Height box, enter 6 pt. Click the button next to Bottom, and then under Bevel click Angle (second row, first option from the left). Next to Bottom, in the Width box, enter 6 pt, and in the Height box, enter 6 pt. Under Depth, in the Depth box, enter 23.5 pt.Under Surface, click the button next to Material, and then under Translucent click Clear (third option from the left). Click the button next to Lighting, and then under Neutral click Balance (first row, second option from the left). In the Angle box, enter 340°.Also in the Format Shape dialog box, click 3-D Rotation in the left pane. In the 3-D Rotation pane, do the following:Click the button next to Presets, and then under Perspective, click Perspective Relaxed (second row, third option from the left).In the X box, enter 333°.In the Y box, enter 300°. In the Z box, enter 25.5°. In the Perspective box, enter 70°.Select the hexagon. On the Home tab, in the Drawing group, click Shape Effects, point to Glow, and then do the following:Click any of the options in the second row (8 pt glow options).Point to More Glow Colors, and then under Theme Colors click White, Background 1, Darker 35% (fifth row, first option from the left).To reproduce the text effects on this slide, do the following:On the Insert tab, in the Text group, click Text Box, and then on the slide, drag to draw the text box. Enter text in the text box, select the text, and then on the Home tab, in the Font group, select Arial from the Font list, select 60 from the Font Size list, click the arrow next to Font Color, and then under Theme Colors click Black, Text 1, Lighter 50% (second row, second option from the left).On the Home tab, in the Paragraph group, click Center to center the text in the text box.Select the text box. Under Drawing Tools, on the Format tab, in the bottom right corner of the WordArt Styles group, click the Format Text Effects dialog box launcher. In the Format Text Effects dialog box, click Text Fill in the left pane. In the Text Fill pane, do the following:Click Solid fill.Click the button next to Color,and then under Theme Colors click Blue, Accent 1, Darker 25% (fifth row, fifth option from the left). Also in the Format Text Effects dialog box, click 3-D Format in the left pane. In the rightpane, do the following:Under Depth, in the Depth box, enter 7 pt. Under Surface, click the button next to Material, and then under Standard click Warm Matte (second option from the left). Click the button next to Lighting, and then under Special click Glow (third option from the left).Also in the Format Text Effects dialog box, click 3-D Rotation, and then do the following:Click the button next to Presets, and then under Perspective click Perspective Heroic Extreme Right (third row, third option from the left).In the X box, enter340°.In the Y box, enter 10°.In the Z box, enter 0°.In the Perspective box, enter 90°.On the slide, drag the text box on top of the hexagon.Press and hold CTRL and select the hexagon and the text box. On the Home tab, in the Drawing group, click the arrow under Arrange, point to Align, and then do the following:Click Align Selected Objects.Click Align Center.Click Align Middle. To reproduce the background effects on this slide, do the following: Right-click the slide background area, and then click Format Background. In the Format Background dialog box, click Fill in the left pane, select Gradient fill in the Fill pane, and then do the following:In the Type list, select Linear.Click the button next to Direction, and then click Linear Down (second option from the left).Under Gradient stops, click Add or Remove until two stops appear in the drop-down list.Also under Gradient stops, customize the gradient stops that you added as follows:Select Stop 1 from the list, and then do the following:In the Stop position box, enter 46%.Click the button next to Color, and then click White, Background 1 (first row, first option from the left).Select Stop 2 from the list, and then do the following:In the Stop position box, enter 100%.Click the button next to Color, and then click Blue, Accent 1, Lighter 60%(third row, fifth option from the left).
- Custom animation effects: open book (Difficult)Tip: You will need to use drawing guides and the ruler to position the objects on this slide. To display the drawing guides and the ruler, do the following:On the Home tab, in the Slides group, click Layout, and then click Blank.Right-click the slide background area, and then click Grid and Guides.In the Grid and Guides dialog box, underGuidesettings, select Display drawing guides on screen. (Note: One horizontal and one vertical guide will display on the slide at 0.00, the default position. The spine of the book will be aligned to the vertical drawing guide.) On the View tab, in the Show/Hide group, select Ruler. To reproduce thefirst shape in the Book cover group on this slide, do the following:On the Home tab, in the Drawing group, click Shapes, and then under Rectangles click Rounded Rectangle (second option from the left). On the slide, drag to draw a rounded rectangle.Select the rounded rectangle. Under Drawing Tools, on the Format tab, in the Size group, do the following:In the Shape Height box, enter 4.5”.In the Shape Width box, enter 3.33”.On the rounded rectangle, drag the yellow diamond adjustment handle to the left to decrease the amount of rounding on the corners.On the Home tab, in the bottom right corner of the Drawing group, click the Format Shape dialog box launcher. In the FormatShape dialog box, click Fill in the left pane, select Gradientfill in the Fill pane, and then do the following: In the Type list, select Linear.Click the button next to Direction, and then click Linear Right (first row, fourth option from the left).In the Angle box, enter 0°. Under Gradient stops, click Add or Remove until two stops appear in the drop-down list. Also under Gradient stops, customize the gradient stops that you added as follows:Select Stop 1 from the list, and then do the following:In the Stop position box, enter 0%.Click the button next to Color, and then under Theme Colors click Red, Accent 2, Darker 50% (sixth row, sixth option from the left).Select Stop 2 from the list, and then do the following: In the Stop position box, enter 100%.Click the button next to Color, and then under Theme Colors click Red, Accent 2, Darker 25%(fifth row, sixth option from the left).Also in the FormatShape dialog box, click LineColor in the left pane. In the LineColor pane, select Noline.Also in the FormatShape dialog box, click 3-DFormat in the left pane, and then in the 3-DFormat pane, do the following:Under Bevel, click the button next to Top, and then under Bevel click Circle (first row, first option from the left). Next to Top, in the Width box, enter 4 pt, and in the Height box, enter 4 pt.Under Surface, click the button next to Material, and then under Standard click WarmMatte (second option from the left).Also under Surface, click the button next to Lighting, and then under Neutral, click ThreePoint (first row, first option from the left).On the slide, drag the rounded rectangle until the left edge is against thevertical drawing guide.On the Home tab, in the Drawing group, click Arrange, point to Align, and then do the following:Click Align to Slide.Click Align Middle.To reproduce thesecond shape in the Book cover group on this slide, do the following:On the Home tab, in the Clipboard group, click the arrow under Paste, and then clickDuplicate.On the slide, drag the duplicate rectangle untilthe left edge is against the vertical drawing guide.On the Home tab, in the Drawing group, click Arrange, point to Align, and then do the following:ClickAlign to Slide. Click Align Middle.Under Drawing Tools, on the Format tab, in the Size group, in the Shape Width box, enter 0.73”.On the Home tab, in the bottom right corner of the Drawing group, click the Format Shape dialog box launcher. In the FormatShape dialog box, click Fill in the left pane, select Gradientfill in the Fill pane, and then do the following: In the Type list, select Linear.Click the button next to Direction, and then click Linear Left (first row, fifth option from the left).In the Angle box, enter 180°.Under Gradient stops, click Add or Remove until two stops appear in the drop-down list. Also under Gradient stops, customize the gradient stops that you added as follows:Select Stop 1 from the list, and then do the following:In the Stop position box, enter 0%.Click the button next to Color, and then under Theme Colors clickBlack, Text 1(first row, second option from the left).In the Transparency box, enter 50%.Select Stop 2 from the list, and then do the following: In the Stop position box, enter 100%.Click the button next to Color, and then under Theme Colors clickBlack, Text 1 (first row, second option from the left).In the Transparency box, enter 100%.Also in the FormatShape dialog box, click 3-DFormat in the left pane. In the 3-D Format pane, under Bevel, click the button next to Top, and then under NoBevel click None.To reproduce thethird shape (first small rectangle on the book spine) in the Book cover group on this slide, do the following:Select the first, larger rectangle on the slide. On the Home tab, in the Clipboard group, click the arrow under Paste, and then click Duplicate.Select the third, duplicate rectangle.Under Drawing tools, on the Format tab, in the Size group, do the following:In the Shape Height box, enter 0.08”. In the Shape Width box, enter 0.73”.On the Home tab, in the bottom right corner of the Drawing group, click the Format Shape dialog box launcher. In the FormatShape dialog box, click Fill in the left pane, select Gradientfill in the Fill pane, and then do the following: In the Type list, select Linear.Click the button next to Direction, and then click Linear Diagonal (first row, third option from the left).In the Angle box, enter 135°.Also in the FormatShape dialog box, click 3-DFormat in the left pane, and then in the 3-D Format pane, do the following:Under Bevel, next to Top, in the Width box, enter 3 pt, and in the Height box, enter 3 pt.Under Surface, click the button next to Lighting, and then under Neutral click Soft (first row, third option from the left).To reproduce therest of the shapes (other small rectangles on the book spine) in the Book cover group on this slide, do the following:Select the third, smaller rectangle.On the Home tab, in the Clipboard group, click the arrow under Paste, and then click Duplicate. Repeat this process for a total of four thin, rounded rectangles. To position the four thin, rounded rectangles on the book spine, do the following:Drag the first rectangle 1.75” above the horizontal drawing guide, with the left edge touching the vertical drawing guide.Drag the second rectangle 0.75” above the horizontal drawing guide, with the left edge touching the vertical drawing guide.Drag the third rectangle 0.75” below the horizontal drawing guide, with the left edge touching the vertical drawing guide.Drag the fourth rectangle 1.75” below the horizontal drawing guide, with the left edge touching the vertical drawing guide.On the Home tab, in the Editing group, click Select, and then click SelectAll.On the Home tab, in the Drawing group, click Arrange, and then click Group.On the Home tab, in the Editing group, click Select, and then click Selection Pane.On the Selection and Visibility pane, double-click the group to edit the name, and then enter Book cover. To reproduce the first shape in the Inside-left pagesgroup on this slide, do the following:On the Home tab, in the Drawing group, click Shapes, and then under Rectangles click Rounded Rectangle (second option from the left). On the slide, drag to draw a rounded rectangle.Under Drawing Tools, on the Format tab, in the Size group, do the following:In the Shape Height box, enter 4.5”.In the Shape Width box, enter 3.33”.On the rounded rectangle, drag the yellow diamond adjustment handle to the left to decrease the amount of rounding on the corners. On the Home tab, in the bottom right corner of the Drawing group, click the Format Shape dialog box launcher. In the FormatShape dialog box, click Fill in the left pane, select Gradientfill in the Fill pane, and then do the following: In the Type list, select Linear.Click the button next to Direction, and then click Linear Left (first row, fifth option from the left).In the Angle box, enter 180°. Under Gradient stops, click Add or Remove until two stops appear in the drop-down list. Also under Gradient stops, customize the gradient stops that you added as follows:Select Stop 1 from the list, and then do the following:In the Stop position box, enter 0%.Click the button next to Color, and then under Theme Colors click Red, Accent 2, Darker 50% (sixth row, sixth option from the left).Select Stop 2 from the list, and then do the following: In the Stop position box, enter 100%.Click the button next to Color, and then under Theme Colors click Red Accent 2, Darker 25% (fifth row, sixth option from the left).Also in the FormatShape dialog box, click LineColor in the left pane. In the LineColor pane, select No line.On the slide, drag the rectangle until the right edge is against the vertical guideline.On the Home, tab, in the Drawing group, click Arrange, point to Align, and then do the following:Click Align to Slide.Click Align Middle.To reproduce the second shape in the Inside-left pages group on this slide, do the following:On the Home tab,in the Drawing group, click Shapes, and then under Rectangles click Rectangle (first option from the left). On the slide, drag to draw a rectangle. Under Drawing Tools, on the Format tab, in the Size group, do the following:In the Shape Height box, enter 4.33”.In the Shape Width box, enter 3.15”.On the Home tab, in the bottom right corner of the Drawing group, click the Format Shape dialog box launcher. In the FormatShape dialog box, click Fill in the left pane, select Gradientfill in the Fill pane, and then do the following: In the Type list, select Linear.Click the button next to Direction, and then click Linear Left (first row, fifth option from the left).In the Angle box, enter 180°. Under Gradient stops, click Add or Remove until five stops appear in the drop-down list. Also under Gradient stops, customize the gradient stops that you added as follows:Select Stop 1 from the list, and then do the following:In the Stop position box, enter 0%.Click the button next to Color, and then under ThemeColors click White, Background 1, Darker 35% (fifth row, first option from the left).Select Stop 2 from the list, and then do the following: In the Stop position box, enter 5%.Click the button next to Color, and then under ThemeColors click White, Background 1 (first row, first option from the left).Select Stop 3 from the list, and then do the following: In the Stop position box, enter 18%.Click the button next to Color, and then under ThemeColors click White, Background 1, Darker 5% (second row, first option from the left).Select Stop 4 from the list, and then do the following: In the Stop position box, enter 38%.Click the button next to Color, and then under ThemeColors click White, Background 1 (first row, first option from the left).Select Stop 5 from the list, and then do the following: In the Stop position box, enter 93%.Click the button next to Color, and then under ThemeColors click White, Background 1 (first row, first option from the left).Also in the FormatShape dialog box, click LineColor in the left pane. In the LineColor pane, select Noline.Also in the FormatShape dialog box, click Shadow in the left pane. In the Shadow pane, click the button next to Presets, under Outer click OffsetRight (second row, first option from the left), and then do the following:In the Transparency box, enter 60%.In the Size box, enter 100%.In the Blur box, enter 4 pt.In the Angle box, enter 0°.In the Distance box, enter 3 pt.On the slide, drag the rectangle until the right edge touches the vertical drawing guide.On the Home tab, in the Drawing group, click Arrange, point to Align, and then do the following:Click Align to Slide.Click Align Middle.Press and hold CTRL, and then in the Selection and Visibility pane, select the rectangle and the rounded rectangle to the left of the vertical drawing guide.On the Home tab, in the Drawing group, click Arrange, and then click Group.In the Selection and Visibility pane, double-click the new group to edit the name, and then enter Inside-left pages.To reproduce the first shape in the Inside-right pages with text group, do the following:In the SelectionandVisibility pane, select the Inside-left pages group. On the Home tab, in the Clipboard group, click the arrow under Paste, and then click Duplicate.On the Home tab, in the Drawing group, click Arrange, point to Rotate, and then click MoreRotationOptions. In the Size and Position dialog box, on the Size tab, under Size and rotation, in the Rotation box, enter 180°.In the Selection and Visibility pane, double-click the new group to edit the name, and then enter Inside-right pages.On the slide, drag the rectangle until the left edge is against the vertical drawing guide.On the Home, tab, in the Drawing group, click Arrange, point to Align, and then do the following:ClickAlign to Slide.ClickAlign Middle. To reproduce the text effects in the Inside-right pages with text group, do the following:On the Insert tab, in the Text group, click Text Box, and then on the slide, drag to draw a text box. Enter text in the text box, and then select the text. (Note: To reproduce the example above, enter Introduction.) On the Home tab, in the Font group, do the following:In the Font list, select Vivaldi.In the Font Size list, select 18.On the Home tab, in the Paragraph group, click Center to center the text in the text box.On the slide, drag the text box until the left edge of the text is 1” to the right of the vertical drawing guide and the bottom edge of the text is 0.5” above the horizontal drawing guide. To reproduce the page edges in the Inside-right pages with text group, do the following:On the Home tab, in the Drawing group, click Shapes, and then under Lines click Line (first option from the left). On the slide, press and hold SHIFT, and then drag to draw a straight, vertical line.Select the line.Under Drawing Tools, on the Format tab, in the Size group, in the Shape Width box, enter 4.32”.Under Drawing Tools, on the Format tab, in the Shape Styles group, click the arrow next to Shape Outline, and then under ThemeColors click White, Background 1, Darker 15% (third row, first option from the left).On the Home tab, in the Clipboard group, click the arrow under Paste, and then click Duplicate. Repeat this process for a total of six lines.On the slide, drag the six lines until they are bunched together in a dense group, no wider than 0.5”. In the Selection and Visibilitypane, press and hold CTRL, and then select all six straight connectors (lines).On the Home tab, in the Drawing group, click Arrange, point to Align, and then do the following:Point to Align, and then clickAlign Selected Objects. Point to Align, and then clickDistribute Horizontally. Point to Align, and then click Align Middle.Click Group.On the slide, drag the group of lines until the right edge of the group of lines is touching the right edge of the white rectangle to the right of the vertical drawing guide.On the Home tab, in the Drawing group, click Arrange, point to Align, and then do the following:Click Align to Slide.Click Align Middle.In the Selection and Visibility pane, press and hold CTRL, and then select the group of lines, the text box, and the Inside-right pages group.On the Home tab, in the Drawing group, click the arrow under Arrange, and then click Group.In the Selection and Visibilitypane, double-click the new group to edit the name, and then enter Inside-right pages with text.To reproduce the animation effects on this slide, do the following:In the Selection and Visibility pane, select the Book cover group. On the Home tab, in the Drawing group, click Arrange, and then click Bring to Front.In the Selection and Visibility pane, select the Inside-left pages group. On the Home tab, in the Drawing group, click Arrange, and then click BringForward.On the Animations tab, in the Animations group, click CustomAnimation.In the Selection and Visibility pane, select the Book cover group. In the CustomAnimation task pane, do the following:Click AddEffect, point to Exit, and then click MoreEffects. In the AddExitEffect dialog box, under Moderate, click Collapse.Select the animation effect, and then under Modify: Collapse,do the following:In the Start list, select WithPrevious.In the Direction list, select ToLeft.In the Speed list, select Fast.In the Selection and Visibility pane, select the Inside-left pages group. In the CustomAnimation task pane, do the following:Click AddEffect, point to Entrance, and then click MoreEffects. In the AddEntranceEffect dialog box, under Moderate, click Stretch.Select the second animation effect, and then under Modify: Stretch,do the following:In the Start list, select AfterPrevious.In the Direction list, select FromRight.In the Speed list, select Fast. To reproduce the background effects on this slide, do the following:Right-click the slide background area, and then click Format Background. In the Format Background dialog box, click Fill in the left pane, select Gradient fill in the Fill pane, and then do the following:In the Type list, select Linear.Click the button next to Direction, and then click Linear Down (first row, second option from the left).Under Gradient stops, click Add or Remove until two stops appear in the drop-down list.Also under Gradient stops, customize the gradient stops that you added as follows:Select Stop 1 from the list, and then do the following:In the Stop position box, enter 63%.Click the button next to Color, and then under Theme Colors click Black, Text 1 (first row, second option from the left).Select Stop 2 from the list, and then do the following: In the Stop position box, enter 100%.Click the button next to Color list, and then under Theme Colors clickBlack, Text 1, Lighter 50% (second row, second option from the left).
- Custom animation effects: page turns in open book(Difficult)Tip: You will need to use drawing guides and the ruler to position the objects on this slide. For instructions on animating an opening book cover, refer to the previous slide (Custom animation effects: open book) for instructions.To display the drawing guides and the ruler, do the following:On the Home tab, in the Slides group, click Layout, and then click Blank.Right-click the slide background area, and then click Grid and Guides.In the Grid and Guides dialog box, underGuidesettings, select Display drawing guides on screen. (Note: One horizontal and one vertical guide will display on the slide at 0.00, the default position. The spine of the book will be aligned to the vertical drawing guide.) On the View tab, in the Show/Hide group, select Ruler. To reproduce the first shape in the Inside-left page 1 group on this slide, do the following:On the Home tab, in the Drawing group, click Shapes, and then under Rectangles, click Rounded Rectangle (second option from the left). On the slide, drag to draw a rounded rectangle.Select the rounded rectangle. Under Drawing Tools, on the Format tab, in the Size group, do the following:In the Shape Height box, enter 4.5”.In the Shape Width box, enter 3.33”.On the rounded rectangle, drag the yellow diamond adjustment handle to the left to reduce the amount of rounding on the corners.On the Home tab, in the bottom right corner of theDrawing group, click the Format Shape dialog box launcher. In the FormatShape dialog box, click Fill in the left pane, select Gradientfill in the Fill pane, and then do the following:In the Type list, select Linear.Click the button next to Direction, and then click Linear Left (first row, fifth option from the left).In the Angle box, enter 180°.Under Gradient stops, click Add or Remove until two stops appear in the drop-down list. Also under Gradient stops, customize the gradient stops that you added as follows:Select Stop 1 from the list, and then do the following:In the Stop position box, enter 0%.Click the button next to Color, and then under Theme Colors click Red, Accent 2, Darker 50% (sixth row, sixth option from the left).Select Stop 2 from the list, and then do the following: In the Stop position box, enter 100%.Click the button next to Color, and then under Theme Colors clickRed Accent 2, Darker 25% (fifth row, sixth option from the left).Also in the FormatShape dialog box, click LineColor in the left pane. In the LineColor pane, select Noline. On the slide, drag the rectangle until the right edge is against the vertical drawing guide.On the Home, tab, in the Drawing group, click the arrow under Arrange, point to Align, and then do the following:Click Align to Slide.Click Align Middle.To reproduce the second shape in the Inside-left page 1 group on this slide, do the following:On the Home tab,in the Drawing group, click Shapes, and then under Rectangles click Rectangle (first option from the left).On the slide, drag to draw a rectangle.Select the rectangle. Under Drawing Tools, on the Format tab, in the Size group, do the following:In the Shape Height box, enter 4.33”.In the Shape Width box, enter 3.15”.On the Home tab, in the bottom right corner of theDrawing group, click the Format Shape dialog box launcher. In the FormatShape dialog box, click Fill in the left pane, select Gradientfill in the Fill pane, and then do the following:In the Type list, select Linear.Click the button next to Direction, and then click Linear Left (first row, fifth option from the left).In the Angle box, enter 180°.Under Gradient stops, click Add or Remove until five stops appear in the drop-down list. Also under Gradient stops, customize the gradient stops that you added as follows:Select Stop 1 from the list, and then do the following:In the Stop position box, enter 0%.Click the button next to Color, and then under Theme Colors click White, Background 1, Darker 35% (fifth row, the first option from the left).Select Stop 2 from the list, and then do the following: In the Stop position box, enter 5%.Click the button next to Color, and then under Theme Colors click White, Background 1 (first row, first option from the left).Select Stop 3 from the list, and then do the following: In the Stop position box, enter 18%.Click the button next to Color, and then under Theme Colors click White, Background 1, Darker 5% (second row, first option from the left).Select Stop 4 from the list, and then do the following: In the Stop position box, enter 38%.Click the button next to Color, and then under Theme Colors click White, Background 1 (first row, first option from the left).Select Stop 5 from the list, and then do the following: In the Stop position box, enter 93%.Click the button next to Color, and then under Theme Colors click White, Background 1 (first row, first option from the left).Also in the FormatShape dialog box, click LineColor in the left pane. In the LineColor pane, select Noline.Also in the FormatShape dialog box, click Shadow in the left pane. In the Shadow pane, click the button next toPresets, under Outer click OffsetRight (second row, first option from the left), and then do the following:In the Transparency box, enter 60%.In the Size box, enter 100%.In the Blur box, enter 4 pt.In the Angle box, enter 0°.In the Distance box, enter 3 pt.On the slide, drag the rectangle until the right edge is against the vertical drawing guide. On the Home tab, in the Drawing group, click Arrange, point to Align, and then do the following:Click Align to Slide.Click Align Middle.On the Home tab, in the Editing group, click Select and then click SelectAll.On the Home tab, in the Drawing group, click Arrange, and then click Group.On the Home tab, in the Editing group, click Select, and then click Selection Pane. In the Selection and Visibility pane, double-click the group to edit the name, and then enter Inside-left page 1. To reproduce the first shape in the Inside-right page 3group on this slide, do the following:On the SelectionandVisibility pane, select the Inside-left page 1group.On the Home tab, in the Clipboard group, click the arrow under Paste, and then click Duplicate.On the Home tab, in the Drawing group, click Arrange, point to Rotate, and then click MoreRotationOptions. In the SizeandPosition dialog box, on the Size tab, under Sizeandrotation, in the Rotation box, enter 180°.On the Selection and Visibility pane, double-click the duplicate group to edit the name, and then enter Inside-right.On the slide, drag theInside-right group until the left edge is against the vertical drawing guide.On the Home tab, in the Drawing group, click Arrange, point to Align, and then do the following:Click Align to Slide.Click Align Middle.To reproduce the text box in the Inside-right page 3group on this slide, do the following:On the Insert tab, in the Text group, click Text Box. On the slide, drag to draw the text box. Enter text in the text box, and then select the text. On the Home tab, in the Font group, do the following:In the Font list, select Bodoni MT Condensed.In the Font Size list, select 16.Drag the text box onto the right-side page to the right of the vertical drawing guide. If the text is wider than the page, drag the adjustment handles on the text box to decrease the width, and then repeat the previous step to reposition. To reproduce the page edges in the Inside-right page 3group on this slide, do the following:On the Home tab, in the Drawing group, click Shapes, and then under Lines click Line (first option from the left). On the slide, press and hold SHIFT, and then drag to draw a straight, vertical line.Select the vertical line.Under Drawing Tools, on the Format tab, in the Size group, in the Shape Width box, enter 4.32”.Under Drawing Tools, on the Format tab, in the Shape Styles group, click the arrow to the right of Shape Outline, and then under Theme Colors click White, Background 1, Darker 15% (third row, first option from the left).On the Home tab, in the Clipboard group, click the arrow under Paste, and then click Duplicate. Repeat this process until there is a total of six lines.On the slide, drag the lines until they are bunched together in a dense group, no wider than 0.5”. In the Selection and Visibility pane, press and hold CTRL, and then select the six straight connectors (lines).On the Home tab, in the Drawing group, click Arrange, andthen do the following:Point to Align, and then click Align Selected Objects. Point to Align, and then click Distribute Horizontally.Point to Align, and then click Align Middle.Click Group. On the slide, drag the group of lines until the right edge is touching the right edge of the white rectangle to the right of the vertical drawing guide.On the Home tab, in the Drawing group, click Arrange, point to Align, and then do the following:Click Align to Slide.Click Align Middle.In the Selection and Visibility pane, press and hold CTRL, and then select the group of lines, the text box, and the Inside-right group.On the Home tab, in the Drawing group, click Arrange, and then click Group.In the Selection and Visibility pane, double-click the new group to edit the name, and then enter Inside-right page 3.To reproduce the first shape in the Inside-left page 2group on this slide, do the following: On the Home tab,in the Drawing group, click Shapes, and then under Rectangles click Rectangle (first option from the left).On the slide, drag to draw a rectangle.Under Drawing Tools, on the Format tab, in the Size group, do the following:In the Shape Height box, enter 4.33”.In the Shape Width box, enter 3.15”.On the Home tab, in the bottom right corner of theDrawing group, click the Format Shape dialog box launcher. In the FormatShape dialog box, click Fill in the left pane, select Gradientfill in the Fill pane, and then do the following:In the Type list, select Linear.Click the button next to Direction, and then click Linear Left (first row, fifth option from the left).In the Angle box, enter 180°.Under Gradient stops, click Add or Remove until five stops appear in the drop-down list. Also under Gradient stops, customize the gradient stops that you added as follows:Select Stop 1 from the list, and then do the following:In the Stop position box, enter 0%.Click the button next to Color, and then under Theme Colors clickWhite, Background 1, Darker 35% (fifth row, first option from the left).Select Stop 2 from the list, and then do the following: In the Stop position box, enter 5%.Click the button next to Color, and then under Theme Colors clickWhite, Background 1 (first row, first option from the left).Select Stop 3 from the list, and then do the following: In the Stop position box, enter 18%.Click the button next to Color, and then under Theme Colors clickWhite, Background 1, Darker 5% (second row, first option from the left).Select Stop 4 from the list, and then do the following: In the Stop position box, enter 38%.Click the button next to Color, and then under Theme Colors clickWhite, Background 1 (first row, first option from the left).Select Stop 5 from the list, and then do the following: In the Stop position box, enter 93%.Click the button next to Color, and then under Theme Colors clickWhite, Background 1 (first row, first option from the left).Also in the FormatShape dialog box, click LineColor in the left pane. In the LineColor pane, select Noline.Also in the FormatShape dialog box, click Shadow in the left pane. In the Shadow pane, click the button next to Presets, under Outer click OffsetRight (second row, first option from the left), and then do the following:In the Transparency box, enter 60%.In the Size box, enter 100%.In the Blur box, enter 4 pt.In the Angle box, enter 0°.In the Distance box, enter 3 pt.On the slide, drag the rectangle until the right edge is against the vertical drawing guide.On the Home tab, in the Drawing group, click the arrow under Arrange, point to Align, and then do the following:Click Align to Slide.Click Align Middle.To reproduce the page edge in the Inside-left page 2group on this slide, do the following: On the Home tab, in the Drawing group, click Shapes, and then under Lines click Line (first option from the left). On the slide, press and hold SHIFT, and then drag to draw a straight, vertical line.Select the vertical line.Under Drawing Tools, on the Format tab, in the Size group, in the Shape Width box, enter 4.32”.Under Drawing Tools, on the Format tab, in the Shape Styles group, click the arrow next to Shape Outline, and then under Theme Colors click White, Background 1, Darker 15% (third row, first option from the left).On the slide, drag the line near the edge of the left-side page (white rectangle to the left of the vertical drawing guide). On the Home tab, in the Drawing group, click Arrange, point to Align, and then do the following:Click Align to Slide.Click Align Middle.In the Selection and Visibility pane, press and hold CTRL, and then select the rectangle and the straight connector (line).On the Home tab, in the Drawing group, click the arrow under Arrange, and then click Group.In the Selection and Visibility pane, double-click the new group to edit the name, and then enter Inside-left page 2.To reproduce the first shape in the Inside-right page 2group on this slide, do the following: In the Selection and Visibility pane, select the Inside-left page 2 group.On the Home tab, in the Clipboard group, click the arrow under Paste, and then clickDuplicate.With the duplicate group still selected, on the Home tab, in the Drawing group, click Arrange, point to Rotate, and then click More Rotation Options. In the Size and Position dialog box, on the Size tab, under Size and rotation, in the Rotation box, enter 180°.In the Selection and Visibility pane, double-click the duplicate group to edit the name, and then enter Inside-right.In the Selection and Visibility pane, select the new Inside-right group. On the slide, drag the selected group until the left edge is against the vertical drawing guide.On the Home, tab, in the Drawing group, click Arrange, point to Align, and then do the following:Click Align to Slide.ClickAlign Middle. On the Insert tab, in the Illustrations group, click Picture.In the InsertPicture dialog box, select a picture, and then click Insert.On the slide, select the picture. Under Picture Tools, on the Format tab, in the bottom right corner of the Size group, click the Sizeand Position dialog box launcher. Select the picture. Under Picture Tools, on the Format tab, in the bottom right corner of the Size group, click the Size and Position dialog box launcher. In the Size and Position dialog box, on the Size tab, resize or crop the picture as needed so that under Size and rotate, the Height box is set to 1.4” and the Width box is set to 2.1”. Resize the picture under Size and rotate by entering values into the Height and Width boxes. Crop the picture under Crop from by entering values into the Left, Right, Top, and Bottom boxes. On the slide, drag the picture until the left edge is 0.5” to the right of the vertical drawing guide and the bottom edge is 0.5” above the horizontal drawing guide.To reproduce the text boxin the Inside-right page 2group on this slide, do the following: On the Insert tab, in the Text group, click Text Box. On the slide, drag to draw the text box. Enter text in the text box, and then select the text. On the Home tab, in the Font group, do the following:In the Font list, select Bodoni MT Condensed.In the Font Size list, select 16.On the slide, drag the text box untilthe left edge of the textis 0.5” to the right of the vertical drawing guide and the top edge of the text is against the horizontal drawing guide.If the text is too wide for the page, drag the adjustment handles on the text box to adjust the width, and then repeat the previous step to reposition. To reproduce the page edgesin the Inside-right page 2group on this slide, do the following: In the Selection and Visibility pane, select the Inside-right group you just created.On the Home tab, in the Drawing group, click Arrange, and then click Ungroup.In the Selection and Visibility pane, select the straight connector (line) that you just ungrouped from the page.On the Home tab, in the Clipboard group, click the arrow under Paste, and then click Duplicate. Repeat this process for a total of six lines. On the slide, drag the six lines until they are bunched together in a dense group, no wider than 0.5”. In the Selection and Visibility pane, press and hold CTRL, and then select the six straight connectors (lines). On the Home tab, in the Drawing group, click Arrange, point to Align, and then do the following:Click Align Selected Objects.Click Distribute Horizontally.Click Align Middle. With the group of lines still selected, on the Home tab, in the Drawing group, click Arrange, and then clickGroup.On the slide, drag the group until the right edge of the group of lines is touching the right edge of the page.On the Home tab, in the Drawing group, click Arrange, point to Align, and then do the following:Click Align to Slide.Click Align Middle.In the Selection and Visibility pane, press and hold CTRL, and then select the new group of lines and the rectangle. On the Home tab, in the Drawing group, click the arrow under Arrange, and then click Group.Also in the Selection and Visibility pane, double-click the new group to edit the name, and then enter Inside-right.Also in the Selection and Visibility pane, press and hold CTRL, and then selectthe Inside-right group, the text box, and the picture.On the Home tab, in the Drawing group, click Arrange, and then click Group.In the Selection and Visibility pane, double-click the new group to edit the name, and then enter Inside-right page 2.To reproduce the first shape in the Inside-left page 3 group, do the following: In the Selection and Visibility pane, select the Inside-left page 2 group.On the Home tab, in the Clipboard group, click the arrow under Paste, and then click Duplicate. In the Selection and Visibility pane, double-click the duplicate group to edit the name, and then enter Inside-left.On the slide, drag the rectangle until the right edge is against the vertical drawing guide.On the Home, tab, in the Drawing group, click Arrange, point to Align, and then do the following:ClickAlign to Slide.Click Align Middle. To reproduce the picture in the Inside-left page 3 group, do the following: On the Insert tab, in the Illustrations group, click Picture.In the InsertPicture dialog box, select a picture, and then click Insert.On the slide, select the picture. Under Picture Tools, on the Format tab, in the bottom right corner of the Size group, click the Size and Position dialog box launcher. In the Size and Position dialog box, on the Size tab, resize or crop the picture as needed so that under Size and rotate, the Height box is set to 1.4” and the Width box is set to 2.1”. Resize the picture under Size and rotate by entering values into the Height and Width boxes. Crop the picture under Crop from by entering values into the Left, Right, Top, and Bottom boxes. On the slide, drag the picture until the left edge is 0.5” to the right of the vertical drawing guide and the top edge is 0.25” below the horizontal drawing guide.To reproduce the text box in the Inside-left page 3 group, do the following: On the Insert tab, in the Text group, click Text Box, and then on the slide, drag to draw the text box. Enter text in the text box, and then select the text. On the Home tab, in the Font group, do the following:In the Font list, select Bodoni MT Condensed.In the Font Size list, select 16.On the slide, drag the text box until the right edgeof the text is 0.5” to the left of the vertical drawing guide and the bottom edge of the text is 0.25” above the horizontal drawing guide.If the text is too wide for the page, drag the adjustment handles on the text box to decrease the width, and then repeat the previous step to reposition. To reproduce the page edges in the Inside-left page 3 group, do the following: In the Selection and Visibility pane, select the Inside-left group you just created. On the Home tab, in the Drawing group, click Arrange, and then click Ungroup.In the Selection and Visibility pane, select the straight connector (line) that you just ungrouped from the page.On the Home tab, in the Clipboard group, click the arrow under Paste, and then click Duplicate. On the slide, drag the duplicate line until it is very close to the original line. In the Selection and Visibility pane, press and hold CTRL, and then select the two straight connectors (lines). On the Home tab, in the Drawing group, click Arrange, point to Align, and then do the following:Click Align Selected Objects.Click Align Middle. With the group of lines still selected, on the Home tab, in the Drawing group, click Arrange, and then clickGroup.On the slide, drag the group until the leftedge of the group of lines is touching the left edge of the rectangle.On the Home tab, in the Drawing group, click Arrange, point to Align, and then do the following:Click Align to Slide.Click Align Middle.In the Selection and Visibility pane, press and hold CTRL, and then select the new group of lines, the rectangle, the text box, and the picture. On the Home tab, in the Drawing group, click the arrow under Arrange, and then click Group.Also in the Selection and Visibility pane, double-click the new group to edit the name, and then enter Inside-left page 3.To reproduce the first shape in the Inside-right page1group on this slide, do the following:In the Selection and Visibility pane, select the Inside-left page 2 group.On the Home tab, in the Clipboard group, click the arrow under Paste, and then click Duplicate.In the Selection and Visibility pane, double-click the new group to edit the name, and then enter Inside-right.In the Selection and Visibility pane, select the Inside-right group. On the Home tab, in the Drawing group, click Arrange, point to Rotate, and then click More Rotation Options. In the Size and Position dialog box, on the Size tab, under Size and rotation, in the Rotation box, enter 180°.On the slide, drag the group until the left edge is against the vertical drawing guide. On the Home tab, in the Drawing group, click Arrange, point to Align, and then do the following:Click Align to Slide.Click Align Middle. To reproduce the text box in the Inside-right page1group on this slide, do the following:On the Insert tab, in the Text group, click TextBox. Drag to draw a text box on the slide.Enter text in the text box (to match the example above, enter Introduction), and then select the text. On the Home tab, in the Font group, do the following:In the Font list, select Vivaldi.In the Font Size list, select 18.On the Home tab, in the Paragraph group, click Center to center the text in the text box.On the slide, drag the text box until the left edge of the text is 0.75” to the right of the vertical drawing guide and the bottom edge of the text is 0.5” above the horizontal drawing guide.If the text is too wide for the page, drag the adjustment handles on the text box to decrease the width, and then repeat the previous step to reposition. To reproduce the page edges in the Inside-right page1group on this slide, do the following:In the Selection and Visibility pane, select the Inside-right group you just created.On the Home tab, in the Drawing group, click Arrange, and then click Ungroup.In the Selection and Visibility pane, select the straight connector (line) that you just ungrouped from the page.On the Home tab, in the Clipboard group, click the arrow under Paste, and then click Duplicate. Repeat this process for a total of six lines. On the slide, drag the six lines until they are bunched together in a dense group, no wider than 0.5”. In the Selection and Visibility pane, press and hold CTRL, and then select the six straight connectors (lines). On the Home tab, in the Drawing group, click Arrange, point to Align, and then do the following:Click Align Selected Objects.Click Distribute Horizontally.Click Align Middle. With the group of lines still selected, on the Home tab, in the Drawing group, click Arrange, and then clickGroup.On the slide, drag the group until the right edge of the group of lines is touching the right edge of the page.On the Home tab, in the Drawing group, click Arrange, point to Align, and then do the following:Click Align to Slide.Click Align Middle.In the Selection and Visibility pane, press and hold CTRL, and then select the new group of lines, the rectangle, and the text box. On the Home tab, in the Drawing group, click the arrow under Arrange, and then click Group.Also in the Selection and Visibility pane, press and hold CTRL, double-click the new group to edit the name, and then enter Inside-right page 1.Right-click the slide background area, and then click Grid and Guides. In the Grid and Guides dialog box, under Guide settings, clear Display drawing guides on screen.On the View tab, in the Show/Hide group, clear Ruler.In the Selection and Visibility pane, the final arrangement of the six groups of objects should be the following (from top to bottom):Inside-right page 1Inside-left page 3Inside-right page 2 Inside-left page 2Inside-right page 3Inside-left page 1To move a group of objects up in the Selectionand Visibility pane, do the following:In the Selection and Visibility pane, select the group of objects.On the Home tab, in the Drawing group, click Arrange, and then click BringForward.To move a group of objects down in the Selectionand Visibility pane, do the following:In the Selection and Visibility pane, select the group of objects.On the Home tab, in the Drawing group, click Arrange, and then clickSend Backward.To reproduce the animation effects on this slide, do the following:On the Animations tab, in the Animations group, click CustomAnimation. In the Selection and Visibility pane, select the Inside-right page 1 group. In the CustomAnimation task pane, do the following:Click Add Effect, point to Exit, and then click MoreEffects. In the AddExitEffect dialog box, under Moderate, click Collapse.Select the first animation effect (collapse effect for the Inside-right page 1 group). Under Modify: Collapse,do the following:In the Start list, select WithPrevious. In the Direction list, select To Left.In the Speed list, select Fast. In the Selection and Visibility pane, select the Inside-left page 2 group. In the CustomAnimation task pane, do the following:Click Add Effect, point to Entrance, and then click MoreEffects. In the Add Entrance Effect dialog box, under Moderate, click Stretch.Select the second animation effect (stretch effect for the Inside-left page 2 group). Under Modify: Stretch,do the following:In the Start list, select AfterPrevious.In the Direction list, select FromRight. In the Speed list, select Fast. In the Selection and Visibility pane, select the Inside-right page 2 group. In the CustomAnimation task pane, do the following:Click Add Effect, point to Exit, and then click MoreEffects. In the AddExitEffect dialog box, under Moderate, click Collapse.Select the third animation effect (collapse effect for the Inside-right page 2 group). Under Modify: Collapse,do the following:In the Start list, select On Click.In the Direction list, select To Left.In the Speed list, select Fast. In the Selection and Visibility pane, select the Inside-left page 3 group. In the CustomAnimation task pane, do the following:Click Add Effect, point to Entrance, and then click MoreEffects. In the Add Entrance Effect dialog box, under Moderate, click Stretch.Select the fourth animation effect (stretch effect for the Inside-left page 3 group). Under Modify: Stretch,do the following:In the Start list, select AfterPrevious.In the Direction list, select FromRight. In the Speed list, select Fast. To reproduce the background effects on this slide, do the following:Right-click the slide background area, and then click Format Background. In the Format Background dialog box, click Fill in the left pane, select Gradient fill in the Fill pane, and then do the following:In the Type list, select Linear.Click the button next to Direction, and then click Linear Down (first row, second option from the left).Under Gradient stops, click Add or Remove until two stops appear in the drop-down list.Also under Gradient stops, customize the gradient stops that you added as follows:Select Stop 1 from the list, and then do the following:In the Stop position box, enter 63%.Click the button next to Color, and then under Theme Colors click Black, Text 1 (first row, second option from the left).Select Stop 2 from the list, and then do the following: In the Stop position box, enter 100%.Click the button next to Color, and then under Theme Colors clickBlack, Text 1, Lighter 50% (second row, fifth option from the left).
- Custom animation effects: tipping scales(Difficult)To reproduce the shape effects on this slide, do the following:On the Home tab, in theSlides group, click Layout, and then click Blank.On the Home tab, in the Drawing group, click Shapes, and under BasicShapes select Oval (first row, second option from the left). Press and hold SHIFT and on the slide, drag to draw a circle.Select the oval. Under DrawingTools, on the Format tab, in theSize group, do the following:In the ShapeHeight box, enter2.16”.In the ShapeWidth box, enter2.16”.With the oval still selected, on the Home tab, in the bottom right corner of the Drawing group, click the FormatShape dialog box launcher. In the FormatShape dialog box, click Fill in the left pane, and in the Fill pane, do the following:Select Solidfill.Click the button next to Color, and then under ThemeColors select White, Background 1, Darker 25% (fourth row, first option from the left).Also in the FormatShape dialog box, click LineColor in the left pane, and in the LineColor pane, click Noline.Also in the FormatShape dialog box, click 3-DFormat in the left pane, and in the 3-DFormat pane, do the following:Under Bevel, in the Top list, under Bevel, select Angle (second row, first option from the left).Next to the Top list, in the Width box, enter 5.5 pt, and in the Height box, enter 9.5 pt. Under Depth, in the Depth box, enter 3.5 pt.Also in the FormatShape dialog box, click 3-DRotation in the left pane, and in the 3-DRotation pane, under Rotation, do the following:In the X box, enter 297.8°. In the Y box, enter 298.9°. In the Z box, enter 65.2°.Also in the Format Shape dialog box, click Shadow in the left pane, and in the Shadow pane, do the following:In the Transparency box, enter 60%.In the Size box, enter 105%. In the Blur box, enter 15 pt. In the Angle box, enter 120°. In the Distance box, enter 9 pt.Drag the circle to the bottom of the slide. On the Home tab, in the Drawing group, click Arrange, point to Align and then select AlignCenter. On the Home tab, in the Drawing group, click Shapes, and under Rectangles select RoundedRectangle (second option from the left). On the slide, drag to draw a rounded rectangle.Drag the yellow diamond adjustment handle to the right to create a rounded top.Select the rectangle. Under DrawingTools, on the Format tab, in the Size group, in the ShapeHeight box, enter 4.2”, and in the ShapeWidth box, enter 0.18”.On the Home tab, in the Drawing group, click the FormatShape dialog box launcher. In the FormatShape dialog box, in the left pane, click Fill, and in the Fill pane, do the following:Click Solidfill. In the Color list, under ThemeColors, select White, Background 1, Darker 15% (third row, first option from the left).Also in the FormatShape dialog box, in the left pane, click LineColor, and in the LineColor pane, click Noline.Also in the FormatShape dialog box, in the left pane, click 3-DFormat, and in the 3-DFormat pane, do the following:Under Bevel, in the Top list, under Bevel, select Circle (first row, first option from the left). Next to the Top list, in the Width box, enter 10 pt,and in the Height box, enter 10 pt. Position the bottom of rectangle so that it slightly overlaps the oval.Select the rounded rectangle. On the Home tab, in the Drawing group, click Arrange, point to Align, and select AlignCenter. With the rounded rectangle still selected, on the Home tab, in the Clipboard group, click the arrow below Paste and select Duplicate.Select the second rounded rectangle. Under DrawingTools, on the Format tab, in theSize group, do the following:In the ShapeHeight box, enter4.35”.In the ShapeWidth box, enter0.13”.With the second rounded rectangle still selected, on the Home tab, in the Drawing group, click Arrange, point to Rotate, and select RotateLeft 90°. Position the second (horizontal) round rectangle so that it slightly overlaps the top of the first, vertical round rectangle.Select the second (horizontal) round rectangle. On the Home tab, in the Drawing group, click Arrange, point to Align, and select AlignCenter. Select the first (vertical) round rectangle. On the Home tab, in the Clipboard group, click the arrow below Paste and select Duplicate.Select the third (vertical) rounded rectangle. Under DrawingTools, on the Format tab, in theSize group, do the following:In the ShapeHeight box, enter0.32”.In the ShapeWidth box, enter0.32”.Position the third, smaller round rectangle at the intersection at the top of the first (vertical) and second (horizontal) round rectangles.Select the third, smaller round rectangle. On the Home tab, in the Drawing group, click Arrange, point to Align, and select AlignCenter. Press and hold SHIFT and select the second (horizontal) and third (smaller) round rectangles. On the Home tab, in the Drawing group, click Arrange, and select Group.Select the oval. On the Home tab, in the Clipboard group, click the arrow below Paste and select Duplicate.Select the second oval. Under DrawingTools, on the Format tab, in theSize group, do the following:In the ShapeHeight box, enter1.93”.In the ShapeWidth box, enter1.93”.On the Home tab, in the bottom right corner of the Drawing group, click the FormatShape dialog box launcher. In the FormatShape dialog box, click Fill in the left pane, and in the Fill pane do the following:Click Solidfill.Click the button next to Color, and then under ThemeColors select White, Background 1, Darker 15% (third row, first option from the left).Also in the FormatShape dialog box, click Shadow in the left pane, and in the Shadow pane, in the Presets list, select NoShadow. Also in the FormatShape dialog box, click 3-DFormat in the left pane, and in the 3-DFormat pane, do the following:Under Bevel, in the Top list, under Bevel, select Slope (second row, fourth option from the left).Next to the Top list, in the Width box, enter 5.5 pt,and in the Height box, enter 5 pt. Under Bevel, in the Bottom list, under Bevel, select Angle (second row, first option from the left). Next to the Bottom list, in the Width box, enter 11 pt,and in the Height box, enter 5 pt.Also in the FormatShape dialog box, click 3-DRotation in the left pane, and in the 3-DRotation pane, under Rotation, do the following:In the X box, enter 287.8°.In the Y box, enter 297.1°.In the Z box, enter 74.1°.Position this oval (or dish) on the left side of the slide, approximately 2.5 inches below the horizontal round rectangleOn the Home tab, in the Drawing group, click Shapes, and under Lines select Line (first option from the left). On the slide, drag to draw a line from the left edge of the horizontal rectangle to the bottom left edge of the dish.Select the line. On the Home tab, in bottom right corner of the Drawing group, click the FormatShape dialog box launcher. In the FormatShape dialog box, click LineColor in the left pane, and in the LineColor pane do the following:Click Solidline. Click the button next to Color, and then under ThemeColors select White, Background 1, Darker 25% (fourth row, first option from the left).Also in the FormatShape dialog box, click LineStyle in the left pane, and in the LineStyle pane do the following:In the Width box, enter 3.75 pt. In the Dashtype list, select Round Dot (second option). In the Captype list, select Round. In the Jointype list, select Round. Select the line. On the Home tab, in the Clipboard group, click the arrow below Paste and select Duplicate. Select the second line. On the Home tab, in the Drawing group, click Arrange, point to Rotate, and select FlipHorizontal. Position the duplicate line so the top point is at the same position as the top point on the first line. Position the endpoint on the right edge of the dish.On the Home tab, in the Drawing group, click Arrange, and then select Send to Back. Press and hold CTRL and select both lines and the dish. On the Home tab, in the Drawing group, click Arrange, and select Group. Select the group (the two dotted lines and the dish). On the Home tab, in the Clipboard group, click the arrow below Paste and select Duplicate. Position the second group on the right side of the slide.Press and hold CTRL and select both left and right groups. On the Home tab, in the Drawing group, click Arrange, and then do the following:Point to Align, and select AlignSelectedObjects.Point to Align, and select AlignTop.Select Send to Back.To reproduce the animation effects on this slide, do the following:Select top horizontal bar group. On the Animations tab, in the Animations group, click CustomAnimations.In the CustomAnimation task pane, click AddEffect, point to Emphasis and select MoreEffects. In the AddEmphasisEffect dialog box, under Basic, select Spin, and then click OK.In the CustomAnimation task pane, select the animation effect, and then under Modify: Spin,do the following:In the Start list, select WithPrevious.In the Amount list, in the Custom box, enter 10, and then press ENTER. Also in the Amount list, select Clockwise.In the Speed list, select Fast.Click OK.Select the left dish group. In the CustomAnimation task pane, click AddEffect, point to MotionPaths, and select Up.In the CustomAnimation task pane, select the Up motion path, and then under Modify: Up,do the following:In the Start list, select WithPrevious. In the Speed list, select Fast. Click OK.In the CustomAnimation task pane, select the Up motion path effect. On the slide, press and hold the SHIFT key and drag the endpoint (red arrow) down to shorten the motion path to approximately .33” in length. (Note: If needed, zoom in to see the objects. On the View tab, in the Zoom group, click Zoom, and in the Zoom dialog box, in the Percent box enter 200%. After editing, on the View tab, in the Zoom group, click Fit to Window to return to the slide to its original size.)In the CustomAnimation task pane, click the arrow to the right of the Up motion path and select EffectOptions. In the Up dialog box, on the Effect tab, under Settings, clear both SmoothStart and SmoothEnd and then click OK.Select right dish group. In the CustomAnimation task pane, click the arrow next to AddEffect, point to MotionPaths, and select Down.In the CustomAnimation task pane, select the Down motion path, and then under Modify: Down, do the following:In the Start list, select WithPrevious. In the Speed list, select Fast.Click OK. In the CustomAnimation task pane, select the Down motion path. On the slide, press and hold SHIFT and drag the endpoint (red arrow) up to shorten the path to approximately .33” in length.In the CustomAnimation task pane, click the arrow next to the Down motion path and select EffectOptions. In the Down dialog box, on the Effect tab, under Settings, clear SmoothStart, clear SmoothEnd, and then click OK.Select the top horizontal bar group. In the CustomAnimation task pane, click the arrow next to AddEffect, point to Emphasis, and select MoreEffects. In the AddEmphasisEffect dialog box, under Basic, select Spin,and then click OK.In the CustomAnimation task pane, select the second Spin animation effect, and then under Modify: Spin do the following:In the Start list, select OnClick. In the Amount list, in the Custom box, enter 20°, and then press ENTER. Also in the Amount list, select Counterclockwise. In the Speed list, select Fast. Click OK.Select the left dish group. In the CustomAnimation task pane, click AddEffect, point to MotionPaths, and select Down. In the CustomAnimation task pane, select the Down motion path, and then under Modify: Down, do the following:In the Start list, select WithPrevious. In the Speed list, select Fast. Click OK.In the CustomAnimation task pane, select the Down motion path for the right dish. On the slide, press and hold SHIFT and drag the starting point (green arrow) to meet the endpoint (red arrow) from the first up motion path. (Note: If needed, zoom in to see the objects. On the View tab, in the Zoom group, click Zoom, and in the Zoom dialog box, in the Percent box, enter 200%. After editing, on the View tab, in the Zoom group, click Fit to Window to return to the slide to its original size.)On the slide, select the down motion path for the left dish and then drag the endpoint (red arrow) up to shorten the path to approximately .66” in length.In the CustomAnimation task pane, click the arrow next to the down motion path for the left dish, and then select EffectOptions. In the Down dialog box, on the Effect tab, under Settings, clear SmoothStart and SmoothEnd,and then click OK.Select the right dish group. In the CustomAnimation task pane, click AddEffect, point to MotionPath, and select Up.In the CustomAnimation task pane, select the Up motion path for the right dish, and then under Modify: Up,do the following:In the Start list, select WithPrevious.In the Speed list, select Fast.Click OK.In the CustomAnimation task pane, select the Up motion path for the right dish. On the slide, press and hold SHIFT and drag the starting point (green arrow) to meet the endpoint (red arrow) from the first down motion path.On the slide, select the upmotion path for the right dish, and then drag the endpoint (red arrow) up to shorten the path to approximately .66” in length.In the CustomAnimation task pane, click the arrow next to the upmotion path for the right dish and select EffectOptions. In the Up dialog box, on the Effect tab, under Settings, clear SmoothStart and SmoothEnd,and then click OK.To reproduce the background effects on this slide, do the following:Right-click the slide background area, and then click Format Background. In the Format Background dialog box, click Fill in the left pane, select Gradient fill in the right pane, and then do the following:In the Type list, select Linear.In the Direction list, click Linear Down (first row, second option from the left).Under Gradient stops, click Add or Remove until two stops appear in the drop-down list.Also under Gradient stops, customize the gradient stops as follows:Select Stop 1 from the list, and then do the following:In the Stop position box, enter 65%.Click the button next to Color, and then click underThemeColors select White, Background 1 (first row, the first option from the left).Select Stop 2 from the list, and then do the following: In the Stop position box, enter 96%.Click the button next to Color, and then click underThemeColors select Black, Text 1, Lighter 50%(second row, the second option from the left).
- For reproduction steps for this slide, refer to the PowerPoint template titled “Static text effects for PowerPoint slides” (STATIC_TEXT.potx), slide number 17.