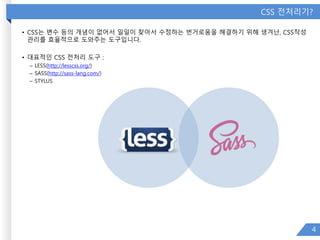
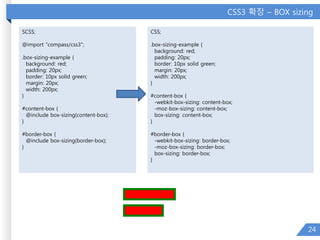
CSS 전처리기?
• CSS는변수 등의 개념이 없어서 일일이 찾아서 수정하는 번거로움을 해결하기 위해 생겨난, CSS작성
관리를 효율적으로 도와주는 도구입니다.
• 대표적인 CSS 전처리 도구 :
– LESS(http://lesscss.org/)
– SASS(http://sass-lang.com/)
– STYLUS
4
5.
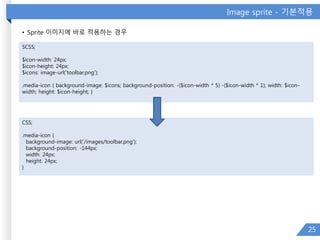
COMPASS?
• Compass는 CSS를쉽게 개발 및 편집할 수 있게하는 CSS Framework
• Ruby를 이용하여 만들어진 개발 툴
• SASS를 기반으로 합니다.
• 확장성이 뛰어납니다.
• Compass의 장점
– 간결한 코드
– 재사용 가능한 패턴
– Sprites를 간단하게 작성
– CSS3 코드를 손쉽게 적용
– 쉽게 확장할 수 있는 구조
– CSS 파일 압축
5
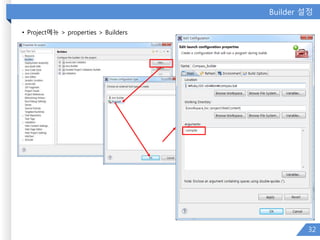
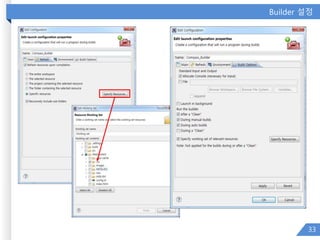
프로젝트 생성하기
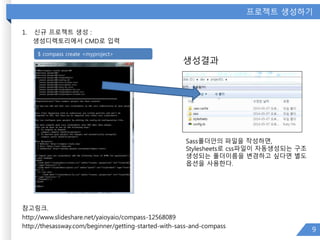
1. 신규프로젝트 생성 :
생성디렉토리에서 CMD로 입력
참고링크.
http://www.slideshare.net/yaioyaio/compass-12568089
http://thesassway.com/beginner/getting-started-with-sass-and-compass
9
$ compass create <myproject>
생성결과
Sass폴더안의 파일을 작성하면,
Stylesheets로 css파일이 자동생성되는 구조
생성되는 폴더이름을 변경하고 싶다면 별도
옵션을 사용한다.
10.
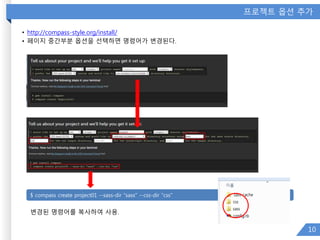
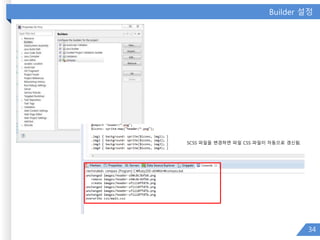
프로젝트 옵션 추가
•http://compass-style.org/install/
• 페이지 중간부분 옵션을 선택하면 명령어가 변경된다.
10
$ compass create project01 --sass-dir "sass" --css-dir "css"
변경된 명령어를 복사하여 사용.
11.
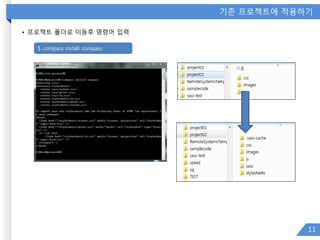
기존 프로젝트에 적용하기
•프로젝트 폴더로 이동후 명령어 입력
11
$ compass install compass
12.
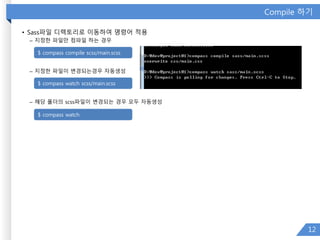
Compile 하기
• Sass파일디렉토리로 이동하여 명령어 적용
– 지정한 파일만 컴파일 하는 경우
– 지정한 파일이 변경되는경우 자동생성
– 해당 폴더의 scss파일이 변경되는 경우 모두 자동생성
12
$ compass compile scss/main.scss
$ compass watch scss/main.scss
$ compass watch
13.
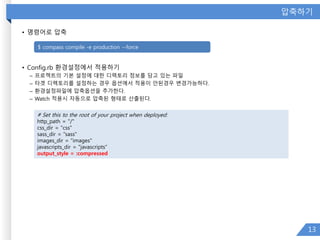
압축하기
• 명령어로 압축
•Config.rb 환경설정에서 적용하기
– 프로젝트의 기본 설정에 대한 디렉토리 정보를 담고 있는 파일
– 타겟 디렉토리를 설정하는 경우 옵션에서 적용이 안된경우 변경가능하다.
– 환경설정파일에 압축옵션을 추가한다.
– Watch 적용시 자동으로 압축된 형태로 산출된다.
13
# Set this to the root of your project when deployed:
http_path = "/"
css_dir = "css"
sass_dir = "sass"
images_dir = "images"
javascripts_dir = "javascripts“
output_style = :compressed
$ compass compile -e production --force
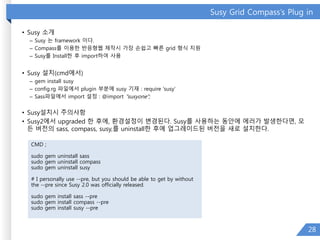
Susy Grid Compass’sPlug in
• Susy 소개
– Susy 는 framework 이다.
– Compass를 이용한 반응형웹 제작시 가장 손쉽고 빠른 grid 형식 지원
– Susy를 Install한 후 import하여 사용
• Susy 설치(cmd에서)
– gem install susy
– config.rg 파일에서 plugin 부분에 susy 기재 : require 'susy‘
– Sass파일에서 import 설정 : @import "susyone";
• Susy설치시 주의사항
• Susy2에서 upgraded 한 후에, 환경설정이 변경된다. Susy를 사용하는 동안에 에러가 발생한다면, 모
든 버전의 sass, compass, susy,를 uninstall한 후에 업그레이드된 버전을 새로 설치한다.
28
CMD ;
sudo gem uninstall sass
sudo gem uninstall compass
sudo gem uninstall susy
# I personally use --pre, but you should be able to get by without
the --pre since Susy 2.0 was officially released.
sudo gem install sass --pre
sudo gem install compass --pre
sudo gem install susy --pre
29.
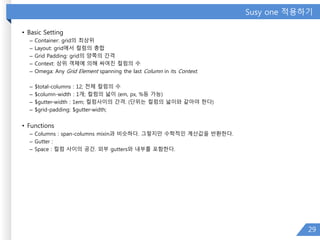
Susy one 적용하기
•Basic Setting
– Container: grid의 최상위
– Layout: grid에서 컬럼의 총합
– Grid Padding: grid의 양쪽의 간격
– Context: 상위 객체에 의해 싸여진 컬럼의 수
– Omega: Any Grid Element spanning the last Column in its Context.
– $total-columns : 12; 전체 컬럼의 수
– $column-width : 1개; 컬럼의 넓이 (em, px, %등 가능)
– $gutter-width : 1em; 컬럼사이의 간격. (단위는 컬럼의 넓이와 같아야 한다)
– $grid-padding: $gutter-width;
• Functions
– Columns : span-columns mixin과 비슷하다. 그렇지만 수학적인 계산값을 반환한다.
– Gutter :
– Space : 컬럼 사이의 공간. 외부 gutters와 내부를 포함한다.
29
SASS 설치
• Compass에서적용하지 않고 별도로 SASS만 사용하는 경우
• SASS 설치하기(http://sass-lang.com/install)
– Here's the quickest way we've found to start using Sass by using the command line:
1. Open your Terminal or Command Prompt. On the Mac the Terminal.app comes installed by default. It's
located in your "Utilities" folder. On Windows, run `cmd`.
2. Install Sass. Ruby uses Gems to manage its various packages of code like Sass. In your open terminal window
type:
gem install sass
This will install Sass and any dependencies for you. It's pretty magical. If you get an error message then it's likely you will need to
use the sudo command to install the Sass gem. It would look like:
sudo gem install sass
3. Double-check. You should now have Sass installed, but it never hurts to double-check. In your terminal
application you can type:
sass –v
It should return Sass 3.3.4 (Maptastic Maple). Congratulations! You've successfully installed Sass.
4. Go and play. If you're brand new to Sass we've set up some resources to help you learn pretty darn quick.
5. 추가로 Compass 를 설치한다면,
sudo gem install compass
• SASS watch명령어(디렉토리에서 cmd로 적용)
sass --watch mlife.scss:mlife.css
• Watch하면서 자동압축
sass --watch a.scss:a.css --style compressed
37
38.
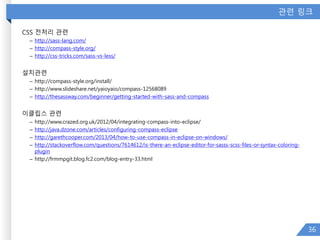
이클립스에서 scss 코드색상 변경하기
• I just figured out how to do this in Eclipse. I admit that this solution does not have 100% SASS support, the colors
get a little funky when using nested css, but it's waaaaay better than looking at plain text and you don't need to
install a separate editor.
• You need to associate the .scss file type with the native Eclipse CSS Editor in Eclipse[Part 1]. After you do that, you
need to add the .scss file type to the native CSS Editor as well so the CSS Editor will be able to open it [Part 2].
Here are the steps for eclipse (I'm running Eclipse Java EE IDE for Web Developers, Indigo):
• ---------- [Part 1] ----------
• Go to Window --> Preferences
• Drill down to General --> Editors --> File Associations
• In File Associations pane, click the 'Add..." button on the top right.
• For "File Type:", enter *.scss and then click OK.
• Find the *.scss entry in the File Associations list and select it.
• After selecting *.scss, on the bottom pane "Associated editors:", click the "Add..." button.
• Make sure "Internal editors" is selected on the top, then find and select "CSS Editor" and then click OK.
• This associated the file type .scss with eclipses native CSS Editor. Now we have to configure the native CSS Editor
to support .scss files. To do this, follow this steps:
• ---------- [Part 2] ----------
• Go to Window --> Preferences
• Drill down to General --> Content Types
• In the Content Types pane, expand "Text", then select "CSS".
• After "CSS" is selected, on the bottom "File associations:" pane, click the "Add..." button.
• For "Content type:", enter *.scss and then click OK.
• Click OK to close out the Preferences window.
• All done. All you need to do now is close any .scss files that you have open then re-open them and wha-la, css
colors in Eclipse for .scss files!
• Hope this helps.
• http://stackoverflow.com/questions/7614612/is-there-an-eclipse-editor-for-sasss-scss-files-or-syntax-coloring-plugin
38


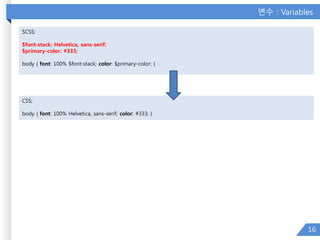

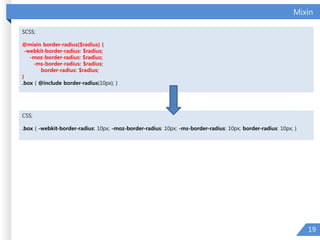
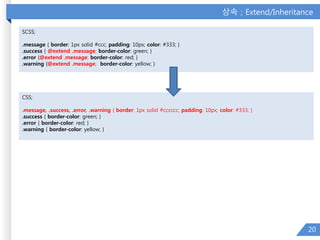
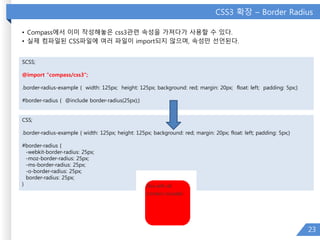
![연산 ; Operators
• +, -, *, /, 와 % 등의 연산이 가능
21
SCSS;
.container { width: 100%; }
article[role="main"] { float: left; width: 600px / 960px * 100%; }
aside[role="complimentary"] { float: right; width: 300px / 960px * 100%; }
CSS;
.container { width: 100%; }
article[role="main"] { float: left; width: 62.5%; }
aside[role="complimentary"] { float: right; width: 31.25%; }](https://image.slidesharecdn.com/compass-150401212308-conversion-gate01/85/Compass-21-320.jpg)


![이클립스에서 scss 코드 색상 변경하기
• I just figured out how to do this in Eclipse. I admit that this solution does not have 100% SASS support, the colors
get a little funky when using nested css, but it's waaaaay better than looking at plain text and you don't need to
install a separate editor.
• You need to associate the .scss file type with the native Eclipse CSS Editor in Eclipse[Part 1]. After you do that, you
need to add the .scss file type to the native CSS Editor as well so the CSS Editor will be able to open it [Part 2].
Here are the steps for eclipse (I'm running Eclipse Java EE IDE for Web Developers, Indigo):
• ---------- [Part 1] ----------
• Go to Window --> Preferences
• Drill down to General --> Editors --> File Associations
• In File Associations pane, click the 'Add..." button on the top right.
• For "File Type:", enter *.scss and then click OK.
• Find the *.scss entry in the File Associations list and select it.
• After selecting *.scss, on the bottom pane "Associated editors:", click the "Add..." button.
• Make sure "Internal editors" is selected on the top, then find and select "CSS Editor" and then click OK.
• This associated the file type .scss with eclipses native CSS Editor. Now we have to configure the native CSS Editor
to support .scss files. To do this, follow this steps:
• ---------- [Part 2] ----------
• Go to Window --> Preferences
• Drill down to General --> Content Types
• In the Content Types pane, expand "Text", then select "CSS".
• After "CSS" is selected, on the bottom "File associations:" pane, click the "Add..." button.
• For "Content type:", enter *.scss and then click OK.
• Click OK to close out the Preferences window.
• All done. All you need to do now is close any .scss files that you have open then re-open them and wha-la, css
colors in Eclipse for .scss files!
• Hope this helps.
• http://stackoverflow.com/questions/7614612/is-there-an-eclipse-editor-for-sasss-scss-files-or-syntax-coloring-plugin
38](https://image.slidesharecdn.com/compass-150401212308-conversion-gate01/85/Compass-38-320.jpg)


![[전파교육] css day 2014](https://cdn.slidesharecdn.com/ss_thumbnails/cssday2014-140806031358-phpapp01-thumbnail.jpg?width=640&height=640&fit=bounds)

![[GDG seoul] 디자이너의 눈과 생각 빌리기: 개발자를 위한 디자인 특강](https://cdn.slidesharecdn.com/ss_thumbnails/gdg-designer-eye-thought-public-181119154704-thumbnail.jpg?width=640&height=640&fit=bounds)


![[20160115] 작심 10시간 - CSS](https://cdn.slidesharecdn.com/ss_thumbnails/10css-220118152205-thumbnail.jpg?width=640&height=640&fit=bounds)