American Sport Education Program
with Sam Snow
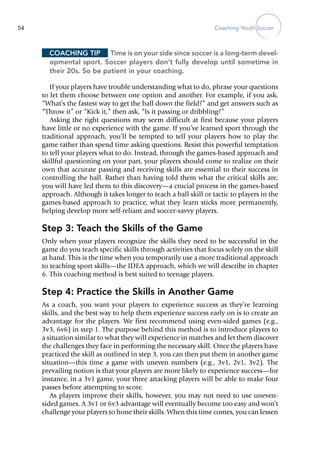
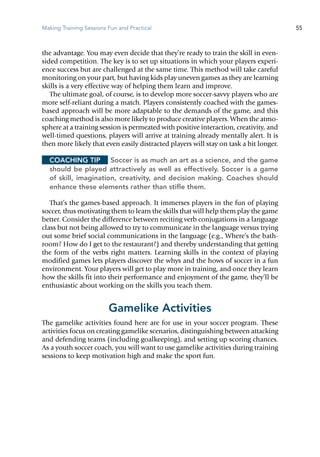
Coaching
Youth
Soccer
Fifth Edition
Human Kinetics
Library of Congress Cataloging-in-Publication Data
Coaching youth soccer / American Sport Education Program ; with Sam Snow. -- 5th ed.
p. cm.
ISBN-13: 978-0-7360-9217-3 (soft cover)
ISBN-10: 0-7360-9217-X (soft cover)
1. Soccer for children--Coaching. 2. Soccer--Coaching. I. Snow, Sam. II. American Sport Education Program.
GV943.8.C63 2011
796.33407'7--dc22
2011002858
ISBN-10: 0-7360-9217-X (print)
ISBN-13: 978-0-7360-9217-3 (print)
Copyright © 2011, 2006, 2001, 1995, 1991 by Human Kinetics, Inc.
All rights reserved. Except for use in a review, the reproduction or utilization of this work in any form or by any elec-
tronic, mechanical, or other means, now known or hereafter invented, including xerography, photocopying, and record-
ing, and in any information storage and retrieval system, is forbidden without the written permission of the publisher.
Notice: Permission to reproduce the following material is granted to instructors and agencies who have purchased
CoachingYouth Soccer, Fifth Edition: pp. 190-194. The reproduction of other parts of this book is expressly forbidden
by the above copyright notice. Persons or agencies who have not purchased Coaching Youth Soccer, Fifth Edition,
may not reproduce any material.
The Web addresses cited in this text were current as of April 2011 unless otherwise noted.
Content Provider: Sam Snow, USYouth Soccer Coaching Director; Acquisitions Editors: Annie Parrett and Aaron
Thais; Managing Editor: Laura E. Podeschi; Assistant Editor: Tyler Wolpert; Copyeditor: Patricia MacDonald;
Permission Manager: Martha Gullo; Graphic Designer: Nancy Rasmus; Graphic Artist: Tara Welsch; Cover
Designer: Keith Blomberg; Photographer (cover): © Human Kinetics; Photographer (interior): Neil Bernstein,
unless otherwise noted; photos on pp. 1, 9, 19, 31, 49, 87, 121, 139, 161, and 173 © Human Kinetics; Photo Asset
Manager: Laura Fitch; Visual Production Assistant: Joyce Brumfield; Photo Production Manager: Jason Allen;
Art Manager: Kelly Hendren; AssociateArt Manager:Alan L. Wilborn; Illustrations: © Human Kinetics; Printer:
Edwards Brothers
We thank Pizza Hut Park in Frisco, Texas, for assistance in providing the location for the photo shoot for this book.
Copies of this book are available at special discounts for bulk purchase for sales promotions, premiums, fund-raising,
or educational use. Special editions or book excerpts can also be created to specifications. For details, contact the
Special Sales Manager at Human Kinetics.
Printed in the United States of America		 10  9  8  7  6  5  4  3  2  1
The paper in this book is certified under a sustainable forestry program.
Human Kinetics
Web site: www.HumanKinetics.com
United States: Human Kinetics
P.O. Box 5076
Champaign, IL 61825-5076
800-747-4457
e-mail: humank@hkusa.com
Canada: Human Kinetics
475 Devonshire Road Unit 100
Windsor, ON N8Y 2L5
800-465-7301 (in Canada only)
e-mail: info@hkcanada.com
Europe: Human Kinetics
107 Bradford Road
Stanningley
Leeds LS28 6AT, United Kingdom
+44 (0) 113 255 5665
e-mail: hk@hkeurope.com
Australia: Human Kinetics
57A Price Avenue
Lower Mitcham, South Australia 5062
08 8372 0999
e-mail: info@hkaustralia.com
New Zealand: Human Kinetics
P.O. Box 80
Torrens Park, South Australia 5062
0800 222 062
e-mail: info@hknewzealand.com
E5120
To my parents, who as managers, teachers, and coaches themselves gave me
the education, experiences, and patient support that allowed me to become a
professional coach.
iv
Foreword  vi
Welcome to Coaching  viii
Welcome From US Youth Soccer  ix
Activity Finder  x
Key to Diagrams  xii
	 1	 Stepping Into Coaching	 1
	 2	 Communicating as a Coach	 9
	 3	 Understanding Rules and Equipment	 19
	 4	 Providing for Players’ Safety	 31
	 5	 Making Training Sessions
Fun and Practical	 49
	 6	 Teaching and Shaping Skills	 75
Contents
v
	 7	 Attacking	 87
	 8	 Defending	 121
	 9	 Goalkeeping	 139
	10	 Coaching on Match Day	 161
	11	 Developing Season
and Training Plans	 173
Appendix  189
Glossary  195
About the Authors  201
vi
Foreword
The status of the US national soccer teams suggests that we still have improve-
ments to make in our approach to developing players. The fundamental problems
begin at the youth level, where our time with ball is so limited and our ideas on
what to do in training are so ordinary. The rest of the world escapes us because
what is apparent once we get to a senior level is our lack of comfort with the ball
at our feet. Some of the solutions to the challenges that players of both sexes
face are provided in this excellent book by Sam Snow.
I’ve had the extraordinary privilege of spending a week observing Barcelona
close up, watching them compete against Arsenal, then seeing the first team train,
and then spending the rest of the time studying their academy program. Every
player in the academy, at every age and skill level, demonstrated a tremendous
commitment to his or her own development. Equally impressive and telling was
what Barca coaches designated their groups to do that day to get better. They
emphasized individual skill work and small-sided games, and they encouraged
players’ love of the ball and the game. Barca coaches also promoted a positive
culture of character building, so the conduct of coaches and players and the
collective attitudes of everyone were superb. The display of ball mastery and
passion for the game were evident, making the entire setting for learning soccer
impressive.
So it’s no mystery why Spain, with the core of their national team right out of
the Barca lineup, is the reigning world champion. This extraordinary game that
they play was not built in a day; it was not built with an 11v11 tournament culture
like we have here in the United States. And we would do well to learn from that.
Coaching Youth Soccer reflects an understanding of what soccer development
in this country should be. It presents advice to help you keep the training fun yet
also properly challenging and balanced to help players become comfortable with
the ball and make decisions on their own in a climate of player development
and mutual respect, like what I observed at Barca. I like Coach Snow’s guided
discovery approach and small-sided games approach to player improvement.
He teaches all the correct principles and presents excellent training games, and
his thoughts about the game are up to date.
I have a great fear that the US women are losing ground to Japan, the Koreas
(North and South), Brazil, and Germany, countries that have embraced skill
development as the foundation for their youth and emphasized a passion for
Foreword vii
the ball. We need to change our approach to youth soccer development now to
catch up and raise our soccer-playing performance to its potential. That effort
entails many things on both sides of the gender divide. Coaching Youth Soccer, if
applied correctly, can play a wonderful part in helping us get there.
Anson Dorrance
Head coach, University of North Carolina women’s soccer
21-time national collegiate champion
US women’s national coach 1986-1994
1991 FIFA world champion
viii
Welcome to Coaching
Coaching young people is an exciting way to be involved in sport.
But it isn’t easy. Some coaches are overwhelmed by the responsibilities involved
in helping athletes through their early sport experiences. And that’s not surprising
because coaching youngsters requires more than just showing up. It also involves
preparing them physically and mentally to compete effectively, fairly, and safely
in their sport and providing them with a positive role model.
This book will help you meet the challenges so you can experience the many
rewards of coaching young players. You’ll learn how to meet your responsibili-
ties as a coach, communicate well and provide for safety, and teach soccer skills
while keeping them fun. More than 40 activities are included throughout the
text to help you with your training sessions. We also provide sample practice
plans and season plans to guide you throughout your season.
If you would like more information about this or other ASEP resources, please
contact us at the following address:
ASEP
P.O. Box 5076
Champaign, IL 61825-5076
800-747-5698
www.ASEP.com
ix
Welcome From
US Youth Soccer
Dear Coach,
Welcome to the world of youth soccer. This is your opportunity to have a deep
and meaningful impact on young lives. The position of coach is one of influence
and prestige in America. You can have a positive influence on your players, both
as athletes and as good citizens.
US Youth Soccer and the American Sport Education Program (ASEP) have
many resources to assist you in your coaching endeavors. From this book to
coaching courses, videos, events, conventions, and online materials, we are here
to support your work to create a rich and healthy youth soccer experience.
You hold in your hands a resource you can come back to time and again:
Coaching Youth Soccer. Whether it’s learning how to teach proper fundamental
skills or how to communicate better, this book can guide you through your
experience of coaching youth soccer.
Here you will find fresh ideas on how to coach children. They may be differ-
ent from the way you were coached, but these methods are best for grooming
passionate players. You will find activities and plenty of resources to aid you in
your coaching journey. These coaching methods are based on our experiences
in teaching the 300,000 coaches of US Youth Soccer across the USA.
You have at your fingertips a book full of ideas to get you through your first
season and many more to come. You will find it easy to follow, an excellent
introduction to coaching youth. Between ASEP and US Youth Soccer, you will
have access to a wealth of practical information on coaching.
Your coaching will have a profound impression on the players you guide, for
today and many years to come. On behalf of the players, thank you for coach-
ing youth soccer!
Keep kicking,
Sam Snow
Technical Director
x
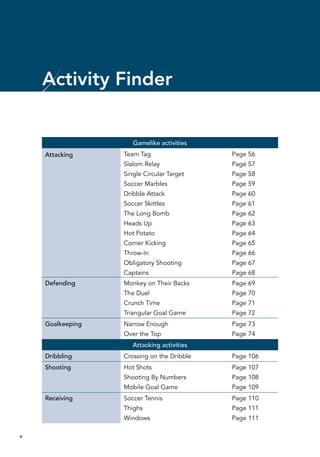
Activity Finder
Gamelike activities
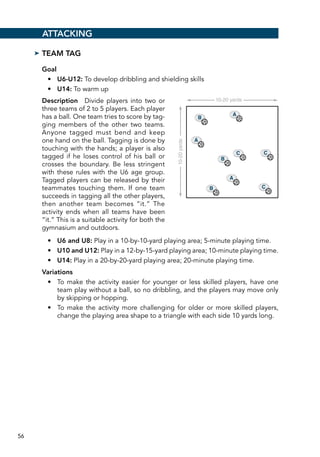
Attacking Team Tag Page 56
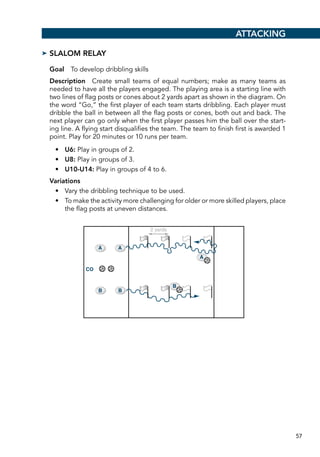
Slalom Relay Page 57
Single Circular Target Page 58
Soccer Marbles Page 59
Dribble Attack Page 60
Soccer Skittles Page 61
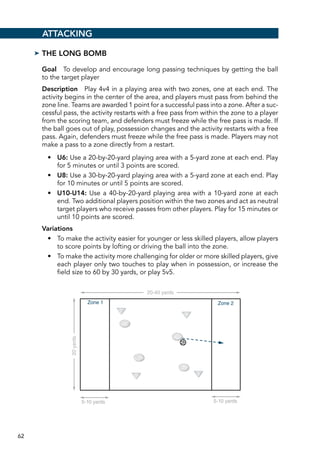
The Long Bomb Page 62
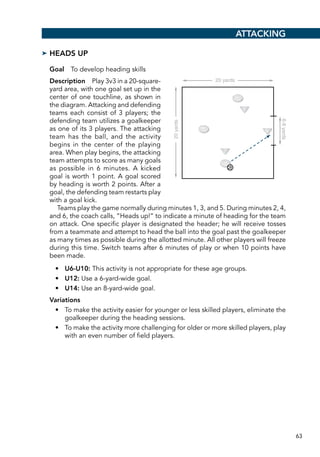
Heads Up Page 63
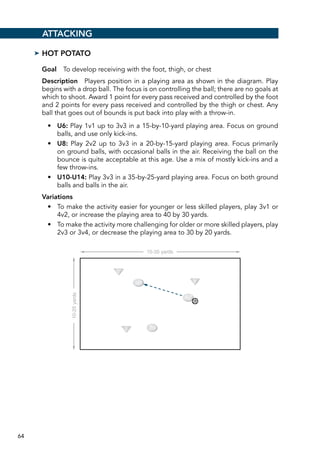
Hot Potato Page 64
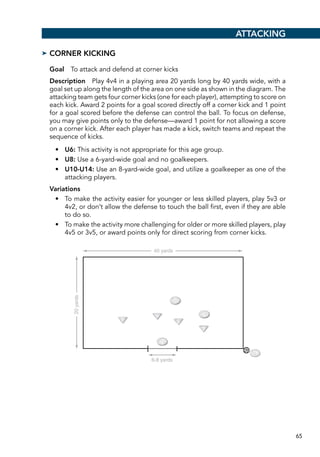
Corner Kicking Page 65
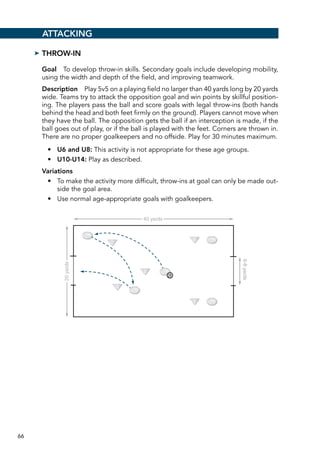
Throw-In Page 66
Obligatory Shooting Page 67
Captains Page 68
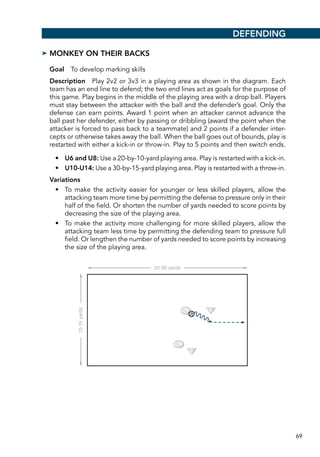
Defending Monkey on Their Backs Page 69
The Duel Page 70
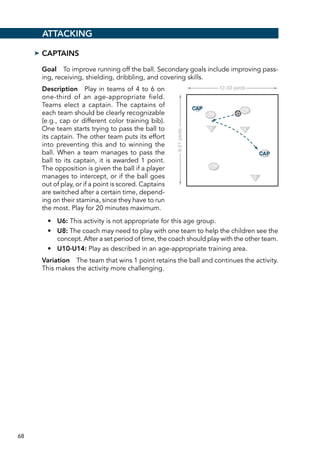
Crunch Time Page 71
Triangular Goal Game Page 72
Goalkeeping Narrow Enough Page 73
Over the Top Page 74
Attacking activities
Dribbling Crossing on the Dribble Page 106
Shooting Hot Shots Page 107
Shooting By Numbers Page 108
Mobile Goal Game Page 109
Receiving Soccer Tennis Page 110
Thighs Page 111
Windows Page 111
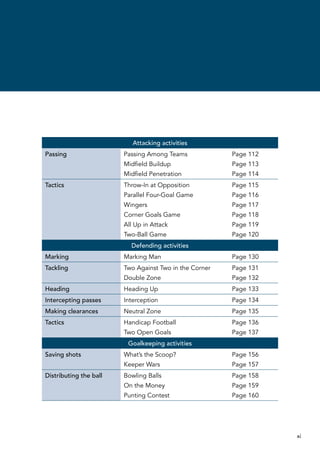
xi
Attacking activities
Passing Passing Among Teams Page 112
Midfield Buildup Page 113
Midfield Penetration Page 114
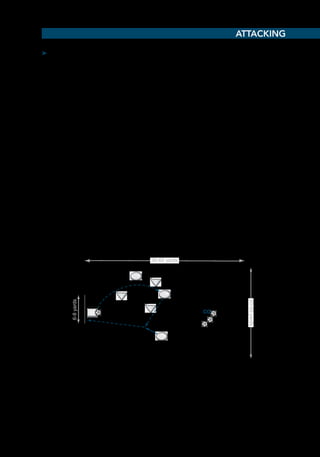
Tactics Throw-In at Opposition Page 115
Parallel Four-Goal Game Page 116
Wingers Page 117
Corner Goals Game Page 118
All Up in Attack Page 119
Two-Ball Game Page 120
Defending activities
Marking Marking Man Page 130
Tackling Two Against Two in the Corner Page 131
Double Zone Page 132
Heading Heading Up Page 133
Intercepting passes Interception Page 134
Making clearances Neutral Zone Page 135
Tactics Handicap Football Page 136
Two Open Goals Page 137
Goalkeeping activities
Saving shots What’s the Scoop? Page 156
Keeper Wars Page 157
Distributing the ball Bowling Balls Page 158
On the Money Page 159
Punting Contest Page 160
xii
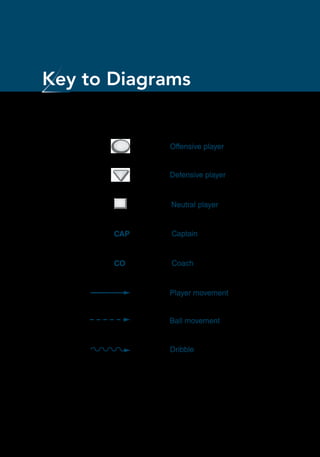
Key to Diagrams
E5120/ASEP/401670/KEY/alw/r1
Key to diagrams
Offensive player
Defensive player
Neutral player
Player movement
Ball movement
Dribble
Captain
Coach
CAP
CO
1
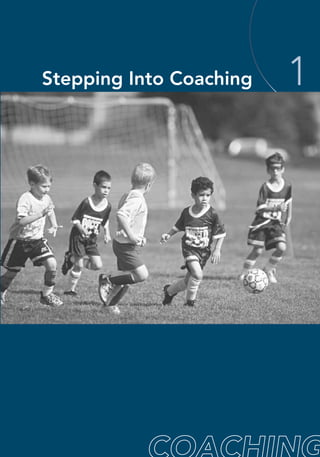
Stepping Into Coaching 1
2 Coaching Youth Soccer
If you are like most youth soccer coaches, you have probably been recruited
from the ranks of concerned parents, soccer enthusiasts, or community volun-
teers. Like many novice and some veteran coaches, you probably have had little
formal instruction on how to coach. But when the call went out for coaches to
assist with the local youth soccer club, you answered because you like children
and enjoy soccer and perhaps because you want to be involved in a worthwhile
community ­activity.
Your initial coaching assignment may be difficult. Like many volunteers, you
may not know everything there is to know about soccer or about how to work
with children, especially of varying ages. Coaching Youth Soccer will help you learn
the basics of coaching soccer effectively. To begin with, we look at the responsi-
bilities you have as a coach. We also talk about what to do when your child is on
the team you coach. Finally, we examine five tools for being an effective coach.
Coaching Tip	 The development of a soccer player is a long process
in which the players progress from a simple to a more complex involve-
ment in the game. This progression requires proper guidance and direc-
tion from coaches who are ethical, knowledgeable, and licensed. This
process cannot be rushed, but players should participate at a level that
is both challenging and demanding. There is no guarantee that players
will reach their potential, but you must provide that opportunity!
Your Responsibilities as a Coach
Coaching at any level involves much more than designing set plays for free kicks
or drawing up team formations. Coaching involves accepting the tremendous
responsibility you face when parents put their children into your care. As a soccer
coach, you’ll be called on to do the following:
	 1.	 Provide a safe physical environment.
Playing soccer holds inherent risks, but as a coach you’re responsible for regularly
inspecting the practice and game fields and the equipment (see Facilities and
Equipment Checklist in the appendix on page 190). Reassure players and parents
that, to reduce the chance of injury, you will be teaching the safest techniques
and that you have an emergency action plan you will be following (see chapter
4 for more information).
	 2.	 Communicate in a positive way.
As you can already see, you have a lot to communicate. You’ll communicate not
only with your players and parents but also with coaching staff, referees, admin-
istrators, and others. Communicate in a positive way that demonstrates you have
the best interests of the players at heart (see chapter 2 for more information).
Stepping Into Coaching 3
	 3.	 Teach the fundamental skills of soccer.
When teaching fundamental skills, keep in mind that soccer is a game; you want
to be sure that your players have fun. Therefore, we ask that you help all players
be the best they can be by creating a fun, yet productive, training environment. To
help you do so, we’ll show you an innovative, games-based approach to teaching
and practicing the tactics and skills young players need to know—an approach
that kids thoroughly enjoy (see chapter 5 for more information). Additionally,
to help your players improve their skills, you need to have a sound understand-
ing of attacking, defending, and goalkeeping skills (see chapters 7, 8, and 9).
	 4.	 Teach the rules of soccer.
Introduce the rules of soccer, and incorporate them into individual instruction
(see chapter 3). You can teach many rules in the first practice, during the course
of gamelike activities and small-sided games. Plan to review the rules, however,
any time an opportunity naturally arises in training.
	 5.	 Direct players in competition.
Match direction includes determining starting lineups and a substitution plan,
relating appropriately to referees and to opposing coaches and players, and
making sound tactical decisions during matches (see chapter 10 for more informa-
tion on coaching during matches). Remember that the focus is not on winning
at all costs but on coaching your kids to compete well, do their best, improve
their skills, and strive to win within the rules.
	 6.	 Help your players become fit and value fitness for a lifetime.
We want young players to become fit so that they can play soccer safely and suc-
cessfully. We also want them to understand the value of fitness, learn to become
fit on their own, and enjoy training. Thus, we ask you not to make them do
push-ups or run laps for punishment. Make it fun to get fit for soccer, and make
it fun to play the game so that they’ll stay fit for a lifetime.
	 7.	 Help young people develop character.
Character development includes learning, caring, being honest and respectful,
and taking responsibility. These intangible qualities are no less important to
teach than the skill of tackling well. We ask you to teach these values to players
by demonstrating and encouraging behaviors that express these values at all
times. For example, while teaching tackling, stress to young players not only
the importance of learning when and where to tackle but also the importance
of helping their teammates, playing within the rules, and showing respect for
their opponents. Help them understand that they are responsible for winning
the individual duel, even though they may not be recognized individually for
their efforts.
Coaching Youth Soccer4
As you exercise your responsibilities, remember that every player is an indi-
vidual. You must provide a wholesome environment in which each one has the
opportunity to learn how to play the game without fear while having fun and
enjoying the overall soccer experience.
Coaching Your Own Child
Coaching can become even more complicated when your child plays on the
team you coach. Many coaches are parents, but the two roles should not be
confused. As a parent, you are responsible only for yourself and your child, but
as a coach you are also responsible for the organization, all the players on the
team, and their parents. Because of this additional responsibility, your behavior
on the soccer field will be different from your behavior at home, and your son
or daughter may not understand why.
Coaching Tip	 Some parents have found that coaching helps keep
their own children involved in soccer. Others find coaching their own
child a recipe for disaster because the child resents the switch from nur-
turing parent to neutral or demanding coach who can’t play favorites.
Discuss the decision with your child.
For example, imagine the confusion of a young boy who is the center of his
parents’ attention at home but is barely noticed by his father (who is the coach)
in the soccer setting; or consider the mixed signals a young girl receives when
her skill is constantly evaluated by her mother, the coach, who otherwise rarely
comments on her daughter’s activities. You need to explain to your child what
your new responsibilities are and how they will affect your relationship when
you’re coaching. Take the following steps to avoid problems when coaching
your own child:
•	 Ask your child whether she wants you to coach the team.
•	 Explain why you want to be involved with the team.
•	 Discuss with your child how your interactions will change when you take
on the role of coach at training sessions or matches.
•	 Limit your coaching behavior to when you are in the coaching role.
•	 Avoid parenting during training or match situations in order to keep your
role clear in your child’s mind.
•	 Reaffirm your love for your child, irrespective of his performance on the
soccer field.
Stepping Into Coaching 5
C
O
A
C
H
Five Tools of an Effective Coach
Have you purchased the traditional coaching tools—things such as disc cones,
coaching clothes, soccer shoes, and a water bottle? They’ll help you with your
coaching, but to be successful you’ll need five other tools that you cannot buy.
These tools are available only through self-examination and hard work; they’re
easy to remember with the acronym COACH:
	 Comprehension
	 Outlook
	 Affection
	 Character
	 Humor
Comprehension
Coaching requires that you comprehend the rules and skills of soccer. You must
understand the basic elements of the sport. To improve your comprehension of
soccer, take the following steps:
•	 Read about the rules of soccer in chapter 3 of this book.
•	 Read about the fundamental skills of soccer in chapters 7, 8, and 9.
•	 Read additional soccer coaching books, including those available from
the American Sport Education Program (ASEP).
•	 Contact youth soccer organizations, including US Youth Soccer (www.
usyouthsoccer.org).
•	 Attend soccer coaching clinics. Check with your state soccer association
for dates and locations.
•	 Talk with more experienced coaches.
•	 Observe local professional, college, high school, and youth soccer games.
•	 Watch soccer matches on television.
In addition to having soccer knowledge, you must implement proper training
and safety methods so that your players can participate with little risk of injury.
Even then, injuries may occur. More often than not, you’ll be the first person
responding to your players’ injuries, so be sure you understand the basic emer-
gency care procedures described in chapter 4. Also, read in that chapter how to
handle more serious sport injury situations.
Coaching Youth Soccer6
Outlook
This coaching tool refers to your perspective and goals—what you seek as a coach.
The most common coaching objectives are to (a) have fun; (b) help players develop
their physical, mental, and social skills; and (c) help players strive to play their
best consistently. Thus, your outlook involves your priorities, your planning, and
your vision for the future. See Assessing Your Priorities to learn more about the
priorities you set for yourself as a coach.
ASEP has a motto that will help you keep your outlook in line with the best
interests of the kids on your team. It summarizes in four words all you need to
remember when establishing your coaching priorities:
Athletes first, winning second.
This motto recognizes that striving to win is an important, even vital, part of
sports. But it emphatically states that no efforts to win should be made at the
expense of the players’ well-being, develop­ment, and enjoyment. Take the fol-
lowing actions to better define your outlook:
•	 With your coaches, determine your priorities for the season.
•	 Prepare for situations that challenge your priorities.
•	 Set goals for yourself and your players that are consistent with your pri-
orities.
•	 Plan how you and your players can best attain your goals.
•	 Review your goals frequently to be sure that you are staying on track.
Affection
Another vital tool you need in your coaching kit is a genuine concern for the
young people you coach. It requires having a passion for kids, a desire to share
with them your enjoyment and knowledge of soccer, and the patience and under-
standing that allow each player to grow from being involved in sports. You can
demonstrate your affection and patience in many ways, including the following:
•	 Make an effort to get to know each player on your team.
•	 Treat each player as an individual.
•	 Empathize with players trying to learn new and difficult skills.
•	 Treat players as you would like to be treated under similar circumstances.
•	 Control your emotions.
•	 Show your enthusiasm for being involved with your team.
•	 Keep an upbeat tempo and a positive tone in all of your communications.
•	 Share your passion for soccer.
Coaching Tip	 Children won’t care what you know until they know
that you care.
7
Assessing Your Priorities
Even though all coaches focus on competition, we want you to focus on posi-
tive competition. Keep the pursuit of victory in perspective—make decisions
that, first, are in the best interests of the players, and second, will help to win
the match.
How do you know whether your outlook and priorities are in order? Here’s
a little test:
	 1.	 Which situation would make you proud?
a. knowing that each player enjoyed playing soccer
b. seeing that all players improved their soccer skills
c. winning the league championship
	 2.	 Which statement best reflects your thoughts about soccer?
a. If it isn’t fun, don’t do it.
b. Everyone should learn something every day.
c. Soccer isn’t fun if you don’t win.
	 3.	 How would you like your players to remember you?
a. as a coach who created a fun experience
b. as a coach who provided a good base of fundamental skills
c. as a coach who had a winning record
	 4.	 Which would you most like to hear a parent of a player on your team
say?
a. Mike really had a good time playing soccer this year.
b. Nicole learned some important lessons playing soccer this year.
c. Willie played on the first-place soccer team this year.
	 5.	 Which of the following would be the most rewarding moment of your
season?
a. having your team want to continue playing, even after training is over
b. seeing one of your players finally master the skill of dribbling
c. winning the league championship
Look over your answers. If you most often selected a responses, then having
fun is most important to you. A majority of b answers suggests that skill devel-
opment is what attracts you to coaching. And if c was your most frequent
response, winning is tops on your list of coaching priorities. If your priorities
are in order, your players’ well-being will take precedence over your team’s
win–loss record every time.
Coaching Youth Soccer8
Character
The fact that you have decided to coach young soccer players probably means
that you think participation in sports is important. But whether or not such
participation develops character in your players depends as much on you as it
does on the sport itself. How can you help your players build character?
Having good character means modeling appropriate behaviors for sport and
life. That means more than just saying the right things—what you say and what
you do must match. There is no place in coaching for the “Do as I say, not as
I do” philosophy. Challenge, support, encourage, and reward every youngster,
and your players will be more likely to accept, even celebrate, their differences.
Be in control before, during, and after all training sessions and matches. And
don’t be afraid to admit it when you’re wrong. No one is perfect.
Each member of your coaching staff should consider the following steps to
becoming a good role model:
•	 Take stock of your strengths and weaknesses.
•	 Build on your strengths.
•	 Set goals for yourself to improve on those weak areas.
•	 If you slip up, apologize to your team and to yourself. You’ll do better
next time.
Humor
Humor is an often overlooked coaching tool. For our purpose, it means having
the ability to laugh at yourself and with your players during practices and
competition. Nothing helps balance the seriousness of a training session like
a chuckle or two, and a sense of humor puts in perspective the many mistakes
your players will make. Don’t get upset over each miscue or respond negatively
to erring players. Allow your players and yourself to enjoy the ups, and don’t
dwell on the downs. Here are some tips for injecting humor into your practices:
•	 Make practices fun by including a variety of activities.
•	 Keep all players involved in matches and training sessions.
•	 Consider laughter by your players a sign of enjoyment, not of ­waning
discipline.
•	 Smile!
9
Communicating
as a Coach 2
10 Coaching Youth Soccer
In chapter 1 you learned about the tools you need for coaching: comprehen-
sion, outlook, affection, character, and humor. These are essentials for effective
coaching; without them, you’d have a difficult time getting started. But none of
the tools will work if you don’t know how to use them with your players—and
doing so requires skillful communication. This chapter examines what commu-
nication is and how you can become a more effective communicator.
Coaches often mistakenly believe that communication occurs only when
they’re instructing players to do something, but verbal commands are only a
small part of the communication process. More than half of what you com-
municate is conveyed nonverbally, so remember this when you are coaching:
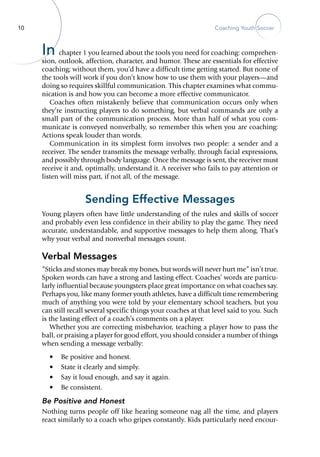
­Actions speak louder than words.
Communication in its simplest form involves two people: a sender and a
receiver. The sender transmits the message verbally, through ­facial expressions,
and possibly through body language. Once the message is sent, the receiver must
receive it and, optimally, understand it. A receiver who fails to pay attention or
listen will miss part, if not all, of the message.
Sending Effective Messages
Young players often have little understanding of the rules and skills of soccer
and probably even less confidence in their ability to play the game. They need
accurate, understandable, and supportive messages to help them along. That’s
why your verbal and nonverbal messages count.
Verbal Messages
“Sticks and stones may break my bones, but words will never hurt me” isn’t true.
Spoken words can have a strong and lasting effect. Coaches’ words are particu-
larly influential because youngsters place great importance on what coaches say.
Perhaps you, like many former youth athletes, have a difficult time remembering
much of anything you were told by your elementary school teachers, but you
can still recall several specific things your coaches at that level said to you. Such
is the lasting effect of a coach’s comments on a player.
Whether you are correcting misbehavior, teaching a player how to pass the
ball, or praising a player for good effort, you should consider a ­number of things
when sending a message verbally:
•	 Be positive and honest.
•	 State it clearly and simply.
•	 Say it loud enough, and say it again.
•	 Be consistent.
Be Positive and Honest
Nothing turns people off like hearing someone nag all the time, and players
react similarly to a coach who gripes constantly. Kids particularly need encour-
Communicating as a Coach 11
agement because they often doubt their abilities to perform in soccer. Look for
what your players do well and tell them. But don’t cover up poor or incorrect
play with rosy words of praise. Kids know all too well when they’ve erred, and no
cheerfully expressed cliche can undo their mistakes. If you fail to acknowledge
players’ ­errors, they will think you are a phony.
An effective way to correct a performance error is to first point out the part
of the skill that the player performed correctly. Then explain—in a positive
manner—the error the player made and show her the correct way to do it. Finish
by encouraging the player and emphasizing the correct performance.
Be sure not to follow a positive statement with the word but. For example,
don’t say, “That was good accuracy on your pass, Kelly, but if you follow through
with your kick a little more, you’ll get more zip on the ball.” Such a remark
causes many kids to ignore the positive statement and focus on the negative
one. Instead, try something like this: “That was good accuracy on your pass,
Kelly. And if you follow through with your kick a little more, you’ll get more
zip on the ball. That was right on target. Way to go.” This is an example of the
sandwich technique: Start with a positive comment, provide the critique, and
finish with a positive comment.
State It Clearly and Simply
Positive and honest messages are good but only if expressed directly in words
your players understand. Beating around the bush is in­effective and in­efficient.
If you ramble, your players will miss the point of your message and probably
lose interest. Here are tips for saying things clearly:
•	 Organize your thoughts before speaking to your players.
•	 Know your subject as completely as possible.
•	 Explain things thoroughly, but don’t bore your players with long-winded
monologues.
•	 Use language your players can understand, and be consistent in your
terminology. However, avoid trying to be hip by using their age group’s
slang.
Coaching Tip	 With the U6 and U8 age groups, give your instruc-
tions, comments, or questions in 30 seconds or less. With the U10 and
U12 age groups, give your instructions, comments, or questions in 45
seconds or less. With the U14 age group, give your instructions, com-
ments, or questions in 1 minute or less.
Say It Loud Enough, and Say It Again
Talk to your team in a voice that all members can hear. A crisp, vigorous voice
commands attention and respect; garbled and weak speech is tuned out. It’s OK,
and in fact appropriate, to soften your voice when speaking to a player individu-
ally about a personal problem. But most of the time your messages will be for all
your players to hear, so make sure they can. An enthusiastic voice also motivates
Coaching Youth Soccer12
players and tells them you enjoy being their coach. A word of caution, however:
Avoid dominating the setting with a booming voice that distracts attention from
players’ performances. When a player enters into a mental state of flow, it can be
a powerful learning environment, in which case interrupting a player’s rhythm
can do more harm than good.
Sometimes what you say, even if you state it loudly and clearly, won’t sink in
the first time. This may be particularly true when young players hear words they
don’t understand. To avoid boring repetition and still get your message across,
say the same thing in a slightly different way. For instance, you might first tell
your players, “Mark your opponents tighter!” If they don’t appear to understand,
you might say, “When your opponents are in shooting range, you can’t give them
the chance to shoot or pass the ball forward.” The second form of the message
may get through to players who missed it the first time around.
Coaching Tip	 Remember, terms that you are familiar with and
understand may be completely foreign to your players, especially the
beginners. Use a vocabulary appropriate for the age group. A 6-year-
old most likely will not comprehend some words that a 12-year-old will
understand.
Be Consistent
People often say things in ways that imply a different message. For example, a
touch of sarcasm added to the words “Way to go!” sends an entirely different
message than the words themselves suggest. Avoid sending mixed messages. Keep
the tone of your voice consistent with the words you use. Don’t say something
one day and contradict it the next; players will get their wires crossed.
Keep your terminology consistent. Many soccer terms describe the same or a
similar skill. One coach may use the term halfback to describe a position in the
middle of the team, whereas another coach may call the same position midfielder.
Both are correct. To be consistent as a staff, however, agree on all terms before
the start of the season, and then stay with them.
Nonverbal Messages
Just as you must be consistent in the tone of voice and words you use, you must
also keep your verbal and nonverbal messages consistent. An extreme example
of failing to do so would be shaking your head, indicating disapproval, and at
the same time telling a player, “Nice try.” Which is the player to believe, your
gesture or your words?
You can send messages nonverbally in several ways. Facial expressions and
body language are just two of the more obvious forms of nonverbal signals that
can help you when you coach. Keep in mind that a coach needs to be a teacher
first, and any action that detracts from the message you are trying to convey
should be avoided.
Communicating as a Coach 13
Facial Expressions
The look on a person’s face is the quickest clue to what he thinks or feels. Your
players know this, so they will study your face, looking for a sign that will tell
them more than the words you say. Don’t try to fool them by putting on a happy
or blank mask. They’ll see through it, and you’ll lose credibility.
Serious, stone-faced expressions provide no cues to kids who want to know
how they are performing. When faced with such, kids will just assume you’re
unhappy or disinterested. Don’t be afraid to smile. A smile from a coach can
give a great boost to an unsure player. Plus, a smile lets your players know that
you are happy coaching them. But don’t overdo it, or they won’t be able to tell
when you are genuinely pleased by something they’ve done and when you are
just putting on a smiling face.
Body Language
What would your players think you were feeling if you came to training slouched
over, with your head down and shoulders slumped? That you were tired, bored,
or unhappy? What would they think you were feeling if you watched them during
a match with your hands on your hips, your jaws clenched, and your face red-
dened? Would they get the impression that you were upset with them, disgusted
at a referee, or mad at a fan? Probably some or all of these things would enter
your players’ minds. None of them are impressions you want your players to
have of you. That’s why you should carry yourself in a pleasant, confident, and
vigorous manner.
Coaching Tip	 A good-humored, energetic posture not only projects
happiness with your coaching role but also provides a good example
for your young players, who may model your behavior. Whereas pre-
pubescent children do pick up on the coach’s mannerisms, pubescent
children are particularly aware of the coach’s actions. Be prepared at
all times to walk the talk.
Physical contact can also be an essential use of body language. A handshake,
a pat on the head, an arm around the shoulder, and even a big hug are effective
ways to show approval, concern, affection, and joy to your players. Youngsters
are especially in need of this type of nonverbal message. Keep within the obvious
moral and legal limits, of course, but don’t be reluctant to touch your players,
sending a message that can be expressed only by such contact.
Coaching Youth Soccer14
Improving Your Receiving Skills
Now, let’s examine the other half of the communication process: receiving
messages. Too often, good senders are poor receivers of messages. As a coach of
young players, you must be able to fulfill both roles effectively.
The requirements for receiving messages are quite simple, but some people
find receiving skills less satisfying than sending skills; therefore, they do not
work at them. People seem to enjoy hearing themselves talk more than they
enjoy hearing others talk. But if you learn the keys of receiving messages and
make a strong effort to use them with your players, you’ll be surprised by what
you’ve been missing.
Pay Attention
First, you must pay attention—you must want to hear what others have to
communicate to you. That’s not always easy when you’re busy coaching and
have many things competing for your attention. But in one-on‑one or team
meetings with players, you must focus on what they are telling you, both
verbally and nonverbally. You’ll be amazed at the little signals you pick up.
Focused attention not only helps you catch every word your players say but
also helps you take in your ­players’ moods and physical states. In addition,
you’ll get an idea of your ­players’ feelings toward you and others on the team.
It is especially important to listen more than talk during a match. As a player-
centered sport, soccer requires players to talk to each other, and you need to
hear what they are saying.
Coaching Tip	 You’ll see training sessions during which the coach
is talking all the time. The players want to continue playing, but the
coach is rambling on. Hundreds of thousands of youth soccer coaches
across America do the same thing during matches. When the coach
takes center stage this way, it takes the game away from the players.
But the game is all about the players, and the players are the game.
Listen Carefully
Perhaps more than anything else, how we receive messages from others demon-
strates how much we care for the sender and for what that person has to tell us.
If you have little regard for your players or for what they have to say, it will show
in how you attend to them. Check yourself. Do you find your mind wandering
to what you are going to do after practice while one of your players is talking to
you? Do you frequently have to ask your players, “What did you say?” If so, you
need to work on the receiving mechanics of attend­ing and listening. If you find
that you’re missing the messages your players send, the most critical question
you should ask yourself is this: Do I care?
Communicating as a Coach 15
If you do care, then you’ll want your players’ input. The degree of input will
depend on their age. As an example, too many coaches carry on a monologue
at halftime, and the players never have a say in the second-half game plan. Yet
they are the ones who must execute it. Instead, the halftime talk should be a
dialogue between the coach and players on what to do for the second half. As
to age appropriateness, that talk with the U6 age group will be one question,
one comment, and then “Let’s play.” With the U14 age group, the talk should
be more detailed. The point is to give ownership of the game to the players, so
you must involve them in the team decision-making process. Remember that
once the match begins, it is completely up to the players.
Providing Feedback
So far we’ve discussed the sending and receiving of messages separately. But we all
know that senders and receivers switch roles several times during an interaction.
One person initiates communication by sending a message to another person, the
receiver. The receiver then becomes the sender by responding to the person who
sent the initial message. These verbal and nonverbal responses are called feedback.
Your players will look to you for feedback all the time. They will want to know
how you think they are performing, what you think of their ideas, and whether
their efforts please you. You can respond in many different ways, and how you
respond will strongly affect your players. They will react most favorably to posi-
tive feedback.
Praising players when they have performed or behaved well is an effective
way of encouraging them to repeat (or try to repeat) that behavior. And positive
feedback for effort is an especially effective way to motivate youngsters to work
on difficult skills. Rather than shouting at players who have made mistakes and
giving them negative feedback, try offering positive feedback by letting them
know what they did correctly and how they can improve. Sometimes just the
way you word feedback can make it more encouraging than not. For example,
instead of saying, “Don’t shoot the ball that way,” you might say, “Shoot the ball
this way.” Then your players will focus on what to do instead of what not to do.
Be careful, though, to not overpraise. Be a coach, not a cheerleader.
Coaching Tip	 Here are a dozen ways to commend your athletes: 1.
I think you’ve got it now. 2. Outstanding! 3. I’m proud of the way you
worked today. 4. Now you’ve got it! 5. Tremendous! 6. Hurray for you!
7. You certainly did well today. 8. Perfect. 9. You’ve got your brain in
gear today. 10. Good! 11. Now you have the hang of it. 12. Bingo!
Positive feedback can be verbal or nonverbal. Telling young players that they
have performed well, especially in front of teammates, is a great way to boost
their confidence. And a pat on the back or a handshake communicates that you
recognize a player’s performance.
Coaching Youth Soccer16
Communicating With Others
Coaching involves not only sending and receiving messages and providing proper
feedback to players but also interacting with members of the staff, parents, fans,
officials, and opposing coaches. If you don’t communicate effectively with these
groups, your coaching career will be unpleasant and short lived. Try the follow-
ing suggestions for communicating with these groups.
Coaching Staff
Before you hold your first practice, the coaching staff must meet and discuss the
roles and responsibilities that each coach will undertake during the year. Staff
responsibilities can be divided into head coach, assistant coaches, and team
manager, depending on the number of volunteers. Some clubs may also have
a goalkeeper coach. The head coach has the final responsibility for all phases
of the game, but the assistant coaches should take on as much responsibility in
their roles as possible.
Before training sessions start, the coaching staff must also discuss and agree
on terminology, plans for training, organization on match day, and methods of
communicating during training sessions and matches. The coaches on your staff
must present a united front; they must all take a similar approach to coaching,
interacting with players and parents, and interacting with one another. Conduct
discussions of disagreements away from the playing field so that each coach can
have a say and the staff can come to an agreement.
Parents
A player’s parents need to be assured that their child is ­under the direction of a
coach who is both knowledgeable about the sport and concerned about each
youngster’s well-being. You can put their worries to rest by holding a preseason
orientation meeting for parents, in which you describe your background and
your approach to coaching (see Preseason Meeting Topics).
If parents contact you with a concern during the season, listen to them closely,
and try to offer positive responses. If you need to communicate with parents,
catch them after training, give them a phone call, or send a note through e-mail
or the U.S. mail. Messages sent to parents through players are too often lost,
misinterpreted, or forgotten. Parents may also connect with US Youth Soccer’s
parent assistance program (which provides parents with information on how to
interact with their child in soccer, how to communicate with their child’s coach,
and so on) at www.usyouthsoccer.org/parents.
Communicating as a Coach 17
Fans
The stands probably won’t be overflowing at your matches, which means you’ll
more easily hear the few fans who criticize your coaching. When you hear some-
thing negative about the job you’re doing, don’t respond. Keep calm, consider
whether the message has any value, and if not, forget it. Acknowledging critical,
unwarranted comments from a fan during a match will only encourage others
to voice their opinions. So put away your rabbit ears and communicate to fans,
through your actions, that you are a confident, competent coach.
Prepare your players, too, for fan criticism. Tell them they should listen to
you, not the spectators. If you notice that one of your players is rattled by a fan’s
comment, reassure the player that your evaluation is more objective and favor-
able—and it’s the one that counts.
Preseason Meeting Topics
	 1.	 Share your philosophy of coaching.
	 2.	 Outline paperwork that is needed for the club:
•	 Copy of player’s birth certificate
•	 Completed player’s application and payment record
•	 Informed consent form (page 191)
•	 Emergency information card (page 193)
	 3.	 Review the inherent risks of soccer and other safety issues, and go over
your emergency action plan.
	 4.	 Inform parents of uniform and equipment costs and needs.
	 5.	 Review the season training schedule including date, location, and time
of each training session.
	 6.	 Discuss nutrition, hydration, and rest for players.
	 7.	 Explain goals for the team.
	 8.	 Cover methods of communication: e-mail list, emergency phone num-
bers, interactive Web site, and so on.
	 9.	 Discuss ways that parents can help with the team.
	 10.	 Discuss standards of conduct for coaches, players, and parents.
	 11.	 Provide time for questions and answers.
Coaching Youth Soccer18
Referees
How you communicate with referees will have a great influence on the way your
players behave toward them; therefore, you must set a good example. Greet ref-
erees with a handshake, an introduction, and ­perhaps casual conversation about
the upcoming match. Indicate your respect for them before, during, and after the
match. Don’t make nasty remarks, shout, or use disrespectful body gestures. Your
players will see you do these things, and they’ll get the idea that such behavior is
appropriate. Plus, if the referee hears or sees you, the communication between
the two of you will break down.
Opposing Coaches
Make an effort to visit with the coach of the opposing team before the match.
During the match, don’t get into a personal feud with the opposing coach.
Remember—it’s the kids, not the coaches, who are competing. And by getting
along well with the opposing coach, you’ll show your players that competition
involves cooperation.
19
Understanding Rules
and Equipment 3
20 Coaching Youth Soccer
Soccer is a simple game played by teams divided into 3 to 11 play-
ers per side. It is governed by rules that are modified for the age group you are
coaching. This introduction to the basic rules of soccer won’t cover every rule
of the game but will give you the fundamentals for working with players who
are 6 to 14 years old. This chapter covers field markings, ball and goal sizes,
and equipment. It also describes player positions, match procedures, and scor-
ing; reviews the rules of play; and gives an overview of officiating and common
officiating signals.
U6 U8 U10 U12 U14
Players
on team
Single
field
method:
4-6
Dual field
method:
8-10
Single
field
method:
6-8
Dual field
method:
10-12
Single
field
method:
9-11
Dual field
method:
14-16
11-13 11-18
Ball size 3 3 4 4 5
Goal size 6 × 18 ft
or smaller
6 × 18 ft
or smaller
6 × 18 ft 6 × 18 ft 8 × 24 ft
Field size 25 × 20 yd 35 × 25 yd 55 × 40 yd 80 × 50 yd 100 × 65 yd
Players
on field
3 per team 4 per team 6 per team 8 per team 11 per team
Length
of game
4 × 8 min 4 × 12 min 2 × 25 min 2 × 30 min 2 × 35 min
Age Modifications for Soccer
Before we begin, however, familiarize yourself with the concept of adjusting
the size of the field, goal, and ball; the number of players on the field; and the
duration of the game for various age groups to accommodate players’ devel-
opmental and skill levels. These adjustments are as follows:
For more detailed information on rule modifications, please refer to the
US Youth Soccer playing recommendations for each specific age group at
www.usyouthsoccer.org.
Understanding Rules and Equipment 21
Field
The Laws of the Game allow for the length and width of the field to vary within
set yardages, for age groups up to 16 and every level of competition. The field
markings within the boundary lines must be the same for every level of compe-
tition, as shown in figure 3.1, but they are modified for the specific age groups.
Some field markings you see on the field of play for teenage and adult players
will not be on the field for the younger players. For example, on the U6 and U8
fields of play, the penalty area is not marked on the field as it is for the U10 and
older age groups. The following markings define all fields (for additional soccer
definitions, please refer to the glossary starting on page 195).
•	 Goal line: The end line of the field, on which the goal sits. The goal line
runs from corner to corner.
•	 Touchline: The sideline that runs the length of the field of play from corner
to corner.
•	 Corner arc: The four 1-yard arcs, one in each corner of the field of play,
from which players take corner kicks.
•	 Goal area: The small box immediately in front of the goal from which
players take goal kicks.
•	 Penalty kick spot: The spot inside the penalty area from which players take
penalty kicks.
•	 Penalty area: The large box in front of the goal. Fouls committed by the
defending team that normally result in a direct free kick will result in a
penalty kick when the foul is committed inside their penalty area. This is
the area in which the goalkeeper may use his hands.
E5120/ASEP/398108/fig3.01/alw/pulled-r2
Goalarea
Goalarea
Penaltyarea
Penalty kick spot
Penalty arc
Corner arc
Touchline
Goalline
Goalline
Center circle
Center mark
Corner arc
Touchline
Penalty kick spot
Penalty arc
Penaltyarea
Halfway line
Goal
Goal
Figure 3.1  Soccer field markings.
Coaching Youth Soccer22
•	 Halfway line: The line that runs across the field of play from touchline to
touchline and divides the field in half.
•	 Center circle: The circle in the center of the field surrounding the center
mark, outside of which the defending team must remain until the ball is
put into play at a kickoff.
•	 Center mark: The spot on the halfway line where the ball is placed for a
kickoff.
Player Equipment
Soccer players need very little equipment to play the game. These items include
multistudded soccer shoes (recommended for outdoor play but not required),
loose-fitting clothing appropriate for the weather (goalkeepers wear a jersey
in a different color), and shin guards worn under knee-length socks to protect
players’ legs. Gloves for goalkeepers have always been optional equipment, used
predominantly to grip the ball better rather than to protect the hands. In cold
weather, gloves can also help keep goalkeepers’ hands warm and flexible for
catching the ball.
Make sure that players on your team are outfitted properly and that the equip-
ment they obtain meets acceptable standards. Advise players and their parents
about how players’ shoes should fit and how players should break shoes in
when they are new. Occasionally inspect shin guards to be sure they are in good
condition.
Player Positions
Give your young players a chance to play a variety of positions. By playing dif-
ferent positions, they’ll have a better all-around playing experience and will stay
more interested in the sport. Furthermore, they’ll have a better understanding
of the many technical and tactical skills used in the game. The players will also
better appreciate the efforts of their teammates who play positions they them-
selves find difficult.
Following are descriptions of the positions for soccer.
•	 Forward: Forwards play closer to the other team’s goal and shoot the ball
more than other players. The forwards that play nearest the touchlines are
called wingers; those in the middle of the field are referred to as strikers.
•	 Midfielder: Midfielders are all-purpose players who take shots and try to
win the ball from the other team. They are transition players, helping move
the ball from defense to offense. Their position is named appropriately
since they play between forwards and defenders on the field.
•	 Defender: Defenders play near their own team’s goal and try to prevent
the other team from shooting the ball. They also receive the ball from the
goalkeeper and move the ball up the field to begin the attack.
Understanding Rules and Equipment 23
•	 Goalkeeper: A goalkeeper plays in front of the goal and tries to pre­vent the
ball from getting into the goal. The goalkeeper is the only player allowed
to use the hands to block shots and to initiate the attack from within the
team’s penalty area.
Soccer uses different alignments for different age groups (see table 3.1). In all
cases, the numbers that describe team formation—as shown in the formation
used column of table 3.1—go from the back to the front, and the goalkeeper is
assumed (except for the U6 and U8 age groups, for which no goalkeepers are
used). For example, in the U14 age group, which uses 11 players on the field per
team, a formation could be 4-3-3. These numbers mean four defenders, three
midfielders, and three forwards. Please note, however, that these are not the only
formations that can work with your players. You should choose a team formation
that best executes the principles of play and that makes it easy for your players
to support one another on offense and defense.
For the U6 age group there is no team formation. Coaches of the U6 age
group should not be dismayed if players tend to congregate around the ball
simultaneously, because this is the nature of the age group. For the U8 age
group, however, two formations—the box or the diamond—can be used. The
diamond consists of four players assuming a diamondlike shape, with one
player in back, two on the sides, and one in front. The box consists of two play-
ers in back and two players in front. In either case, remember that U8 players
will have only slightly more understanding of group shape than the U6 age
group, so don’t be dismayed if they tend to stray from these formations and
bunch around the ball.
The U10 through U14 age groups use more complex formations. For the U10
age group, you can use two basic formations—three defenders and two forwards,
or the reverse. US Youth Soccer recommends the 3-2 formation. For the U12 age
group, three basic formations, a 3-2-2, a 3-3-1, or a 2-3-2, can be used. At this
level, if the coach and team wish to forgo a midfield line, they can use a 4-3 for-
mation. US Youth Soccer recommends the formation with two defenders, three
midfielders, and two forwards. For the U14 age group, you can use two basic
formations—a 4-3-3 or a 3-4-3. US Youth Soccer recommends the formation
with three defenders, four midfielders, and three forwards.
Table 3.1  Soccer Formations for Age Groups
Age group Players on field Formation used
U6 3v3 N/A
U8 4v4 Box or diamond
U10 6v6 3-2
U12 8v8 2-3-2
U14 11v11 3-4-3
Coaching Youth Soccer24
Rules of Play
Soccer rules are designed to make the match run smoothly and safely and to
prevent either team from gaining an unfair advantage. Following is an overview
of some of the basic rules in soccer.
Starting the Match
Soccer matches begin with one team, chosen by a coin toss, kicking the ball
from the center mark. The opposing team’s players are not allowed within the
center circle during the kickoff. Players on both teams must be on their half of
the field during the kickoff, and the kicked ball must roll forward before another
player may touch it.
The same procedures are followed after a goal is scored. In this situation, the
team that was scored on restarts the match by kicking off from the center mark,
and the team that scored stands outside of the center circle in its half of the field.
Restarting the Game
Several situations may cause a referee to stop play during a match, and play
must restart accordingly (depending on the reason for stopping play). Play is
also stopped when a ball goes out of bounds beyond the goal line or along the
touchline.
When an attacking team kicks the ball out of bounds beyond the goal line,
as in a missed shot, the opposing team is awarded a free kick called a goal kick.
The defending team makes this kick from anywhere inside the goal area. The
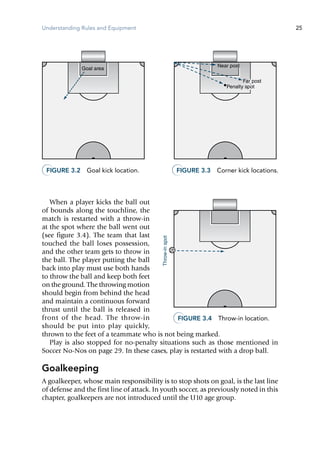
majority of the time, the goal kick should be played upfield and out toward
the touchlines, as shown in figure 3.2. The players on the team that kicked the
ball out of bounds must stay outside the penalty area until the ball clears the
penalty area.
If a team kicks the ball beyond its own goal line, the other team is awarded
a corner kick from the corner arc on the side of the field where the ball went
out. During the kick, defending players must be at least 10 yards, or a distance
equivalent to the diameter of the center circle, from the player kicking the ball.
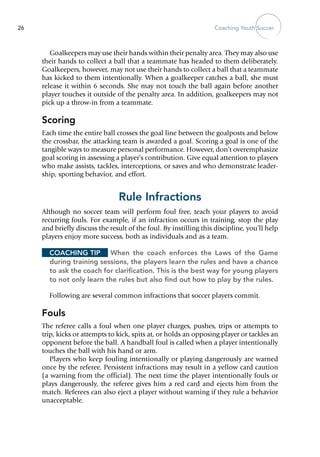
The kicker’s teammates may position themselves anywhere they choose. Corner
kicks are most commonly made into three areas—the near post, the far post,
and the penalty spot—as shown in figure 3.3.
Coaching Tip	 Many U6 and U8 players do not yet have the eye–
hand coordination to execute a throw-in, so for these age groups a
kick-in is used to replace the throw-in. For a kick-in, the ball is on the
ground and stationary so that U6 and U8 players have a better chance
of striking it correctly.
Understanding Rules and Equipment 25
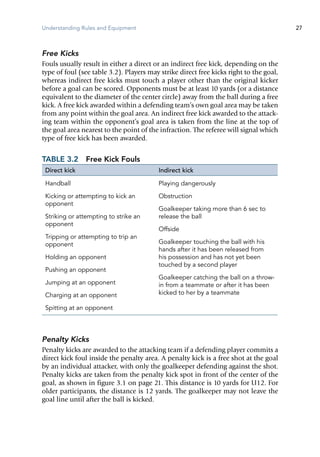
When a player kicks the ball out
of bounds along the touchline, the
match is restarted with a throw-in
at the spot where the ball went out
(see figure 3.4). The team that last
touched the ball loses possession,
and the other team gets to throw in
the ball. The player putting the ball
back into play must use both hands
to throw the ball and keep both feet
on the ground. The throwing motion
should begin from behind the head
and maintain a continuous forward
thrust until the ball is released in
front of the head. The throw-in
should be put into play quickly,
thrown to the feet of a teammate who is not being marked.
Play is also stopped for no-penalty situations such as those mentioned in
Soccer No-Nos on page 29. In these cases, play is restarted with a drop ball.
Goalkeeping
A goalkeeper, whose main responsibility is to stop shots on goal, is the last line
of defense and the first line of attack. In youth soccer, as previously noted in this
chapter, goalkeepers are not introduced until the U10 age group.
E5120/ASEP/398109/fig3.02/alw/pulled-r1
Goal area
Figure 3.2  Goal kick location.
E5120/ASEP/398112/fig3.03/alw/pulled-r1
Near post
Far post
Penalty spot
Figure 3.3  Corner kick locations.
E5120/ASEP/398114/fig3.04/alw/pulled-r1
Throw-inspot
Figure 3.4  Throw-in location.
Coaching Youth Soccer26
Goalkeepers may use their hands within their penalty area. They may also use
their hands to collect a ball that a teammate has headed to them deliberately.
Goalkeepers, however, may not use their hands to collect a ball that a teammate
has kicked to them intentionally. When a goalkeeper catches a ball, she must
release it within 6 seconds. She may not touch the ball again before another
player touches it outside of the penalty area. In addition, goalkeepers may not
pick up a throw-in from a teammate.
Scoring
Each time the entire ball crosses the goal line between the goalposts and below
the crossbar, the attacking team is awarded a goal. Scoring a goal is one of the
tangible ways to measure personal performance. However, don’t overemphasize
goal scoring in assessing a player’s contribution. Give equal attention to players
who make assists, tackles, interceptions, or saves and who demonstrate leader-
ship, sporting behavior, and effort.
Rule Infractions
Although no soccer team will perform foul free, teach your players to avoid
recurring fouls. For example, if an infraction occurs in training, stop the play
and briefly discuss the result of the foul. By instilling this discipline, you’ll help
players enjoy more success, both as individuals and as a team.
Coaching Tip	 When the coach enforces the Laws of the Game
during training sessions, the players learn the rules and have a chance
to ask the coach for clarification. This is the best way for young players
to not only learn the rules but also find out how to play by the rules.
Following are several common infractions that soccer players commit.
Fouls
The referee calls a foul when one player charges, pushes, trips or attempts to
trip, kicks or attempts to kick, spits at, or holds an opposing player or tackles an
opponent before the ball. A handball foul is called when a player intentionally
touches the ball with his hand or arm.
Players who keep fouling intentionally or playing dangerously are warned
once by the referee. Persistent infractions may result in a yellow card caution
(a warning from the official). The next time the player intentionally fouls or
plays dangerously, the referee gives him a red card and ejects him from the
match. Referees can also eject a player without warning if they rule a behavior
unacceptable.
Understanding Rules and Equipment 27
Free Kicks
Fouls usually result in either a direct or an indirect free kick, depending on the
type of foul (see table 3.2). Players may strike direct free kicks right to the goal,
whereas indirect free kicks must touch a player other than the original kicker
before a goal can be scored. Opponents must be at least 10 yards (or a distance
equivalent to the diameter of the center circle) away from the ball during a free
kick. A free kick awarded within a defending team’s own goal area may be taken
from any point within the goal area. An indirect free kick awarded to the attack-
ing team within the opponent’s goal area is taken from the line at the top of
the goal area nearest to the point of the infraction. The referee will signal which
type of free kick has been awarded.
Table 3.2  Free Kick Fouls
Direct kick Indirect kick
Handball
Kicking or attempting to kick an
opponent
Striking or attempting to strike an
opponent
Tripping or attempting to trip an
opponent
Holding an opponent
Pushing an opponent
Jumping at an opponent
Charging at an opponent
Spitting at an opponent
Playing dangerously
Obstruction
Goalkeeper taking more than 6 sec to
release the ball
Offside
Goalkeeper touching the ball with his
hands after it has been released from
his possession and has not yet been
touched by a second player
Goalkeeper catching the ball on a throw-
in from a teammate or after it has been
kicked to her by a teammate
Penalty Kicks
Penalty kicks are awarded to the attacking team if a defending player commits a
direct kick foul inside the penalty area. A penalty kick is a free shot at the goal
by an individual attacker, with only the goalkeeper defending against the shot.
Penalty kicks are taken from the penalty kick spot in front of the center of the
goal, as shown in figure 3.1 on page 21. This distance is 10 yards for U12. For
older participants, the distance is 12 yards. The goalkeeper may not leave the
goal line until after the ball is kicked.
Coaching Youth Soccer28
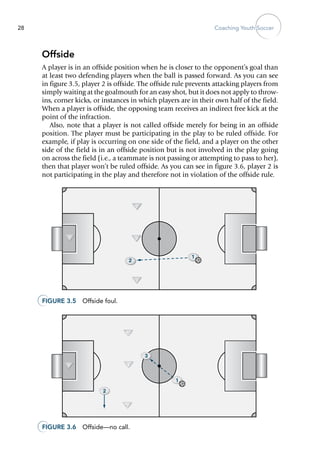
Offside
A player is in an offside position when he is closer to the opponent’s goal than
at least two defending players when the ball is passed forward. As you can see
in figure 3.5, player 2 is offside. The offside rule prevents attacking players from
simply waiting at the goalmouth for an easy shot, but it does not apply to throw-
ins, corner kicks, or instances in which players are in their own half of the field.
When a player is offside, the opposing team receives an indirect free kick at the
point of the infraction.
Also, note that a player is not called offside merely for being in an offside
position. The player must be participating in the play to be ruled off­side. For
example, if play is occurring on one side of the field, and a player on the other
side of the field is in an offside position but is not involved in the play going
on across the field (i.e., a teammate is not passing or attempting to pass to her),
then that player won’t be ruled offside. As you can see in figure 3.6, player 2 is
not participating in the play and therefore not in violation of the offside rule.
1
2
E5120/ASEP/398119/fig3.05/alw/pulled-r1
E5120/ASEP/398120/fig3.06/alw/pulled-r1
1
2
3
Figure 3.5  Offside foul.
Figure 3.6  Offside—no call.
Understanding Rules and Equipment 29
Officiating
Soccer referees enforce the rules. Their authority over a match begins at least
30 minutes before the start of play and finishes at least 30 minutes after it has
ended. In youth soccer, there are typically three officials—a referee and two
assistant referees—overseeing the game. For the U6 and U8 age groups there is
often only one referee, and in many leagues even the coaches officiate. In the U10
age group, it is common for one certified referee to officiate the game because
of the shortage of referees. It is also common for youngsters, some as young as
12 years old, to be the referees. Any official, however, has many responsibilities
during a match, including effectively communicating the calls to other members
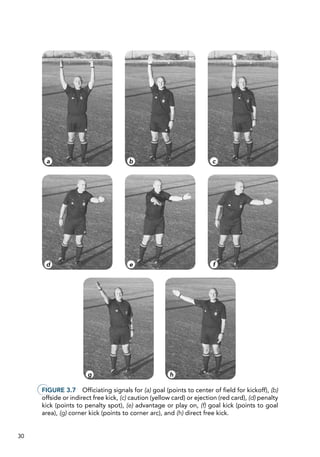
of the referee crew and to the players, coaches, and spectators. See figure 3.7, a
through h, on page 30 for common officiating signals.
In addition, if you have a concern about how referees are officiating a match,
address the referees respectfully. Do so immediately if at any time you believe
the officiating jeopardizes the safety of your players.
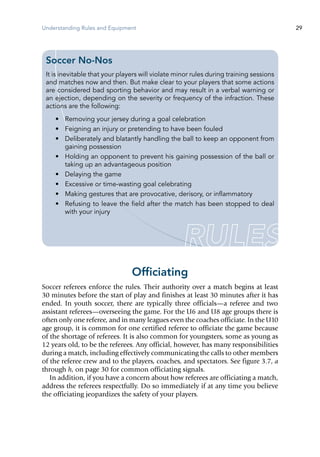
Soccer No-Nos
It is inevitable that your players will violate minor rules during training sessions
and matches now and then. But make clear to your players that some actions
are considered bad sporting behavior and may result in a verbal warning or
an ejection, depending on the severity or frequency of the infraction. These
actions are the following:
•	 Removing your jersey during a goal celebration
•	 Feigning an injury or pretending to have been fouled
•	 Deliberately and blatantly handling the ball to keep an opponent from
gaining possession
•	 Holding an opponent to prevent his gaining possession of the ball or
taking up an advantageous position
•	 Delaying the game
•	 Excessive or time-wasting goal celebrating
•	 Making gestures that are provocative, derisory, or inflammatory
•	 Refusing to leave the field after the match has been stopped to deal
with your injury
30
Figure 3.7  Officiating signals for (a) goal (points to center of field for kickoff), (b)
offside or indirect free kick, (c) caution (yellow card) or ejection (red card), (d) penalty
kick (points to penalty spot), (e) advantage or play on, (f) goal kick (points to goal
area), (g) corner kick (points to corner arc), and (h) direct free kick.
a b c
d e f
g h
31
Providing
for Players’ Safety 4
32 Coaching Youth Soccer
One of your players breaks free down the field, dribbling the ball. Sud-
denly a defender catches up with, and accidentally trips, the goal-bound player.
You notice that your player is not getting up from the ground and seems to be
in pain. What do you do?
No coach wants to see players get hurt. But injury remains a reality of sports
participation; consequently, you must be prepared to provide first aid when
injuries occur and to protect yourself against unjustified ­lawsuits. Fortunately,
coaches can institute many preventive measures to reduce the risks. In this chap-
ter we describe steps you can take to prevent injuries, first aid and emergency
responses you can carry out when injuries occur, and legal responsibilities you
have as a coach.
Game Plan for Safety
You can’t prevent all injuries from happening, but you can take preventive
measures that give your players the best possible chance for ­injury-free participa-
tion. In creating the safest possible environment for your players, you can make
preparations in these areas:
•	 Preseason physical examination
•	 Physical conditioning
•	 Equipment and facilities inspection
•	 Player matchups and inherent risks
•	 Proper supervision and record keeping
•	 Environmental conditions
Preseason Physical Examination
We recommend that your players have a physical examination before participat-
ing in soccer. The exam should address the most likely areas of medical concern
and identify youngsters at high risk. We also suggest that you have players’ par-
ents or guardians sign a participation agreement form (this will be discussed in
more detail later in this chapter) and an informed consent form to allow their
children to be treated in case of an emergency. For a sample informed consent
form, see page 191 of the appendix.
Physical Conditioning
Players need to be fit or get fit to play the game at the level expected. They must
have adequate cardiorespiratory and muscular fitness.
Cardiorespiratory fitness involves the body’s ability to use oxygen and fuel
efficiently to power muscle contractions. As players get fitter, their bodies are able
to more efficiently deliver oxygen to fuel muscles and carry off carbon dioxides
and other wastes. Soccer requires lots of running and exertion; most players will
move nearly continuously and make short bursts throughout a match. Youngsters
Providing for Players' Safety 33
who aren’t as fit as their peers often overextend in trying to keep up, which can
result in light-­headed­ness, ­nausea, fatigue, and potential injury.
Try to remember that the players’ goals are to participate, learn, and have
fun. Therefore, you must keep your players active, attentive, and involved with
every phase of training. If you do, they will attain higher levels of cardiorespira-
tory fitness as the season progresses simply by taking part in training. However,
watch closely for signs of low cardiorespiratory fitness; don’t let your players do
much until they’re fit. You might privately counsel youngsters who appear overly
winded, suggesting that they train under proper supervision outside of training
sessions to increase their fitness.
Muscular fitness encompasses strength, muscular endurance, power, speed,
and flexibility. This type of fitness is affected by physical maturity as well as by
strength training and other types of training. Your ­players will likely exhibit a
relatively wide range of muscular fitness. Those who have greater muscular fitness
will be able to run faster and perform more consistently. They will also sustain
fewer muscular injuries, and any injuries that do occur will tend to be minor. And
in case of injury, recovery is faster in those with higher levels of muscular fitness.
Coaching Tip	 Children aged 5 to 8 will play all out, with little or
no sense of pace, and consequently will fatigue quickly. They will stop
activity to rest, and when they resume, they will go flat out again. Pre-
adolescent children aged 5 to 15 will overheat sooner than an adult, so
pay close attention to water breaks and to the climate in which training
sessions and matches are taking place.
Two other components of fitness and injury prevention are the warm-up and
the cool-down. Although young bodies are generally very limber, they can become
tight through inactivity. The warm-up should address each muscle group and
elevate the heart rate in preparation for strenuous activity. Players should warm
up for 5 to 10 minutes using a combination of light, dynamic movement and
stretching. As training winds down, slow the players’ heart rates with an easy jog
or walk. Then have players stretch for 5 minutes to help prevent tight muscles
before the next training session or match.
Equipment and Facilities Inspection
Another way to prevent injuries is to check the quality and fit of uniforms, train-
ing attire, and protective equipment that your players use. Ensure that all players
have ade­quate shin guards and that they wear them.
Remember also to regularly examine the field on which your players train
and play. Remove hazards, report conditions you cannot remedy, and request
maintenance as necessary. If unsafe conditions exist, either make adaptations
to prevent risk to your players’ safety or stop the training session or match until
safe conditions have been restored. Refer to the facilities and equipment check-
list on page 190 of the appendix to guide you in verifying that facilities are safe.
Coaching Youth Soccer34
Player Matchups and Inherent Risks
We recommend that you group teams in two-year age increments if possible.
You’ll encounter fewer mismatches in physical maturation with narrow age
ranges. Even so, two 12-year-old boys might differ greatly in weight, a foot in
height, and one to three years in emotional and intellectual maturity. Such varia-
tion presents dangers for the less mature. Closely supervise activities so that the
more mature do not put the less mature at undue risk.
Coaching Tip	 Coed teams are perfectly acceptable up until puberty
(generally the U12 age group). In the U6 and U8 age groups there are
few differences between females and males in height and weight.
Although proper matching of age groups helps protect you from certain liabil-
ity concerns, you must also warn players of the inherent risks involved in playing
soccer because failure to warn is one of the most successful arguments in lawsuits
against coaches. Please note that although soccer is not a collision sport, it is a
contact sport and injuries are possible. Thoroughly explain the inherent risks of
soccer, and make sure each player knows, understands, and appreciates the risks.
Some of these intrinsic risks are outlined in chapter 1; learn more about them
in this chapter and by talking with your league administrators.
The preseason orientation meeting for parents is a good opportunity to explain
the risks of the sport to both parents and players. It is also a good occasion on
which to have both the players and their parents sign a waiver releasing you
from liability should an injury occur. You should work with your league when
creating these ­forms or waivers, and legal counsel should review them before
presentation. These documents do not relieve you of responsibility for your
players’ well-being, but lawyers recommend them, and they may help you in
the event of a lawsuit.
Proper Supervision and Record Keeping
To ensure players’ safety, you must provide both general supervision and specific
supervision. General supervision means you are in the area of activity so you
can see and hear what is happening. You should be
•	 on the field and in position to supervise the players even before the formal
training begins;
•	 immediately accessible to, and able to oversee, the entire activity;
•	 alert to conditions that may be dangerous to players and ready to take
action to protect players;
•	 able to react immediately and appropriately to emergencies; and
•	 present on the field until the last player has been picked up after the train-
ing session or match.
Providing for Players' Safety 35
Specific supervision is the direct supervision of an activity at training. For
example, you should provide specific supervision when you teach new skills
and continue it until your players understand the requirements of the activ-
ity, the risks involved, and their own ability to perform in light of these risks.
You must also provide specific supervision when you notice players breaking
rules or see a change in the condition of your players. As a general rule, the
more dangerous the activity, the more specific the supervision required. This
principle suggests that younger and less experienced players require more
specific supervision.
Coaching Tip	 Although 6-year-olds do indeed need a good bit of
supervision during training sessions and matches, they do not gener-
ate the force or velocity that teenage players do in respect to impact
injuries. They bump into one another, which may cause tears to appear,
but it is less likely that a serious injury has occurred. You must atten-
tively supervise all activity, of all age groups, at all training sessions and
matches.
As part of your supervisory duties, you are expected to foresee potentially
dangerous situations and to help prevent them. This responsibility requires
that you know soccer well, especially the rules that are intended to provide for
safety. For example, serious injury and possibly death can occur if a goal topples
over onto a player, so prohibit dangerous horseplay, and hold training sessions
only under safe weather conditions. Such specific supervisory activities, applied
consistently, will make the play environment safer for your players and will help
protect you from lia­bility if a mishap occurs.
For further protection, keep records of your season plans, practice plans,
and players’ injuries. Season and practice plans come in handy when you need
evidence that you have taught players certain skills, and accurate, detailed
injury report forms offer protection against unfounded lawsuits. Ask for these
forms from your sponsoring organization (see the Injury Report Form on page
192 of the appendix), and hold onto these records for several years so that a
so-called old soccer injury of a former player doesn’t come back to haunt you.
Environmental Conditions
Most health problems that environmental factors cause are related to excessive
heat or cold, but you should also consider other environmental factors such as
severe weather and air pollution. A little thought about the potential problems
and a little effort to ensure adequate protection for your players will prevent
most serious emergencies related to environmental conditions.
Coaching Youth Soccer36
Coaching Tip	 Encourage players to drink plenty of water before,
during, and after training. Water makes up 45 to 65 percent of a young-
ster’s body weight, and losing even a small amount of water can cause
severe consequences in the body’s systems. It doesn’t have to be hot
and humid for players to become dehydrated, nor is thirst an accurate
indicator. In fact, by the time players are aware of their thirst, they are
long overdue for a drink.
Heat
On hot, humid days the body has difficulty cooling itself. Because the air is
already saturated with water vapor (humidity), sweat doesn’t evaporate as easily.
Therefore, body sweat is a less effective cooling agent, and the body retains extra
heat. Hot, humid environments put players at risk of heat exhaustion and heat-
stroke (see more on these in Serious Injuries on pages 43-47). And if you think
it’s hot or humid, it’s worse for the kids, not only because they’re more active
but also because kids under the age of 12 have more difficulty regulating their
body temperature than do adults. To provide for players’ safety in hot or humid
conditions, take the following preventive measures.
•	 Monitor weather conditions, and adjust training sessions accordingly.
Table 4.1 shows the specific air temperatures and humidity percentages
that can be hazardous.
•	 Acclimatize players to exercising in high heat and humidity. Players can
adjust to high heat and humidity in 7 to 10 days. During this period, hold
practices at low to moderate levels of activity, and give the players fluid
breaks every 20 minutes or less.
•	 Switch to light clothing. Players should wear shorts and white T‑shirts.
•	 Identify and monitor players who are prone to heat illness. ­Players who
are overweight, heavily muscled, or out of shape and players who work
excessively hard or have experienced previous heat illness are more prone
Table 4.1  Warm-Weather Precautions
Temperature (°F) Humidity Precautions
80-90 <70% Monitoring of athletes
prone to heat illness
≥70% 5 min rest after 30 min of
practice
90-100 <70% 5 min rest after 30 min of
practice
≥70% Short practices in eve-
ning or early morning
Providing for Players' Safety 37
to getting heat illness. Closely monitor these children, and give them fluid
breaks every 15 to 20 minutes, or even more frequently for the U6 age group.
•	 Make sure players replace fluids lost through sweat. Encourage players
to drink 17 to 20 ounces of fluid 2 to 3 hours before training sessions or
matches and 7 to 10 ounces every 20 minutes during and after training.
Afterward they should drink 16 to 24 ounces of fluid for every pound lost
during exercise. Fluids such as water and sports drinks are preferable during
matches and training sessions (suggested intakes are based on National
Athletic Trainers’ Association [NATA] recommendations). The amount
of fluid is generally the same for each age group; however, prepubescent
players should drink more water than sports drinks.
•	 Encourage players to replenish electrolytes, such as sodium (salt) and
potassium, which are lost through sweat. The best way to replace these
lost nutrients in addition to others such as carbohydrate (for energy) and
protein (for muscle building) is by eating a balanced diet.
Cold
When a person is exposed to cold weather, body temperature starts to drop
below normal. To counteract this reaction, the body shivers to create heat and
reduces blood flow to the extremities to conserve heat in the core of the body.
But no matter how effective its natural heating mechanism is, the body will better
withstand cold temperatures if it is prepared to handle them. To reduce the risk
of cold-related illnesses, make sure players wear appropriate protective clothing,
and keep them active to maintain body heat. Also monitor the windchill factor
because it can drastically affect the severity of players’ responses to the weather.
The windchill factor index is shown in figure 4.1.
E5120/ASEP/398144/fig4.01/alw/pulled-r1
-29
-27
-26
-24
-22
-19
-16
-11
-22
-21
-19
-17
-15
-13
-10
-5
-15
-14
-12
-11
-9
-7
-4
1
-8
-7
-5
-4
-2
0
3
7
-1
0
1
3
4
6
9
13
6
7
8
9
11
13
15
19
13
14
15
16
17
19
21
25
20
21
22
23
24
25
27
31
27
28
28
29
30
32
34
36
0 5 10 15 20 25 30 35 40
Temperature (˚F)
Windspeed(mph)
40
35
30
25
20
15
10
5
Windchill temperature (˚F)
Flesh may freeze within one minute
NOTE
NEW SIZE
1/3-2
Figure 4.1  Windchill factor index.
Adapted from National Weather Service, 2009, NWS windchill chart. [Online]. Available: http://www.nws.noaa.gov/om/
windchill/index.shtml [December 6, 2010].
Coaching Youth Soccer38
Severe Weather
Severe weather refers to a host of potential dangers, including lightning storms,
tornadoes, hail, and heavy rains. Lightning is of special concern because it can
come up quickly and cause great harm or even kill. For each 5-second count
from the flash of lightning to the bang of thunder, lightning is one mile away.
A flash–bang of 10 seconds means lightning is two miles away; a flash–bang of
15 seconds indicates lightning is three miles away. You should stop a practice
or competition for the day if lightning is three miles away or closer (15 seconds
or less from flash to bang). Your school or club, league, or state association may
have additional rules that you will want to consider in severe weather.
Safe places in which to take cover when lightning strikes are fully enclosed
metal vehicles with the windows up, enclosed buildings, and low ground (under
cover of bushes, if possible). It’s not safe to be near metal objects such as flag
poles, fences, light poles, goals, and metal bleachers. Also avoid trees, water,
and open fields.
Cancel training when under a tornado watch or warning. If you are practic-
ing or competing when a tornado is nearby, you should get inside a building
if possible. If you cannot get into a building, lie down in a ditch or other low-
lying area, or crouch near a strong building and use your arms to protect your
head and neck.
The keys to handling severe weather are caution and prudence. Don’t try to
get that last 10 minutes of practice in if lightning is on the horizon. Don’t con-
tinue to play in heavy rain. Many storms can strike both quickly and ferociously.
Respect the weather and play it safe.
Air Pollution
Poor air quality and smog can present real dangers to your players. Both short- and
long-term lung damage are possible from exercising in unsafe air. Although it’s
true that exercising in clean air is not possible in many areas, restricting activity
is recommended when the air quality ratings are lower than moderate or when
there is a smog alert. Your local health department or air quality control board
can inform you of the air quality ratings for your area and of their recommenda-
tions for when to restrict activities.
Responding to Players’ Injuries
No matter how good and thorough your prevention program is, in­juries quite
likely will occur. When injury does strike, chances are you will be the one
in charge. The severity and nature of the injury will determine how actively
involved you’ll be in treating it. But regardless of how seriously a player is hurt,
it is your responsibility to know what steps to take. Therefore, you must be
prepared to take appropriate action and provide basic emergency care when
an injury occurs.
Providing for Players' Safety 39
Being Prepared
Being prepared to provide basic emergency care involves many elements, includ-
ing being trained in cardiopulmonary resuscitation (CPR) and first aid and
having an emergency plan.
First-Aid Kit
A well-stocked first-aid kit should include the following:
•	 Antibacterial soap or wipes
•	 Arm sling
•	 Athletic tape—one and a half
inches
•	 Bandage scissors
•	 Bandage strips—assorted
sizes
•	 Blood spill kit
•	 Cell phone
•	 Contact lens case
•	 Cotton swabs
•	 Elastic wraps—three inches,
four inches, and six inches
•	 Emergency blanket
•	 Examination gloves (latex free)
•	 Eye patch
•	 Foam rubber—one-eighth
inch, one-fourth inch, and
one-half inch
•	 Insect sting kit
•	 List of emergency phone num-
bers
•	 Mirror
•	 Moleskin
•	 Nail clippers
•	 Oral thermometer (to deter-
mine whether a player has a
fever caused by illness)
•	 Penlight
•	 Petroleum jelly
•	 Plastic bags for crushed ice
•	 Prewrap (underwrap for
tape)
•	 Rescue breathing or CPR
face mask
•	 Safety glasses (for assis-
tance in first aid)
•	 Safety pins
•	 Saline solution for eyes
•	 Sterile gauze pads—three-
inch and four-inch squares
(preferably nonstick)
•	 Sterile gauze rolls
•	 Sunscreen—sun protection
factor (SPF) 30 or greater
•	 Tape adherent and tape
remover
•	 Tongue depressors
•	 Tooth saver kit
•	 Triangular bandages
•	 Tweezers
Adapted, by permission, from M. Flegel, 2008, Sport first aid, 4th ed. (Champaign, IL: Human Kinetics), 20.
Coaching Youth Soccer40
CPR and First-Aid Training
We recommend that all coaches receive CPR and first-aid training from a nation-
ally recognized organization such as the National Safety Council, the American
Heart Association, the American Red Cross, or the American Sport Education
Program (ASEP). You should be certified based on both a practical test and a
written test of knowledge. Training in CPR should include obstructed airway
procedures and basic life support for both children and adults.
Emergency Plan
An emergency plan is the final tool for being prepared to take appropriate action
for severe or serious injuries. The plan calls for three steps:
	 1.	 Evaluate the injured player.
Use your CPR and first-aid training to guide you. Be sure to keep these certifica-
tions up to date. Practice your skills frequently to keep them fresh and ready to
use when you need them.
	 2.	 Call the appropriate medical personnel.
If possible, delegate the responsibility of seeking medical help to another calm
and responsible adult who attends all training sessions and matches. Write out a
list of emergency phone numbers, and keep it with you at training and matches.
Include the following phone numbers:
•	 Rescue unit
•	 Hospital
•	 Physician
•	 Police
•	 Fire department
Take each player’s emergency information to every training session and match
(see the sample emergency information card on page 193 of the appendix). This
information includes the person to contact in case of an emergency, what types of
medicationstheplayerisusing,whattypesofdrugstheplayerisallergicto,andsoon.
Give an emergency response card (see page 194 of the appendix) to the contact
person calling for emergency assistance. Having this information ready should
help the contact person remain calm. You must also complete an injury report
form (see page 192 of the appendix); keep one on file for any injury that occurs.
	 3.	 Provide first aid.
If medical personnel are not on hand at the time of the injury, provide first-aid
care to the extent of your qualifications. Although your CPR and first-aid train-
ing will guide you, you must remember the following:
•	 Do not move the injured player if the injury is to the head, neck, or back;
if a large joint (ankle, knee, elbow, shoulder) is dis­located; or if the pelvis,
a rib, an arm, or a leg is fractured.
Providing for Players' Safety 41
•	 Calm the injured player, and keep others away from him as much as possible.
•	 Evaluate whether the player’s breathing has stopped or is ir­regular; clear
the airway with your fingers if necessary.
•	 Administer artificial respiration if the player’s breathing has stopped.
Administer CPR if the player’s circulation has stopped.
•	 Remain with the player until medical personnel arrive.
Taking Appropriate Action
Proper CPR and first-aid training, a well-stocked first-aid kit, and an emergency
plan prepare you to take appropriate action when an injury occurs. In the previ-
ous section, we mention the importance of providing first aid to the extent of
your qualifications. Don’t play doctor with injuries; sort out minor injuries that
you can treat from those that need medical attention. Let’s take a look at the
appropriate actions for minor injuries and more serious injuries.
Minor Injuries
Although no injury seems minor to the person experiencing it, most injuries are
neither life threatening nor severe enough to restrict participation. When these
injuries occur, you can take an active role in their initial treatment.
Emergency Steps
You must have a clear, well-rehearsed emergency action plan. You want to be
sure you are prepared in case of an emergency because every second counts.
Your emergency plan should follow this sequence:
	 1.	 Check the player’s level of consciousness.
	 2.	 Send a contact person to call the appropriate medical personnel and
the player’s parents.
	 3.	 Send someone to wait for the rescue team and direct them to the injured
player.
	 4.	 Assess the injury.
	 5.	 Administer first aid.
	 6.	 Assist emergency medical personnel in preparing the player for trans-
portation to a medical facility.
	 7.	 Appoint someone to go with the player if the parents are not available.
This person should be responsible, calm, and familiar with the player.
Assistant coaches or parents are best for this job.
	 8.	 Complete an injury report form while the incident is fresh in your mind
(see page 192 of the appendix).
Coaching Youth Soccer42
P
R
I
C
E
Scrapes and Cuts  When one of your players has an open wound, the first
thing you should do is put on a pair of disposable latex-free examination gloves
or some other effective blood barrier. Then follow these four steps:
	 1.	 Stop the bleeding by applying direct pressure with a clean dressing to the
wound and elevating the injured area if possible. The player may be able
to apply this pressure while you put on your gloves. Do not remove the
dressing if it becomes soaked with blood. Instead, place an additional
dressing on top of the one already in place. If bleeding continues, keep
elevating the injured area above the heart and maintain pressure.
	 2.	 Cleanse the wound thoroughly once the bleeding is controlled. A good
rinsing with a forceful stream of water, and perhaps light scrubbing with
soap, will help prevent infection.
	 3.	 Protect the wound with sterile gauze or a bandage strip. If the player con-
tinues to participate, apply protective padding over the injured area.
	 4.	 Remove and dispose of gloves carefully to prevent yourself or anyone else
from coming into contact with blood.
For bloody noses not associated with serious facial injury, have the player sit
and lean slightly forward. Then pinch the player’s nostrils shut. If the bleeding
continues after several minutes, or if the player has a history of nosebleeds, seek
medical assistance.
Coaching Tip	 You shouldn’t let a fear of acquired immunodeficiency
syndrome (AIDS) and other communicable diseases stop you from helping
a player. You are only at risk if you allow contaminated blood to come in
contact with an open wound on your body, so the disposable examination
gloves that you wear will protect you from AIDS if one of your players
carries this disease. Check with your club director, your league, or the
Centers for Disease Control and Prevention (CDC) for more information
about protecting yourself and your participants from AIDS.
Strains and Sprains  The physical demands of soccer training and matches
often result in injuries to the muscles or tendons (strains) or to the ligaments
(sprains). When your players suffer minor strains or sprains, immediately apply
the PRICE method of injury care:
Protecttheplayerandtheinjuredbodypartfromfurtherdangerortrauma.
Rest the injured area to avoid further damage and foster healing.
Ice the area to reduce swelling and pain.
Compress the area by securing an ice bag in place with an elastic wrap.
Elevate the injury above heart level to keep blood from pooling in the
area.
Providing for Players' Safety 43
Bumps and Bruises  Soccer players inevitably make contact with each other and
with the ground. If the force applied to a body part at impact is great enough, a
bump or bruise will result. Many players continue playing with such sore spots,
but if the bump or bruise is large and painful, you should take appropriate action.
Again, use the PRICE method for injury care, and monitor the injury. If swell-
ing, discoloration, and pain have lessened, the player may resume participation
with protective padding; if not, the player should be examined by a physician.
Serious Injuries
Head, neck, and back injuries; fractures; and injuries that cause a player to lose
consciousness are among a class of injuries that you cannot and should not try
to treat yourself. In these cases you should follow the emergency plan outlined
on page 41.
If you suspect that a player has received a blow to the head, no matter how
mild the symptoms, you should view it as a serious injury. If the player has only
mild symptoms, such as a headache, call the parents and have them take the
player to a doctor immediately. You should alert emergency medical services
(EMS) immediately if the player has lost consciousness or has impaired memory,
dizziness, ringing in the ears, blood or fluid draining from the nose or ears, or
blurry vision. For more information, see the “Heads Up: Concussion in Youth
Sports” fact sheet, provided by the Centers for Disease Control and Prevention
(www.cdc.gov), on page 45. If you suspect that a player has a spine injury, joint
dislocation, or bone fracture, do not remove any of the player’s equipment unless
you have to do so to provide lifesaving CPR.
We do want to examine more closely, however, your role in preventing heat
cramps, heat exhaustion, and heatstroke. Additionally, please refer to figure 4.2
on page 44 for an illustrative example of the signs and symptoms associated
with heat exhaustion and heat stroke.
Heat Cramps  Tough training combined with heat stress and substantial fluid
loss from sweating can provoke muscle cramps commonly known as heat cramps.
Cramping is most common during the early part of the season, when weather
is the hottest and players may be least adapted to heat. The cramp, a severe
tightening of the muscle, can drop a player and prevent continued play. Dehy-
dration, electrolyte loss, and fatigue are the contributing factors. The immediate
treatment is to have the player cool off and slowly stretch the contracted muscle.
The player should also consume fluids with electrolytes in order to rehydrate.
The player may return to play later that same day or the next day, provided the
cramp doesn’t cause a muscle strain.
Heat Exhaustion  Heat exhaustion is a shocklike condition caused by dehydra-
tion and electrolyte depletion. Symptoms include headache, nausea, dizziness,
chills, fatigue, and extreme thirst. Profuse sweating is a key sign of heat exhaus-
tion. Other signs include pale, cool, clammy skin; a rapid, weak pulse; loss of
coordination; and dilated pupils.
Coaching Youth Soccer44
A player suffering from heat exhaustion should rest in a cool, shaded area;
drink cool fluids, particularly those containing electrolytes; and apply ice to the
neck, back, or ­abdomen to help cool the body. If you believe that a player has
heat exhaustion, seek medical attention. Under no conditions should the player
return to activity that day or before she regains all the weight lost through sweat-
ing. If the player has to see a physician, she shouldn’t return to the team until
she has a written release from the physician.
Heatstroke  Heatstroke is a life-threatening condition in which the body stops
sweating and body temperature rises dangerously high. It occurs when dehydra-
tion causes a malfunction in the body’s temperature control center in the brain.
Symptoms include the feeling of being extremely hot, nausea, confusion, irrita-
bility, and fatigue. Signs include hot, dry, and flushed or red skin (this is a key
sign); lack of sweat; rapid pulse; rapid breathing; constricted pupils; vomiting;
diarrhea; and possibly seizures, unconsciousness, or respiratory or cardiac arrest.
If you suspect a player has heatstroke, send for emergency medical assistance
immediately and cool the player as quickly as possible. Remove excess cloth-
ing and equipment from the player, and lower his body temperature by using
Figure 4.2  Signs and symptoms of heat exhaustion and heat stroke.
Heat exhaustion
Dizziness
Headache
Fatigue
Dehydration
Profuse sweat-
ing
Mildly
increased
body tempera-
ture
Nausea or vom-
iting
Rapid, weak
pulse
Diarrhea
Muscle cramps
Heat stroke
Dizziness
Headache
Disoriented, com-
bative, or uncon-
scious
Dehydration
Hot and wet or dry
skin
Markedly increased
body temperature
Nausea or vomit-
ing
Diarrhea
45
Heads Up: Concussion in Youth Sports
What Is a Concussion?
A concussion is a brain injury. Concussions are caused by a bump or blow to
the head. Even a “ding,” “getting your bell rung,” or what seems to be a mild
bump or blow to the head can be serious.
You can’t see a concussion. Signs and symptoms of concussion can show up
right after the injury or may not appear or be noticed until days or weeks after
the injury. If your child reports any symptoms of concussion, or if you notice
the symptoms yourself, seek medical attention right away.
What Are the Signs and Symptoms of a Concussion?
Signs Observed by Parents or Guardians
If your child has experienced a bump or blow to the head during a game or
practice, look for any of the following signs and symptoms of a concussion:
•	 Appears dazed or stunned
•	 Is confused about assignment or position
•	 Forgets an instruction
•	 Is unsure of game, score, or opponent
•	 Moves clumsily
•	 Answers questions slowly
•	 Loses consciousness (even briefly)
•	 Shows behavior or personality changes
•	 Can’t recall events before hit or fall
•	 Can’t recall events after hit or fall
Symptoms Reported by Athlete
•	 Headache or “pressure” in head
•	 Nausea or vomiting
•	 Balance problems or dizziness
•	 Double or blurry vision
•	 Sensitivity to light
•	 Sensitivity to noise
•	 Feeling sluggish, hazy, foggy, or groggy
•	 Concentration or memory problems
•	 Confusion
•	 Does not “feel right”
> continued
Coaching Youth Soccer46
cool, wet towels; by pouring cool water over him; or by placing him in a cold
bath. Apply ice packs to the armpits, neck, back, and abdomen and between
the legs. If the player is conscious, give him cool fluids to drink. If the player is
unconscious, place him on his side to allow fluids and vomit to drain from the
mouth. A player who has suffered heatstroke may not return to the team until
he has a written release from a physician.
Adapted from Centers for Disease Control and Prevention, 2007, Heads up: Concussion in youth sports: A fact sheet for
parents. [Online]. Available: http://www.cdc.gov/concussion/pdf/parents_Eng.pdf [December 6, 2010].
How Can You Help Children Prevent a Concussion?
Every sport is different, but there are steps children can take to protect them-
selves from concussion.
•	 Ensure that they follow their coach’s rules for safety and the rules of the
sport.
•	 Encourage them to practice good sportsmanship at all times.
•	 Make sure they wear the right protective equipment for their activity
(such as shin guards). Protective equipment should fit properly, be well
maintained, and be worn consistently and correctly.
•	 Learn the signs and symptoms of a concussion.
What Should You Do if You Think a Child Has
a Concussion?
	 1.	 Seek medical attention right away. A health care professional will be
able to decide how serious the concussion is and when it is safe for the
child to return to sports.
	 2.	 Keep the child out of play. Concussions take time to heal. Don’t let the
child return to play until a health care professional says it’s OK. Athletes
who return to play too soon—while the brain is still healing—risk a greater
chance of having a second concussion. Second or later concussions can
be very serious. They can cause permanent brain damage, affecting the
child for a lifetime.
	 3.	 Tell other coaches about any recent concussion. All coaches should
know if a child has had a recent concussion in any sport. Other coaches
might not know about a concussion the child suffered in another sport
or activity unless you tell them.
> Heads Up: Concussion in Youth Sports (continued)
Providing for Players' Safety 47
Protecting Yourself
When one of your players is injured, naturally your first concern is that player’s
well-being. Your feelings for youngsters, after all, are what made you decide to
coach. Unfortunately, you must consider something else: Can you be held liable
for the injury?
From a legal standpoint, a coach must fulfill nine duties. We’ve discussed all
but planning in this chapter (planning will be discussed in chapters 5 and 11).
The following is a summary of your legal duties:
	 1.	 Provide a safe environment.
	 2.	 Properly plan the activity.
	 3.	 Provide adequate and proper equipment.
	 4.	 Match players appropriately.
	 5.	 Warn of inherent risks in the sport.
	 6.	 Supervise the activity closely.
	 7.	 Evaluate players for injury or incapacitation.
	 8.	 Know emergency procedures, CPR, and first aid.
	 9.	 Keep adequate records.
In addition to fulfilling these nine legal duties, you should check your orga-
nization’s insurance coverage and your own insurance coverage to make sure
these policies will properly protect you from liability.
This page intentionally left blank.
49
Making Training Sessions
Fun and Practical 5
50 Coaching Youth Soccer
Every coach first needs to know the difference between practice and a
training session. Practice is something players should be encouraged to do on
their own time, either alone or with one or two friends. Practice involves rep-
etition (e.g., repeatedly kicking the ball against a wall) and has obvious value.
But although players do need repetition to learn a technique, when the team is
together, the approach must be to have a training session. A training session is
dynamic and involves correct feedback from the coach.
In the past we have placed too much emphasis on learning skills in training
sessions and not enough emphasis on learning how to play skillfully—that is,
learning how to use those skills in competition. The games-based approach, in
contrast to the traditional drill-like approach, emphasizes first learning what to
do and then learning how to do it. Moreover, the games-based approach lets kids
discover what to do in the game not by your telling them but by their experienc-
ing it. This guided discovery method of coaching empowers your players to solve
the problems that arise in the game, which is a large part of the fun in learning.
The games-based approach, in time, helps develop soccer-savvy players. Being
soccer savvy means a player has an innate understanding of what is going on
around him on a soccer field and has the talent to influence the match. Such
an outcome can occur only if the player is trained in a rich soccer environment.
The use of guided discovery by coaches has a positive influence on this healthy
soccer experience.
Using Guided Discovery in Your Coaching
You should employ guided discovery with your players and teams on the
soccer field, just as teachers do with their students in the classroom. You can
do this by asking your players questions rather than overcoaching. The goal of
a well-rounded player development program is to cultivate the “soccer minds”
of your players. Athletes who think for themselves will develop into creative
players who can anticipate and adapt within the game instead of players who
are predictable and merely react to game situations. Guided discovery will
force your players to think about what they are doing and why they are doing
it. In general, guided discovery is not an easy thing for coaches to do. Asking
players good questions at the right moments is challenging and takes years of
practice to master.
Guided discovery is a process that coaches can use to introduce new skills
and concepts presented in various stages of the curriculum. This process gives
players an opportunity to be creative and actively participate with each new
skill presented. It also gives an opportunity for the players to ask questions and
practice making appropriate decisions.
The best players in the world put thought and energy into developing tech-
niques and styles of play best suited to their individual talents. We are rarely
taught conditionally. Being mindful and using imagination and creativity to
Making Training Sessions Fun and Practical 51
learn what works best for you is what makes the difference between an average
player and a champion. When players see that there’s more than one technical
or tactical solution to each situation, they become mindful.
To cultivate mindfulness, players and coaches must realize that information
about the game looks different from different perspectives. But many coaches
and players operate mindlessly, pursuing routines (drills) rather than looking
for these new details.
In many ways, using guided discovery as a coaching method is more difficult
than using the command style, in which the coach makes all the decisions and
continually gives directed instructions to the players, who simply respond to
these instructions without understanding the reasons behind them. Although
the command style can be efficient, it requires no thinking on the part of the
players other than memory.
To guide players, the coach must actually know the destination. To ask appro-
priate questions requires deeper knowledge of the training session topic by the
coach. It is useful for the coach to write some questions down; these questions
should appear in the written lesson plan that a coach should prepare for each
training session. A characteristic of effective coaches at all levels is ongoing
learning and reflection.
Coaching Tip	 It is often argued that effective coaching is as much
an art as it is a science. The guided discovery method is a balance of
the two. In a broad sense, our coaching style of the American soccer
player must move away from the “sage on the stage” to the “guide on
the side.”
The Games-Based Approach
On the surface, it would seem to make sense to introduce soccer using the
traditional approach—by first teaching the basic skills of soccer and then the
tactics of the game. This approach, however, has disadvantages. First, it teaches
soccer skills out of the context of the game. Kids may learn to control, shoot,
pass, dribble, and head the ball. But they find it difficult to use these skills in
the real match because they do not yet understand the fundamental tactics of
soccer and do not appreciate how best to use their newfound skills. Second,
learning skills by doing drills outside of the context of the game is downright
boring. The single biggest turnoff in sports is overly organized instruction that
deprives kids of their intrinsic desire to play the game. See table 5.1 on page 52
for a comparison of the use of drills versus activities in soccer.
Using activities that are gamelike at training sessions helps develop skillful,
physically fit, tactically aware, and passionate players. The games-based approach
helps players learn concepts of the game. Understanding game concepts (prin-
ciples of play) guides players to better positioning and tactical decisions. The
Coaching Youth Soccer52
games-based approach is taught using a four-step process. These steps are as
follows:
	 1.	 Play a modified game.
	 2.	 Help the players discover what they need to do to play the game success-
fully.
	 3.	 Teach the skills of the game.
	 4.	 Practice the skills in another game.
Step 1: Play a Modified Game
It’s the first day of training; some of the kids are eager to get started, whereas
others are obviously apprehensive. Some have rarely kicked a ball, most don’t
know the rules, and none of them know the positions in soccer. What do you do?
First, base all training sessions on the season and practice plans that you will
learn more about in chapter 11. For example, if you used the traditional approach,
you would have players practice kicking by lining them up for a simple kicking
drill. With the games approach, however, you begin by playing an even-sided
game, such as 3v3, that is modified to be developmentally appropriate for the
level of the players and is designed to focus on learning a specific part of the
game (such as passing).
Modifying the game emphasizes a limited number of game situations. This
is one way you guide your players to discover certain tactics in the game. For
instance, you have your players play a 2v2 game in a 20-by-15-yard playing area.
The objective of the game is to make four passes before attempting to score.
Playing the game this way forces players to think about what they have to do to
keep possession of the ball.
Step 2: Help Players Understand the Game
As your players are participating in a modified game, look for the right spot to
freeze the action, step in, and ask questions about errors you’re seeing. When
you do so, you help the players better understand the objective of the game,
what they must do to reach that objective, and what specific skills they must use.
Table 5.1  Drills Versus Activities
Drills Activities
Static Dynamic
Rigid structure Flexible structure
Lines Free movement
Boring Fun
No thought Decision making
Age inappropriate Age appropriate
Making Training Sessions Fun and Practical 53
When introducing a new aspect of play for all age groups, begin teaching the
topic with simple questions. The coach may need to go through a three-step
questioning process:
	 1.	 Open question: This allows players to express whatever they’re thinking,
leaving space for them to answer thoughtfully.
	 2.	 Directed question: Part of the answer is worded within the question.
	 3.	 Closed question: The answer is within the question; a yes or no answer is
a satisfactory reply.
Asking the right questions is an important part of coaching. You’ll be asking
your players (usually literally), “What do you need to do to succeed in this situ-
ation?” Sometimes players simply need to have more playing time to discover
what they are to do, or you may need to further modify the game to make it
even easier for them. This approach may take more patience on your part, but
it’s a powerful way for kids to learn. For example, assume your players are play-
ing the game mentioned earlier, in which the objective is to make four passes
before attempting to score, but they are having trouble. Interrupt the action and
ask the following questions:
•	 What are you supposed to do in this game?
•	 What does your team have to do to keep the ball for four passes in a row?
•	 What do you need to do when you pass the ball to help your team keep
the ball?
•	 Where would you move to when your teammate has the ball and you
need to help him keep the ball?
Modified Games Checklist
Modified games should be done at each training session. A modified game
involves all the players in action and thinking. When developing modified games
for your team, here are a few questions you should ask yourself.
•	 Are the games fun?
•	 Are the games organized?
•	 Are the players involved in the games?
•	 Are creativity and decision making being used?
•	 Are the spaces used appropriate?
•	 Is the coach’s feedback appropriate?
•	 Are there implications for the game?
Coaching Youth Soccer54
Coaching Tip	 Time is on your side since soccer is a long-term devel-
opmental sport. Soccer players don’t fully develop until sometime in
their 20s. So be patient in your coaching.
If your players have trouble understanding what to do, phrase your questions
to let them choose between one option and another. For example, if you ask,
“What’s the fastest way to get the ball down the field?” and get answers such as
“Throw it” or “Kick it,” then ask, “Is it passing or dribbling?”
Asking the right questions may seem difficult at first because your players
have little or no experience with the game. If you’ve learned sport through the
traditional approach, you’ll be tempted to tell your players how to play the
game rather than spend time asking questions. Resist this powerful temptation
to tell your players what to do. Instead, through the games-based approach and
skillful questioning on your part, your players should come to realize on their
own that accurate passing and receiving skills are essential to their success in
controlling the ball. Rather than having told them what the critical skills are,
you will have led them to this discovery—a crucial process in the games-based
approach. Although it takes longer to teach a ball skill or tactic to players in the
games-based approach to practice, what they learn sticks more permanently,
helping develop more self-reliant and soccer-savvy players.
Step 3: Teach the Skills of the Game
Only when your players recognize the skills they need to be successful in the
game do you teach specific skills through activities that focus solely on the skill
at hand. This is the time when you temporarily use a more traditional approach
to teaching sport skills—the IDEA approach, which we will describe in chapter
6. This coaching method is best suited to teenage players.
Step 4: Practice the Skills in Another Game
As a coach, you want your players to experience success as they’re learning
skills, and the best way to help them experience ­success early on is to create an
advantage for the players. We first recommend using even-sided games (e.g.,
3v3, 6v6) in step 1. The purpose behind this method is to introduce players to
a situation similar to what they will experience in matches and let them discover
the challenges they face in performing the necessary skill. Once the players have
practiced the skill as outlined in step 3, you can then put them in another game
situation—this time a game with uneven numbers (e.g., 3v1, 2v1, 3v2). The
prevailing notion is that your players are more likely to experience success—for
instance, in a 3v1 game, your three attacking players will be able to make four
passes before attempting to score.
As players improve their skills, however, you may not need to use uneven-
sided games. A 3v1 or 6v3 advantage will eventually become too easy and won’t
challenge your players to hone their skills. When this time comes, you can lessen
Making Training Sessions Fun and Practical 55
the advantage. You may even decide that they’re ready to train the skill in even-
sided competition. The key is to set up situations in which your players experi-
ence success but are challenged at the same time. This method will take careful
monitoring on your part, but having kids play uneven games as they are learning
skills is a very effective way of helping them learn and improve.
The ultimate goal, of course, is to develop more soccer-savvy players who are
more self-reliant during a match. Players consistently coached with the games-
based approach will be more adaptable to the demands of the game, and this
coaching method is also more likely to produce creative players. When the atmo-
sphere at a training session is permeated with positive interaction, creativity, and
well-timed questions, players will arrive at training already mentally alert. It is
then more likely that even easily distracted players will stay on task a bit longer.
Coaching Tip	 Soccer is as much an art as a science, and the game
should be played attractively as well as effectively. Soccer is a game
of skill, imagination, creativity, and decision making. Coaches should
enhance these elements rather than stifle them.
That’s the games-based approach. It immerses players in the fun of playing
soccer, thus motivating them to learn the skills that will help them play the game
better. Consider the difference between reciting verb conjugations in a language
class but not being allowed to try to communicate in the language versus trying
out some brief social communications in the language (e.g., Where’s the bath-
room? How do I get to the restaurant?) and thereby understanding that getting
the form of the verbs right matters. Learning skills in the context of playing
modified games lets players discover the whys and the hows of soccer in a fun
environment. Your players will get to play more in training, and once they learn
how the skills fit into their performance and enjoyment of the game, they’ll be
enthusiastic about working on the skills you teach them.
Gamelike Activities
The gamelike activities found here are for use in your soccer program. These
activities focus on creating gamelike scenarios, distinguishing between attacking
and defending teams (including goalkeeping), and setting up scoring chances.
As a youth soccer coach, you will want to use gamelike activities during training
sessions to keep motivation high and make the sport fun.
56
➤➤ Team Tag
Goal
•	 U6-U12: To develop dribbling and shielding skills
•	 U14: To warm up
Description  Divide players into two or
three teams of 2 to 5 players. Each player
has a ball. One team tries to score by tag-
ging members of the other two teams.
Anyone tagged must bend and keep
one hand on the ball. Tagging is done by
touching with the hands; a player is also
tagged if he loses control of his ball or
crosses the boundary. Be less stringent
with these rules with the U6 age group.
Tagged players can be released by their
teammates touching them. If one team
succeeds in tagging all the other players,
then another team becomes “it.” The
activity ends when all teams have been
“it.” This is a suitable activity for both the
gymnasium and outdoors.
•	 U6 and U8: Play in a 10-by-10-yard playing area; 5-minute playing time.
•	 U10 and U12: Play in a 12-by-15-yard playing area; 10-minute playing time.
•	 U14: Play in a 20-by-20-yard playing area; 20-minute playing time.
Variations
•	 To make the activity easier for younger or less skilled players, have one
team play without a ball, so no dribbling, and the players may move only
by skipping or hopping.
•	 To make the activity more challenging for older or more skilled players,
change the playing area shape to a triangle with each side 10 yards long.
Attacking
E5120/ASEP/398210/Drill7.01/alw/r2
10-20 yards
10-20yards
B
A
A
B
C C
C
A
B
57
➤➤ Slalom Relay
Goal  To develop dribbling skills
Description  Create small teams of equal numbers; make as many teams as
needed to have all the players engaged. The playing area is a starting line with
two lines of flag posts or cones about 2 yards apart as shown in the diagram. On
the word “Go,” the first player of each team starts dribbling. Each player must
dribble the ball in between all the flag posts or cones, both out and back. The
next player can go only when the first player passes him the ball over the start-
ing line. A flying start disqualifies the team. The team to finish first is awarded 1
point. Play for 20 minutes or 10 runs per team.
•	 U6: Play in groups of 2.
•	 U8: Play in groups of 3.
•	 U10-U14: Play in groups of 4 to 6.
Variations
•	 Vary the dribbling technique to be used.
•	 To make the activity more challenging for older or more skilled players, place
the flag posts at uneven distances.
Attacking
E5120/ASEP/398212/Drill7.03/alw/r3
AA
A
B
CO
BB
2 yards
58
➤➤ Single Circular Target
Goal  To develop the push pass. Secondary goals include improving group tactics
and soccer-specific fitness.
Description  Play 3v3 in a 20-square-
yard area containing a circle of 5 to 8
yards diameter, with a medicine ball
or other large ball in the middle as a
target, as shown in the diagram. The
team in possession attacks and tries to
hit the medicine ball; when possession
is lost, they defend the circle. Players
cannot enter the circle. If the ball goes
out of play or stops within the circle, a
throw-in continues the game. Hitting
the medicine ball scores 1 point. After
each hit, the medicine ball must be
replaced on its spot. Play for a maxi-
mum of 15 minutes.
•	 U6: Let each player have a ball and play for individual points.
•	 U8: Play the activity in pairs.
Variation  The number of players may be altered: If an odd number, the extra
man plays with the attackers so they have numerical superiority.
Attacking
E5120/ASEP/398213/Drill7.04/alw/r3
20 yards
20yards
CO
59
➤➤ Soccer Marbles
Goal
•	 U6: To develop dribbling skills
•	 U8-U14: To develop dribbling, shielding, and passing
Description  Play in groups of 3 on a
10-yard-square area or up to half the field
to accommodate several groups. Each
player has a ball. One player in each group
dribbles her ball up and down the playing
area. The other two try to knock the drib-
bler’s ball away from her feet by kicking
their balls against her ball. A player may
kick only her ball. If a shot misses, the
player must retrieve the ball herself. If she
“scores” (i.e., knocks the dribbler’s ball
away), she changes places with the drib-
bler. Challenge the players to try either foot
and different parts of the foot to dribble
or shoot. Play for 20 minutes maximum.
•	 U6: Each player has her own ball and tries to hit one large ball in the center
of the playing area.
•	 U8-U14: Play as described.
Variation  To make the activity easier, use a smaller playing area.
Attacking
E5120/ASEP/398214/Drill7.05/alw/r3
10-15 yards
10-15yards
60
➤➤ Dribble Attack
Goal  To develop and encourage dribbling with both feet
Description  Play 3v3 in an area 30
yards long by 20 yards wide, as shown
in the diagram. Attacking and defend-
ing players (3 of each) pair up and
position anywhere inside the playing
area (a second playing area can be set
up if there are more than 6 players).
Attacking players must dribble past
the defending players. The defending
players should try to gain possession
of the ball and then (if they do) dribble
past an opponent. Players may dribble
in any direction inside the playing area
to start, and play can progress to a variation in which the coach gives the attack
a direction (e.g., dribbling to a specified goal line). The attacker earns 1 point
whenever she is able to dribble past a defender. The attacker is allowed to pass
past a defender in an effort to advance the ball but receives no points for doing so.
•	 U6: Play two 2-minute rounds; focus only on attackers properly dribbling
past defenders.
•	 U8: Play two 2-minute rounds.
•	 U10: Play three 3-minute rounds.
•	 U12: Play four 4-minute rounds.
•	 U14: Play five 5-minute rounds.
Variations
•	 To make the activity easier for younger or less skilled players, play 3v2 or 2v1.
•	 To make the activity more challenging for older or more skilled players, award
an additional point for attacking players who dribble past a defender while
using their weak foot, or award points only for dribbling past a defender
with the weak foot.
Attacking
E5120/ASEP/398161/Drill5.01/alw/pulled-r2
20yards
30 yards
61
➤➤ Soccer Skittles
Goal  To practice passing with the inside of the foot. Secondary goals include
improving receiving and group defending skills; developing principles of attack
and soccer-specific fitness; and practicing dynamic game situations.
Description  Play 3v3 or 4v4 in a playing area 40 yards long by 20 yards wide,
with an area 3 yards wide along each side. Place three “skittles” (cones, bowling
pins) at an equal distance inside both of these areas as shown in the diagram.
Adapt the size of the playing area and the duration of play to the age group. A
team defends its own skittles and attempts to knock over its opponent’s skittles.
If a team loses the ball, puts the ball out of play, or scores, the other team gains
possession. Players cannot enter the skittle area. Skittles that are knocked over
remain down to show the score. Play for 20 minutes maximum.
•	 U6: Begin by asking each player to play on his own, one ball per player. In
the final round, play 3v3 with one ball.
•	 U8: Begin the activity with the players divided into pairs, one ball per pair.
In the final round, play 4v4 with one ball.
•	 U10-U14: Play the activity as described.
Variation  To make the activity more difficult, restrict which foot can be used for
the shot at the skittle.
Attacking
E5120/ASEP/398216/Drill7.07/alw/r2
20yards
40 yards
3 yards3 yards 3 yards3 yards
62
➤➤ The Long Bomb
Goal  To develop and encourage long passing techniques by getting the ball
to the target player
Description  Play 4v4 in a playing area with two zones, one at each end. The
activity begins in the center of the area, and players must pass from behind the
zone line. Teams are awarded 1 point for a successful pass into a zone. After a suc-
cessful pass, the activity restarts with a free pass from within the zone to a player
from the scoring team, and defenders must freeze while the free pass is made. If
the ball goes out of play, possession changes and the activity restarts with a free
pass. Again, defenders must freeze while the free pass is made. Players may not
make a pass to a zone directly from a restart.
•	 U6: Use a 20-by-20-yard playing area with a 5-yard zone at each end. Play
for 5 minutes or until 3 points are scored.
•	 U8: Use a 30-by-20-yard playing area with a 5-yard zone at each end. Play
for 10 minutes or until 5 points are scored.
•	 U10-U14: Use a 40-by-20-yard playing area with a 10-yard zone at each
end. Two additional players position within the two zones and act as neutral
target players who receive passes from other players. Play for 15 minutes or
until 10 points are scored.
Variations
•	 To make the activity easier for younger or less skilled players, allow players
to score points by lofting or driving the ball into the zone.
•	 To make the activity more challenging for older or more skilled players, give
each player only two touches to play when in possession, or increase the
field size to 60 by 30 yards, or play 5v5.
Attacking
E5120/ASEP/398163/Drill5.02/alw/pulled-r2
20yards
20-40 yards
5-10 yards5-10 yards 5-10 yards5-10 yards
Zone 1 Zone 2
63
➤➤ Heads Up
Goal  To develop heading skills
Description  Play 3v3 in a 20-square-
yard area, with one goal set up in the
center of one touchline, as shown in
the diagram. Attacking and defending
teams each consist of 3 players; the
defending team utilizes a goalkeeper
as one of its 3 players. The attacking
team has the ball, and the activity
begins in the center of the playing
area. When play begins, the attacking
team attempts to score as many goals
as possible in 6 minutes. A kicked
goal is worth 1 point. A goal scored
by heading is worth 2 points. After a
goal, the defending team restarts play
with a goal kick.
Teams play the game normally during minutes 1, 3, and 5. During minutes 2, 4,
and 6, the coach calls, “Heads up!” to indicate a minute of heading for the team
on attack. One specific player is designated the header; he will receive tosses
from a teammate and attempt to head the ball into the goal past the goalkeeper
as many times as possible during the allotted minute. All other players will freeze
during this time. Switch teams after 6 minutes of play or when 10 points have
been made.
•	 U6-U10: This activity is not appropriate for these age groups.
•	 U12: Use a 6-yard-wide goal.
•	 U14: Use an 8-yard-wide goal.
Variations
•	 To make the activity easier for younger or less skilled players, eliminate the
goalkeeper during the heading sessions.
•	 To make the activity more challenging for older or more skilled players, play
with an even number of field players.
Attacking
E5120/ASEP/398164/Drill5.03/alw/pulled-r2
20 yards
20yards
6-8yards
64
➤➤ Hot Potato
Goal  To develop receiving with the foot, thigh, or chest
Description  Players position in a playing area as shown in the diagram. Play
begins with a drop ball. The focus is on controlling the ball; there are no goals at
which to shoot. Award 1 point for every pass received and controlled by the foot
and 2 points for every pass received and controlled by the thigh or chest. Any
ball that goes out of bounds is put back into play with a throw-in.
•	 U6: Play 1v1 up to 3v3 in a 15-by-10-yard playing area. Focus on ground
balls, and use only kick-ins.
•	 U8: Play 2v2 up to 3v3 in a 20-by-15-yard playing area. Focus primarily
on ground balls, with occasional balls in the air. Receiving the ball on the
bounce is quite acceptable at this age. Use a mix of mostly kick-ins and a
few throw-ins.
•	 U10-U14: Play 3v3 in a 35-by-25-yard playing area. Focus on both ground
balls and balls in the air.
Variations
•	 To make the activity easier for younger or less skilled players, play 3v1 or
4v2, or increase the playing area to 40 by 30 yards.
•	 To make the activity more challenging for older or more skilled players, play
2v3 or 3v4, or decrease the playing area to 30 by 20 yards.
Attacking
E5120/ASEP/398165/Drill5.04/alw/pulled-r3
10-25yards
15-35 yards
65
➤➤ Corner Kicking
Goal  To attack and defend at corner kicks
Description  Play 4v4 in a playing area 20 yards long by 40 yards wide, with a
goal set up along the length of the area on one side as shown in the diagram. The
attacking team gets four corner kicks (one for each player), attempting to score on
each kick. Award 2 points for a goal scored directly off a corner kick and 1 point
for a goal scored before the defense can control the ball. To focus on defense,
you may give points only to the defense—award 1 point for not allowing a score
on a corner kick. After each player has made a kick, switch teams and repeat the
sequence of kicks.
•	 U6: This activity is not appropriate for this age group.
•	 U8: Use a 6-yard-wide goal and no goalkeepers.
•	 U10-U14: Use an 8-yard-wide goal, and utilize a goalkeeper as one of the
attacking players.
Variations
•	 To make the activity easier for younger or less skilled players, play 5v3 or
4v2, or don’t allow the defense to touch the ball first, even if they are able
to do so.
•	 To make the activity more challenging for older or more skilled players, play
4v5 or 3v5, or award points only for direct scoring from corner kicks.
Attacking
E5120/ASEP/398166/Drill5.05/alw/pulled-r2
20yards
40 yards
6-8 yards
66
➤➤ Throw-In
Goal  To develop throw-in skills. Secondary goals include developing mobility,
using the width and depth of the field, and improving teamwork.
Description  Play 5v5 on a playing field no larger than 40 yards long by 20 yards
wide. Teams try to attack the opposition goal and win points by skillful position-
ing. The players pass the ball and score goals with legal throw-ins (both hands
behind the head and both feet firmly on the ground). Players cannot move when
they have the ball. The opposition gets the ball if an interception is made, if the
ball goes out of play, or if the ball is played with the feet. Corners are thrown in.
There are no proper goalkeepers and no offside. Play for 30 minutes maximum.
•	 U6 and U8: This activity is not appropriate for these age groups.
•	 U10-U14: Play as described.
Variations
•	 To make the activity more difficult, throw-ins at goal can only be made out-
side the goal area.
•	 Use normal age-appropriate goals with goalkeepers.
Attacking
E5120/ASEP/401666/drillXX.04/alw/r2
40 yards
6-8yards6-8yards
20yards
67
➤➤ Obligatory Shooting
Goal  To improve instep shooting. Secondary goals include learning the role of
first and second attacker; training for passing, receiving, blocking shots, tackling,
and intercepting passes; and improving group defending, communication, tactical
awareness, mental focus, and match fitness.
Description  Play in teams of 2 to 5, with one neutral keeper, in a playing area
as small as double the age-appropriate penalty area and as large as half the
field. Use one age-appropriate goal. One team attacks and tries to score goals
as the defense tries to avoid conceding goals. The keeper starts the activity with
an impartial throw or goal kick. The first player controls the ball and passes to a
teammate, who is then obliged to shoot. Ball possession changes after intercep-
tions, balls out of play, or errors in play (e.g., someone other than the second
player shoots the ball) as well as after any foul. If the keeper gathers the ball or
if it goes over the goal line, he restarts the game with a goal kick, as he does if a
goal is scored. Play for 30 minutes maximum.
•	 U6 and U8: This activity is not appropriate for these age groups.
•	 U10-U14: Play as described with the age-appropriate field dimensions and
goal.
Variation  Establish which foot and which type of kick should be used for shoot-
ing. This makes the activity more challenging. Please note that if there are only 2
players on each team, the first player must shoot. If more than 5, the third player
must shoot.
Attacking
E5120/ASEP/398167/drill5.06/alw/r3
CO
30-60 yards
20-50yards
6-8yards
68
➤➤ Captains
Goal  To improve running off the ball. Secondary goals include improving pass-
ing, receiving, shielding, dribbling, and covering skills.
Description  Play in teams of 4 to 6 on
one-third of an age-appropriate field.
Teams elect a captain. The captains of
each team should be clearly recognizable
(e.g., cap or different color training bib).
One team starts trying to pass the ball to
its captain. The other team puts its effort
into preventing this and to winning the
ball. When a team manages to pass the
ball to its captain, it is awarded 1 point.
The opposition is given the ball if a player
manages to intercept, or if the ball goes
out of play, or if a point is scored. Captains
are switched after a certain time, depend-
ing on their stamina, since they have to run
the most. Play for 20 minutes maximum.
•	 U6: This activity is not appropriate for this age group.
•	 U8: The coach may need to play with one team to help the children see the
concept. After a set period of time, the coach should play with the other team.
•	 U10-U14: Play as described in an age-appropriate training area.
Variation  The team that wins 1 point retains the ball and continues the activity.
This makes the activity more challenging.
Attacking
E5120/ASEP/398168/drill5.07/alw/r4
12-33 yards
9-21yards
CAP
CAP
69
Defending
➤➤ Monkey on Their Backs
Goal  To develop marking skills
Description  Play 2v2 or 3v3 in a playing area as shown in the diagram. Each
team has an end line to defend; the two end lines act as goals for the purpose of
this game. Play begins in the middle of the playing area with a drop ball. Players
must stay between the attacker with the ball and the defender’s goal. Only the
defense can earn points. Award 1 point when an attacker cannot advance the
ball past her defender, either by passing or dribbling (award the point when the
attacker is forced to pass back to a teammate) and 2 points if a defender inter-
cepts or otherwise takes away the ball. When the ball goes out of bounds, play is
restarted with either a kick-in or throw-in. Play to 5 points and then switch ends.
•	 U6 and U8: Use a 20-by-10-yard playing area. Play is restarted with a kick-in.
•	 U10-U14: Use a 30-by-15-yard playing area. Play is restarted with a throw-in.
Variations
•	 To make the activity easier for younger or less skilled players, allow the
attacking team more time by permitting the defense to pressure only in their
half of the field. Or shorten the number of yards needed to score points by
decreasing the size of the playing area.
•	 To make the activity more challenging for more skilled players, allow the
attacking team less time by permitting the defending team to pressure full
field. Or lengthen the number of yards needed to score points by increasing
the size of the playing area.
E5120/ASEP/398169/Drill5.08/alw/pulled-r3
10-15yards
20-30 yards
70
➤➤ The Duel
Goal  To develop tackling techniques
Description  Players posi-
tion in a playing area with
two 5-yard-wide goals and
a 4-yard-long shooting zone
set up at each end, as shown
in the diagram. Play begins at
midfield, and the 2 defend-
ers try to tackle the ball while
the 2 attacking players try
to move the ball down the
field. Once inside the 4‑yard
shooting zone, the attacking
players can shoot on goal. If
a goal is scored the ball goes
to the opposing team, and
play restarts with a kick-in or throw-in at its own end line. Award 2 points for any
ball that is tackled and 1 point if the ball leaves the field and is awarded to the
defending team.
•	 U6 and U8: Play 1v1 in a 15-by-10-yard playing area. Play is restarted with
a kick-in.
•	 U10-U14: Play 2v2 in a 20-by-15-yard playing area. Play is restarted with a
throw-in.
Variations
•	 To make the activity easier for younger or less skilled players, reduce the
length of the field or play 2v3.
•	 To make the activity more challenging for older or more skilled players, create
a dividing line halfway down the field, and require the defender to tackle in
the opponent’s half of the field only. Or create a dividing line halfway down
the field, allow the attacker to pass back to a teammate to relieve pressure
from the defender, and require the defender to stay at the halfway line until
the attacker gets the ball back from the teammate.
Defending
E5120/ASEP/398170/Drill5.09/alw/pulled-r3
5yards
15-20 yards
4 yards 4 yards
10-15yards
71
➤➤ Crunch Time
Goal  To develop block-tackling and poke-tackling techniques
Description  Players position in a playing area with a goal set up at each end, as
shown in the diagram. The attacking team starts play with a kickoff. Award 1 point
for each block or poke tackle made by the defense. After the defense makes a
tackle, the ball is returned to the attackers.
•	 U6: Play 1v1 in a 15-by-10-yard playing area with a 6-yard-wide goal; 5-minute
playing time.
•	 U8-U14: Play 2v4 or 3v5 (or other lopsided configuration with more players
on the defending side) in a 30-by-15-yard playing area with a 6-yard-wide
goal or 8-yard-wide goal for U14; 10-minute playing time.
Variations
•	 To make the activity easier for younger or less skilled players, decrease the
size of the field or add a defender.
•	 To make the activity more challenging for older or more skilled players,
increase the size of the field or add another offensive player.
Defending
E5120/ASEP/398171/Drill5.10/alw/pulled-r2
10-15yards
15-30 yards
6-8yards
72
➤➤ Triangular Goal Game
Goal  To practice intercepting passes. Secondary goals include covering the goal,
tackling, developing defensive posture, and improving recovery and tracking runs.
Description  Play 3v3 in a playing area from 20 square yards to 40 square yards,
depending on the age group. The playing area is divided into two halves, each
containing three goalmouths (three flag posts placed in a triangle), as shown in
the diagram. One team attacks its opponent’s half with the objective of scoring
through any side of the triangular goal, while one player of the other team each
defends one side of the goal. A goal is scored whenever the ball crosses any of
the three goal lines. A shot may be taken only from inside the attacking half. Each
player is responsible for one goal line. His teammates may not come to his aid
by leaving their own goal untended. Ball possession changes after interceptions
or saves, balls out of play, fouls, and goals. The width of the goals and the length
of the periods played should suit the stamina and ability of the players. Play 10
to 30 minutes depending on the age group.
•	 U6: This activity is not appropriate for this age group.
•	 U8: The coach may need to play with one team to help the children see the
concept. After a set period of time, the coach should play with the other team.
•	 U10-U14: Play as described for a duration appropriate for the age group.
Variations
•	 To make the activity easier for younger or less skilled players, all players can
defend all goal lines.
•	 To make the activity more challenging for older or more skilled players, do
not allow handballs.
Defending
E5120/ASEP/398172/Drill5.11/alw/r2
20-40 yards
20-40yards
73
➤➤ Narrow Enough
Goal  To develop the goalkeeper’s ability to narrow the shooting angle
Description  Play 3v1 in a
30-square-yard area with a goal
set up at one end, as shown
in the diagram. The attacking
team consists of 3 players, and
the defending team consists of
1 goalkeeper. The 3 attacking
players pass among each other,
attempting to score. The objec-
tive is to try to shoot from the
side, forcing the goalkeeper to
narrow the angle to stop the
shot. Award the attack 1 point
for a goal scored head-on and
2 points for a goal scored from
either side. Award the goal-
keeper 1 point for every shot
stopped. After shots are com-
pleted, rotate keepers.
•	 U6 and U8: This activity is not appropriate for these age groups.
•	 U10: Use a 6-yard-wide goal; 5 shots on goal or a 5- to 10-minute playing
time.
•	 U12 and U14: Use an 8-yard-wide goal; 7 shots on goal or a 10- to 15-minute
playing time.
Variations
•	 To make the activity easier for younger or less skilled players, call out the
side for the shot to come from, increase the shooting distance, or use a
smaller goal.
•	 To make the activity more challenging for older or more skilled players, reduce
the shooting distance, use a bigger goal, or add a player who tries to score
goals from rebounds if the goalkeeper fails to deal with the shot effectively.
Goalkeeping
E5120/ASEP/398173/Drill5.12/alw/pulled-r3
6-8yards
30 yards
30yards
74
➤➤ Over the Top
Goal  To develop the ability to distribute the ball by punting it
Description  Play 3v3 in a playing area divided into zones, with a goal set up
at one end as shown in the diagram. The attacking team consists of 3 players,
and the defending team consists of 3 players, the latter utilizing a goalkeeper as
one of its players. The attacking team attacks the goal, and the defending team
defends it. The defense is awarded points for shots that the keeper stops and
successfully distributes by punting the ball: 1 point if the ball lands within zone
2 (the middle 20 yards), 2 points if the ball lands within zone 3 (the farthest 20
yards), and 1 additional point for any punt that is controlled by one of the keeper’s
teammates. After each defender has had three chances to punt, switch teams.
•	 U6 and U8: This activity is not appropriate for these age groups.
•	 U10: Play in a 40-by-20-yard playing area with 10-yard zones; use a 6-yard-
wide goal.
•	 U12 and U14: Play in a 60-by-20-yard playing area with 20-yard zones; use
an 8-yard-wide goal.
Variations
•	 To make the activity easier for younger or less skilled players, instruct the
attackers to kick the ball easily to the keeper to begin play and not to try to
score a goal, or reduce the length of the field.
•	 To make the activity more challenging for older or more skilled players, give
keepers a point for catching the ball cleanly, or increase the length of the field.
Goalkeeping
E5120/ASEP/398174/Drill5.13/alw/pulled-r3
6-8yards
Zone 3 Zone 2 Zone 1
10-20 yards 10-20 yards
40-60 yards
20yards
75
Teaching and
Shaping Skills 6
76 Coaching Youth Soccer
I
D
E
A
Coaching soccer is about teaching kids how to play the game
by teaching them skills, strategies, fitness, fair play, and values. It’s also about
coaching players before, during, and after matches. Teaching and coaching are
closely related, but there are important differences. In this chapter we focus on
principles of teaching, especially teaching technical and tactical skills. But these
principles apply to teaching fitness concepts and values as well. Armed with
these principles, you will be able to design effective and efficient practices and
will understand how to deal with misbehavior. Then you will be able to teach
the skills and tactics necessary to be successful in soccer, which are outlined in
chapters 7, 8, and 9.
Teaching Soccer Skills
Technique is the body’s mechanical execution in order to manipulate the ball
(e.g., receiving, catching, shooting, dribbling, or deflecting). It is one of the four
components of the game and leads to ball skill. Skill is being able to execute a
technique under the pressure of opponents in tight spaces and most likely on
the move. Without ball skill, a player cannot execute tactics.
Many people believe that the only qualification needed to teach a skill is to
have performed it. Although it’s helpful to have performed the skill, teaching it
successfully requires much more than that. Even if you haven’t performed the
skill before, you can still learn to teach successfully with the useful acronym IDEA:
Introduce the skill.
Demonstrate the skill.
Explain the skill.
Attend to players practicing the skill.
Introduce the Skill
Players, especially those who are young and inexperienced, need to know what
skill they are learning and why they are learning it. You should therefore use the
following three steps every time you introduce a skill to your ­players:
	 1.	 Get your players’ attention.
	 2.	 Name the skill.
	 3.	 Explain the importance of the skill.
Get Your Players’ Attention
Because youngsters are easily distracted, you must make them sit up and take
notice. Some coaches use interesting news items or stories, others use jokes, and
still others simply project enthusiasm to get their ­players to listen. Whatever
method you use, speak slightly above your normal volume, and look your play-
ers in the eye when you speak.
Teaching and Shaping Skills 77
Also, position players so that they can see and hear you. Arrange them ­in a
group, facing you (make sure they aren’t looking into the sun or at a distracting
activity). Be sure they are all in your field of vision before you begin to speak.
Coaching Tip	 Writing out in detail each skill you will teach clari-
fies what you will say and how you will demonstrate each skill to your
players. The Skills School Manual, with key points on all soccer skills, is
available at www.usyouthsoccer.org.
Name the Skill
Use the names of the ball skills as you find them in US Youth Soccer’s Skills
School Manual. Doing so prevents confusion and enhances communication
among your players. When you introduce the new skill, call it by name several
times so that the players automatically correlate the name with the skill in later
discussions.
Explain the Importance of the Skill
As Rainer Martens, the founder of ASEP, has said, “The most difficult aspect of
coaching is this: Coaches must learn to let athletes learn. Sport skills should
be taught so they have meaning to the child, not just meaning to the coach.”
Although the importance of a skill may be apparent to you, your ­players may be
less able to see how the skill will help them become better soccer players. Offer
them a reason for learning the skill, and describe how it relates to more advanced
skills. This step will increase in importance for the U10 age group and up. For
the U6 and U8 age groups, you may want to use imagination and storytelling
to introduce skills into gamelike activities.
Demonstrate the Skill
The demonstration step is the most important part of teaching sport skills to
players who may never have done anything closely resembling it. They need to
see how the skill is performed, not just to hear a description. If you are unable to
perform the skill correctly, ask an assistant coach, one of your players, an older
player in your club, or someone more skilled to demonstrate it.
These tips will make your demonstrations more ­effective:
•	 Use correct form.
•	 Demonstrate the skill several times.
•	 Slow the action, if possible, during one or two performances so that play-
ers can see every movement involved in the skill.
•	 Perform the skill at different angles so that your players can get a range
of perspectives.
•	 Demonstrate the skill with both sides of the body, as applicable.
•	 Do not speak during the demonstration; save your words for before and
after you demonstrate.
Coaching Youth Soccer78
Explain the Skill
Players learn more effectively when they’re given a brief explanation of the skill
along with the demonstration. Use simple terms and, if possible, relate the skill
to those previously learned. Ask your players whether they understand your
description. A good technique is to ask the team to repeat your explanation. Ask
questions such as “What are you going to do first?” and “Then what?” Should
players look confused or uncertain, repeat your explanation and demonstration.
If possible, use different words so that your players can try to understand the skill
from a different perspective. Remember, too, that whenever you bring players
into a group to make a coaching point, you must be clear, correct, and concise.
Complex skills often are better understood when you explain them in more
manageable parts. For instance, if you want to teach your ­players how to change
direction when they dribble the ball, you might take the following steps:
	 1.	 Show players a correct performance of the entire skill, and explain its
function in soccer. Now have your players participate in a brief activity
that accentuates the skill.
	 2.	 Break down the skill, and point out its component parts to your players.
	 3.	 Have players perform each of the component skills you have already taught
them, such as dribbling while running, changing speed, and changing
direction. Now play the same activity as you did in step 1.
	 4.	 After players have demonstrated their ability to perform the separate parts
of the skill in sequence, explain the entire skill again.
	 5.	 Have players practice the skill in gamelike conditions.
Young players have short attention spans, and a long demonstration or expla-
nation of a skill may cause them to lose focus. Therefore, spend no more than
a few minutes altogether on the introduction, demonstration, and explanation
phases. Then involve the players in activities that call on them to perform the skill.
Coaching Tip	 Demonstrations should take 1 minute or less in order
to keep the attention of the players. For the U8 and U10 age groups,
try to keep demonstrations at 30 seconds or less, and for the U6 age
group, try to keep demonstrations at 15 seconds or less.
Attend to Players Practicing the Skill
If the skill you selected was within your players’ capabilities and you have done
an effective job of introducing, demonstrating, and explaining it, your players
should be ready to attempt the skill. Some ­players may need to be physically
guided through the movements during their first few attempts. Walking unsure
athletes through the skill in this way will help them gain confidence to perform
it on their own. Please be aware that trial and error is an important part of learn-
ing any physical skill. Be patient as players make mistakes learning a skill; many
soccer skills can take years to fully master.
Teaching and Shaping Skills 79
Look at the entire skill, and then break it down into fundamental components.
For example, when teaching the push pass, your activity sequence could consist
of the following steps:
	 1.	 Stance
	 2.	 Eye on the ball
	 3.	 Back swing of the kicking leg
	 4.	 Forward swing of the kicking leg
	 5.	 Proper contact with the ball
	 6.	 Follow-through of the kicking leg
	 7.	 Pattern recognition and pattern reaction
Your teaching duties, though, don’t end when all your players have demon-
strated that they understand how to perform a skill. As you help your players
improve their skills, your teaching role is in fact just beginning. A significant
part of coaching consists of closely observing the hit-and-miss trial performances
of your players. You will sharpen players’ skills by detecting errors and correct-
ing them with positive feedback. Keep in mind that your positive feedback will
have a great influence on your players’ motivation to practice and improve their
performances. Focus your attention and comments on catching the kids doing
well rather than on the inevitable miscues.
Remember, too, that some players may need individual instruction. So set
aside a time before, during, or after training to give individual help.
How to Properly Run Your Activities
Before running an activity that teaches technique, you should do the following:
•	 Name the activity.
•	 Explain the skill you are teaching.
•	 Organize the equipment and the players correctly.
•	 Explain what the activity will accomplish. This step is important for the
U12 and older age groups.
•	 State the command that will start the activity.
•	 State the command that will end the activity.
Once you have introduced and repeated the activity a few times in this
manner, you will find that merely calling out its name is sufficient. Your players
will automatically line up in the proper position to run the activity and practice
the skill.
Coaching Youth Soccer80
Helping Players Improve Skills
After you have successfully taught your players the fundamentals of a skill, your
focus will be on helping them improve it. Players learn skills and improve them
at different rates, so don’t get frustrated if progress seems slow. Instead, help them
progress by shaping their skills and detect­ing and correcting errors.
Shaping Players’ Skills
One of your principal teaching duties is to reward positive effort and behavior—in
terms of successful skill execution—when you see it. A player makes a good pass
in training, and you immediately say, “That’s the way to drive through it! Good
follow-through!” Such comments, plus a smile and a thumbs-up gesture, go a
long way toward reinforcing skill technique in that player. However, sometimes
you may have a long dry spell before you see correct techniques to reinforce. It’s
difficult to reward players when they don’t execute skills correctly. How can you
shape their skills if this is the case?
Molding skills takes practice on your players’ part and patience on yours.
Expect them to make errors. Telling the player who made the great pass that he
did a good job doesn’t ensure that he’ll have the same success next time. Seeing
inconsistency in your players’ technique can be frustrating. It’s even more chal-
lenging to stay positive when your players repeatedly perform a skill incorrectly
or have a lack of enthusiasm for learning. It can be quite frustrating to see players
who seemingly don’t heed your advice and continue to make the same mistakes.
Please know that it is normal to get frustrated sometimes when teaching skills.
Nevertheless, part of successful coaching is controlling this frustration. Instead
of getting upset, use these six guidelines for shaping skills:
	 1.	 Think small initially.
Reward the first signs of behavior that approximate what you want. Then reward
closer and closer approximations of the desired behavior. In short, use your
reward power to shape the behavior you seek.
	 2.	 Break skills into small steps.
For instance, in learning to dribble, one of your players does well in watching for
defenders around the ball, but she’s careless with dribbling the ball and doesn’t
effectively shield it from defenders. She often has the ball too far away from her
as she dribbles, or she runs too fast and loses control of it. Reinforce the correct
technique of watching for defenders, and teach her how to keep the ball close.
Once she masters these skills, focus on getting her to run at a speed at which
she can control the ball.
Teaching and Shaping Skills 81
	 3.	 Develop one component of a skill at a time.
Don’t try to shape two components of a skill at once. For example, in receiv-
ing a ball with the inside of the foot, players must first stop the ball and then
redirect or turn it by trapping and controlling it with the foot. Players should
focus initially on one aspect (stopping the ball with the arch of the inside of the
foot while cushioning it by pulling the receiving leg back slightly) and then on
the other (turning the ball by controlling it with the foot). When players have
problems mastering a skill, it’s often because they’re trying to improve two or
more components at once. Help these players isolate a single component. As
each component of a technique improves, then combine those components into
a sequence of movements that becomes a skill.
	 4.	 Use reinforcement only occasionally, for the best examples.
By focusing only on the best examples, you will help players continue to improve
once they’ve mastered the basics. Using occasional reinforcement during train-
ing allows players to have more contact time with the ball rather than to con-
stantly stop and listen to the coach. Soccer skills are best learned through a lot
of random repetition, such as gamelike activities, and the coach needs to make
the best use of team training time by allowing the players as much time with
the ball as possible.
	 5.	 Relax your reward standards.
As players focus on mastering a new skill or attempt to integrate it with other
skills, their old, well-learned skills may temporarily degenerate, and you may
need to relax your expectations. For example, a player who has learned how to
receive a pass along the ground with the inside of the foot is now learning how
to combine that skill with turning at the same time as he receives. While learning
to combine the two skills and getting the timing down, he may have poor control
of the ball. A similar degeneration of ball skills may occur during growth spurts,
typically between ages 11 and 14, while the coordination of muscles, tendons,
and ligaments catches up to the growth of bones.
	 6.	 Go back to the basics.
If, however, a well-learned skill degenerates for long, you may need to restore
it by going back to the basics. If necessary, practice the skill using an activity in
which the players have a larger training area and less pressure from opponents
so that they can refresh the skill.
Coaching Tip	 Beginning with the U10 age group, coaches can ask
players to self-coach. With the proper guidance and a positive team
environment, young players can think about how they perform a skill
and how they might be able to perform it better. Self-coaching is best
done at practice, where a player can experiment with learning new skills.
Coaching Youth Soccer82
Detecting and Correcting Errors
Good coaches recognize that players make two types of errors: learning errors
and performance errors. Learning errors are ones that occur because players
don’t know how to perform a skill; that is, they have not yet developed the
correct motor pattern in the brain to perform a particular skill. Players make
performance errors not because they don’t know how to execute the skill but
because they have made a mistake in executing what they do know. There is no
easy way to know whether a player is making learning or performance errors,
and part of the art of coaching is being able to sort out which type of error
each mistake is. As Yankee legend Yogi Berra once said, “You can observe a lot
by watching.”
The process of helping players correct errors begins with your observing and
evaluating their performances to determine whether the mistakes are learning or
performance errors. Carefully watch your players to see whether they routinely
make the errors in both training and match settings, or whether the errors tend
to occur only in match settings. If the latter is the case, then your players are
making performance errors. For performance errors, you need to look for the
reasons your players are not performing as well as they should; perhaps they are
nervous, or maybe they get distracted by the match setting. If the mistakes are
learning errors, then you need to help them learn the skill, which is the focus
of this section.
When correcting learning errors, there is no substitute for the coach know-
ing skills well. The better you understand a skill—not only how one performs
it correctly but also what causes learning errors—the more helpful you will be
in correcting mistakes.
One of the most common coaching mistakes is to provide inaccurate feedback
and advice on how to correct errors. Don’t rush into error correction; wrong
feedback or poor advice will hurt the learning process more than no feedback
or advice at all. If you are uncertain about the cause of the problem or how to
correct it, continue to observe and analyze until you are more sure. As a rule,
you should see the error repeated several times before attempting to correct it.
Correct One Error at a Time
Suppose Jill, one of your forwards, is having trouble with her shooting. She’s
doing most things well, but you notice that she’s not keeping her toes pointed
down as she strikes the ball, and she often approaches the ball sort of sideways,
with her hips not square to the target. What do you do?
First, decide which error to begin with; players learn more effectively when they
attempt to correct one error at a time. Determine whether one error is causing
the other; if so, have the player correct that error first because it may eliminate
the other error. In Jill’s case, however, neither error is causing the other. In such
cases, players should correct the error that is easiest to correct and that will bring
the greatest improvement when remedied. For Jill, it probably means kicking
with the toes of the kicking foot pointed down. Improving the kick will likely
motivate her to correct the other error.
Teaching and Shaping Skills 83
Use Positive Feedback to Correct Errors
The positive approach to correcting errors includes emphasizing what to do
instead of what not to do. Use compliments, praise, rewards, and encourage-
ment to correct errors. Acknowledge correct performance as well as efforts to
improve. By using positive feedback, you can help your players feel good about
themselves and promote a strong desire to achieve. Give them praise when it
has been earned. The younger they are, the more praise they need.
When you’re working with one player at a time, the positive approach to cor-
recting errors includes four steps:
	 1.	 Praise effort and proper performance.
Praise the player for trying to perform a skill correctly and for performing any
parts of it correctly. Do so immediately after he performs the skill, if possible.
Keep the praise simple: “Good try,” “Way to stay focused,” “Good extension,” or
“That’s the way to follow through.” You can also use nonverbal feedback such
as smiling, clapping your hands, or any facial or body expression that shows
approval.
Make sure you’re sincere with your praise. Don’t indicate that a player’s effort
was good when it wasn’t. Usually a player knows whether he has made a sincere
effort to perform the skill correctly and perceives undeserved praise for what it
is—untruthful feedback to make him feel good. Likewise, don’t indicate that a
player’s performance was correct when it wasn’t.
	 2.	 Give simple and precise feedback to correct errors.
Don’t burden a player with a long or detailed explanation of how to correct an
error. Give just enough feedback that the player can correct one error at a time.
Before giving feedback, recognize that some players readily accept it immediately
after the error, whereas others respond better if you delay the correction slightly.
Be brief while making your coaching point, and get the player back into action
quickly.
For errors that are complicated to explain and difficult to correct, try the fol-
lowing:
•	 Explain and demonstrate what the player should have done. Do not
demonstrate what the player did wrong.
•	 Explain the causes of the error if they aren’t obvious.
•	 Explain why you are recommending the correction you have selected
if it’s not obvious.
	 3.	 Make sure the player understands your feedback.
If the player doesn’t understand your feedback, she won’t be able to correct the
error. First ask her to show you how to do the skill again. Then if needed ask her
to repeat the feedback and to explain and demonstrate how she will use it. If
the player can’t do this, be patient and present your feedback again. Then have
her repeat the feedback after you’re finished.
Coaching Youth Soccer84
	 4.	 Provide an environment that motivates the player to im­prove.
Your players won’t always be able to correct their errors immediately, even if they
do understand your feedback. Encourage them to hang tough and stick with it
when adjustments are difficult or when they seem discouraged. For more difficult
corrections, remind them that it will take time and that the improvement will
happen only if they work at it. Encourage players who have little self-confidence.
Say something like this: “You were dribbling smoother today; with practice, you’ll
be able to keep the ball closer to you and shield it from defenders.” Such support
can motivate a player to continue to refine his dribbling skills.
Other players may be very self-motivated and need little help from you in
this area; with them you can practically ignore step 4 when correcting an error.
Although motivation comes from within, try to provide an environment of posi-
tive instruction and encouragement to help your players ­improve.
Coaching Tip	 Players are also more motivated to learn when
exposed to a higher level of play. The youth soccer environment has
devolved into a situation that limits interaction between age groups
(and, on occasion, genders). By allowing this to happen, we miss out
on opportunities for players to help one another grow into the game
and learn from each other. Coaches should organize training sessions in
which more experienced players are available to give younger players
encouragement and pointers.
A final note on correcting errors: Team sports such as soccer provide unique
challenges in this endeavor. How do you provide individual feedback in a group
setting using a positive approach? Instead of yelling across the field to correct
an error (and embarrassing the player), pull that player aside. Then make the
correction beside the training area. This type of feedback has several advantages:
•	 The player will be more receptive to one-on-one feedback.
•	 The other players are active and still practicing skills, unable to hear your
discussion.
•	 Because the rest of the team is still playing, you’ll feel compelled to make
your comments simple and concise, which is more helpful to the player.
This procedure doesn’t mean you can’t also use the team setting to give spe-
cific, positive feedback. You can do so to emphasize proper group and ­individual
performances. Use this team feedback approach only for ­positive statements,
though. Save corrections for individual discussion.
Teaching and Shaping Skills 85
Dealing With Misbehavior
Children misbehave at times; it’s only natural. Following are two ways you can
respond to misbehavior, through extinction or discipline.
Extinction
Ignoring misbehavior—neither rewarding it nor disciplining it—is called extinc-
tion. This approach can be effective under certain circumstances. In some situ-
ations, disciplining young people’s misbehavior only encourages them to act
up further because of the recognition they get. Ignoring misbehavior teaches
youngsters that it is not worth your attention.
Sometimes, though, you cannot wait for a behavior to fizzle out. When players
cause danger to themselves or others or disrupt the activities of others, you need
to take immediate action. Tell the offending player that the behavior must stop
and that discipline will follow if it doesn’t. If the child doesn’t stop misbehaving
after the warning, follow through with discipline.
Extinction also doesn’t work well when misbehavior is self-­rewarding. For
example, you may be able to keep from grimacing if a youngster kicks you in
the shin, but the kid still knows you were hurt—therein lies the reward. In such
circumstances, you must discipline the player for the undesirable behavior.
Extinction works best in situations in which players are seeking recognition
through mischievous behaviors, clowning, or grandstanding. Usually, if you are
patient, their failure to get your attention will cause the behavior to disappear.
However, be alert so that you don’t extinguish desirable behavior. When young-
sters do something well, they expect to be positively reinforced. Not rewarding
them will likely cause them to discontinue the desired behavior.
Discipline
Some educators say we should never discipline young people but should only
reinforce their positive behaviors. They argue that discipline does not work, cre-
ates hostility, and sometimes leads to avoidance behaviors that may be more
unwholesome than the original problem behavior. It is true that discipline
does not always work and that it can create problems when used ineffectively,
but when used appropriately, discipline is effective in eliminating undesirable
behaviors without creating undesirable consequences. You must use discipline
effectively because it is impossible to guide players through positive reinforce-
ment and extinction alone. Discipline is part of the positive approach when
these guidelines are followed:
•	 Discipline in a corrective way to help players improve now and in the
future. Don’t discipline to retaliate and make yourself feel ­better.
•	 Impose discipline in a matter-of-fact way when players break team rules
or otherwise misbehave. Shouting at or scolding children indicates that
your attitude is one of revenge.
Coaching Youth Soccer86
•	 Once a good rule has been agreed on, ensure that players who violate it
experience the unpleasant consequences of their mis­behavior. Warn play-
ers once before disciplining, but don’t wave discipline threateningly over
their heads—just do it.
•	 Be consistent in administering discipline.
•	 Don’t discipline using consequences that may cause you guilt. If you
can’t think of an appropriate consequence right away, tell the player you
will talk with her after you think about it. You might consider involving
a teenage player in designing her own consequence.
•	 Once the discipline is completed, don’t make players feel that they are in
the doghouse. Always let them know they’re valued members of the team.
•	 Make sure that what you think is discipline isn’t perceived by the player as a
positive reinforcement. For instance, keeping a player out of a certain activ-
ity or portion of the training session may be just what the child desired.
•	 Never discipline players for making errors when they are playing.
•	 Never use physical activity—running laps or doing push-ups—as discipline.
To do so only causes players to resent physical activity, whereas we want
them to learn to enjoy it throughout their lives.
•	 Discipline sparingly. Constant discipline and criticism causes players to
resent you and to turn their interests elsewhere as well.
87
Attacking 7
88 Coaching Youth Soccer
This chapter focuses on the attacking skills and tactics your players must
learn in order to perform effectively in youth soccer games. Remember to use
the IDEA approach to teaching skills: Introduce, demonstrate, and explain the
skill, and then attend to players as they practice it (see page 76 in chapter 6).
This chapter also ties in directly to the season and practice plans in chapter 11.
It describes the technical and tactical skills that you’ll teach at the training ses-
sions outlined there. If you aren’t familiar with soccer skills, rent or purchase a
video, such as Skills School: Developing Essential Soccer Techniques from US Youth
Soccer, so that you can see the skills performed correctly.
Because the information in this book is limited to soccer basics, you will
need to advance your coaching knowledge as your players advance their skills.
You can do this by learning from your ­experiences, watching and talking with
more experienced coaches, attending coaching courses conducted by your state
association, and studying resources on advanced skills.
Attacking Technical Skills
The attacking skills you will teach your players are dribbling, shooting, receiving,
passing, and heading. The skills are in priority order. Mastering these techniques
will enable your players to better execute your attacking tactics—or set plays—
during a match. These basic skills serve as the foundation for playing soccer well
at all levels. Soccer players practice these technical skills at every training session,
from youth soccer to the pros.
Dribbling
Dribbling is moving and controlling the ball using only the feet. Soccer players
dribble to move the ball down the field for a pass or shot, to keep the ball from
the opposing team, and to change direction. Some players may have trouble
dribbling at first, especially those at younger levels or those who have not played
soccer before.
Players need to be able to use the inside and outside of each foot as well as
the sole and the instep to dribble (see figure 7.1, a-d) while keeping the ball
near the body and close to the feet. When dribbling with the inside of the foot
(see figure 7.2a), the player turns the foot out and then pushes the ball forward
with the arch of the foot. When dribbling with the outside of the foot (see figure
7.2b), the player turns the foot in and then pushes the ball slightly forward or
to the side with the arch of the foot.
Coaching Tip	 Encourage players to use either foot to dribble
because this versatility will make it easier for them to protect the ball
from opponents. The ability to change speed and direction with either
foot will greatly advance a player’s skills.