SlideShare a Scribd company logo
1 of 49
Download to read offline
Manually cleaning an infected Computer
Introduction
Let me preface this article with some of my history. Thousands of articles from thousands of people can
be found on this very topic but how do you trust what you’re reading to be from credible sources? You
don’t and I think that’s your best bet. What you do instead is make a decision to look at the articles from
a stand point that provides you with enough information to match your situation and hopefully find a
resolve as you read on.
To that point, I will tell you that I have been building and servicing computers since 1998. Around 2002, I
started to become very interested in computer security and then in 2004, I ran my first network cabling
and deployed a fully functioning network in my own home providing network and internet access to
both wired and Wi-Fi clients.
I have always been technologically driven to know my own thing because I was always convinced that
computer shops are exactly the same as the shops that fix my car; if the service techs can spot a sucker,
they’ll do everything they can to separate that sucker from their money. Because of this I earned my
certification as a CompTIA certified A+ and Network+ technician, I then went on to earn my MCP
certification from Microsoft for servicing Windows based computers running the Windows operating
system and Office applications. I have never once accepted employment with any company to be
employed as a member of their IT department; I’m a forklift operator in the shipping department of a
very busy and highly successful manufacturing facility in Ontario, Canada. Privately, I started a company
of my own called u.s.e.TEC Computer Security Consulting providing computer security consultation
services to both the retail and the corporate users.
What’s wrong with my Computer?
You boot up and are ready to go but it’s so slow and, to top it off, there’s all kinds of strange
happenings; internet browsing windows that appear without being launched, popup windows telling me
there’s a nasty virus on my computer, my anti-virus scanning software is disabled, it’s taking a long time
for apps to launch when I click on them, my internet browser page keeps being changed to a page I
didn’t set to launch.
There are a whole host of problems that you may be seeing that I haven’t listed here, there’s no point
because you’ll know there’s a problem and it could be just about anything, that’s why you’re reading
this. Let’s start this by telling you that recovering from these problems can cost you up to $250 to have a
shop look at it and it’s quite possible that the end result will be; “We can’t actually remove the virus. We
recommend a complete operating system reinstallation.”
Because reinstalling the operating system is not always an option, it is almost certainly the quickest and
easiest way to recover from a truly dirty computer. If you can’t simply reinstall the operating system,
follow along with each part of this guide to clean up your computer and get things back to a manageable
and reliable state.
Let’s get into it…
My Base operating environment is Windows 8 but this process is basically the same in Windows 7 save
for how to open certain dialogue boxes and the right click context options that may be available. For the
most part I’m going to focus on Windows 8 through this article.
Part One
Take note of the obvious before you dig deeper. If you are seeing obvious signs of an infection; browser
window popups, funky exclamation points popping up from the taskbar notification area, your browser
start page has been hijacked. Record any helpful information about those things that may be available
such as; the name of the site that is popping up on you, the name of the site that has hijacked your start
page and even the name or description of the taskbar icon appearing in the notification area. This
information will help you in ridding your computer of the problems you're encountering.
Diagnosing the problem with Task Manager
The first thing to check for an idea of what’s actually happening is the Task Manager, you’ll be able to
see pretty much everything currently running on your PC that has a registered process with the system.
Not everything registers its process with the system though so this won’t catch everything but will
certainly catch most things.
Opening the Task Manager
Windows 7 – Right click the task bar and select Task Manager
Windows 8 – Right click the windows icon (lower left corner) and select Task Manager
Note: Windows 7, if you are not currently logged in on an Administrator account, reboot and log into the computer using one.
Windows 8, the task manager processes tab shows all running processes while the User tab displays processes for currently
logged in account and the Details tab shows all running processes as well the details about those processes exactly as Windows
7 shows them in the Processes tab
Figure 1a: Windows 8 Task Manager
Figure 1b: Windows 7 Task Manager
Note: Windows 7 Task Manager will require you to click the Show processes from all users button to reveal all the running
processes on the computer, otherwise you’ll only see the processes running for the current logged in user displayed.
1) Get yourself a pen and some paper to write on, you’ll also want a laptop or suitable internet
connected device with a web browser, trust me, it’ll make life easier. If diagnosing in Windows
8, make sure the computer is connected to the internet as you may not need an additional
computer, (see step 7 - point 2) you may be able to use the computer you are diagnosing to
perform research with.
2) With the task manager open, click on the Processes tab (windows 7) or Details tab (windows 8)
to show you everything that’s currently running on the computer that the operating system is
aware of.
3) While on the Details tab, cycle either the CPU or Memory columns to determine which process
(seen under the Name column) is using the most resources. You need to know the top users of
these resources and depending on what your issue is. The CPU and Memory columns will show
usages which should point to the culprits helping you determine which processes are slowing
you down.
Note: This procedure will require both the CPU and Memory columns to be diagnosed so start by diagnosing one then the other.
It’s always best practice to perform the system cleanup on the computer as a sole task, in other words, don’t bother doing
anything else with your computer while you are performing this procedure.
4) Begin diagnosing with cycling the RAM and CPU columns to determine what processes are using
the system resources and slowing you down. Record the processes with the highest amount of
memory or CPU usages.
Figure 1c: Windows 8 Task Manager with the CPU column cycled to show the highest processes using
the processor
5) Right click on the top process under the name column to reveal various right click context
options
Figure 1d: Showing Right Click context options
6) Understand that many of the processes run natively in the operating system, they were added
to the OS itself and run in the background as required to provide the OS with certain functions
such as Networking, printer spooling and desktop windows management. Other processes were
added as part of the installation of software packages you legitimately installed to make your
user experience better, these may include things like printer software and status, anti-virus
software and gaming applications like Steam or Origins. The main thing you’re looking for are
processes that you do not recognize as part of the operating system or others that exists
because of things you’ve installed.
 Operating System processes will be listed under the User Name column as System, Network and
Local Service to name a few. For applications you’ve installed, they should be, for the most part,
running under the current logged user name but may also have been installed to run as part of the
system itself.
 Look at the User Name column to determine what type of process is running, for example; is the
process a System, Network Service, Local Service or currently logged in User service?
 If there are processes running that show anything other than the above mentioned or nothing at all,
look at the Description column to further determine what type of process you are dealing with.
7) Once you’ve distinguished the offensive processes from the legitimate ones, you’ll want to know
two things about the offenders;
 Where on the system are they located?
To figure this out, right click the process in question and select Open File Location, this will take you to
the installation folder where the file is running from. You will want to note this so that you can come
back here later (see Part Four) and check to see that file has actually been removed and if not, you can
manually delete it.
Figure 1e: Showing Open File Location option
 What additional information should I know before dealing with it?
Before progressing past the diagnostics point, you should always perform a search on suspected
offensive processes just to make sure they are actually offensive and not something that you may need
for the OS or any applications you may have installed. To do this, Right click on the file in question and
select Search Online. Your internet browser will launch and your browsers default search engine will
provide results about the file for you to choose from and read about.
8) Once you have created your list, as suggested way back in step 1, of offensive processes, you
can temporarily close the offensive processes so that you can begin the removal of them.
Note: Because you may need to restart the computer after removing each and every offensive process, it is best to close the
offensive process one at time as you clean your computer, this will allow diagnosing by elimination rather than trying to clean
everything at once and forgetting what you’ve already done and still need to do
9) To close each offensive process, right click on the process and select End Task
Figure 1f: Showing End Task/End Process Tree option
 Selecting End Task will simply close the process that you are working with. Clicking End Process Tree
will end the process you are working with and any related or dependant services attached to it. Be
sure you carefully research each process as you may risk losing data or having the computer restart
on you without warning.
 If you wish to see which additional processes, if any, are attached to the process you are working
with, switch to the Process tab and locate the process in question then click the arrow to the left of
it and view the services displayed below.
 Not all processes have dependant services and not all services have processes they depend upon
Figure 1g: Shows the Task Manager – Details tab showing Processes with attached services
10) With the offensive process ended, you can now move on the next step, Disable the Start-up of
the process in question and permanently remove the Start-up of it.
Part Two
Begin the Cleanup using the Startup Tab and Registry Editor
1) With the Task Manager open, click the Startup Tab and locate the name of the process in
question, right click on it and select Disable. The idea with this step is to disable the offensive
process to make its manual removal will be possible.
Note: It is possible that the name of the process in the Details tab may not be the same as the name of its Startup entry, be sure
to research properly in order to find out what the name might be listed as in the Startup if need be
Figure 2a: Showing the Startup tab with right click context options
2) Disabling the Start-up of the process will also end any related and dependant processes and
services for that process, use the drop down arrow, if applicable, to see the related and
dependant processes and services attached to it.
Note: Disabling any item in the Startup tab permanently disables that item from automatically launching with system start-up
until it is enabled again
3) Now we are going to permanently delete the Start-up of the offensive process using the Registry
Editor. To open the Registry Editor, Right click the Windows icon, click Run and type Regedit
then click OK.
4) With the Registry Editor launched, there are a few places you need to check to determine where
the start-up entry resides but before we do this, we’re going to actually make a backup of the
Registry just in case the computer has a problem with the changes we are about to make
Figure 2b: Showing the Registry Editor main screen
 To back up the registry, click File then click Export, choose a place to save the exported registry file
and name it something you’ll remember. If needed, you can return the registry to the previous state
using this backup.
 It’s a good idea to create a backup of the registry every time you make changes to it, by that I mean
every time. Feel free to overwrite a previously saved backup as long as you are sure that the
previous changes were successfully implemented and there are no anomalies.
5) With the Registry backup completed, let’s delete the Startup of the process using the Registry
Editor
 Check all of the following locations for entries of the offensive process by its Startup name;
 HKCUSoftwareMicrosoftWindowsCurrentVersionRun
HKCUSoftwareMicrosoftWindowsCurrentVersionRunOnce
 HKLMSoftwareMicrosoftWindowsCurrentVersionRun
HKLMSoftwareMicrosoftWindowsCurrentVersionRunOnce
 HKLMSoftwareWow6432NodeMicrosoftWindows CurrentVersionRun
HKLMSoftwareWow6432NodeMicrosoftWindowsCurrentVersionRunOnce
 When you spot the entry of the offensive process by name within the Registry location, right click on
the name and select Delete
Note: The above locations of the registry start with HKCU & HKLM, these are short form terms for the root folder of each
Registry Editor location you will be searching, look at the left hand column to see the full name of these folders. As you navigate
through the Registry Editor, your current location will constantly update in the bottom address bar of the Registry Editor.
Figure 2c: Showing the Registry Editor at a location with Right click context options
6) You will now move to the next in which you will use Programs and Features to uninstall the
application of the offensive process
Part Three
Using Programs and Features
1) Right click the Windows icon and select Control Panel
2) Select Programs and Features
3) Search for the application you wish to uninstall then Right click on the item and select Uninstall
Figure 3a: Showing Programs and Features with Right Click context options displayed
4) After you have uninstalled of the application you may be required to reboot.
5) Open the Task Manager, click on the Details tab and make sure the offensive process is removed
then click the Startup tab and make sure that it is also removed from there.
6) The next part will require you to navigate to the locations you earlier recorded during the
diagnostic process in Part One/Step 7 - Point 1 to manually cleanup any residual files and folder
that may still be hanging around from the offensive process
Part Four
Manually removing residual files and folders
Though the uninstalling the application that should have automatically taken care of the removal,
occasionally residual folders and files are left. Clean them up as required
1) Using the list you created in Part One, navigate to the folder of the file location and delete and
files and folders that remain
 Make sure to select the files and folders then press and hold the Shift key while deleting them, this
will permanently delete the files and folders rather than just moving them to the recycling bin.
2) The next thing you’ll need to do is check other places on your computer where programs may
install files and folders, these locations will be program files, program data and User folders.
 Go to Control Panel and select Folder options, click the View tab and place a mark in the Show
hidden files, folders and drives radial button to make the folders you will be working with viewable,
some of these files, folders are hidden by default.
Figure 4a: Shows the Folder Options on the View tab
 Navigate to C:Program Files, C:Program Files (x86), C:ProgramData to check for folders and files
and folders that may belong to the offensive process you are looking to clean, if found you can
delete them from your computer
 Navigate also to C:UsersUserNameAppData folder and check each of the Local, LocalLow and
Roaming folders for files and folders that may also need to be deleted
Final Check
The last thing to do in the cleanup process is scan your system to be sure that you’ve cleaned the
offensive processes. To do this you will need to use software that runs independently from your
computer so that the scanning software is not influenced by anything that may still be on the computer.
A company called Trend Micro has standalone virus scanning software that is made specifically for this
purpose; you can download it from their website by searching for Trend Micro HouseCall or going to
http://housecall.trendmicro.com/ .
Figure 4b: Shows Trend Micro’s HouseCall download page
 There are many other standalone scanners available; Microsoft Safety Scanner or Kaspersky Virus
Removal Tool to name a couple. You could run a couple of these if you wish or just choose one. I use
Trend Micro simply because the results have always been solid.
 Select the OS version you are running then click the download button, wait for the download to
complete, navigate to the download location and install the software
Figure 4c: Shows HouseCall main screen
 Before scanning, you need to change some of the scan settings to make sure that you concentrate
the scan specifically to your computer, start by deselecting the home network scan option then click
on Settings
Figure 4d: Shows HouseCall’s scan settings dialogue box
 On the Scan Type tab, you may see more drives listed than what the above example shows, leaving
the Quick scan option selected will only scan a small portion of the C drive where programs are
often installed to and run from; Program Files, ProgramData, User folders etc., but will does not scan
the entire C drive. If you wish to perform a deeper scan of the C drive select Full system scan, if you
wish to select specific drives, use the Custom scan option and select the drives.
Note: Custom scan will show all drives currently connected to the computer whether they are empty or drives containing data;
USB connected drives or CD/DVD discs inserted to the CD drive.
 When ready, click the Scan Now button and wait for the scan to complete
Figure 4e: Shows HouseCall’s scanning in progress
 As the scan progresses, you may see the Threats found counter populate, let the scan continue until
the next screen is presented, this will be the screen that provides options with how to deal with the
threats found
Note: Trend Micro is designed to find all threats that may be present on a computer including items that you may be
intentionally running on your computer to circumvent the activation of software titles you’ve installed on your computer, these
could include Key Hacking tools that are distributed as part of the installation of pirated software.
Figure 4f: Shows Housecall’s Fix Problems screen with a threat detected
 Use the Action drop down to select Ignore if you are sure that the displayed threat is a legitimate
item running on your computer, otherwise leave the Action drop down as Fix and click the Fix Now
button to see the Review Results screen
 The Review Results screen will display your Fix Now option results based on how you chose to allow
HouseCall to deal with each item found, if you chose to ignore something the Summary column will
show how many items were ignored, if you chose to Fix something, the Summary column will also
show how many threats were fixed.
Figure 4g.1 & 4g.2: Showing Threats ignored and Threats fixed screens
 Clicking the More Details link will take you to a Summary where you will be presented with the
actions you’ve selected and the option to restore files you previously instructed HouseCall to fix
Figure 4h: Shows HouseCall’s summary screen where you can restore fixed files
 Return to the Review Results screen by clicking the Back button
 When you are satisfied the scan has successfully dealt with any remaining threats, you may simply
close HouseCall or you can run another scan to verify that your fix was successful.
 Because HouseCall uses date sensitive virus definitions, there’s no point in keeping the software
installed on the computer, you may now uninstall HouseCall
Note: HouseCall is updated and intended to be run from Trend Micro as a standalone scanner and is not intended to be used as
a real time virus scanning solution, the definitions that HouseCall uses are added periodically by Trend Micro and can’t be
updated by the user. Each time the user downloads HouseCall, they provided with the most recently updated version of
HouseCall.
Part Five
Windows Update and Real Time virus scanning health check
With your computer free from the offensive processes, it’s time to focus on tightening up your
computers security.
Windows Update
Though you likely have Windows set to update itself at a specific time, with the problems you’ve just
recovered from, it may be that the Update settings were changed by one of the offensive processes to
disable Windows Updating.
1) Navigate to Control Panel and select Windows Update to launch your computers Windows
Update screen
Figure 5a: Shows Windows Update main screen
2) In the left column, click Change settings to verify that Windows is set scheduled automatically
update itself
Figure 5b: Shows Windows Update installation settings
 Unless there’s a reason why you’d rather Windows didn’t automatically update itself, insure the
Important updates drop down is set to Install updates automatically (recommended) and there are
checks in both the Recommended and Microsoft updates boxes.
Note: There are certain instances where you may not want Microsoft to update itself automatically; if your internet bandwidth is
capped – limited to a set amount of data you are allowed to transfer per month or if you have hardware devices that you prefer
to manually install software drivers for.
 Important updates refer to update specific to the operating system itself, Recommended updates
refer to updates that Microsoft suggests based on your computers configuration itself such as
certain browser add-ons, software that require .Net installations and Hardware drivers that control
things like Network adapters, GPU’s and so on. Microsoft updates for other Microsoft products will
pertain to other Microsoft products you’ve installed to your computer like Microsoft Office.
 If the settings are where you like them, click OK to return to Windows updates main screen
 Back to the left column of the main screen, click View update history and look through the list of
updates for any updates that have “failed” in the status column.
Figure 5c: Shows Windows Updates history screen
 There may be several reasons for why an update would have failed, we’re not concerned with the
why so much as for the what, at this point you simply want to make a list of all the failed updates so
that you can check back later to see that these particular updates were successful.
 Make a note of the KB number for each failed update.
Figure 5d: Shows Windows Updates history screen with a failed update presented
 Click the back arrow to return to Windows Updates main screen and select Restore hidden updates
in the left column.
 If there’s nothing displayed, return to the Main screen. If there are items listed here, review them to
see what they are then, as required, select them and press “Restore” to return them to the list of
available updates that need to be installed.
 Back to Windows Updates main screen, in the left column, select Check for updates and wait on the
check to complete.
Figure 5e: Shows Windows update checking for available updates
Figure 5f: Shows check complete
 If there are updates to be installed, they will be listed here. If you are presented with the message as
above; “You’re set to automatically…” you can simply exit from the update screen and let Windows
automatically update the computer later.
 If you are presented with a list of updates to install, check the list and compare it to the list of failed
updates you created previously to be insure previously failed updates have been successfully
installed.
 If for some reason any updates continue to fail, there may be legitimate reasons for this, you can
now perform an internet search using the KB number to investigate causes for installation failure
and how to resolve the issues for successful installation.
Real Time virus scanning
It’s time to check that your virus scanning software is operating as it should be. In my example I use
Microsoft Security Essentials as my real time virus scanning solution, the steps may be different for you
depending on which product you use but the outcome will be the same; making sure the software you
use is actually functioning the way it should be.
1) To be sure that the virus scanning software is active, navigate to the Control Panel and select
Action Center
Figure 5g: Shows the Action Center
2) Action Center displays any areas of concern that require your attention; look at each item
displayed and make the required changes.
3) Go back into Control Panel and select your Antivirus software to launch it.
Figure 5h: Shows Microsoft’s Windows Defender main screen on the Home tab
 Click the Update tab then verify the definitions are up to date, if not click the Update button to
update the virus software with the latest definitions.
Figure 5i: Shows the Update screen for Windows Defender
 With Windows Defender up to date, click the Settings tab and check that the Excluded files and
locations, types and processes paths are all empty.
Note: It may be possible that there are excluded paths displayed here if you’ve previously set them but it is also possible that
malicious software made entries here too. If there’s something strange listed, feel free to make changes.
Figure 5j: Shows Settings tab with Excluded paths
 You may also check the other options and make changes to suit your configuration then click Save
changes.
 Now click the History button and check each of the three areas presented for options that may
require your attention.
Figure 5k.1: Shows the History tab with the Allowed radial button selected
 Select View details to show any items that Windows Defender is currently allowing to run on the
computer
Figure 5k.2: Shows the History tab presenting details of the items Allowed
 The above example shows items that heave been allowed to remain on the computer, if these files
are unknown to you, take the time now to research them prior to making changes. Once satisfied
with the legitimacy or lack thereof, make the required changes by selecting each item and clicking
Remove or Remove all. You can also chose to simply leave them alone if you are sure they are
legitimate.
 With your Antivirus software up to date, all Allowed items and excluded paths dealt with, you can
now run a full system scan to make sure that you Antivirus software is running properly. Click the
Home Tab and select Scan Now button.
Figure 5l: Shows Windows Defender Home tab with scan in progress
 As the scan runs, it may encounter problems and should display this information, allow the scan to
complete.
 Upon scan completion you should be presented with a scan result screen, if there are items
requiring your attention, those items along with options you can perform will be provided.
Figure 5m: Shows Windows Defender Home tab with scan results screen
 You have just completed all the steps required to clean up your infected computer. You should now
be left with a computer that is running as optimally as you expect. You may now check the Task
Manager to verify that your RAM and CPU usages, at idle with nothing launched other than those
processes required by the operating system, are sitting as close to 0% as reasonably possible.
Figure 5n: Shows Task Manager at completion of the clean up
 Check each of the Processes, Startup and Details tab to make sure everything looks fine
 If all is good, you may perform a reboot to finish up this part.
Part Six
The final step in all this will be to clean up your internet browser. It would suck if you launched your
browser and found that your home page still navigated to a site that was causing problems.
Cleaning up your Browser
The step here will be performed using Internet Explorer 11 in Windows 8.1. Be warned that by clean up I
actually mean reset, we will be taking IE11 back to the state it was in when it was first installed on your
computer. Before embarking on that journey though, we’ll backup your current internet settings which
will allow you to export your Favorites, Feeds and Cookies so that you can Import them to your reset
browser.
Backing up your IE11 Browser settings
The following backup steps of this part will need to be performed on all user accounts on the computer
you are cleaning, if you have more than one user account, you’ll need to log into each individual user
account and perform the backup procedure on each account available prior to performing the reset of
IE11.
 Launch your browser and then click the Favorites star in the upper right corner.
Figure 6a: Shows IE11 launched with the Add to Favorites options displayed
 Click the Drop arrow beside Add to favorites then click Import and export to open Internet Explorer
11’s Import/Export Setting dialogue.
Figure 6b: Shows the Import/Export settings dialogue box asking if you want to Import or Export
browser settings.
 You’ll be asked how you’d like to import or export your browser setting, select Export to a file then
click Next.
Figure 6c: Shows Import/Export settings dialogue box asking what you want to export.
 You will now be asked what you’d like to export; Favorites, Feeds and Cookies. Select all that you’d
like to export then click Next.
Note: I’m sure there’s a fight in the Internet universe about Cookies and exporting them for later import to a cleaned browser.
For the most part, by the time you’ve gotten to this step your computer should be fairly safe and all your remaining stored
cookies should be safe as well. Do what you think is right on this one.
Figure 6d: Shows Import/Export settings dialogue box asking what folder you’d like to export from.
 The next dialogue box will ask you to select which folder you want to export your favorites from,
select the top most Favorites folder showing then click Next.
Figure 6e.1: Shows the Export dialogue box asking where you want to export your favorites to.
Figure 6e.2: Shows the Export dialogue box asking where you want to export your feeds to.
Figure 6e.1: Shows the Export dialogue box asking where you want to export your cookies to.
 The next three dialogue boxes will ask you where you would like to save your Favorites, Feeds and
Cookies. The default should be the Documents folder for the current logged in user but using the
Browse button, you can save them anywhere you wish. Click Next at the Favorites and Feeds
dialogues then Export at the Cookies Dialogue to proceed.
Figure 6f: Shows the Import/Export dialogue box confirming successful export of your settings.
 The successful export dialogue will now be presented, click Finish to complete the backup of your
IE11 settings.
Browser Reset
While logged into the Administrator account, navigate to the Control Panel and click Internet options to
start the process of resetting the Browser. Once again, this will entirely reset IE11 to the state it was
when first installed. All of your previous settings including; Favorites, RSS Feeds and Cookies will be
deleted so you may want to be sure that you actually backed everything for every user account you
needed to.
 With Internet options launched, click the Advanced tab
Figure 6g: Shows the Internet Options dialogue box with the Advanced tab displayed
 At the bottom of the Advanced tab you will click the Reset button
Figure 6h: Shows the Reset Internet Explorer Settings dialogue box
 At the next dialogue box you will be asked if you are sure about the reset, carefully absorb the
information you are presented with so you understand what “Reset” means. The purpose of this
exercise is to rid the Browser of any residual annoyances so I advise you to place a check in the
“Delete personal settings” box then click Reset.
Figure 6i: Shows the Reset was completed successfully
 The next dialogue box shows the successful completion of the Reset, click close then restart your
computer. The clean-up process is now complete.
 The next time you launch IE11, you’ll be starting fresh. At that point, you can simply launch the
Import/Export Settings and this time select “Import from a file” to begin the process of adding your
previous Favorites, Feeds and Cookies to your Reset browser.
Bonus Part
The following is just a taste of some advanced diagnostics you can perform but, as I’ll explain below, this
is not normally required to complete the steps of this guide.
Advanced Diagnostics
At the retail consumer level, Microsoft included some cool advanced features from Windows XP and up
that allow users to look at how their hardware is being used by the system. In Windows 8, through the
Task Manager, you can launch these features and perform some advanced diagnostics. Past simply
showing you that they exist, I am not going to go into these advanced items just now.
 It is possible to incorporate the Resource Monitor diagnostics into the overall diagnostics steps
beginning in Part One but it is not necessary to do so in order to successfully complete the steps in
this guide.
 For Advanced diagnostics, you may also click the Performance tab to further investigate system
slowdowns.
Figure 7a: Shows Task Managers Performance tab
 Using the Performance tab will often help you determine if there are hardware problems causing
system slowdowns. On the Performance tab you can look at each hardware device for detailed
operating information.
 You can also click the Open Resources Monitor link to launch the Resource Monitor and perform
further diagnostics from there.
Figure 7b: Shows the Resource Monitor
Conclusion
The six parts of this guide show you how to manually cleanup your computer in order to recover from a
virus attack without the need to reinstall the operating system. To avoid the potential of problems
occurring again is however up to each individual user’s best practices. Though I won’t go into great
detail here, I will tell you that you need to be careful and mindful while using your computer on the
internet.
 Almost all problems are self-inflicted;
 Nothing is free; any software that you download, though use of it may be free, usually comes at a
price. Be sure to fully read any End User Licence agreement available and pay attention to all
presented options during the installation process of any given title. You’ll be surprised to find that
even the most innocent of software titles are full of additional software installations or potential
system changes that you may not expect.
 Using certain websites to stream free TV or movies and even sites to download pirated software
from will almost always present its own dangers you need to be aware of. Do not click on any
popups or links unless you are sure they are safe to navigate to, if you don’t know don’t do it.
 Email attachments, come on now, I certainly don’t need to tell you this… but just don’t bother with
anything you are not expecting to receive, if you unexpectedly received something from someone
you trust, contact them and ask them about it before opening or launching the file.
 Kids should never be allowed to use the computer, download or install anything without your
monitoring, guidance and approval; there are no compromises with this. The adult/parent is
ultimately responsible for the safe use of all connected devices in their home.
 If you share files on your network, be careful with the permissions granted for the folders on each
device, allowing full privileges to other users may create an environment for virus propagation.
This article was compiled and created by Brandon Near of u.s.e.TEC Computer Security Consulting. All
software titles referenced in this guide belong to their respective developers are have been referred to
in the guide as it was written. Use of this guide is strictly at the users own risk and there is no guarantee
provided in any way for any of the steps provided through this guide.

More Related Content

What's hot

Remove adware and_popups
Remove adware and_popupsRemove adware and_popups
Remove adware and_popupsCHRISLEE PHIL
 
Login to windows 7 without flash drive break password
Login to windows 7 without flash drive break passwordLogin to windows 7 without flash drive break password
Login to windows 7 without flash drive break passwordSehrish Moeen
 
Fixing windows 10 automatic updates install problem
Fixing windows 10 automatic updates install problemFixing windows 10 automatic updates install problem
Fixing windows 10 automatic updates install problemscarlet christer
 
Epa remote gfe 1
Epa remote  gfe 1Epa remote  gfe 1
Epa remote gfe 1Darnette A
 
How to enable admin account w10 pureinfotech
How to enable admin account w10 pureinfotechHow to enable admin account w10 pureinfotech
How to enable admin account w10 pureinfotechDarnette A
 
How to Install Norton Internet Security in Windows 8.1 - RiseZone
How to Install Norton Internet Security in Windows 8.1 - RiseZoneHow to Install Norton Internet Security in Windows 8.1 - RiseZone
How to Install Norton Internet Security in Windows 8.1 - RiseZoneRISEZONE SOLUTIONS
 
How to remove malware from pc?
How to remove malware from pc?How to remove malware from pc?
How to remove malware from pc?Patrick Presley
 
Photo Upload Utility2
Photo Upload Utility2Photo Upload Utility2
Photo Upload Utility2CGIIBS
 
Computer class final
Computer class finalComputer class final
Computer class finalscrambler400
 
Complete working guide to uninstall piesearch.com from pc
Complete working guide to uninstall piesearch.com from pcComplete working guide to uninstall piesearch.com from pc
Complete working guide to uninstall piesearch.com from pcharoNaroum
 
Setup AppInventor
Setup AppInventorSetup AppInventor
Setup AppInventorzakri1802
 
How to get help in windows 10
How to get help in windows 10 How to get help in windows 10
How to get help in windows 10 hpcustomerservices
 
Windows 10 blue screen of death converted
Windows 10 blue screen of death convertedWindows 10 blue screen of death converted
Windows 10 blue screen of death convertedMariaLena7
 
3671 explore windows-8.1_update_wsg_external
3671 explore windows-8.1_update_wsg_external3671 explore windows-8.1_update_wsg_external
3671 explore windows-8.1_update_wsg_externalHeo Gòm
 

What's hot (20)

Module 2: Problem solving
Module 2: Problem solvingModule 2: Problem solving
Module 2: Problem solving
 
Remove adware and_popups
Remove adware and_popupsRemove adware and_popups
Remove adware and_popups
 
Basic pc trouble shooting
Basic pc trouble shootingBasic pc trouble shooting
Basic pc trouble shooting
 
Login to windows 7 without flash drive break password
Login to windows 7 without flash drive break passwordLogin to windows 7 without flash drive break password
Login to windows 7 without flash drive break password
 
Fixing windows 10 automatic updates install problem
Fixing windows 10 automatic updates install problemFixing windows 10 automatic updates install problem
Fixing windows 10 automatic updates install problem
 
Epa remote gfe 1
Epa remote  gfe 1Epa remote  gfe 1
Epa remote gfe 1
 
How to enable admin account w10 pureinfotech
How to enable admin account w10 pureinfotechHow to enable admin account w10 pureinfotech
How to enable admin account w10 pureinfotech
 
How to Install Norton Internet Security in Windows 8.1 - RiseZone
How to Install Norton Internet Security in Windows 8.1 - RiseZoneHow to Install Norton Internet Security in Windows 8.1 - RiseZone
How to Install Norton Internet Security in Windows 8.1 - RiseZone
 
How to remove malware from pc?
How to remove malware from pc?How to remove malware from pc?
How to remove malware from pc?
 
Photo Upload Utility2
Photo Upload Utility2Photo Upload Utility2
Photo Upload Utility2
 
Computer class final
Computer class finalComputer class final
Computer class final
 
Xampp
XamppXampp
Xampp
 
Complete working guide to uninstall piesearch.com from pc
Complete working guide to uninstall piesearch.com from pcComplete working guide to uninstall piesearch.com from pc
Complete working guide to uninstall piesearch.com from pc
 
5 stepmainttut
5 stepmainttut5 stepmainttut
5 stepmainttut
 
Setup AppInventor
Setup AppInventorSetup AppInventor
Setup AppInventor
 
How to get help in windows 10
How to get help in windows 10 How to get help in windows 10
How to get help in windows 10
 
Combined
CombinedCombined
Combined
 
Windows 10 blue screen of death converted
Windows 10 blue screen of death convertedWindows 10 blue screen of death converted
Windows 10 blue screen of death converted
 
3671 explore windows-8.1_update_wsg_external
3671 explore windows-8.1_update_wsg_external3671 explore windows-8.1_update_wsg_external
3671 explore windows-8.1_update_wsg_external
 
Xampp11
Xampp11Xampp11
Xampp11
 

Viewers also liked

How to find a formal dress in brown idodressau
How to find a formal dress in brown idodressauHow to find a formal dress in brown idodressau
How to find a formal dress in brown idodressauAlison Tang
 
RTB-Media Intro
RTB-Media IntroRTB-Media Intro
RTB-Media IntroRTB-Media
 
Mirabillis_Broucher_Final_16th_Dec_2014
Mirabillis_Broucher_Final_16th_Dec_2014Mirabillis_Broucher_Final_16th_Dec_2014
Mirabillis_Broucher_Final_16th_Dec_2014Pradeep Kumar
 
Print present. irina shirjajeva
Print present. irina shirjajevaPrint present. irina shirjajeva
Print present. irina shirjajevairinash19
 
Nadim Abdul Aziz Resume
Nadim Abdul Aziz ResumeNadim Abdul Aziz Resume
Nadim Abdul Aziz ResumeNadeem Salim
 
Research on the conventions of thriller posters
Research on the conventions of thriller postersResearch on the conventions of thriller posters
Research on the conventions of thriller postersAmber Wilkinson
 
Nadim Abdul Aziz Resume
Nadim Abdul Aziz ResumeNadim Abdul Aziz Resume
Nadim Abdul Aziz ResumeNadeem Salim
 
Bite me picture powerpoint
Bite me picture powerpointBite me picture powerpoint
Bite me picture powerpointAmber Wilkinson
 
Kunstide instituut
Kunstide instituutKunstide instituut
Kunstide instituutirinash19
 
Lande: productos de lujo
Lande: productos de lujoLande: productos de lujo
Lande: productos de lujoIrenka Barud
 
RegalMwanza_AtrapantSomriures
RegalMwanza_AtrapantSomriuresRegalMwanza_AtrapantSomriures
RegalMwanza_AtrapantSomriuressetmanased
 
експедиція рідним краєм
експедиція рідним краємекспедиція рідним краєм
експедиція рідним краємchelyadnikov2015
 

Viewers also liked (18)

How to find a formal dress in brown idodressau
How to find a formal dress in brown idodressauHow to find a formal dress in brown idodressau
How to find a formal dress in brown idodressau
 
RTB-Media Intro
RTB-Media IntroRTB-Media Intro
RTB-Media Intro
 
Mirabillis_Broucher_Final_16th_Dec_2014
Mirabillis_Broucher_Final_16th_Dec_2014Mirabillis_Broucher_Final_16th_Dec_2014
Mirabillis_Broucher_Final_16th_Dec_2014
 
Print present. irina shirjajeva
Print present. irina shirjajevaPrint present. irina shirjajeva
Print present. irina shirjajeva
 
фотоальбом
фотоальбомфотоальбом
фотоальбом
 
Nadim Abdul Aziz Resume
Nadim Abdul Aziz ResumeNadim Abdul Aziz Resume
Nadim Abdul Aziz Resume
 
Wood2
Wood2Wood2
Wood2
 
Research on the conventions of thriller posters
Research on the conventions of thriller postersResearch on the conventions of thriller posters
Research on the conventions of thriller posters
 
Nadim Abdul Aziz Resume
Nadim Abdul Aziz ResumeNadim Abdul Aziz Resume
Nadim Abdul Aziz Resume
 
Untitled Presentation
Untitled PresentationUntitled Presentation
Untitled Presentation
 
Bite me picture powerpoint
Bite me picture powerpointBite me picture powerpoint
Bite me picture powerpoint
 
Kunstide instituut
Kunstide instituutKunstide instituut
Kunstide instituut
 
Lande: productos de lujo
Lande: productos de lujoLande: productos de lujo
Lande: productos de lujo
 
Lonnie fletcher resume
Lonnie fletcher resumeLonnie fletcher resume
Lonnie fletcher resume
 
LONNIE FLETCHER Resume
LONNIE FLETCHER ResumeLONNIE FLETCHER Resume
LONNIE FLETCHER Resume
 
RegalMwanza_AtrapantSomriures
RegalMwanza_AtrapantSomriuresRegalMwanza_AtrapantSomriures
RegalMwanza_AtrapantSomriures
 
експедиція рідним краєм
експедиція рідним краємекспедиція рідним краєм
експедиція рідним краєм
 
Kinetic : Potential
Kinetic : PotentialKinetic : Potential
Kinetic : Potential
 

Similar to Manually cleaning an infected computer

Monitoring of computers
Monitoring of computers Monitoring of computers
Monitoring of computers carlosrudy_45
 
How to activate windows 8
How to activate windows 8How to activate windows 8
How to activate windows 8KevinDRolle
 
apply problem solve.pdf
apply problem solve.pdfapply problem solve.pdf
apply problem solve.pdfdereje33
 
Take Care of Your Computer Part 1 -- Disinfection Jan-19-2012
Take Care of Your Computer Part 1 -- Disinfection Jan-19-2012Take Care of Your Computer Part 1 -- Disinfection Jan-19-2012
Take Care of Your Computer Part 1 -- Disinfection Jan-19-2012Ted Whittemore
 
Optimize and speed up windows 7
Optimize and speed up windows 7Optimize and speed up windows 7
Optimize and speed up windows 7Power Admin LLC
 
Troubleshooting guide
Troubleshooting guideTroubleshooting guide
Troubleshooting guidejameszzzzz
 
Troubleshooting guide
Troubleshooting guideTroubleshooting guide
Troubleshooting guidejameszzzz
 
Speed Up Your Computer
Speed Up Your ComputerSpeed Up Your Computer
Speed Up Your Computerroselynolinar
 
Clearing Your Registry for Windows 7
Clearing Your Registry for Windows 7Clearing Your Registry for Windows 7
Clearing Your Registry for Windows 7rhroach1
 
Operating systems 2
Operating systems 2Operating systems 2
Operating systems 2mariacalji
 
Fixed: Slow Startup on Windows 10 HP Laptop
Fixed: Slow Startup on Windows 10 HP LaptopFixed: Slow Startup on Windows 10 HP Laptop
Fixed: Slow Startup on Windows 10 HP LaptopDash Milly
 
Top 10 PC Maintenance Tasks That You Need To Remember
Top 10 PC Maintenance Tasks That You Need To RememberTop 10 PC Maintenance Tasks That You Need To Remember
Top 10 PC Maintenance Tasks That You Need To Remembersherireid89
 
Operating systems
Operating systemsOperating systems
Operating systemssandrahezro
 
How to repair windows 8
How to repair  windows 8How to repair  windows 8
How to repair windows 8Alex Robert
 
Operating systems and networks
Operating systems and networksOperating systems and networks
Operating systems and networkscarmenpuigdueta
 

Similar to Manually cleaning an infected computer (20)

Monitoring of computers
Monitoring of computers Monitoring of computers
Monitoring of computers
 
How to activate windows 8
How to activate windows 8How to activate windows 8
How to activate windows 8
 
apply problem solve.pdf
apply problem solve.pdfapply problem solve.pdf
apply problem solve.pdf
 
Take Care of Your Computer Part 1 -- Disinfection Jan-19-2012
Take Care of Your Computer Part 1 -- Disinfection Jan-19-2012Take Care of Your Computer Part 1 -- Disinfection Jan-19-2012
Take Care of Your Computer Part 1 -- Disinfection Jan-19-2012
 
Optimize and speed up windows 7
Optimize and speed up windows 7Optimize and speed up windows 7
Optimize and speed up windows 7
 
Girl Gets Ring
Girl Gets RingGirl Gets Ring
Girl Gets Ring
 
Troubleshooting guide
Troubleshooting guideTroubleshooting guide
Troubleshooting guide
 
Troubleshooting guide
Troubleshooting guideTroubleshooting guide
Troubleshooting guide
 
Speed Up Your Computer
Speed Up Your ComputerSpeed Up Your Computer
Speed Up Your Computer
 
Clearing Your Registry for Windows 7
Clearing Your Registry for Windows 7Clearing Your Registry for Windows 7
Clearing Your Registry for Windows 7
 
Operating systems 2
Operating systems 2Operating systems 2
Operating systems 2
 
Computer Problems
Computer ProblemsComputer Problems
Computer Problems
 
Computer is slow
Computer is slowComputer is slow
Computer is slow
 
Fixed: Slow Startup on Windows 10 HP Laptop
Fixed: Slow Startup on Windows 10 HP LaptopFixed: Slow Startup on Windows 10 HP Laptop
Fixed: Slow Startup on Windows 10 HP Laptop
 
Top 10 PC Maintenance Tasks That You Need To Remember
Top 10 PC Maintenance Tasks That You Need To RememberTop 10 PC Maintenance Tasks That You Need To Remember
Top 10 PC Maintenance Tasks That You Need To Remember
 
Operating systems
Operating systemsOperating systems
Operating systems
 
CCleaner Installation and Operation
CCleaner Installation and OperationCCleaner Installation and Operation
CCleaner Installation and Operation
 
How to repair windows 8
How to repair  windows 8How to repair  windows 8
How to repair windows 8
 
Operating systems and networks
Operating systems and networksOperating systems and networks
Operating systems and networks
 
LAS 6.pdf
LAS 6.pdfLAS 6.pdf
LAS 6.pdf
 

Manually cleaning an infected computer

  • 1. Manually cleaning an infected Computer Introduction Let me preface this article with some of my history. Thousands of articles from thousands of people can be found on this very topic but how do you trust what you’re reading to be from credible sources? You don’t and I think that’s your best bet. What you do instead is make a decision to look at the articles from a stand point that provides you with enough information to match your situation and hopefully find a resolve as you read on. To that point, I will tell you that I have been building and servicing computers since 1998. Around 2002, I started to become very interested in computer security and then in 2004, I ran my first network cabling and deployed a fully functioning network in my own home providing network and internet access to both wired and Wi-Fi clients. I have always been technologically driven to know my own thing because I was always convinced that computer shops are exactly the same as the shops that fix my car; if the service techs can spot a sucker, they’ll do everything they can to separate that sucker from their money. Because of this I earned my certification as a CompTIA certified A+ and Network+ technician, I then went on to earn my MCP certification from Microsoft for servicing Windows based computers running the Windows operating system and Office applications. I have never once accepted employment with any company to be employed as a member of their IT department; I’m a forklift operator in the shipping department of a very busy and highly successful manufacturing facility in Ontario, Canada. Privately, I started a company of my own called u.s.e.TEC Computer Security Consulting providing computer security consultation services to both the retail and the corporate users. What’s wrong with my Computer? You boot up and are ready to go but it’s so slow and, to top it off, there’s all kinds of strange happenings; internet browsing windows that appear without being launched, popup windows telling me there’s a nasty virus on my computer, my anti-virus scanning software is disabled, it’s taking a long time for apps to launch when I click on them, my internet browser page keeps being changed to a page I didn’t set to launch. There are a whole host of problems that you may be seeing that I haven’t listed here, there’s no point because you’ll know there’s a problem and it could be just about anything, that’s why you’re reading this. Let’s start this by telling you that recovering from these problems can cost you up to $250 to have a shop look at it and it’s quite possible that the end result will be; “We can’t actually remove the virus. We recommend a complete operating system reinstallation.” Because reinstalling the operating system is not always an option, it is almost certainly the quickest and easiest way to recover from a truly dirty computer. If you can’t simply reinstall the operating system,
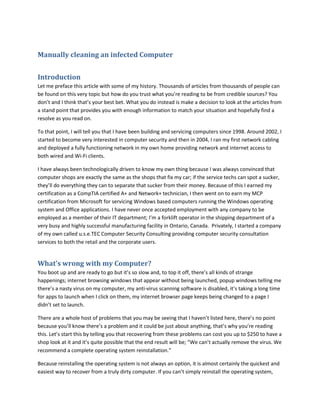
  • 2. follow along with each part of this guide to clean up your computer and get things back to a manageable and reliable state. Let’s get into it… My Base operating environment is Windows 8 but this process is basically the same in Windows 7 save for how to open certain dialogue boxes and the right click context options that may be available. For the most part I’m going to focus on Windows 8 through this article. Part One Take note of the obvious before you dig deeper. If you are seeing obvious signs of an infection; browser window popups, funky exclamation points popping up from the taskbar notification area, your browser start page has been hijacked. Record any helpful information about those things that may be available such as; the name of the site that is popping up on you, the name of the site that has hijacked your start page and even the name or description of the taskbar icon appearing in the notification area. This information will help you in ridding your computer of the problems you're encountering. Diagnosing the problem with Task Manager The first thing to check for an idea of what’s actually happening is the Task Manager, you’ll be able to see pretty much everything currently running on your PC that has a registered process with the system. Not everything registers its process with the system though so this won’t catch everything but will certainly catch most things. Opening the Task Manager Windows 7 – Right click the task bar and select Task Manager Windows 8 – Right click the windows icon (lower left corner) and select Task Manager Note: Windows 7, if you are not currently logged in on an Administrator account, reboot and log into the computer using one. Windows 8, the task manager processes tab shows all running processes while the User tab displays processes for currently logged in account and the Details tab shows all running processes as well the details about those processes exactly as Windows 7 shows them in the Processes tab Figure 1a: Windows 8 Task Manager
  • 3. Figure 1b: Windows 7 Task Manager
  • 4. Note: Windows 7 Task Manager will require you to click the Show processes from all users button to reveal all the running processes on the computer, otherwise you’ll only see the processes running for the current logged in user displayed. 1) Get yourself a pen and some paper to write on, you’ll also want a laptop or suitable internet connected device with a web browser, trust me, it’ll make life easier. If diagnosing in Windows 8, make sure the computer is connected to the internet as you may not need an additional computer, (see step 7 - point 2) you may be able to use the computer you are diagnosing to perform research with. 2) With the task manager open, click on the Processes tab (windows 7) or Details tab (windows 8) to show you everything that’s currently running on the computer that the operating system is aware of.
  • 5. 3) While on the Details tab, cycle either the CPU or Memory columns to determine which process (seen under the Name column) is using the most resources. You need to know the top users of these resources and depending on what your issue is. The CPU and Memory columns will show usages which should point to the culprits helping you determine which processes are slowing you down. Note: This procedure will require both the CPU and Memory columns to be diagnosed so start by diagnosing one then the other. It’s always best practice to perform the system cleanup on the computer as a sole task, in other words, don’t bother doing anything else with your computer while you are performing this procedure. 4) Begin diagnosing with cycling the RAM and CPU columns to determine what processes are using the system resources and slowing you down. Record the processes with the highest amount of memory or CPU usages. Figure 1c: Windows 8 Task Manager with the CPU column cycled to show the highest processes using the processor
  • 6. 5) Right click on the top process under the name column to reveal various right click context options Figure 1d: Showing Right Click context options
  • 7. 6) Understand that many of the processes run natively in the operating system, they were added to the OS itself and run in the background as required to provide the OS with certain functions such as Networking, printer spooling and desktop windows management. Other processes were added as part of the installation of software packages you legitimately installed to make your user experience better, these may include things like printer software and status, anti-virus software and gaming applications like Steam or Origins. The main thing you’re looking for are processes that you do not recognize as part of the operating system or others that exists because of things you’ve installed.  Operating System processes will be listed under the User Name column as System, Network and Local Service to name a few. For applications you’ve installed, they should be, for the most part,
  • 8. running under the current logged user name but may also have been installed to run as part of the system itself.  Look at the User Name column to determine what type of process is running, for example; is the process a System, Network Service, Local Service or currently logged in User service?  If there are processes running that show anything other than the above mentioned or nothing at all, look at the Description column to further determine what type of process you are dealing with. 7) Once you’ve distinguished the offensive processes from the legitimate ones, you’ll want to know two things about the offenders;  Where on the system are they located? To figure this out, right click the process in question and select Open File Location, this will take you to the installation folder where the file is running from. You will want to note this so that you can come back here later (see Part Four) and check to see that file has actually been removed and if not, you can manually delete it. Figure 1e: Showing Open File Location option  What additional information should I know before dealing with it? Before progressing past the diagnostics point, you should always perform a search on suspected offensive processes just to make sure they are actually offensive and not something that you may need for the OS or any applications you may have installed. To do this, Right click on the file in question and select Search Online. Your internet browser will launch and your browsers default search engine will provide results about the file for you to choose from and read about. 8) Once you have created your list, as suggested way back in step 1, of offensive processes, you can temporarily close the offensive processes so that you can begin the removal of them.
  • 9. Note: Because you may need to restart the computer after removing each and every offensive process, it is best to close the offensive process one at time as you clean your computer, this will allow diagnosing by elimination rather than trying to clean everything at once and forgetting what you’ve already done and still need to do 9) To close each offensive process, right click on the process and select End Task Figure 1f: Showing End Task/End Process Tree option  Selecting End Task will simply close the process that you are working with. Clicking End Process Tree will end the process you are working with and any related or dependant services attached to it. Be sure you carefully research each process as you may risk losing data or having the computer restart on you without warning.  If you wish to see which additional processes, if any, are attached to the process you are working with, switch to the Process tab and locate the process in question then click the arrow to the left of it and view the services displayed below.  Not all processes have dependant services and not all services have processes they depend upon Figure 1g: Shows the Task Manager – Details tab showing Processes with attached services
  • 10. 10) With the offensive process ended, you can now move on the next step, Disable the Start-up of the process in question and permanently remove the Start-up of it. Part Two Begin the Cleanup using the Startup Tab and Registry Editor 1) With the Task Manager open, click the Startup Tab and locate the name of the process in question, right click on it and select Disable. The idea with this step is to disable the offensive process to make its manual removal will be possible. Note: It is possible that the name of the process in the Details tab may not be the same as the name of its Startup entry, be sure to research properly in order to find out what the name might be listed as in the Startup if need be Figure 2a: Showing the Startup tab with right click context options
  • 11. 2) Disabling the Start-up of the process will also end any related and dependant processes and services for that process, use the drop down arrow, if applicable, to see the related and dependant processes and services attached to it. Note: Disabling any item in the Startup tab permanently disables that item from automatically launching with system start-up until it is enabled again 3) Now we are going to permanently delete the Start-up of the offensive process using the Registry Editor. To open the Registry Editor, Right click the Windows icon, click Run and type Regedit then click OK.
  • 12. 4) With the Registry Editor launched, there are a few places you need to check to determine where the start-up entry resides but before we do this, we’re going to actually make a backup of the Registry just in case the computer has a problem with the changes we are about to make Figure 2b: Showing the Registry Editor main screen  To back up the registry, click File then click Export, choose a place to save the exported registry file and name it something you’ll remember. If needed, you can return the registry to the previous state using this backup.  It’s a good idea to create a backup of the registry every time you make changes to it, by that I mean every time. Feel free to overwrite a previously saved backup as long as you are sure that the previous changes were successfully implemented and there are no anomalies. 5) With the Registry backup completed, let’s delete the Startup of the process using the Registry Editor  Check all of the following locations for entries of the offensive process by its Startup name;  HKCUSoftwareMicrosoftWindowsCurrentVersionRun HKCUSoftwareMicrosoftWindowsCurrentVersionRunOnce  HKLMSoftwareMicrosoftWindowsCurrentVersionRun HKLMSoftwareMicrosoftWindowsCurrentVersionRunOnce  HKLMSoftwareWow6432NodeMicrosoftWindows CurrentVersionRun HKLMSoftwareWow6432NodeMicrosoftWindowsCurrentVersionRunOnce  When you spot the entry of the offensive process by name within the Registry location, right click on the name and select Delete
  • 13. Note: The above locations of the registry start with HKCU & HKLM, these are short form terms for the root folder of each Registry Editor location you will be searching, look at the left hand column to see the full name of these folders. As you navigate through the Registry Editor, your current location will constantly update in the bottom address bar of the Registry Editor. Figure 2c: Showing the Registry Editor at a location with Right click context options 6) You will now move to the next in which you will use Programs and Features to uninstall the application of the offensive process Part Three Using Programs and Features 1) Right click the Windows icon and select Control Panel 2) Select Programs and Features 3) Search for the application you wish to uninstall then Right click on the item and select Uninstall Figure 3a: Showing Programs and Features with Right Click context options displayed
  • 14. 4) After you have uninstalled of the application you may be required to reboot. 5) Open the Task Manager, click on the Details tab and make sure the offensive process is removed then click the Startup tab and make sure that it is also removed from there. 6) The next part will require you to navigate to the locations you earlier recorded during the diagnostic process in Part One/Step 7 - Point 1 to manually cleanup any residual files and folder that may still be hanging around from the offensive process Part Four Manually removing residual files and folders Though the uninstalling the application that should have automatically taken care of the removal, occasionally residual folders and files are left. Clean them up as required 1) Using the list you created in Part One, navigate to the folder of the file location and delete and files and folders that remain  Make sure to select the files and folders then press and hold the Shift key while deleting them, this will permanently delete the files and folders rather than just moving them to the recycling bin. 2) The next thing you’ll need to do is check other places on your computer where programs may install files and folders, these locations will be program files, program data and User folders.
  • 15.  Go to Control Panel and select Folder options, click the View tab and place a mark in the Show hidden files, folders and drives radial button to make the folders you will be working with viewable, some of these files, folders are hidden by default. Figure 4a: Shows the Folder Options on the View tab  Navigate to C:Program Files, C:Program Files (x86), C:ProgramData to check for folders and files and folders that may belong to the offensive process you are looking to clean, if found you can delete them from your computer  Navigate also to C:UsersUserNameAppData folder and check each of the Local, LocalLow and Roaming folders for files and folders that may also need to be deleted Final Check The last thing to do in the cleanup process is scan your system to be sure that you’ve cleaned the offensive processes. To do this you will need to use software that runs independently from your computer so that the scanning software is not influenced by anything that may still be on the computer.
  • 16. A company called Trend Micro has standalone virus scanning software that is made specifically for this purpose; you can download it from their website by searching for Trend Micro HouseCall or going to http://housecall.trendmicro.com/ . Figure 4b: Shows Trend Micro’s HouseCall download page  There are many other standalone scanners available; Microsoft Safety Scanner or Kaspersky Virus Removal Tool to name a couple. You could run a couple of these if you wish or just choose one. I use Trend Micro simply because the results have always been solid.  Select the OS version you are running then click the download button, wait for the download to complete, navigate to the download location and install the software Figure 4c: Shows HouseCall main screen
  • 17.  Before scanning, you need to change some of the scan settings to make sure that you concentrate the scan specifically to your computer, start by deselecting the home network scan option then click on Settings Figure 4d: Shows HouseCall’s scan settings dialogue box
  • 18.  On the Scan Type tab, you may see more drives listed than what the above example shows, leaving the Quick scan option selected will only scan a small portion of the C drive where programs are often installed to and run from; Program Files, ProgramData, User folders etc., but will does not scan the entire C drive. If you wish to perform a deeper scan of the C drive select Full system scan, if you wish to select specific drives, use the Custom scan option and select the drives. Note: Custom scan will show all drives currently connected to the computer whether they are empty or drives containing data; USB connected drives or CD/DVD discs inserted to the CD drive.  When ready, click the Scan Now button and wait for the scan to complete Figure 4e: Shows HouseCall’s scanning in progress
  • 19.  As the scan progresses, you may see the Threats found counter populate, let the scan continue until the next screen is presented, this will be the screen that provides options with how to deal with the threats found Note: Trend Micro is designed to find all threats that may be present on a computer including items that you may be intentionally running on your computer to circumvent the activation of software titles you’ve installed on your computer, these could include Key Hacking tools that are distributed as part of the installation of pirated software. Figure 4f: Shows Housecall’s Fix Problems screen with a threat detected
  • 20.  Use the Action drop down to select Ignore if you are sure that the displayed threat is a legitimate item running on your computer, otherwise leave the Action drop down as Fix and click the Fix Now button to see the Review Results screen  The Review Results screen will display your Fix Now option results based on how you chose to allow HouseCall to deal with each item found, if you chose to ignore something the Summary column will show how many items were ignored, if you chose to Fix something, the Summary column will also show how many threats were fixed. Figure 4g.1 & 4g.2: Showing Threats ignored and Threats fixed screens
  • 21.  Clicking the More Details link will take you to a Summary where you will be presented with the actions you’ve selected and the option to restore files you previously instructed HouseCall to fix
  • 22. Figure 4h: Shows HouseCall’s summary screen where you can restore fixed files  Return to the Review Results screen by clicking the Back button  When you are satisfied the scan has successfully dealt with any remaining threats, you may simply close HouseCall or you can run another scan to verify that your fix was successful.  Because HouseCall uses date sensitive virus definitions, there’s no point in keeping the software installed on the computer, you may now uninstall HouseCall Note: HouseCall is updated and intended to be run from Trend Micro as a standalone scanner and is not intended to be used as a real time virus scanning solution, the definitions that HouseCall uses are added periodically by Trend Micro and can’t be updated by the user. Each time the user downloads HouseCall, they provided with the most recently updated version of HouseCall. Part Five Windows Update and Real Time virus scanning health check With your computer free from the offensive processes, it’s time to focus on tightening up your computers security. Windows Update Though you likely have Windows set to update itself at a specific time, with the problems you’ve just recovered from, it may be that the Update settings were changed by one of the offensive processes to disable Windows Updating.
  • 23. 1) Navigate to Control Panel and select Windows Update to launch your computers Windows Update screen Figure 5a: Shows Windows Update main screen 2) In the left column, click Change settings to verify that Windows is set scheduled automatically update itself Figure 5b: Shows Windows Update installation settings
  • 24.  Unless there’s a reason why you’d rather Windows didn’t automatically update itself, insure the Important updates drop down is set to Install updates automatically (recommended) and there are checks in both the Recommended and Microsoft updates boxes. Note: There are certain instances where you may not want Microsoft to update itself automatically; if your internet bandwidth is capped – limited to a set amount of data you are allowed to transfer per month or if you have hardware devices that you prefer to manually install software drivers for.  Important updates refer to update specific to the operating system itself, Recommended updates refer to updates that Microsoft suggests based on your computers configuration itself such as certain browser add-ons, software that require .Net installations and Hardware drivers that control things like Network adapters, GPU’s and so on. Microsoft updates for other Microsoft products will pertain to other Microsoft products you’ve installed to your computer like Microsoft Office.  If the settings are where you like them, click OK to return to Windows updates main screen  Back to the left column of the main screen, click View update history and look through the list of updates for any updates that have “failed” in the status column. Figure 5c: Shows Windows Updates history screen
  • 25.  There may be several reasons for why an update would have failed, we’re not concerned with the why so much as for the what, at this point you simply want to make a list of all the failed updates so that you can check back later to see that these particular updates were successful.  Make a note of the KB number for each failed update. Figure 5d: Shows Windows Updates history screen with a failed update presented  Click the back arrow to return to Windows Updates main screen and select Restore hidden updates in the left column.  If there’s nothing displayed, return to the Main screen. If there are items listed here, review them to see what they are then, as required, select them and press “Restore” to return them to the list of available updates that need to be installed.  Back to Windows Updates main screen, in the left column, select Check for updates and wait on the check to complete.
  • 26. Figure 5e: Shows Windows update checking for available updates Figure 5f: Shows check complete
  • 27.  If there are updates to be installed, they will be listed here. If you are presented with the message as above; “You’re set to automatically…” you can simply exit from the update screen and let Windows automatically update the computer later.  If you are presented with a list of updates to install, check the list and compare it to the list of failed updates you created previously to be insure previously failed updates have been successfully installed.  If for some reason any updates continue to fail, there may be legitimate reasons for this, you can now perform an internet search using the KB number to investigate causes for installation failure and how to resolve the issues for successful installation. Real Time virus scanning It’s time to check that your virus scanning software is operating as it should be. In my example I use Microsoft Security Essentials as my real time virus scanning solution, the steps may be different for you depending on which product you use but the outcome will be the same; making sure the software you use is actually functioning the way it should be. 1) To be sure that the virus scanning software is active, navigate to the Control Panel and select Action Center Figure 5g: Shows the Action Center 2) Action Center displays any areas of concern that require your attention; look at each item displayed and make the required changes. 3) Go back into Control Panel and select your Antivirus software to launch it. Figure 5h: Shows Microsoft’s Windows Defender main screen on the Home tab
  • 28.  Click the Update tab then verify the definitions are up to date, if not click the Update button to update the virus software with the latest definitions. Figure 5i: Shows the Update screen for Windows Defender
  • 29.  With Windows Defender up to date, click the Settings tab and check that the Excluded files and locations, types and processes paths are all empty. Note: It may be possible that there are excluded paths displayed here if you’ve previously set them but it is also possible that malicious software made entries here too. If there’s something strange listed, feel free to make changes. Figure 5j: Shows Settings tab with Excluded paths
  • 30.  You may also check the other options and make changes to suit your configuration then click Save changes.  Now click the History button and check each of the three areas presented for options that may require your attention. Figure 5k.1: Shows the History tab with the Allowed radial button selected
  • 31.  Select View details to show any items that Windows Defender is currently allowing to run on the computer Figure 5k.2: Shows the History tab presenting details of the items Allowed
  • 32.  The above example shows items that heave been allowed to remain on the computer, if these files are unknown to you, take the time now to research them prior to making changes. Once satisfied with the legitimacy or lack thereof, make the required changes by selecting each item and clicking Remove or Remove all. You can also chose to simply leave them alone if you are sure they are legitimate.  With your Antivirus software up to date, all Allowed items and excluded paths dealt with, you can now run a full system scan to make sure that you Antivirus software is running properly. Click the Home Tab and select Scan Now button. Figure 5l: Shows Windows Defender Home tab with scan in progress
  • 33.  As the scan runs, it may encounter problems and should display this information, allow the scan to complete.  Upon scan completion you should be presented with a scan result screen, if there are items requiring your attention, those items along with options you can perform will be provided. Figure 5m: Shows Windows Defender Home tab with scan results screen
  • 34.  You have just completed all the steps required to clean up your infected computer. You should now be left with a computer that is running as optimally as you expect. You may now check the Task Manager to verify that your RAM and CPU usages, at idle with nothing launched other than those processes required by the operating system, are sitting as close to 0% as reasonably possible. Figure 5n: Shows Task Manager at completion of the clean up
  • 35.  Check each of the Processes, Startup and Details tab to make sure everything looks fine  If all is good, you may perform a reboot to finish up this part. Part Six The final step in all this will be to clean up your internet browser. It would suck if you launched your browser and found that your home page still navigated to a site that was causing problems. Cleaning up your Browser The step here will be performed using Internet Explorer 11 in Windows 8.1. Be warned that by clean up I actually mean reset, we will be taking IE11 back to the state it was in when it was first installed on your computer. Before embarking on that journey though, we’ll backup your current internet settings which will allow you to export your Favorites, Feeds and Cookies so that you can Import them to your reset browser.
  • 36. Backing up your IE11 Browser settings The following backup steps of this part will need to be performed on all user accounts on the computer you are cleaning, if you have more than one user account, you’ll need to log into each individual user account and perform the backup procedure on each account available prior to performing the reset of IE11.  Launch your browser and then click the Favorites star in the upper right corner. Figure 6a: Shows IE11 launched with the Add to Favorites options displayed  Click the Drop arrow beside Add to favorites then click Import and export to open Internet Explorer 11’s Import/Export Setting dialogue. Figure 6b: Shows the Import/Export settings dialogue box asking if you want to Import or Export browser settings.
  • 37.  You’ll be asked how you’d like to import or export your browser setting, select Export to a file then click Next. Figure 6c: Shows Import/Export settings dialogue box asking what you want to export.
  • 38.  You will now be asked what you’d like to export; Favorites, Feeds and Cookies. Select all that you’d like to export then click Next. Note: I’m sure there’s a fight in the Internet universe about Cookies and exporting them for later import to a cleaned browser. For the most part, by the time you’ve gotten to this step your computer should be fairly safe and all your remaining stored cookies should be safe as well. Do what you think is right on this one. Figure 6d: Shows Import/Export settings dialogue box asking what folder you’d like to export from.
  • 39.  The next dialogue box will ask you to select which folder you want to export your favorites from, select the top most Favorites folder showing then click Next. Figure 6e.1: Shows the Export dialogue box asking where you want to export your favorites to.
  • 40. Figure 6e.2: Shows the Export dialogue box asking where you want to export your feeds to.
  • 41. Figure 6e.1: Shows the Export dialogue box asking where you want to export your cookies to.
  • 42.  The next three dialogue boxes will ask you where you would like to save your Favorites, Feeds and Cookies. The default should be the Documents folder for the current logged in user but using the Browse button, you can save them anywhere you wish. Click Next at the Favorites and Feeds dialogues then Export at the Cookies Dialogue to proceed. Figure 6f: Shows the Import/Export dialogue box confirming successful export of your settings.
  • 43.  The successful export dialogue will now be presented, click Finish to complete the backup of your IE11 settings. Browser Reset While logged into the Administrator account, navigate to the Control Panel and click Internet options to start the process of resetting the Browser. Once again, this will entirely reset IE11 to the state it was when first installed. All of your previous settings including; Favorites, RSS Feeds and Cookies will be deleted so you may want to be sure that you actually backed everything for every user account you needed to.  With Internet options launched, click the Advanced tab Figure 6g: Shows the Internet Options dialogue box with the Advanced tab displayed
  • 44.  At the bottom of the Advanced tab you will click the Reset button Figure 6h: Shows the Reset Internet Explorer Settings dialogue box
  • 45.  At the next dialogue box you will be asked if you are sure about the reset, carefully absorb the information you are presented with so you understand what “Reset” means. The purpose of this exercise is to rid the Browser of any residual annoyances so I advise you to place a check in the “Delete personal settings” box then click Reset. Figure 6i: Shows the Reset was completed successfully
  • 46.  The next dialogue box shows the successful completion of the Reset, click close then restart your computer. The clean-up process is now complete.  The next time you launch IE11, you’ll be starting fresh. At that point, you can simply launch the Import/Export Settings and this time select “Import from a file” to begin the process of adding your previous Favorites, Feeds and Cookies to your Reset browser. Bonus Part The following is just a taste of some advanced diagnostics you can perform but, as I’ll explain below, this is not normally required to complete the steps of this guide. Advanced Diagnostics At the retail consumer level, Microsoft included some cool advanced features from Windows XP and up that allow users to look at how their hardware is being used by the system. In Windows 8, through the Task Manager, you can launch these features and perform some advanced diagnostics. Past simply showing you that they exist, I am not going to go into these advanced items just now.  It is possible to incorporate the Resource Monitor diagnostics into the overall diagnostics steps beginning in Part One but it is not necessary to do so in order to successfully complete the steps in this guide.  For Advanced diagnostics, you may also click the Performance tab to further investigate system slowdowns. Figure 7a: Shows Task Managers Performance tab
  • 47.  Using the Performance tab will often help you determine if there are hardware problems causing system slowdowns. On the Performance tab you can look at each hardware device for detailed operating information.  You can also click the Open Resources Monitor link to launch the Resource Monitor and perform further diagnostics from there. Figure 7b: Shows the Resource Monitor
  • 48. Conclusion The six parts of this guide show you how to manually cleanup your computer in order to recover from a virus attack without the need to reinstall the operating system. To avoid the potential of problems occurring again is however up to each individual user’s best practices. Though I won’t go into great detail here, I will tell you that you need to be careful and mindful while using your computer on the internet.  Almost all problems are self-inflicted;  Nothing is free; any software that you download, though use of it may be free, usually comes at a price. Be sure to fully read any End User Licence agreement available and pay attention to all presented options during the installation process of any given title. You’ll be surprised to find that even the most innocent of software titles are full of additional software installations or potential system changes that you may not expect.  Using certain websites to stream free TV or movies and even sites to download pirated software from will almost always present its own dangers you need to be aware of. Do not click on any popups or links unless you are sure they are safe to navigate to, if you don’t know don’t do it.
  • 49.  Email attachments, come on now, I certainly don’t need to tell you this… but just don’t bother with anything you are not expecting to receive, if you unexpectedly received something from someone you trust, contact them and ask them about it before opening or launching the file.  Kids should never be allowed to use the computer, download or install anything without your monitoring, guidance and approval; there are no compromises with this. The adult/parent is ultimately responsible for the safe use of all connected devices in their home.  If you share files on your network, be careful with the permissions granted for the folders on each device, allowing full privileges to other users may create an environment for virus propagation. This article was compiled and created by Brandon Near of u.s.e.TEC Computer Security Consulting. All software titles referenced in this guide belong to their respective developers are have been referred to in the guide as it was written. Use of this guide is strictly at the users own risk and there is no guarantee provided in any way for any of the steps provided through this guide.