
Recommended
More Related Content
More from ting1499041267
More from ting1499041267 (20)
Recently uploaded
Recently uploaded (20)
Caterpillar Cat C2.2 Industrial Engine (Prefix J26) Service Repair Manual Instant Download (J2600001 and up).pdf
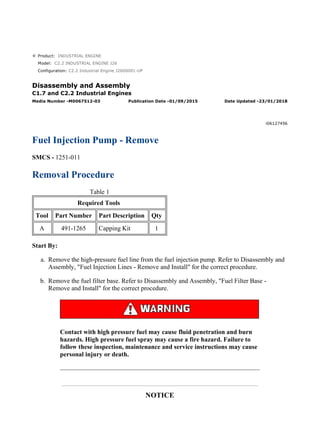
- 1. Product: INDUSTRIAL ENGINE Model: C2.2 INDUSTRIAL ENGINE J26 Configuration: C2.2 Industrial Engine J2600001-UP Disassembly and Assembly C1.7 and C2.2 Industrial Engines Media Number -M0067512-03 Publication Date -01/09/2015 Date Updated -23/01/2018 i06127456 Fuel Injection Pump - Remove SMCS - 1251-011 Removal Procedure Table 1 Required Tools Tool Part Number Part Description Qty A 491-1265 Capping Kit 1 Start By: a. Remove the high-pressure fuel line from the fuel injection pump. Refer to Disassembly and Assembly, "Fuel Injection Lines - Remove and Install" for the correct procedure. b. Remove the fuel filter base. Refer to Disassembly and Assembly, "Fuel Filter Base - Remove and Install" for the correct procedure. Contact with high pressure fuel may cause fluid penetration and burn hazards. High pressure fuel spray may cause a fire hazard. Failure to follow these inspection, maintenance and service instructions may cause personal injury or death. NOTICE 1/6(W) w 2022/4/17 https://127.0.0.1/sisweb/sisweb/techdoc/techdoc_print_page.jsp?returnurl=/sisweb/sisw...
- 2. Ensure that all adjustments and repairs that are carried out to the fuel system are performed by authorised personnel that have the correct training. Before begining ANY work on the fuel system, refer to Operation and Maintenance Manual, "General Hazard Information and High Pressure Fuel Lines" for safety information. Refer to Systems Operation, Testing and Adjusting Manual, "Cleanliness of Fuel System Components" for detailed information on the standards of cleanliness that must be observed during ALL work on the fuel system. NOTICE Care must be taken to ensure that fluids are contained during performance of inspection, maintenance, testing, adjusting and repair of the product. Be prepared to collect the fluid with suitable containers before opening any compartment or disassembling any component containing fluids. Dispose of all fluids according to local regulations and mandates. Turn the fuel supply to the OFF position. Turn the battery disconnect switch to the OFF position. 2/6(W) w 2022/4/17 https://127.0.0.1/sisweb/sisweb/techdoc/techdoc_print_page.jsp?returnurl=/sisweb/sisw...
- 4. Illustration 2 g03841191 1. Remove bolts (1) from cover (5). Remove clip (2) complete with the wiring harness and position the wiring harness away from engine. 2. Remove plate (3) and O-ring seal (4) from cover (5). 3. Align the timing marks on the fuel injection pump gear and the camshaft gear as shown in Illustration 2. Refer to Systems Operation Testing and Adjusting, "Fuel Injection Timing - Check" for more information. 4/6(W) w 2022/4/17 https://127.0.0.1/sisweb/sisweb/techdoc/techdoc_print_page.jsp?returnurl=/sisweb/sisw...
- 5. Illustration 3 g03818187 4. Disconnect the hose assembly for fuel inlet connection (21). Use Tooling (A) to plug and cap all open ports. 5. Disconnect harness (11) and harness (12) from fuel injection pump assembly (10). 6. Loosen nut (6) and nut (8). Remove fuel line (7), use Tooling (A) to plug and cap all open ports. Discard the fuel line. Note: It may be necessary to reposition the high-pressure fuel line clamp. 7. Remove banjo bolt (9) with sealing washers (not shown), use Tooling (A) to plug and cap all open ports. Discard the sealing washers. Note: Make a temporary Mark on the bolts in order to aide installation. 5/6(W) w 2022/4/17 https://127.0.0.1/sisweb/sisweb/techdoc/techdoc_print_page.jsp?returnurl=/sisweb/sisw...
- 6. Illustration 4 g03818192 8. Remove bolts (13), (14), (16), (17), (18), (19) and (20). 9. Remove nut (15) and remove fuel injection pump assembly (10) and O-ring seal (not shown) from engine. Discard the O-ring seal. 6/6(W) w 2022/4/17 https://127.0.0.1/sisweb/sisweb/techdoc/techdoc_print_page.jsp?returnurl=/sisweb/sisw...
- 7. Product: INDUSTRIAL ENGINE Model: C2.2 INDUSTRIAL ENGINE J26 Configuration: C2.2 Industrial Engine J2600001-UP Disassembly and Assembly C1.7 and C2.2 Industrial Engines Media Number -M0067512-03 Publication Date -01/09/2015 Date Updated -23/01/2018 i06128546 Fuel Injection Pump - Install SMCS - 1251-012 Installation Procedure NOTICE All plugs and caps must be remain in position until the component is about to be installed 1. Rotate gear on the fuel injection pump in order to align the timing marks. Align the timing marks, refer to Systems Operation Testing and Adjusting, "Fuel Injection Timing - Check" for more information. 1/5(W) w 2022/4/17 https://127.0.0.1/sisweb/sisweb/techdoc/techdoc_print_page.jsp?returnurl=/sisweb/sisw...
- 10. Illustration 3 g03818187 2. Install new O-ring (22) to fuel injection pump assembly (10). 3. Install fuel injection pump assembly (10) to the front housing. Ensure that the timing mark on the fuel injection pump gear and the camshaft gear are aligned as shown in Illustration 2. 4. Install bolts (13), (14), (16), (17), (18), (19), and (20). Install nut (15). Tighten nut (15) and bolts (13), (14), (16), (17), (18), and (19) to a torque of 10 N·m (88 lb in). 5. Install new fuel line (7) and tighten nuts (6) and (8) to a torque of 23 N·m (204 lb in). Note: If the high-pressure fuel line clamp was repositioned during disassembly, return the clamp to the original position. 6. Install banjo bolt (9) with new sealing washer (not shown) and tighten the bolt to a torque of 13 N·m (115. lb in). 7. Connect the fuel hose assembly to fuel inlet (21). 8. Reconnect the harness assembly to fuel temperature sensor (12) and fuel solenoid (11). 4/5(W) w 2022/4/17 https://127.0.0.1/sisweb/sisweb/techdoc/techdoc_print_page.jsp?returnurl=/sisweb/sisw...
- 11. Illustration 4 g03819043 9. If necessary, replace O ring seal (4). Install O ring seal (4) into cover (5). 10. Install plate (3) and clip (2) complete with harness. Install bolts (1) and tighten to a torque of 26 N·m (230 lb in). 11. Install the fuel filter base, refer to Disassembly and Assembly, "Fuel Filter Base - Remove and Install" for the correct procedure. 12. Turn the fuel supply to the ON position. Turn the battery disconnect switch to the ON position. 13. Prime the fuel system, refer to Operation and Maintenance Manual, "Fuel system - Prime". 14. After replacement of the fuel injection pump, the fuel injection pump must be calibrated in order to prevent damage to the fuel system. Use the electronic service tool to perform "Fuel Pump Learn". 5/5(W) w 2022/4/17 https://127.0.0.1/sisweb/sisweb/techdoc/techdoc_print_page.jsp?returnurl=/sisweb/sisw...
- 12. Product: INDUSTRIAL ENGINE Model: C2.2 INDUSTRIAL ENGINE J26 Configuration: C2.2 Industrial Engine J2600001-UP Disassembly and Assembly C1.7 and C2.2 Industrial Engines Media Number -M0067512-03 Publication Date -01/09/2015 Date Updated -23/01/2018 i06128191 Fuel Injection Pump Gear - Remove SMCS - 1251-011 Removal Procedure Start By: a. Remove the fuel injection pump, refer to Disassembly and Assembly, "Fuel Injection Pump - Remove" for the correct procedure. Contact with high pressure fuel may cause fluid penetration and burn hazards. High pressure fuel spray may cause a fire hazard. Failure to follow these inspection, maintenance and service instructions may cause personal injury or death. NOTICE Ensure that all adjustments and repairs that are carried out to the fuel system are performed by authorised personnel that have the correct training. Before begining ANY work on the fuel system, refer to Operation and Maintenance Manual, "General Hazard Information and High Pressure Fuel Lines" for safety information. Refer to Systems Operation, Testing and Adjusting Manual, "Cleanliness of Fuel System Components" for detailed information on 1/3(W) w 2022/4/17 https://127.0.0.1/sisweb/sisweb/techdoc/techdoc_print_page.jsp?returnurl=/sisweb/sisw...
- 13. the standards of cleanliness that must be observed during ALL work on the fuel system. NOTICE Care must be taken to ensure that fluids are contained during performance of inspection, maintenance, testing, adjusting and repair of the product. Be prepared to collect the fluid with suitable containers before opening any compartment or disassembling any component containing fluids. Dispose of all fluids according to local regulations and mandates. Illustration 1 g03818435 1. Use a suitable tool in order to prevent the fuel injection pump gear from rotating. Remove nut (6) and timing plate (5) from fuel injection pump assembly (1). 2. Using a suitable puller, remove gear (4) from fuel injection pump assembly (1). 2/3(W) w 2022/4/17 https://127.0.0.1/sisweb/sisweb/techdoc/techdoc_print_page.jsp?returnurl=/sisweb/sisw...
- 14. 3. If necessary, remove key (2) from fuel injection pump assembly (1). Illustration 2 g03818442 4. Remove bolts (7) from fuel injection pump assembly (1). 5. Remove adaptor plate (9) from fuel injection pump (1) and remove O ring seal (8). Discard O ring seal. 6. If necessary, remove stud (10) from adaptor plate (9). 3/3(W) w 2022/4/17 https://127.0.0.1/sisweb/sisweb/techdoc/techdoc_print_page.jsp?returnurl=/sisweb/sisw...
- 15. Product: INDUSTRIAL ENGINE Model: C2.2 INDUSTRIAL ENGINE J26 Configuration: C2.2 Industrial Engine J2600001-UP Disassembly and Assembly C1.7 and C2.2 Industrial Engines Media Number -M0067512-03 Publication Date -01/09/2015 Date Updated -23/01/2018 i06128223 Fuel Injection Pump Gear - Install SMCS - 1251-012 Installation Procedure Contact with high pressure fuel may cause fluid penetration and burn hazards. High pressure fuel spray may cause a fire hazard. Failure to follow these inspection, maintenance and service instructions may cause personal injury or death. NOTICE Ensure that all adjustments and repairs that are carried out to the fuel system are performed by authorised personnel that have the correct training. Before begining ANY work on the fuel system, refer to Operation and Maintenance Manual, "General Hazard Information and High Pressure Fuel Lines" for safety information. Refer to Systems Operation, Testing and Adjusting Manual, "Cleanliness of Fuel System Components" for detailed information on the standards of cleanliness that must be observed during ALL work on the fuel system. 1/3(W) w 2022/4/17 https://127.0.0.1/sisweb/sisweb/techdoc/techdoc_print_page.jsp?returnurl=/sisweb/sisw...
- 16. NOTICE Care must be taken to ensure that fluids are contained during performance of inspection, maintenance, testing, adjusting and repair of the product. Be prepared to collect the fluid with suitable containers before opening any compartment or disassembling any component containing fluids. Dispose of all fluids according to local regulations and mandates. Illustration 1 g03818442 1. If necessary, install stud (10) into adaptor plate (9). Tighten stud (10) to a torque of 10 N·m (89 lb in). 2. Install new O ring seal (8) into adaptor plate (9). 3. Install fuel injection pump (1) onto adaptor plate (9) and install bolts (7). Tighten bolts (9) to a torque of 30 N·m (265 lb in). 2/3(W) w 2022/4/17 https://127.0.0.1/sisweb/sisweb/techdoc/techdoc_print_page.jsp?returnurl=/sisweb/sisw...
- 17. Illustration 2 g03818435 4. If necessary, install key (2) into fuel pump assembly (1). Install O ring seal (3) on to fuel injection pump assembly (1). 5. Check for correct orientation and install gear (4) onto fuel injection pump assembly (1). 6. Check for correct orientation and install timing plate (5) onto to gear (4). 7. Install nut (6) onto fuel injection pump assembly (1) and tighten nut (6) to a torque of 60 N·m (44 lb ft). End By: a. Install the fuel injection pump. Refer to Disassembly and Assembly, "Fuel Injection Pump - Install" for the correct procedure. 3/3(W) w 2022/4/17 https://127.0.0.1/sisweb/sisweb/techdoc/techdoc_print_page.jsp?returnurl=/sisweb/sisw...
- 18. Product: INDUSTRIAL ENGINE Model: C2.2 INDUSTRIAL ENGINE J26 Configuration: C2.2 Industrial Engine J2600001-UP Disassembly and Assembly C1.7 and C2.2 Industrial Engines Media Number -M0067512-03 Publication Date -01/09/2015 Date Updated -23/01/2018 i06124804 Fuel Injector - Remove and Install SMCS - 1290-010 Remove Fuel Injector Table 1 Required Tools Tool Part Number Part Description Qty A 491-1265 Capping Kit 1 Start By: a. Remove the fuel injection lines. Refer to Disassembly and Assembly, "Fuel Injection Lines - Remove and Install" for the correct procedure. Contact with high pressure fuel may cause fluid penetration and burn hazards. High pressure fuel spray may cause a fire hazard. Failure to follow these inspection, maintenance and service instructions may cause personal injury or death. NOTICE Ensure that all adjustments and repairs that are carried out to the fuel system are performed by authorised personnel that have the correct training. 1/8(W) w 2022/4/17 https://127.0.0.1/sisweb/sisweb/techdoc/techdoc_print_page.jsp?returnurl=/sisweb/sisw...
- 19. Before begining ANY work on the fuel system, refer to Operation and Maintenance Manual, "General Hazard Information and High Pressure Fuel Lines" for safety information. Refer to Systems Operation, Testing and Adjusting Manual, "Cleanliness of Fuel System Components" for detailed information on the standards of cleanliness that must be observed during ALL work on the fuel system. NOTICE Care must be taken to ensure that fluids are contained during performance of inspection, maintenance, testing, adjusting and repair of the product. Be prepared to collect the fluid with suitable containers before opening any compartment or disassembling any component containing fluids. Dispose of all fluids according to local regulations and mandates. Note: Put identification marks on electrical connectors and hoses for installation purposes. Plug all hose assemblies and tube assemblies. That helps to prevent fluid loss and plugging helps to keep contaminants from entering the system. 1. Ensure that the fuel supply to the OFF position. 2. Ensure that the battery disconnect switch to the OFF position. 2/8(W) w 2022/4/17 https://127.0.0.1/sisweb/sisweb/techdoc/techdoc_print_page.jsp?returnurl=/sisweb/sisw...
- 20. Illustration 1 g03817041 3. Depress clip (7) and remove harness assembly .Place harness away from engine. 4. Reposition clip (1) on hose (8). 5. Remove banjo bolts (4) and sealing washers (3). Use Tooling (A) to plug or cap all open ports. 6. Remove leak off pipe (5) from engine and from hose (8). Remove sealing washer (2). Discard all old sealing washers. Use Tooling (A) to plug or cap all open ports. 3/8(W) w 2022/4/17 https://127.0.0.1/sisweb/sisweb/techdoc/techdoc_print_page.jsp?returnurl=/sisweb/sisw...
- 21. Illustration 2 g03817407 7. Remove bolt (10) and washers (11). Remove clamp (12) and remove injectors (9). Repeat the procedure in order to remove the remaining fuel injections. 4/8(W) w 2022/4/17 https://127.0.0.1/sisweb/sisweb/techdoc/techdoc_print_page.jsp?returnurl=/sisweb/sisw...
- 22. Illustration 3 g03817429 8. Remove O-ring seal (13) and sealing washer (14) from injector (9). Install Tooling (A) to the tip of the fuel injector nozzle. Discard used O-ring seals and sealing washers. Install Fuel Injector NOTICE All plugs and caps must be remain in position until the component is about to be installed 5/8(W) w 2022/4/17 https://127.0.0.1/sisweb/sisweb/techdoc/techdoc_print_page.jsp?returnurl=/sisweb/sisw...
- 23. Illustration 4 g03817429 1. Install new O ring seal (13) onto injector (9). 2. Install new sealing washer (14) into the cylinder head. 3. Ensure that the orifices in the cylinder head for the fuel injectors are clean and free from debris. 6/8(W) w 2022/4/17 https://127.0.0.1/sisweb/sisweb/techdoc/techdoc_print_page.jsp?returnurl=/sisweb/sisw...
- 24. Illustration 5 g03817407 4. Install the fuel injectors into the cylinder head. Install fuel injector (9). Install clamp (12) and install bolt (10) with washer (11). 5. Tighten bolts (10) to a torque of 26 N·m (230 lb in). 7/8(W) w 2022/4/17 https://127.0.0.1/sisweb/sisweb/techdoc/techdoc_print_page.jsp?returnurl=/sisweb/sisw...
- 25. Thank you so much for reading. Please click the “Buy Now!” button below to download the complete manual. After you pay. You can download the most perfect and complete manual in the world immediately. Our support email: ebooklibonline@outlook.com