
Recommended
More Related Content
Viewers also liked
Viewers also liked (19)
Recently uploaded
Recently uploaded (20)
Casio tutorials
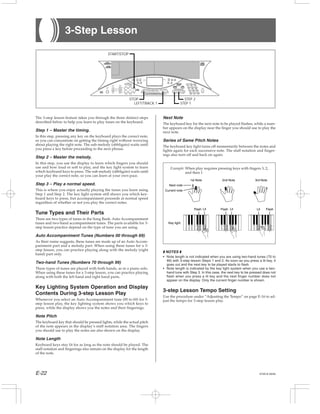
- 1. E-22 3-Step Lesson The 3-step lesson feature takes you through the three distinct steps described below to help you learn to play tunes on the keyboard. Step 1 – Master the timing. In this step, pressing any key on the keyboard plays the correct note, so you can concentrate on getting the timing right without worrying about playing the right note. The sub-melody (obbligato) waits until you press a key before proceeding to the next phrase. Step 2 – Master the melody. In this step, you use the display to learn which fingers you should use and how loud or soft to play, and the key light system to learn which keyboard keys to press. The sub-melody (obbligato) waits until your play the correct note, so you can learn at your own pace. Step 3 – Play a normal speed. This is where you enjoy actually playing the tunes you learn using Step 1 and Step 2. The key light system still shows you which key- board keys to press, but accompaniment proceeds at normal speed regardless of whether or not you play the correct notes. Tune Types and Their Parts There are two types of tunes in the Song Bank: Auto Accompaniment tunes and two-hand accompaniment tunes. The parts available for 3- step lesson practice depend on the type of tune you are using. Auto Accompaniment Tunes (Numbers 00 through 69) As their name suggests, these tunes are made up of an Auto Accom- paniment part and a melody part. When using these tunes for a 3- step lesson, you can practice playing along with the melody (right hand) part only. Two-hand Tunes (Numbers 70 through 99) These types of tunes are played with both hands, as in a piano solo. When using these tunes for a 3-step lesson, you can practice playing along with both the left hand and right hand parts. Key Lighting System Operation and Display Contents During 3-step Lesson Play Whenever you select an Auto Accompaniment tune (00 to 69) for 3- step lesson play, the key lighting system shows you which keys to press, while the display shows you the notes and their fingerings. Note Pitch The keyboard key that should be pressed lights, while the actual pitch of the note appears in the display’s staff notation area. The fingers you should use to play the notes are also shown on the display. Note Length Keyboard keys stay lit for as long as the note should be played. The staff notation and fingerings also remain on the display for the length of the note. Flash Next note Current note Lit Flash Lit Flash 1st Note 2nd Note 3rd Note Lit Key light Example: When play requires pressing keys with fingers 3, 2, and then 1 ❚ NOTES ❚ • Note length is not indicated when you are using two-hand tunes (70 to 99) with 3-step lesson Steps 1 and 2. As soon as you press a lit key, it goes out and the next key to be played starts to flash. • Note length is indicated by the key light system when you use a two- hand tune with Step 3. In this case, the next key to be pressed does not flash when you press a lit key and the next finger number does not appear on the display. Only the current finger number is shown. 3-step Lesson Tempo Setting Use the procedure under “Adjusting the Tempo” on page E-16 to ad- just the tempo for 3-step lesson play. 474A-E-024A Next Note The keyboard key for the next note to be played flashes, while a num- ber appears on the display near the finger you should use to play the next note. Series of Same Pitch Notes The keyboard key light turns off momentarily between the notes and lights again for each successive note. The staff notation and finger- ings also turn off and back on again. 7 8 9 4 5 6 1 0 2 3 POWER MODE VOLUME MAX TEMPO INTRO STEP 1 STEP 2 STEP 3 DEMO NORMAL/ FILL-IN VARIATION/ FILL-IN SYNCHRO/ ENDING FULL RANGE KEY LIGHT KEY LIGHT TOUCH RESPONSE METRONOME BEAT TOUCH TRANSPOSE/ TUNE/MIDI MEMORY STEP SPLIT LAYER GM MEMORY STEPRESPONSE ACCOMP VOLUME CHORD FINGERED CASIO CHORD NORMAL MIN START/ STOP STOP PLAY/PAUSE REW FF LEFT/TRACK1 RIGHT/TRACK2 SONG BANK CONTROLLER 3-STEP LESSON REST (TIE) STOP LEFT/TRACK 1 STEP 1 STEP 2 START/STOP
- 2. E-23 Step 1 – Master the timing. 1. Select the Song Bank tune you want to use. 2. Press the STEP 1 button to start Step 1 play. • After a count sounds, they keyboard stands by and waits for you to play the first note of the tune. • The hand you should use is indicated by arrows around it. 3. Press any keyboard keys to play the melody (right hand part). • The key for the next note to be played flashes while the key- board waits for you to play it. When you press any key to play the note, the key remains lit as the note plays. • Accompaniment (left-hand part) waits until you press any key to play a note. • If you accidentally press more than one key in succession, accompaniment is played for the corresponding number of notes. • Pressing more than one key at the same time counts as a sin- gle melody note. Pressing a key while another key is held down is counted as two melody notes. 4. To stop play at any time, press the STOP or START/ STOP button. ❚ NOTES ❚ • Left hand practice can also be performed with two-hand tunes (70 to 99). Simply select one of the two-hand tunes in step 1 of the above procedure, and then press the LEFT/TRACK 1 button following step 2. • 3-step lesson does not allow simultaneous practice of both hands. • You can also use fast forward and fast reverse operations with Step 1 play. • You cannot pause Step 1 play. • Rhythm does not sound during Step 1 play. Step 2 – Master the melody. 1. Select the Song Bank tune you want to use. 2. Press the STEP 2 button to start Step 2 play. • After a count sounds, the keyboard stands by and waits for you to play the first note of the tune. 3. Follow the key light system to press the correct key- board keys and play the melody (right hand part). • The key for the next note to be played flashes while the key- board waits for you to play it. When you press any key to play the note, the key remains lit as the note plays. • If more than one key lights when you are using a two-hand tune, it means that you must press all of the keys that are lit. 4. To stop play at any time, press the STOP or START/ STOP button. ❚ NOTES ❚ • Left hand practice can also be performed with two-hand tunes (70 to 99). Simply select one of the two-hand tunes in step 1 of the above procedure, and then press the LEFT/TRACK 1 button following Step 2. • 3-step lesson does not allow simultaneous practice of both hands. • You can also use fast forward and fast reverse operations with Step 2 play. • You cannot pause Step 2 play. • Rhythm does not sound during Step 2 play. Dynamic Marks The dynamic marks listed below appear on the display while Song Bank tunes are playing. Adjust the pressure you apply to the key- board in accordance with the mark that is on the display. pianissimo: Very soft piano: Soft mezzo piano: Moderately soft mezzo forte: Moderately loud forte: Loud fortissimo: Very loud cresc.(<) crescendo: Gradually louder decresc.(>) decrescendo: Gradually softer 474A-E-025A T nk l ehiw Fingering Note pitchIndicator appears T nk l ehiw Dynamic mark FingeringIndicator appears Lit
- 3. E-24 Crossed Finger Indications The display also shows when you have to cross fingers to play notes, and in which direction your fingers should cross. Example: Display for playing the notes below with the right hand only • B and C indicate that the index finger should cross over the thumb. • C and D indicate that the thumb should cross under the index fin- ger. Step 3 – Play a normal speed. 1. Select the Song Bank tune you want to play. 2. Press the STEP 3 button to start Step 3 play. • Accompaniment (left hand part) starts to play at normal speed. 3. Follow the key light system to press the correct key- board keys and play the melody (right hand part). 4. To stop play at any time, press the STOP or START/ STOP button. C EDA B 3 31 12 C EDA B Using the Song Bank Crossed finger display ❚ NOTES ❚ • Left hand practice can also be performed with two-hand tunes (70 to 99). Simply select one of the two-hand tunes in step 1 of the above procedure, and then press the LEFT/TRACK 1 button following step 2. • 3-step lesson does not allow simultaneous practice of both hands. • You can also use pause, fast forward and fast reverse operations with Step 3 play. 474A-E-026A 7 8 9 4 5 6 1 0 2 3 POWER MODE VOLUME MAX TEMPO INTRO STEP 1 STEP 2 STEP 3 DEMO NORMAL/ FILL-IN VARIATION/ FILL-IN SYNCHRO/ ENDING FULL RANGE KEY LIGHT KEY LIGHT TOUCH RESPONSE METRONOME BEAT TOUCH TRANSPOSE/ TUNE/MIDI MEMORY STEP SPLIT LAYER GM MEMORY STEPRESPONSE ACCOMP VOLUME CHORD FINGERED CASIO CHORD NORMAL MIN START/ STOP STOP PLAY/PAUSE REW FF LEFT/TRACK1 RIGHT/TRACK2 SONG BANK CONTROLLER 3-STEP LESSON REST (TIE) STOP LEFT/TRACK 1 STEP 3 START/STOP T nk l ehiw FingeringIndicator appears