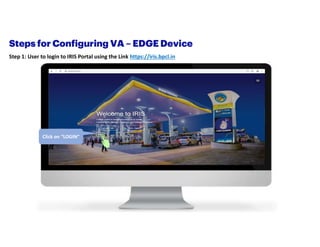
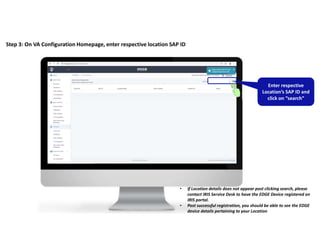
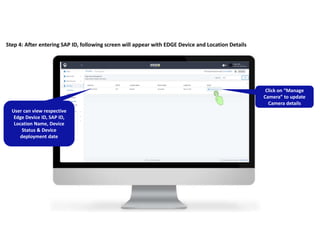
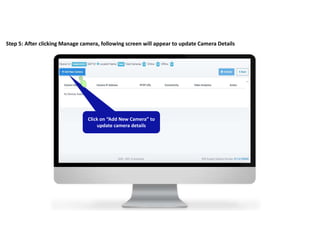
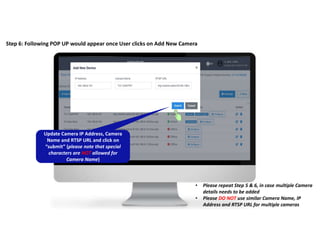
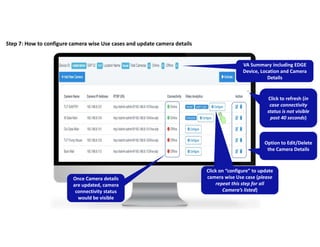
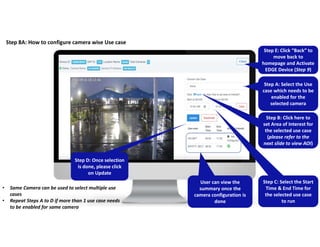
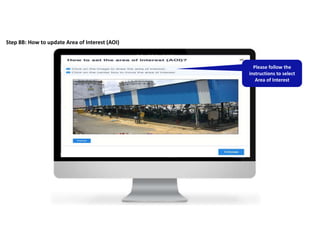
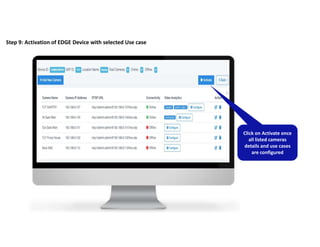
Step 1: User to login to IRIS Portal using the Link https://iris.bpcl.in
Click on “LOGIN”
Step 2: Click on VA Configuration from the respective BU dropdown menu
Click on “VA
Configuration”
Step 3: On VA Configuration Homepage, enter respective location SAP ID
Enter respective
Location’s SAP ID and
click on “search”
• If Location details does not appear post clicking search, please
contact IRIS Service Desk to have the EDGE Device registered on
IRIS portal.
• Post successful registration, you should be able to see the EDGE
device details pertaining to your Location
Step 4: After entering SAP ID, following screen will appear with EDGE Device and Location Details
User can view respective
Edge Device ID, SAP ID,
Location Name, Device
Status & Device
deployment date
Click on “Manage
Camera” to update
Camera details
Step 5: After clicking Manage camera, following screen will appear to update Camera Details
User can see Camera name, IP
Address, RTSP URL, Connectivity
status, Prioritized Use-case &
Action buttons
Click on “Add New Camera” to
update camera details
Step 6: Following POP UP would appear once User clicks on Add New Camera
• Please repeat Step 5 & 6, in case multiple Camera
details needs to be added
• Please DO NOT use similar Camera Name, IP
Address and RTSP URL for multiple cameras
Update Camera IP Address, Camera
Name and RTSP URL and click on
“submit” (please note that special
characters are NOT allowed for
Camera Name)
Step 7: How to configure camera wise Use cases and update camera details
VA Summary including EDGE
Device, Location and Camera
Details
Option to Edit/Delete
the Camera Details
Once Camera details
are updated, camera
connectivity status
would be visible
Click on “configure” to update
camera wise Use case (please
repeat this step for all
Camera’s listed)
Click to refresh (in
case connectivity
status is not visible
post 40 seconds)
Step 8A: How to configure camera wise Use case
Step A: Select the Use
case which needs to be
enabled for the
selected camera
Step B: Click here to
set Area of Interest for
the selected use case
(please refer to the
next slide to view AOI)
Step D: Once selection
is done, please click
on Update
Step C: Select the Start
Time & End Time for
the selected use case
to run
User can view the
summary once the
camera configuration is
done
• Same Camera can be used to select multiple use
cases
• Repeat Steps A to D if more than 1 use case needs
to be enabled for same camera
Step E: Click “Back” to
move back to
homepage and Activate
EDGE Device (Step 9)
Step 8B: How to update Area of Interest (AOI)
Please follow the
instructions to select
Area of Interest
Step 9: Activation of EDGE Device with selected Use case
Click on Activate once
all listed cameras
details and use cases
are configured
Copyright © 2020 Accenture All rights reserved.
THANK YOU

BPCL IRIS_VA Configuration_User Manual v1.pdf

  • 2.
    Step 1: Userto login to IRIS Portal using the Link https://iris.bpcl.in Click on “LOGIN”
  • 3.
    Step 2: Clickon VA Configuration from the respective BU dropdown menu Click on “VA Configuration”
  • 4.
    Step 3: OnVA Configuration Homepage, enter respective location SAP ID Enter respective Location’s SAP ID and click on “search” • If Location details does not appear post clicking search, please contact IRIS Service Desk to have the EDGE Device registered on IRIS portal. • Post successful registration, you should be able to see the EDGE device details pertaining to your Location
  • 5.
    Step 4: Afterentering SAP ID, following screen will appear with EDGE Device and Location Details User can view respective Edge Device ID, SAP ID, Location Name, Device Status & Device deployment date Click on “Manage Camera” to update Camera details
  • 6.
    Step 5: Afterclicking Manage camera, following screen will appear to update Camera Details User can see Camera name, IP Address, RTSP URL, Connectivity status, Prioritized Use-case & Action buttons Click on “Add New Camera” to update camera details
  • 7.
    Step 6: FollowingPOP UP would appear once User clicks on Add New Camera • Please repeat Step 5 & 6, in case multiple Camera details needs to be added • Please DO NOT use similar Camera Name, IP Address and RTSP URL for multiple cameras Update Camera IP Address, Camera Name and RTSP URL and click on “submit” (please note that special characters are NOT allowed for Camera Name)
  • 8.
    Step 7: Howto configure camera wise Use cases and update camera details VA Summary including EDGE Device, Location and Camera Details Option to Edit/Delete the Camera Details Once Camera details are updated, camera connectivity status would be visible Click on “configure” to update camera wise Use case (please repeat this step for all Camera’s listed) Click to refresh (in case connectivity status is not visible post 40 seconds)
  • 9.
    Step 8A: Howto configure camera wise Use case Step A: Select the Use case which needs to be enabled for the selected camera Step B: Click here to set Area of Interest for the selected use case (please refer to the next slide to view AOI) Step D: Once selection is done, please click on Update Step C: Select the Start Time & End Time for the selected use case to run User can view the summary once the camera configuration is done • Same Camera can be used to select multiple use cases • Repeat Steps A to D if more than 1 use case needs to be enabled for same camera Step E: Click “Back” to move back to homepage and Activate EDGE Device (Step 9)
  • 10.
    Step 8B: Howto update Area of Interest (AOI) Please follow the instructions to select Area of Interest
  • 11.
    Step 9: Activationof EDGE Device with selected Use case Click on Activate once all listed cameras details and use cases are configured
  • 12.
    Copyright © 2020Accenture All rights reserved. THANK YOU