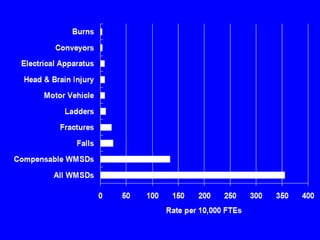
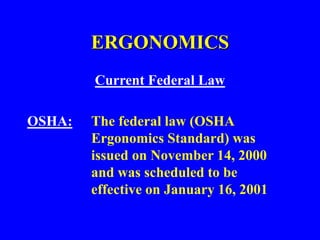
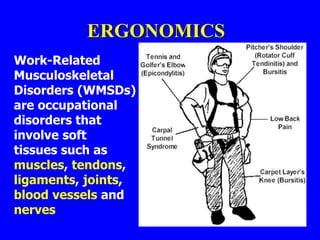
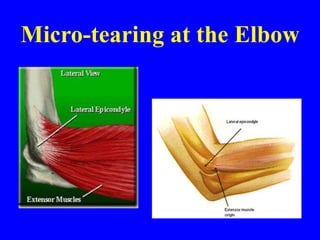
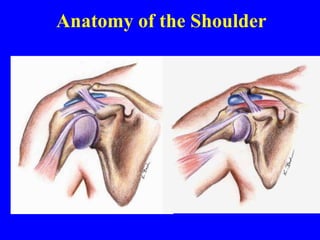
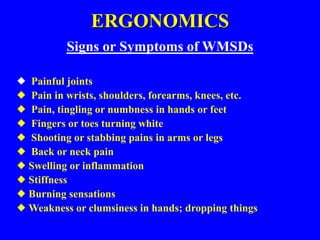
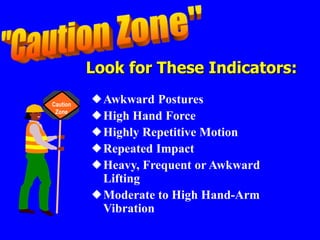
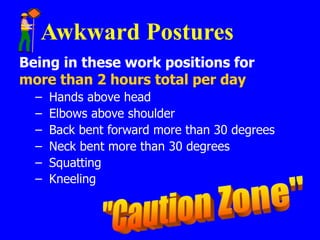
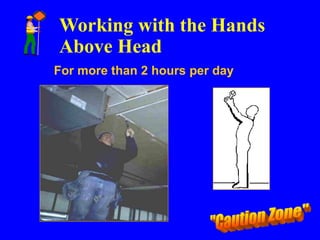
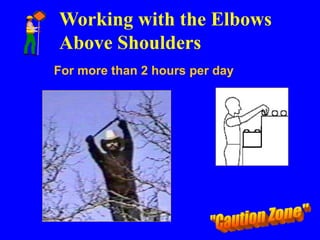
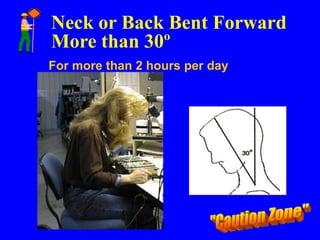
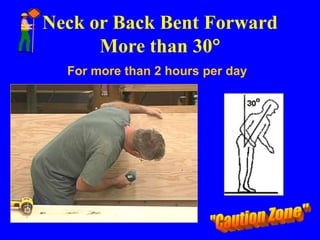
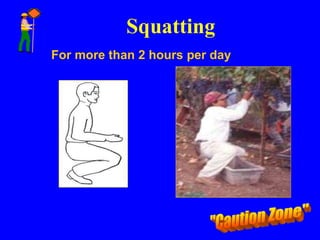
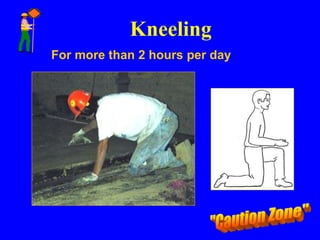
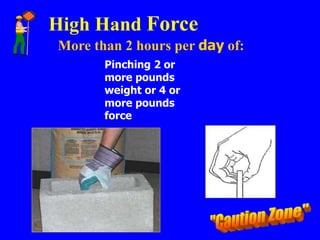
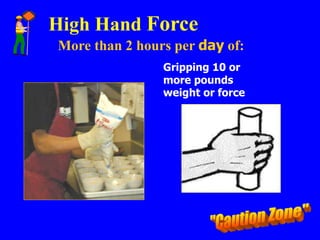
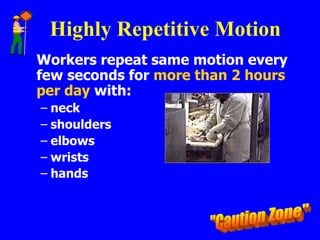
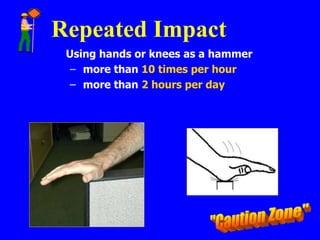
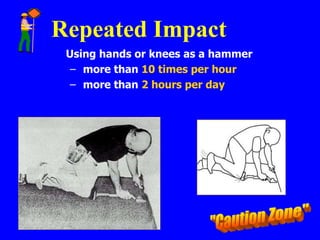
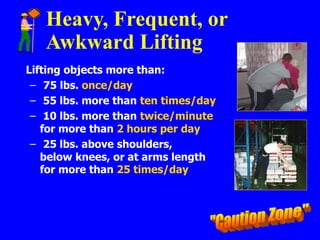
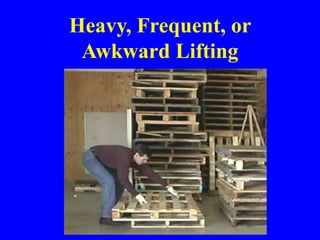
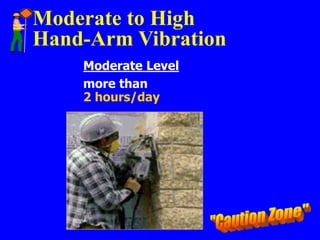
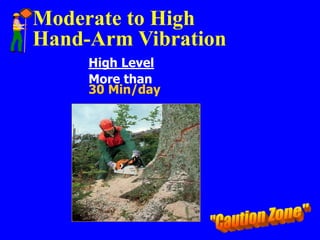
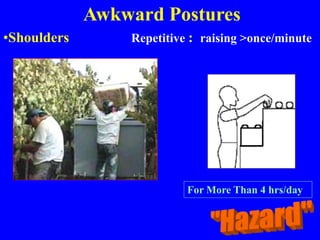
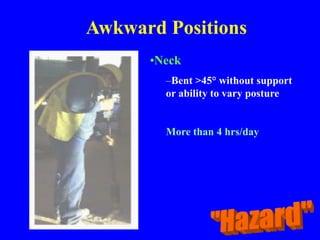
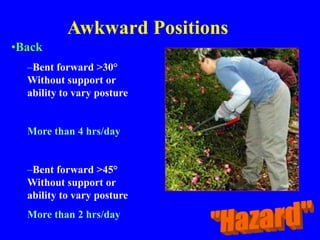
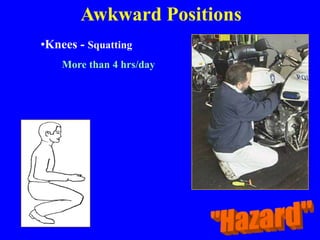
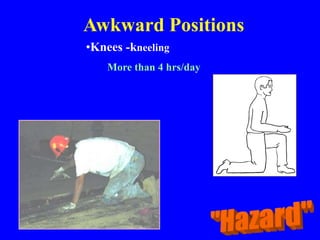
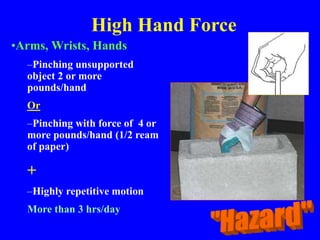
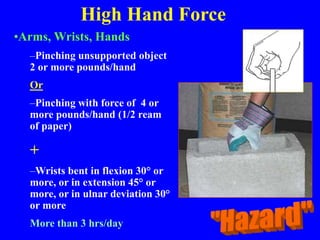
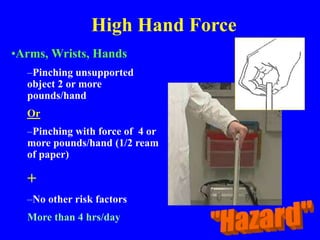
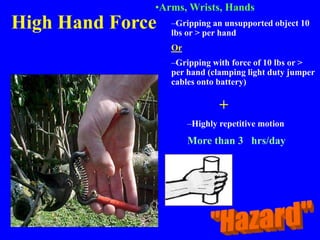
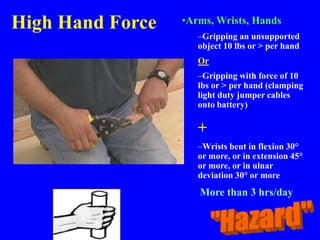
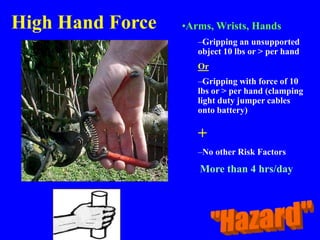
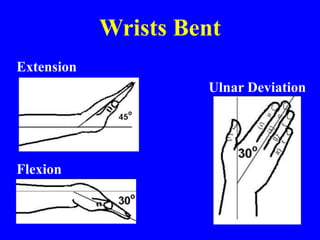
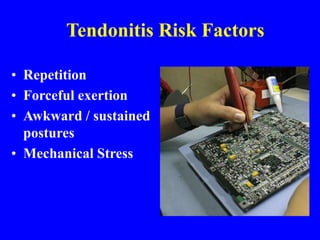
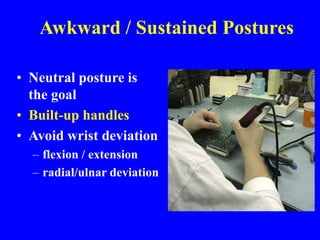
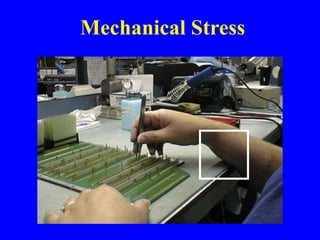
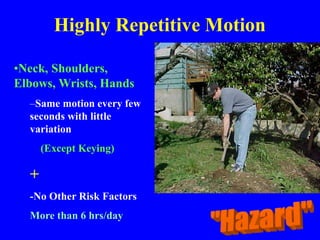
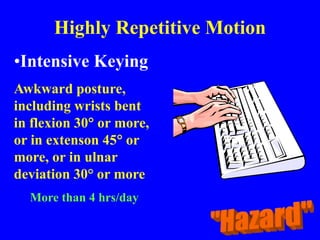
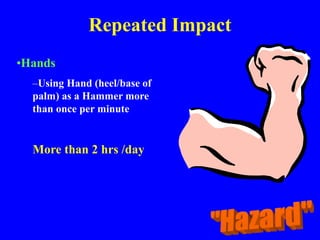
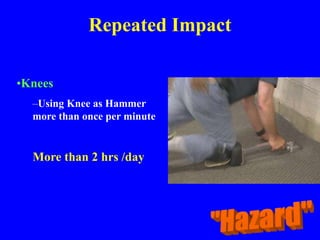
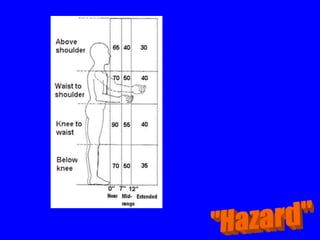
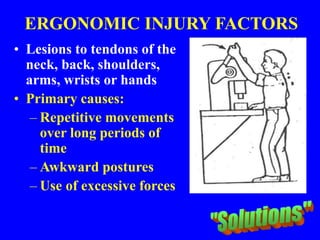
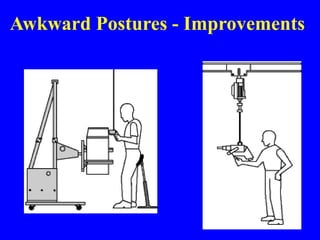
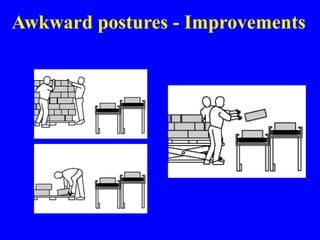
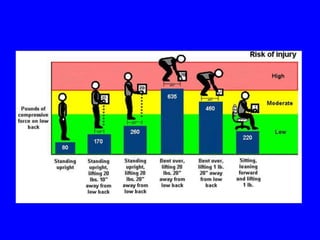
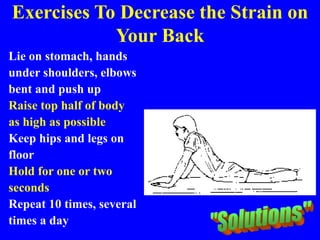
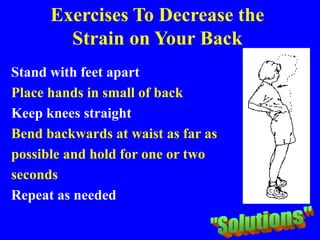
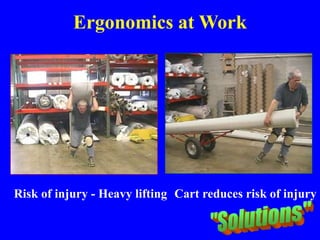
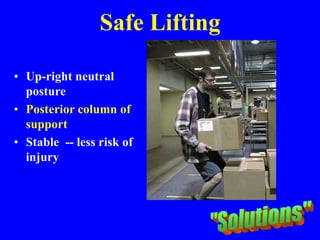
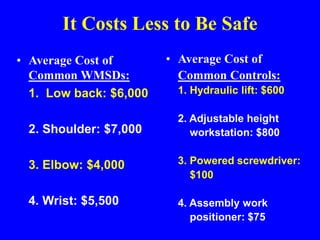
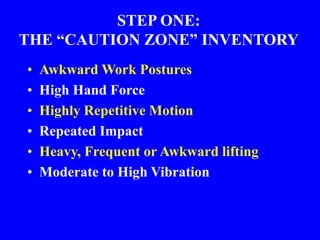
Photo: “Tulalip Bay” by Diane L. Wilson-Simon
BASIC ERGONOMICS
Instructor: David Ellsworth
Edmonds Community College
This course is being supported under grant number
SH16637SH7 from the Occupational Safety and Health
Administration, U.S. Department of Labor. It does not
necessarily reflect the views or policies of the U.S.
Department of Labor, nor does mention of trade names,
commercial products, or organizations imply endorsement by
the U.S. Government.
With Thanks to & Cooperation of the Tulalip Occupational
Safety & Health Administration (TOSHA)
INTRODUCTION
ERGONOMICS
WHAT IS “ERGONOMICS”??”
Ergos = work
Nomos = laws
Ergonomics = the laws of
work
ERGONOMICS
What Does Ergonomics Mean?
 Designing jobs, equipment, and work tasks to
fit human physical characteristics and energy
limitations
 It considers body dimensions, mobility, and the
body’s stress behavior
 “Make the work fit the person, not the person
fit the work”
ERGONOMICS
Benefits of Ergonomics Include:
– safer jobs with fewer injuries
– increased efficiency and productivity
– improved quality and fewer errors
– improved morale
ERGONOMICS
Ergonomic Goals:
 Finding ways to make strenuous, often
repetitive work, less likely to cause muscle and
joint injuries -- and still get the job done.
 Keeping young bodies from wearing out
prematurely, and mature bodies from giving
out early.
ERGONOMICS
Work-Related Musculoskeletal
Disorders (WMSD) accounted for an
average total of $410.3 million of
worker’s compensation claims in the
years 1995-1997
This type of injury affects nearly 50,000
Washington workers each year
Enough People to Fill Safeco
Field!!
It is estimated that the actual
cost including lost taxes, wages,
fringe benefits, administrative
costs, etc. is close to $1.5 billion per year.
ERGONOMICS
ERGONOMICS
State Fund Claims - Statewide 1990-98*
WMSDs
All
other
claims
26%
74%
WMSDs
40%
60%
All
other
claims
Number of Claims Cost of Claims
Source: SHARP Report No. 40-4a-2000
* Note: This data does not include lower extremity WMSDs.
ERGONOMICS
Nationally, almost 60% of all
work-related illnesses are
MSDs
The Problem is Widespread
The Top 12 Standard Industrial Classifications (SIC)
SIC Industry WMSDs per year
078 Landscape, Horticultural 420
152 General Bldg Contractors, Residential 1,361
174 Masonry, Tile, Plaster 703
175 Carpentry, Floor Work 429
176 Roofing, Siding, Sheet Metal 388
177 Concrete Work 287
242 Sawmills, Planing Mills 432
421 Trucking and Courier Services (non-air) 1,591
451 Air Transportation, Air Courier 411
541 Grocery Stores 1,486
805 Nursing, Personal Care Facilities 2,177
445
836 Residential Care
Total 10,130
These 12 SICs alone account for 20% of WMSDs
Source: SHARP Report No. 40-4a-2000
The Cost-Benefit Ratio
Is Substantial
Statewide
estimated
annual costs
to comply
with the rule:
Statewide
estimated
annual costs
saved by
ergonomics
prevention
$80
Million
$340
Million
The Estimated Savings to Business
Is $4 for Every $1 Invested
REGULATIONS
ERGONOMICS
Current Federal Law
OSHA: The federal law (OSHA
Ergonomics Standard) was
issued on November 14, 2000
and was scheduled to be
effective on January 16, 2001
REGULATIONS
Congress utilized the little known
Congressional Review Act (CRA) to pass a
joint resolution of disapproval of the new
OSHA Ergonomics Standard with the Senate
voting 56 to 44 on March 7 and the House
voting 223 to 203 on March 8, 2001
President Bush signed the joint resolution on
March 20, 2001
REGULATIONS
The effect is that the OSHA Ergonomics
Standard is REPEALED – There is no
Federal Law!!
NOTE: OSHA still has some regulatory
“bite” in this area by virtue of
the infamous “General Duty
Clause” (OSHA Sec. 5(a)(1))
REGULATIONS
OSHA General Duty Clause
Each employer “shall furnish to each of
his employees employment and a place of
employment which are free from
recognized hazards that are causing or
are likely to cause death or serious
physical harm to his employees”
REGULATIONS
What’s Next ?
Several interested parties including Labor Unions,
Business and associations such as ASSE have been
meeting with Secretary of Labor, Elaine Chao to
formulate a new standard that will be acceptable to
all stake-holders
The federal ergonomics regulations are being
proposed on an industry by industry basis
WORK-RELATED
MUSCULOSKELETAL
DISORDERS
ERGONOMICS
Work-Related
Musculoskeletal
Disorders (WMSDs)
are occupational
disorders that
involve soft
tissues such as
muscles, tendons,
ligaments, joints,
blood vessels and
nerves
ERGONOMICS
WMSDs are:
– Daily stress to anatomical structures that may occur when
a person is exposed to certain high risk activities
– If the accumulating stress exceeds the body’s normal
recuperative ability, inflammation of the tissue can follow
– Chronic inflammation may lead to the development of
WMSDs
– May require weeks, months or years for development -
and for recovery
ERGONOMICS
What is The Musculoskeletal System?
The Musculoskeletal System includes the following:
1. Bones – The load-bearing structure of the body
2. Muscles- Tissue that contract to create movement
3. Tendons – Tissues that connect muscles to bones
4. Ligaments – Tissues that connect bones to bones
5. Cartilage – Tissue that provides cushioning and reduces friction
between bones
6. Nerves – Communication system that links muscles, tendons and other
tissue with the brain
7. Blood Vessels – Tubes that circulate nutrients throughout the body
ERGONOMICS
What Are Examples of WMSDs?
1. Sprain – Overstretching or overexertion of a
ligament that results in a tear or rupture of the
ligament
2. Strain – Overstretching or overexertion of a muscle
or tendon
3. Tendonitis – Inflammation of the tendon inside the
sheath
4. Tenosynovitis – Inflammation of the sheath around
the tendon
5. Carpal Tunnel Syndrome – Compression of the
median nerve as it passes through the carpal tunnel
in the heel of the hand
ERGONOMICS
What are Examples of WMSDs?
6. Tennis elbow or Golfer’s elbow – Medical term is
Epicondylitis – inflammation of the tendons at the elbow.
7. Trigger Finger – Common term for tendonitis or
tenosynovitis that causes painful locking of the finger(s)
while flexing
8. Pitcher’s Shoulder – Rotator cuff tendonitis –
inflammation of one or more tendons at the shoulder
9. White Finger – Medical term is Reynaud’s Phenomenon –
constriction of the blood vessels in the hands and fingers
10. Digital Neuritis – Compression of the nerves along the sides
of the fingers or thumbs
Injury in the making...
Ditto...
Anatomy of a Tendon
Tendonitis
• Tendon function:
– Transmit force from muscle to bone
• Micro tears of tendon occur daily
• Typically repair themselves
• With repeated loading repair is not
adequate
• Pain / Inflammation
Anatomy of DeQuervain’s
Tendonitis
What Causes DeQuervain’s?
• Wringing washcloths, clothes
• Typing on the computer keyboard
• Cutting with scissors
• Sewing or pinching
• Stirring food for a long period of time
• Opening jars
Carpal Tunnel
Carpal Tunnel
• Best known MSD
• Compression of the
median nerve at the
wrist
• Tunnel made up of
nine flexor tendons
and one peripheral
nerve
• Numbness and
tingling on the thumb
side of the hand
Surgical Release of Tunnel
Tennis Elbow Syndrome
Micro-tearing at the Elbow
Overhead Lifting
Anatomy of the Shoulder
Reynaud’s Phenomenon or
“White Finger”
• Caused by
operating
vibrating
machinery –
especially in cold,
damp weather
ERGONOMICS
WMSDs are sometimes referred to
using other unfamiliar terms such as :
1. Cumulative Trauma Disorders – CTD
2. Repetitive Trauma Disorders – RTD
3. Repetitive Strain Injuries – RSI
4. Repeated Motion Disorders – RMD
5. Overuse Syndromes
ERGONOMICS
Signs or Symptoms of WMSDs
 Painful joints
 Pain in wrists, shoulders, forearms, knees, etc.
 Pain, tingling or numbness in hands or feet
 Fingers or toes turning white
 Shooting or stabbing pains in arms or legs
 Back or neck pain
 Swelling or inflammation
 Stiffness
 Burning sensations
 Weakness or clumsiness in hands; dropping things
INCREASED RISK
FACTORS
Caution
Zone What is a
“Caution Zone” job?
Awkward Postures
High Hand Force
Highly Repetitive Motion
Repeated Impact
Heavy, Frequent or Awkward
Lifting
Moderate to High Hand-Arm
Vibration
Caution
Zone
Look for These Indicators:
Awkward Postures
Being in these work positions for
more than 2 hours total per day
– Hands above head
– Elbows above shoulder
– Back bent forward more than 30 degrees
– Neck bent more than 30 degrees
– Squatting
– Kneeling
Working with the Hands
Above Head
For more than 2 hours per day
Working with the Elbows
Above Shoulders
For more than 2 hours per day
Neck or Back Bent Forward
More than 30º
For more than 2 hours per day
Neck or Back Bent Forward
More than 30
For more than 2 hours per day
Neck or Back Bent Forward
More than 30
For more than 2 hours per day
Squatting
For more than 2 hours per day
Kneeling
For more than 2 hours per day
High Hand Force
More than 2 hours per day of:
Pinching 2 or
more pounds
weight or 4 or
more pounds
force
High Hand Force
More than 2 hours per day of:
Gripping 10 or
more pounds
weight or force
Highly Repetitive Motion
Workers repeat same motion every
few seconds for more than 2 hours
per day with:
– neck
– shoulders
– elbows
– wrists
– hands
Highly Repetitive Motion
Intensive keying
for more than 4 hours per day
Repeated Impact
Using hands or knees as a hammer
– more than 10 times per hour
– more than 2 hours per day
Repeated Impact
Using hands or knees as a hammer
– more than 10 times per hour
– more than 2 hours per day
Heavy, Frequent, or
Awkward Lifting
Lifting objects more than:
– 75 lbs. once/day
– 55 lbs. more than ten times/day
– 10 lbs. more than twice/minute
for more than 2 hours per day
– 25 lbs. above shoulders,
below knees, or at arms length
for more than 25 times/day
Heavy, Frequent, or
Awkward Lifting
Heavy, Frequent, or
Awkward Lifting
Moderate to High
Hand-Arm Vibration
Moderate Level
more than
2 hours/day
Moderate to High
Hand-Arm Vibration
High Level
More than
30 Min/day
If the Employer Has
“Caution Zone” Jobs, They Should:
 Begin an employee awareness
education program
 Analyze the workplace for
hazards
 Reduce any hazards they find
Ergonomics Awareness
Education Should:
Show the types, symptoms and
impacts of WMSDs
Show the importance of early
reporting of symptoms
Provide information on all “caution
zone” risk factors
Identify the hazards and measures to
reduce them
Analyzing Caution Zone
Jobs for Hazards
Use a systematic method to look
at:
-physical demands
-layout of work area
-size, shape, and weight of objects
handled
The results will help to
determine controls
Hazard Zone
Risk factors become hazardous when:
-there is a longer duration of exposure
-there is greater intensity
-there is a combination of risk
factors
The ERGONOMIC TRIANGLE
FREQUENCY
FORCE
POSTURE
THE GOAL IS
TO ELIMINATE
AT LEAST ONE
FROM EVERY
TASK
Awkward Postures
•Shoulders: Hands above Head
Elbows above shoulders
For More Than 4 hrs/day
Awkward Postures
•Shoulders Repetitive : raising >once/minute
For More Than 4 hrs/day
Awkward Positions
•Neck
–Bent >45° without support
or ability to vary posture
More than 4 hrs/day
Awkward Positions
•Back
–Bent forward >30°
Without support or
ability to vary posture
More than 4 hrs/day
–Bent forward >45°
Without support or
ability to vary posture
More than 2 hrs/day
•Knees - Squatting
More than 4 hrs/day
Awkward Positions
Awkward Positions
•Knees -kneeling
More than 4 hrs/day
High Hand Force
•Arms, Wrists, Hands
–Pinching unsupported
object 2 or more
pounds/hand
Or
–Pinching with force of 4 or
more pounds/hand (1/2 ream
of paper)
+
–Highly repetitive motion
More than 3 hrs/day
High Hand Force
•Arms, Wrists, Hands
–Pinching unsupported object
2 or more pounds/hand
Or
–Pinching with force of 4 or
more pounds/hand (1/2 ream
of paper)
+
–Wrists bent in flexion 30° or
more, or in extension 45° or
more, or in ulnar deviation 30°
or more
More than 3 hrs/day
High Hand Force
•Arms, Wrists, Hands
–Pinching unsupported
object 2 or more
pounds/hand
Or
–Pinching with force of 4 or
more pounds/hand (1/2 ream
of paper)
+
–No other risk factors
More than 4 hrs/day
High Hand Force
•Arms, Wrists, Hands
–Gripping an unsupported object 10
lbs or > per hand
Or
–Gripping with force of 10 lbs or >
per hand (clamping light duty jumper
cables onto battery)
+
–Highly repetitive motion
More than 3 hrs/day
High Hand Force •Arms, Wrists, Hands
–Gripping an unsupported
object 10 lbs or > per hand
Or
–Gripping with force of 10
lbs or > per hand (clamping
light duty jumper cables
onto battery)
+
–Wrists bent in flexion 30°
or more, or in extension 45°
or more, or in ulnar
deviation 30° or more
More than 3 hrs/day
High Hand Force •Arms, Wrists, Hands
–Gripping an unsupported
object 10 lbs or > per hand
Or
–Gripping with force of 10
lbs or > per hand (clamping
light duty jumper cables
onto battery)
+
–No other Risk Factors
More than 4 hrs/day
Wrists Bent
Extension
Ulnar Deviation
Flexion
Tendonitis Risk Factors
• Repetition
• Forceful exertion
• Awkward / sustained
postures
• Mechanical Stress
Awkward / Sustained Postures
• Neutral posture is
the goal
• Built-up handles
• Avoid wrist deviation
– flexion / extension
– radial/ulnar deviation
Mechanical Stress
Highly Repetitive Motion
•Neck, Shoulders,
Elbows, Wrists, Hands
–Same motion every few
seconds with little
variation
(Except Keying)
+
-No Other Risk Factors
More than 6 hrs/day
Highly Repetitive Motion
•Neck, Shoulders, Elbows,
Wrists, Hands
–Same motion every few seconds
with little variation
(Except Keying)
+
-Wrists bent in flexion 30° or more,
or in extension 45° or more, or in
ulnar deviation 30° or more AND
High, forceful exertions with the
hands
More than 2 hrs/day
Highly Repetitive Motion
•Intensive Keying
Awkward posture,
including wrists bent
in flexion 30 or more,
or in extenson 45 or
more, or in ulnar
deviation 30° or more
More than 4 hrs/day
Highly Repetitive Motion
•Intensive Keying
–No Other Factors
More than 7 hrs/day
Repeated Impact
•Hands
–Using Hand (heel/base of
palm) as a Hammer more
than once per minute
More than 2 hrs /day
Repeated Impact
•Knees
–Using Knee as Hammer
more than once per minute
More than 2 hrs /day
Heavy, Frequent, Awkward
Lifting
How many lifts For how many hours per day?
per minute? 1 hr. or less 1 hr. to 2 hrs. 2 hrs. or more
1 lift every 2-5 mins. 1.0 0.95 0.85
1 lift every min. 0.95 0.9 0.75
2-3 lifts every min. 0.9 0.85 0.65
4-5 lifts every min. 0.85 0.7 0.45
6-7 lifts every min. 0.75 0.5 0.25
8-9 lifts every min. 0.6 0.35 0.15
10+ lifts every min. 0.3 0.2 0.0
Heavy, Frequent or Awkward Lifting
Manual Handling
• Manual handling is
transporting or
supporting a load by
hands or bodily force
- This includes:
• Lifting
• Carrying
• Putting down
• Pushing
• Pulling
• Moving
• Supporting
Hand-Arm Vibration
Hand-Arm Vibration
Step 1: Find the vibration value for the tool.
(manufacturer or web site:
http://umetech.niwl.se/vibration/HAVHome.
html or measure it yourself. The vibration
value will be in units of meters per second
squared (m/s²) - Using a hand-arm vibration
graph find the point on the left side that is
equal to the vibration value
Hand-Arm Vibration
Step 2: Find out how many total hours per
day the employee is using the tool and
find that point on the bottom of the graph
Step 3: Trace a line in from each of these
two points until they cross
0
10
20
30
40
50
0 1 2 3 4 5 6 7 8
Time (in hours)
Vibration
value
(in
m/s
2
)
Example:
An impact wrench
with a vibration value
of 12 m/s2 is used for
2½ hours total per
day.
Hand-Arm Vibration
Note: The caution limit curve (bottom) is based on
an 8-hour vibration value of 2.5 m/s². The hazard limit
curve (top) is based on an 8-hour vibration value of 5 m/s²
Hand-Arm Vibration
Step 4: If that point lies in the crosshatched
“Hazard” area above the upper curve, then the
vibration hazard should be reduced below the
hazard level or to the degree technologically
and economically feasible
If the point lies between the two curves in the
“Caution” area, then the job remains a
“Caution Job”
If it falls in the “OK” area below the bottom
curve, then no further steps are necessary
Reducing Identified Hazards
Employers should reduce hazards to below
hazard level, or to a degree technologically and
economically feasible through:
– Engineering and administrative controls (preferred)
and/or
– Individual work practices and PPE
Employers might also consider reducing
employee hours performing a particular task to
lower the hazard of the job
ERGONOMIC
SOLUTIONS
General
Illustrations from Ergonomic
Checkpoints by the International
Labour Organization (ILO), and
Practical Ergonomics by the
UAW-GM Ergonomics Task
Force
ERGONOMICS
• Ergonomic hazards are prevented primarily by
the effective design of a job or job-site and the
tools or equipment used in that job
• Based on information gathered in the work-site
analysis, procedures can be established to
correct or control ergonomic hazards using
either engineering controls or work practice
controls
ERGONOMICS
• Thoughtful arrangements reduce stress and eliminate
many potential injuries and disorders associated with
the overuse of muscles, with bad posture, and with
repetitive motion
• Some jobs expose workers to excessive vibration and
noise, eyestrain, repetitive motion, and heavy lifting
• Machines, tools, and the work environment may be
poorly designed, placing stress on workers' tendons,
muscles, and nerves and in addition, workplace
temperature extremes may aggravate or increase
stress
ERGONOMICS
• Engineering Controls
• Work stations should be ergonomically designed to
accommodate the full range of required movements of
a worker
• Sufficient space should be provided for the knees and
feet
• Machine controls should be reachable and equally
accessible by both right and left-handed operators
• Other factors to look at include hard or sharp edges,
contact with thermally conducting work surfaces,
proper seating, work piece orientation, and lay-out of
the workstation
ERGONOMICS
• Engineering Controls
• Attention must be given to the selection and designs of
the tools used in the workplace to prevent the tools
from having a negative effect
• Workers should be permitted to test tools in the actual
work environment before purchasing new tools
• A variety of tool sizes should be available with
consideration to handle sizes, right and left-handed
workers, weight, center of gravity, and adequacy for
gloved hands
• Engineering adaptations may be made to tools and
tool handles
ERGONOMICS
• Work Practice Controls
• Key elements of a good work practice program
include instruction in proper work techniques,
employee training and conditioning, regular
monitoring, feedback, adjustments, modification, and
maintenance
• After workers are trained in a particular work
activity, such as proper lifting, they should be
monitored to ensure that they continue to use the
proper techniques
• Improper practices should be corrected to prevent
injury
STAY FIT FOR THE JOB...
“C’mon! Keep those stomachs
over the handle! Let the fat do
the work!… That’s it!”
Stretching
• Prepares muscles to do
work
• Flexible muscles not
easily injured
• Tight muscles easily
injured
– Morning/After Lunch
– Stress
– Previous strain/sprain
Stretching
Stretching
90-degree" posture:
Sit upright with your elbows,
hips and knees bent at right
angles and your feet flat on the
floor or on a footrest
This position is biomechanically
correct, but it can fatigue your
back muscles over time
Fatigue can lead to slouching,
even on a chair with lumbar
support
Forward tilt posture:
Raise the height of your chair's seat
a few inches and tilt the front of it
downward about 8o
This will open up your hip angle and
allow you to support some of your
weight using your legs rather than
having it all rest on your hips and the
backs of your thighs
You may not find this posture
comfortable if you have knee or foot
problems, or if you feel like you are
sliding off the front of the seat - A
contoured chair seat can help to hold
you in place
Reclining posture:
Lean back 10o - 20o into the
chair's backrest and put your
feet out in front of you to open
up the angle at your hips and
knees
This helps relax your back
muscles and promotes blood
circulation
Leaning back too far however,
can result in an awkward neck
posture when trying to keep
your head upright
Standing posture:
Standing provides the biggest
change in posture, and is a
good alternative to prolonged
sitting, which can aggravate low
back injuries
It can be fatiguing, however, so
have a counter-height chair
available at standing
workstations, or use a height
adjustable sit/stand workstation
Also, prop one foot up on a low
footrest occasionally to help
shift your weight
ERGONOMIC INJURY FACTORS
• Lesions to tendons of the
neck, back, shoulders,
arms, wrists or hands
• Primary causes:
– Repetitive movements
over long periods of
time
– Awkward postures
– Use of excessive forces
ERGONOMIC SOLUTIONS: POSTURE
• NEUTRAL &
COMFORTABLE:
– Wrists straight
– Shoulders relaxed with
elbows close to body
– Head / shoulders &
back in vertical
alignment
– Frequent breaks when
bent postures can’t be
avoided
ERGONOMIC SOLUTIONS:
REPETITION
• Use automatic tools for repetitive tasks
(screw and bolt tightening)
• Eliminate unnecessary tasks / movements
by redesigning maintenance procedures
and workstations
• Take short, frequent breaks
• Alternate tasks and processes to use
different muscle groups
ERGONOMIC SOLUTIONS: HIGH
REPETITION
ERGONOMIC SOLUTIONS: HIGH
REPETITION
• Job Enlargement
• Reduce Speeds
• Mechanical Assists / Positioning
• Jigs/vices to hold parts
• Move work to worker
• Voice-recognition software
• Macros
• Mini-Breaks
ERGONOMIC SOLUTIONS:
PROPER ALIGNMENT
Tools: Orientation to Work Surface
JOB ANALYSIS
ERGONOMIC SOLUTIONS:
HIGH HAND FORCE
• Use clamps and fasteners
• Reduce weight of tool or object
• Redesign tool/user interface
• Look at Material Handling Alternatives
• Use Two Hands /Alternate Hands
• Sharp, well-maintained tools
• Alternate Positions/Tasks
Tool Handle Design
Shoulder harness for landscaping tool
to reduce hand forces
ERGONOMIC SOLUTIONS
ERGONOMIC SOLUTIONS:
REPEATED IMPACT
• Use rubber mallets & padded tools
• Use levers
• Mechanical devices
ERGONOMIC SOLUTIONS: HEAVY,
FREQUENT, AWKWARD LIFTING
• Reduce or Increase load weight, capacity
• Handholds, rigid containers
• Store objects 30” or more above floor
• Slides, gravity chutes
• Hoists, lifts, forklifts, Conveyors
• Reduce horizontal distance
• Handle items once
• Mobile racks, storage
• Arrange to avoid twist
Wallboard lifting system for installing drywall
ERGONOMIC SOLUTIONS
Lift assist device to eliminate heavy, awkward
lifts in nursing homes and home health care
ERGONOMIC SOLUTIONS
Repetitive
Motion
Awkward
Lifting
Back
Angle
Gripping
Smarter,
Not Harder:
Bend &
Brace
JOB ANALYSIS
Manual Handling - Work Smarter
Not Harder
Choose the Right Tools
Harder, Not Smarter!
Wrong Tool
Choose the Right Tools
ERGONOMIC SOLUTIONS
Using a carpet stretcher to
eliminate knee impacts
ERGONOMIC SOLUTIONS
• Redesign hand-tool
• Reduce weight of tool
• Rotate jobs
• Use clamps or vises
ERGONOMIC SOLUTIONS:
HAND TOOLS
• The design of grips for hand tools can be
crucial:
• Grip shape and size appropriate to the task and
user
• Isolate cold temperature
• Keep wrist and elbow in a "neutral" position
• Eliminate sharp edges or pressure points
• Use two-handed grips (where possible)
• Attenuate vibration
Redesign the Work Station
Courtesy of UCDavis
Bring the load down or lift yourself
Awkward Postures
Awkward Postures
Awkward Postures
Awkward Postures - Improvements
Awkward postures - Improvements
HAND-ARM VIBRATIONS
(HAVS)
• A disorder which affects the blood
vessels, nerves and muscles of the hand,
wrist and forearm
• Can be severely disabling
• Is better known as Vibration White
Finger
HAND-ARM VIBRATIONS
• Regular Maintenance
• Balancers, isolators, damping material
• Tool Selection
– low-vibration tools
– Battery rather than pneumatic operated tools
– High power to weight ratio
– Low torque w/cutoff rather than slip-clutch
– Non-slip surface
– Contoured handles
Why talk about HAVS?
• 1 Million workers are exposed to high
levels of vibration, of those 460,000 are
estimated to be working in construction
• 242,000 cases of HAVS are reported every
year
What are the Symptoms?
• Tingling and numbness in the fingers
• In the cold and wet, fingers go blue then red
and are painful
• You can’t feel things with your fingers
• Pain or tingling in your forearms at night
which stop you from sleeping
• Loss of strength in your arms and hands
What are the Symptoms?
Who is at Risk?
• Users of breakers
and pokers, sanders
and angle grinders
• Users of scabblers (to
clean concrete) and
needle guns
• Users of drills and
jigsaws
Who is at Risk?
• Those with a
disease that
reduces blood
flow
• Workers in cold
and damp
conditions
Who is at Risk?
Workers using
vibrating tools
Workers in contact
with cold tools
How Can I Prevent it?
• Ask for low vibration
tools
• Try a different
approach to your job
• Use the right tool for
the job
• Keep blades and
cutting edges sharp
How can I Prevent it?
• Check to ensure that
the tool has been
properly maintained
• Reduce the amount
of time you use the
tool
• Keep the handles
warm
How can I Prevent it?
Improve your blood circulation by:
• Keeping warm, wearing gloves etc.
• Giving up smoking - Smoking drastically
impairs blood flow through the body
• Massaging and exercising fingers during
work breaks
Prevention
Low vibration tools
Use the right tool for the job
Tool maintenance
Reduce amount of time using the tool
Keep hands & handles warm
New approach to your job
Anti-vibration gloves
What Else Can I Do?
• Learn to Recognize the signs of HAVS
• Stop work and report any symptoms to
your supervisor immediately
• Use any control measures provided, i.e.
gloves etc., that your employer has
provided
• Ask for advice from your safety
department or safety rep
Remember
• Once you have had an attack of HAVS,
you will always be at risk (it is a chronic
condition)
• Tell your supervisor as soon as you
suspect any symptoms
JOB ANALYSIS
JOB ANALYSIS
CARPAL TUNNEL SYNDROME
• Occurs with repetitive motion of hands &
wrists--especially with high force levels
• Incidence up to 15% in certain industries
• A “natural” keyboard and good wrist support
can help most PC users avoid problems
• GOOD NEWS: Have dropped about 30% since
1990--which most attribute to strong workplace
ergonomics programs
Computer Ergonomics
• Routine PC user defined as spending 20 hours
or more per week working at a computer
• Studies of PC users have not shown a risk of
eye damage...although fatigue very possible
• NIOSH studies have not indicated a radiation
hazard nor pregnancy risk from PC usage
• Workers using bi/tri-focal glasses before
beginning PC use may need special purpose
glasses for computer work
“NATURAL” KEYBOARDS
• Three types:
1. Fixed split
2. Adjustable split
3. “Sculptured”
• Awkward wrist postures minimized
with 15 to 25 horizontal degree key
split AND 8 to 66 degree vertical
incline
“NATURAL” KEYBOARDS
“NATURAL” KEYBOARDS
“NATURAL” KEYBOARDS
• Key Layout Design Changes Have:
- increased comfort (81% of users)
– improved postures
– reduced muscle activity
– lowered carpal tunnel pressure in lab
settings
• Obtained primarily to alleviate an injury
WRIST RESTS
• No medical evidence that they reduce Repetitive Strain
Injuries...As they work for some, but not for others
• Usage Guidelines:
– Buy a rest that is even with top of keyboard
– Material should be “medium-soft” (foam--gel mix) so foam
doesn’t break down - AVOID hard plastic types
– DON’T leave wrists on rest...which compresses carpal tunnel -
Palm rest instead
– Changing typing habits more critical than wrist support
– MOST APPROPRIATELY USED TO REST HANDS DURING
PAUSE IN TYPING
• LEARN TO TYPE CORRECTLY WITH “FLOATING
WRISTS” FIRST!!!
Ergonomic chairs
• Adjustable back height
• Adjustable arm rest
• **Chair on left NOT
ergonomically designed
Alternative Pointing Devices
• Track-balls
• “Scrolling” Mouse
Other Ergonomic PC Accessories
• Height-adjustable articulating keyboard tray
Standard Layout
Wrist and Hand Issues
Posture: Orientation to Work
• Elbows at 90° to
105°
• Whenever
possible, unload
your upper
extremity
From the Top…
• Position keyboard relative to major functions
• Minimize wrist deviation
Compression
• Avoid reaching up
and over
• Consider the wrist-
rest as a transitional
landing pad; not as
the “bus stop” for
your wrists
Wrist Positioning for Mousing…
Mouse – What it Does
In order to operate the mouse while typing, the
operator is frequently forced to reach forward or
sideways, or even both at the same time
Mouse – Common Complaints
Mouse Platform
Mouse Platform
Notice that reaching forwards and sideways is
substantially reduced.
Keyboard with a Touch Pad
A keyboard with a touch pad for those applications
that don’t require frequent and precise placement of
the cursor
Short Keyboard
A narrower keyboard (14”) allows one to
operate the mouse without side movements
Where Else Can You Keep the Mouse?
Placing the mouse between the operator and the
keyboard requires using cordless mouse
Proof-Reading
Targeting the Work
• Targeting of large objects
can be performed at a
distance > 15 inches
• Targeting of small objects
need to be performed at
6-10 inches, ie., needle
and thread
Targeting Your Computer…
Glare…
Lighting Options…
Proper Seating
Upper Extremity Unloading
JOB ANALYSIS
JOB ANALYSIS
JOB ANALYSIS
JOB ANALYSIS
JOB ANALYSIS
JOB ANALYSIS
JOB ANALYSIS
MODEL COMPUTER WORKSTATION
• Keyboard trays WITH
wrist support
• Split "Natural"
keyboards to facilitate
neutral wrist angle
• Fully adjustable
ergonomic chair
• Document holder to
minimize head / eye &
neck movements
MODEL COMPUTER WORKSTATION
• Corner desk units to
position monitor directly
in front of employee
• Foot rest where
requested
• Re-organization of
working materials within
employee arm reach
• Alternative pointing
devices (e.g., scrolling
mouse or trackball
devices
BACK SAFETY &
LIFTING
Lifting Safely
Back Injuries are the Nation’s
#1
Workplace Safety Problem
Normal Curves of the Spine
Columns of Support
• Posterior column of support
– made up of the facet column
– very stable
– reflects an upright posture
• Anterior column of support
– made up of body of vertebra and the disc
– less stable
– reflects a flexed posture
The Disc & Nerve Root
• The disc is the
shock absorber of
the spine
• 85% water at the
age of 15
• 25% water at the
age of 75
A Close-up Look
Forward Bending
• Too much spinal
flexion
– loads the anterior
column of support
– places the posterior
wall of the disc at
risk
– has the potential for
nerve root
compromise
Balance the Curves
Cervical Spine Anatomy
The Process of Degeneration
Weight of the Head = 10-12 lbs.
Muscular support of the Neck
Up-right Neutral Posture
Forward Head Postures
Consider Elevation of Product
• A back injury costs an average
of $11,645 in medical claims and
lost time wages.
National Safety Council
• Most back injuries can be
prevented
The Forces Involved
The amount of force
you place on your
back in lifting may
surprise you!
Think of your back as a
lever - with the
fulcrum in the center,
it only takes ten
pounds of pressure to
lift a ten pound object.
The Forces Involved
If you shift the fulcrum
to one side, it takes
much more force to lift
the same object. Your
waist acts like the
fulcrum in a lever
system, on a 10:1 ratio
Lifting a ten pound
object puts 100 pounds
of pressure on your
lower back
The Forces Involved
When you add in the
105 pounds of the
average human upper
torso, you see that
lifting a ten pound
object actually puts
1,150 pounds of
pressure on the
lower back!
The Forces Involved
If you were 25 pounds
overweight, it would add
an additional 250 pounds
of pressure on your back
every time you bend over!
Common Causes of Back Injuries
Anytime you find yourself doing
one of these things, you should
think:
DANGER! My back is at risk!
Try to avoid heavy lifting
. . Especially repetitive lifting
over a long period of time
Common Causes of Back Injuries
Twisting at the
waist while
lifting or
holding a heavy
load . . . this
frequently happens
when using a shovel.
Common Causes of Back
Injuries
Reaching and lifting . . .
over your head, across
a table, or out the back
of a truck . . . .
Common Causes of Back Injuries
Lifting or carrying
objects with awkward
or odd shapes . . . .
Common Causes of Back Injuries
Working in awkward,
uncomfortable positions . . .
Common Causes of Back Injuries
Sitting or standing
too long in one
position . . . sitting
can be very hard
on the lower back . . . .
Common Causes of Back Injuries
It is also possible
to injure your
back slipping on
a wet floor or ice . . .
Prevent Back Injuries
• Avoid lifting and bending whenever you can
• Place objects up off the floor
• Raise/lower shelves.
• Use carts and dollies
• Use cranes, hoists, lift tables, and other lift-
assist devices whenever you can
• Test the weight of an object before lifting by
picking up a corner
• Get help if it’s too heavy for you to lift it alone
Prevent Back Injuries
• Use proper lift procedures
• Follow these steps when lifting . . .
STEP ONE
Stand close to the load
with your feet spread
apart about shoulder
width, with one foot
slightly in front of the
other for balance
STEP TWO
Squat down bending at
the knees (not your
waist). Tuck your chin
while keeping your
back as vertical as
possible
STEP THREE
Get a firm
grasp of the
object before
beginning the
lift
STEP FOUR
Begin slowly lifting
with your LEGS by
straightening them -
Never twist your
body during this
step.
STEP FIVE
Once the lift is
complete, keep the
object as close to the
body as possible. As
the load's center of
gravity moves away
from the body, there is
a dramatic increase in
stress to the lumbar
region of the back
For those Awkward Moments...
If you must lift or lower from a high place:
1. Stand on a platform instead of a ladder
2. Lift the load in smaller pieces if possible
3. Push the load to see how heavy and stable it
is
4. Slide the load as close to yourself as
possible before lifting up or down
5. Get help when needed to avoid an injury
From hard-to-get-at places...
• Get as close to the load as possible
• Keep back straight, stomach muscles tight
• Push buttocks out behind you
• Bend your knees
• Use leg, stomach, and buttock muscles to
lift -- not your back
Team lifting
• All participants should be of similar
height, build and gender
• One person should take control of the lift,
command attention, inform others and
co-ordinate the lift
• Double the people DOES NOT MEAN
double the capacity
If one person can lift 100
pounds:
How much can two people lift?
Only 70 % or 140 pounds
How much can three people lift?
Only 50 % or 150 pounds
A. No. Manufacturers of back
support belts do not claim they
increase maximum lifting potential.
Q. Will wearing
a back support
belt increase my
maximum lifting
potential?
Job Analysis
Things You Can Do
• Minimize problems with your back
by exercises that tone the muscles in
your back, hips and thighs
• Before beginning any exercise
program, you should check with
your doctor
Exercise!
Exercise regularly, every other day
Warm up slowly . . . A brisk walk is a
good way to warm up
Inhale deeply before each repetition of
an exercise and exhale when
performing each repetition
Exercises To Help Your Back
Wall slides to strengthen
your muscles . . . .
Stand with your back
against a wall, feet
shoulder-width apart.
Slide down into a crouch
with knees bent to 90 degrees
Count to 5 and slide back up
the wall - Repeat 5 times
Exercises To Help Your Back
Leg raises to strengthen back and hip
muscles . . .
Lie on your stomach
Tighten muscles in one leg and raise leg from floor
Hold for count of 10, and return leg to floor
Do the same with your other leg
Repeat five times with each leg
Exercises To Help Your Back
Leg raises to strengthen
back and hip muscles . . .
Lie on back, arms at your sides
Lift one leg off the floor and
hold for count of ten
Do the same with the other leg
Repeat 5 times with each leg
If this is too difficult… keep
one knee bent and the foot flat
on the floor while raising the
other leg
Exercises To Help Your Back
Leg raises while seated ...
Sit upright, legs straight and
extended at an angle to floor
Lift one leg waist high
Slowly return to floor
Do the same with the other
leg
Repeat 5 times with each leg
Exercises To Help Your Back
Partial sit-up to strengthen stomach muscles . .
Lie on back, knees bent and feet flat on floor Slowly
raise head and shoulders off floor and reach both
hands toward your knees
Count to 10
Repeat 5 times
Exercises To Help Your Back
Back leg swing to strengthen
hip and back muscles . . . .
Stand behind chair, hands on chair
Lift one leg back and up, keeping
the knee straight
Return slowly
Raise other leg and return
Repeat 5 times with each leg
Exercises To Decrease the
Strain on Your Back
Lie on back, knees bent, feet flat
on floor
Raise knees toward chest
Place hands under knees & pull
knees to chest
Do not raise head
Do not straighten legs as you
lower them
Start with 5 repetitions, several
times a day
Exercises To Decrease the Strain on
Your Back
Lie on stomach, hands
under shoulders, elbows
bent and push up
Raise top half of body
as high as possible
Keep hips and legs on
floor
Hold for one or two
seconds
Repeat 10 times, several
times a day
Exercises To Decrease the
Strain on Your Back
Stand with feet apart
Place hands in small of back
Keep knees straight
Bend backwards at waist as far as
possible and hold for one or two
seconds
Repeat as needed
A FEW SOLUTIONS...
• Reduce manual material handling
– Pre-Plan material drops
– Utilize material handling equipment
– Keep materials in “neutral zone”
• Equipment
– Use the right tool for the job
– Evaluate new tools for ergonomics
– Keep sharp & in good repair
– Use vibration dampening tools / gloves
• Reduce Duration
– Mini-breaks
– Multi-task
– Employee rotation/job share
PRODUCTS
SCISSORS LIFT TABLE 550 LB
Ergonomics at Work
Risk of injury - Heavy lifting Cart reduces risk of injury
Ergonomics at Work
Safe Lifting
• Up-right neutral
posture
• Posterior column of
support
• Stable -- less risk of
injury
Avoid Twisting
Awkward Positions
• Adjustability
• Raise Worker or Raise Work
• Extending or Articulating Tools
• Tilt Tables
• Magnifiers
• Mirrors/Video for difficult access viewing
• Chest, Head, Arm supports
• Locate Objects w/in arms reach
• Alternate Positions/Tasks
It Costs Less to Be Safe
• Average Cost of
Common WMSDs:
1. Low back: $6,000
2. Shoulder: $7,000
3. Elbow: $4,000
4. Wrist: $5,500
• Average Cost of
Common Controls:
1. Hydraulic lift: $600
2. Adjustable height
workstation: $800
3. Powered screwdriver:
$100
4. Assembly work
positioner: $75
CREATING A COMPANY
ERGONOMICS PROGRAM
WE ARE HERE TO SHARE IDEAS!
“Okay! I’ll talk! I’ll talk…. Take two sticks of approximately equal
size and weight -- rub them together at opposing angles using short,
brisk strokes…”
START WITH A
STEERING COMMITTEE
• Designated Safety Coordinators
• Field Supervision
• Who must be involved-- to make a
positive impact in your company?
STEP ONE:
THE “CAUTION ZONE” INVENTORY
• Awkward Work Postures
• High Hand Force
• Highly Repetitive Motion
• Repeated Impact
• Heavy, Frequent or Awkward lifting
• Moderate to High Vibration
STEP TWO:
EMPLOYEE AWARENESS
• Education for affected employees
• Causes of musculoskeletal disorders
• Caution Zone Jobs of concern
• How to identify and prevent WMSDs
• Non-work related physical activities
• Promote physical fitness...
STEP THREE: ANALYSIS OF
CAUTION ZONE JOBS
• By the steering committee?
• By all field employees?
• By selected crafts or professions?
• Checklists or Pocket Cards?
• General or Specific Performance?
STEP FOUR:
SET REASONABLE OBJECTIVES
“If we pull this off, we’ll eat like kings!”
STEP FIVE:
GET EMPLOYEE INPUT & IDEAS
• Changes in tools or equipment
• Use of ergonomic PPE
• Reducing the size & weight of loads
• Ideas for task variety or job rotation
• Remember the impact of peer pressure
Primitive Peer Pressure
STEP SIX:
PRIORITIZE HAZARD REDUCTION
• Senior management support is needed
• Consider cost/benefits of changes
• Assign trial teams and a trial schedule
• Reduce exposures below hazardous levels, or
to the extent technologically and
economically feasible
STEP SEVEN:
COMPANY-WIDE APPLICATION
• Discuss experiments at safety meetings
• Assign new equipment or procedures
• Encourage continuing suggestions
• Keep ergonomic awareness high at safety
meetings, and during new employee
orientation
WHAT ARE OTHER
COMPANIES DOING?
TOOLS & RESOURCES
• WorkSafe Institute of Washington
• OSHA Website
• Dept. of Labor & Industries
• The Internet – general information
search
• Ergonomic Equipment Suppliers
• Training Materials & Consultants
• Other?
Discrimination & Retaliation are Illegal !
– Employees have a legal right to report injuries
and raise safety and health concerns without fear
of retaliation or discrimination
– If an employee becomes disabled, an employer
must still comply with the Americans with
Disabilities Act (ADA)
– For ADA information, contact the federal
Department Of Labor at 1-800-949-4232 or the
Northwest Disability Business Technical
Assistance Center at 1-800-HELP-ADA

basic-ergo.ppt

  • 1.
    Photo: “Tulalip Bay”by Diane L. Wilson-Simon
  • 2.
    BASIC ERGONOMICS Instructor: DavidEllsworth Edmonds Community College This course is being supported under grant number SH16637SH7 from the Occupational Safety and Health Administration, U.S. Department of Labor. It does not necessarily reflect the views or policies of the U.S. Department of Labor, nor does mention of trade names, commercial products, or organizations imply endorsement by the U.S. Government. With Thanks to & Cooperation of the Tulalip Occupational Safety & Health Administration (TOSHA)
  • 3.
  • 4.
    ERGONOMICS WHAT IS “ERGONOMICS”??” Ergos= work Nomos = laws Ergonomics = the laws of work
  • 5.
    ERGONOMICS What Does ErgonomicsMean?  Designing jobs, equipment, and work tasks to fit human physical characteristics and energy limitations  It considers body dimensions, mobility, and the body’s stress behavior  “Make the work fit the person, not the person fit the work”
  • 6.
    ERGONOMICS Benefits of ErgonomicsInclude: – safer jobs with fewer injuries – increased efficiency and productivity – improved quality and fewer errors – improved morale
  • 7.
    ERGONOMICS Ergonomic Goals:  Findingways to make strenuous, often repetitive work, less likely to cause muscle and joint injuries -- and still get the job done.  Keeping young bodies from wearing out prematurely, and mature bodies from giving out early.
  • 8.
    ERGONOMICS Work-Related Musculoskeletal Disorders (WMSD)accounted for an average total of $410.3 million of worker’s compensation claims in the years 1995-1997
  • 9.
    This type ofinjury affects nearly 50,000 Washington workers each year Enough People to Fill Safeco Field!! It is estimated that the actual cost including lost taxes, wages, fringe benefits, administrative costs, etc. is close to $1.5 billion per year. ERGONOMICS
  • 10.
    ERGONOMICS State Fund Claims- Statewide 1990-98* WMSDs All other claims 26% 74% WMSDs 40% 60% All other claims Number of Claims Cost of Claims Source: SHARP Report No. 40-4a-2000 * Note: This data does not include lower extremity WMSDs.
  • 11.
    ERGONOMICS Nationally, almost 60%of all work-related illnesses are MSDs
  • 12.
    The Problem isWidespread The Top 12 Standard Industrial Classifications (SIC) SIC Industry WMSDs per year 078 Landscape, Horticultural 420 152 General Bldg Contractors, Residential 1,361 174 Masonry, Tile, Plaster 703 175 Carpentry, Floor Work 429 176 Roofing, Siding, Sheet Metal 388 177 Concrete Work 287 242 Sawmills, Planing Mills 432 421 Trucking and Courier Services (non-air) 1,591 451 Air Transportation, Air Courier 411 541 Grocery Stores 1,486 805 Nursing, Personal Care Facilities 2,177 445 836 Residential Care Total 10,130 These 12 SICs alone account for 20% of WMSDs Source: SHARP Report No. 40-4a-2000
  • 14.
    The Cost-Benefit Ratio IsSubstantial Statewide estimated annual costs to comply with the rule: Statewide estimated annual costs saved by ergonomics prevention $80 Million $340 Million The Estimated Savings to Business Is $4 for Every $1 Invested
  • 15.
  • 16.
    ERGONOMICS Current Federal Law OSHA:The federal law (OSHA Ergonomics Standard) was issued on November 14, 2000 and was scheduled to be effective on January 16, 2001
  • 17.
    REGULATIONS Congress utilized thelittle known Congressional Review Act (CRA) to pass a joint resolution of disapproval of the new OSHA Ergonomics Standard with the Senate voting 56 to 44 on March 7 and the House voting 223 to 203 on March 8, 2001 President Bush signed the joint resolution on March 20, 2001
  • 18.
    REGULATIONS The effect isthat the OSHA Ergonomics Standard is REPEALED – There is no Federal Law!! NOTE: OSHA still has some regulatory “bite” in this area by virtue of the infamous “General Duty Clause” (OSHA Sec. 5(a)(1))
  • 19.
    REGULATIONS OSHA General DutyClause Each employer “shall furnish to each of his employees employment and a place of employment which are free from recognized hazards that are causing or are likely to cause death or serious physical harm to his employees”
  • 20.
    REGULATIONS What’s Next ? Severalinterested parties including Labor Unions, Business and associations such as ASSE have been meeting with Secretary of Labor, Elaine Chao to formulate a new standard that will be acceptable to all stake-holders The federal ergonomics regulations are being proposed on an industry by industry basis
  • 21.
  • 22.
    ERGONOMICS Work-Related Musculoskeletal Disorders (WMSDs) are occupational disordersthat involve soft tissues such as muscles, tendons, ligaments, joints, blood vessels and nerves
  • 23.
    ERGONOMICS WMSDs are: – Dailystress to anatomical structures that may occur when a person is exposed to certain high risk activities – If the accumulating stress exceeds the body’s normal recuperative ability, inflammation of the tissue can follow – Chronic inflammation may lead to the development of WMSDs – May require weeks, months or years for development - and for recovery
  • 24.
    ERGONOMICS What is TheMusculoskeletal System? The Musculoskeletal System includes the following: 1. Bones – The load-bearing structure of the body 2. Muscles- Tissue that contract to create movement 3. Tendons – Tissues that connect muscles to bones 4. Ligaments – Tissues that connect bones to bones 5. Cartilage – Tissue that provides cushioning and reduces friction between bones 6. Nerves – Communication system that links muscles, tendons and other tissue with the brain 7. Blood Vessels – Tubes that circulate nutrients throughout the body
  • 25.
    ERGONOMICS What Are Examplesof WMSDs? 1. Sprain – Overstretching or overexertion of a ligament that results in a tear or rupture of the ligament 2. Strain – Overstretching or overexertion of a muscle or tendon 3. Tendonitis – Inflammation of the tendon inside the sheath 4. Tenosynovitis – Inflammation of the sheath around the tendon 5. Carpal Tunnel Syndrome – Compression of the median nerve as it passes through the carpal tunnel in the heel of the hand
  • 26.
    ERGONOMICS What are Examplesof WMSDs? 6. Tennis elbow or Golfer’s elbow – Medical term is Epicondylitis – inflammation of the tendons at the elbow. 7. Trigger Finger – Common term for tendonitis or tenosynovitis that causes painful locking of the finger(s) while flexing 8. Pitcher’s Shoulder – Rotator cuff tendonitis – inflammation of one or more tendons at the shoulder 9. White Finger – Medical term is Reynaud’s Phenomenon – constriction of the blood vessels in the hands and fingers 10. Digital Neuritis – Compression of the nerves along the sides of the fingers or thumbs
  • 27.
    Injury in themaking...
  • 28.
  • 29.
  • 30.
    Tendonitis • Tendon function: –Transmit force from muscle to bone • Micro tears of tendon occur daily • Typically repair themselves • With repeated loading repair is not adequate • Pain / Inflammation
  • 31.
  • 32.
    What Causes DeQuervain’s? •Wringing washcloths, clothes • Typing on the computer keyboard • Cutting with scissors • Sewing or pinching • Stirring food for a long period of time • Opening jars
  • 33.
  • 34.
    Carpal Tunnel • Bestknown MSD • Compression of the median nerve at the wrist • Tunnel made up of nine flexor tendons and one peripheral nerve • Numbness and tingling on the thumb side of the hand
  • 37.
  • 38.
  • 39.
  • 40.
  • 41.
  • 42.
    Reynaud’s Phenomenon or “WhiteFinger” • Caused by operating vibrating machinery – especially in cold, damp weather
  • 44.
    ERGONOMICS WMSDs are sometimesreferred to using other unfamiliar terms such as : 1. Cumulative Trauma Disorders – CTD 2. Repetitive Trauma Disorders – RTD 3. Repetitive Strain Injuries – RSI 4. Repeated Motion Disorders – RMD 5. Overuse Syndromes
  • 45.
    ERGONOMICS Signs or Symptomsof WMSDs  Painful joints  Pain in wrists, shoulders, forearms, knees, etc.  Pain, tingling or numbness in hands or feet  Fingers or toes turning white  Shooting or stabbing pains in arms or legs  Back or neck pain  Swelling or inflammation  Stiffness  Burning sensations  Weakness or clumsiness in hands; dropping things
  • 46.
  • 47.
    Caution Zone What isa “Caution Zone” job?
  • 48.
    Awkward Postures High HandForce Highly Repetitive Motion Repeated Impact Heavy, Frequent or Awkward Lifting Moderate to High Hand-Arm Vibration Caution Zone Look for These Indicators:
  • 49.
    Awkward Postures Being inthese work positions for more than 2 hours total per day – Hands above head – Elbows above shoulder – Back bent forward more than 30 degrees – Neck bent more than 30 degrees – Squatting – Kneeling
  • 50.
    Working with theHands Above Head For more than 2 hours per day
  • 51.
    Working with theElbows Above Shoulders For more than 2 hours per day
  • 52.
    Neck or BackBent Forward More than 30º For more than 2 hours per day
  • 53.
    Neck or BackBent Forward More than 30 For more than 2 hours per day
  • 54.
    Neck or BackBent Forward More than 30 For more than 2 hours per day
  • 55.
    Squatting For more than2 hours per day
  • 56.
    Kneeling For more than2 hours per day
  • 57.
    High Hand Force Morethan 2 hours per day of: Pinching 2 or more pounds weight or 4 or more pounds force
  • 58.
    High Hand Force Morethan 2 hours per day of: Gripping 10 or more pounds weight or force
  • 59.
    Highly Repetitive Motion Workersrepeat same motion every few seconds for more than 2 hours per day with: – neck – shoulders – elbows – wrists – hands
  • 60.
    Highly Repetitive Motion Intensivekeying for more than 4 hours per day
  • 61.
    Repeated Impact Using handsor knees as a hammer – more than 10 times per hour – more than 2 hours per day
  • 62.
    Repeated Impact Using handsor knees as a hammer – more than 10 times per hour – more than 2 hours per day
  • 63.
    Heavy, Frequent, or AwkwardLifting Lifting objects more than: – 75 lbs. once/day – 55 lbs. more than ten times/day – 10 lbs. more than twice/minute for more than 2 hours per day – 25 lbs. above shoulders, below knees, or at arms length for more than 25 times/day
  • 64.
  • 65.
  • 66.
    Moderate to High Hand-ArmVibration Moderate Level more than 2 hours/day
  • 67.
    Moderate to High Hand-ArmVibration High Level More than 30 Min/day
  • 68.
    If the EmployerHas “Caution Zone” Jobs, They Should:  Begin an employee awareness education program  Analyze the workplace for hazards  Reduce any hazards they find
  • 69.
    Ergonomics Awareness Education Should: Showthe types, symptoms and impacts of WMSDs Show the importance of early reporting of symptoms Provide information on all “caution zone” risk factors Identify the hazards and measures to reduce them
  • 71.
    Analyzing Caution Zone Jobsfor Hazards Use a systematic method to look at: -physical demands -layout of work area -size, shape, and weight of objects handled The results will help to determine controls
  • 72.
    Hazard Zone Risk factorsbecome hazardous when: -there is a longer duration of exposure -there is greater intensity -there is a combination of risk factors
  • 73.
    The ERGONOMIC TRIANGLE FREQUENCY FORCE POSTURE THEGOAL IS TO ELIMINATE AT LEAST ONE FROM EVERY TASK
  • 74.
    Awkward Postures •Shoulders: Handsabove Head Elbows above shoulders For More Than 4 hrs/day
  • 75.
    Awkward Postures •Shoulders Repetitive: raising >once/minute For More Than 4 hrs/day
  • 76.
    Awkward Positions •Neck –Bent >45°without support or ability to vary posture More than 4 hrs/day
  • 77.
    Awkward Positions •Back –Bent forward>30° Without support or ability to vary posture More than 4 hrs/day –Bent forward >45° Without support or ability to vary posture More than 2 hrs/day
  • 78.
    •Knees - Squatting Morethan 4 hrs/day Awkward Positions
  • 79.
  • 80.
    High Hand Force •Arms,Wrists, Hands –Pinching unsupported object 2 or more pounds/hand Or –Pinching with force of 4 or more pounds/hand (1/2 ream of paper) + –Highly repetitive motion More than 3 hrs/day
  • 81.
    High Hand Force •Arms,Wrists, Hands –Pinching unsupported object 2 or more pounds/hand Or –Pinching with force of 4 or more pounds/hand (1/2 ream of paper) + –Wrists bent in flexion 30° or more, or in extension 45° or more, or in ulnar deviation 30° or more More than 3 hrs/day
  • 82.
    High Hand Force •Arms,Wrists, Hands –Pinching unsupported object 2 or more pounds/hand Or –Pinching with force of 4 or more pounds/hand (1/2 ream of paper) + –No other risk factors More than 4 hrs/day
  • 83.
    High Hand Force •Arms,Wrists, Hands –Gripping an unsupported object 10 lbs or > per hand Or –Gripping with force of 10 lbs or > per hand (clamping light duty jumper cables onto battery) + –Highly repetitive motion More than 3 hrs/day
  • 84.
    High Hand Force•Arms, Wrists, Hands –Gripping an unsupported object 10 lbs or > per hand Or –Gripping with force of 10 lbs or > per hand (clamping light duty jumper cables onto battery) + –Wrists bent in flexion 30° or more, or in extension 45° or more, or in ulnar deviation 30° or more More than 3 hrs/day
  • 85.
    High Hand Force•Arms, Wrists, Hands –Gripping an unsupported object 10 lbs or > per hand Or –Gripping with force of 10 lbs or > per hand (clamping light duty jumper cables onto battery) + –No other Risk Factors More than 4 hrs/day
  • 86.
  • 87.
    Tendonitis Risk Factors •Repetition • Forceful exertion • Awkward / sustained postures • Mechanical Stress
  • 88.
    Awkward / SustainedPostures • Neutral posture is the goal • Built-up handles • Avoid wrist deviation – flexion / extension – radial/ulnar deviation
  • 89.
  • 90.
    Highly Repetitive Motion •Neck,Shoulders, Elbows, Wrists, Hands –Same motion every few seconds with little variation (Except Keying) + -No Other Risk Factors More than 6 hrs/day
  • 91.
    Highly Repetitive Motion •Neck,Shoulders, Elbows, Wrists, Hands –Same motion every few seconds with little variation (Except Keying) + -Wrists bent in flexion 30° or more, or in extension 45° or more, or in ulnar deviation 30° or more AND High, forceful exertions with the hands More than 2 hrs/day
  • 92.
    Highly Repetitive Motion •IntensiveKeying Awkward posture, including wrists bent in flexion 30 or more, or in extenson 45 or more, or in ulnar deviation 30° or more More than 4 hrs/day
  • 93.
    Highly Repetitive Motion •IntensiveKeying –No Other Factors More than 7 hrs/day
  • 94.
    Repeated Impact •Hands –Using Hand(heel/base of palm) as a Hammer more than once per minute More than 2 hrs /day
  • 95.
    Repeated Impact •Knees –Using Kneeas Hammer more than once per minute More than 2 hrs /day
  • 96.
  • 98.
    How many liftsFor how many hours per day? per minute? 1 hr. or less 1 hr. to 2 hrs. 2 hrs. or more 1 lift every 2-5 mins. 1.0 0.95 0.85 1 lift every min. 0.95 0.9 0.75 2-3 lifts every min. 0.9 0.85 0.65 4-5 lifts every min. 0.85 0.7 0.45 6-7 lifts every min. 0.75 0.5 0.25 8-9 lifts every min. 0.6 0.35 0.15 10+ lifts every min. 0.3 0.2 0.0 Heavy, Frequent or Awkward Lifting
  • 99.
    Manual Handling • Manualhandling is transporting or supporting a load by hands or bodily force - This includes: • Lifting • Carrying • Putting down • Pushing • Pulling • Moving • Supporting
  • 100.
  • 101.
    Hand-Arm Vibration Step 1:Find the vibration value for the tool. (manufacturer or web site: http://umetech.niwl.se/vibration/HAVHome. html or measure it yourself. The vibration value will be in units of meters per second squared (m/s²) - Using a hand-arm vibration graph find the point on the left side that is equal to the vibration value
  • 102.
    Hand-Arm Vibration Step 2:Find out how many total hours per day the employee is using the tool and find that point on the bottom of the graph Step 3: Trace a line in from each of these two points until they cross
  • 103.
    0 10 20 30 40 50 0 1 23 4 5 6 7 8 Time (in hours) Vibration value (in m/s 2 ) Example: An impact wrench with a vibration value of 12 m/s2 is used for 2½ hours total per day. Hand-Arm Vibration Note: The caution limit curve (bottom) is based on an 8-hour vibration value of 2.5 m/s². The hazard limit curve (top) is based on an 8-hour vibration value of 5 m/s²
  • 104.
    Hand-Arm Vibration Step 4:If that point lies in the crosshatched “Hazard” area above the upper curve, then the vibration hazard should be reduced below the hazard level or to the degree technologically and economically feasible If the point lies between the two curves in the “Caution” area, then the job remains a “Caution Job” If it falls in the “OK” area below the bottom curve, then no further steps are necessary
  • 105.
    Reducing Identified Hazards Employersshould reduce hazards to below hazard level, or to a degree technologically and economically feasible through: – Engineering and administrative controls (preferred) and/or – Individual work practices and PPE Employers might also consider reducing employee hours performing a particular task to lower the hazard of the job
  • 106.
  • 107.
    Illustrations from Ergonomic Checkpointsby the International Labour Organization (ILO), and Practical Ergonomics by the UAW-GM Ergonomics Task Force
  • 108.
    ERGONOMICS • Ergonomic hazardsare prevented primarily by the effective design of a job or job-site and the tools or equipment used in that job • Based on information gathered in the work-site analysis, procedures can be established to correct or control ergonomic hazards using either engineering controls or work practice controls
  • 109.
    ERGONOMICS • Thoughtful arrangementsreduce stress and eliminate many potential injuries and disorders associated with the overuse of muscles, with bad posture, and with repetitive motion • Some jobs expose workers to excessive vibration and noise, eyestrain, repetitive motion, and heavy lifting • Machines, tools, and the work environment may be poorly designed, placing stress on workers' tendons, muscles, and nerves and in addition, workplace temperature extremes may aggravate or increase stress
  • 110.
    ERGONOMICS • Engineering Controls •Work stations should be ergonomically designed to accommodate the full range of required movements of a worker • Sufficient space should be provided for the knees and feet • Machine controls should be reachable and equally accessible by both right and left-handed operators • Other factors to look at include hard or sharp edges, contact with thermally conducting work surfaces, proper seating, work piece orientation, and lay-out of the workstation
  • 111.
    ERGONOMICS • Engineering Controls •Attention must be given to the selection and designs of the tools used in the workplace to prevent the tools from having a negative effect • Workers should be permitted to test tools in the actual work environment before purchasing new tools • A variety of tool sizes should be available with consideration to handle sizes, right and left-handed workers, weight, center of gravity, and adequacy for gloved hands • Engineering adaptations may be made to tools and tool handles
  • 112.
    ERGONOMICS • Work PracticeControls • Key elements of a good work practice program include instruction in proper work techniques, employee training and conditioning, regular monitoring, feedback, adjustments, modification, and maintenance • After workers are trained in a particular work activity, such as proper lifting, they should be monitored to ensure that they continue to use the proper techniques • Improper practices should be corrected to prevent injury
  • 113.
    STAY FIT FORTHE JOB... “C’mon! Keep those stomachs over the handle! Let the fat do the work!… That’s it!”
  • 114.
    Stretching • Prepares musclesto do work • Flexible muscles not easily injured • Tight muscles easily injured – Morning/After Lunch – Stress – Previous strain/sprain
  • 115.
  • 116.
  • 117.
    90-degree" posture: Sit uprightwith your elbows, hips and knees bent at right angles and your feet flat on the floor or on a footrest This position is biomechanically correct, but it can fatigue your back muscles over time Fatigue can lead to slouching, even on a chair with lumbar support
  • 118.
    Forward tilt posture: Raisethe height of your chair's seat a few inches and tilt the front of it downward about 8o This will open up your hip angle and allow you to support some of your weight using your legs rather than having it all rest on your hips and the backs of your thighs You may not find this posture comfortable if you have knee or foot problems, or if you feel like you are sliding off the front of the seat - A contoured chair seat can help to hold you in place
  • 119.
    Reclining posture: Lean back10o - 20o into the chair's backrest and put your feet out in front of you to open up the angle at your hips and knees This helps relax your back muscles and promotes blood circulation Leaning back too far however, can result in an awkward neck posture when trying to keep your head upright
  • 120.
    Standing posture: Standing providesthe biggest change in posture, and is a good alternative to prolonged sitting, which can aggravate low back injuries It can be fatiguing, however, so have a counter-height chair available at standing workstations, or use a height adjustable sit/stand workstation Also, prop one foot up on a low footrest occasionally to help shift your weight
  • 121.
    ERGONOMIC INJURY FACTORS •Lesions to tendons of the neck, back, shoulders, arms, wrists or hands • Primary causes: – Repetitive movements over long periods of time – Awkward postures – Use of excessive forces
  • 122.
    ERGONOMIC SOLUTIONS: POSTURE •NEUTRAL & COMFORTABLE: – Wrists straight – Shoulders relaxed with elbows close to body – Head / shoulders & back in vertical alignment – Frequent breaks when bent postures can’t be avoided
  • 123.
    ERGONOMIC SOLUTIONS: REPETITION • Useautomatic tools for repetitive tasks (screw and bolt tightening) • Eliminate unnecessary tasks / movements by redesigning maintenance procedures and workstations • Take short, frequent breaks • Alternate tasks and processes to use different muscle groups
  • 124.
  • 125.
    ERGONOMIC SOLUTIONS: HIGH REPETITION •Job Enlargement • Reduce Speeds • Mechanical Assists / Positioning • Jigs/vices to hold parts • Move work to worker • Voice-recognition software • Macros • Mini-Breaks
  • 126.
  • 127.
  • 128.
  • 129.
  • 130.
    ERGONOMIC SOLUTIONS: HIGH HANDFORCE • Use clamps and fasteners • Reduce weight of tool or object • Redesign tool/user interface • Look at Material Handling Alternatives • Use Two Hands /Alternate Hands • Sharp, well-maintained tools • Alternate Positions/Tasks
  • 131.
  • 132.
    Shoulder harness forlandscaping tool to reduce hand forces ERGONOMIC SOLUTIONS
  • 133.
    ERGONOMIC SOLUTIONS: REPEATED IMPACT •Use rubber mallets & padded tools • Use levers • Mechanical devices
  • 134.
    ERGONOMIC SOLUTIONS: HEAVY, FREQUENT,AWKWARD LIFTING • Reduce or Increase load weight, capacity • Handholds, rigid containers • Store objects 30” or more above floor • Slides, gravity chutes • Hoists, lifts, forklifts, Conveyors • Reduce horizontal distance • Handle items once • Mobile racks, storage • Arrange to avoid twist
  • 135.
    Wallboard lifting systemfor installing drywall ERGONOMIC SOLUTIONS
  • 136.
    Lift assist deviceto eliminate heavy, awkward lifts in nursing homes and home health care ERGONOMIC SOLUTIONS
  • 137.
  • 138.
  • 139.
    Manual Handling -Work Smarter Not Harder
  • 140.
  • 141.
  • 142.
  • 143.
  • 144.
    ERGONOMIC SOLUTIONS Using acarpet stretcher to eliminate knee impacts
  • 145.
    ERGONOMIC SOLUTIONS • Redesignhand-tool • Reduce weight of tool • Rotate jobs • Use clamps or vises
  • 146.
    ERGONOMIC SOLUTIONS: HAND TOOLS •The design of grips for hand tools can be crucial: • Grip shape and size appropriate to the task and user • Isolate cold temperature • Keep wrist and elbow in a "neutral" position • Eliminate sharp edges or pressure points • Use two-handed grips (where possible) • Attenuate vibration
  • 147.
    Redesign the WorkStation Courtesy of UCDavis
  • 148.
    Bring the loaddown or lift yourself
  • 149.
  • 150.
  • 151.
  • 152.
    Awkward Postures -Improvements
  • 153.
    Awkward postures -Improvements
  • 154.
    HAND-ARM VIBRATIONS (HAVS) • Adisorder which affects the blood vessels, nerves and muscles of the hand, wrist and forearm • Can be severely disabling • Is better known as Vibration White Finger
  • 155.
    HAND-ARM VIBRATIONS • RegularMaintenance • Balancers, isolators, damping material • Tool Selection – low-vibration tools – Battery rather than pneumatic operated tools – High power to weight ratio – Low torque w/cutoff rather than slip-clutch – Non-slip surface – Contoured handles
  • 156.
    Why talk aboutHAVS? • 1 Million workers are exposed to high levels of vibration, of those 460,000 are estimated to be working in construction • 242,000 cases of HAVS are reported every year
  • 157.
    What are theSymptoms? • Tingling and numbness in the fingers • In the cold and wet, fingers go blue then red and are painful • You can’t feel things with your fingers • Pain or tingling in your forearms at night which stop you from sleeping • Loss of strength in your arms and hands
  • 158.
    What are theSymptoms?
  • 159.
    Who is atRisk? • Users of breakers and pokers, sanders and angle grinders • Users of scabblers (to clean concrete) and needle guns • Users of drills and jigsaws
  • 160.
    Who is atRisk? • Those with a disease that reduces blood flow • Workers in cold and damp conditions
  • 161.
    Who is atRisk? Workers using vibrating tools Workers in contact with cold tools
  • 162.
    How Can IPrevent it? • Ask for low vibration tools • Try a different approach to your job • Use the right tool for the job • Keep blades and cutting edges sharp
  • 163.
    How can IPrevent it? • Check to ensure that the tool has been properly maintained • Reduce the amount of time you use the tool • Keep the handles warm
  • 164.
    How can IPrevent it? Improve your blood circulation by: • Keeping warm, wearing gloves etc. • Giving up smoking - Smoking drastically impairs blood flow through the body • Massaging and exercising fingers during work breaks
  • 165.
    Prevention Low vibration tools Usethe right tool for the job Tool maintenance Reduce amount of time using the tool Keep hands & handles warm New approach to your job Anti-vibration gloves
  • 166.
    What Else CanI Do? • Learn to Recognize the signs of HAVS • Stop work and report any symptoms to your supervisor immediately • Use any control measures provided, i.e. gloves etc., that your employer has provided • Ask for advice from your safety department or safety rep
  • 167.
    Remember • Once youhave had an attack of HAVS, you will always be at risk (it is a chronic condition) • Tell your supervisor as soon as you suspect any symptoms
  • 168.
  • 169.
  • 170.
    CARPAL TUNNEL SYNDROME •Occurs with repetitive motion of hands & wrists--especially with high force levels • Incidence up to 15% in certain industries • A “natural” keyboard and good wrist support can help most PC users avoid problems • GOOD NEWS: Have dropped about 30% since 1990--which most attribute to strong workplace ergonomics programs
  • 171.
    Computer Ergonomics • RoutinePC user defined as spending 20 hours or more per week working at a computer • Studies of PC users have not shown a risk of eye damage...although fatigue very possible • NIOSH studies have not indicated a radiation hazard nor pregnancy risk from PC usage • Workers using bi/tri-focal glasses before beginning PC use may need special purpose glasses for computer work
  • 172.
    “NATURAL” KEYBOARDS • Threetypes: 1. Fixed split 2. Adjustable split 3. “Sculptured” • Awkward wrist postures minimized with 15 to 25 horizontal degree key split AND 8 to 66 degree vertical incline
  • 173.
  • 174.
  • 175.
    “NATURAL” KEYBOARDS • KeyLayout Design Changes Have: - increased comfort (81% of users) – improved postures – reduced muscle activity – lowered carpal tunnel pressure in lab settings • Obtained primarily to alleviate an injury
  • 176.
    WRIST RESTS • Nomedical evidence that they reduce Repetitive Strain Injuries...As they work for some, but not for others • Usage Guidelines: – Buy a rest that is even with top of keyboard – Material should be “medium-soft” (foam--gel mix) so foam doesn’t break down - AVOID hard plastic types – DON’T leave wrists on rest...which compresses carpal tunnel - Palm rest instead – Changing typing habits more critical than wrist support – MOST APPROPRIATELY USED TO REST HANDS DURING PAUSE IN TYPING • LEARN TO TYPE CORRECTLY WITH “FLOATING WRISTS” FIRST!!!
  • 177.
    Ergonomic chairs • Adjustableback height • Adjustable arm rest • **Chair on left NOT ergonomically designed
  • 178.
    Alternative Pointing Devices •Track-balls • “Scrolling” Mouse
  • 179.
    Other Ergonomic PCAccessories • Height-adjustable articulating keyboard tray
  • 192.
  • 193.
  • 194.
    Posture: Orientation toWork • Elbows at 90° to 105° • Whenever possible, unload your upper extremity
  • 195.
    From the Top… •Position keyboard relative to major functions • Minimize wrist deviation
  • 196.
    Compression • Avoid reachingup and over • Consider the wrist- rest as a transitional landing pad; not as the “bus stop” for your wrists
  • 197.
  • 198.
    Mouse – Whatit Does In order to operate the mouse while typing, the operator is frequently forced to reach forward or sideways, or even both at the same time
  • 199.
    Mouse – CommonComplaints
  • 200.
  • 201.
    Mouse Platform Notice thatreaching forwards and sideways is substantially reduced.
  • 202.
    Keyboard with aTouch Pad A keyboard with a touch pad for those applications that don’t require frequent and precise placement of the cursor
  • 203.
    Short Keyboard A narrowerkeyboard (14”) allows one to operate the mouse without side movements
  • 204.
    Where Else CanYou Keep the Mouse? Placing the mouse between the operator and the keyboard requires using cordless mouse
  • 205.
  • 206.
    Targeting the Work •Targeting of large objects can be performed at a distance > 15 inches • Targeting of small objects need to be performed at 6-10 inches, ie., needle and thread
  • 207.
  • 208.
  • 209.
  • 210.
  • 211.
  • 212.
  • 213.
  • 214.
  • 215.
  • 216.
  • 217.
  • 218.
  • 219.
  • 220.
    MODEL COMPUTER WORKSTATION •Keyboard trays WITH wrist support • Split "Natural" keyboards to facilitate neutral wrist angle • Fully adjustable ergonomic chair • Document holder to minimize head / eye & neck movements
  • 221.
    MODEL COMPUTER WORKSTATION •Corner desk units to position monitor directly in front of employee • Foot rest where requested • Re-organization of working materials within employee arm reach • Alternative pointing devices (e.g., scrolling mouse or trackball devices
  • 222.
  • 224.
    Lifting Safely Back Injuriesare the Nation’s #1 Workplace Safety Problem
  • 225.
  • 226.
    Columns of Support •Posterior column of support – made up of the facet column – very stable – reflects an upright posture • Anterior column of support – made up of body of vertebra and the disc – less stable – reflects a flexed posture
  • 227.
    The Disc &Nerve Root • The disc is the shock absorber of the spine • 85% water at the age of 15 • 25% water at the age of 75
  • 228.
  • 229.
    Forward Bending • Toomuch spinal flexion – loads the anterior column of support – places the posterior wall of the disc at risk – has the potential for nerve root compromise
  • 230.
  • 231.
  • 232.
    The Process ofDegeneration
  • 233.
    Weight of theHead = 10-12 lbs.
  • 234.
  • 235.
  • 236.
  • 237.
  • 238.
    • A backinjury costs an average of $11,645 in medical claims and lost time wages. National Safety Council • Most back injuries can be prevented
  • 240.
    The Forces Involved Theamount of force you place on your back in lifting may surprise you! Think of your back as a lever - with the fulcrum in the center, it only takes ten pounds of pressure to lift a ten pound object.
  • 241.
    The Forces Involved Ifyou shift the fulcrum to one side, it takes much more force to lift the same object. Your waist acts like the fulcrum in a lever system, on a 10:1 ratio Lifting a ten pound object puts 100 pounds of pressure on your lower back
  • 242.
    The Forces Involved Whenyou add in the 105 pounds of the average human upper torso, you see that lifting a ten pound object actually puts 1,150 pounds of pressure on the lower back!
  • 243.
    The Forces Involved Ifyou were 25 pounds overweight, it would add an additional 250 pounds of pressure on your back every time you bend over!
  • 244.
    Common Causes ofBack Injuries Anytime you find yourself doing one of these things, you should think: DANGER! My back is at risk! Try to avoid heavy lifting . . Especially repetitive lifting over a long period of time
  • 245.
    Common Causes ofBack Injuries Twisting at the waist while lifting or holding a heavy load . . . this frequently happens when using a shovel.
  • 246.
    Common Causes ofBack Injuries Reaching and lifting . . . over your head, across a table, or out the back of a truck . . . .
  • 247.
    Common Causes ofBack Injuries Lifting or carrying objects with awkward or odd shapes . . . .
  • 248.
    Common Causes ofBack Injuries Working in awkward, uncomfortable positions . . .
  • 249.
    Common Causes ofBack Injuries Sitting or standing too long in one position . . . sitting can be very hard on the lower back . . . .
  • 250.
    Common Causes ofBack Injuries It is also possible to injure your back slipping on a wet floor or ice . . .
  • 251.
    Prevent Back Injuries •Avoid lifting and bending whenever you can • Place objects up off the floor • Raise/lower shelves. • Use carts and dollies • Use cranes, hoists, lift tables, and other lift- assist devices whenever you can • Test the weight of an object before lifting by picking up a corner • Get help if it’s too heavy for you to lift it alone
  • 252.
    Prevent Back Injuries •Use proper lift procedures • Follow these steps when lifting . . .
  • 253.
    STEP ONE Stand closeto the load with your feet spread apart about shoulder width, with one foot slightly in front of the other for balance
  • 254.
    STEP TWO Squat downbending at the knees (not your waist). Tuck your chin while keeping your back as vertical as possible
  • 255.
    STEP THREE Get afirm grasp of the object before beginning the lift
  • 256.
    STEP FOUR Begin slowlylifting with your LEGS by straightening them - Never twist your body during this step.
  • 257.
    STEP FIVE Once thelift is complete, keep the object as close to the body as possible. As the load's center of gravity moves away from the body, there is a dramatic increase in stress to the lumbar region of the back
  • 258.
    For those AwkwardMoments... If you must lift or lower from a high place: 1. Stand on a platform instead of a ladder 2. Lift the load in smaller pieces if possible 3. Push the load to see how heavy and stable it is 4. Slide the load as close to yourself as possible before lifting up or down 5. Get help when needed to avoid an injury
  • 259.
    From hard-to-get-at places... •Get as close to the load as possible • Keep back straight, stomach muscles tight • Push buttocks out behind you • Bend your knees • Use leg, stomach, and buttock muscles to lift -- not your back
  • 260.
    Team lifting • Allparticipants should be of similar height, build and gender • One person should take control of the lift, command attention, inform others and co-ordinate the lift • Double the people DOES NOT MEAN double the capacity
  • 261.
    If one personcan lift 100 pounds: How much can two people lift? Only 70 % or 140 pounds How much can three people lift? Only 50 % or 150 pounds
  • 262.
    A. No. Manufacturersof back support belts do not claim they increase maximum lifting potential. Q. Will wearing a back support belt increase my maximum lifting potential?
  • 263.
  • 266.
    Things You CanDo • Minimize problems with your back by exercises that tone the muscles in your back, hips and thighs • Before beginning any exercise program, you should check with your doctor
  • 267.
    Exercise! Exercise regularly, everyother day Warm up slowly . . . A brisk walk is a good way to warm up Inhale deeply before each repetition of an exercise and exhale when performing each repetition
  • 268.
    Exercises To HelpYour Back Wall slides to strengthen your muscles . . . . Stand with your back against a wall, feet shoulder-width apart. Slide down into a crouch with knees bent to 90 degrees Count to 5 and slide back up the wall - Repeat 5 times
  • 269.
    Exercises To HelpYour Back Leg raises to strengthen back and hip muscles . . . Lie on your stomach Tighten muscles in one leg and raise leg from floor Hold for count of 10, and return leg to floor Do the same with your other leg Repeat five times with each leg
  • 270.
    Exercises To HelpYour Back Leg raises to strengthen back and hip muscles . . . Lie on back, arms at your sides Lift one leg off the floor and hold for count of ten Do the same with the other leg Repeat 5 times with each leg If this is too difficult… keep one knee bent and the foot flat on the floor while raising the other leg
  • 271.
    Exercises To HelpYour Back Leg raises while seated ... Sit upright, legs straight and extended at an angle to floor Lift one leg waist high Slowly return to floor Do the same with the other leg Repeat 5 times with each leg
  • 272.
    Exercises To HelpYour Back Partial sit-up to strengthen stomach muscles . . Lie on back, knees bent and feet flat on floor Slowly raise head and shoulders off floor and reach both hands toward your knees Count to 10 Repeat 5 times
  • 273.
    Exercises To HelpYour Back Back leg swing to strengthen hip and back muscles . . . . Stand behind chair, hands on chair Lift one leg back and up, keeping the knee straight Return slowly Raise other leg and return Repeat 5 times with each leg
  • 274.
    Exercises To Decreasethe Strain on Your Back Lie on back, knees bent, feet flat on floor Raise knees toward chest Place hands under knees & pull knees to chest Do not raise head Do not straighten legs as you lower them Start with 5 repetitions, several times a day
  • 275.
    Exercises To Decreasethe Strain on Your Back Lie on stomach, hands under shoulders, elbows bent and push up Raise top half of body as high as possible Keep hips and legs on floor Hold for one or two seconds Repeat 10 times, several times a day
  • 276.
    Exercises To Decreasethe Strain on Your Back Stand with feet apart Place hands in small of back Keep knees straight Bend backwards at waist as far as possible and hold for one or two seconds Repeat as needed
  • 277.
    A FEW SOLUTIONS... •Reduce manual material handling – Pre-Plan material drops – Utilize material handling equipment – Keep materials in “neutral zone” • Equipment – Use the right tool for the job – Evaluate new tools for ergonomics – Keep sharp & in good repair – Use vibration dampening tools / gloves • Reduce Duration – Mini-breaks – Multi-task – Employee rotation/job share
  • 278.
  • 279.
    Ergonomics at Work Riskof injury - Heavy lifting Cart reduces risk of injury
  • 280.
  • 281.
    Safe Lifting • Up-rightneutral posture • Posterior column of support • Stable -- less risk of injury
  • 282.
  • 283.
    Awkward Positions • Adjustability •Raise Worker or Raise Work • Extending or Articulating Tools • Tilt Tables • Magnifiers • Mirrors/Video for difficult access viewing • Chest, Head, Arm supports • Locate Objects w/in arms reach • Alternate Positions/Tasks
  • 284.
    It Costs Lessto Be Safe • Average Cost of Common WMSDs: 1. Low back: $6,000 2. Shoulder: $7,000 3. Elbow: $4,000 4. Wrist: $5,500 • Average Cost of Common Controls: 1. Hydraulic lift: $600 2. Adjustable height workstation: $800 3. Powered screwdriver: $100 4. Assembly work positioner: $75
  • 285.
  • 286.
    WE ARE HERETO SHARE IDEAS! “Okay! I’ll talk! I’ll talk…. Take two sticks of approximately equal size and weight -- rub them together at opposing angles using short, brisk strokes…”
  • 287.
    START WITH A STEERINGCOMMITTEE • Designated Safety Coordinators • Field Supervision • Who must be involved-- to make a positive impact in your company?
  • 288.
    STEP ONE: THE “CAUTIONZONE” INVENTORY • Awkward Work Postures • High Hand Force • Highly Repetitive Motion • Repeated Impact • Heavy, Frequent or Awkward lifting • Moderate to High Vibration
  • 289.
    STEP TWO: EMPLOYEE AWARENESS •Education for affected employees • Causes of musculoskeletal disorders • Caution Zone Jobs of concern • How to identify and prevent WMSDs • Non-work related physical activities • Promote physical fitness...
  • 290.
    STEP THREE: ANALYSISOF CAUTION ZONE JOBS • By the steering committee? • By all field employees? • By selected crafts or professions? • Checklists or Pocket Cards? • General or Specific Performance?
  • 291.
    STEP FOUR: SET REASONABLEOBJECTIVES “If we pull this off, we’ll eat like kings!”
  • 292.
    STEP FIVE: GET EMPLOYEEINPUT & IDEAS • Changes in tools or equipment • Use of ergonomic PPE • Reducing the size & weight of loads • Ideas for task variety or job rotation • Remember the impact of peer pressure
  • 293.
  • 294.
    STEP SIX: PRIORITIZE HAZARDREDUCTION • Senior management support is needed • Consider cost/benefits of changes • Assign trial teams and a trial schedule • Reduce exposures below hazardous levels, or to the extent technologically and economically feasible
  • 295.
    STEP SEVEN: COMPANY-WIDE APPLICATION •Discuss experiments at safety meetings • Assign new equipment or procedures • Encourage continuing suggestions • Keep ergonomic awareness high at safety meetings, and during new employee orientation
  • 296.
  • 297.
    TOOLS & RESOURCES •WorkSafe Institute of Washington • OSHA Website • Dept. of Labor & Industries • The Internet – general information search • Ergonomic Equipment Suppliers • Training Materials & Consultants • Other?
  • 298.
    Discrimination & Retaliationare Illegal ! – Employees have a legal right to report injuries and raise safety and health concerns without fear of retaliation or discrimination – If an employee becomes disabled, an employer must still comply with the Americans with Disabilities Act (ADA) – For ADA information, contact the federal Department Of Labor at 1-800-949-4232 or the Northwest Disability Business Technical Assistance Center at 1-800-HELP-ADA