Downloaded 33 times


![Back to Basics 2016 : Webinar 2
La Tua Prima Applicazione MongoDB
{
name:”Massimo Brignoli”,
role:”Principal Solutions Architect”
region:”EMEA”,
company:”MongoDB”,
contacts: [ {type:”email”, address:massimo@mongodb.com},
{type:”twitter”,nick:”@massimobrignoli”} ]
hashtag:”#back2basics”
}](https://image.slidesharecdn.com/b2b-webinar2-ita-latuaprimaapplicazionemongodb-160607080050/75/Back-to-Basics-webinar-2-La-tua-prima-applicazione-MongoDB-3-2048.jpg)


![Eseguire MongodJD10Gen:mongodb massimobrignoli $ ./bin/mongod --dbpath /data/b2b
2016-05-23T19:21:07.767+0100 I CONTROL [initandlisten] MongoDB starting : pid=49209 port=27017 dbpath=/data/b2b 64-
bit host=JD10Gen.local
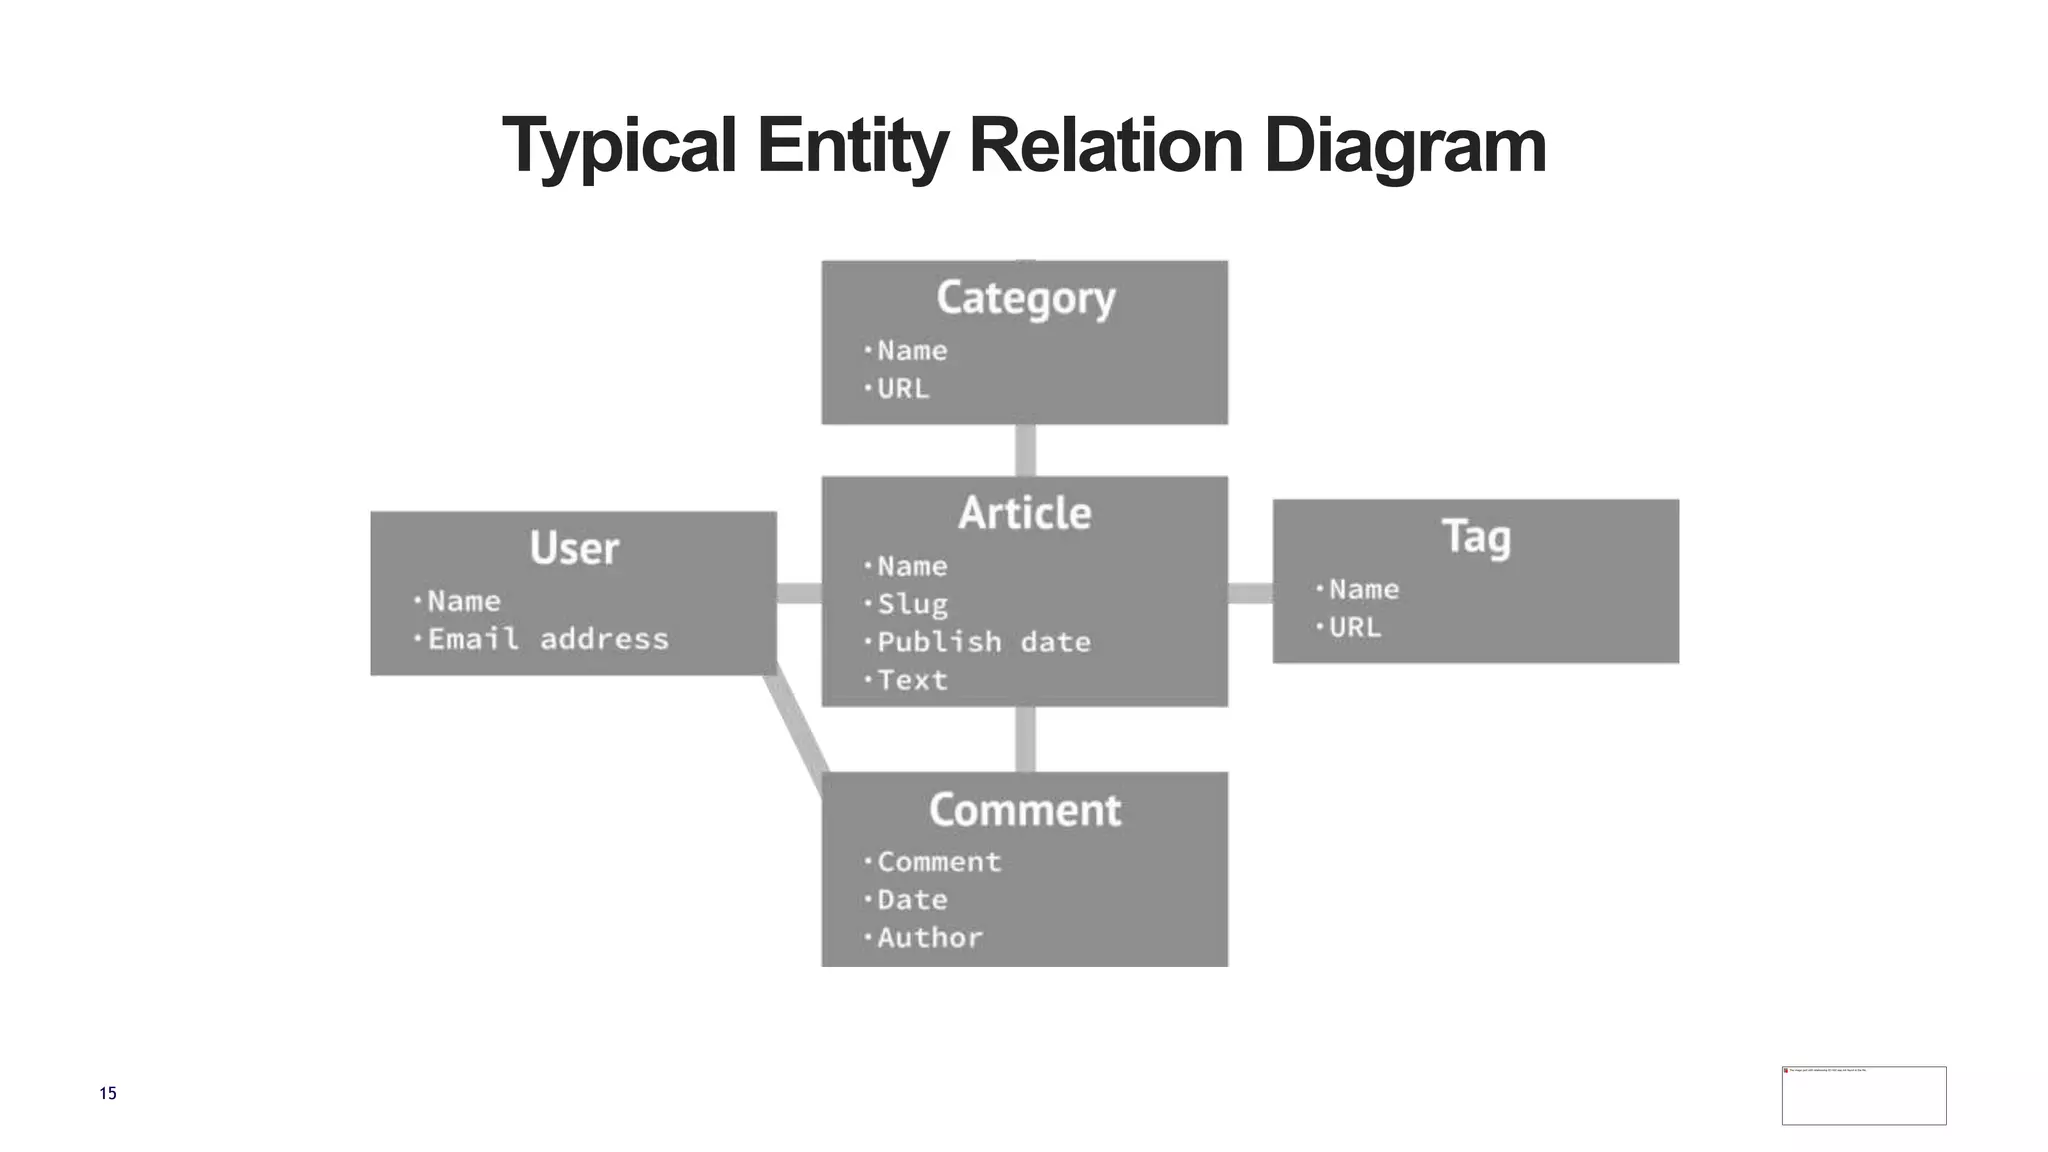
2016-05-23T19:21:07.768+0100 I CONTROL [initandlisten] db version v3.2.6
2016-05-23T19:21:07.768+0100 I CONTROL [initandlisten] git version: 05552b562c7a0b3143a729aaa0838e558dc49b25
2016-05-23T19:21:07.768+0100 I CONTROL [initandlisten] allocator: system
2016-05-23T19:21:07.768+0100 I CONTROL [initandlisten] modules: none
2016-05-23T19:21:07.768+0100 I CONTROL [initandlisten] build environment:
2016-05-23T19:21:07.768+0100 I CONTROL [initandlisten] distarch: x86_64
2016-05-23T19:21:07.768+0100 I CONTROL [initandlisten] target_arch: x86_64
2016-05-23T19:21:07.768+0100 I CONTROL [initandlisten] options: { storage: { dbPath: "/data/b2b" } }
2016-05-23T19:21:07.769+0100 I - [initandlisten] Detected data files in /data/b2b created by the 'wiredTiger'
storage engine, so setting the active storage engine to 'wiredTiger'.
2016-05-23T19:21:07.769+0100 I STORAGE [initandlisten] wiredtiger_open config:
create,cache_size=4G,session_max=20000,eviction=(threads_max=4),config_base=false,statistics=(fast),log=(enabled=true
,archive=true,path=journal,compressor=snappy),file_manager=(close_idle_time=100000),checkpoint=(wait=60,log_size=2GB)
,statistics_log=(wait=0),
2016-05-23T19:21:08.837+0100 I CONTROL [initandlisten]
2016-05-23T19:21:08.838+0100 I CONTROL [initandlisten] ** WARNING: soft rlimits too low. Number of files is 256,
should be at least 1000
2016-05-23T19:21:08.840+0100 I NETWORK [HostnameCanonicalizationWorker] Starting hostname canonicalization worker
2016-05-23T19:21:08.840+0100 I FTDC [initandlisten] Initializing full-time diagnostic data capture with directory
'/data/b2b/diagnostic.data'
2016-05-23T19:21:08.841+0100 I NETWORK [initandlisten] waiting for connections on port 27017
2016-05-23T19:21:09.148+0100 I NETWORK [initandlisten] connection accepted from 127.0.0.1:59213 #1 (1 connection now
open)](https://image.slidesharecdn.com/b2b-webinar2-ita-latuaprimaapplicazionemongodb-160607080050/75/Back-to-Basics-webinar-2-La-tua-prima-applicazione-MongoDB-10-2048.jpg)
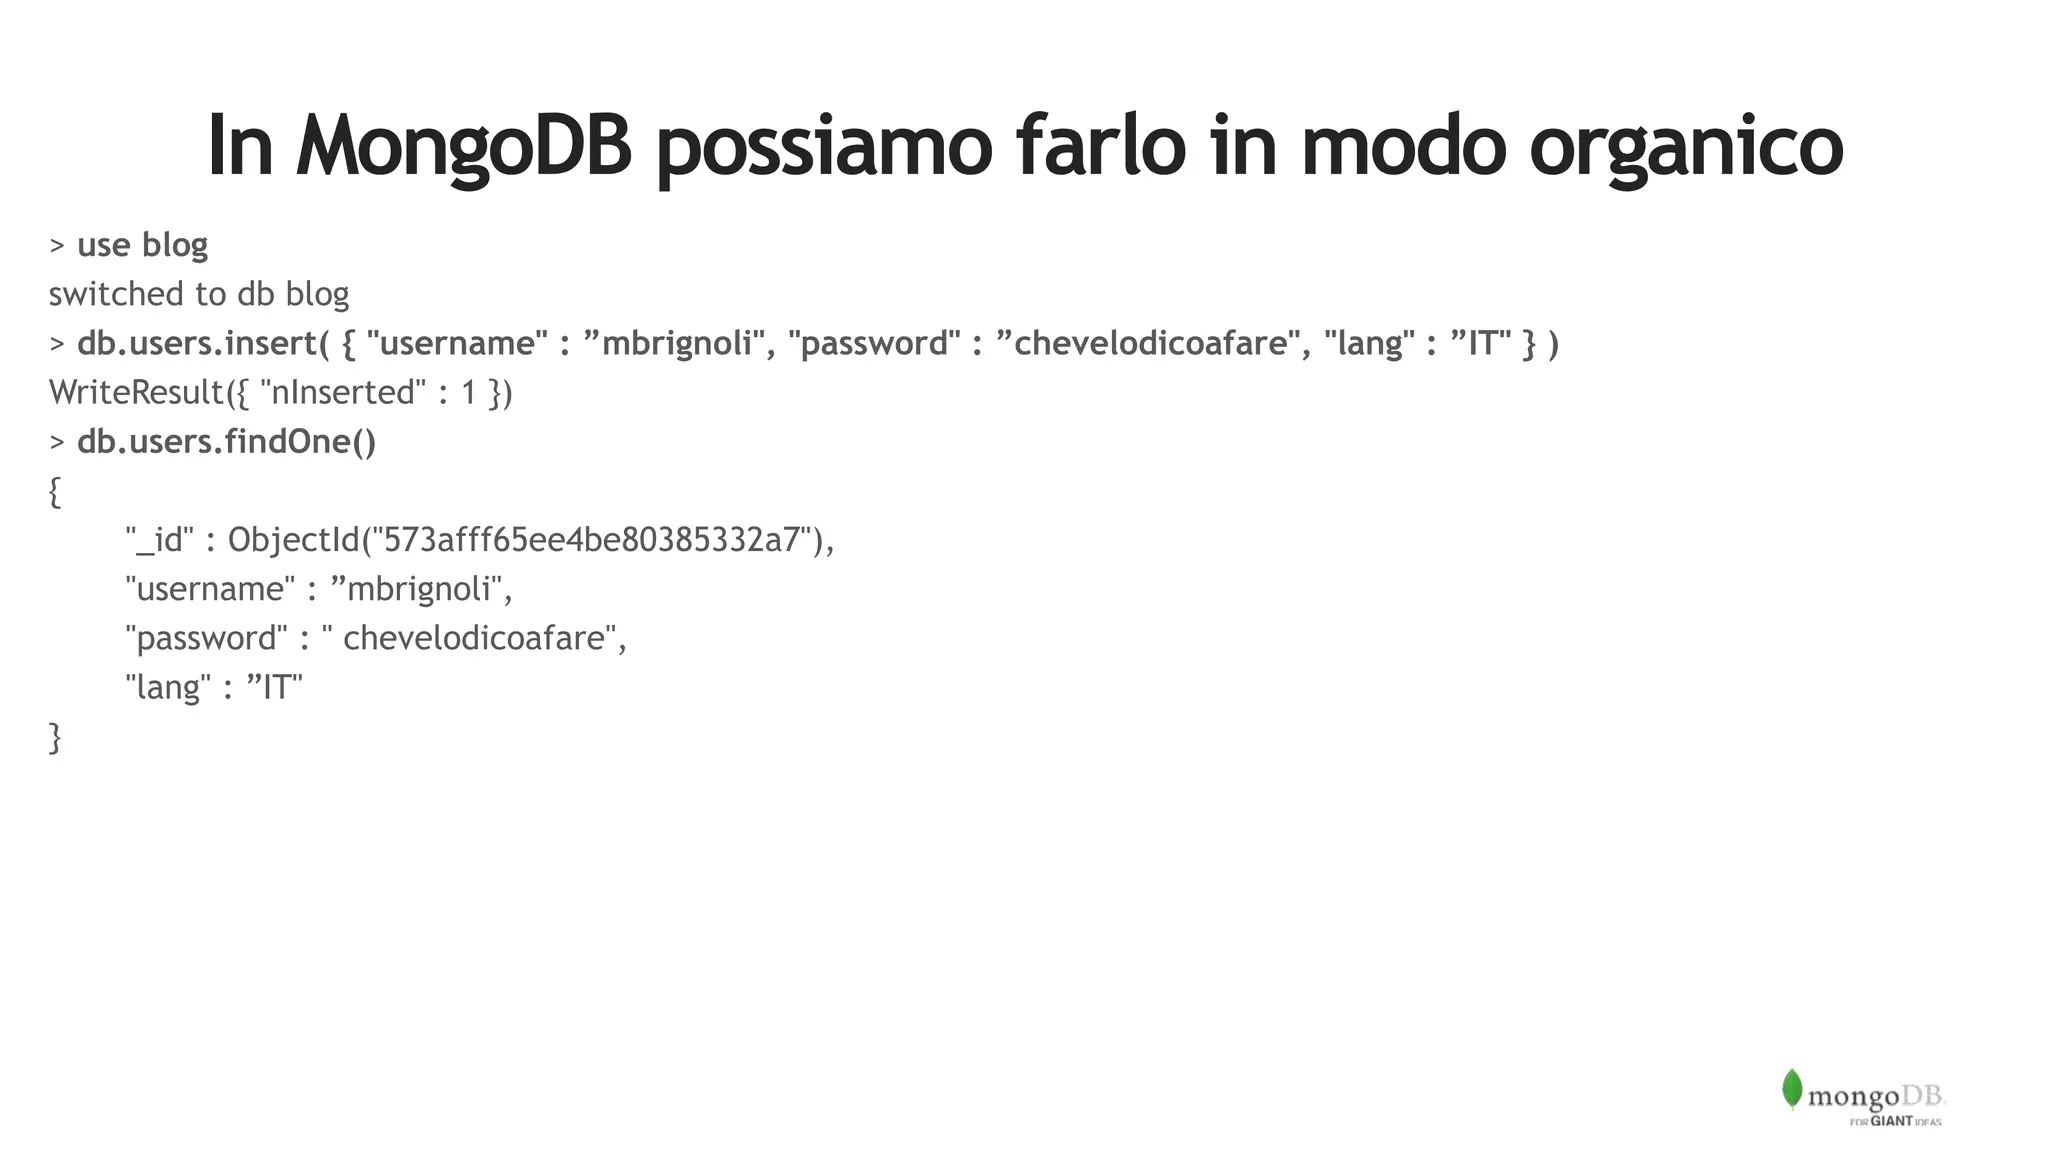
![Collegarsi Attraverso la Shell
$ ./bin/mongo
MongoDB shell version: 3.2.6
connecting to: test
Server has startup warnings:
2016-05-17T11:46:03.516+0100 I CONTROL [initandlisten]
2016-05-17T11:46:03.516+0100 I CONTROL [initandlisten] **
WARNING: soft rlimits too low. Number of files is 256,
should be at least 1000
>](https://image.slidesharecdn.com/b2b-webinar2-ita-latuaprimaapplicazionemongodb-160607080050/75/Back-to-Basics-webinar-2-La-tua-prima-applicazione-MongoDB-11-2048.jpg)
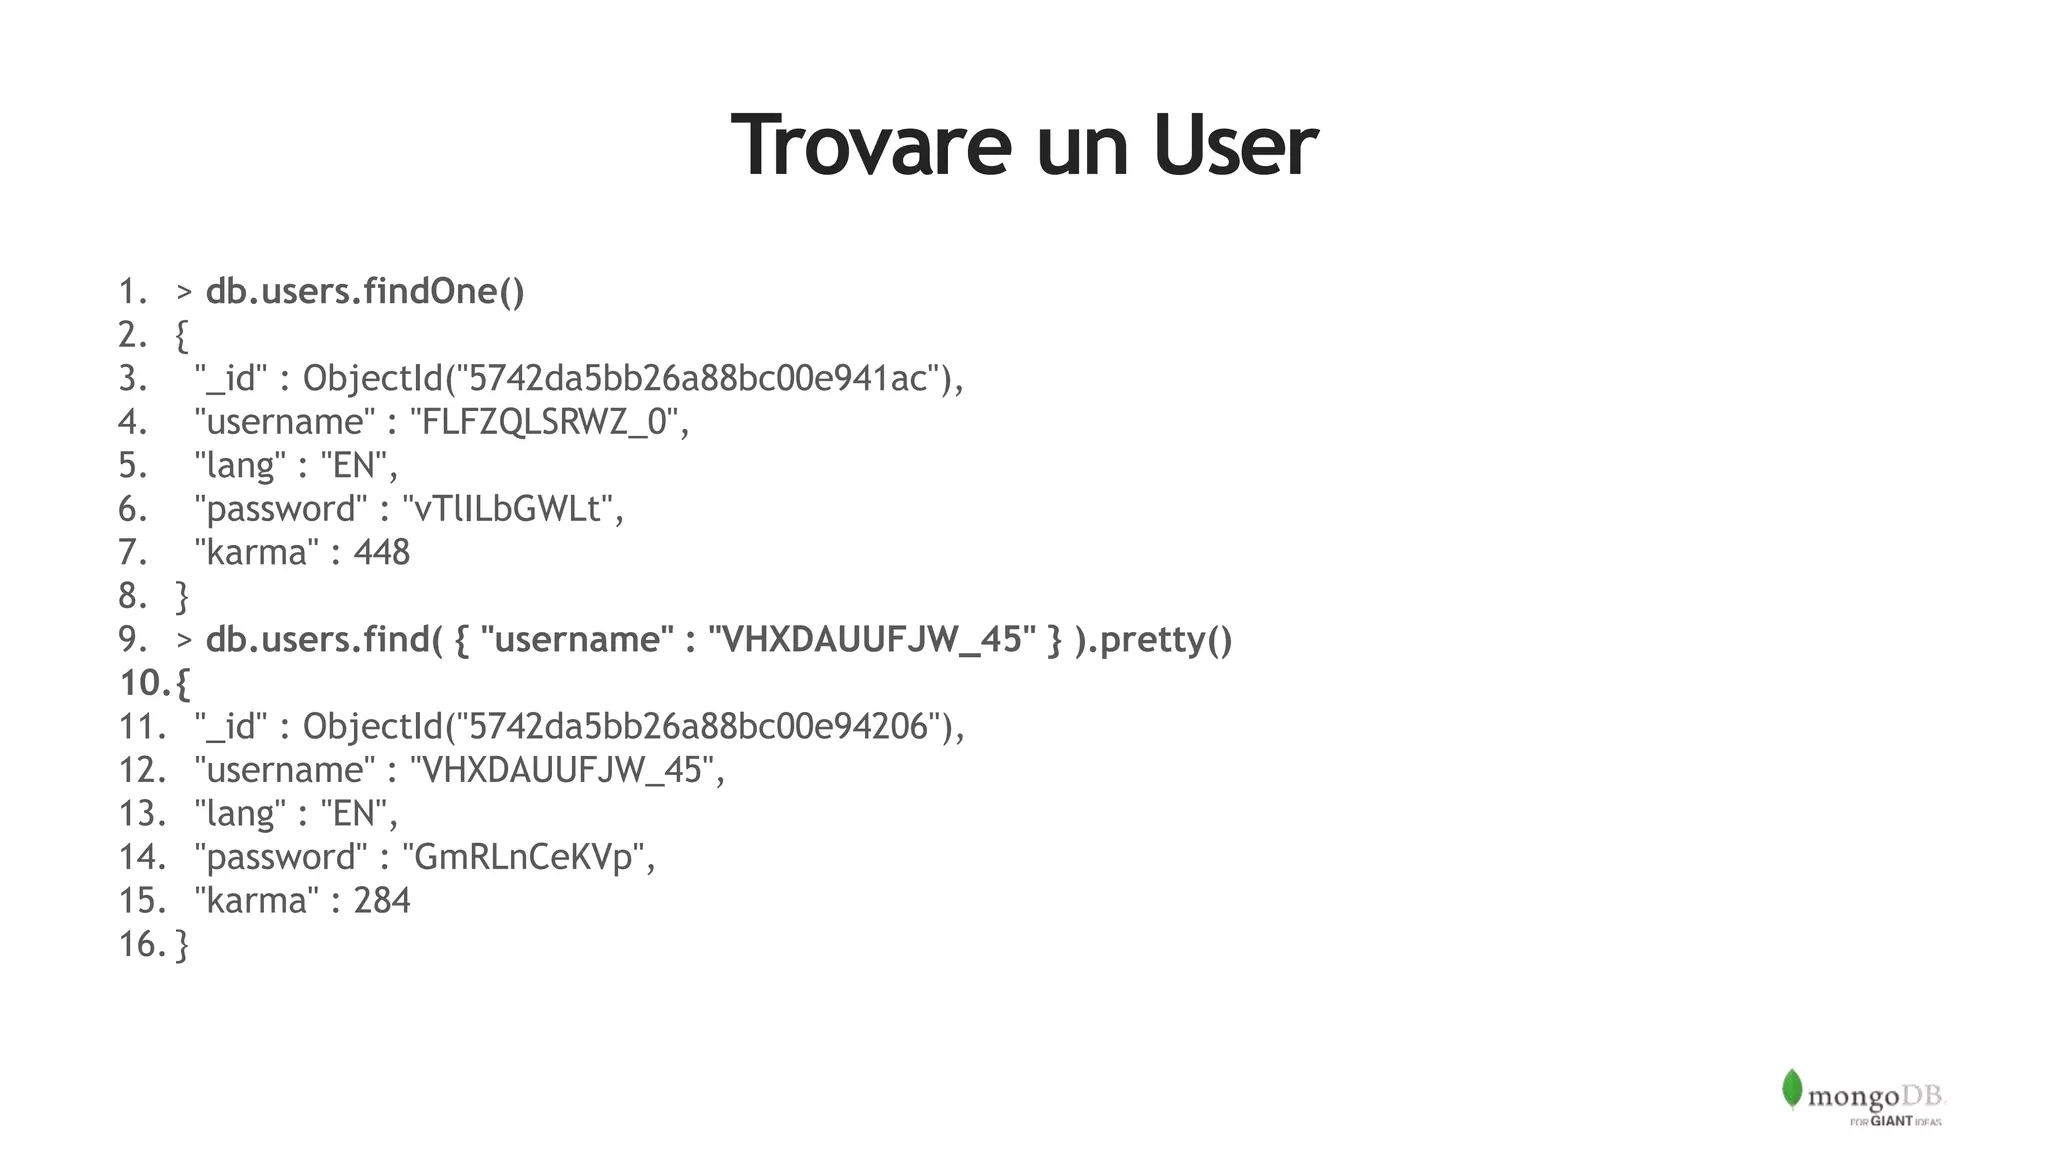
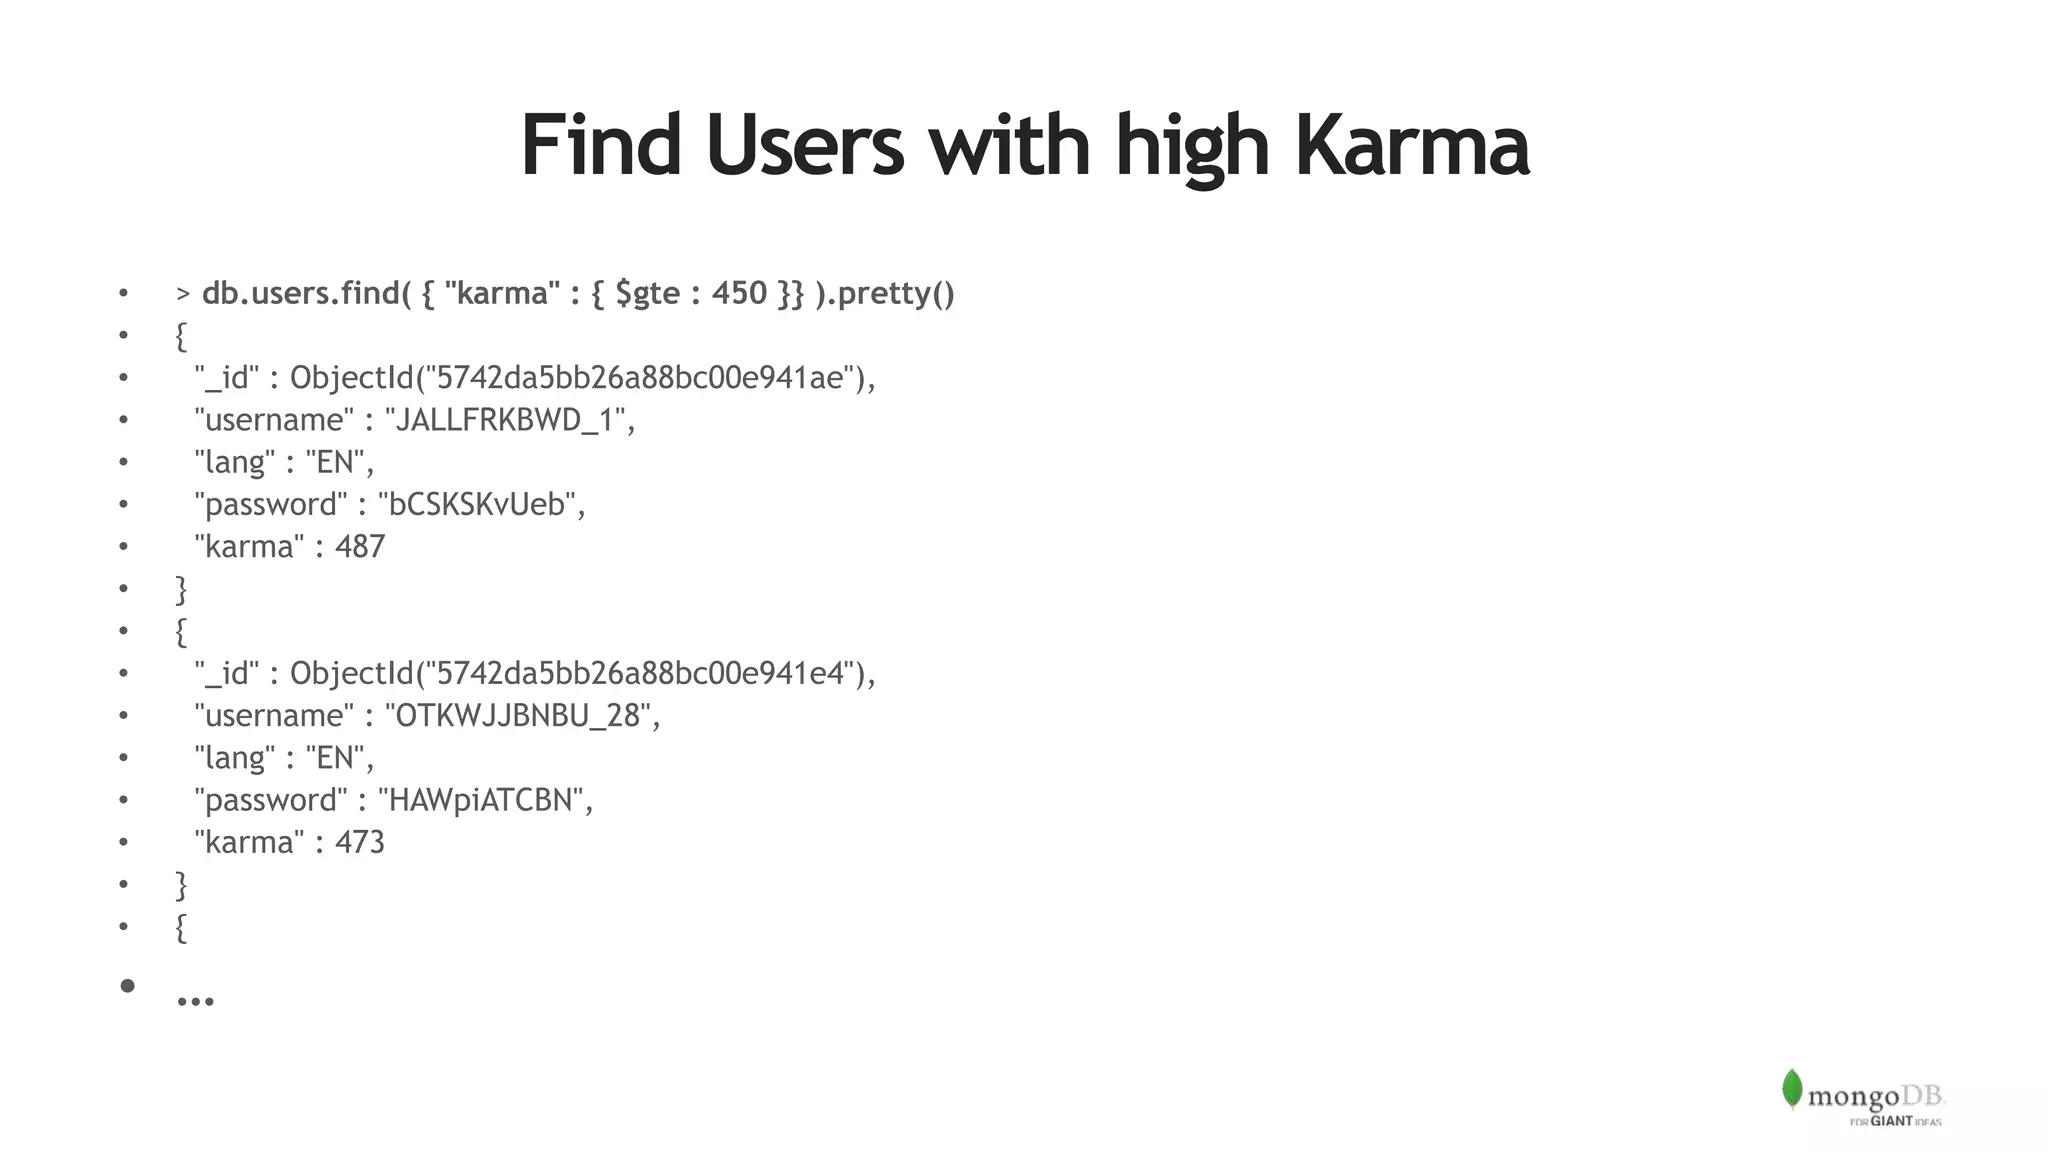
![Come lo facciamo in un’applicazione?
'''
Created on 17 May 2016
@author: mbrignoli
'''
import pymongo
#
# client defaults to localhost and port 27017. eg MongoClient('localhost', 27017)
client = pymongo.MongoClient()
blogDatabase = client[ "blog" ]
usersCollection = blogDatabase[ ”users" ]
usersCollection.insert_one( { "username" : ”mbrignoli",
"password" : ”chevelodicoafare",
"lang" : ”IT" })
user = usersCollection.find_one()
print( user )](https://image.slidesharecdn.com/b2b-webinar2-ita-latuaprimaapplicazionemongodb-160607080050/75/Back-to-Basics-webinar-2-La-tua-prima-applicazione-MongoDB-17-2048.jpg)
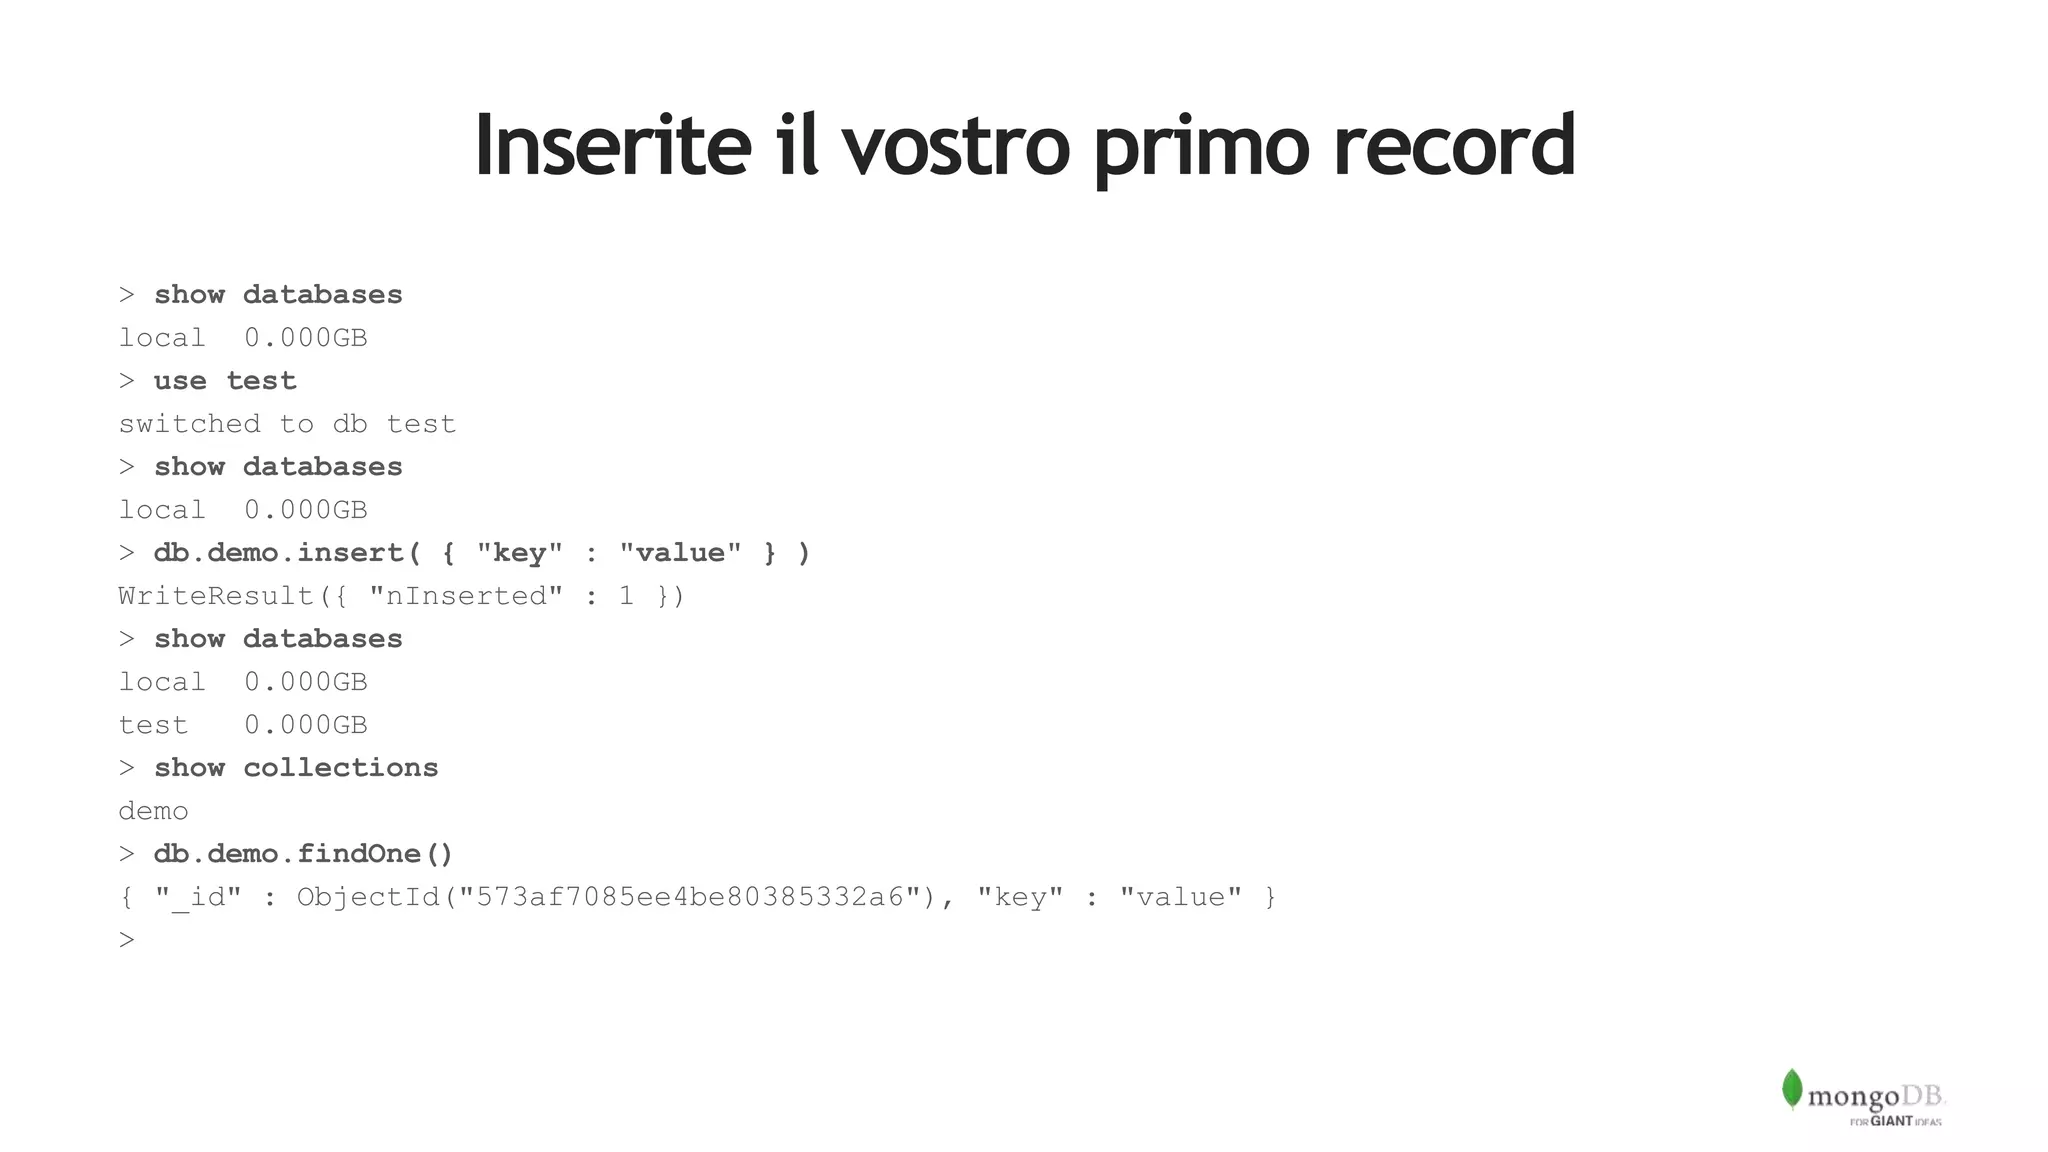
![Inseriamo un Articolo
…
articlesCollection = blogDatabase[ ”articles" ]
author = ”mbrignoli"
article = { "title" : "This is my first post",
"body" : "The is the longer body text for my blog post. We can add lots of text here.",
"author" : author,
"tags" : [ ”massimo", "general", ”italy", "admin" ]
}
#
# Lets check if our author exists
#
if usersCollection.find_one( { "username" : author }) :
articlesCollection.insert_one( article )
else:
raise ValueError( "Author %s does not exist" % author )](https://image.slidesharecdn.com/b2b-webinar2-ita-latuaprimaapplicazionemongodb-160607080050/75/Back-to-Basics-webinar-2-La-tua-prima-applicazione-MongoDB-18-2048.jpg)
![Creare un nuovo tipo di articolo
• #
• # Lets add a new type of article with a posting date and a section
• #
• author = ”mbrignoli"
• title = "This is a post on MongoDB"
•
• newPost = { "title" : title,
• "body" : "MongoDB is the worlds most popular NoSQL database. It is a document
database",
• "author" : author,
• "tags" : [ ”massimo", "mongodb", ”italy" ],
• "section" : "technology",
• "postDate" : datetime.datetime.now(),
• }
• #
• # Lets check if our author exists
• #
• if usersCollection.find_one( { "username" : author }) :
• articlesCollection.insert_one( newPost )](https://image.slidesharecdn.com/b2b-webinar2-ita-latuaprimaapplicazionemongodb-160607080050/75/Back-to-Basics-webinar-2-La-tua-prima-applicazione-MongoDB-19-2048.jpg)
![Inseriamo tanti articoli - 1
• import pymongo
• import string
• import datetime
• import random
•
• def randomString( size, letters = string.letters ):
• return "".join( [random.choice( letters ) for _ in xrange( size )] )
• client = pymongo.MongoClient()
• def makeArticle( count, author, timestamp ):
•
• return { "_id" : count,
• "title" : randomString( 20 ),
• "body" : randomString( 80 ),
• "author" : author,
• "postdate" : timestamp }
• def makeUser( username ):
• return { "username" : username,
• "password" : randomString( 10 ) ,
• "karma" : random.randint( 0, 500 ),
• "lang" : "EN" }](https://image.slidesharecdn.com/b2b-webinar2-ita-latuaprimaapplicazionemongodb-160607080050/75/Back-to-Basics-webinar-2-La-tua-prima-applicazione-MongoDB-20-2048.jpg)
![Inseriamo tanti Articoli – parte 2
blogDatabase = client[ "blog" ]
usersCollection = blogDatabase[ "users" ]
articlesCollection = blogDatabase[ "articles" ]
bulkUsers = usersCollection.initialize_ordered_bulk_op()
bulkArticles = articlesCollection.initialize_ordered_bulk_op()
ts = datetime.datetime.now()
for i in range( 1000000 ) :
#username = randomString( 10, string.ascii_uppercase ) + "_" + str( i )
username = "USER_" + str( i )
bulkUsers.insert( makeUser( username ) )
ts = ts + datetime.timedelta( seconds = 1 )
bulkArticles.insert( makeArticle( i, username, ts ))
if ( i % 500 == 0 ) :
bulkUsers.execute()
bulkArticles.execute()
bulkUsers = usersCollection.initialize_ordered_bulk_op()
bulkArticles = articlesCollection.initialize_ordered_bulk_op()
bulkUsers.execute()
bulkArticles.execute()](https://image.slidesharecdn.com/b2b-webinar2-ita-latuaprimaapplicazionemongodb-160607080050/75/Back-to-Basics-webinar-2-La-tua-prima-applicazione-MongoDB-21-2048.jpg)
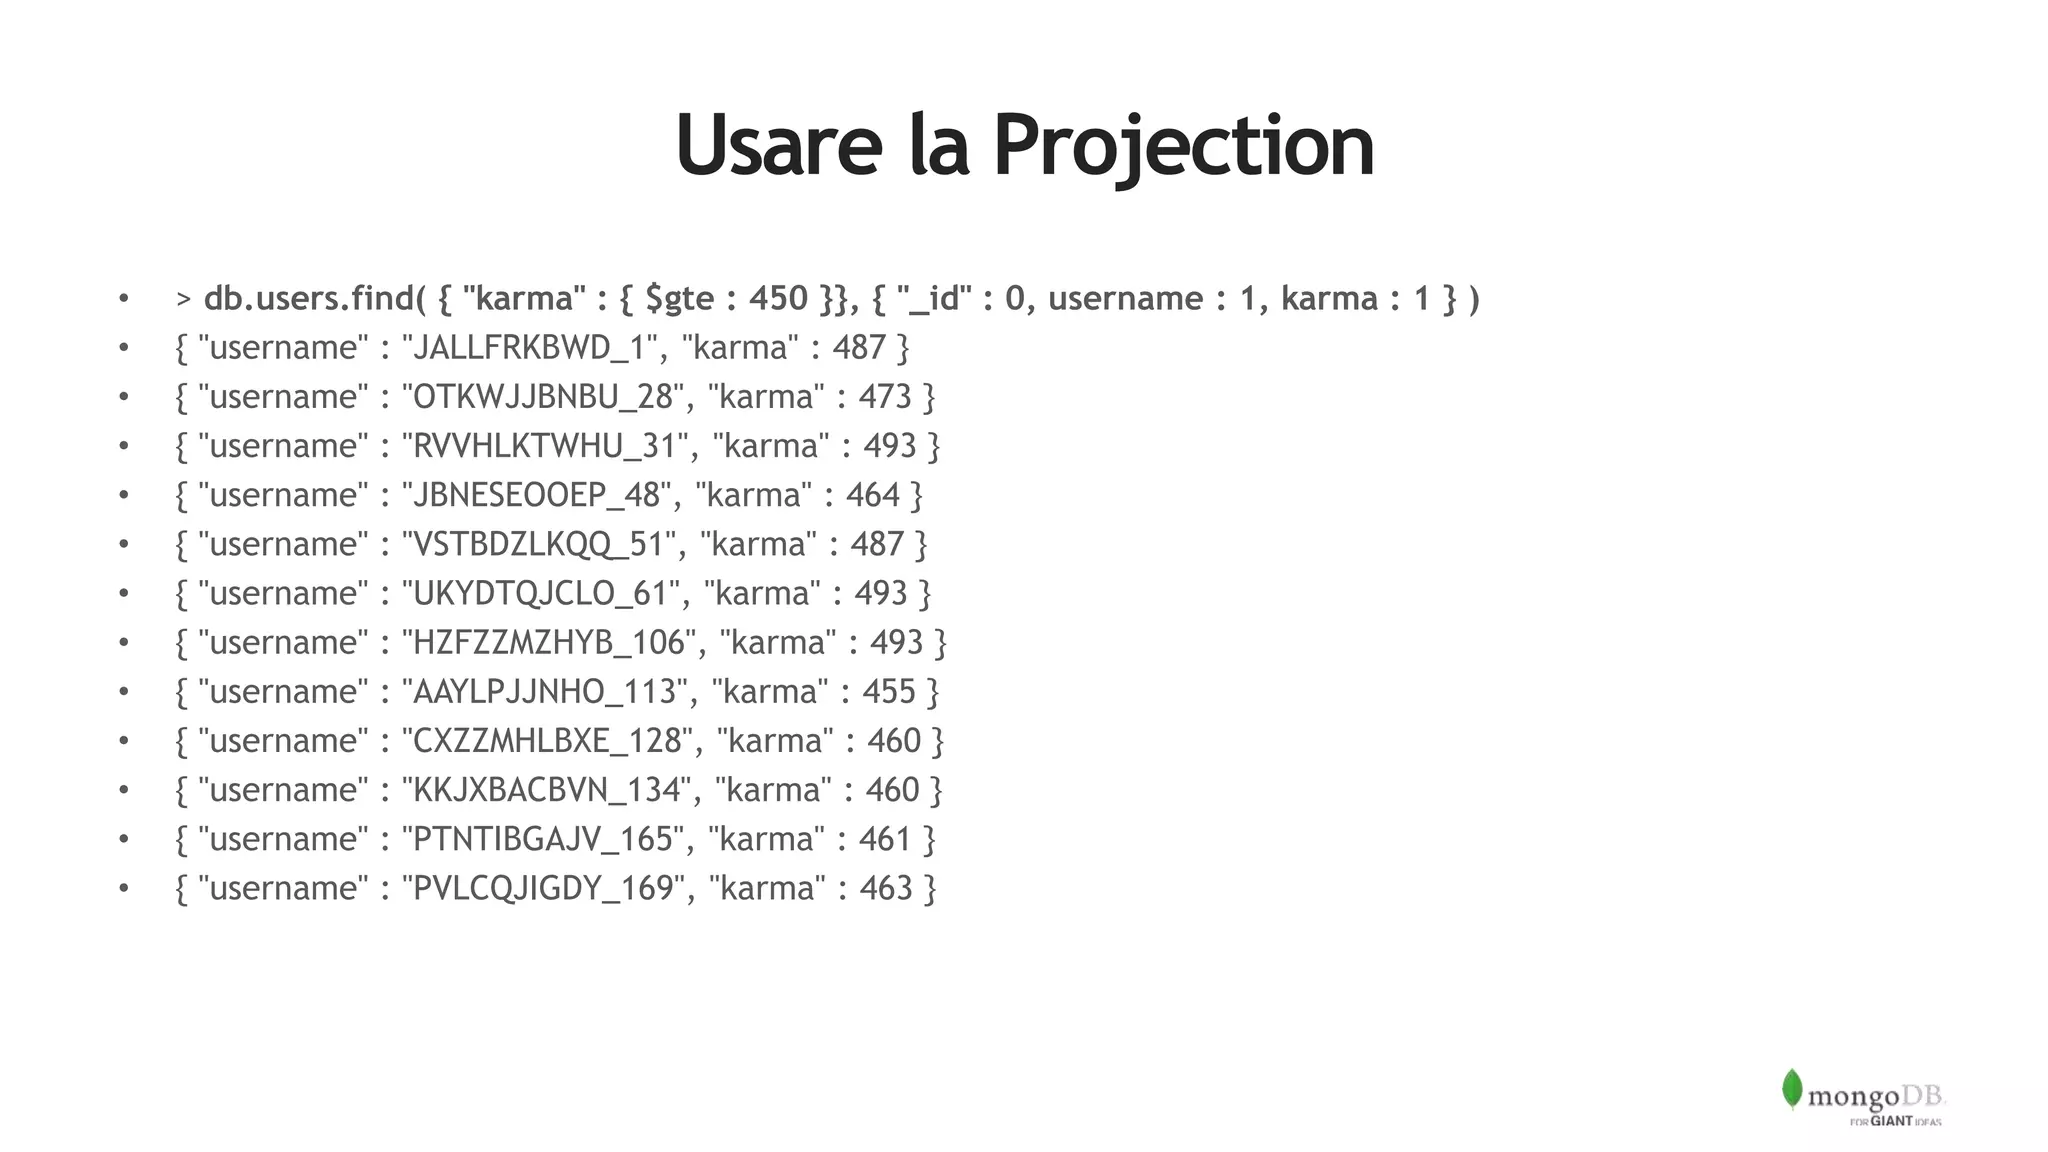
![Aggiornare un Articolo aggiungendo i Commenti
> db.articles.find( { "_id" : 19 } ).pretty()
{
"_id" : 19,
"body" :
"nTzOofOcnHKkJxpjKAyqTTnKZMFzzkWFeXtBRuEKsctuGBgWIrEBrYdvFIVHJWaXLUTVUXblOZZgUqWu",
"postdate" : ISODate("2016-05-23T12:02:46.830Z"),
"author" : "ASWTOMMABN_19",
"title" : "CPMaqHtAdRwLXhlUvsej"
}
> db.articles.update( { _id : 18 }, { $set : { comments : [] }} )
WriteResult({ "nMatched" : 1, "nUpserted" : 0, "nModified" : 1 })](https://image.slidesharecdn.com/b2b-webinar2-ita-latuaprimaapplicazionemongodb-160607080050/75/Back-to-Basics-webinar-2-La-tua-prima-applicazione-MongoDB-25-2048.jpg)
![Aggiornare un Articolo aggiungendo Commenti
> db.articles.find( { _id :18 } ).pretty()
{
"_id" : 18,
"body" :
"KmwFSIMQGcIsRNTDBFPuclwcVJkoMcrIPwTiSZDYyatoKzeQiKvJkiVSrndXqrALVIYZxGpaMjucgXUV",
"postdate" : ISODate("2016-05-23T16:04:39.497Z"),
"author" : "USER_18",
"title" : "wTLreIEyPfovEkBhJZZe",
"comments" : [ ]
}
>](https://image.slidesharecdn.com/b2b-webinar2-ita-latuaprimaapplicazionemongodb-160607080050/75/Back-to-Basics-webinar-2-La-tua-prima-applicazione-MongoDB-26-2048.jpg)
![Aggiornare un Articolo aggiungendo i Commenti
• > db.articles.update( { _id : 18 }, { $push : { comments : { username : ”massimo", comment : "hey first post" }}} )
• WriteResult({ "nMatched" : 1, "nUpserted" : 0, "nModified" : 1 })
• > db.articles.find( { _id :18 } ).pretty()
• {
• "_id" : 18,
• "body" : "KmwFSIMQGcIsRNTDBFPuclwcVJkoMcrIPwTiSZDYyatoKzeQiKvJkiVSrndXqrALVIYZxGpaMjucgXUV",
• "postdate" : ISODate("2016-05-23T16:04:39.497Z"),
• "author" : "USER_18",
• "title" : "wTLreIEyPfovEkBhJZZe",
• "comments" : [
• {
• "username" : ”massimo",
• "comment" : "hey first post"
• }
• ]
• }
• >](https://image.slidesharecdn.com/b2b-webinar2-ita-latuaprimaapplicazionemongodb-160607080050/75/Back-to-Basics-webinar-2-La-tua-prima-applicazione-MongoDB-27-2048.jpg)
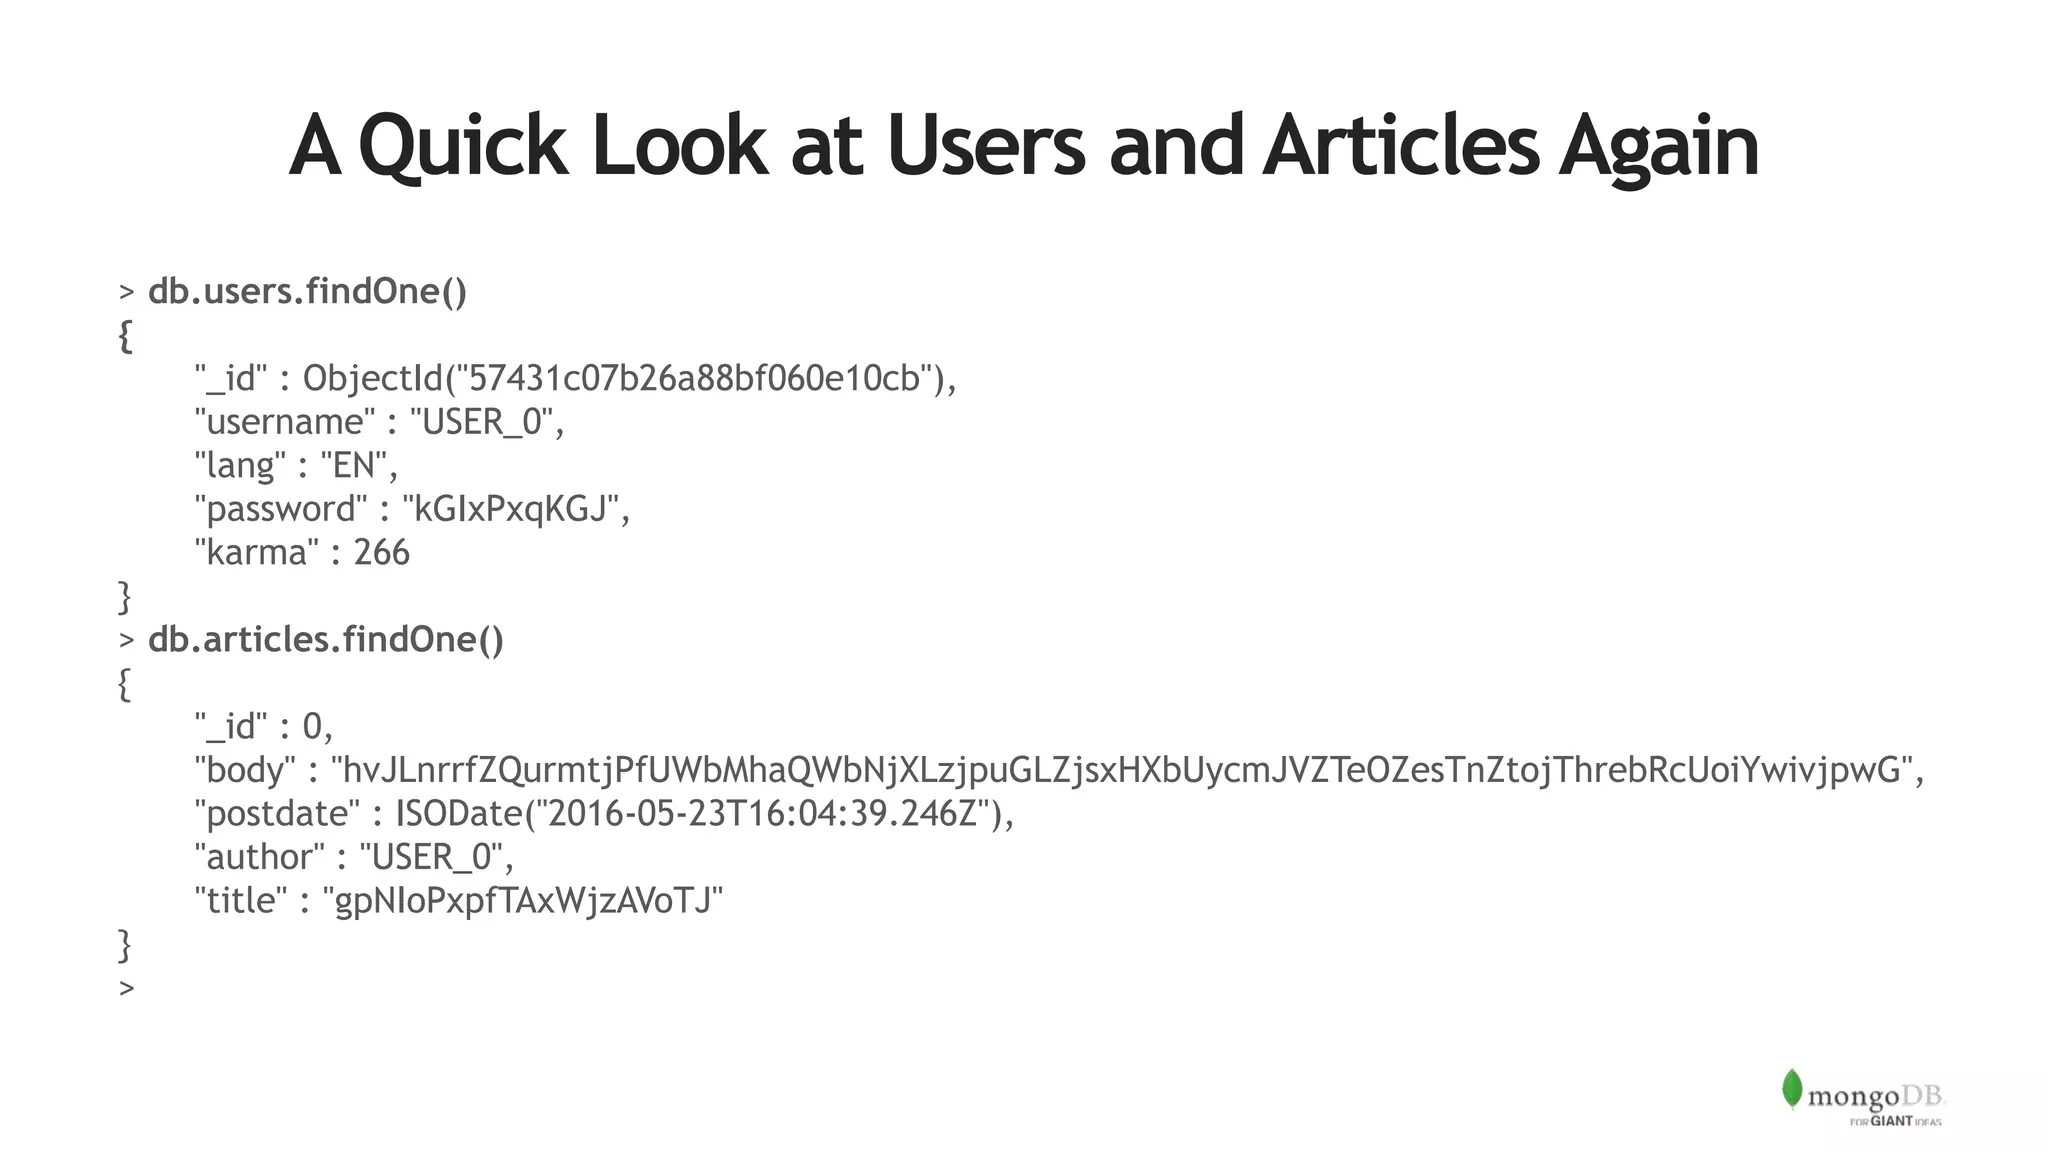
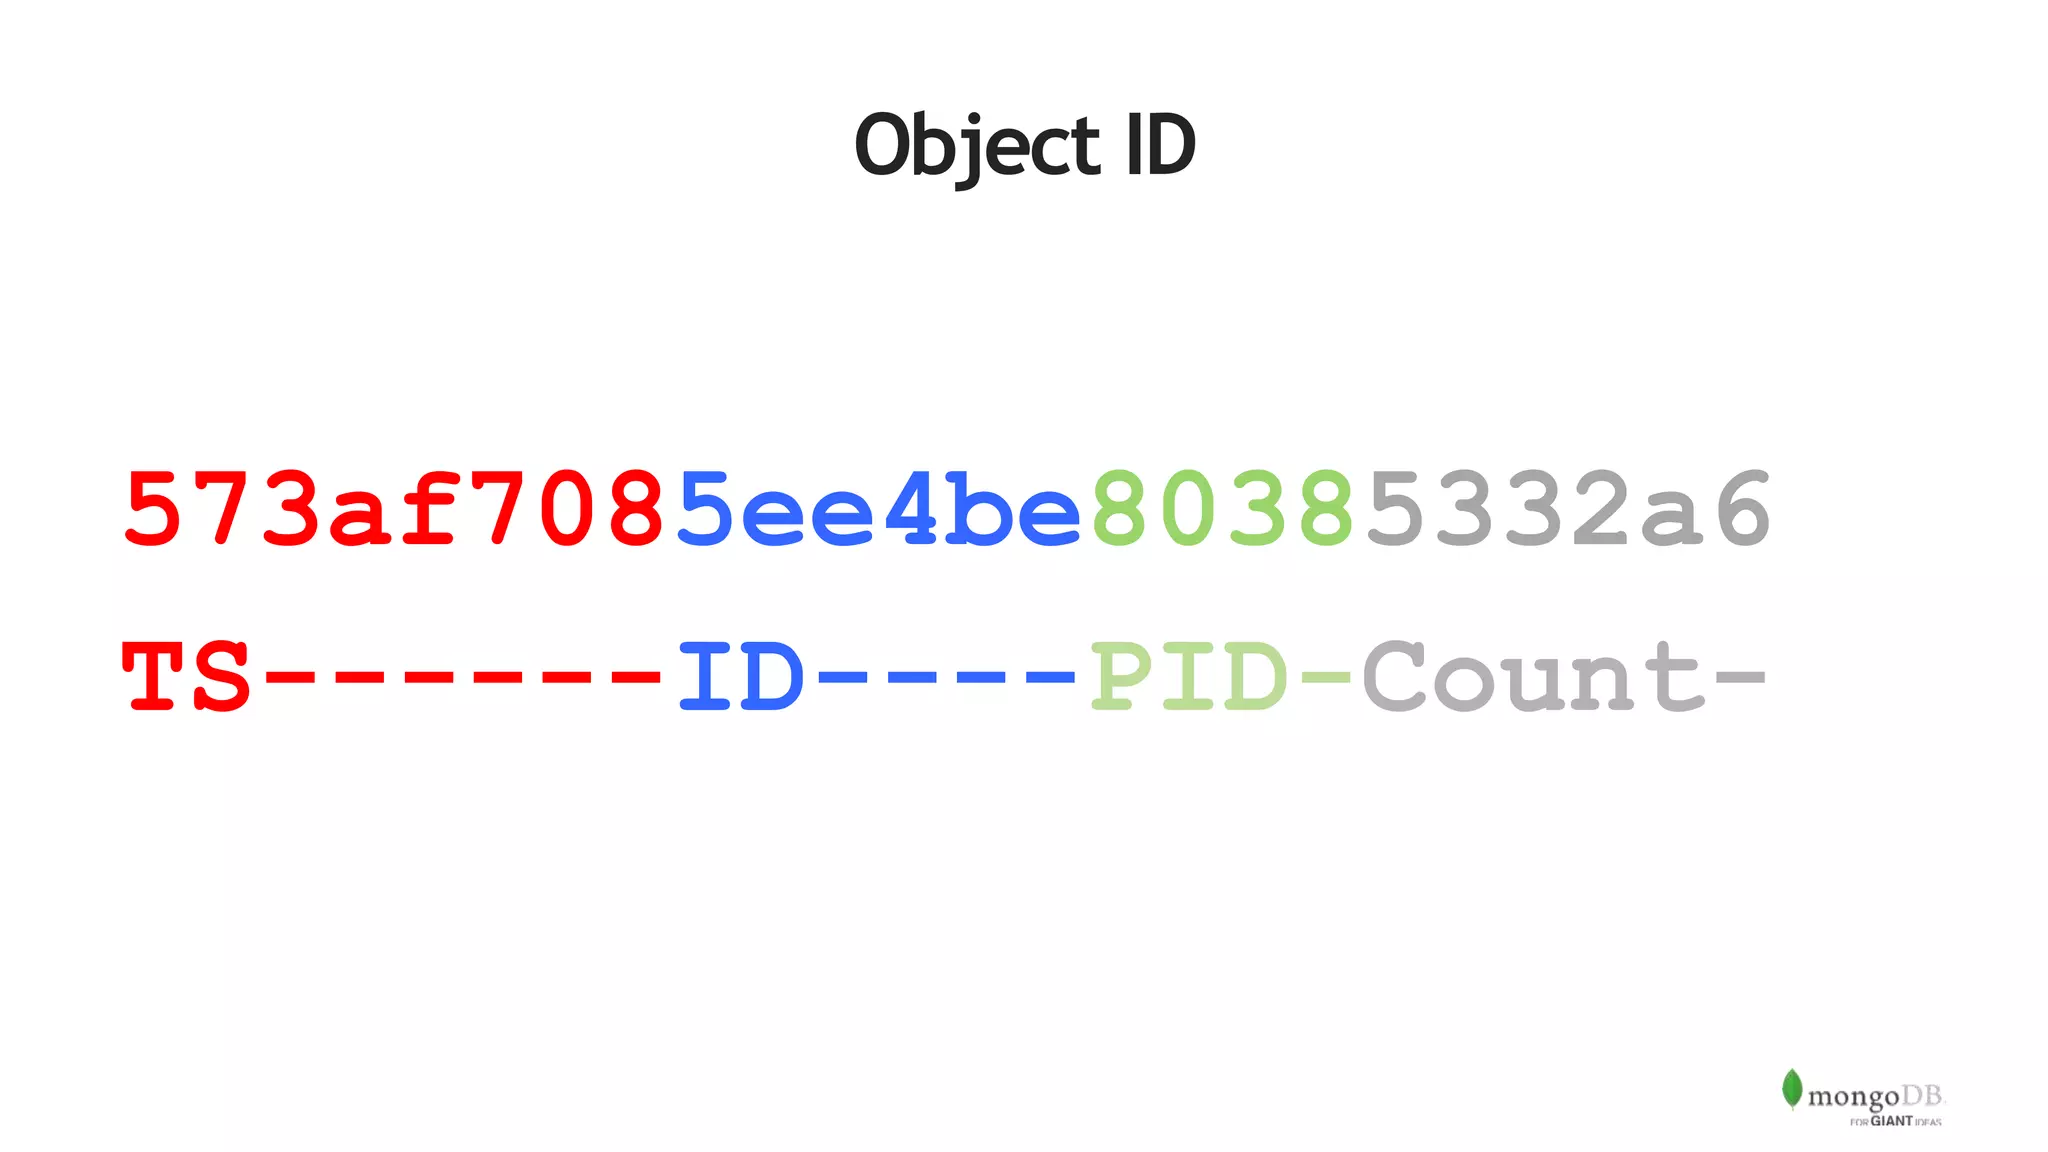
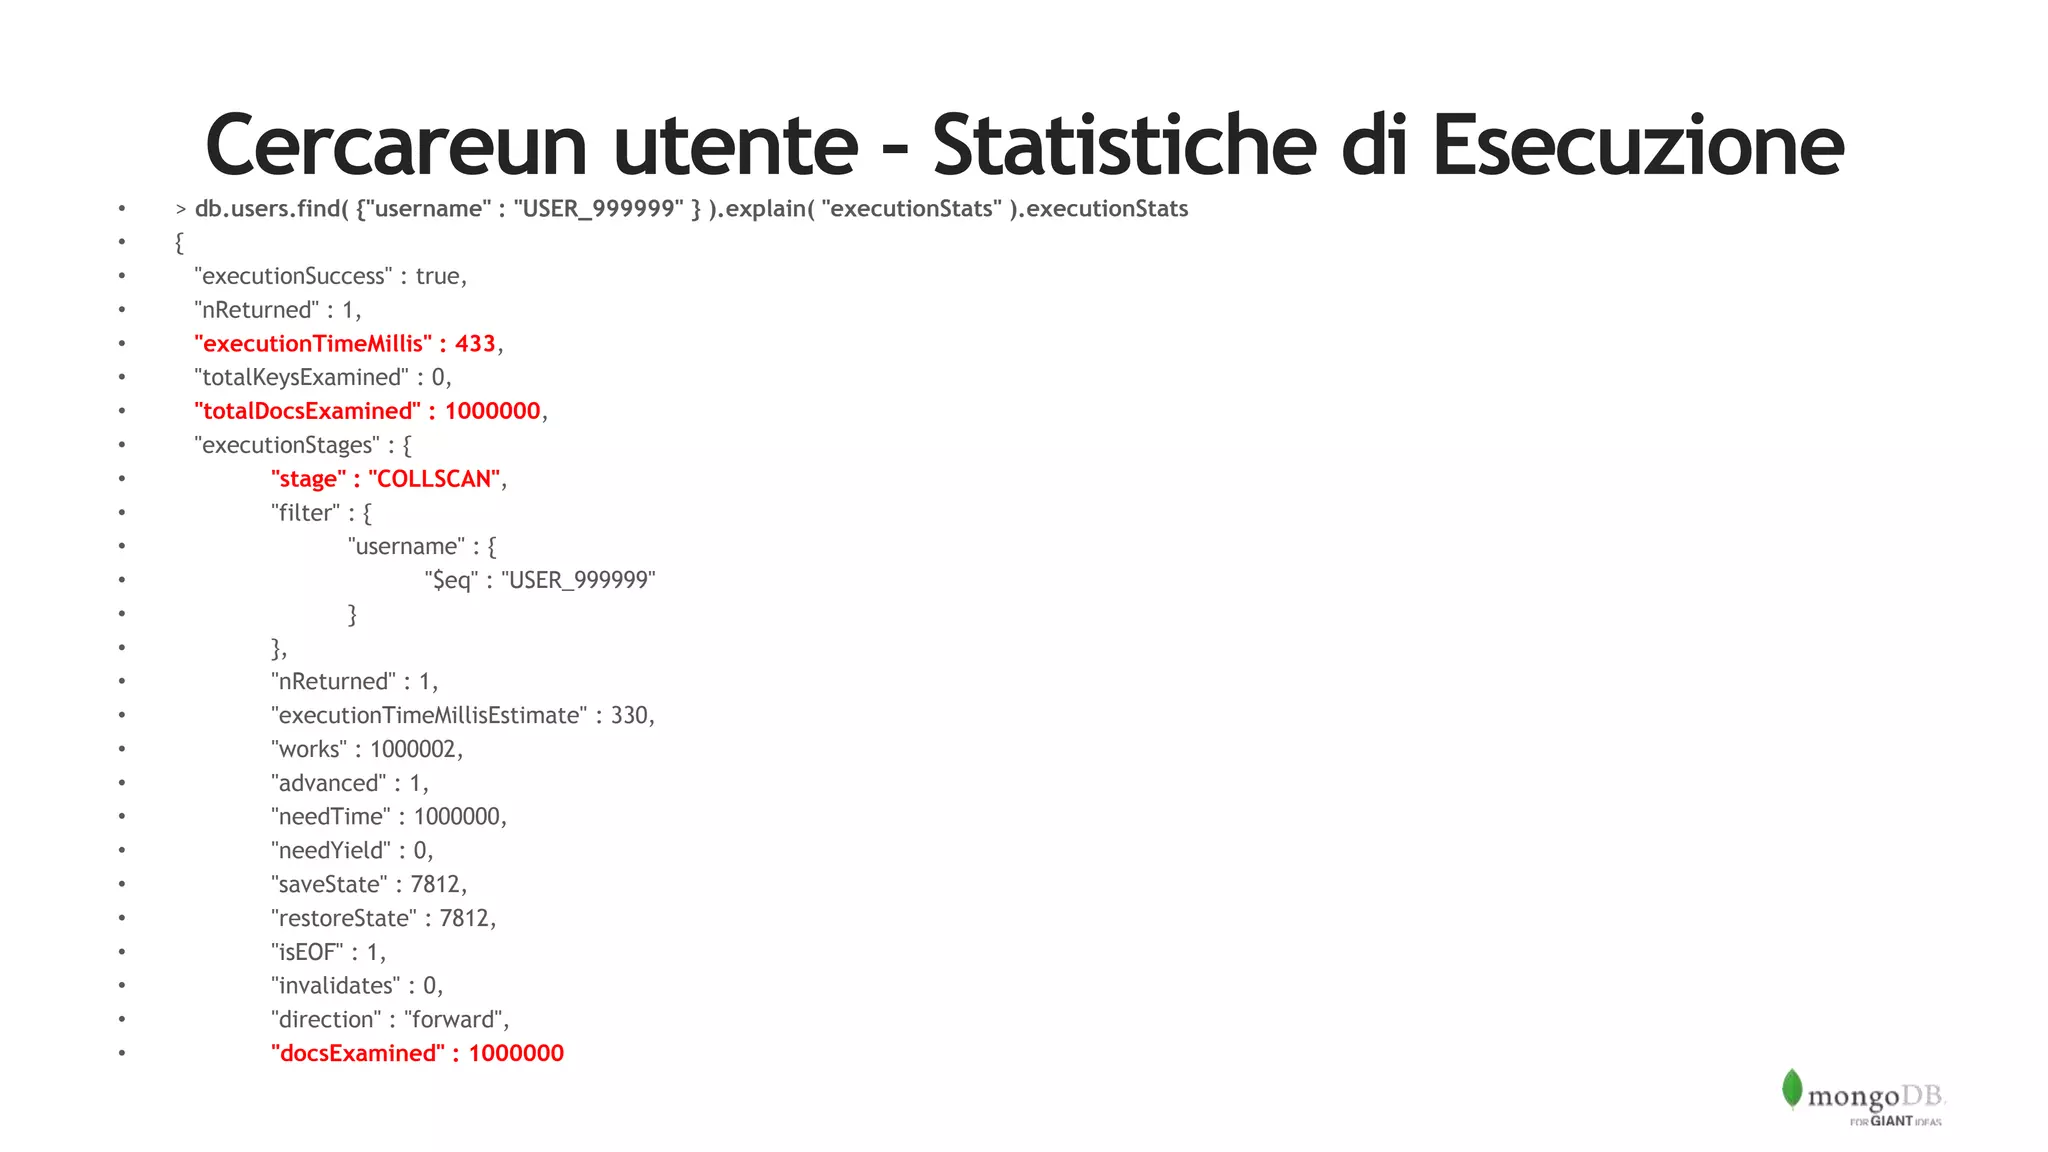
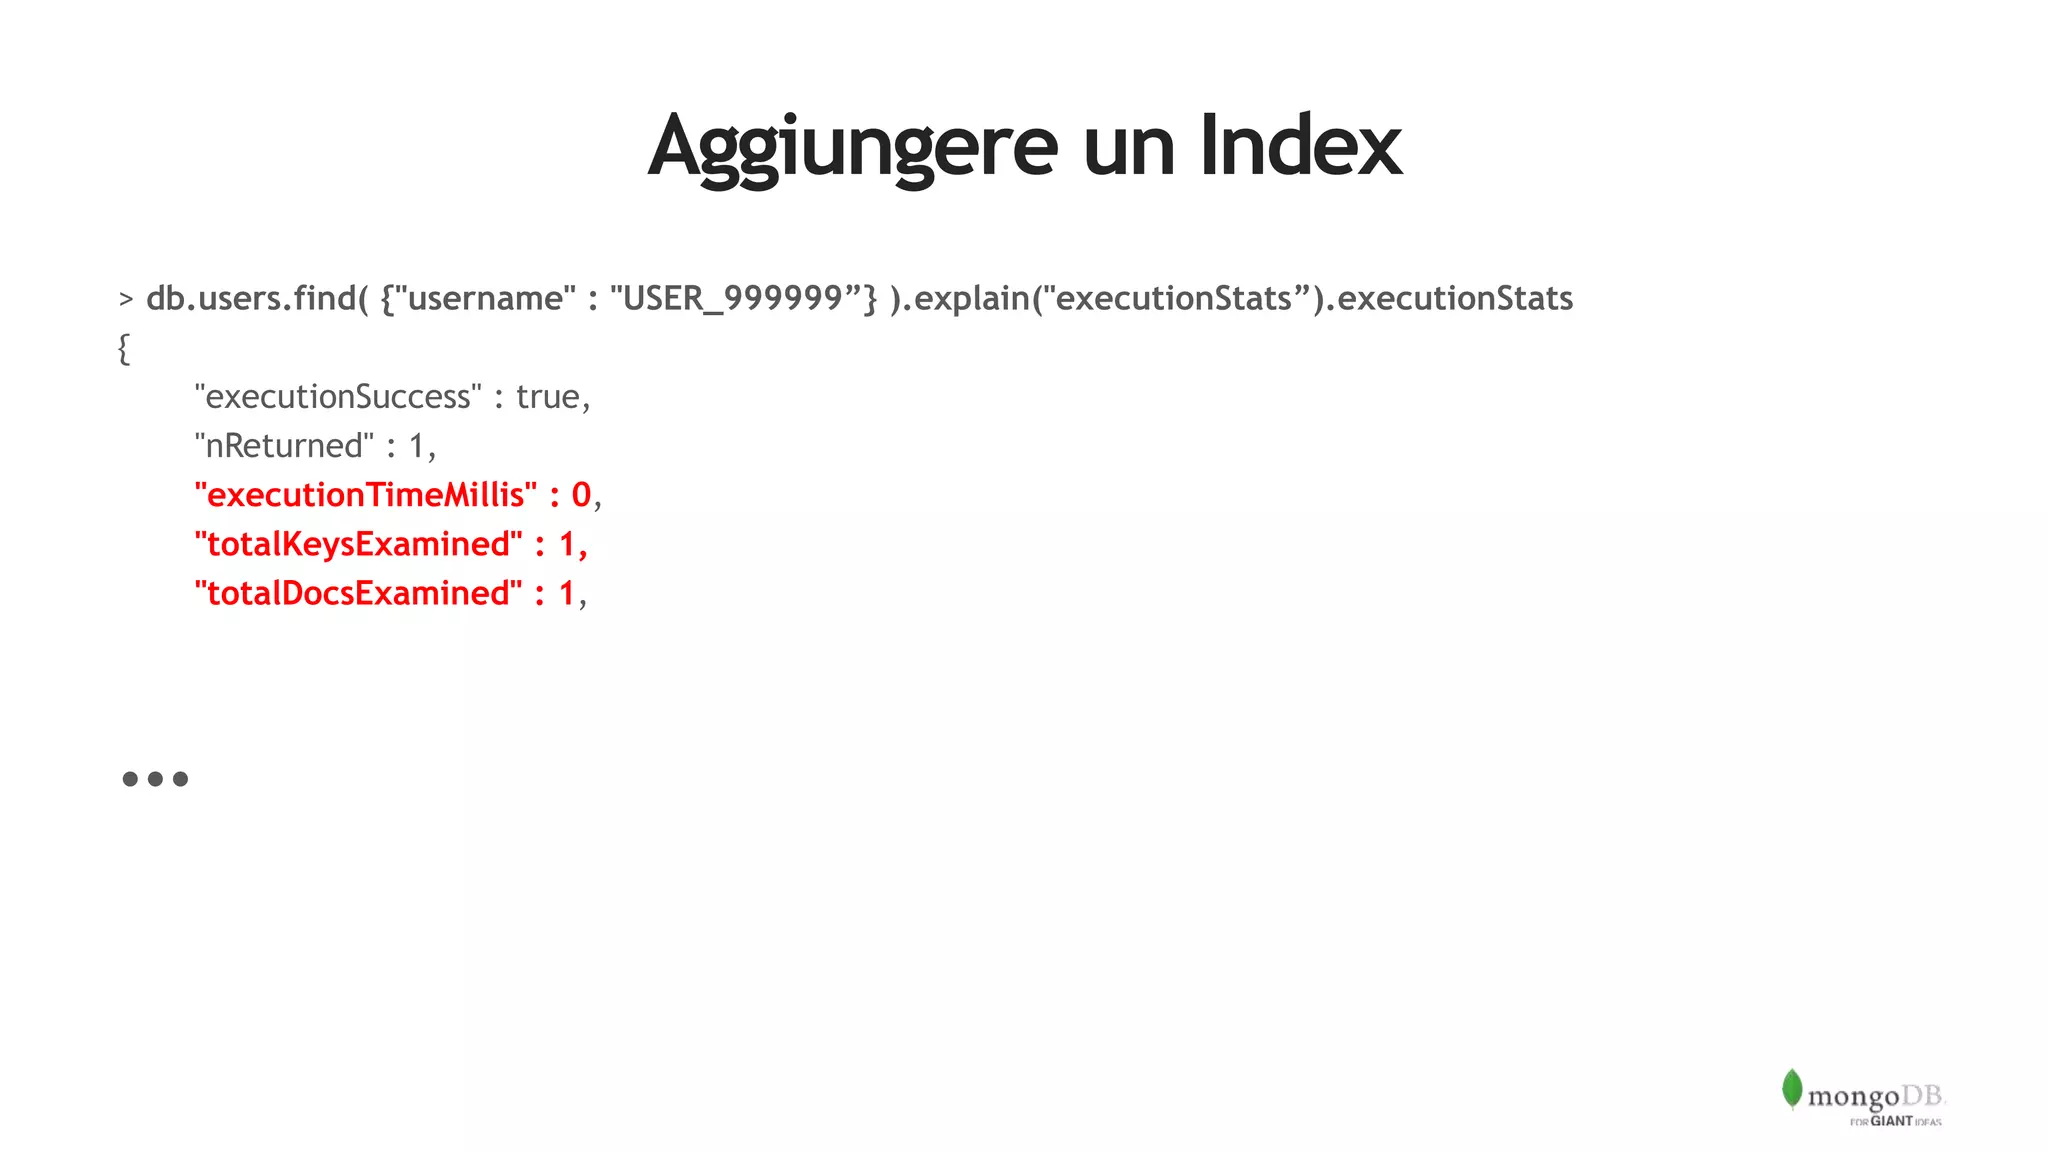
![Cercare un User
> db.users.find( { "username" : "ABOXHWKBYS_199" } ).explain()
{
"queryPlanner" : {
"plannerVersion" : 1,
"namespace" : "blog.users",
"indexFilterSet" : false,
"parsedQuery" : {
"username" : {
"$eq" : "ABOXHWKBYS_199"
}
},
"winningPlan" : {
"stage" : "COLLSCAN",
"filter" : {
"username" : {
"$eq" : "ABOXHWKBYS_199"
}
},
"direction" : "forward"
},
"rejectedPlans" : [ ]
},
"serverInfo" : {
"host" : "JD10Gen.local",
"port" : 27017,
"version" : "3.2.6",
"gitVersion" : "05552b562c7a0b3143a729aaa0838e558dc49b25"
},
"ok" : 1
}](https://image.slidesharecdn.com/b2b-webinar2-ita-latuaprimaapplicazionemongodb-160607080050/75/Back-to-Basics-webinar-2-La-tua-prima-applicazione-MongoDB-30-2048.jpg)
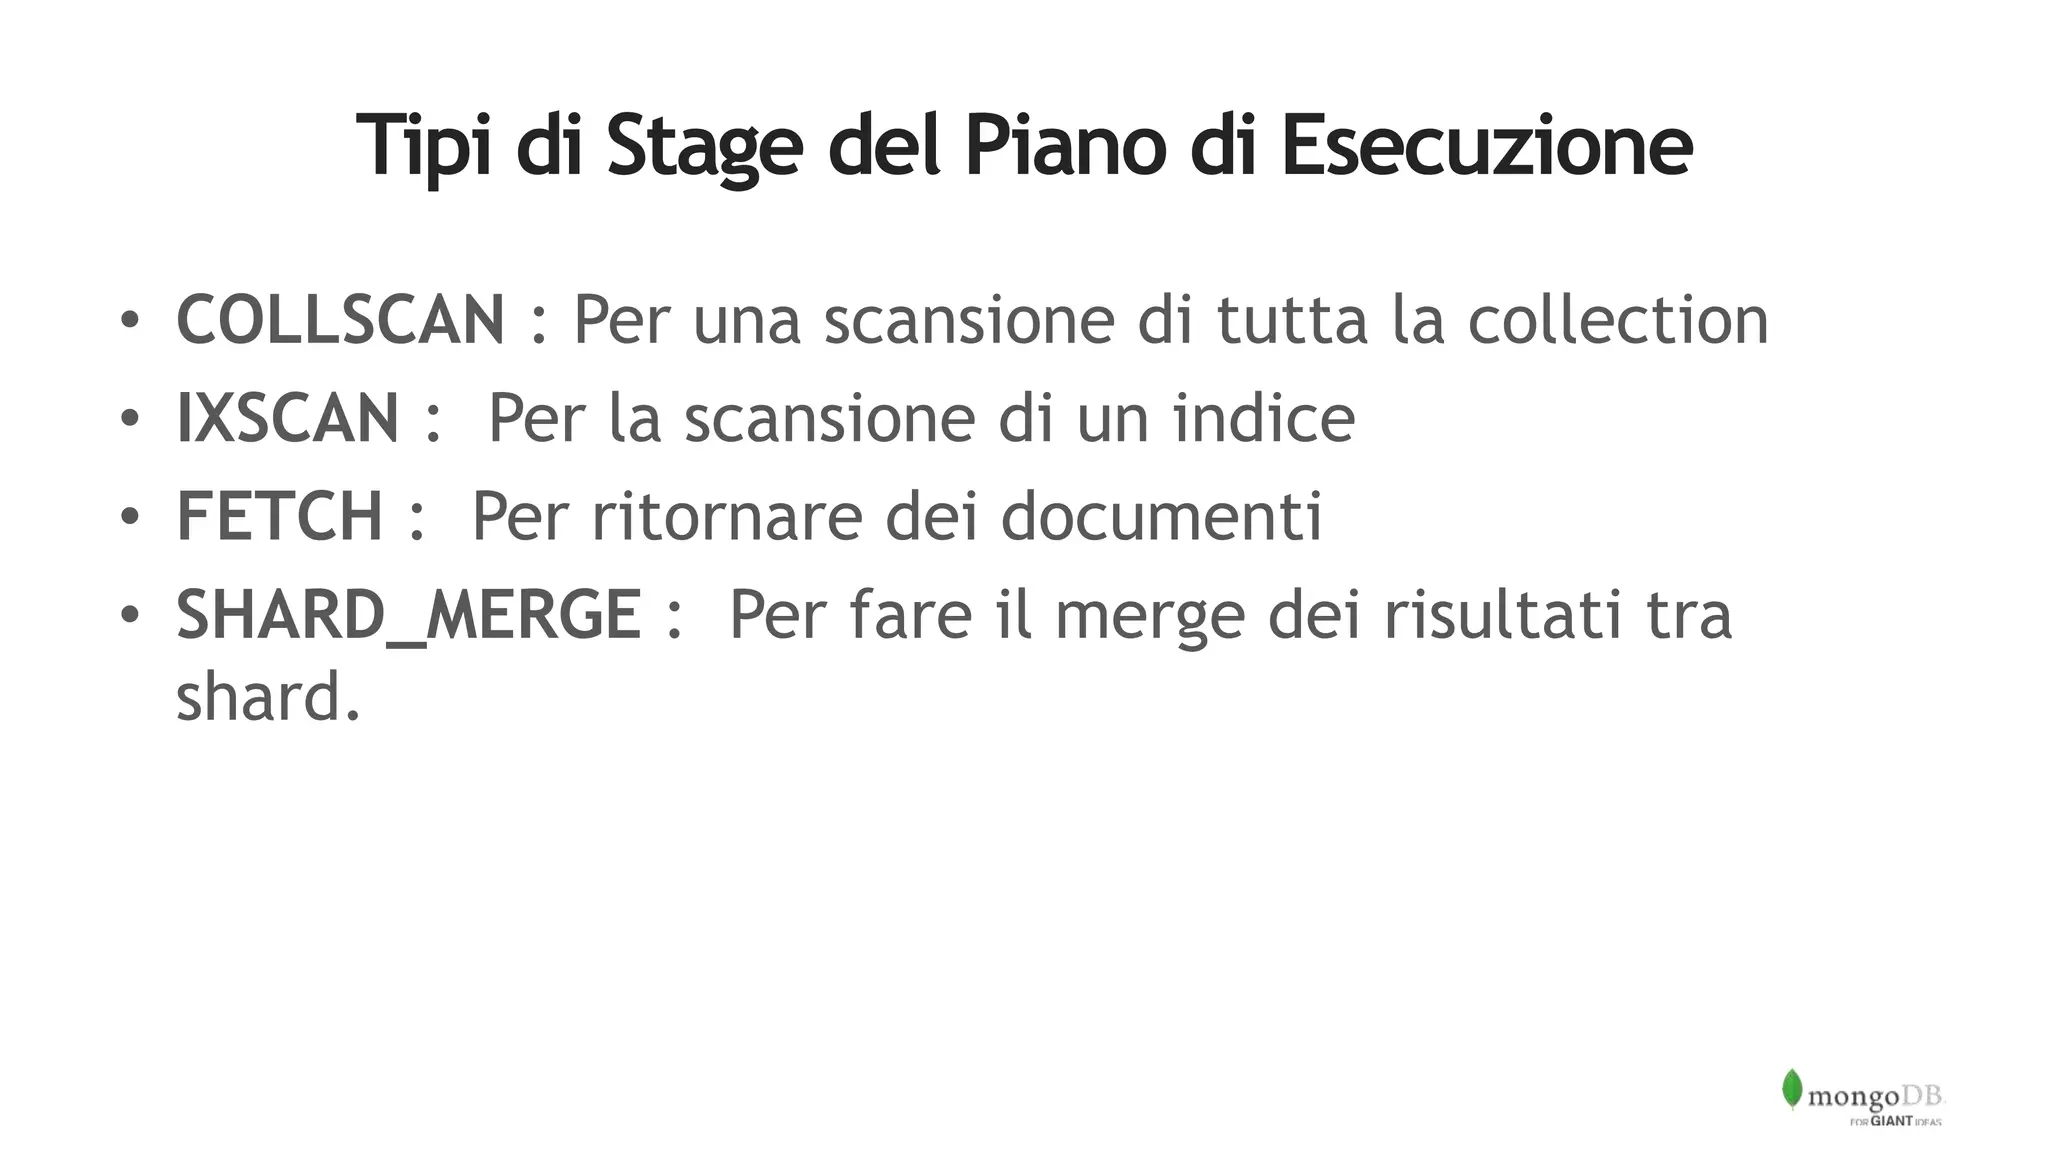
![Execution Stage
"executionStages" : {
"stage" : "FETCH",
"nReturned" : 1,
"executionTimeMillisEstimate" : 0,
"docsExamined" : 1,,
"inputStage" : {
"stage" : "IXSCAN",
"nReturned" : 1,
"executionTimeMillisEstimate" : 0,
"keyPattern" : {
"username" : 1
},
"indexName" : "username_1",
"isMultiKey" : false,
"isUnique" : false,
"isSparse" : false,
"isPartial" : false,
"indexVersion" : 1,
"direction" : "forward",
"indexBounds" : {
"username" : [
"["USER_999999", "USER_999999"]"
]
},
"keysExamined" : 1,
"seenInvalidated" : 0
}
}
}](https://image.slidesharecdn.com/b2b-webinar2-ita-latuaprimaapplicazionemongodb-160607080050/75/Back-to-Basics-webinar-2-La-tua-prima-applicazione-MongoDB-36-2048.jpg)


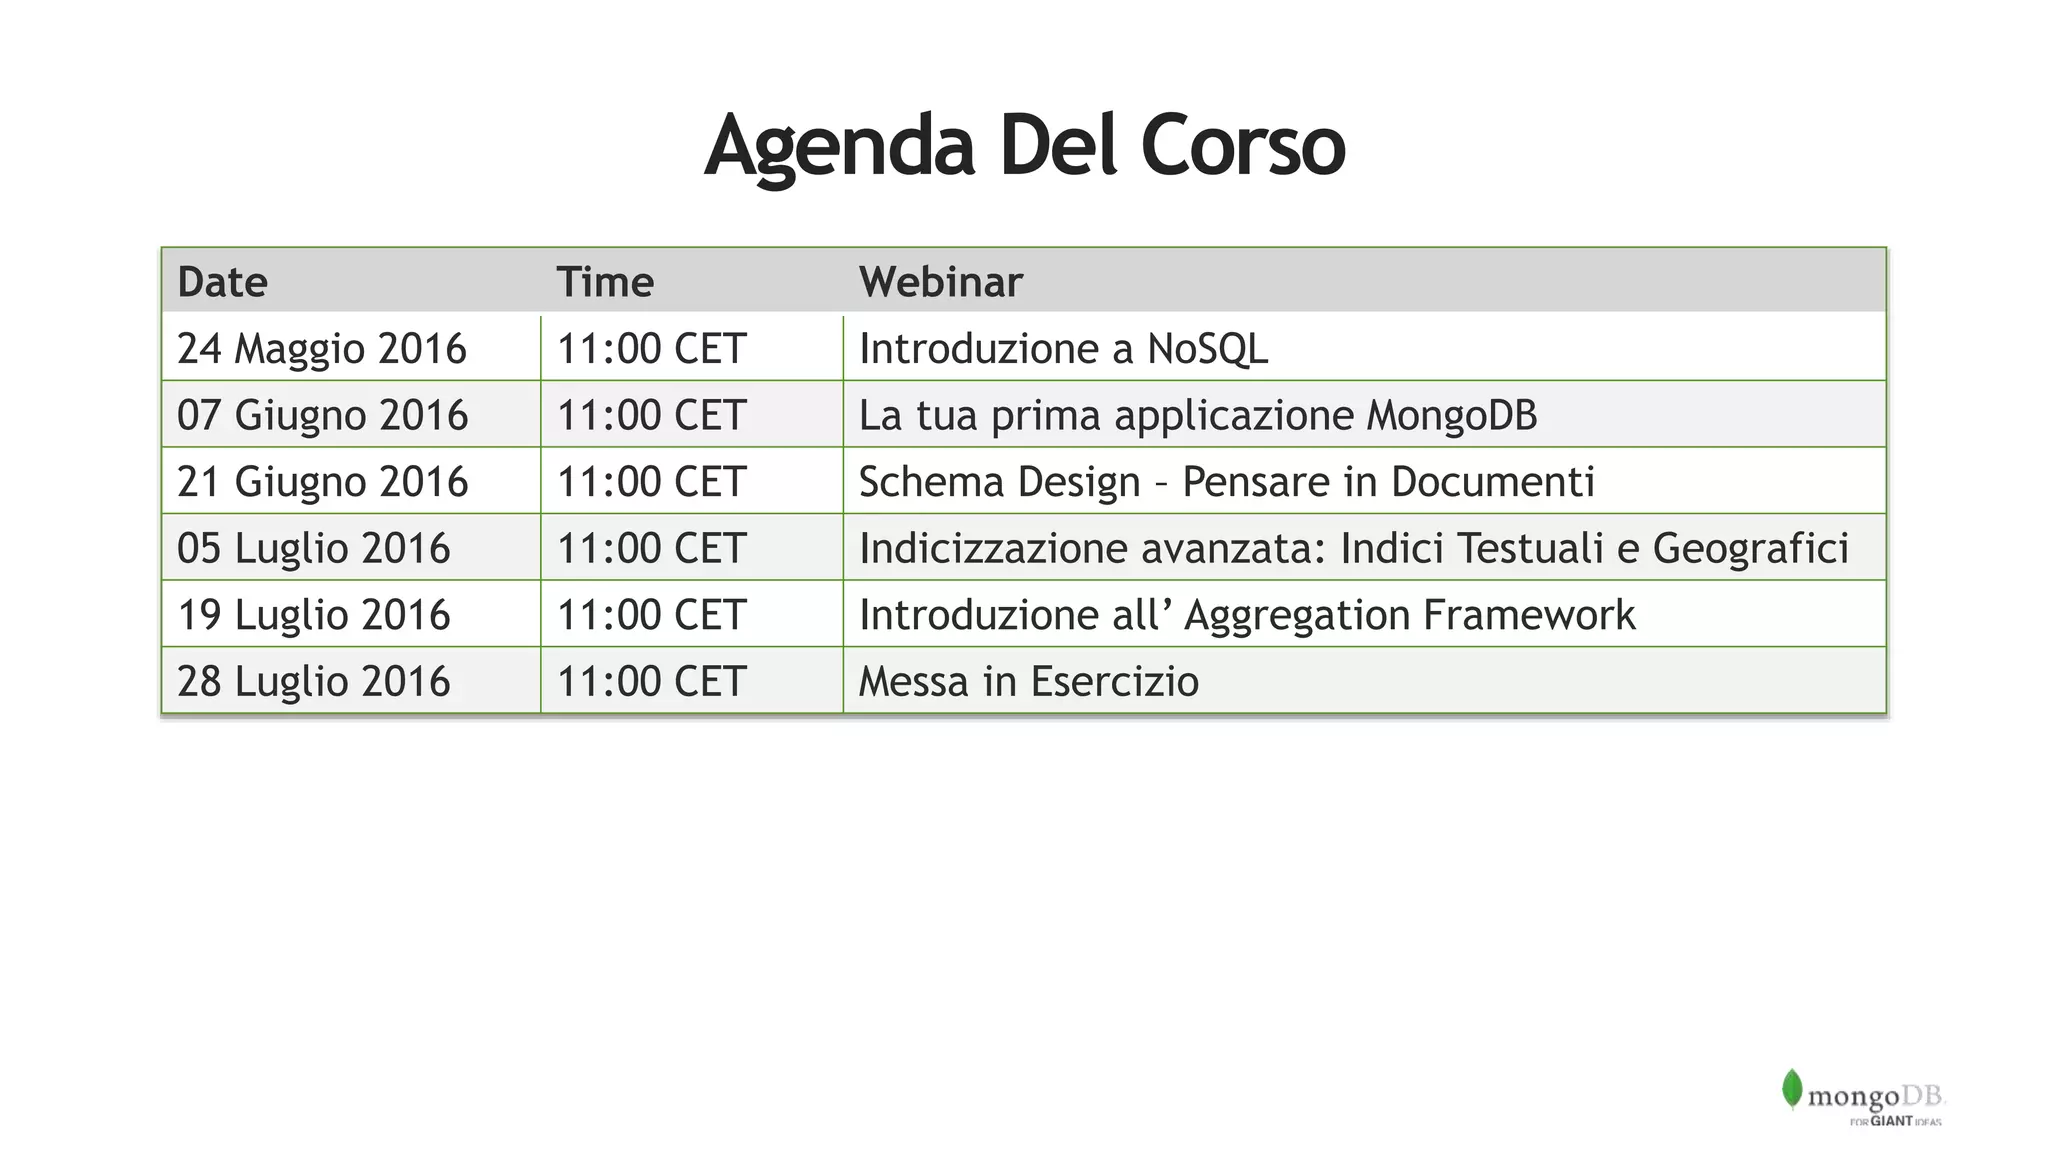
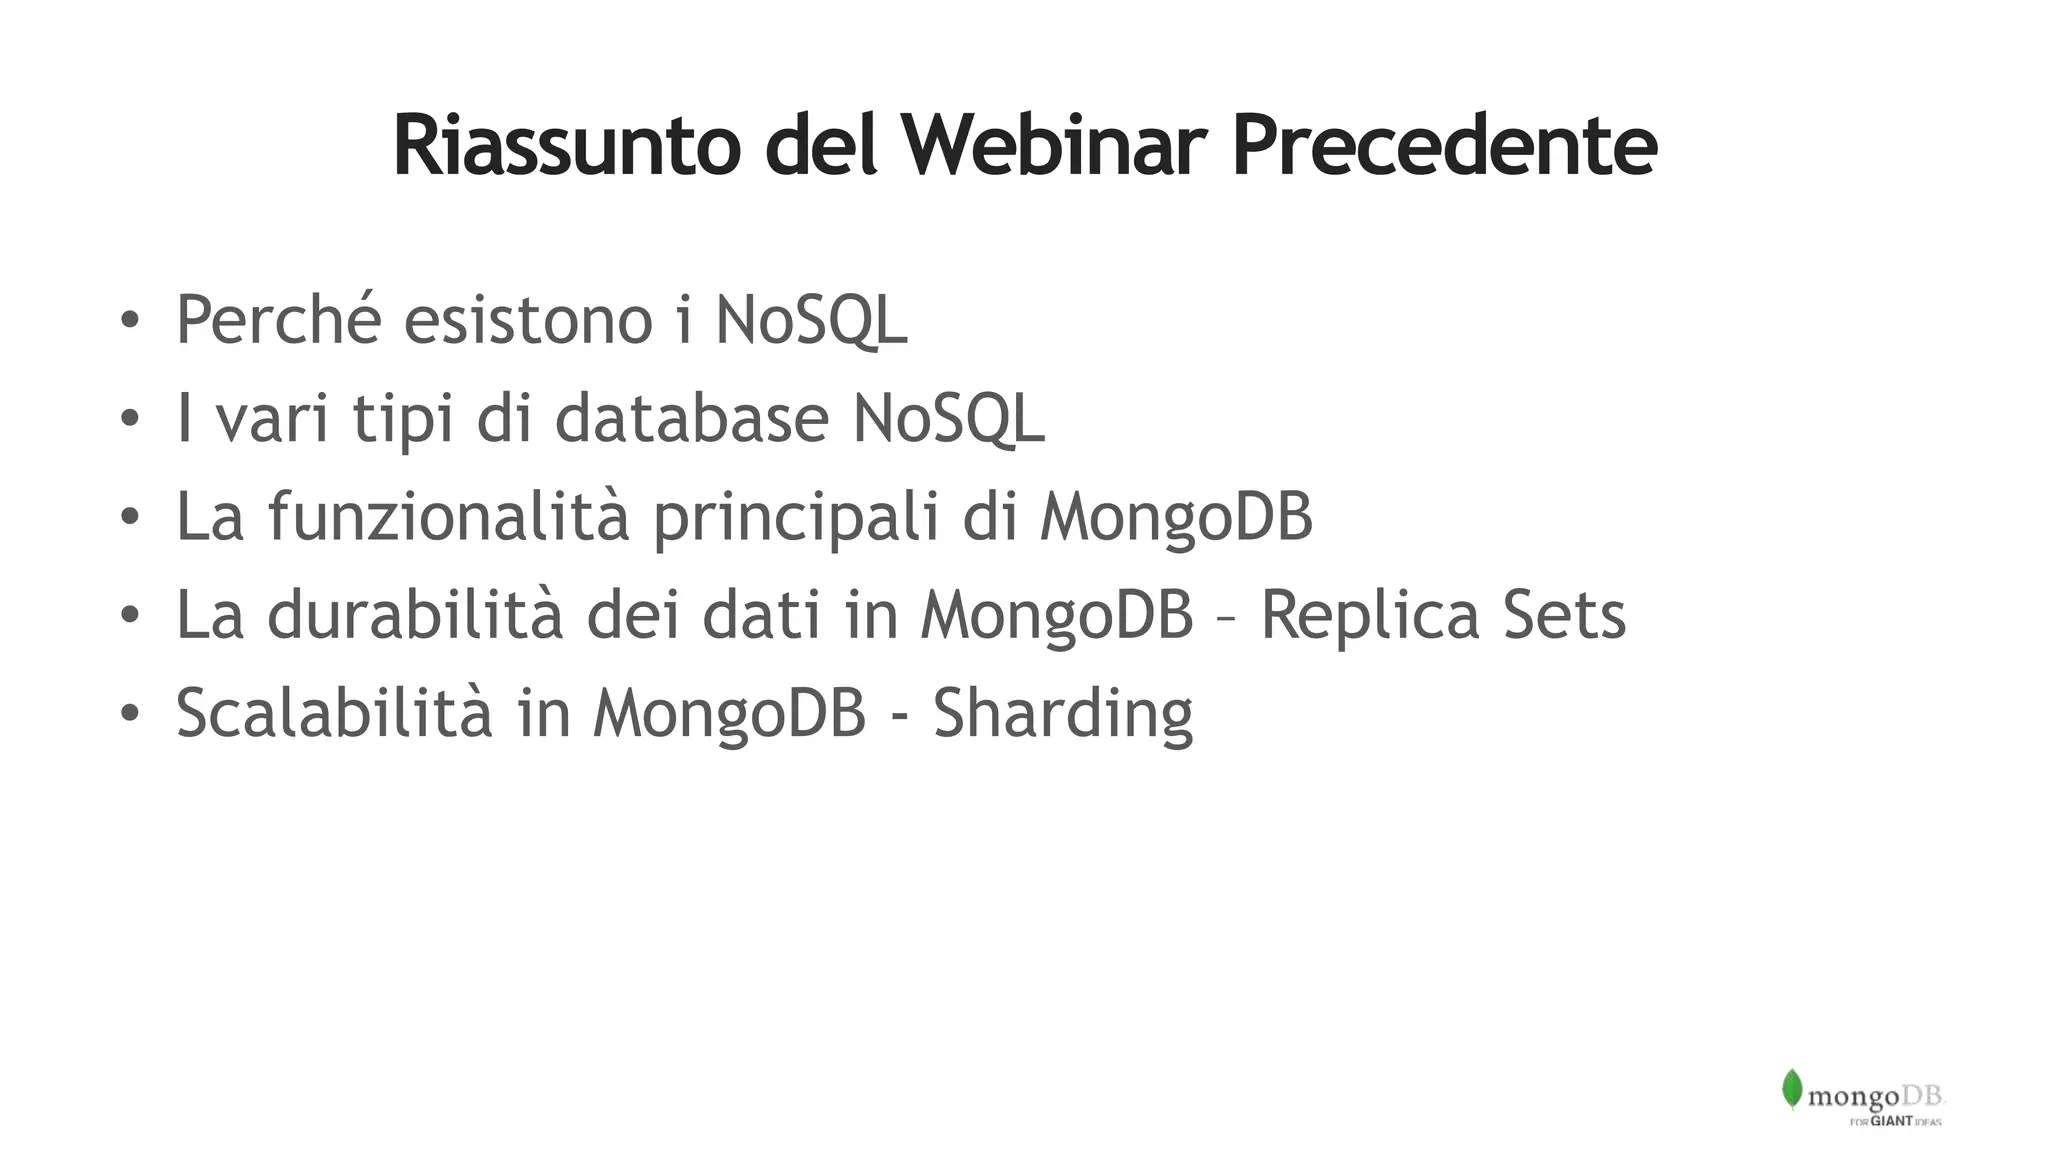
The document outlines a series of webinars focused on MongoDB basics, scheduled from May to July 2016, led by Massimo Brignoli. It includes technical guidance on setting up MongoDB, creating a basic blogging application, and various MongoDB functionalities like indexing and data aggregation. Additionally, it provides code snippets demonstrating how to interact with MongoDB using Python and includes example database operations.


![MongoDB .local San Francisco 2020: Powering the new age data demands [Infosys]](https://cdn.slidesharecdn.com/ss_thumbnails/315pminfosysfinalsfoversionvocalpart1-200120221508-thumbnail.jpg?width=640&height=640&fit=bounds)