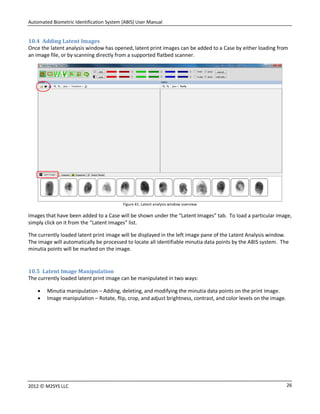
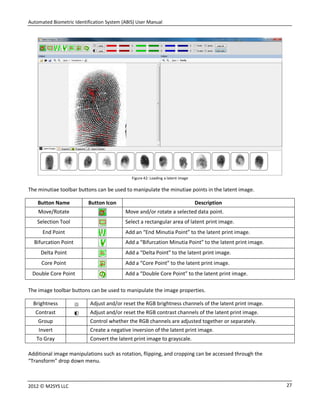
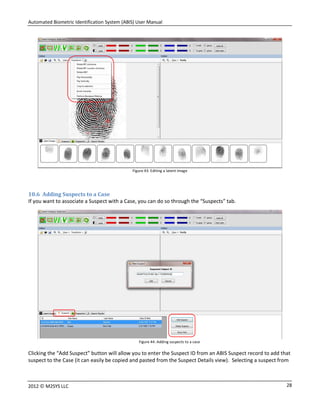
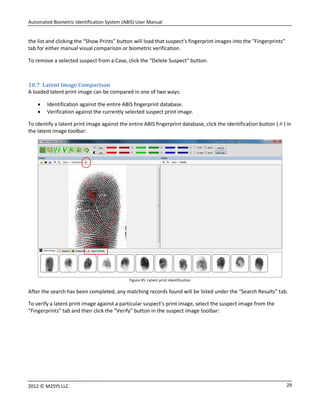
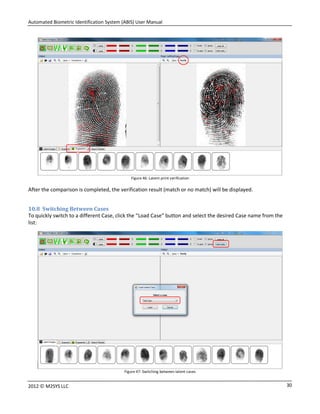
Automated Biometric Identification System (ABIS)
User Manual
Automated Biometric Identification System (ABIS) User Manual
22012 © M2SYS LLC
Contents
1. Login to ABIS............................................................................................................................................ 3
2. Dashboard ............................................................................................................................................... 3
3. Adding New Subjects................................................................................................................................ 4
3.1 Demographic Information................................................................................................................. 4
3.2 Additional Information........................................................................................................................... 4
3.3 Images.............................................................................................................................................. 5
3.4 Fingerprint Capture .......................................................................................................................... 6
4. Subject List............................................................................................................................................... 8
5. Subject Search.......................................................................................................................................... 9
5.3 Biometric Search .............................................................................................................................. 9
5.4 Text Search..................................................................................................................................... 13
6. Importing and Exporting Subjects........................................................................................................... 13
6.3 Export Subject to NIST .................................................................................................................... 13
6.4 Import Subject from NIST ............................................................................................................... 14
7. Report Generation ................................................................................................................................. 14
8. Activity Log ............................................................................................................................................ 17
9. Application Configuration....................................................................................................................... 19
9.3 User Management.......................................................................................................................... 19
9.4 Database Configuration.................................................................................................................. 22
9.5 Module Settings ............................................................................................................................. 22
9.6 General Settings ............................................................................................................................. 22
9.7 Fingerprint Card Configuration ....................................................................................................... 23
10. Latent Analysis ................................................................................................................................... 24
10.3 Adding New Cases .......................................................................................................................... 25
10.4 Adding Latent Images..................................................................................................................... 26
10.5 Latent Image Manipulation............................................................................................................. 26
10.6 Adding Suspects to a Case .............................................................................................................. 28
10.7 Latent Image Comparison............................................................................................................... 29
10.8 Switching Between Cases ............................................................................................................... 30
Automated Biometric Identification System (ABIS) User Manual
32012 © M2SYS LLC
This document will cover the basic functionality of the M2SYS ABIS software.
1. Login to ABIS
Access to the ABIS software is restricted by user login accounts. When you launch ABIS you will be prompted to
log in with such an account.
Figure 1: ABIS login screen
In the Login screen enter a valid User Name and Password and Click “Login” button.
Default Username Admin
Default Password admin
You can change the default username and password, or create additional user accounts from the User
Management section of the software Application Configuration.
2. Dashboard
Once you have logged into ABIS, you will be welcomed by the Dashboard. This screen provides you with a
variety of at-a-glance information about the activity of the ABIS system.
Figure 2: Dashboard
Automated Biometric Identification System (ABIS) User Manual
42012 © M2SYS LLC
3. Adding New Subjects
The persons who are enrolled in ABIS are referred to as “Subjects”. To add a new Subject to ABIS, either click
the “Add Subject” ribbon button, or “Add A New Subject” in the navigation bar. Adding a new Subject will bring
up the Subject Details view where you can begin entering information about the Subject.
Figure 3: Adding a new subject
A Subject record typically consists of multiple separate parts:
 Demographic information
 One or more images
 Biometric templates
Exactly what kind of biometric templates can be captured may vary depending on which modules are enabled
within ABIS.
Note: The term “Subject”, like nearly every other string displayed in the ABIS user interface, can be customized
through external language files.
3.1 Demographic Information
Provide all of the appropriate textual demographic information for the Subject. Click the “Next” button to
proceed to image acquisition.
3.2 Additional Information
Then enter Additional information and click “Next” button as shown bellow
Automated Biometric Identification System (ABIS) User Manual
52012 © M2SYS LLC
Figure: Additional information
3.3 Images
Images can be added to a Subject record in one of two ways:
a) Capture from webcam, by clicking the button.
b) Load Image file, by clicking the button.
Figure 5: Capture or load subject image
Automated Biometric Identification System (ABIS) User Manual
62012 © M2SYS LLC
Webcam Capture Process
1. Select the image category from the dropdown box at the upper right corner.
Figure 6: Capturing an image from webcam
2. Click the webcam button at the upper-left corner. The video feed from the webcam will be shown.
3. Click the “Capture” button at the lower left-corner which will show the captured image.
4. Click the “Save” button at the lower right corner.
Default Images
Each Subject will have one image that is “default”, meaning that it will be the representative image that is
displayed in the Subject details view. To set an image as “default” for a Subject, click the checkmark ( )
button.
Removing Images
To remove an image from a Subject record, click the trash can ( ) button.
3.4 Fingerprint Capture
Fingerprints for a Subject can be added in one of two ways:
a) Capturing from a Live Fingerprint Scanner
b) Loading/Scanning from a Fingerprint Card
12
3 4
Automated Biometric Identification System (ABIS) User Manual
72012 © M2SYS LLC
Figure 7: Subject fingerprint details
For capturing fingerprints from live scanner, select the “Live Scanner” radio button, and then click the
“Register” button. Follow the on-screen prompts to perform the fingerprint captures.
Figure 8: Fingerprint capture process
When fingerprint capture is finished, they will be shown in the Subject Details view:
Figure 9: Subject fingerprint details - Images
Automated Biometric Identification System (ABIS) User Manual
82012 © M2SYS LLC
4. Subject List
The entire Subject list can be viewed clicking the “Subjects” ribbon button, or “Show All Subjects” in the
navigation bar, as shown below:
Figure 10: Subject list
To view a specific Subject’s details double click on its entry in the list. The Subject details will be shown:
Figure 11: Subject details
The “default” image will be displayed in the main Subject Details view, along with the demographic information.
Biometric images, as well as non-default images can be displayed by selecting the appropriate tab under the
Subject Details view.
Automated Biometric Identification System (ABIS) User Manual
92012 © M2SYS LLC
5. Subject Search
5.3 Biometric Search
To perform a fingerprint biometric search, click the “Fingerprint” ribbon button in the “Biometric Search”
section, or click the “Fingerprint” navigation button in “Biometric Search” section. Additionally, from the
biometric search results list, you can select the biometric search type and click the “New Search” button:
Figure 12: Subject biometric search – Start a search
Before the fingerprint search process starts, you are prompted to enter a description for the search. The
description can used to help you locate the search at a later time. If no description entered, current timestamp
will be used by default.
Automated Biometric Identification System (ABIS) User Manual
102012 © M2SYS LLC
Figure 13: Subject biometric search - Description
Once a description has been provided, the biometric fingerprint data will be captured:
Figure 14: Fingerprint capture process
After capturing the fingerprint data they will be shown in the search screen:
Automated Biometric Identification System (ABIS) User Manual
112012 © M2SYS LLC
Figure 15: Subject biometric search
The click the “Search” button to perform the biometric search.
When the search process has finished, the search results will be shown at right side of the screen. Double-
clicking on a record in the search results will open that Subject details.
Figure 16: Search results
Adding New Subject from Non-Matching Biometric Search
When a Subject search fails to find a match (e.g. the Subject is not present in ABIS) you have the option to add a
new Subject using the biometric data from the search:
Automated Biometric Identification System (ABIS) User Manual
122012 © M2SYS LLC
Figure 17: Add subject from non-matched biometric search
After clicking the “Yes” button you will be brought to the normal “Adding a New Subject” process.
Another way to add Subject from search data is by clicking the ribbon icon “Register from Search Data” to view
the search records which were not found in ABIS:
Figure 18: List of failed searches
After selecting a record from the list of failed searches, click the “Enroll Subject” button to create a new Subject
from the biometric data of the selected search.
The search data can also be merged with an existing Subject record by clicking the “Merge with Existing Subject”
button. Enter the desired Subject ID in the “Existing Subject Selection” window.
Automated Biometric Identification System (ABIS) User Manual
132012 © M2SYS LLC
Figure 19: Merging search data with an existing subject
5.4 Text Search
Subjects can be searched using their demographic data through the Text Search screen. Click the “Text Search”
ribbon button then enter the search string in the corresponding fields. Click the “Search” button to submit.
Figure 20: Subject text search
6. Importing and Exporting Subjects
6.3 Export Subject to NIST
For exporting Subject information to NIST file, go to the details screen of that Subject. Then click the “Export
NIST” button, select the folder to export the file to. The file will be saved with the Subject’s name and a unique
GUID identifier.
Automated Biometric Identification System (ABIS) User Manual
142012 © M2SYS LLC
Figure 21: Exporting subject record to NIST file
6.4 Import Subject from NIST
For importing Subject from a NIST file, please go to the Subjects list, and then click the “Import from NIST”
button, and browse the desired NIST file on your computer.
Figure 22: Importing subject record from NIST file
7. Report Generation
In the Subjects detail view click the “Generate Report” button for report generation:
Automated Biometric Identification System (ABIS) User Manual
152012 © M2SYS LLC
Figure 23: Subject report generation
From the generated report it can be saved as PDF, Excel and can also be printed directly by printer.
Button Name Button Icon Description
Print Print the report to printer.
Print Preview Preview what the printed report will look like.
Page Setup Change the printed page setup properties.
Save Save the report contents to an Excel or PDF file.
Automated Biometric Identification System (ABIS) User Manual
162012 © M2SYS LLC
Figure 24: View Report
Automated Biometric Identification System (ABIS) User Manual
172012 © M2SYS LLC
Figure 25: Report View (Continued)
8. Activity Log
To view the Activities related to a Subject, click the “Subject Activities” tab:
Automated Biometric Identification System (ABIS) User Manual
182012 © M2SYS LLC
Figure 26: Subject activities
After clicking the “Subject Activities” tab the list of Activities will be shown:
Figure 27: Subject activities list
Automated Biometric Identification System (ABIS) User Manual
192012 © M2SYS LLC
9. Application Configuration
9.3 User Management
Click the ribbon button “Application Configuration” then select the “User Management” section there. By
default list of existing user will be shown in “View Users” tab.
Figure 28: User management
For adding a new user account, click the “Add User” button. To edit an existing user, select that and click the
“Edit User” button. After entering the user information click the “Save” button.
Figure 29: User management – User details
If a user is no longer required then you can deactivate it by uncheck the “Active User” check box.
Automated Biometric Identification System (ABIS) User Manual
202012 © M2SYS LLC
Select the “View Roles” tab to view the list of existing user roles in the system. To add a new user role click the
“Add Role” button. To edit an existing user role, select the role and click “Edit Role”.
Figure 30: User management – View roles
Figure 31: User management - Role details
If a Role is no longer required you can deactivate it by uncheck the “Active Role” check box.
For assigning privileges to a user role select the “Role Privileges” tab and select the desired role from the drop-
down list.
Automated Biometric Identification System (ABIS) User Manual
212012 © M2SYS LLC
Figure 32: User management - Role selection
After selecting a role in the dropdown list all the privileges of that Role will be displayed (if there is any). To
change the privileges associated with a role, check or uncheck the entries in the drop-down list, and click the
button “Save Privileges”.
Figure 33: User management - Editing role privileges
Automated Biometric Identification System (ABIS) User Manual
222012 © M2SYS LLC
9.4 Database Configuration
Please select the “Database Configuration” section. Existing database and database connection string will be
displayed there.
Figure 34: Database configuration
Database and Database connection string can be changed, tested and saved here. After changing the database
connection string, the database connection can be tested using the “Test Connection String” button, and then
saved.
9.5 Module Settings
The various modules of the ABIS software can be configured here. These settings should never need to be
changed once the initial installation and setup has been completed. Please contact your ABIS system
administrator if you have any questions about this information.
9.6 General Settings
For General Settings please select the “General Settings” section. Here you will be able to configure the
Application Logo which will be shown at the upper right corner of the application. Also you can configure the
splash Logo which will be displayed at the Login time.
Automated Biometric Identification System (ABIS) User Manual
232012 © M2SYS LLC
Figure 37: General Settings
General Settings also include:
Help File: Here if you set a file that will be open when you will click the ribbon button ‘Help’.
Language File Path: From this path ABIS will load the language on login time will show the language accordingly.
License Settings: You can configure the License server, port and string here according to which ABIS will load the
license for biometric operation.
9.7 Fingerprint Card Configuration
In order to extract each fingerprint from a scanned fingerprint card, an overlay must be positioned over the
scanned image by the operator to accurately mark where each fingerprint region is located within the image.
The layout of this overlay is stored in an XML file which can be adjusted within this configuration module.
Automated Biometric Identification System (ABIS) User Manual
242012 © M2SYS LLC
Figure 38: Fingerprint card layout configuration
The width of each cell can be adjusted by changing the values in the “Width” fields. Please note that the total
combined width of the individual finger cells (Thumb, Index, Middle, Ring, and Little) should match that of the
multi-finger cells (Left Four, Two Thumb, Right Four).
The height of each row of cells can be adjusted by changing the values in the “Height” fields.
The ratio of width to height of the entire overlay can be adjusted using the value in the “Aspect Ratio” field.
Once you have made any changes to the layout, click the “Preview” button to see the changes applied to the
preview screen.
Save your layout changes using the “Save” button, or load a previously saved layout file using the “Open File”
button.
Note: Keep in mind that you can always scale the overlay up or down using the “anchor” in the lower right corner
of the overlay.
10. Latent Analysis
Latent analyses are performed based on Cases. You can choose to see the list of all Cases, or only the Cases that
have been marked as “Active”. You can add a new Case or edit an existing Case, and perform analysis of latent
prints for a particular Case.
Automated Biometric Identification System (ABIS) User Manual
252012 © M2SYS LLC
Figure 39: Latent analysis window overview
10.3 Adding New Cases
To create a new Latent Analysis Case, click the “Add Case” ribbon button, or the “Create a New Case” button in
the navigation bar. Provide a name for the Case, and an appropriate description. The status of a newly created
Case can also be chosen between “Active”, “Pending”, or “Closed”.
Figure 40: Creating a new case
Automated Biometric Identification System (ABIS) User Manual
262012 © M2SYS LLC
10.4 Adding Latent Images
Once the latent analysis window has opened, latent print images can be added to a Case by either loading from
an image file, or by scanning directly from a supported flatbed scanner.
Figure 41: Latent analysis window overview
Images that have been added to a Case will be shown under the “Latent Images” tab. To load a particular image,
simply click on it from the “Latent Images” list.
The currently loaded latent print image will be displayed in the left image pane of the Latent Analysis window.
The image will automatically be processed to locate all identifiable minutia data points by the ABIS system. The
minutia points will be marked on the image.
10.5 Latent Image Manipulation
The currently loaded latent print image can be manipulated in two ways:
 Minutia manipulation – Adding, deleting, and modifying the minutia data points on the print image.
 Image manipulation – Rotate, flip, crop, and adjust brightness, contrast, and color levels on the image.
Automated Biometric Identification System (ABIS) User Manual
272012 © M2SYS LLC
Figure 42: Loading a latent image
The minutiae toolbar buttons can be used to manipulate the minutiae points in the latent image.
Button Name Button Icon Description
Move/Rotate Move and/or rotate a selected data point.
Selection Tool Select a rectangular area of latent print image.
End Point Add an “End Minutia Point” to the latent print image.
Bifurcation Point Add a “Bifurcation Minutia Point” to the latent print image.
Delta Point Add a “Delta Point” to the latent print image.
Core Point Add a “Core Point” to the latent print image.
Double Core Point Add a “Double Core Point” to the latent print image.
The image toolbar buttons can be used to manipulate the image properties.
Brightness Adjust and/or reset the RGB brightness channels of the latent print image.
Contrast Adjust and/or reset the RGB contrast channels of the latent print image.
Group Control whether the RGB channels are adjusted together or separately.
Invert Create a negative inversion of the latent print image.
To Gray Convert the latent print image to grayscale.
Additional image manipulations such as rotation, flipping, and cropping can be accessed through the
“Transform” drop down menu.
Automated Biometric Identification System (ABIS) User Manual
282012 © M2SYS LLC
Figure 43: Editing a latent image
10.6 Adding Suspects to a Case
If you want to associate a Suspect with a Case, you can do so through the “Suspects” tab.
Figure 44: Adding suspects to a case
Clicking the “Add Suspect” button will allow you to enter the Suspect ID from an ABIS Suspect record to add that
suspect to the Case (it can easily be copied and pasted from the Suspect Details view). Selecting a suspect from
Automated Biometric Identification System (ABIS) User Manual
292012 © M2SYS LLC
the list and clicking the “Show Prints” button will load that suspect’s fingerprint images into the “Fingerprints”
tab for either manual visual comparison or biometric verification.
To remove a selected suspect from a Case, click the “Delete Suspect” button.
10.7 Latent Image Comparison
A loaded latent print image can be compared in one of two ways:
 Identification against the entire ABIS fingerprint database.
 Verification against the currently selected suspect print image.
To identify a latent print image against the entire ABIS fingerprint database, click the identification button ( ) in
the latent image toolbar:
Figure 45: Latent print identification
After the search has been completed, any matching records found will be listed under the “Search Results” tab.
To verify a latent print image against a particular suspect’s print image, select the suspect image from the
“Fingerprints” tab and then click the “Verify” button in the suspect image toolbar:
Automated Biometric Identification System (ABIS) User Manual
302012 © M2SYS LLC
Figure 46: Latent print verification
After the comparison is completed, the verification result (match or no match) will be displayed.
10.8 Switching Between Cases
To quickly switch to a different Case, click the “Load Case” button and select the desired Case name from the
list:
Figure 47: Switching between latent cases

Automated Biometric Identification System (ABIS) User Manual

  • 1.
    Automated Biometric IdentificationSystem (ABIS) User Manual
  • 2.
    Automated Biometric IdentificationSystem (ABIS) User Manual 22012 © M2SYS LLC Contents 1. Login to ABIS............................................................................................................................................ 3 2. Dashboard ............................................................................................................................................... 3 3. Adding New Subjects................................................................................................................................ 4 3.1 Demographic Information................................................................................................................. 4 3.2 Additional Information........................................................................................................................... 4 3.3 Images.............................................................................................................................................. 5 3.4 Fingerprint Capture .......................................................................................................................... 6 4. Subject List............................................................................................................................................... 8 5. Subject Search.......................................................................................................................................... 9 5.3 Biometric Search .............................................................................................................................. 9 5.4 Text Search..................................................................................................................................... 13 6. Importing and Exporting Subjects........................................................................................................... 13 6.3 Export Subject to NIST .................................................................................................................... 13 6.4 Import Subject from NIST ............................................................................................................... 14 7. Report Generation ................................................................................................................................. 14 8. Activity Log ............................................................................................................................................ 17 9. Application Configuration....................................................................................................................... 19 9.3 User Management.......................................................................................................................... 19 9.4 Database Configuration.................................................................................................................. 22 9.5 Module Settings ............................................................................................................................. 22 9.6 General Settings ............................................................................................................................. 22 9.7 Fingerprint Card Configuration ....................................................................................................... 23 10. Latent Analysis ................................................................................................................................... 24 10.3 Adding New Cases .......................................................................................................................... 25 10.4 Adding Latent Images..................................................................................................................... 26 10.5 Latent Image Manipulation............................................................................................................. 26 10.6 Adding Suspects to a Case .............................................................................................................. 28 10.7 Latent Image Comparison............................................................................................................... 29 10.8 Switching Between Cases ............................................................................................................... 30
  • 3.
    Automated Biometric IdentificationSystem (ABIS) User Manual 32012 © M2SYS LLC This document will cover the basic functionality of the M2SYS ABIS software. 1. Login to ABIS Access to the ABIS software is restricted by user login accounts. When you launch ABIS you will be prompted to log in with such an account. Figure 1: ABIS login screen In the Login screen enter a valid User Name and Password and Click “Login” button. Default Username Admin Default Password admin You can change the default username and password, or create additional user accounts from the User Management section of the software Application Configuration. 2. Dashboard Once you have logged into ABIS, you will be welcomed by the Dashboard. This screen provides you with a variety of at-a-glance information about the activity of the ABIS system. Figure 2: Dashboard
  • 4.
    Automated Biometric IdentificationSystem (ABIS) User Manual 42012 © M2SYS LLC 3. Adding New Subjects The persons who are enrolled in ABIS are referred to as “Subjects”. To add a new Subject to ABIS, either click the “Add Subject” ribbon button, or “Add A New Subject” in the navigation bar. Adding a new Subject will bring up the Subject Details view where you can begin entering information about the Subject. Figure 3: Adding a new subject A Subject record typically consists of multiple separate parts:  Demographic information  One or more images  Biometric templates Exactly what kind of biometric templates can be captured may vary depending on which modules are enabled within ABIS. Note: The term “Subject”, like nearly every other string displayed in the ABIS user interface, can be customized through external language files. 3.1 Demographic Information Provide all of the appropriate textual demographic information for the Subject. Click the “Next” button to proceed to image acquisition. 3.2 Additional Information Then enter Additional information and click “Next” button as shown bellow
  • 5.
    Automated Biometric IdentificationSystem (ABIS) User Manual 52012 © M2SYS LLC Figure: Additional information 3.3 Images Images can be added to a Subject record in one of two ways: a) Capture from webcam, by clicking the button. b) Load Image file, by clicking the button. Figure 5: Capture or load subject image
  • 6.
    Automated Biometric IdentificationSystem (ABIS) User Manual 62012 © M2SYS LLC Webcam Capture Process 1. Select the image category from the dropdown box at the upper right corner. Figure 6: Capturing an image from webcam 2. Click the webcam button at the upper-left corner. The video feed from the webcam will be shown. 3. Click the “Capture” button at the lower left-corner which will show the captured image. 4. Click the “Save” button at the lower right corner. Default Images Each Subject will have one image that is “default”, meaning that it will be the representative image that is displayed in the Subject details view. To set an image as “default” for a Subject, click the checkmark ( ) button. Removing Images To remove an image from a Subject record, click the trash can ( ) button. 3.4 Fingerprint Capture Fingerprints for a Subject can be added in one of two ways: a) Capturing from a Live Fingerprint Scanner b) Loading/Scanning from a Fingerprint Card 12 3 4
  • 7.
    Automated Biometric IdentificationSystem (ABIS) User Manual 72012 © M2SYS LLC Figure 7: Subject fingerprint details For capturing fingerprints from live scanner, select the “Live Scanner” radio button, and then click the “Register” button. Follow the on-screen prompts to perform the fingerprint captures. Figure 8: Fingerprint capture process When fingerprint capture is finished, they will be shown in the Subject Details view: Figure 9: Subject fingerprint details - Images
  • 8.
    Automated Biometric IdentificationSystem (ABIS) User Manual 82012 © M2SYS LLC 4. Subject List The entire Subject list can be viewed clicking the “Subjects” ribbon button, or “Show All Subjects” in the navigation bar, as shown below: Figure 10: Subject list To view a specific Subject’s details double click on its entry in the list. The Subject details will be shown: Figure 11: Subject details The “default” image will be displayed in the main Subject Details view, along with the demographic information. Biometric images, as well as non-default images can be displayed by selecting the appropriate tab under the Subject Details view.
  • 9.
    Automated Biometric IdentificationSystem (ABIS) User Manual 92012 © M2SYS LLC 5. Subject Search 5.3 Biometric Search To perform a fingerprint biometric search, click the “Fingerprint” ribbon button in the “Biometric Search” section, or click the “Fingerprint” navigation button in “Biometric Search” section. Additionally, from the biometric search results list, you can select the biometric search type and click the “New Search” button: Figure 12: Subject biometric search – Start a search Before the fingerprint search process starts, you are prompted to enter a description for the search. The description can used to help you locate the search at a later time. If no description entered, current timestamp will be used by default.
  • 10.
    Automated Biometric IdentificationSystem (ABIS) User Manual 102012 © M2SYS LLC Figure 13: Subject biometric search - Description Once a description has been provided, the biometric fingerprint data will be captured: Figure 14: Fingerprint capture process After capturing the fingerprint data they will be shown in the search screen:
  • 11.
    Automated Biometric IdentificationSystem (ABIS) User Manual 112012 © M2SYS LLC Figure 15: Subject biometric search The click the “Search” button to perform the biometric search. When the search process has finished, the search results will be shown at right side of the screen. Double- clicking on a record in the search results will open that Subject details. Figure 16: Search results Adding New Subject from Non-Matching Biometric Search When a Subject search fails to find a match (e.g. the Subject is not present in ABIS) you have the option to add a new Subject using the biometric data from the search:
  • 12.
    Automated Biometric IdentificationSystem (ABIS) User Manual 122012 © M2SYS LLC Figure 17: Add subject from non-matched biometric search After clicking the “Yes” button you will be brought to the normal “Adding a New Subject” process. Another way to add Subject from search data is by clicking the ribbon icon “Register from Search Data” to view the search records which were not found in ABIS: Figure 18: List of failed searches After selecting a record from the list of failed searches, click the “Enroll Subject” button to create a new Subject from the biometric data of the selected search. The search data can also be merged with an existing Subject record by clicking the “Merge with Existing Subject” button. Enter the desired Subject ID in the “Existing Subject Selection” window.
  • 13.
    Automated Biometric IdentificationSystem (ABIS) User Manual 132012 © M2SYS LLC Figure 19: Merging search data with an existing subject 5.4 Text Search Subjects can be searched using their demographic data through the Text Search screen. Click the “Text Search” ribbon button then enter the search string in the corresponding fields. Click the “Search” button to submit. Figure 20: Subject text search 6. Importing and Exporting Subjects 6.3 Export Subject to NIST For exporting Subject information to NIST file, go to the details screen of that Subject. Then click the “Export NIST” button, select the folder to export the file to. The file will be saved with the Subject’s name and a unique GUID identifier.
  • 14.
    Automated Biometric IdentificationSystem (ABIS) User Manual 142012 © M2SYS LLC Figure 21: Exporting subject record to NIST file 6.4 Import Subject from NIST For importing Subject from a NIST file, please go to the Subjects list, and then click the “Import from NIST” button, and browse the desired NIST file on your computer. Figure 22: Importing subject record from NIST file 7. Report Generation In the Subjects detail view click the “Generate Report” button for report generation:
  • 15.
    Automated Biometric IdentificationSystem (ABIS) User Manual 152012 © M2SYS LLC Figure 23: Subject report generation From the generated report it can be saved as PDF, Excel and can also be printed directly by printer. Button Name Button Icon Description Print Print the report to printer. Print Preview Preview what the printed report will look like. Page Setup Change the printed page setup properties. Save Save the report contents to an Excel or PDF file.
  • 16.
    Automated Biometric IdentificationSystem (ABIS) User Manual 162012 © M2SYS LLC Figure 24: View Report
  • 17.
    Automated Biometric IdentificationSystem (ABIS) User Manual 172012 © M2SYS LLC Figure 25: Report View (Continued) 8. Activity Log To view the Activities related to a Subject, click the “Subject Activities” tab:
  • 18.
    Automated Biometric IdentificationSystem (ABIS) User Manual 182012 © M2SYS LLC Figure 26: Subject activities After clicking the “Subject Activities” tab the list of Activities will be shown: Figure 27: Subject activities list
  • 19.
    Automated Biometric IdentificationSystem (ABIS) User Manual 192012 © M2SYS LLC 9. Application Configuration 9.3 User Management Click the ribbon button “Application Configuration” then select the “User Management” section there. By default list of existing user will be shown in “View Users” tab. Figure 28: User management For adding a new user account, click the “Add User” button. To edit an existing user, select that and click the “Edit User” button. After entering the user information click the “Save” button. Figure 29: User management – User details If a user is no longer required then you can deactivate it by uncheck the “Active User” check box.
  • 20.
    Automated Biometric IdentificationSystem (ABIS) User Manual 202012 © M2SYS LLC Select the “View Roles” tab to view the list of existing user roles in the system. To add a new user role click the “Add Role” button. To edit an existing user role, select the role and click “Edit Role”. Figure 30: User management – View roles Figure 31: User management - Role details If a Role is no longer required you can deactivate it by uncheck the “Active Role” check box. For assigning privileges to a user role select the “Role Privileges” tab and select the desired role from the drop- down list.
  • 21.
    Automated Biometric IdentificationSystem (ABIS) User Manual 212012 © M2SYS LLC Figure 32: User management - Role selection After selecting a role in the dropdown list all the privileges of that Role will be displayed (if there is any). To change the privileges associated with a role, check or uncheck the entries in the drop-down list, and click the button “Save Privileges”. Figure 33: User management - Editing role privileges
  • 22.
    Automated Biometric IdentificationSystem (ABIS) User Manual 222012 © M2SYS LLC 9.4 Database Configuration Please select the “Database Configuration” section. Existing database and database connection string will be displayed there. Figure 34: Database configuration Database and Database connection string can be changed, tested and saved here. After changing the database connection string, the database connection can be tested using the “Test Connection String” button, and then saved. 9.5 Module Settings The various modules of the ABIS software can be configured here. These settings should never need to be changed once the initial installation and setup has been completed. Please contact your ABIS system administrator if you have any questions about this information. 9.6 General Settings For General Settings please select the “General Settings” section. Here you will be able to configure the Application Logo which will be shown at the upper right corner of the application. Also you can configure the splash Logo which will be displayed at the Login time.
  • 23.
    Automated Biometric IdentificationSystem (ABIS) User Manual 232012 © M2SYS LLC Figure 37: General Settings General Settings also include: Help File: Here if you set a file that will be open when you will click the ribbon button ‘Help’. Language File Path: From this path ABIS will load the language on login time will show the language accordingly. License Settings: You can configure the License server, port and string here according to which ABIS will load the license for biometric operation. 9.7 Fingerprint Card Configuration In order to extract each fingerprint from a scanned fingerprint card, an overlay must be positioned over the scanned image by the operator to accurately mark where each fingerprint region is located within the image. The layout of this overlay is stored in an XML file which can be adjusted within this configuration module.
  • 24.
    Automated Biometric IdentificationSystem (ABIS) User Manual 242012 © M2SYS LLC Figure 38: Fingerprint card layout configuration The width of each cell can be adjusted by changing the values in the “Width” fields. Please note that the total combined width of the individual finger cells (Thumb, Index, Middle, Ring, and Little) should match that of the multi-finger cells (Left Four, Two Thumb, Right Four). The height of each row of cells can be adjusted by changing the values in the “Height” fields. The ratio of width to height of the entire overlay can be adjusted using the value in the “Aspect Ratio” field. Once you have made any changes to the layout, click the “Preview” button to see the changes applied to the preview screen. Save your layout changes using the “Save” button, or load a previously saved layout file using the “Open File” button. Note: Keep in mind that you can always scale the overlay up or down using the “anchor” in the lower right corner of the overlay. 10. Latent Analysis Latent analyses are performed based on Cases. You can choose to see the list of all Cases, or only the Cases that have been marked as “Active”. You can add a new Case or edit an existing Case, and perform analysis of latent prints for a particular Case.
  • 25.
    Automated Biometric IdentificationSystem (ABIS) User Manual 252012 © M2SYS LLC Figure 39: Latent analysis window overview 10.3 Adding New Cases To create a new Latent Analysis Case, click the “Add Case” ribbon button, or the “Create a New Case” button in the navigation bar. Provide a name for the Case, and an appropriate description. The status of a newly created Case can also be chosen between “Active”, “Pending”, or “Closed”. Figure 40: Creating a new case
  • 26.
    Automated Biometric IdentificationSystem (ABIS) User Manual 262012 © M2SYS LLC 10.4 Adding Latent Images Once the latent analysis window has opened, latent print images can be added to a Case by either loading from an image file, or by scanning directly from a supported flatbed scanner. Figure 41: Latent analysis window overview Images that have been added to a Case will be shown under the “Latent Images” tab. To load a particular image, simply click on it from the “Latent Images” list. The currently loaded latent print image will be displayed in the left image pane of the Latent Analysis window. The image will automatically be processed to locate all identifiable minutia data points by the ABIS system. The minutia points will be marked on the image. 10.5 Latent Image Manipulation The currently loaded latent print image can be manipulated in two ways:  Minutia manipulation – Adding, deleting, and modifying the minutia data points on the print image.  Image manipulation – Rotate, flip, crop, and adjust brightness, contrast, and color levels on the image.
  • 27.
    Automated Biometric IdentificationSystem (ABIS) User Manual 272012 © M2SYS LLC Figure 42: Loading a latent image The minutiae toolbar buttons can be used to manipulate the minutiae points in the latent image. Button Name Button Icon Description Move/Rotate Move and/or rotate a selected data point. Selection Tool Select a rectangular area of latent print image. End Point Add an “End Minutia Point” to the latent print image. Bifurcation Point Add a “Bifurcation Minutia Point” to the latent print image. Delta Point Add a “Delta Point” to the latent print image. Core Point Add a “Core Point” to the latent print image. Double Core Point Add a “Double Core Point” to the latent print image. The image toolbar buttons can be used to manipulate the image properties. Brightness Adjust and/or reset the RGB brightness channels of the latent print image. Contrast Adjust and/or reset the RGB contrast channels of the latent print image. Group Control whether the RGB channels are adjusted together or separately. Invert Create a negative inversion of the latent print image. To Gray Convert the latent print image to grayscale. Additional image manipulations such as rotation, flipping, and cropping can be accessed through the “Transform” drop down menu.
  • 28.
    Automated Biometric IdentificationSystem (ABIS) User Manual 282012 © M2SYS LLC Figure 43: Editing a latent image 10.6 Adding Suspects to a Case If you want to associate a Suspect with a Case, you can do so through the “Suspects” tab. Figure 44: Adding suspects to a case Clicking the “Add Suspect” button will allow you to enter the Suspect ID from an ABIS Suspect record to add that suspect to the Case (it can easily be copied and pasted from the Suspect Details view). Selecting a suspect from
  • 29.
    Automated Biometric IdentificationSystem (ABIS) User Manual 292012 © M2SYS LLC the list and clicking the “Show Prints” button will load that suspect’s fingerprint images into the “Fingerprints” tab for either manual visual comparison or biometric verification. To remove a selected suspect from a Case, click the “Delete Suspect” button. 10.7 Latent Image Comparison A loaded latent print image can be compared in one of two ways:  Identification against the entire ABIS fingerprint database.  Verification against the currently selected suspect print image. To identify a latent print image against the entire ABIS fingerprint database, click the identification button ( ) in the latent image toolbar: Figure 45: Latent print identification After the search has been completed, any matching records found will be listed under the “Search Results” tab. To verify a latent print image against a particular suspect’s print image, select the suspect image from the “Fingerprints” tab and then click the “Verify” button in the suspect image toolbar:
  • 30.
    Automated Biometric IdentificationSystem (ABIS) User Manual 302012 © M2SYS LLC Figure 46: Latent print verification After the comparison is completed, the verification result (match or no match) will be displayed. 10.8 Switching Between Cases To quickly switch to a different Case, click the “Load Case” button and select the desired Case name from the list: Figure 47: Switching between latent cases