AUDI A4 B5 1.8L 1996 BADY INTERIOR 70 1 front door trim
•
0 likes•1,490 views

AUDI A4 B5 1.8L 1996 BADY INTERIOR

Recommended
Recommended
More Related Content
Viewers also liked
Viewers also liked (20)
Similar to AUDI A4 B5 1.8L 1996 BADY INTERIOR 70 1 front door trim
Similar to AUDI A4 B5 1.8L 1996 BADY INTERIOR 70 1 front door trim (20)
More from Gherghescu Gabriel
More from Gherghescu Gabriel (20)
Recently uploaded
Recently uploaded (20)
AUDI A4 B5 1.8L 1996 BADY INTERIOR 70 1 front door trim
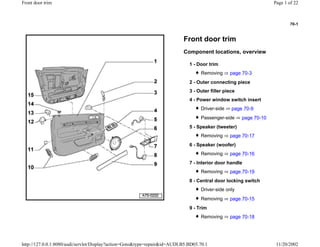
- 1. 70-1 Front door trim Component locations, overview 1 - Door trim Removing page 70-3 2 - Outer connecting piece 3 - Outer filler piece 4 - Power window switch insert Driver-side page 70-9 Passenger-side page 70-10 5 - Speaker (tweeter) Removing page 70-17 6 - Speaker (woofer) Removing page 70-16 7 - Interior door handle Removing page 70-19 8 - Central door locking switch Driver-side only Removing page 70-15 9 - Trim Removing page 70-18 Page 1 of 22Front door trim 11/20/2002http://127.0.0.1:8080/audi/servlet/Display?action=Goto&type=repair&id=AUDI.B5.BD03.70.1
- 2. 70-2 10 - Door warning and footwell lights Removing and installing page 70-33 11 - Detent notch base 12 - Inner connecting piece 13 - Inner filler piece 14 - Door knob guide 15 - Front door trim insulation Removing and installing page 70-5 Page 2 of 22Front door trim 11/20/2002http://127.0.0.1:8080/audi/servlet/Display?action=Goto&type=repair&id=AUDI.B5.BD03.70.1
- 3. 70-3 Front door trim, removing and installing Vehicles with manual window crank page 70-6 . - Remove bolt -1-. Tightening torque: 1.5 Nm (13 in. lb) - Pull handle shell -2- downward out of door trim -4-. - Remove bolts -3- (2x). Tightening torque: 2.5 Nm (22 in. lb) Note: The Bowden cable for the inside door mechanism and the electrical harness connectors are not disconnected until after removing door trim -3- . - Remove bolts -1- (2x). Tightening torque: 1.5 Nm (13 in. lb) - Lift door trim -3- up and out of door shell. - To install, bases -4- for detent notches -2- (7x) must be installed. Page 3 of 22Front door trim 11/20/2002http://127.0.0.1:8080/audi/servlet/Display?action=Goto&type=repair&id=AUDI.B5.BD03.70.1
- 4. 70-4 Note: When installing make sure that hook -3- faces upward. - Pull Bowden cable -1- out of guide -2- and remove. - Disconnect electrical harness connectors. Page 4 of 22Front door trim 11/20/2002http://127.0.0.1:8080/audi/servlet/Display?action=Goto&type=repair&id=AUDI.B5.BD03.70.1
- 5. 70-5 Front door trim insulation, removing and installing - Insulation -1- must be inserted into door trim -2- all around. - When removing or installing insulation -1-, ensure that insulation is not damaged when installing it over retaining tabs or electrical harness connectors. Page 5 of 22Front door trim 11/20/2002http://127.0.0.1:8080/audi/servlet/Display?action=Goto&type=repair&id=AUDI.B5.BD03.70.1
- 6. 70-6 Front manual window cranks, removing and installing - Press in flat side of flat-head screwdriver in direction of arrow -1-. - Rotate flat-head screwdriver in direction of arrow -2-. - Pull off cover in direction of arrow -3-. - Remove bolt -1-. Tightening torque: 2.5 Nm (22 in. lb) - Remove manual window crank -2- and base -3-. Page 6 of 22Front door trim 11/20/2002http://127.0.0.1:8080/audi/servlet/Display?action=Goto&type=repair&id=AUDI.B5.BD03.70.1
- 7. 70-7 Front door manual window crank installation position Illustration shows left manual window crank (right side is mirror of left). Installation position shown: window closed A - Driving direction Page 7 of 22Front door trim 11/20/2002http://127.0.0.1:8080/audi/servlet/Display?action=Goto&type=repair&id=AUDI.B5.BD03.70.1
- 8. 70-8 Release button, adjusting - When locked, release lever must not project more than dimension -a-. Dimension -a-: 0-2 mm countersunk Page 8 of 22Front door trim 11/20/2002http://127.0.0.1:8080/audi/servlet/Display?action=Goto&type=repair&id=AUDI.B5.BD03.70.1
- 9. 70-9 Driver-side power window switches, removing and installing - Remove door trim page 70-3 . - Remove insulation page 70-5 . - Remove vapor barrier page 70-12 . - Use screwdriver to remove retaining tabs -1-. - Remove power window switches -2-. Page 9 of 22Front door trim 11/20/2002http://127.0.0.1:8080/audi/servlet/Display?action=Goto&type=repair&id=AUDI.B5.BD03.70.1
- 10. 70-10 Passenger-side power window switch, removing and installing - Remove door trim page 70-3 . - Remove insulation page 70-5 . - Use screwdriver to release retaining tabs -1-. - Remove power window switches -2-. Page 10 of 22Front door trim 11/20/2002http://127.0.0.1:8080/audi/servlet/Display?action=Goto&type=repair&id=AUDI.B5.BD03.70.1
- 11. 70-11 Grip handle cover with power window switch unit and power mirror switch, removing and installing - Remove door trim page 70-3 . - Remove insulation page 70-5 . - Remove vapor barrier page 70-12 . - Remove bolts -1- (2x). Tightening torque: 1.5 Nm (13 in. lb) - Release retaining tabs -2- (2x) and clips -3- (2x). - Remove grip handle cover forward. Page 11 of 22Front door trim 11/20/2002http://127.0.0.1:8080/audi/servlet/Display?action=Goto&type=repair&id=AUDI.B5.BD03.70.1
- 12. 70-12 Vapor barrier, removing - Remove door trim page 70-3 . - Remove insulation page 70-5 . - To install, press in vapor barrier -1- in area of adhesive bead -2-. - Push power window electrical harness connectors through vapor barrier. Page 12 of 22Front door trim 11/20/2002http://127.0.0.1:8080/audi/servlet/Display?action=Goto&type=repair&id=AUDI.B5.BD03.70.1
- 13. 70-13 Power mirror switch, removing and installing - Remove door trim page 70-3 . - Remove grip handle cover page 70-11 . - Press pins -1- (2x) in direction of arrow. - Remove retaining tabs -2-. - Remove power mirror switch -3-. Page 13 of 22Front door trim 11/20/2002http://127.0.0.1:8080/audi/servlet/Display?action=Goto&type=repair&id=AUDI.B5.BD03.70.1
- 14. 70-14 Door warning light and footwell lights, removing and installing - Detach door warning light -1- from below using screwdriver and remove toward outside together with cable. - Disconnect door warning light -1-. - Detach footwell lighting -2- from front using screwdriver and remove toward outside together with cable. - Disconnect footwell lighting -2-. Page 14 of 22Front door trim 11/20/2002http://127.0.0.1:8080/audi/servlet/Display?action=Goto&type=repair&id=AUDI.B5.BD03.70.1
- 15. 70-15 Central door locking switch, removing - Remove door trim page 70-3 . - Remove insulation page 70-5 . - Using screwdriver, detach retaining tabs (2x) and remove central door locking switch toward rear. Page 15 of 22Front door trim 11/20/2002http://127.0.0.1:8080/audi/servlet/Display?action=Goto&type=repair&id=AUDI.B5.BD03.70.1
- 16. 70-16 Bass speaker, removing - Remove door trim page 70-3 . - Remove insulation page 70-5 . - Remove bolts -1- (3x). Tightening torque: 1.5 Nm (13 in. lb) - Remove bass speaker -2-. Page 16 of 22Front door trim 11/20/2002http://127.0.0.1:8080/audi/servlet/Display?action=Goto&type=repair&id=AUDI.B5.BD03.70.1
- 17. 70-17 Tweeter, removing and installing - Remove door trim page 70-3 . - Remove insulation page 70-5 . - Pull wiring from door trim up to bass speaker. - Remove interior door handle page 70-19 . - Using screwdriver, detach bracket -1-. - Remove tweeter -2-. Page 17 of 22Front door trim 11/20/2002http://127.0.0.1:8080/audi/servlet/Display?action=Goto&type=repair&id=AUDI.B5.BD03.70.1
- 18. 70-18 Trim panel in door trim, removing - Remove door trim page 70-3 . - Remove insulation page 70-5 . - Pull vapor barrier -3- down in area of trim. - Carefully open clips -2- of clips -1-. - Remove trim panel. Page 18 of 22Front door trim 11/20/2002http://127.0.0.1:8080/audi/servlet/Display?action=Goto&type=repair&id=AUDI.B5.BD03.70.1
- 19. 70-19 Interior door handle, removing - Remove door trim page 70-3 . - Remove tweeter page 70-17 . - Remove central door locking switch (driver-side only) page 70-15 . - Remove bolt -1-. - Press retaining tabs -2- (2x) and remove interior door handle toward front. Page 19 of 22Front door trim 11/20/2002http://127.0.0.1:8080/audi/servlet/Display?action=Goto&type=repair&id=AUDI.B5.BD03.70.1
- 20. 70-20 Console and trunk release switch, removing - Remove door trim page 70-3 . - Remove bolts -2- (2x). - Remove console -5-. - Disconnect harness connector from switch -1-. - Remove trim panel -4- together with switch -1-. - Remove grommet -1-. Page 20 of 22Front door trim 11/20/2002http://127.0.0.1:8080/audi/servlet/Display?action=Goto&type=repair&id=AUDI.B5.BD03.70.1
- 21. 70-21 Door trim for trunk release switch, cutting out The area to be cut out -1- is indicated on door trim. - Cut out area using available tools. - Install grommet -2-. Page 21 of 22Front door trim 11/20/2002http://127.0.0.1:8080/audi/servlet/Display?action=Goto&type=repair&id=AUDI.B5.BD03.70.1
- 22. 70-22 Switching speaker trim (Normal, Bose) - Drill out old speaker trim -1- at -2- (4x). - Insert speaker trim -1- from front and secure speaker trim -1- with clips -3- (4x). Page 22 of 22Front door trim 11/20/2002http://127.0.0.1:8080/audi/servlet/Display?action=Goto&type=repair&id=AUDI.B5.BD03.70.1