SlideShare a Scribd company logo
1 of 9
Download to read offline
ALTA DISPONIBILDAD
OBJETIVO : Construir un sistema de alta disponiblidad basado en software libre.
PROCEDIMIENTO:
Para la implementación se utilizarán dos servidores virtualizados con sistema operativo Debian
GNU/Linux en su ultima rama estable (versión 7). Para alta disponibilidad utilizaremos Hearbeat y
para la replicación de la información Distributed Replicated Block Device (DRBD)
CARACTERÍSTICAS DE LOS SERVIDORES:
Cada servidor tiene dos tarjetas de red, una conectada a la red local y otra conectada con un cable
cruzado a la tarjeta del otro servidor. A travéz de esta interfaz se realiza la replicación de las
particiones.
Se utilizará el gestor de contenidos Wordpress para demostrar que la información ingresada por el
servidor 1 es replicada de inmediato hacia el servidor 2.
ESQUEMA DE CONECCIÓN:
Se tendrá el siguiente esquema:
La IP flotante es la dirección a la que van a llegar los
Clientes.
CONFIGURACION
Se realiza la instalación basica de Debian GNU/Linux en ambos servidores, se crearan las
siguientes particiones:
/boot
/
/swap
/drdb ---> es la particion que queremos replicar entre los dos servidores
Se instalan los paquetes necesarios:
aptitude install linux-headers-'uname -r' drdb8-utils drdblinks heartbeat
Una vez instalados los paquetes se procede con la configuración en Servidor 1:
/etc/drdb.conf
global {
dialog-refresh 5; # 5 seconds
usage-count no;
}
common {
syncer { rate 100M; }
}
resource shared {
protocol C;
startup {
wfc-timeout 5;
degr-wfc-timeout 3;
}
on servidor1 {
device /dev/drbd0;
disk /dev/sda3;
address 10.10.10.201:7789;
meta-disk internal;
}
on servidor2 {
device /dev/drbd0;
disk /dev/sda3;
address 10.10.10.202:7789;
meta-disk internal;
}
}
De igual manera en Servidor 2:
/etc/drdb.conf
global {
dialog-refresh 5; # 5 seconds
usage-count no;
}
common {
syncer { rate 100M; }
}
resource shared {
protocol C;
startup {
wfc-timeout 5;
degr-wfc-timeout 3;
}
on servidor1 {
device /dev/drbd0;
disk /dev/sda3;
address 10.10.10.201:7789;
meta-disk internal;
}
on servidor2 {
device /dev/drbd0;
disk /dev/sda3;
address 10.10.10.202:7789;
meta-disk internal;
}
}
En ambos servidores se activa el modulo drbd:
modprobe drbd
/etc/init.d/drbd start
Se crea el recurso drbd en ambos servidores para habilitar la sincronizacion:
drbdadm creat-md shared
drbdadm attach shared
drbdadm connect shared
Para sincronizar Servidor 1 con Servidor 2 se ejecutan los siguientes comandos en Servidor 1:
drbdadmin -- --overwrite-data-of-peer primary shared
Despues de unos segundos se podra ver en ambos nodos Servidor 1 y Servidor 2 el estado
UpToDate
cat /proc/drbd
Ahora debemos crear el sistema de archivos sobre el modulo drbd:
mkfs.ext4 /dev/drbd0
mount -t ext4 /dev/drbd0 /drbd
A continuacion se debera configurar Heartbeat. El archivo /etc/ha.d/ha.cf debera contener lo
siguiente:
#
# There are lots of options in this file. All you have to have is a set
# of nodes listed {"node ...} one of {serial, bcast, mcast, or ucast},
# and a value for "auto_failback".
#
# ATTENTION: As the configuration file is read line by line,
# THE ORDER OF DIRECTIVE MATTERS!
#
# In particular, make sure that the udpport, serial baud rate
# etc. are set before the heartbeat media are defined!
# debug and log file directives go into effect when they
# are encountered.
#
# All will be fine if you keep them ordered as in this example.
#
#
# Note on logging:
# If all of debugfile, logfile and logfacility are not defined,
# logging is the same as use_logd yes. In other case, they are
# respectively effective. if detering the logging to syslog,
# logfacility must be "none".
#
# File to write debug messages to
debugfile /var/log/ha-debug
#
#
# File to write other messages to
#
#logfile /var/log/ha-log
#
#
# Facility to use for syslog()/logger
#
logfacility local0
#
#
# A note on specifying "how long" times below...
#
# The default time unit is seconds
# 10 means ten seconds
#
# You can also specify them in milliseconds
# 1500ms means 1.5 seconds
#
#
# keepalive: how long between heartbeats?
#
#keepalive 2
#
# deadtime: how long-to-declare-host-dead?
#
# If you set this too low you will get the problematic
# split-brain (or cluster partition) problem.
# See the FAQ for how to use warntime to tune deadtime.
#
#deadtime 30
#
# warntime: how long before issuing "late heartbeat" warning?
# See the FAQ for how to use warntime to tune deadtime.
#
#warntime 10
#
#
# Very first dead time (initdead)
#
# On some machines/OSes, etc. the network takes a while to come up
# and start working right after you've been rebooted. As a result
# we have a separate dead time for when things first come up.
# It should be at least twice the normal dead time.
#
#initdead 120
#
#
# What UDP port to use for bcast/ucast communication?
#
#udpport 694
#
# Baud rate for serial ports...
#
#baud 19200
#
# serial serialportname ...
#serial /dev/ttyS0 # Linux
#serial /dev/cuaa0 # FreeBSD
#serial /dev/cuad0 # FreeBSD 6.x
#serial /dev/cua/a # Solaris
#
#
# What interfaces to broadcast heartbeats over?
#
#bcast eth0 # Linux
#bcast eth1 eth2 # Linux
#bcast le0 # Solaris
#bcast le1 le2 # Solaris
#
# Set up a multicast heartbeat medium
# mcast [dev] [mcast group] [port] [ttl] [loop]
#
# [dev] device to send/rcv heartbeats on
# [mcast group] multicast group to join (class D multicast address
# 224.0.0.0 - 239.255.255.255)
# [port] udp port to sendto/rcvfrom (set this value to the
# same value as "udpport" above)
# [ttl] the ttl value for outbound heartbeats. this effects
# how far the multicast packet will propagate. (0-255)
# Must be greater than zero.
# [loop] toggles loopback for outbound multicast heartbeats.
# if enabled, an outbound packet will be looped back and
# received by the interface it was sent on. (0 or 1)
# Set this value to zero.
#
#
#mcast eth0 225.0.0.1 694 1 0
#
# Set up a unicast / udp heartbeat medium
# ucast [dev] [peer-ip-addr]
#
# [dev] device to send/rcv heartbeats on
# [peer-ip-addr] IP address of peer to send packets to
#
#ucast eth0 192.168.1.2
#
#
# About boolean values...
#
# Any of the following case-insensitive values will work for true:
# true, on, yes, y, 1
# Any of the following case-insensitive values will work for false:
# false, off, no, n, 0
#
#
#
# auto_failback: determines whether a resource will
# automatically fail back to its "primary" node, or remain
# on whatever node is serving it until that node fails, or
# an administrator intervenes.
#
# The possible values for auto_failback are:
# on - enable automatic failbacks
# off - disable automatic failbacks
# legacy - enable automatic failbacks in systems
# where all nodes do not yet support
# the auto_failback option.
#
# auto_failback "on" and "off" are backwards compatible with the old
# "nice_failback on" setting.
#
# See the FAQ for information on how to convert
# from "legacy" to "on" without a flash cut.
# (i.e., using a "rolling upgrade" process)
#
# The default value for auto_failback is "legacy", which
# will issue a warning at startup. So, make sure you put
# an auto_failback directive in your ha.cf file.
# (note: auto_failback can be any boolean or "legacy")
#
auto_failback on
#
#
# Basic STONITH support
# Using this directive assumes that there is one stonith
# device in the cluster. Parameters to this device are
# read from a configuration file. The format of this line is:
#
# stonith <stonith_type> <configfile>
#
# NOTE: it is up to you to maintain this file on each node in the
# cluster!
#
#stonith baytech /etc/ha.d/conf/stonith.baytech
#
# STONITH support
# You can configure multiple stonith devices using this directive.
# The format of the line is:
# stonith_host <hostfrom> <stonith_type> <params...>
# <hostfrom> is the machine the stonith device is attached
# to or * to mean it is accessible from any host.
# <stonith_type> is the type of stonith device (a list of
# supported drives is in /usr/lib/stonith.)
# <params...> are driver specific parameters. To see the
# format for a particular device, run:
# stonith -l -t <stonith_type>
#
#
# Note that if you put your stonith device access information in
# here, and you make this file publically readable, you're asking
# for a denial of service attack ;-)
#
# To get a list of supported stonith devices, run
# stonith -L
# For detailed information on which stonith devices are supported
# and their detailed configuration options, run this command:
# stonith -h
#
#stonith_host * baytech 10.0.0.3 mylogin mysecretpassword
#stonith_host ken3 rps10 /dev/ttyS1 kathy 0
#stonith_host kathy rps10 /dev/ttyS1 ken3 0
#
# Watchdog is the watchdog timer. If our own heart doesn't beat for
# a minute, then our machine will reboot.
# NOTE: If you are using the software watchdog, you very likely
# wish to load the module with the parameter "nowayout=0" or
# compile it without CONFIG_WATCHDOG_NOWAYOUT set. Otherwise even
# an orderly shutdown of heartbeat will trigger a reboot, which is
# very likely NOT what you want.
#
#watchdog /dev/watchdog
#
# Tell what machines are in the cluster
# node nodename ... -- must match uname -n
#node ken3
#node kathy
#
# Less common options...
#
# Treats 10.10.10.254 as a psuedo-cluster-member
# Used together with ipfail below...
# note: don't use a cluster node as ping node
#
#ping 10.10.10.254
#
# Treats 10.10.10.254 and 10.10.10.253 as a psuedo-cluster-member
# called group1. If either 10.10.10.254 or 10.10.10.253 are up
# then group1 is up
# Used together with ipfail below...
#
#ping_group group1 10.10.10.254 10.10.10.253
#
# HBA ping derective for Fiber Channel
# Treats fc-card-name as psudo-cluster-member
# used with ipfail below ...
#
# You can obtain HBAAPI from http://hbaapi.sourceforge.net. You need
# to get the library specific to your HBA directly from the vender
# To install HBAAPI stuff, all You need to do is to compile the common
# part you obtained from the sourceforge. This will produce libHBAAPI.so
# which you need to copy to /usr/lib. You need also copy hbaapi.h to
# /usr/include.
#
# The fc-card-name is the name obtained from the hbaapitest program
# that is part of the hbaapi package. Running hbaapitest will produce
# a verbose output. One of the first line is similar to:
# Apapter number 0 is named: qlogic-qla2200-0
# Here fc-card-name is qlogic-qla2200-0.
#
#hbaping fc-card-name
#
#
# Processes started and stopped with heartbeat. Restarted unless
# they exit with rc=100
#
#respawn userid /path/name/to/run
#respawn hacluster /usr/lib/heartbeat/ipfail
#
# Access control for client api
# default is no access
#
#apiauth client-name gid=gidlist uid=uidlist
#apiauth ipfail gid=haclient uid=hacluster
###########################
#
# Unusual options.
#
###########################
#
# hopfudge maximum hop count minus number of nodes in config
#hopfudge 1
#
# deadping - dead time for ping nodes
#deadping 30
#
# hbgenmethod - Heartbeat generation number creation method
# Normally these are stored on disk and incremented as needed.
#hbgenmethod time
#
# realtime - enable/disable realtime execution (high priority, etc.)
# defaults to on
#realtime off
#
# debug - set debug level
# defaults to zero
#debug 1
#
# API Authentication - replaces the fifo-permissions-based system of the past
#
#
# You can put a uid list and/or a gid list.
# If you put both, then a process is authorized if it qualifies under either
# the uid list, or under the gid list.
#
# The groupname "default" has special meaning. If it is specified, then
# this will be used for authorizing groupless clients, and any client groups
# not otherwise specified.
#
# There is a subtle exception to this. "default" will never be used in the
# following cases (actual default auth directives noted in brackets)
# ipfail (uid=HA_CCMUSER)
# ccm (uid=HA_CCMUSER)
# ping (gid=HA_APIGROUP)
# cl_status (gid=HA_APIGROUP)
#
# This is done to avoid creating a gaping security hole and matches the most
# likely desired configuration.
#
#apiauth ipfail uid=hacluster
#apiauth ccm uid=hacluster
#apiauth cms uid=hacluster
#apiauth ping gid=haclient uid=alanr,root
#apiauth default gid=haclient
# message format in the wire, it can be classic or netstring,
# default: classic
#msgfmt classic/netstring
# Do we use logging daemon?
# If logging daemon is used, logfile/debugfile/logfacility in this file
# are not meaningful any longer. You should check the config file for logging
# daemon (the default is /etc/logd.cf)
# more infomartion can be fould in the man page.
# Setting use_logd to "yes" is recommended
#
# use_logd yes/no
#
# the interval we reconnect to logging daemon if the previous connection failed
# default: 60 seconds
#conn_logd_time 60
#
#
# Configure compression module
# It could be zlib or bz2, depending on whether u have the corresponding
# library in the system.
#compression bz2
#
# Confiugre compression threshold
# This value determines the threshold to compress a message,
# e.g. if the threshold is 1, then any message with size greater than 1 KB
# will be compressed, the default is 2 (KB)
#compression_threshold 2
logfile /var/log/ha-log
logfacility local0
keepalive 2
deadtime 20
warntime 10
initdead 40
udpport 694
bcast eth0
auto_failback off
node servidor1
node servidor2
El archivo /etc/ha.d/authkeys debe contener:
#
# Authentication file. Must be mode 600
#
#
# Must have exactly one auth directive at the front.
# auth send authentication using this method-id
#
# Then, list the method and key that go with that method-id
#
# Available methods: crc sha1, md5. Crc doesn't need/want a key.
#
# You normally only have one authentication method-id listed in this file
#
# Put more than one to make a smooth transition when changing auth
# methods and/or keys.
#
#
# sha1 is believed to be the "best", md5 next best.
#
# crc adds no security, except from packet corruption.
# Use only on physically secure networks.
#
#auth 1
#1 crc
#2 sha1 HI!
#3 md5 Hello!
auth 2
2 sha1 password
El archivo /etc/ha.d/haresources debe contener (en una sola linea):
servidor1 drbddisk::shared Filesystem::/dev/drbd0::/drbd::ext4
IPaddr::192.168.0.200/24/eth0 apache2 mysql
En ambos servidores se debe iniciar el servicio hearbeat:
/etc/init.d/hearbeat start
El siguiente comando nos ayuda a identificar cual de los dos servidores esta en el rol principal:
drbdadm role shared

More Related Content

What's hot

Linux Kernel Crashdump
Linux Kernel CrashdumpLinux Kernel Crashdump
Linux Kernel CrashdumpMarian Marinov
 
Kdump and the kernel crash dump analysis
Kdump and the kernel crash dump analysisKdump and the kernel crash dump analysis
Kdump and the kernel crash dump analysisBuland Singh
 
Linux Kernel Debugging Essentials workshop
Linux Kernel Debugging Essentials workshopLinux Kernel Debugging Essentials workshop
Linux Kernel Debugging Essentials workshopLubomir Rintel
 
Kernel_Crash_Dump_Analysis
Kernel_Crash_Dump_AnalysisKernel_Crash_Dump_Analysis
Kernel_Crash_Dump_AnalysisBuland Singh
 
High Availability Server with DRBD in linux
High Availability Server with DRBD in linuxHigh Availability Server with DRBD in linux
High Availability Server with DRBD in linuxAli Rachman
 
Linux lv ms step by step
Linux lv ms step by stepLinux lv ms step by step
Linux lv ms step by stepsudakarman
 
Linux Crash Dump Capture and Analysis
Linux Crash Dump Capture and AnalysisLinux Crash Dump Capture and Analysis
Linux Crash Dump Capture and AnalysisPaul V. Novarese
 
Kernel Recipes 2015 - Kernel dump analysis
Kernel Recipes 2015 - Kernel dump analysisKernel Recipes 2015 - Kernel dump analysis
Kernel Recipes 2015 - Kernel dump analysisAnne Nicolas
 
Two single node cluster to one multinode cluster
Two single node cluster to one multinode clusterTwo single node cluster to one multinode cluster
Two single node cluster to one multinode clustersushantbit04
 
Kernel Recipes 2016 - Understanding a Real-Time System (more than just a kernel)
Kernel Recipes 2016 - Understanding a Real-Time System (more than just a kernel)Kernel Recipes 2016 - Understanding a Real-Time System (more than just a kernel)
Kernel Recipes 2016 - Understanding a Real-Time System (more than just a kernel)Anne Nicolas
 
Docker and friends at Linux Days 2014 in Prague
Docker and friends at Linux Days 2014 in PragueDocker and friends at Linux Days 2014 in Prague
Docker and friends at Linux Days 2014 in Praguetomasbart
 
Linux Containers From Scratch
Linux Containers From ScratchLinux Containers From Scratch
Linux Containers From Scratchjoshuasoundcloud
 
A Journey to Boot Linux on Raspberry Pi
A Journey to Boot Linux on Raspberry PiA Journey to Boot Linux on Raspberry Pi
A Journey to Boot Linux on Raspberry PiJian-Hong Pan
 
Hernan Ochoa - WCE Internals [RootedCON 2011]
Hernan Ochoa - WCE Internals [RootedCON 2011]Hernan Ochoa - WCE Internals [RootedCON 2011]
Hernan Ochoa - WCE Internals [RootedCON 2011]RootedCON
 
Linux Containers From Scratch: Makfile MicroVPS
Linux Containers From Scratch: Makfile MicroVPSLinux Containers From Scratch: Makfile MicroVPS
Linux Containers From Scratch: Makfile MicroVPSjoshuasoundcloud
 
Software Packaging for Cross OS Distribution
Software Packaging for Cross OS DistributionSoftware Packaging for Cross OS Distribution
Software Packaging for Cross OS DistributionJian-Hong Pan
 

What's hot (20)

Linux Kernel Crashdump
Linux Kernel CrashdumpLinux Kernel Crashdump
Linux Kernel Crashdump
 
Kdump and the kernel crash dump analysis
Kdump and the kernel crash dump analysisKdump and the kernel crash dump analysis
Kdump and the kernel crash dump analysis
 
Web Server Free Bsd
Web Server Free BsdWeb Server Free Bsd
Web Server Free Bsd
 
Linux Kernel Debugging Essentials workshop
Linux Kernel Debugging Essentials workshopLinux Kernel Debugging Essentials workshop
Linux Kernel Debugging Essentials workshop
 
Kernel_Crash_Dump_Analysis
Kernel_Crash_Dump_AnalysisKernel_Crash_Dump_Analysis
Kernel_Crash_Dump_Analysis
 
High Availability Server with DRBD in linux
High Availability Server with DRBD in linuxHigh Availability Server with DRBD in linux
High Availability Server with DRBD in linux
 
Linux lv ms step by step
Linux lv ms step by stepLinux lv ms step by step
Linux lv ms step by step
 
Linux Crash Dump Capture and Analysis
Linux Crash Dump Capture and AnalysisLinux Crash Dump Capture and Analysis
Linux Crash Dump Capture and Analysis
 
Kernel Recipes 2015 - Kernel dump analysis
Kernel Recipes 2015 - Kernel dump analysisKernel Recipes 2015 - Kernel dump analysis
Kernel Recipes 2015 - Kernel dump analysis
 
Two single node cluster to one multinode cluster
Two single node cluster to one multinode clusterTwo single node cluster to one multinode cluster
Two single node cluster to one multinode cluster
 
Kernel Recipes 2016 - Understanding a Real-Time System (more than just a kernel)
Kernel Recipes 2016 - Understanding a Real-Time System (more than just a kernel)Kernel Recipes 2016 - Understanding a Real-Time System (more than just a kernel)
Kernel Recipes 2016 - Understanding a Real-Time System (more than just a kernel)
 
Putting some "logic" in LVM.
Putting some "logic" in LVM.Putting some "logic" in LVM.
Putting some "logic" in LVM.
 
Docker and friends at Linux Days 2014 in Prague
Docker and friends at Linux Days 2014 in PragueDocker and friends at Linux Days 2014 in Prague
Docker and friends at Linux Days 2014 in Prague
 
Solaris
SolarisSolaris
Solaris
 
Linux Containers From Scratch
Linux Containers From ScratchLinux Containers From Scratch
Linux Containers From Scratch
 
A Journey to Boot Linux on Raspberry Pi
A Journey to Boot Linux on Raspberry PiA Journey to Boot Linux on Raspberry Pi
A Journey to Boot Linux on Raspberry Pi
 
Unixtoolbox
UnixtoolboxUnixtoolbox
Unixtoolbox
 
Hernan Ochoa - WCE Internals [RootedCON 2011]
Hernan Ochoa - WCE Internals [RootedCON 2011]Hernan Ochoa - WCE Internals [RootedCON 2011]
Hernan Ochoa - WCE Internals [RootedCON 2011]
 
Linux Containers From Scratch: Makfile MicroVPS
Linux Containers From Scratch: Makfile MicroVPSLinux Containers From Scratch: Makfile MicroVPS
Linux Containers From Scratch: Makfile MicroVPS
 
Software Packaging for Cross OS Distribution
Software Packaging for Cross OS DistributionSoftware Packaging for Cross OS Distribution
Software Packaging for Cross OS Distribution
 

Similar to Alta disponibilidad en GNU/Linux

Your own minecraft server on a linode vps
Your own minecraft server on a linode vpsYour own minecraft server on a linode vps
Your own minecraft server on a linode vpsCleo Morisson
 
Intrusion Detection System using Snort
Intrusion Detection System using Snort Intrusion Detection System using Snort
Intrusion Detection System using Snort webhostingguy
 
Intrusion Detection System using Snort
Intrusion Detection System using Snort Intrusion Detection System using Snort
Intrusion Detection System using Snort webhostingguy
 
9 creating cent_os 7_mages_for_dpdk_training
9 creating cent_os 7_mages_for_dpdk_training9 creating cent_os 7_mages_for_dpdk_training
9 creating cent_os 7_mages_for_dpdk_trainingvideos
 
7 hands on
7 hands on7 hands on
7 hands onvideos
 
Mirroring the root_disk under solaris SVM
Mirroring the root_disk under solaris SVMMirroring the root_disk under solaris SVM
Mirroring the root_disk under solaris SVMKazimal Abed Mohammed
 
2345014 unix-linux-bsd-cheat-sheets-i
2345014 unix-linux-bsd-cheat-sheets-i2345014 unix-linux-bsd-cheat-sheets-i
2345014 unix-linux-bsd-cheat-sheets-iLogesh Kumar Anandhan
 
linux_Commads
linux_Commadslinux_Commads
linux_Commadstastedone
 
Free radius billing server with practical vpn exmaple
Free radius billing server with practical vpn exmapleFree radius billing server with practical vpn exmaple
Free radius billing server with practical vpn exmapleChanaka Lasantha
 
Configuring Your First Hadoop Cluster On EC2
Configuring Your First Hadoop Cluster On EC2Configuring Your First Hadoop Cluster On EC2
Configuring Your First Hadoop Cluster On EC2benjaminwootton
 
DPDK in Containers Hands-on Lab
DPDK in Containers Hands-on LabDPDK in Containers Hands-on Lab
DPDK in Containers Hands-on LabMichelle Holley
 
Tutorial CentOS 5 untuk Webhosting
Tutorial CentOS 5 untuk WebhostingTutorial CentOS 5 untuk Webhosting
Tutorial CentOS 5 untuk WebhostingBeni Krisbiantoro
 
Network Automation Tools
Network Automation ToolsNetwork Automation Tools
Network Automation ToolsEdwin Beekman
 

Similar to Alta disponibilidad en GNU/Linux (20)

Dev ops
Dev opsDev ops
Dev ops
 
Your own minecraft server on a linode vps
Your own minecraft server on a linode vpsYour own minecraft server on a linode vps
Your own minecraft server on a linode vps
 
Intrusion Detection System using Snort
Intrusion Detection System using Snort Intrusion Detection System using Snort
Intrusion Detection System using Snort
 
Intrusion Detection System using Snort
Intrusion Detection System using Snort Intrusion Detection System using Snort
Intrusion Detection System using Snort
 
9 creating cent_os 7_mages_for_dpdk_training
9 creating cent_os 7_mages_for_dpdk_training9 creating cent_os 7_mages_for_dpdk_training
9 creating cent_os 7_mages_for_dpdk_training
 
Kafka and kafka connect
Kafka and kafka connectKafka and kafka connect
Kafka and kafka connect
 
Jana treek 4
Jana treek 4Jana treek 4
Jana treek 4
 
Xen time machine
Xen time machineXen time machine
Xen time machine
 
Linux
LinuxLinux
Linux
 
7 hands on
7 hands on7 hands on
7 hands on
 
Mirroring the root_disk under solaris SVM
Mirroring the root_disk under solaris SVMMirroring the root_disk under solaris SVM
Mirroring the root_disk under solaris SVM
 
2345014 unix-linux-bsd-cheat-sheets-i
2345014 unix-linux-bsd-cheat-sheets-i2345014 unix-linux-bsd-cheat-sheets-i
2345014 unix-linux-bsd-cheat-sheets-i
 
linux_Commads
linux_Commadslinux_Commads
linux_Commads
 
Hadoop on osx
Hadoop on osxHadoop on osx
Hadoop on osx
 
testing-nfs
testing-nfstesting-nfs
testing-nfs
 
Free radius billing server with practical vpn exmaple
Free radius billing server with practical vpn exmapleFree radius billing server with practical vpn exmaple
Free radius billing server with practical vpn exmaple
 
Configuring Your First Hadoop Cluster On EC2
Configuring Your First Hadoop Cluster On EC2Configuring Your First Hadoop Cluster On EC2
Configuring Your First Hadoop Cluster On EC2
 
DPDK in Containers Hands-on Lab
DPDK in Containers Hands-on LabDPDK in Containers Hands-on Lab
DPDK in Containers Hands-on Lab
 
Tutorial CentOS 5 untuk Webhosting
Tutorial CentOS 5 untuk WebhostingTutorial CentOS 5 untuk Webhosting
Tutorial CentOS 5 untuk Webhosting
 
Network Automation Tools
Network Automation ToolsNetwork Automation Tools
Network Automation Tools
 

Alta disponibilidad en GNU/Linux

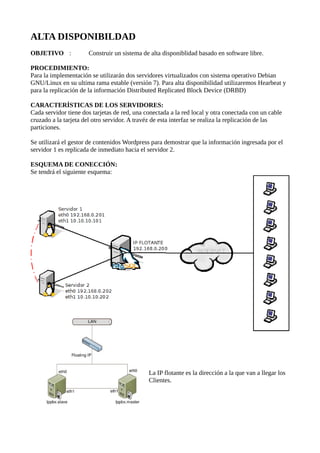
  • 1. ALTA DISPONIBILDAD OBJETIVO : Construir un sistema de alta disponiblidad basado en software libre. PROCEDIMIENTO: Para la implementación se utilizarán dos servidores virtualizados con sistema operativo Debian GNU/Linux en su ultima rama estable (versión 7). Para alta disponibilidad utilizaremos Hearbeat y para la replicación de la información Distributed Replicated Block Device (DRBD) CARACTERÍSTICAS DE LOS SERVIDORES: Cada servidor tiene dos tarjetas de red, una conectada a la red local y otra conectada con un cable cruzado a la tarjeta del otro servidor. A travéz de esta interfaz se realiza la replicación de las particiones. Se utilizará el gestor de contenidos Wordpress para demostrar que la información ingresada por el servidor 1 es replicada de inmediato hacia el servidor 2. ESQUEMA DE CONECCIÓN: Se tendrá el siguiente esquema: La IP flotante es la dirección a la que van a llegar los Clientes.
  • 2. CONFIGURACION Se realiza la instalación basica de Debian GNU/Linux en ambos servidores, se crearan las siguientes particiones: /boot / /swap /drdb ---> es la particion que queremos replicar entre los dos servidores Se instalan los paquetes necesarios: aptitude install linux-headers-'uname -r' drdb8-utils drdblinks heartbeat Una vez instalados los paquetes se procede con la configuración en Servidor 1: /etc/drdb.conf global { dialog-refresh 5; # 5 seconds usage-count no; } common { syncer { rate 100M; } } resource shared { protocol C; startup { wfc-timeout 5; degr-wfc-timeout 3; } on servidor1 { device /dev/drbd0; disk /dev/sda3; address 10.10.10.201:7789; meta-disk internal; } on servidor2 { device /dev/drbd0; disk /dev/sda3; address 10.10.10.202:7789; meta-disk internal; } } De igual manera en Servidor 2: /etc/drdb.conf global { dialog-refresh 5; # 5 seconds usage-count no; } common {
  • 3. syncer { rate 100M; } } resource shared { protocol C; startup { wfc-timeout 5; degr-wfc-timeout 3; } on servidor1 { device /dev/drbd0; disk /dev/sda3; address 10.10.10.201:7789; meta-disk internal; } on servidor2 { device /dev/drbd0; disk /dev/sda3; address 10.10.10.202:7789; meta-disk internal; } } En ambos servidores se activa el modulo drbd: modprobe drbd /etc/init.d/drbd start Se crea el recurso drbd en ambos servidores para habilitar la sincronizacion: drbdadm creat-md shared drbdadm attach shared drbdadm connect shared Para sincronizar Servidor 1 con Servidor 2 se ejecutan los siguientes comandos en Servidor 1: drbdadmin -- --overwrite-data-of-peer primary shared Despues de unos segundos se podra ver en ambos nodos Servidor 1 y Servidor 2 el estado UpToDate cat /proc/drbd Ahora debemos crear el sistema de archivos sobre el modulo drbd: mkfs.ext4 /dev/drbd0 mount -t ext4 /dev/drbd0 /drbd
  • 4. A continuacion se debera configurar Heartbeat. El archivo /etc/ha.d/ha.cf debera contener lo siguiente: # # There are lots of options in this file. All you have to have is a set # of nodes listed {"node ...} one of {serial, bcast, mcast, or ucast}, # and a value for "auto_failback". # # ATTENTION: As the configuration file is read line by line, # THE ORDER OF DIRECTIVE MATTERS! # # In particular, make sure that the udpport, serial baud rate # etc. are set before the heartbeat media are defined! # debug and log file directives go into effect when they # are encountered. # # All will be fine if you keep them ordered as in this example. # # # Note on logging: # If all of debugfile, logfile and logfacility are not defined, # logging is the same as use_logd yes. In other case, they are # respectively effective. if detering the logging to syslog, # logfacility must be "none". # # File to write debug messages to debugfile /var/log/ha-debug # # # File to write other messages to # #logfile /var/log/ha-log # # # Facility to use for syslog()/logger # logfacility local0 # # # A note on specifying "how long" times below... # # The default time unit is seconds # 10 means ten seconds # # You can also specify them in milliseconds # 1500ms means 1.5 seconds # # # keepalive: how long between heartbeats? # #keepalive 2 # # deadtime: how long-to-declare-host-dead? # # If you set this too low you will get the problematic # split-brain (or cluster partition) problem. # See the FAQ for how to use warntime to tune deadtime. # #deadtime 30 # # warntime: how long before issuing "late heartbeat" warning? # See the FAQ for how to use warntime to tune deadtime. # #warntime 10 # # # Very first dead time (initdead)
  • 5. # # On some machines/OSes, etc. the network takes a while to come up # and start working right after you've been rebooted. As a result # we have a separate dead time for when things first come up. # It should be at least twice the normal dead time. # #initdead 120 # # # What UDP port to use for bcast/ucast communication? # #udpport 694 # # Baud rate for serial ports... # #baud 19200 # # serial serialportname ... #serial /dev/ttyS0 # Linux #serial /dev/cuaa0 # FreeBSD #serial /dev/cuad0 # FreeBSD 6.x #serial /dev/cua/a # Solaris # # # What interfaces to broadcast heartbeats over? # #bcast eth0 # Linux #bcast eth1 eth2 # Linux #bcast le0 # Solaris #bcast le1 le2 # Solaris # # Set up a multicast heartbeat medium # mcast [dev] [mcast group] [port] [ttl] [loop] # # [dev] device to send/rcv heartbeats on # [mcast group] multicast group to join (class D multicast address # 224.0.0.0 - 239.255.255.255) # [port] udp port to sendto/rcvfrom (set this value to the # same value as "udpport" above) # [ttl] the ttl value for outbound heartbeats. this effects # how far the multicast packet will propagate. (0-255) # Must be greater than zero. # [loop] toggles loopback for outbound multicast heartbeats. # if enabled, an outbound packet will be looped back and # received by the interface it was sent on. (0 or 1) # Set this value to zero. # # #mcast eth0 225.0.0.1 694 1 0 # # Set up a unicast / udp heartbeat medium # ucast [dev] [peer-ip-addr] # # [dev] device to send/rcv heartbeats on # [peer-ip-addr] IP address of peer to send packets to # #ucast eth0 192.168.1.2 # # # About boolean values... # # Any of the following case-insensitive values will work for true: # true, on, yes, y, 1 # Any of the following case-insensitive values will work for false: # false, off, no, n, 0 # # # # auto_failback: determines whether a resource will # automatically fail back to its "primary" node, or remain # on whatever node is serving it until that node fails, or
  • 6. # an administrator intervenes. # # The possible values for auto_failback are: # on - enable automatic failbacks # off - disable automatic failbacks # legacy - enable automatic failbacks in systems # where all nodes do not yet support # the auto_failback option. # # auto_failback "on" and "off" are backwards compatible with the old # "nice_failback on" setting. # # See the FAQ for information on how to convert # from "legacy" to "on" without a flash cut. # (i.e., using a "rolling upgrade" process) # # The default value for auto_failback is "legacy", which # will issue a warning at startup. So, make sure you put # an auto_failback directive in your ha.cf file. # (note: auto_failback can be any boolean or "legacy") # auto_failback on # # # Basic STONITH support # Using this directive assumes that there is one stonith # device in the cluster. Parameters to this device are # read from a configuration file. The format of this line is: # # stonith <stonith_type> <configfile> # # NOTE: it is up to you to maintain this file on each node in the # cluster! # #stonith baytech /etc/ha.d/conf/stonith.baytech # # STONITH support # You can configure multiple stonith devices using this directive. # The format of the line is: # stonith_host <hostfrom> <stonith_type> <params...> # <hostfrom> is the machine the stonith device is attached # to or * to mean it is accessible from any host. # <stonith_type> is the type of stonith device (a list of # supported drives is in /usr/lib/stonith.) # <params...> are driver specific parameters. To see the # format for a particular device, run: # stonith -l -t <stonith_type> # # # Note that if you put your stonith device access information in # here, and you make this file publically readable, you're asking # for a denial of service attack ;-) # # To get a list of supported stonith devices, run # stonith -L # For detailed information on which stonith devices are supported # and their detailed configuration options, run this command: # stonith -h # #stonith_host * baytech 10.0.0.3 mylogin mysecretpassword #stonith_host ken3 rps10 /dev/ttyS1 kathy 0 #stonith_host kathy rps10 /dev/ttyS1 ken3 0 # # Watchdog is the watchdog timer. If our own heart doesn't beat for # a minute, then our machine will reboot. # NOTE: If you are using the software watchdog, you very likely # wish to load the module with the parameter "nowayout=0" or # compile it without CONFIG_WATCHDOG_NOWAYOUT set. Otherwise even # an orderly shutdown of heartbeat will trigger a reboot, which is # very likely NOT what you want. #
  • 7. #watchdog /dev/watchdog # # Tell what machines are in the cluster # node nodename ... -- must match uname -n #node ken3 #node kathy # # Less common options... # # Treats 10.10.10.254 as a psuedo-cluster-member # Used together with ipfail below... # note: don't use a cluster node as ping node # #ping 10.10.10.254 # # Treats 10.10.10.254 and 10.10.10.253 as a psuedo-cluster-member # called group1. If either 10.10.10.254 or 10.10.10.253 are up # then group1 is up # Used together with ipfail below... # #ping_group group1 10.10.10.254 10.10.10.253 # # HBA ping derective for Fiber Channel # Treats fc-card-name as psudo-cluster-member # used with ipfail below ... # # You can obtain HBAAPI from http://hbaapi.sourceforge.net. You need # to get the library specific to your HBA directly from the vender # To install HBAAPI stuff, all You need to do is to compile the common # part you obtained from the sourceforge. This will produce libHBAAPI.so # which you need to copy to /usr/lib. You need also copy hbaapi.h to # /usr/include. # # The fc-card-name is the name obtained from the hbaapitest program # that is part of the hbaapi package. Running hbaapitest will produce # a verbose output. One of the first line is similar to: # Apapter number 0 is named: qlogic-qla2200-0 # Here fc-card-name is qlogic-qla2200-0. # #hbaping fc-card-name # # # Processes started and stopped with heartbeat. Restarted unless # they exit with rc=100 # #respawn userid /path/name/to/run #respawn hacluster /usr/lib/heartbeat/ipfail # # Access control for client api # default is no access # #apiauth client-name gid=gidlist uid=uidlist #apiauth ipfail gid=haclient uid=hacluster ########################### # # Unusual options. # ########################### # # hopfudge maximum hop count minus number of nodes in config #hopfudge 1 # # deadping - dead time for ping nodes #deadping 30 # # hbgenmethod - Heartbeat generation number creation method # Normally these are stored on disk and incremented as needed. #hbgenmethod time # # realtime - enable/disable realtime execution (high priority, etc.)
  • 8. # defaults to on #realtime off # # debug - set debug level # defaults to zero #debug 1 # # API Authentication - replaces the fifo-permissions-based system of the past # # # You can put a uid list and/or a gid list. # If you put both, then a process is authorized if it qualifies under either # the uid list, or under the gid list. # # The groupname "default" has special meaning. If it is specified, then # this will be used for authorizing groupless clients, and any client groups # not otherwise specified. # # There is a subtle exception to this. "default" will never be used in the # following cases (actual default auth directives noted in brackets) # ipfail (uid=HA_CCMUSER) # ccm (uid=HA_CCMUSER) # ping (gid=HA_APIGROUP) # cl_status (gid=HA_APIGROUP) # # This is done to avoid creating a gaping security hole and matches the most # likely desired configuration. # #apiauth ipfail uid=hacluster #apiauth ccm uid=hacluster #apiauth cms uid=hacluster #apiauth ping gid=haclient uid=alanr,root #apiauth default gid=haclient # message format in the wire, it can be classic or netstring, # default: classic #msgfmt classic/netstring # Do we use logging daemon? # If logging daemon is used, logfile/debugfile/logfacility in this file # are not meaningful any longer. You should check the config file for logging # daemon (the default is /etc/logd.cf) # more infomartion can be fould in the man page. # Setting use_logd to "yes" is recommended # # use_logd yes/no # # the interval we reconnect to logging daemon if the previous connection failed # default: 60 seconds #conn_logd_time 60 # # # Configure compression module # It could be zlib or bz2, depending on whether u have the corresponding # library in the system. #compression bz2 # # Confiugre compression threshold # This value determines the threshold to compress a message, # e.g. if the threshold is 1, then any message with size greater than 1 KB # will be compressed, the default is 2 (KB) #compression_threshold 2 logfile /var/log/ha-log logfacility local0 keepalive 2 deadtime 20 warntime 10 initdead 40 udpport 694 bcast eth0 auto_failback off
  • 9. node servidor1 node servidor2 El archivo /etc/ha.d/authkeys debe contener: # # Authentication file. Must be mode 600 # # # Must have exactly one auth directive at the front. # auth send authentication using this method-id # # Then, list the method and key that go with that method-id # # Available methods: crc sha1, md5. Crc doesn't need/want a key. # # You normally only have one authentication method-id listed in this file # # Put more than one to make a smooth transition when changing auth # methods and/or keys. # # # sha1 is believed to be the "best", md5 next best. # # crc adds no security, except from packet corruption. # Use only on physically secure networks. # #auth 1 #1 crc #2 sha1 HI! #3 md5 Hello! auth 2 2 sha1 password El archivo /etc/ha.d/haresources debe contener (en una sola linea): servidor1 drbddisk::shared Filesystem::/dev/drbd0::/drbd::ext4 IPaddr::192.168.0.200/24/eth0 apache2 mysql En ambos servidores se debe iniciar el servicio hearbeat: /etc/init.d/hearbeat start El siguiente comando nos ayuda a identificar cual de los dos servidores esta en el rol principal: drbdadm role shared