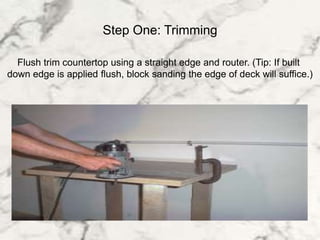
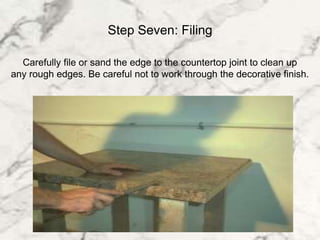
How To Install Laminate Countertop Trim
7 Quick Steps to Install Your New Edge Trim:
Whether you are a countertop fabricator or this is your first time taking on a home
improvement project, building a new countertop can sometimes be a formidable task.
To ease your concerns and build some confidence, we broke the installation of
the edge trim moldings down into 7 quick and easy steps.
We've even provided a list of required materials to get started.
Required Materials
Router & Flush Trim Bit
or
Block Sander
Straight Edge
Table, Circular or Miter Saw
Filament Tape
Exterior Grade Wood Glue (Titebond II)
Lacquer Thinner
Laminate File
Spring Clamp (Optional)
Most of these items are available for purchase on our website or you can call us
toll-free 1-866-322-3835 for more information on availability
Step One: Trimming
Flush trim countertop using a straight edge and router. (Tip: If built
down edge is applied flush, block sanding the edge of deck will suffice.)
Step Two: Cut Moldings
lCut Bevel-Edge slightly longer than necessary and trim to
lfinal dimension after fitting one end. Remember to cut into laminate
lto prevent chipping or separation.
Step Three: Dry Fitting
lMake sure to dry fit all pieces prior to applying glue.
Step Four: Apply Adhesive
lUsing your moisture resistant wood glue, apply
la thin coat to the entire back surface of the edge molding.
Step Five: Installation
lNow its time to install the edge trim to the countertop.
lAttach the molding to the deck using Filament tape every
l3'', affix from bottom to top. Place spring clamp on one
lend to hold in place and align with top of counter as you go.
Step Six: Cleaning
Next is everyone's favorite activity, cleaning. Once the glue has dried,
remove tape and clean excess adhesive with Lacquer Thinner.
Then sand bottom edge flush with deck.
Step Seven: Filing
Carefully file or sand the edge to the countertop joint to clean up
any rough edges. Be careful not to work through the decorative finish.
The End
That's it. You're finished. It really was that easy.
The final result should look like this:

7 step install

  • 1.
    How To InstallLaminate Countertop Trim 7 Quick Steps to Install Your New Edge Trim: Whether you are a countertop fabricator or this is your first time taking on a home improvement project, building a new countertop can sometimes be a formidable task. To ease your concerns and build some confidence, we broke the installation of the edge trim moldings down into 7 quick and easy steps. We've even provided a list of required materials to get started.
  • 2.
    Required Materials Router &Flush Trim Bit or Block Sander Straight Edge Table, Circular or Miter Saw Filament Tape Exterior Grade Wood Glue (Titebond II) Lacquer Thinner Laminate File Spring Clamp (Optional) Most of these items are available for purchase on our website or you can call us toll-free 1-866-322-3835 for more information on availability
  • 3.
    Step One: Trimming Flushtrim countertop using a straight edge and router. (Tip: If built down edge is applied flush, block sanding the edge of deck will suffice.)
  • 4.
    Step Two: CutMoldings lCut Bevel-Edge slightly longer than necessary and trim to lfinal dimension after fitting one end. Remember to cut into laminate lto prevent chipping or separation.
  • 5.
    Step Three: DryFitting lMake sure to dry fit all pieces prior to applying glue.
  • 6.
    Step Four: ApplyAdhesive lUsing your moisture resistant wood glue, apply la thin coat to the entire back surface of the edge molding.
  • 7.
    Step Five: Installation lNowits time to install the edge trim to the countertop. lAttach the molding to the deck using Filament tape every l3'', affix from bottom to top. Place spring clamp on one lend to hold in place and align with top of counter as you go.
  • 8.
    Step Six: Cleaning Nextis everyone's favorite activity, cleaning. Once the glue has dried, remove tape and clean excess adhesive with Lacquer Thinner. Then sand bottom edge flush with deck.
  • 9.
    Step Seven: Filing Carefullyfile or sand the edge to the countertop joint to clean up any rough edges. Be careful not to work through the decorative finish.
  • 10.
    The End That's it.You're finished. It really was that easy. The final result should look like this: