SlideShare a Scribd company logo
1 of 131
Download to read offline
General Info
Specifications
Maintenance
*Engine Electrical
Engine
Cooling
Fuel and Emissions
*Transaxle
Steering
Suspension
*Brakes (Including ABS,
TCS and VSA)
*Body
*Heating, Ventilation and
Air Conditioning
*Body Electrical
*Restraints
1996–04 3.5RL Main Menu
As sections w/ * include SRS components,
special precautions are required when servicing.
Troubleshooting - '96 - 98 Models
Diagnostic Trouble Code (DTC) Chart
24-41
24-44
24-44
24-46
24-48
24-50
24-52
24-52
24-54
24-56
24-58
24-60
24-60
24-62
24-64
24-66
24-68
24-68
24-70
24-72
24-74
Main Menu Table of Contents
24-181
24-181
24-181
24-181
24-76
24-81
24-181
If fuse No. 7 (10 A) is open or removed, and you keep the engine cranking, this may be self-diagnosed as a failure in the
SRS system, and the SRS indicator light may indicate DTC 7-2. In this case, first check the No. 7 (10 A) fuse in the under-
dash fuse/relay box. Next, erase the DTC memory (see page 24-37), and check the DTC. If DTC 7-2 doesn't reappear, the
SRS unit is normal.
Main Menu Table of Contents
BackprobingSpring-loadedLock
Connectors
• When checking voltage or resistance on this type of
connector the first time, it is necessary to remove the
retainer to insert tester probes from the wire side.
NOTE: It is not necessary to reinstall the removed
retainer; the terminals will stay locked in the connec-
tor housing.
Disconnecting the Airbag
Connectors and Seat Belt
Tensioner Connectors
'96 - 98 Models
Before removing an airbag or other SRS related devices
(the SRS unit and the cable reel), disconnecting connec-
tors from SRS related devices, or removing the dash-
board or the steering column, disconnect the airbag
connectors to prevent accidental deployment.
Turn the ignition switch OFF and disconnect the nega-
tive cable from the battery, and wait at least 3 minutes
before beginning the following procedures.
• Before disconnecting the SRS main harness 18P con-
nector (A) from the SRS unit, disconnect both airbag
2P connectors (C, D) and both seat belt tensioner 2P
connectors (F, H).
• Before disconnecting the cable reel 2P connector (B),
disconnect the driver's airbag 2P connector (C).
• Before disconnecting the left side wire harness 2P
connector (E), disconnect the driver's seat belt ten-
sioner 2P connector. (F).
• Before disconnecting the right side wire harness 2P
connector (G), disconnect the front passenger seat
belt tensioner 2P connector (H).
Refer to page 24-33 for the disconnect the connector(s).
• To remove the retainer, insert a flat tip screwdriver
between connector body and retainer, and carefully
pry out the retainer.
NOTE: Take care not to break the connector.
Main Menu Table of Contents
Chassis and Paint Codes
1996 Model
Vehicle Identification Number Transmission Number
Engine Number
Vehicle Identification Number
and Federal Motor Vehicle
Safety Standard Certification.
Vehicle Identification Number
and Canadian Motor Vehicle
Safety Standard Certification.
COLOR LABEL
INT. COLOR
TYPE F
EXT. COLOR
G-79P
KA SZ3 A3 C
Paint Code
Paint Code
Paint Code Color
G-79P
G-83P
NH-585P
NH-592P
RP-25P
YR-508M
YR-511P
Juniper Green Pearl
Eucalyptus Green Pearl
Cayman White Pearl
Flamenco Black Pearl
Black Currant Pearl
Heather Mist Metallic
Devon Slate Pearl
Main Menu Table of Contents
1997 Model
Vehicle Identification Number Transmission Number
Paint Code
Paint Code
B-75M
G-79P
G-83P
NH-585P
NH-592P
RP-25P
YR-508M
YR-511P
Color
Crescent Silver Metallic*2
Juniper Green Pearl
Eucalyptus Green Pearl*1
Cayman White Pearl
Flamenco Black Pearl
Black Currant Pearl*1
Heather Mist Metallic
Devon Slate Pearl*1
Engine Number
Vehicle Identification Number
and Federal Motor Vehicle
Safety Standard Certification.
Vehicle Identification Number
and Canadian Motor Vehicle
Safety Standard Certification.
COLORLABEL
INT. COLOR
TYPE F
EXT. COLOR
G-79P
KA SZ3 A3 C
Paint Code
Main Menu Table of Contents
Chassis and Paint Codes
1998 Model
Vehicle Identification Number
U.S. model: 000001-
Canada model: 800001-
Transmission Number
*1: U.S. model only
Engine Number
Vehicle Identification Number
and Federal Motor Vehicle
Safety Standard Certification.
Vehicle Identification Number
and Canadian Motor Vehicle
Safety Standard Certification.
COLORLABEL
INT. COLOR
TYPE F
EXT. COLOR
G-79P
KA SZ3 A3 C
Paint Code
Paint Code
Paint Code Color
Crystal Silver Metallic
Juniper Green Pearl*1
Cayman White Pearl
Flamenco Black Pearl
Athlete Gray Metallic*1
Ruby Red Pearl*1
Heather Mist Metallic
B-91M
G-79P
NH-585P
NH-592P
NH-611M
R-504P
YR-508M
Main Menu Table of Contents
1999 Model
Vehicle Identification Number TransmissionNumber
*1: U.S. model only
Engine Number
C35A1 - 4000001
Vehicle Identification Number
and Federal Motor Vehicle
Safety Standard Certification.
Vehicle Identification Number
and Canadian Motor Vehicle
Safety Standard Certification.
COLOR LABEL
INT. COLOR
TYPE F
EXT. COLOR
G-97P
KA SZ3 A6 C
Paint Code
PaintCode
Paint Code Color
Crystal Silver Metallic
Nighthawk Black Pearl
Monterey Blue Pearl*1
Vermont Green Pearl
Premium White Pearl
Ruby Red Pearl*1
Naples Gold Metallic
B-91M
B-92P
B-93P
G-97P
NH-624P
R-504P
YR-524M
Main Menu Table of Contents
Chassis and Paint Codes
2000 Model
Vehicle Identification Number
U.S. model: 000001~
Canada model: 800001 ~
Transmission Number
Engine Number
Vehicle Identification Number
and Federal Motor Vehicle
Safety Standard Certification.
Vehicle Identification Number
and Canadian Motor Vehicle
Safety Standard Certification.
COLOR LABEL
INT. COLOR
TYPE F
EXT. COLOR
G-97P
KA SZ3 A6 C
Paint Code
Paint Code
Paint Code Color
B-92P
B-93P
G-97P
NH-552M
R-504P
YR-524M
Nighthawk Black Pearl
Monterey Blue Pearl
Vermont Green Pearl*1
Sebring Silver Metallic
Ruby Red Pearl*1
Naples Gold Metallic
*1: U.S. model only
Main Menu Table of Contents
Chassisand PaintCodes
2001 Model
Vehicle Identification Number Transmission Number
*1: U.S. model only
Engine Number
Vehicle Identification Number
and Federal Motor Vehicle
Safety Standard Certification.
Vehicle Identification Number
and Canadian Motor Vehicle
Safety Standard Certification.
COLOR LABEL
INT. COLOR
TYPE F
EXT. COLOR
G-97P
KA SZ3 A6 C
Paint Code
B-92P
B-502P
G-97P
NH-623M
NH-624P
R-507P
YR-524M
Nighthawk Black Pearl
Indigo Blue Pearl*1
Vermont Green Pearl*1
Satin Silver Metallic
Premium White Pearl
Firepepper Pearl
Naples Gold Metallic
ColorPaintCode
Paint Code
Main Menu Table of Contents
ChassisandPaintCodes
2002 Model
Vehicle Identification Number Transmission Number
PaintCode
Engine Number
Main Menu Table of Contents
Chassis and Paint Codes
2003 Model
- Vehicle Identification Number TransmissionNumber
Paint Code
Main Menu Table of Contents
Chassis and Paint Codes
2004 Model
Main Menu Table of Contents
Revised Component Terms
Beginning with '01 models, the following component terms have been changed to conform with the standards in SAE docu-
ment J1930. If you find a term or abbreviation in a '01 manual that is unfamiliar to you, check this list. If a term is not listed
below, it did not change.
'00 and Earlier Models '01 and LaterModels
Main Menu Table of Contents
'00 and Earlier Models '01 and Later Models
Main Menu Table of Contents
Parts Marking
To deter vehicle theft, certain major components are marked with the vehicle identification number (VIN). Original
parts have self-adhesive labels. Replacement body parts have generic self-adhesive labels. The original engine or
transmission VIN plate is transferred to a replacement engine or transmission and attached with break-off bolts.
NOTE: Be careful not to damage the parts marking labels during body repair. Mask the labels before repairing the part.
Main Menu Table of Contents
Identification Number Locations
Vehicle Identification Number Vehicle Identification Number
Transmission Number
(Automatic) EngineNumber
Main Menu Table of Contents
Caution Label Locations
SRSWARNING
(HOOD)
DRIVERSRSINFORMATION
(see page 1-10)
PASSENGER SRS
INFORMATION
U.S. model
(on back of sunvisor, see page 1-10)
PASSENGER SRS
INFORMATION
U.S. model
(see page 1-10)
FRONTSEATPASSENGER
AIRBAG MODULE DANGER/
WARNING
(see page 1-10)
FRONTSEAT
PASSENGER AIRBAG
CAUTION
U.S. model
(see page 1-11)
FRONT SEATBELT
TENSIONER WARNING
(see page 1-11)
STEERING COLUMN
NOTICE
(see page 1-11)
MONITOR NOTICE
(see page 1-11)
SIDE AIRBAG CAUTION
(see page 1-11)
SRS WARNING (HOOD) ('96 - 98 models)
SUPPLEMENTAL RESTRAINT SYSTEM (SRS)
THIS VEHICLE IS EQUIPPED WITH DRIVER AND
FRONT SEAT PASSENGER AIRBAGS AND FRONT
SEATBELT TENSIONER SYSTEMS.
ALL SRS ELECTRICAL WIRING AND CONNECTORS
ARECOLOREDYELLOW.
TAMPERING WITH, DISCONNECTING OR USING
ELECTRICAL TEST EQUIPMENT ON THE SRS
WIRING CAN MAKE THE SYSTEM INOPERATIVE OR
CAUSE ACCIDENTAL FIRING OF THE INFLATOR.
WARNING
THE AIRBAG INFLATOR IS EXPLOSIVE AND, IF
ACCIDENTALLYDEPLOYED,CANSERIOUSLY
HURT YOU.
FOLLOW SERVICE MANUAL INSTRUCTIONS
CAREFULLY.
SRS WARNING (HOOD) ('99 - 01 models)
SUPPLEMENTAL RESTRAINT SYSTEM (SRS)
THIS VEHICLE IS EQUIPPED WITH DRIVER AND
FRONT SEAT PASSENGER FRONT AND SIDE
AIRBAGS AND FRONT SEATBELT TENSIONERS.
ALL SRS ELECTRICAL WIRING AND CONNECTORS
ARE COLORED YELLOW.
TAMPERING WITH, DISCONNECTING OR USING
TEST EQUIPMENT ON THE SRS WIRING CAN MAKE
THE SYSTEM INOPERATIVE OR CAUSE ACCIDEN-
TAL DEPLOYMENT.
WARNING
ACCIDENTAL DEPLOYMENT, CAN SERIOUSLY
HURT OR KILL YOU.
FOLLOW SERVICE MANUAL INSTRUCTIONS
CAREFULLY.
Main Menu Table of Contents
Caution Label Locations
(cont'd)
DRIVER SRS INFORMATION
PASSENGER SRS INFORMATION ('96, '97 models)
CAUTION
TO AVOID SERIOUS INJURY:
FOR MAXIMUM SAFETY PROTECTION IN ALL TYPES OF
CRASHES, YOU MUST ALWAYS WEAR YOUR SAFETY
BELT.
DO NOT INSTALL REARWARD-FACING CHILD SEATS IN
ANY FRONT PASSENGER SEAT POSITION.
DO NOT SIT OR LEAN UNNECESSARILY CLOSE TO THE
AIRBAG.
DO NOT PLACE ANY OBJECTS OVER THE AIRBAG OR
BETWEEN THE AIRBAG AND YOURSELF.
SEE THE OWNER'S MANUAL FOR FURTHER INFORMA-
TION AND EXPLANATIONS.
THE SRS MUST BE INSPECTED TEN YEARS AFTER IT IS
INSTALLED.
THE DATE OF INSTALLATION IS SHOWN ON THE DRIV-
ER'S DOORJAMB.
PASSENGER SRS INFORMATION
U.S. model ('96, '97 models)
AIRBAG. SEE OTHER SIDE.
DRIVER SRS INFORMATION
Canada model ('98, '99 models)
CAUTION
TO AVOID SERIOUS INJURY:
FOR MAXIMUM SAFETY PROTECTION IN ALL TYPES OF
CRASHES, YOU MUST ALWAYS WEAR YOUR SAFETY
BELT.
DO NOT INSTALL REARWARD FACING CHILD SEATS IN
ANY FRONT PASSENGER SEAT POSITION.
DO NOT SIT OR LEAN UNNECESSARILY CLOSE TO THE
AIRBAG.
DO NOT PLACE ANY OBJECTS OVER THE AIRBAG OR
BETWEEN THE AIR BAG AND YOURSELF.
SEE THE OWNER'S MANUAL FOR FURTHER INFORMA-
TION AND EXPLANATIONS.
DRIVER SRS INFORMATION
PASSENGER SRS INFORMATION
U.S. model ('98 - 01 models)
WARNING
DEATH OR SERIOUS INJURY CAN OCCUR.
CHILDREN 12 AND UNDER CAN BE KILLED BY THE
AIRBAG.
THE BACK SEAT IS THE SAFEST PLACE FOR CHILDREN.
NEVER PUT A REAR-FACING CHILD SEAT IN THE FRONT.
SIT AS FAR BACK AS POSSIBLE FROM THE AIRBAG.
ALWAYS USE SEAT BELTS AND CHILD RESTRAINTS.
DRIVER SRS INFORMATION
PASSENGER SRS INFORMATION
U.S. model ('98, '99 models)
AIRBAG WARNING
FLIP VISOR OVER
FRONT SEAT PASSENGER AIRBAG MODULE
DANGER/WARNING ('96, '97 models)
DANGER
EXPLOSIVE/FLAMMABLE
CONTACT WITH ACID, WATER OR HEAVY METALS SUCH AS
COPPER, LEAD OR MERCURY MAY PRODUCE HARMFUL AND
IRRITATING GASES OR EXPLOSIVE COMPOUNDS. STORAGE
TEMPERATURES MUST NOT EXCEED 200°F (93°C). FOR
PROPER HANDLING, STORAGE AND DISPOSAL PROCE-
DURES REFER TO THE SERVICE MANUAL SRS SUPPLEMENT.
POISON, CONTAINS POISONOUS SODIUM AZIDE AND
POTASSIUM NITRATE.
FIRST AID IF CONTENTS ARE SWALLOWED, INDUCE VOMIT-
ING. FOR EYE CONTACT, FLUSH EYES WITH WATER FOR 15
MINUTES. IF GASES (FROM ACID OR WATER CONTACT)
ARE INHALED, SEEK FRESH AIR.
IN EVERY CASE, GET PROMPT MEDICAL ATTENTION.
KEEP OUT OF REACH OF CHILDREN.
. WARNING
THE AIRBAG INFLATOR IS EXPLOSIVE AND, IF ACCIDEN-
TALLY DEPLOYED, CAN SERIOUSLY HURT OR KILL YOU.
DO NOT USE ELECTRICAL TEST EQUIPMENT OR PROB-
ING DEVICES.
THEY CAN CAUSE ACCIDENTAL DEPLOYMENT.
NO SERVICEABLE PARTS INSIDE. DO NOT DISASSEM-
BLE.
PLACE THE AIRBAG UPRIGHT WHEN REMOVED.
FOLLOW THE SERVICE MANUAL INSTRUCTIONS CARE-
FULLY.
FRONT SEAT PASSENGER AIRBAG MODULE
DANGER/WARNING ('98 - 01 models)
DANGER
EXPLOSIVE/FLAMMABLE
STORAGE TEMPERATURES MUST NOT EXCEED 200°F (93°C).
FOR PROPER HANDLING, STORAGE AND DISPOSAL PROCE-
DURES REFER TO THE SERVICE MANUAL SRS SUPPLEMENT.
FIRST AID IF CONTENTS ARE SWALLOWED, INDUCE VOMIT-
ING. FOR EYE CONTACT, FLUSH EYES WITH WATER FOR 15
MINUTES. IN EVERY CASE, GET PROMPT MEDICAL ATTEN-
TION.
KEEP OUT OF REACH OF CHILDREN.
WARNING
THE AIRBAG INFLATOR IS EXPLOSIVE AND, IF ACCIDEN-
TALLY DEPLOYED, CAN SERIOUSLY HURT OR KILL YOU.
DO NOT USE ELECTRICAL TEST EQUIPMENT OR PROB-
ING DEVICES. THEY CAN CAUSE ACCIDENTAL DEPLOY-
MENT.
NO SERVICEABLE PARTS INSIDE. DO NOT DISASSEMBLE.
PLACE AIRBAG UPRIGHT WHEN REMOVED.
FOLLOW THE SERVICE MANUAL INSTRUCTIONS CARE-
FULLY.
Main Menu Table of Contents
STEERING COLUMN NOTICE
TO PREVENT SRS DAMAGE, REMOVE STEERING WHEEL
BEFORE REMOVING STEERING SHAFT CONNECTING
BOLT.
MONITOR NOTICE
NOTICE
NO SERVICEABLE PARTS INSIDE.
REFER TO SERVICE MANUAL FOR DETAILED INSTRUC-
TIONS.
FRONT SEATBELT TENSIONER WARNING
WARNING
EXPLOSIVE MATERIAL INSIDE
YOU CAN BE SERIOUSLY HURT OR BURNED.
DO NOT TAMPER OR DISASSEMBLE.
NO SERVICEABLE PARTS INSIDE.
REFER TO SERVICE MANUAL FOR COMPLETE INSTRUC-
TIONS.
FRONT SEAT PASSENGER AIRBAG CAUTION
'96 - 99 U.S. model
WARNING
CHILDREN CAN BE KILLED OR INJURED BY A PASSENGER
AIRBAG.
THE BACK SEAT IS THE SAFEST PLACE FOR CHILDREN
AGES 12 AND UNDER. MAKE SURE ALL CHILDREN USE
SEAT BELTS OR CHILD SEATS.
FRONT SEAT PASSENGER AIRBAG CAUTION
'00 - 01 U.S. models
WARNING
CHILDREN CAN BE KILLED OR INJURED BY PASSENGER
AIRBAG.
MAKE SURE ALL CHILDREN USE SEAT BELTS OR CHILD
SEATS.
CABLE REEL
CAUTION
DRIVER MODULE
DANGER ('97, '98 models)
DRIVER MODULE
WARNING
DRIVER MODULE DANGER ('99 - 01 models)
CABLE REEL CAUTION
INSTALLATION OF THE SRS CABLE REEL IS CRITICAL TO
THE PROPER OPERATION OF THE SRS SYSTEM. REFER TO
THE SERVICE MANUAL DETAILED INSTALLATION
INSTRUCTIONS.
DRIVER MODULE DANGER ('97 model)
DANGER
EXPLOSIVE/FLAMMABLE
CONTACT WITH ACID, WATER OR HEAVY METALS SUCH AS
COPPER, LEAD OR MERCURY MAY PRODUCE HARMFUL AND
IRRITATING GASES OR EXPLOSIVE COMPOUNDS. STORAGE
TEMPERATURES MUST NOT EXCEED 200°F (93°C). FOR
PROPER HANDLING, STORAGE AND DISPOSAL PROCE-
DURES REFER TO SERVICE MANUAL SRS SUPPLEMENT.
POISON, CONTAINS POISONOUS SODIUM AZIDE AND
POTASSIUM NITRATE.
FIRST AID IF CONTENTS ARE SWALLOWED, INDUCE VOMIT-
ING. FOR EYE CONTACT, FLUSH EYES WITH WATER FOR 15
MINUTES. IF GASES (FROM ACID OR WATER CONTACT)
ARE INHALED, SEEK FRESH AIR.
IN EVERY CASE, GET PROMPT MEDICAL ATTENTION.
KEEP OUT OF REACH OF CHILDREN.
DRIVER MODULE DANGER ('98 model)
DANGER
EXPLOSIVE/FLAMMABLE
STORAGE TEMPERATURES MUST NOT EXCEED 200°F <93°C).
FOR PROPER HANDLING, STORAGE AND DISPOSAL PROCE-
DURES REFER TO SERVICE MANUAL SRS SUPPLEMENT.
FIRST AID IF CONTENTS ARE SWALLOWED, INDUCE VOMIT-
ING. FOR EYE CONTACT, FLUSH EYES WITH WATER FOR 15
MINUTES.
IN EVERY CASE, GET PROMPT MEDICAL ATTENTION.
KEEP OUT OF REACH OF CHILDREN.
DRIVER MODULE WARNING
WARNING
THE AIRBAG INFLATOR IS EXPLOSIVE AND, IF ACCIDEN-
TALLY DEPLOYED, CAN SERIOUSLY HURT OR KILL YOU.
DO NOT USE ELECTRICAL TEST EQUIPMENT OR PROB-
ING DEVICES. THEY CAN CAUSE ACCIDENTAL DEPLOY-
MENT.
NO SERVICEABLE PARTS INSIDE. DO NOT DISASSEM-
BLE.
PLACE AIRBAG UPRIGHT WHEN REMOVED.
FOLLOW SERVICE MANUAL INSTRUCTIONS CAREFULLY.
SIDE AIRBAG CAUTION ('99 - 01 models)
SIDE AIRBAG
THIS CAR IS EQUIPPED WITH SIDE AIRBAGS IN THE
DRIVER'S AND PASSENGER'S SEAT.
DO NOT LEAN AGAINST THE DOOR.
SEE OWNER'S MANUAL FOR MORE INFORMATION.
SRS
NOTICE
Main Menu Table of Contents
Caution Label Locations
(cont'd)
SERVICE INFORMATION
Under-hood Emissions
Control Label
HEADLIGHT AIMING
INFORMATION
'96 - 99 models
See page 1-11.
This caution is also labeled
on passenger doorjamb.
AIR CONDITIONING
INFORMATION
TIREINFORMATION
SIDEAIRBAGCAUTION
TIRE INFORMATION
RADIATOR CAP
CAUTION
'00-01 models
BATTERY CAUTION
COOLANT
INFORMATION
Main Menu Table of Contents
Under-hood Emissions Control Label
Emission Group Identification
(1997 model)
Example:
VACUUM HOSE ROUTING DIAGRAM
50ST (50 State):
THIS VEHICLE CONFORMS TO THE U.S. EPA AND THE
STATE OF CALIFORNIA REGULATIONS APPLICABLE TO
1997 MODEL YEAR NEW MOTOR VEHICLES.
Engine and Evaporative Families
Engine Family:
Main Menu Table of Contents
Under-hood Emissions Control Label
Emission Group Identification
(1998 model)
Example:
VACUUM HOSE ROUTING DIAGRAM
50ST (50 States):
THIS VEHICLE CONFORMS TO THE U.S. EPA AND THE
STATE OF CALIFORNIA REGULATIONS APPLICABLE TO
1998 MODEL YEAR NEW MOTOR VEHICLES.
Engine and Evaporative Families
Engine Family:
Evaporative Family:
Main Menu Table of Contents
Emission Group Identification
(1999 model)
Example:
VACUUM HOSE ROUTING DIAGRAM
50ST (50 States):
THIS VEHICLE CONFORMS TO THE U.S. EPA AND THE
STATE OF CALIFORNIA REGULATIONS APPLICABLE TO
1999 MODEL YEAR NEW MOTOR VEHICLES.
Engine and Evaporative Families
Engine Family:
Evaporative Family:
Main Menu Table of Contents
Under-hood Emissions Control Label
Emission Group Identification
(2000 model)
Example:
50ST (50 States):
THIS VEHICLE CONFORMS TO U.S. EPA NLEV REGULA-
TIONS APPLICABLE TO 2000 MODEL YEAR NEW LEV
PASSENGER CARS AND CALIFORNIA REGULATIONS
APPLICABLE TO 2000 MODEL YEAR NEW LEV PASSEN-
GERCARS.
Engine and Evaporative Families
Engine Family:
Evaporative Family:
VACUUM HOSE ROUTING DIAGRAM
Main Menu Table of Contents
Emission Group Identification
(2001 model)
Example:
VEHICLE EMISSION CONTROL INFORMATION
50ST (50 States):
THIS VEHICLE CONFORMS TO U.S. EPA NLEV REGULA-
TIONS APPLICABLE TO 2001 MODEL YEAR NEW LEV
PASSENGER CARS AND CALIFORNIA REGULATIONS
APPLICABLE TO 2001 MODEL YEAR NEW LEV PASSEN-
GER CARS.
CANADIAN TIER 1:
THIS VEHICLE CONFORMS CANADIAN TIER 1 STAN-
DARDS FOR 2001 MODEL YEAR NEW PASSENGER
CARS.
Engine and Evaporative Families
Engine Family:
Evaporative Family:
Main Menu Table of Contents
Emission Group Identification
(2003 model)
Under-hood Emissions Control Label
Engine and Evaporative Families
Main Menu Table of Contents
Under-hood Emissions Control Label
Emission Group Identification
(2004 model)
Main Menu Table of Contents
Lift and Support Points
Lift and Safety Stands
1. Place the lift blocks as shown.
2. Raise the hoist a few inches (centimeters), and rock the vehicle to be sure it is firmly supported.
3. Raise the hoist to full height, and inspect the lift points for solid support.
NOTE: Use the same support points to support the vehicle on safety stands.
FRONT SUPPORT POINT REAR SUPPORT POINT
LIFT BLOCKS
Main Menu Table of Contents
FloorJack
1. Block the rear wheels when raising the front of the
vehicle; block the front wheels when raising the rear
of the vehicle.
Place the blocks behind and ahead of the wheels.
2. Raise the vehicle high enough to insert the safety
stands.
3. Adjust and place the safety stands so the vehicle
will be approximately level, then lower the vehicle
onto them.
Always use safety stands when working on or under
any vehicle that is supported by only a jack.
Never attempt to use a bumper jack for lifting or
supporting the vehicle.
Front
Center the jack
bracket in the middle
ofthe jack lift platform.
JACK LIFT PLATFORM
Rear
Center the jack
bracket in the middle
of the jack lift platform.
JACK LIFT PLATFORM
Main Menu Table of Contents
Towing
If the vehicle needs to be towed, call a professional tow-
ing service. Never tow the vehicle behind another vehi-
cle with just a rope or chain. It is very dangerous.
EmergencyTowing
There are three popular methods of towing a vehicle.
Flat-bed Equipment — The operator loads the vehicle on
the back of a truck. This is the best way of transporting the
vehicle.
Wheel Lift Equipment — The tow truck uses two pivoting
arms that go under the tires (front or rear) and lifts them
off the ground. The other two wheels remain on the
ground.
Sling-type Equipment — The tow truck uses metal cables
with hooks on the ends. These hooks go around parts of
the frame or suspension and the cables lift that end of
the vehicle off the ground. The vehicle's suspension and
body can be seriously damaged if this method of towing
is attempted.
If the vehicle cannot be transported by flat-bed, it should
be towed with the front wheels off the ground. If due to
damage, the vehicle must be towed with the front
wheels on the ground, do the following.
Releasethe parking brake.
Start the engine.
Shift to position, then position.
Turn off the engine.
Leave the ignition switch in Accessory (I) so the steer-
ing wheel does not look.
CAUTION: Improper towing preparation will damage
the transmission. Follow the above procedure exactly. If
you cannot shift the transmission or start the engine,
the vehicle must be transported on a flat-bed.
It is best to tow the vehicle no farther than 50 miles
(80 km), and keep the speed below 35 mph (55 km/h).
CAUTION: Trying to lift or tow the vehicle by the bumpers
will cause serious damage. The bumpers are not designed
to support the vehicle's weight.
Front:
TOWING HOOKS and
TIE DOWN BRACKETS
Rear:
TIE DOWN BRACKET
Main Menu Table of Contents
Service Precautions
Handling of Special Nuts and Bolts
Because the front sub frame sections on this vehicle are
constructed with aluminum alloys, use only the special
"Dacro" type nuts and bolts recommended by Acura.
NOTE:
Dacro finish can be identified by gray plating.
Some Dacro finish bolts have a green coating on the
thread section of the bolt for easier application. This
type of bolt is called a "Torquer" bolt.
Use of other types of nuts and bolts may cause elec-
trolysis and corrosion which in turn could cause the
bolt to loosen.
Gray plating
Green coating
on the threads
of some bolts.
Gray plating: "Dacro" type
Gray plating + Green coating on the threads:
"Torquer" type
1. When replacing nuts and bolts, use only the same
type.
2. Tighten the nuts and bolts with a torque wrench to
the specifications provided in this manual.
3. Clean all thread ridges with a non-wire-type bristle
brush. Foreign matter in the threads may cause the
bolt to loosen.
4. Sections on this vehicle requiring the use of Dacro
nuts and bolts will be indicated by a ( ) in this
manual.
Main Menu Table of Contents
Standards and Service Limits
Engine Electrical — Section 4
*1 When using a new belt, adjust deflection to new value. Run the engine for 5 minutes then turn it off. Readjust deflection to used belt value.
*2 Do not adjust the gap, replace the spark plug if it is out of service limit.
'1: NIHON HATSUJO manufactured valve spring *2: CHUO HATSUJO manufactured valve spring
Cylinder Head/Valve Train — Section 6
Main Menu Table of Contents
Standards and Service Limits
Engine Electrical — Section 4
*1 When using a new belt, adjust deflection or tension to new value. Run the engine for 5 minutes then turn it off. Readjust deflection or tension
to used belt value.
*2 Do not adjust the gap, replace the spark plug if it is out of service limit.
Cylinder Head/Valve Train — Section 6
*1: NIHON HATSUJO manufactured valve spring *2: CHUO HATSUJO manufactured valve spring
Main Menu Table of Contents
Standards and Service Limits
Engine Electrical — Section 4
Cylinder Head/Valve Train — Section 6
Main Menu Table of Contents
Standards and Service Limits
Engine Electrical —Section 4
Cylinder Head/Valve Train — Section 6
*1 When using a new belt, adjust deflection or tension to new value. Run the engine for 5 minutes then turn it off. Readjust deflection or tension
to used belt value.
*2 Do not adjust the gap, replace the spark plug if it is out of service limit.
Main Menu Table of Contents
Engine Lubrication — Section 8
Engine Block — Section 7
Main Menu Table of Contents
Engine Block — Section 7
Engine Lubrication — Section 8
*1: RIKEN manufactured piston ring.
*2: TEIKOKU PISTON RING manufactured piston ring.
Main Menu Table of Contents
- Engine Block — Section 7
Engine Lubrication — Section 8
Main Menu Table of Contents
Engine Block — Section 7
Engine Lubrication — Section 8
Main Menu Table of Contents
Standards and Service Limits
Cooling — Section 10
Fuel and Emissions — Section 11
Main Menu Table of Contents
Standards and Service Limits
Cooling — Section 10
Fuel and Emissions — Section 11
Main Menu Table of Contents
Fuel and Emissions — Section 11
Standards and Service Limits
Cooling — Section 10 -
Main Menu Table of Contents
Standards and Service Limits
Cooling — Section 10
Fuel and Emissions — Section 11
Main Menu Table of Contents
Standards and Service Limits
Differential — Section 15
Main Menu Table of Contents
Standards and Service Limits
Differential — Section 15
Main Menu Table of Contents
Standards and Service Limits
Differential — Section 15
Main Menu Table of Contents
Standards and Service Limits
Differential — Section 15
Main Menu Table of Contents
Steering — Section 17
Suspension — Section 18
Brakes — Section 19
Main Menu Table of Contents
Steering — Section 17
Suspension — Section 18
Brakes — Section 19
Main Menu Table of Contents
Steering — Section 17
Suspension — Section 18
Brakes — Section 19
Main Menu Table of Contents
Brakes — Section 19
Suspension — Section 18
Steering — Section 17
Main Menu Table of Contents
Standards and Service Limits
AirConditioning—Section22
Main Menu Table of Contents
Standards and Service Limits
Air Conditioning — Section 22
* When using a new belt, adjust deflection or tension to new value. Run the engine for 5 minutes then turn it off. Readjust deflection or tension to
used belt value.
Main Menu Table of Contents
Standards and Service Limits
Air Conditioning— Section 22
Main Menu Table of Contents
Design Specifications
Main Menu Table of Contents
Design Specifications
(cont'd)
Main Menu Table of Contents
Standards and Service Limits
Air Conditioning — Section 22
Main Menu Table of Contents
Design Specifications
Main Menu Table of Contents
Design Specifications
(cont'd)
Main Menu Table of Contents
Design Specifications
Main Menu Table of Contents
Design Specifications
Main Menu Table of ContentsMain Menu Table of Contents
Design Specifications
Main Menu Table of Contents
Design Specifications
(cont'd)
Main Menu Table of Contents
Body Specifications
Main Menu Table of Contents
Body Specifications
Main Menu Table of Contents
Body Specifications
Main Menu Table of Contents
Body Specifications
Main Menu Table of Contents
LubricationPoints
For the details of lubrication points and types of lubricants to be applied, refer to the Illustrated Index and various work
procedures (such as Assembly/Reassembly, Replacement, Overhaul, Installation, etc.) contained in each section.
No.
1
2
3
4
5
6
7
8
9
10
11
12
13
14
15
16
17
18
19
20
21
22
LUBRICATION POINTS
Engine
Transmission
Brake line (Includes ABS line)
Power steering gearbox
Steering boots
Throttle cable end
Steering ball joints
Shift lever (Automatic transmission)
Pedallinkage
Intermediate shaft
Brake master cylinder pushrod
Fuel fill lid
Battery terminals
Trunk hinges and latch
Door hinges upper and lower
Door opening detents
Hood hinges and hood latch
Brake line joints (Front and rear wheelhouse)
Caliper Piston boot, caliper
Pins and boots
Power steering system
Differential
A/C compressor
API SERVICE LABEL API CERTIFICATION SEAL
LUBRICANT
API Service Grade: Use SJ "Energy Conserving" grade oil.
The oil container may also display the API Certification
seal shown below. Make sure it says "For Gasoline
Engines."
SAE Viscosity: See chart below.
HondaATF-Z1(ATF)*1
Genuine Honda DOT3 brake fluid*2
Steering grease P/N 08733 - B070E
Multi-purpose grease
Honda White Lithium Grease
Rust preventive
Silicone grease
Genuine Honda power steering fluid*3
Hypoid gear Oil API GL4 or GL5
Viscosity:
at above -18°C (0°F): SAE 90
at less than -18°C (0°F): SAE 80W-90
Compressor oil:
DENSO: ND-OIL8 (P/N) 38897 - PR7 - A01AH or 38899 -
PR7-A01)
(For Refrigerant: HFC-134a (R-134a))
Recommendedengineoil
viscosity for ambient
temperature ranges
*1: Always use Honda ATF-Z1 (ATF). Using a non-Honda ATF can affect shift quality.
*2: Always use Genuine Honda DOT3 Brake Fluid. Using a non-Honda brake fluid can cause corrosion and decrease the
life of the system.
*3: Always use Genuine Honda Power Steering Fluid. Using any other type of power steering fluid or automatic transmis-
sion fluid can cause increased wear and poor steering in cold weather.
Main Menu Table of Contents
NOTE: Lubricate all hinges, latches, and locks once a year.
In corrosive areas, more frequent lubrication is necessary.
We recommend Honda White Lithium Grease.
Main Menu Table of Contents
Follow the Normal Conditions Maintenance Schedule if the severe driving conditions specified in the Severe Conditions Maintenance Schedule on pages 3-6 and 3-7 do not apply.
8-4
8-5
8-4, 10-5
11-153
4-22
6-8 to 6-13,
10-10
4-33, 17-15,
22-85
11-124
10-5
14-108
15-4
19-10, 19-11,
12, 17, 18,
19-19, 19-23
19-8
19-6
22-68
Main Menu Table of Contents
According to state and federal regulations, failure to perform maintenance on the items marked with an asterisk (*) will not void customer's emission
warranties. However, Acura recommends that all maintenance services be performed at the recommended time or mileage period to ensure long-term reliability.
For Canadian models:
This Maintenance Schedule outlines the minimum required maintenance.
17-14, 17-23
18-3,18-21, 18-22
16-3
19-28
8-4, 10-5,
14-108, 15-4,
17-16, 19-8
10-2
9-5
11-126
Main Menu Table of Contents
Follow the Normal Conditions Maintenance Schedule if the severe driving conditions specified in the Severe Conditions Maintenance Schedule on pages 3-10 and 3-11 do not apply.
8-4
8-5
8-4, 10-5
11-153
4-22
6-8 to 6-13,
10-10
4-33, 17-15,
22-85
11-124
10-5
14-108
15-4
19-10, 19-11,
12, 17, 18,
19-19, 19-23
19-8
19-6
22-68
Main Menu Table of Contents
According to state and federal regulations, failure to perform maintenance on the items marked with an asterisk (*) will not void customer's emission
warranties. However, Acura recommends that all maintenance services be performed at the recommended time or mileage period to ensure long-term reliability.
ForCanadianmodels:
This Maintenance Schedule outlines the minimum required maintenance.
17-14, 17-23
18-3, 18-21, 18-22
16-3
19-28
8-4, 10-5,
14-108, 15-4,
17-16, 19-8
10-3
9-5
11-126
Main Menu Table of Contents
Follow the Normal Conditions Maintenance Schedule if the severe driving conditions specified in the Severe Conditions Maintenance Schedule on pages 3-14 and 3-15 do not apply.
8-4
8-5
8-4, 10-5
11-153
4-22
6-8 to 6-13,
10-10
4-33, 17-15,
22-85
11-124
10-5
14-108
15-4
19-10, 19-11,
12, 17, 18,
19-19, 19-23
19-8
19-6
22-68
Main Menu Table of Contents
According to state and federal regulations, failure to perform maintenance on the items marked with an asterisk (*) will not void customer's emission
warranties. However, Acura recommends that all maintenance services be performed at the recommended time or mileage period to ensure long-term reliability.
For Canadian models:
This Maintenance Schedule outlines the minimum required maintenance.
17-14, 17-23
18-3, 18-21, 18-22
16-3
19-28
8-4, 10-5,
14-108, 15-4,
17-16, 19-8
10-2
9-5
11-126
Main Menu Table of Contents
Follow the Normal Conditions Maintenance Schedule if the severe driving conditions specified in the Severe Conditions Maintenance Schedule on pages 3-4 and 3-5 do not apply.
8-4
8-5
8-4,10-5
11-153
4-22
6-8 to 6-13,
10-10
4-33, 17-15,
22-85
11-124
10-5
14-108
15-4
19-10, 19-11,
19-12, 19-17, 19-18,
19-19, 19-23
19-8
19-6
22-68
Main Menu Table of Contents
* According to state and federal regulations, failure to perform maintenance on the items marked with an asterisk (*) will not void customer's emission
warranties. However, Acura recommends that all maintenance services be performed at the recommended time or mileage period to ensure long-term reliability.
For Canadian models: Follow the Severe Conditions Maintenance Schedule on page 3-4 and 3-5.
17-14, 17-23
18-3, 18-21, 18-22
16-3
19-28
8-4, 10-5,
14-108, 15-4,
17-16, 19-8
10-2
9-5
11-126
Main Menu Table of Contents
Follow the Normal Conditions Maintenance Schedule if the severe driving conditions specified in the Severe Conditions Maintenance Schedule on pages 3-4 and 3-5 do not apply.
8-4
8-5
8-4, 10-5
11-150
4-22
6-8 to 6-13,
10-10
4-33, 17-15,
22-85
11-121
10-5
14-108
15-4
19-10, 19-11,
19-12, 19-17, 19-18,
19-19, 19-23
19-8
19-7
22-68
Main Menu Table of Contents
For Canadian models: Follow the Severe Conditions Maintenance Schedule on page 3-4 and 3-5.
17-14, 17-23
18-3, 18-21, 18-22
16-3
19-28
8-4, 10-5,
14-108 15-4,
17-16, 19-8
9-5
11-123
Main Menu Table of Contents
Follow the Severe Conditions Maintenance Schedule if the vehicle is driven in Canada or MAINLY under one or more of the Severe Driving Conditions (page 3-7):
8-4, 8-5
8-4, 10-5
11-153
4-22
6-8 to 6-13,
10-10
4-33, 17-15,
22-85
11-124
10-5
14-108
15-4
19-10, 19-11,
19-12,19-17,19-18,
19-19, 19-23
19-8
19-6
22-68
3-2, 3-3
*1: Do not adjust the gap, replace the spark plug if it is out of service limit.
*2: Replace the tinning belt and timing balancer belt at 60,000 miles (U.S.) 100,000 km (Canada) if the vehicle regularly is driven in one or more of these conditions:
• In very high temperatures (over 110°F, 43°C).
• In very low temperatures (under -20°F, -29°C).
*3: Replace every 15,000 miles (24,000 km) if the vehicle is driven primarily in urban areas that have high concentrations of soot in the air from industry and diesel-powered vehi-
cles. Replace the air conditioning filter more often if air flow from the climate control system becomes less than usual.
Main Menu Table of Contents
According to state and federal regulations, failure to perform maintenance on the items marked with an asterisk (*) will not void customer's emission
warranties. However, Acura recommends that all maintenance services be performed at the recommended time or mileage period to ensure long-term
reliability.
Severe Driving Conditions:
• Driving less than 5 miles (8 km) per trip or, in freezing temperatures, driving less than 10 miles (16 km) per trip.
• Driving in hot [over 90°F (32°C)] conditions.
• Extensive idling or long periods of stop-and-go driving.
• Trailer towing, driving with a roof-top carrier, or driving in mountainous conditions.
• Driving on muddy, dusty, or de-iced roads.
NOTE: If the vehicle is driven OCCASIONALLY under a
3-4 and 3-5.
'severe" condition, you should follow the Normal Conditions Maintenance Schedule on pages
23-123
11-126
9-5
10-2
8-4, 10-5,
14-108, 15-4,
17-16, 19-8
19-28
16-3
18-3, 18-21, 18-22
17-14, 17-23
Main Menu Table of Contents
Follow the Severe Conditions Maintenance Schedule if the vehicle is driven in Canada or MAINLY under one or more of the Severe Driving Conditions (page 3-11):
8-4,8-5
8-4, 10-5
11-153
4-22
6-8 to 6-13,
10-10
4-33, 17-15,
22-85
11-124
10-5
14-108
15-4
19-10, 19-11,
12, 17, 18,
19,23
19-8
19-6
22-68
3-2, 3-3
Main Menu Table of Contents
According to state and federal regulations, failure to perform maintenance on the items marked with an asterisk (*) will not void customer's emission
warranties. However, Acura recommends that all maintenance services be performed at the recommended time or mileage period to ensure long-term
reliability.
Severe Driving Conditions:
• Driving less than 5 miles (8 km) per trip or, in freezing temperatures, driving less than 10 miles (16 km) per trip.
• Driving in hot [over 90°F (32°C)] conditions.
• Extensive idling or long periods of stop-and-go driving.
• Trailer towing, driving with a roof-top carrier, or driving in mountainous conditions.
• Driving on muddy, dusty, or de-iced roads.
NOTE: If the vehicle is driven OCCASIONALLY under a "severe" condition, you should follow the Normal Conditions Maintenance Schedule on pages
3-8 and 3-9.
17-14, 17-23
18-3, 21, 22
16-3
19-28
8-4, 10-5,
14-108, 15-4,
17-16, 19-8
10-2
9-5
11-126
23-123
Main Menu Table of Contents
Follow the Severe Conditions Maintenance Schedule if the vehicle is driven MAINLY under one or more of the Severe Driving Conditions (page 3-15):
8-4, 8-5
8-4, 10-5
11-153
4-22
6-8 to 6-13,
10-10
4-33, 17-15,
22-85
11-124
10-5
14-108
15-4
19-10, 19-11,
12, 17, 18,
19-19, 19-23
19-8
19-6
22-68
3-2, 3-3
*1: Do not adjust the gap, replace the spark plug if it is out of service limit.
*2: Replace the timing belt and timing balancer belt at 60,000 miles (U.S.) 100,000 km (Canada) if the vehicle regularly is driven in one or more of these conditions:
• In very high temperatures (over 110°F, 43°C).
• In very low temperatures (under -20°F, -29°C).
*3: Replace every 15,000 miles (24,000 km) if the vehicle is driven primarily in urban areas that have high concentrations of soot in the air from industry and diesel-powered vehi-
cles. Replace the air conditioning filter more often if air flow from the climate control system becomes less than usual.
Main Menu Table of Contents
According to state and federal regulations, failure to perform maintenance on the items marked with an asterisk (*) will not void customer's emission
warranties. However, Acura recommends that all maintenance services be performed at the recommended time or mileage period to ensure long-term
reliability.
Severe Driving Conditions:
• Driving less than 5 miles (8 km) per trip or, in freezing temperatures, driving less than 10 miles (16 km) per trip.
• Driving in hot [over 90°F (32°C)] conditions.
• Extensive idling or long periods of stop-and-go driving.
• Trailer towing, driving with a roof-top carrier, or driving in mountainous conditions.
• Driving on muddy, dusty, or de-iced roads.
NOTE: If the vehicle is driven OCCASIONALLY under a "severe" condition, you should follow the Normal Conditions Maintenance Schedule on pages
3-12 and 3-13.
17-14, 17-23
18-3, 18-21, 18-22
16-3
19-28
8-4, 10-5,
14-108, 15-4,
17-16, 19-8
10-2
9-5
11-126
23-123
Main Menu Table of Contents
8-4,8-5
11-153
4-22
6-8 to 6-13,
10-10
4-33, 17-15,
22-85
19-8
19-6
22-68
3-2, 3-3
8-4, 10-5
19-10, 19-11,
19-12,19-17, 19-18,
19-19,19-23
11-124
10-5
14-108
15-4
*1: Replace the timing belt and timing balancer belt at 60,000 miles (U.S.) 96,000 km (Canada) if the vehicle regularly is driven in one or more of these conditions:
• In very high temperatures (over 110°F, 43°C).
• In very low temperatures (under -20°F, -29°C).
*2: Replace every 15,000 miles (24,000 km) if the vehicle is driven primarily in urban areas that have high concentrations of soot in the air from industry and diesel-powered vehi-
Follow the Severe Conditions Maintenance Schedule if the vehicle is driven in Canada or MAINLY under one or more of the Severe Driving Conditions (page 3-5):
cles. Replace the air conditioning filter more often if air flow from the climate control system becomes less than usual.
Main Menu Table of Contents
17-14, 17-23
18-3,18-21,18-22
16-3
19-28
8-4, 10-5,
14-108, 15-4,
17-16, 19-8
10-2
9-5
11-126
23-123
* According to state and federal regulations, failure to perform maintenance on the items marked with an asterisk (*) will not void customer's emission
warranties. However, Acura recommends that all maintenance services be performed at the recommended time or mileage period to ensure long-term
reliability.
Severe Driving Conditions:
• Driving less than 5 miles (8 km) per trip or, in freezing temperatures, driving less than 10 miles (16 km) per trip.
• Driving in hot [over 90°F (32°C)] conditions.
• Extensive idling or long periods of stop-and-go driving.
• Trailer towing, driving with a roof-top carrier, or driving in mountainous conditions.
• Driving on muddy, dusty, or de-iced roads.
NOTE: If the vehicle is driven OCCASIONALLY under a "severe" condition, you should follow the Normal Conditions Maintenance Schedule on pages
3-2 and 3-3.
Main Menu Table of Contents
Follow the Severe Conditions Maintenance Schedule if the vehicle is driven in Canada or MAINLY under one or more of the Severe Driving Conditions (page 3-5):
8-4, 8-5
8-4, 10-5
11-150
4-22
6-8 to 6-13,
10-10
4-33, 17-15,
22-85
11-121
10-5
14-108
15-4
19-10, 19-11,
19-12, 19-17, 19-18,
19-19, 19-23
19-8
19-7
22-68
3-2, 3-3
Main Menu Table of Contents
NOTE: If the vehicle is driven OCCASIONALLY under a "severe" condition, you should follow the Normal Conditions Maintenance Schedule on pages
3-2 and 3-3.
17-14, 17-23
18-3, 18-21, 18-22
16-3
19-28
8-4, 10-5,
14-108, 15-4,
17-16, 19-8
9-5
11-123
23-123
Main Menu Table of Contents
Special Tools
Ref. No. Tool Number Description Qty Page Reference
A973X - 041 - XXXXX
07JGG-001010A
07PAZ-0010100
Vacuum Pump Gauge
Belt Tension Gauge
SCS Service Connector
4-43
4-33
4-18
* Included in Belt Tension Gauge Set, T/N 07TGG - 001000A.
Main Menu Table of Contents
Starting System
ComponentLocation Index
STARTER CUT RELAY
Wire colors: BLK/WHT,
BLK/WHT, BLK/WHT and WHT/RED
UNDER-DASH
FUSE/RELAY BOX
STARTER
Test, page 4-5
Replacement, page 4-6
Overhaul, page 4-8
Solenoid Test, page 4-9
Reassembly, page 4-14
Main Menu Table of Contents
Starter Test
NOTE: The air temperature must be between 59 and
100°F (15 and 38°C) before testing.
Recommended Procedure:
Use a starter system tester.
Connect and operate the equipment in accordance
with the manufacturer's instructions.
Test and troubleshoot as described.
Alternate Procedure:
Use following equipment:
— Ammeter, 0 - 400 A
— Voltmeter, 0 - 20 V (accurate within 0.1 volt)
— Tachometer, 0 - 1,200 rpm
Hook up a voltmeter and ammeter as shown.
NEGATIVE
TERMINAL
NOTE: After this test, or any subsequent repair, reset
the PCM to clear any codes (see section 11).
Check the Starter Engagement
1. Disconnect the 8P and 6P connector from the ICM.
6P CONNECTOR
ICM
8P CONNECTOR
2.
3.
With the shift lever in or , turn the ignition
switch to START (III).
The starter should crank the engine. If the starter
does not crank the engine, go to step 3.
If it cranks the engine erratically or too slowly, go
to "Check for Wear and Damage" on the next
page.
Check the battery, battery positive cable, ground,
starter cut relay, and the wire connections for loose-
ness and corrosion. Test again. If the starter still does
not crank the engine, go to step 4.
Unplug the connector (BLK/WHT wire) from the
starter. Make sure the shift lever is in or , then
connect a jumper wire from the battery positive (+)
terminal to the solenoid terminal. The starter should
crank the engine.
S (SOLENOID)
TERMINAL
BLK/WHT
WIRE
If the starter still does not crank the engine, remove
it, and diagnose its internal problem.
If the starter cranks the engine, go to step 5 and
continue the test.
5. Check the ignition switch.
6. Check the starter cut relay.
7. Check for an open in the wire between the ignition
switch and starter.
8. Check the immobilizer system (see section 23).
4.
Main Menu Table of Contents
Starting System
Starter Test (cont'd)
Checkfor Wear and Damage
The starter should crank the engine smoothly and steadily.
If the starter engages, but cranks the engine erratically,
remove it, and inspect the starter drive gear and drive
plate ring gear for damage.
Check the drive gear overrunning clutch for binding or
slipping when the armature is rotated with the drive gear
held. If the clutch is damaged, replace the clutch assem-
bly.
Check Cranking Voltage and Current Draw
Cranking voltage should be no less than 8.0 volts.
Current draw should be no more than 400 amperes.
If cranking voltage is too low, or current draw too high,
check for:
Dead or low battery
Open circuit in starter armature commutator segments
Starter armature dragging
Shorted armature winding
Excessive drag in engine
Check Cranking rpm
Engine speed during cranking should be above 100 rpm.
If speed is too low, check for:
Loose battery or starter terminals
Excessively worn starter brushes
Open circuit in commutator segments
Dirty or damaged helical spline or drive gear
Defective drive gear overrunning clutch
Check Starter Disengagement
With the shift lever in turn the ignition switch to
"START (III)", and release to "ON (II)". The starter drive
gear should disengage from the drive plate ring gear
when you release the key.
If the drive gear hangs up on the drive plate ring gear,
check for:
• Solenoid plunger and switch malfunction
• Dirty drive gear assembly or damaged overrunning
clutch
Main Menu Table of Contents
4. Remove the alternator belt and alternator (see page
4-29).
5. Remove the left exhaust manifold cover. (see
section 9).
6. Remove the left damper fork (see section 18).
7. Disconnect the left suspension lower arm ball joint
(see section 18).
8. Remove the left driveshaft (see section 16).
Starter Replacement
1. Make sure you have the anti-theft code for the radio,
then write down the frequencies for the radio's pre-
set buttons.
2. Disconnect the battery negative terminal first, then
the positive terminal.
NOTE: The PCM memory setting is needed after
reconnecting the battery (see page 11-123).
3. Raise the coolant reservoir, then remove the battery
and battery base.
Starting System
Main Menu Table of Contents
GASKET
Replace.
EXHAUST
PIPE A
SELF-LOCKING NUT
10 x 1.25 mm
54 N-m (5.5 kgf-m,
40 Ibf-ft)
Replace.
10 x 1.25 mm
38 N-m (3.9 kgf-m,
28 Ibf-ft)
SELF-LOCKING NUT
10 x 1.25 mm
54 N-m (5.5 kgf-m,
40 Ibf-ft)
Replace.
TRANSMISSION STOP
COLLAR
10. Remove the front mount mounting bolts (see
section 5).
11. Attach the chain hoist to the engine (see section 5).
12. Remove the left engine mount bracket.
12 x 1.25 mm
54 N-m (5.5 kgf-m,
40 Ibf-ft)
12 x 1.25 mm
64 N-m (6.5 kgf-m,
47 Ibf-ft)
LEFT ENGINE
MOUNT BRACKET
12 x 1.25 mm
54 N-m (5.5 kgf-m, 40 Ibf-ft)
13. Disconnect the starter cable and BLK/WHT wire, then
remove the starter.
8 x 1.25 mm
8.8 N-m (0.9 kgf-m,
6.5 Ibf-ft)
10 x 1.25 mm
STARTER 44 N-m (4.5 kgf-m, 33 Ibf-ft)
CABLE
BLK/WHT
WIRE
10 x 1.25 mm
44 N-m (4.5 kgf-m, 33 Ibf-ft)
STARTER
14. Install in the reverse order of removal.
NOTE: When installing the starter cable, make sure
that the crimped side of the ring terminal is facing
out.
Crimped side of ring
terminal
NUT
TERMINAL
15. Enter the anti-theft code for the radio, then enter the
customer's radio station presets.
9. Remove the transmission stop collar, then remove
the exhaust pipe A.
GASKETS
Replace.
SELF-LOCKING NUT
8 x 1.25 mm
22 N-m (2.2 kgf-m, 16 Ibf-ft)
Replace.
Main Menu Table of Contents
Starting System
Starter Overhaul
CAUTION: Disconnect the battery cable before remov-
ing the starter (see page 4-6).
NOTE: The PCM memory setting is needed after recon-
necting the battery (see page 11-125).
BRUSH HOLDER
BRUSH SPRING
BRUSH HOLDER
Test, page 4-12
END COVER
RING
GEAR
ARMATURE HOUSING
Test, page 4-9
MOLYBDENUM
DISULFIDE
OVERRUNNING
CLUTCH ASSEMBLY
GEAR SHAFT
PLANETARY GEAR
Inspection, page 4-13
PLATE
MOLYBDENUM
DISULFIDE
ARMATURE
Inspection and
Test, page 4-10
MOLYBDENUM
DISULFIDE
OVERRUNNING
CLUTCH ASSEMBLY
Inspection, page 4-13
SOLENOID
LEVER
STARTER SOLENOID
Test, page 4-9
RINGGEAR
PINION STOP
SPRING CLIP
Replace
MOLYBDENUM
DISULFIDE
GEAR HOUSING
PLANETARY GEARARMATURE
STEEL BALL
Main Menu Table of Contents
Starter Solenoid Test
1. Remove the starter solenoid from the gear housing.
SOLENOID
SCREWS
GEAR HOUSING
2. Check for continuity between the terminals in each
solenoid plunger position according to the table.
PLUNGER
SOLENOID HOUSING (GROUND)
Starter Field Winding Test
1. Check for continuity between the brushes. If there's
no continuity, replace the armature housing.
2. Check for continuity between each brush and the
armature housing (ground).
If continuity exists, replace the armature housing.
BRUSHES
ARMATURE HOUSING (GROUND)
GROUND
PULL-IN COIL HOLD-IN COIL
Main Menu Table of Contents
StartingSystem
ArmatureInspectionandTest
1. Inspect the armature for wear or damage due to con-
tact with the permanent magnet. If there is wear or
damage, replace the armature.
Inspect for damage
2. Check commutator surface and diameter.
If the surface is dirty or burnt, resurface with emery
cloth or a lathe within the following specifications,
or recondition with #500 or #600 sandpaper.
COMMUTATOR
SANDPAPER
If commutator diameter is below the service limit,
replace the armature.
Commutator Diameter
Standard (NEW)
31.9-32.1 mm
(1.256 -1.264 in)
Service Limit
31.5 mm
(1.240 in)
VERNIER CALIPER
COMMUTATOR
3. Measure the commutator runout.
If the commutator runout is within the service
limit, check the commutator for carbon dust or
brass chips between the segments.
If the commutator runout is not within the ser-
vice limit, replace the armature.
Commutator Runout
Standard(NEW)
0-0.05 mm
(0-0.002 in)
Service Limit
0.1 mm
(0.004in)
DIAL INDICATOR
COMMUTATOR
Main Menu Table of Contents
4. Check for mica depth. If necessary, undercut the mica
with a hacksaw blade to achieve proper depth. If the
service limit cannot be maintained, replace the arma-
ture.
NO-GOOD
GOOD
MICA DEPTH
Commutator Mica Depth
Standard (NEW)
0.5-0.8 mm
(0.020-0.031 in)
Service Limit
0.20 mm
(0.008 in)
5. Check for continuity between the segments of the
commutator. If an open circuit exists between any
segments, replace the armature.
COMMUTATOR SEGMENT
6. Place the armature on an armature tester. Hold a
hacksaw blade on the armature core. If the blade is
attracted to the core or vibrates while the core is
turned, the armature is shorted. Replace the arma-
ture.
ARMATURE TESTER
HACKSAW BLADE
ARMATURE
7. With an ohmmeter, check that no continuity exists
between the commutator and armature coil core,
and between the commutator and armature shaft. If
there is continuity, replace the armature.
SHAFT COIL CORE COMMUTATOR
HIGH
MICA
Main Menu Table of Contents
Starting System
Starter Brush Holder Test
1. Check that there is no continuity between the and
brush holders. If there is continuity, replace the
brush holder assembly.
BRUSH HOLDER
BRUSH HOLDER BRUSH HOLDER
2. Insert the brush into the brush holder, and bring the
brush into contact with the commutator, then attach
a spring scale to the spring. Measure the spring ten-
sion at the moment the spring lifts off the brush.
SPRING SCALE
(Commercially available)
SPRING
BRUSH
SpringTension
29.1 - 37.8 N (2.97 - 3.85 kgf, 6.548 - 8.488 Ibf)
Starter Brush Inspection
Measure the brush length. If the length not within the
service limit, replace the brush holder assembly.
Brush Length
Standard(NEW)
18 mm
(0.71in)
Service Limit
10 mm
(0.39 in)
BRUSH
NOTE: To seat new brushes after installing them in their
holders, slip a strip of #500 or #600 sandpaper, with the
grit side up, over the commutator, and smoothly rotate
the armature. The contact surface of the brushes will be
sanded to the same contour as the commutator.
BRUSH HOLDER
Main Menu Table of Contents
Planetary Gear Inspection
Check if the planetary gears are worn or damaged. If they
are, also check the condition of the armature shaft gear
and ring gear.
ARMATURE
SHAFTGEAR
RING
GEAR
PLANETARY GEARS
Overrunning Clutch Inspection
Slide the overrunning clutch along the shaft.
Does it move freely? If not, replace it.
1.
2. Rotate the overrunning clutch both ways.
Does it lock in one direction and rotate smoothly in
reverse? If it does not lock in either direction or it
locks in both directions, replace it.
SHAFT
3.
4.
DRIVE GEAR
If the starter drive gear is worn or damaged, replace
the overrunning clutch assembly; the gear is not avail-
able separately.
Check the condition of the torque converter ring gear
if the starter drive gear teeth are damaged.
Main Menu Table of Contents
Starting System
Overrunning Clutch Removal
1. Put the end of a pipe (inner diameter 13 mm (0.51 in))
against the pinion stop, and strike the pipe to force
the pinion stop over the spring clip.
A: 13 mm (0.51 in)
PINION STOP
PIPE
SPRING CLIP
PLANETARY GEAR SHAFT
NOTE: Be careful not to damage the planetary gear
shaft when striking the pipe.
2. Remove the spring clip then pull the pinion stop
and overrunning clutch off the shaft.
SPRING CLIP
PINION STOP
Starter Reassembly
NOTE: Use the illustration on page 4-8 as reference for
reassembly.
1. Pry back each brush spring with a screwdriver, then
position the brush about halfway out of its holder,
and release the spring to hold it there.
2. Install the armature in the housing. Next pry back
each brush spring again and push the brush down
until it seats against the commutator, then release
the spring against the end of the brush.
3. Install the end cover on the brush holder.
END COVER
BRUSH HOLDER
Main Menu Table of Contents
Performance Test
NOTE: Before starting the following checks, disconnect
the wire from terminal M, and make a connection as
described below using as heavy a wire as possible (prefer-
ably equivalent to the wire used in the vehicle).
Pull-in Coil Test:
Connect the battery as shown. If the starter pinion pops
out, it is working properly.
CAUTION: Do not leave the battery connected for more
than 10 seconds.
Disconnect the wire.
Hold-in Coil Test:
Disconnect the battery from the M terminal. If the pinion
does not retract, the hold-in coil is working properly.
CAUTION: Do not leave the battery connected for more
than 10 seconds.
RetractingTest:
Disconnect the battery also from the body. If the pinion
retracts immediately, it is working properly.
CAUTION: Do not leave the battery connected for more
than 10 seconds.
NOTE: The PCM memory must be reset after reconnect-
ing the battery (see page 11-125).
Starter No-load Test:
1. Clamp the starter firmly in a vise.
2. Connect the starter to the battery as shown in the
diagram below, and confirm that the motor starts
and keeps rotating.
3. If the electric current and motor speed meet the
specifications when the battery voltage is at 11 V,
the starter is working properly.
Specifications:
145 A or less current draw
3,300 rpm or more rpm
BODY
(GROUND)
BODY
(GROUND)
BATTERY
STARTER
BATTERY
BODY
(GROUND)
Main Menu Table of Contents
Ignition System
Component Location Index
IGNITION COILS
Test, page 4-21
SPARKPLUGS
Inspection, page 4-22
NOISE CONDENSER
Test, page 4-19
IGNITION CONTROL MODULE (ICM)
Input Test, page 4-20
Main Menu Table of Contents
Ignition System
Ignition Timing Inspection
SRS components are located in this area. Review the SRS
component locations, precautions, and procedures in the
SRS (section 24) before performing repairs or service.
1. Start the engine. Hold the engine at 3,000 rpm with
no load (shift lever in or position) until the
radiator fan comes on, then let it idle.
2. Pull out the service check connector located under
the glove box. Connect the GRN/BLK and RED wire
terminals with the special tool.
SERVICE CHECK CONNECTOR (2P)
NOTE: Located under the glove box
SCS SERVICE CONNECTOR
(07PAZ-0010100)
3. Check the idle speed (see page 4-19).
4. Remove the engine cover (see section 5).
5. Connect a timing light to the No. 1 ignition coil wires;
while the engine idles, point the timing light toward
the pointer on the timing belt cover.
No. 1 IGNITION
COIL WIRES
TIMING LIGHT
CRANKSHAFTPULLEY
6. Inspect ignition timing at idle speed.
Ignition Timing:
15 ± 2° BTDC (RED) at 650 ± 50 rpm with shift lever
in or position and electrical systems turned
off.
WHITE MARK
POINTER
CRANKSHAFT PULLEY
RED MARK
7. If the ignition timing is incorrect, replace the PCM
(there is no way to adjust ignition timing).
8. Disconnect the special tool from the service check
connector (2P).
Main Menu Table of Contents
Idle Speed Check
1. Start the engine. Hold the engine at 3,000 rpm with
no load (shift lever in or ) until the radiator fan
comes on, then let it idle.
2. Connect a tachometer to the test tachometer connec-
tor.
TEST TACHOMETER CONNECTOR
BATTERY
Idle speed: 650 ± 50 rpm with shift lever in position
or and electrical systemsturned off.
3. Adjust the idle speed if necessary (see section 11).
Noise Condenser Capacity Test
1. Use a commercially available condenser tester. Con-
nect the condenser tester probes, and measure the
condenser capacity.
Condenser capacity: 0.47 ± 0.09 microfarads( F)
POSITIVE TERMINAL
BODY GROUND
(Negative)
NOTE: The noise condenser is intended to reduce
ignition noise. However, condenser failure may cause
the engine to stop running.
2. If not within the specifications, replace the noise con-
denser.
CLIP
TACHOMETER
Main Menu Table of Contents
Ignition System
Ignition Control Module (ICM) Input Test
NOTE: See section 11 if the malfunction indicator lamp (MIL) blinks. Disconnect the 8P connector from the ignition control
module (ICM). Inspect the connector and socket terminals to be sure they are all making good contact.
If any terminals are bent, loose or corroded, repair them as necessary, and recheck the system.
If the terminals look OK, make the following input tests at the connector.
— If any test indicates a problem, find and correct the cause, then recheck the system.
— If all the input tests prove OK, the ICM must be faulty; replace it.
Wire side of
female terminals
ICM
8P CONNECTOR
Trml Wire Test condition Test: Desired result Possible cause if result is not obtained
2
7
4
3
1
8
6
5
BLK3
BLK4
WHT1
WHT/GRN
WHT/BLK
WHT/BLU
RED/GRN
WHT/RED
Under all
conditions
Ignition switch ON
(ID
Check for continuity to ground:
There should be continuity.
Check for voltage to ground:
There should be battery
voltage.
• Poor ground (G151)
• An open in the wire
• Blown 30 A fuse in the under-dash
fuse/relay box
• Faulty ignition coil
• An open in the wire
Main Menu Table of Contents
Ignition Coil Test
1. Turn the ignition switch OFF.
2. Remove the strut brace, then remove the engine
cover (see section 5).
3. Remove the ignition coil.
4. Using an ohmmeter, measure resistance between
the terminals. Replace the coil if the resistance is
not within specification.
NOTE: Resistance will vary with the coil tempera-
ture; specification is at 77°F (25°C).
Primary Winding Resistance
(between the No. 1 and No. 2 terminals)
0.9- 1.1 ohms
If the resistance is not within specification,
replace the coil.
If the resistance is OK, but other troubleshooting
doesn't reveal the cause of the problem, substi-
tute a known-good ignition coil and check engine
operation again.
If the engine then runs OK, replace the original
coil.
Terminal
side of male
terminals
IGNITION
COIL
SECONDARY
WINDING
TERMINAL
SECONDARY
WINDING
TERMINAL
Main Menu Table of Contents
Ignition System
Spark Plug Inspection
1. Inspect the electrodes and ceramic insulator for:
Worn or deformed
electrodes
Damaged
gasket
Cracked
insulator
Improper gap
Oil-fouling
Carbon deposits
Cracked center
electrode insulator
Burned or worn electrodes may be caused by:
Advanced ignition timing
Loose spark plug
Plug heat range too hot
Insufficient cooling
Fouled plug may be caused by:
Retarded ignition timing
Oil in combustion chamber
Incorrect spark plug gap
Plug heat range too cold
Excessive idling/low speed running
Clogged air cleaner element
Deteriorated ignition coil or ignition wires
2. Do not adjust the gap of platinum tip plugs; replace
the spark plug if the gap is out of specification or if
the center electrode is rounded.
Electrode Gap:
Standard
Service Limit
1.1 mm (0.043 in)
1.3 mm (0.051 in)
Platinum tip plug:
Do not adjust the gap;
replace the spark plug if the
gap is out of specification or
if the center electrode is
rounded.
3. Replace the plug at the specified interval, or if the
center electrode is rounded as shown below:
ROUNDED ELECTRODE
NOTE: Use only the spark plugs listed below.
SparkPlugs
PFR5L-11 (NGK)
PK16PR-L11 (DENSO)
4. Apply a small quantity of anti-seize compound to
the plug threads, and screw the plugs into the cylin-
der head finger-tight. Then torque them to 18 N-m
(1.8 kgf-m, 13 Ibf-ft).
Main Menu Table of Contents
Charging System
Component Location Index
ALTERNATOR BELT
Inspection and Adjustment, page 4-33
ALTERNATOR
Alternator and Regulator Test, page 4-27
Replacement, page 4-29
Overhaul, page 4-30
Main Menu Table of Contents
Troubleshooting
If the charging system light does not come on or does not go off, or the battery is dead or low, test the following items in
the order listed below:
1. Battery (see section 23)
2. Charging System Light (see below)
3. Alternator/Regulator (see page 4-27)
Charging System Light Test
Check the No. 20 (7.5 A) fuse in
the under-dash fuse/relay box.
Is the fuse OK?
Check for an open in the L circuit:
1. Disconnect the 4P connector
from the alternator.
2. Ground the No. 3 terminal of
the 4P connector.
3. Turn the ignition switch ON (II).
Does the charging system
light come on?
Disconnect the No. 3 terminal
of the 4P connector from the
ground.
Does the charging system
light go off?
Check for a short to body ground
in the L circuit:
1. Turn the ignition switch OFF.
2. Disconnect the ABS control
unit (C447) and passenger's
multiplex control unit (C401),
as applicable.
3. Turn the ignition switch ON (II).
Does the charging system
light stay off?
Check for short in control unit(s):
1. Turn the ignition switch OFF.
2. Reconnect the ABS control
unit connector.
3. Turn the ignition switch ON
(II), and check the charging
system light.
Did the light stay off when you
turned on the ignition switch
after connecting ABS control unit
connector?
Substitute a known-good ABS
control unit, and recheck.
ALTERNATOR
4PCONNECTOR
Replace the fuse.
Check for a blown charging sys-
tem light bulb. If the bulb is OK,
repair the open in the WHT/BLU
Wire side of
female terminals
(To page 4-26)
Turn the ignition switch OFF, and
repair the short to ground in the
WHT/BLU wire.
Substitute a known-good pas-
senger's multiplex control unit,
and recheck.
Main Menu Table of Contents
Charging System
Troubleshooting (cont'd)
(From page 4-25)
Check for an open in the IG circuit:
Measure the voltage at the No. 1
terminal of the 4P connector.
Is there battery voltage?
Check the Alternator/Regulator:
1. Turn the ignition switch OFF.
2. Connect the 4P connector to
the alternator.
3. Turn the ignition switch ON
(II).
Does the charging system
lightcome on?
4. Start the engine.
Does the charging system
light go off?
The charging system light circuit
is OK.
Turn the ignition switch OFF, and
repair the open circuit in the BLK/
YELwire.
ALTERNATOR
4PCONNECTOR
Wire side of
female terminals
Check the alternator/regulator
(see page 4-27).
Check the alternator/regulator
(seepage4-27).
Main Menu Table of Contents
AlternatorReplacement
1. Make sure you have the anti-theft code for the radio,
then write down the frequencies for the radio's pre-
set buttons.
2. Disconnect the battery negative terminal first, then
the positive terminal.
NOTE: The PCM memory must be reset after recon-
necting the battery (see page 11-125).
3. Remove the battery and battery base (see page 4-6).
4. Remove the mounting bolt, lock bolt and adjusting
rod, then remove the alternator belt.
LOCK BOLT
8 x 1.25 mm
22 N-m (2.2 kgf-m,
16 Ibf-ft)
ADJUSTING
ROD
ALTERNATOR
BELT
MOUNTING BOLT
10 x 1.25 mm
44 N-m (4.5 kgf-m,
33 Ibf-ft)
5. Remove the alternator bracket.
ALTERNATOR
BRACKET
10 x 1.25 mm
44 N-m (4.5 kgf-m,
33 Ibf-ft)
8 x 1.25 mm
22 N-m (2.2 kgf-m,
16 Ibf-ft)
6. Disconnect the 4P connector and harness clip bracket,
then remove the terminal nut and the BLK wire from
the B terminal. Take out the alternator.
BLKWIRE
8 x 1.25 mm
12 N-m (1.2 kgf-m,
8.7 Ibf-ft)
4P CONNECTOR
ALTERNATOR
7. Install the reverse order of removal.
8. Adjust the alternator belt (see page 4-33).
9. Enter the anti-theft code for the radio, then enter the
customer's radio station presets.
Main Menu Table of Contents
Charging System
Alternator Overhaul
NOTE: Do not remove the pulley unless the front bear-
ing needs replacement.
To loosen the pulley locknut, use the tools as shown. If
necessary, use an impact wrench.
HARNESS
CLIP
BRACKET
PULLEY
END COVER
BRUSH HOLDER
INSULATOR
BRUSH ASSEMBLY
Inspection, page 4-31
22 mm BOX
WRENCH
10 mm BOX WRENCH
PULLEY LOCKNUT
110 N-m (11.3 kgf-m, 81.7 Ibf-ft)
VOLTAGE REGULATOR
RECTIFIER ASSEMBLY
Test, page 4-31
TERMINAL INSULATOR INSULATOR SLEEVE
REAR HOUSING
SPACER
CAUTION: Do not get grease
or oil on the slip rings.
ROTOR
Test, page 4-32
PULLEY LOCKNUT
110 N-m
(11.3 kgf-m, 81.7 Ibf-ft)
STATOR THROUGH BOLT
STATOR/DRIVE END HOUSING
Test, page 4-32
PULLEY
FRONT BEARING
BEARING RETAINER
Do not disassemble.
REAR BEARING
Main Menu Table of Contents
RectifierTest
NOTE: The diodes are designed to allow current to pass
in one direction while blocking it in the opposite direc-
tion. Since the alternator rectifier is made up of eight
diodes (four pairs), each diode must be tested for conti-
nuity in both directions with an ohmmeter that has diode
checking capability; a total of 16 checks.
1. Check for continuity in each direction, between the
B and P, and between the E (ground) and P termi-
nals of each diode pair. All diodes should have con-
tinuity in only one direction.
2. If any of the eight diodes fails, replace the rectifier
assembly. (Diodes are not available separately.)
Alternator Brush Inspection
1. Remove the end cover, then take out the brush holder
by removing its two screws.
2. Measure the length of the brushes with a vernier
caliper.
Alternator Brush Length:
Standard: 10.5 mm (0.41 in)
Service Limit: 1.5 mm (0.06 in)
ALTERNATOR BRUSHES
VERNIER CALIPER
If the brushes are less than the service limit, replace
the alternator brush assembly.
Main Menu Table of Contents
Charging System
Rotor Slip Ring Test
1. Check the resistance between the slip rings.
There should be 2.9 ohms.
If resistance meets the specification, go to step 2.
If resistance does not meet the specification,
replace the alternator.
ROTOR SHAFT
SLIP RINGS ROTOR
2. Check that there is no continuity between the slip
rings and the rotor or rotor shaft.
3. If the rotor fails either continuity check, replace the
alternator.
Stator Test
1. Check that there is continuity between each pair of
leads.
LEADS
COIL CORE
2. Check that there is no continuity between each lead
and the coil core.
3. If the coil fails either continuity check, replace the
alternator.
Main Menu Table of Contents
Alternator Belt Inspection and Adjustment
NOTE: When using a new belt, first adjust the deflection
or tension to the values for the new belt, then readjust
the deflection or tension to the values for the used belt
after running engine for 5 minutes.
Deflection method:
Apply a force of 98 N (10 kgf, 22 Ibf), and measure the
deflection between the alternator and crankshaft pulley.
Deflection:
Used Belt: 9.5 - 11.5 mm (0.37 - 0.45 in)
New Belt: 7.0 - 8.0 mm (0.28 - 0.31 in)
NOTE: If the belt is worn or damaged, replace it.
Belt tension gauge method:
Attach the belt tension gauge to the belt and measure the
tension. Follow the gauge manufacturer's instructions.
Tension:
Used Belt: 390 - 590 N (40 - 60 kgf, 88 - 130 Ibf)
New Belt: 780 - 980 N (80 - 100 kgf, 180 - 220 Ibf)
NOTE: If the belt is worn or damaged, replace it.
BELT TENSION GAUGE
07JGG-001010A
Main Menu Table of Contents
Charging System
Alternator Belt Inspection and
Adjustment(cont'd)
Ifadjustmentisnecessary:
1. Loosen the mounting bolt and the lock bolt.
2. Move the alternator by turning the adjusting rod to
obtain the proper belt tension, then retighten the
bolts.
Looser Tighter
ADJUSTING
ROD
MOUNTING BOLT
10 x 1.25 mm
44 N-m (4.5 kgf-m,
33 Ibf-ft)
LOCK BOLT
8 x 1.25 mm
22 N-m (2.2 kgf-m,
16 Ibf-ft)
3. Recheck the deflection or tension of the belt.
NOTE: For the power steering pump belt and A/C
compressor belt adjustments, refer to section 17 and
section 22.
Main Menu Table of Contents
Cruise Control
Component Location Index
SRS components are located in this area. Review the SRS component locations, precautions, and procedures in the SRS
(section 24) before performing repairs or service.
CRUISE CONTROL INDICATOR LIGHT
Bulb Locations, page 23-76
MAIN SWITCH
Test/Replacement, page 4-41
SET/RESUME/CANCEL SWITCH
Test/Replacement, page 4-39
CRUISE CONTROL UNIT
Input Test, page 4-37
VEHICLE SPEED SENSOR (VSS)
Troubleshooting, page 23-86
TRANSMISSION RANGE
SWITCH
Test, section 14
ACTUATOR CABLE
Adjustment, page 4-45
ACTUATOR
Test, page 4-43
Replacement, page 4-44,
Solenoid Test, page 4-42
BRAKE PEDAL POSITION SWITCH
Test, page 4-41
Main Menu Table of Contents
Control Unit Input Test
SRS components are located in this area. Review the SRS component locations, precautions, and procedures in the SRS
(section 24) before performing repairs or service.
1. Disconnect the 14P connector from the control unit.
2. Inspect the connector and socket terminals to be sure they are all making good contact.
If the terminals are bent, loose, or corroded, repair them as necessary, and recheck the system.
If the terminals look OK, make the following input tests at the connector.
— If any test indicates a problem, find and correct the cause, then recheck the system.
— If all the input tests prove OK, the control unit must be faulty; replace it.
CRUISE CONTROL UNIT
14P CONNECTOR
Wire side of female terminals
Main Menu Table of Contents
CruiseControl
Control Unit Input Test (cont'd)
Cavity Wire Test condition Test:Desiredresult Possible cause if result is not obtained
3
13
7
6
14
12
2
5
10
9
11
1
BLK
LT GRN
LT GRN/BLK
LT GRN/RED
PNK
BLU/WHT
GRY
GRN/WHT
BLU/YEL
BRN
BRN/BLK
BRN/WHT
Under all conditions
Ignition switch ON (II) and
main switch ON
Resume button pushed
Cancel button pushed
Set button pushed
Cancel button pushed
Shift lever in , or
Ignition switch ON (II), and
main switch ON; raise the
front of the vehicle, and rotate
one wheel slowly while
holding the other wheel.
Ignition switch ON (II), main
switch ON; brake pedal
pressed, then released
Brake pedal pressed then
released
Ignition switch ON (II)
Under all conditions
Check for continuity to ground:
There should be continuity.
Check for voltage to ground:
There should be battery voltage.
Check for voltage to ground:
There should be battery voltage.
When testing terminal No. 7, there
should be no voltage on terminal No. 6.
Check for voltage to ground:
There should be battery voltage.
When testing terminal No. 7, there
should be voltage on terminal No. 6.
Check for voltage to ground:
There should be battery voltage.
When testing terminal No. 6, there
should be no voltage on terminal No. 7.
Check for voltage to ground:
There should be battery voltage.
When testing terminal No. 6, there
should be voltage on terminal No. 7.
Check for continuity to ground:
There should be continuity.
NOTE: There should be no continuity
when the shift lever is in other positions.
Check for voltage between the
BLU/WHT andBLK terminals:
There should be cycle 0 - 5 V or
battery voltage.
Check for voltage to ground:
There should be 0 V with the pedal
pressed, and battery voltage with
the pedal released.
Check for voltage to ground:
There should be battery voltage with
the pedal pressed, and 0 V with the
pedalreleased.
Attach to ground:
The cruise light in the gauge assembly
should come on.
Check for resistance to ground:
There should be 80 -120
Check for resistance to ground:
There should be 70 -110
Check for resistance to ground:
There should be 40 - 60
• Poor ground (G401, G402)
• An open in the wire
• Blown No. 20 (20 A) fuse in the
under-dash fuse/relay box
• Faulty main switch
• An open in the wire
• Blown No. 39 (15 A) fuse in the
under-hood fuse/relay box
• Faulty horn relay
• Faulty set/resume/cancel switch
• Faulty cable reel
• An open in the wire
• Short between LT GRN/BLK and
LT GRN/REDwires
• Blown No. 39 (15 A) fuse in the
under-hood fuse/relay box
• Faulty horn relay
• Faulty set/resume/cancel switch
• Faulty cable reel
• An open in the wire
• Blown No. 39 (15 A) fuse in the
under-hood fuse/relay box
• Faulty horn relay
• Faulty set/resume/cancel switch
• Faulty cable reel
• An open in the wire
• Short between LT GRN/BLK and
LT GRN/RED wires
• Blown No. 39 (15 A) fuse in the
under-hood fuse/relay box
• Faulty horn relay
• Faulty set/resume/cancel switch
• Faulty cable reel
• An open in the wire
• Faulty A/T gear position switch
• Poor ground (G401, G402)
• An open in the wire
• Faulty vehicle speed sensor (VSS)
• An open in the wire
• Short to ground
• Blown No. 39 (15 A) fuse in the
under-hood fuse/relay box
• Faulty brake switch
• An open in the wire
• Blown No. 39 (15 A) fuse in the
under-hood fuse/relay box
• Faulty brake switch
• An open in the wire
• Blown bulb
• Faulty gauge circuit
• An open in the wire
• Faulty actuator solenoid
• An open in the wire
Main Menu Table of Contents
Set/Resume/Cancel Switch Test/Replacement
SRS components are located in this area. Review the SRS
component locations, precautions, and procedures in the
SRS (section 24) before performing repairs or service.
1. Make sure you have the anti-theft code for the radio,
then write down the frequencies for the radio's pre-
set buttons.
2. Disconnect the battery negative cable, then discon-
nect the positive cable, and wait at least 3 minutes.
NOTE: The PCM memory must be reset after recon-
necting the battery (see page 11-125).
3. Disconnect the airbag connectors.
Driver's Side:
Remove the access panel from the steering wheel,
then disconnect the 2P connector between the
driver's airbag and cable reel.
CABLE REEL
CONNECTOR
DRIVER'S
AIRBAG
2P CONNECTOR
ACCESS PANEL
Front Passenger's Side:
Remove the glove box (see section 20).
Disconnect the front passenger's 2P connector
from the SRS main harness.
FRONT PASSENGER'S
AIRBAG
2P CONNECTOR
SRS MAIN HARNESS
4. Remove the dashboard lower cover.
5. Disconnect the combination switch 20P connector
from the main harness.
20P CONNECTOR
Wire side of
female terminals
Main Menu Table of Contents
Cruise Control
Set/Resume/Cancel SwitchTest/Replacement(cont'd)
6. Check for continuity between the terminals of the
combination switch harness connector in each switch
position according to the table.
If there is continuity, and it matches the table,
the switch is OK.
If there is no continuity in any positions, go to
step 7.
7. Carefully remove the set/resume/cancel switch cover
by prying between the cover and the switch in the
sequence shown.
SET/RESUME/CANCEL
SWITCH
SET/RESUME/CANCEL
SWITCH COVER
8. Remove the two screws, and disconnect the 4P con-
nector. Then remove the switch.
SET/RESUME/CANCEL SWITCH
SCREWS
9. Check for continuity between the terminals in each
switch position according to the table.
If there is continuity, and it matches the table,
replace the cable reel.
If there is no continuity in any positions, replace
the switch.
10. If all the tests prove OK, reconnect the battery cables,
and enter the anti-theft code for the radio. Then enter
the customer's radio station presets.
Terminal side of
male terminals
Main Menu Table of Contents
Main Switch Test
1. Remove the driver's switch panel (see section 20).
DRIVER'S SWITCH PANEL
TCS SWITCH
CRUISE
MAIN
SWITCH
BULBS
(0.84 W x 2)
2. Remove the TCS and cruise main switch assembly
from the driver's switch panel.
3. Check for continuity between the terminals in each
switch position according to the table.
If there is no continuity, replace the switch.
BrakePedalPositionSwitchTest
1. Disconnect the 4P connector from the switch.
Terminal side of
male terminals
4P CONNECTOR
BRAKE PEDAL
2. Check for continuity between the terminals accord-
ing to the table.
3. If necessary, replace the switch or adjust pedal height
(see section 19).
Main Menu Table of Contents
Cruise Control
Actuator Solenoid Test
1. Disconnect the 4P connector from the actuator.
Terminal side of
male terminals
2. Check for resistance between the terminals accord-
ing to the table.
NOTE: Resistance will vary slightly with tempera-
ture; specified resistance is at 70°F (20°C).
VENT VALVE
From VENT
HOSE
To VACUUM
TANK
VACUUM VALVE
SAFETY VALVE
Main Menu Table of Contents
Actuator Test
1. Disconnect the actuator cable from the actuator rod,
and disconnect the 4P connector.
2. Connect battery power to the No. 4 terminal and
ground to the No. 1, No. 2, and No. 3 terminals.
3. Connect a vacuum pump to the check valve. Then
apply vacuum to the actuator.
VACUUM PUMP GAUGE
A973X-041-XXXXX
Terminal side of male terminals
4. The actuator rod should pull in completely. If the
rod pulls in only part-way or not at all, check for a
leaking vacuum line or defective solenoid.
ACTUATOR ROD
5.
6.
7.
8.
9.
With voltage and vacuum still applied, try to pull
the actuator rod out by hand. You should not be
able to pull it out. If you can, it is defective.
Disconnect ground from the No. 3 terminal. The
actuator rod should return. If it does not return, and
the vent hose and filter are not plugged, the
solenoid valve assembly is defective.
Repeat steps 2 through 5, and disconnect ground
from the No. 1 terminal. The actuator rod should
return. If it does not return, and the vent hose and
filter are not plugged, the solenoid valve assembly
is defective.
If you replace the solenoid valve assembly, be sure
to use new O-rings on each solenoid.
Disconnect power and ground from the 4P connec-
tor. Disconnect the vent hose from the actuator. Con-
nect a vacuum pump to the actuator vent hose port,
and apply vacuum. The actuator rod should pull in
completely. If not, the vacuum valve is stuck open.
Replace the actuator.
Main Menu Table of Contents
CruiseControl
Actuator/Cable Replacement
1. Disconnect the 4P connector from the actuator.
2. Remove the three mounting bolts and the actuator
with the bracket.
4P CONNECTOR
3. Remove the vacuum hose.
4. Remove the three nuts.
5. Disconnect the actuator cable from the actuator rod
by releasing the clip from the rod with a screwdriver
as shown.
CLIP
ACTUATOR
ROD ACTUATOR
CABLE NUTS
6. Loosen the locknut, then disconnect the actuator
cable from the throttle linkage.
ADJUSTING
NUT LOCKNUT
ACTUATOR
CABLE
CABLE
BRACKET
THROTTLE
LINKAGE
7. Install in the reverse order of removal, and adjust
free play at the throttle linkage after connecting the
actuatorcable.
MOUNTING BOLTS
VACUUM HOSE
MOUNTING BOLT
Main Menu Table of Contents
Actuator Cable Adjustment
1. Check that the actuator cable moves smoothly with
no binding or sticking.
2. Measure the amount of movement of the output
linkage until the engine speed starts to increase. At
first, the output linkage should be located at the
fully closed position. Free play should be 5 ± 0.5 mm
(0.20 ± 0.02 in).
OUTPUT
LINKAGE
ADJUSTING
NUT
FREE PLAY: 5 ± 0.5 mm (0.20 ± 0.02 in)
ACTUATOR
CABLE
3. If the free play is not within specs, move the cable to
the point where the engine speed starts to increase,
and tighten the locknut and adjusting nut.
CABLE
BRACKET
ADJUSTING
NUT
LOCKNUT
ACTUATOR
CABLE
4. Turn the adjusting nut until it is 5 ± 0.5 mm (0.20 ±
0.02 in) away from the bracket.
5 ± 0.5 mm (0.20 ± 0.02 in)
CABLE
BRACKET
ADJUSTING
NUT
5. Pull the cable so that the adjusting nut touches the
bracket, and tighten the locknut.
ADJUSTING
NUT
LOCKNUT
Main Menu Table of Contents
Engine
Engine Removal/Installation 5–1. . . . . . . . . . . . . . . . . . . . . . . .
Cylinder Head/Valve Train 6–1. . . . . . . . . . . . . . . . . . . . . . . . . . .
Engine Block 7–1. . . . . . . . . . . . . . . . . . . . . . . . . . . . . . . . . . . . . .
Engine Lubrication 8–1. . . . . . . . . . . . . . . . . . . . . . . . . . . . . . . . .
Intake Manifold/Exhaust System 9–1. . . . . . . . . . . . . . . . . . . .
Cooling 10–1. . . . . . . . . . . . . . . . . . . . . . . . . . . . . . . . . . . . . . . . . . . .
Main Menu
Thank you very much
for your reading.
Please Click Here
Then Get More
Information.

More Related Content

What's hot

Ids sdd-jlr manual 02 02-12 (1)
Ids sdd-jlr manual 02 02-12 (1)Ids sdd-jlr manual 02 02-12 (1)
Ids sdd-jlr manual 02 02-12 (1)Boualam Mohammed
 
YAMAHA 60FETO OUTBOARD Service Repair Manual L: 472180 -
YAMAHA 60FETO OUTBOARD Service Repair Manual L: 472180 -YAMAHA 60FETO OUTBOARD Service Repair Manual L: 472180 -
YAMAHA 60FETO OUTBOARD Service Repair Manual L: 472180 -kjndksme89
 
BOBCAT E60 COMPACT EXCAVATOR Service Repair Manual SN:AGSZ11001 AND Above
BOBCAT E60 COMPACT EXCAVATOR Service Repair Manual SN:AGSZ11001 AND AboveBOBCAT E60 COMPACT EXCAVATOR Service Repair Manual SN:AGSZ11001 AND Above
BOBCAT E60 COMPACT EXCAVATOR Service Repair Manual SN:AGSZ11001 AND Abovejksmttemmd
 
Auto service-repair-manuals..
Auto service-repair-manuals..Auto service-repair-manuals..
Auto service-repair-manuals..MdAlAmin332
 
Kobelco sk20 sr mini excavator parts catalogue manual (sn pm02001 and up)
Kobelco sk20 sr mini excavator parts catalogue manual (sn pm02001 and up)Kobelco sk20 sr mini excavator parts catalogue manual (sn pm02001 and up)
Kobelco sk20 sr mini excavator parts catalogue manual (sn pm02001 and up)fujjsejfksekkm
 
Nissan forklift internal combustion j02 series service repair manual
Nissan forklift internal combustion j02 series service repair manualNissan forklift internal combustion j02 series service repair manual
Nissan forklift internal combustion j02 series service repair manualolfjsekdmmes
 
Can Transport Protocol : UDS
Can Transport Protocol : UDS Can Transport Protocol : UDS
Can Transport Protocol : UDS Kapil Thakar
 

What's hot (7)

Ids sdd-jlr manual 02 02-12 (1)
Ids sdd-jlr manual 02 02-12 (1)Ids sdd-jlr manual 02 02-12 (1)
Ids sdd-jlr manual 02 02-12 (1)
 
YAMAHA 60FETO OUTBOARD Service Repair Manual L: 472180 -
YAMAHA 60FETO OUTBOARD Service Repair Manual L: 472180 -YAMAHA 60FETO OUTBOARD Service Repair Manual L: 472180 -
YAMAHA 60FETO OUTBOARD Service Repair Manual L: 472180 -
 
BOBCAT E60 COMPACT EXCAVATOR Service Repair Manual SN:AGSZ11001 AND Above
BOBCAT E60 COMPACT EXCAVATOR Service Repair Manual SN:AGSZ11001 AND AboveBOBCAT E60 COMPACT EXCAVATOR Service Repair Manual SN:AGSZ11001 AND Above
BOBCAT E60 COMPACT EXCAVATOR Service Repair Manual SN:AGSZ11001 AND Above
 
Auto service-repair-manuals..
Auto service-repair-manuals..Auto service-repair-manuals..
Auto service-repair-manuals..
 
Kobelco sk20 sr mini excavator parts catalogue manual (sn pm02001 and up)
Kobelco sk20 sr mini excavator parts catalogue manual (sn pm02001 and up)Kobelco sk20 sr mini excavator parts catalogue manual (sn pm02001 and up)
Kobelco sk20 sr mini excavator parts catalogue manual (sn pm02001 and up)
 
Nissan forklift internal combustion j02 series service repair manual
Nissan forklift internal combustion j02 series service repair manualNissan forklift internal combustion j02 series service repair manual
Nissan forklift internal combustion j02 series service repair manual
 
Can Transport Protocol : UDS
Can Transport Protocol : UDS Can Transport Protocol : UDS
Can Transport Protocol : UDS
 

More from jksejkmds

Yanmar 4 tnv84t z industrial engine service repair manual
Yanmar 4 tnv84t z industrial engine service repair manualYanmar 4 tnv84t z industrial engine service repair manual
Yanmar 4 tnv84t z industrial engine service repair manualjksejkmds
 
Yamaha ft50 cehd outboard service repair manual l 650101
Yamaha ft50 cehd outboard service repair manual l 650101 Yamaha ft50 cehd outboard service repair manual l 650101
Yamaha ft50 cehd outboard service repair manual l 650101 jksejkmds
 
Yamaha f40 bmhd, f40mh outboard service repair manual sn:300101
Yamaha f40 bmhd, f40mh outboard service repair manual sn:300101Yamaha f40 bmhd, f40mh outboard service repair manual sn:300101
Yamaha f40 bmhd, f40mh outboard service repair manual sn:300101jksejkmds
 
Yamaha f25 aeh, f25eh outboard service repair manual s 050503
Yamaha f25 aeh, f25eh outboard service repair manual s 050503  Yamaha f25 aeh, f25eh outboard service repair manual s 050503
Yamaha f25 aeh, f25eh outboard service repair manual s 050503 jksejkmds
 
Yamaha f15 amh, f15mlhx outboard service repair manual l 300964
Yamaha f15 amh, f15mlhx outboard service repair manual l 300964 Yamaha f15 amh, f15mlhx outboard service repair manual l 300964
Yamaha f15 amh, f15mlhx outboard service repair manual l 300964 jksejkmds
 
Yamaha 140 bet outboard service repair manual x 421113 –
Yamaha 140 bet outboard service repair manual x 421113 –Yamaha 140 bet outboard service repair manual x 421113 –
Yamaha 140 bet outboard service repair manual x 421113 –jksejkmds
 
Toyota 62 6 fdu20 forklift service repair manual
Toyota 62 6 fdu20 forklift service repair manualToyota 62 6 fdu20 forklift service repair manual
Toyota 62 6 fdu20 forklift service repair manualjksejkmds
 
Toyota 30 7 fbchu25 forklift service repair manual
Toyota 30 7 fbchu25 forklift service repair manualToyota 30 7 fbchu25 forklift service repair manual
Toyota 30 7 fbchu25 forklift service repair manualjksejkmds
 
Mitsubishi 2 fbc18 forklift trucks chassis mast service repair manual
Mitsubishi 2 fbc18 forklift trucks chassis mast service repair manualMitsubishi 2 fbc18 forklift trucks chassis mast service repair manual
Mitsubishi 2 fbc18 forklift trucks chassis mast service repair manualjksejkmds
 
Man marine diesel engine d 2842 le 418 service repair manual
Man marine diesel engine d 2842 le 418 service repair manualMan marine diesel engine d 2842 le 418 service repair manual
Man marine diesel engine d 2842 le 418 service repair manualjksejkmds
 
Man industrial gas engine e 2842 e 312 service repair manual
Man industrial gas engine e 2842 e 312 service repair manualMan industrial gas engine e 2842 e 312 service repair manual
Man industrial gas engine e 2842 e 312 service repair manualjksejkmds
 
Komatsu wa480 5 wheel loader service repair manual sn:80001 and up
Komatsu wa480 5 wheel loader service repair manual sn:80001 and upKomatsu wa480 5 wheel loader service repair manual sn:80001 and up
Komatsu wa480 5 wheel loader service repair manual sn:80001 and upjksejkmds
 
John deere 610 c backhoe loader service repair manual
John deere 610 c backhoe loader service repair manualJohn deere 610 c backhoe loader service repair manual
John deere 610 c backhoe loader service repair manualjksejkmds
 
John deere 410 c backhoe loader service repair manual
John deere 410 c backhoe loader service repair manualJohn deere 410 c backhoe loader service repair manual
John deere 410 c backhoe loader service repair manualjksejkmds
 
Jcb hammermaster 1750 rockbreakers service repair manual
Jcb hammermaster 1750 rockbreakers service repair manualJcb hammermaster 1750 rockbreakers service repair manual
Jcb hammermaster 1750 rockbreakers service repair manualjksejkmds
 
Hitachi zaxis 225 usrlc excavator service repair manual
Hitachi zaxis 225 usrlc excavator service repair manualHitachi zaxis 225 usrlc excavator service repair manual
Hitachi zaxis 225 usrlc excavator service repair manualjksejkmds
 
Doosan dl450 3 wheeled loader service repair manual
Doosan dl450 3 wheeled loader service repair manualDoosan dl450 3 wheeled loader service repair manual
Doosan dl450 3 wheeled loader service repair manualjksejkmds
 
Doosan dl450 wheeled loader service repair manual
Doosan dl450 wheeled loader service repair manualDoosan dl450 wheeled loader service repair manual
Doosan dl450 wheeled loader service repair manualjksejkmds
 
Doosan dl420 3 wheeled loader service repair manual
Doosan dl420 3 wheeled loader service repair manualDoosan dl420 3 wheeled loader service repair manual
Doosan dl420 3 wheeled loader service repair manualjksejkmds
 
Doosan dl300 a wheeled loader service repair manual
Doosan dl300 a wheeled loader service repair manualDoosan dl300 a wheeled loader service repair manual
Doosan dl300 a wheeled loader service repair manualjksejkmds
 

More from jksejkmds (20)

Yanmar 4 tnv84t z industrial engine service repair manual
Yanmar 4 tnv84t z industrial engine service repair manualYanmar 4 tnv84t z industrial engine service repair manual
Yanmar 4 tnv84t z industrial engine service repair manual
 
Yamaha ft50 cehd outboard service repair manual l 650101
Yamaha ft50 cehd outboard service repair manual l 650101 Yamaha ft50 cehd outboard service repair manual l 650101
Yamaha ft50 cehd outboard service repair manual l 650101
 
Yamaha f40 bmhd, f40mh outboard service repair manual sn:300101
Yamaha f40 bmhd, f40mh outboard service repair manual sn:300101Yamaha f40 bmhd, f40mh outboard service repair manual sn:300101
Yamaha f40 bmhd, f40mh outboard service repair manual sn:300101
 
Yamaha f25 aeh, f25eh outboard service repair manual s 050503
Yamaha f25 aeh, f25eh outboard service repair manual s 050503  Yamaha f25 aeh, f25eh outboard service repair manual s 050503
Yamaha f25 aeh, f25eh outboard service repair manual s 050503
 
Yamaha f15 amh, f15mlhx outboard service repair manual l 300964
Yamaha f15 amh, f15mlhx outboard service repair manual l 300964 Yamaha f15 amh, f15mlhx outboard service repair manual l 300964
Yamaha f15 amh, f15mlhx outboard service repair manual l 300964
 
Yamaha 140 bet outboard service repair manual x 421113 –
Yamaha 140 bet outboard service repair manual x 421113 –Yamaha 140 bet outboard service repair manual x 421113 –
Yamaha 140 bet outboard service repair manual x 421113 –
 
Toyota 62 6 fdu20 forklift service repair manual
Toyota 62 6 fdu20 forklift service repair manualToyota 62 6 fdu20 forklift service repair manual
Toyota 62 6 fdu20 forklift service repair manual
 
Toyota 30 7 fbchu25 forklift service repair manual
Toyota 30 7 fbchu25 forklift service repair manualToyota 30 7 fbchu25 forklift service repair manual
Toyota 30 7 fbchu25 forklift service repair manual
 
Mitsubishi 2 fbc18 forklift trucks chassis mast service repair manual
Mitsubishi 2 fbc18 forklift trucks chassis mast service repair manualMitsubishi 2 fbc18 forklift trucks chassis mast service repair manual
Mitsubishi 2 fbc18 forklift trucks chassis mast service repair manual
 
Man marine diesel engine d 2842 le 418 service repair manual
Man marine diesel engine d 2842 le 418 service repair manualMan marine diesel engine d 2842 le 418 service repair manual
Man marine diesel engine d 2842 le 418 service repair manual
 
Man industrial gas engine e 2842 e 312 service repair manual
Man industrial gas engine e 2842 e 312 service repair manualMan industrial gas engine e 2842 e 312 service repair manual
Man industrial gas engine e 2842 e 312 service repair manual
 
Komatsu wa480 5 wheel loader service repair manual sn:80001 and up
Komatsu wa480 5 wheel loader service repair manual sn:80001 and upKomatsu wa480 5 wheel loader service repair manual sn:80001 and up
Komatsu wa480 5 wheel loader service repair manual sn:80001 and up
 
John deere 610 c backhoe loader service repair manual
John deere 610 c backhoe loader service repair manualJohn deere 610 c backhoe loader service repair manual
John deere 610 c backhoe loader service repair manual
 
John deere 410 c backhoe loader service repair manual
John deere 410 c backhoe loader service repair manualJohn deere 410 c backhoe loader service repair manual
John deere 410 c backhoe loader service repair manual
 
Jcb hammermaster 1750 rockbreakers service repair manual
Jcb hammermaster 1750 rockbreakers service repair manualJcb hammermaster 1750 rockbreakers service repair manual
Jcb hammermaster 1750 rockbreakers service repair manual
 
Hitachi zaxis 225 usrlc excavator service repair manual
Hitachi zaxis 225 usrlc excavator service repair manualHitachi zaxis 225 usrlc excavator service repair manual
Hitachi zaxis 225 usrlc excavator service repair manual
 
Doosan dl450 3 wheeled loader service repair manual
Doosan dl450 3 wheeled loader service repair manualDoosan dl450 3 wheeled loader service repair manual
Doosan dl450 3 wheeled loader service repair manual
 
Doosan dl450 wheeled loader service repair manual
Doosan dl450 wheeled loader service repair manualDoosan dl450 wheeled loader service repair manual
Doosan dl450 wheeled loader service repair manual
 
Doosan dl420 3 wheeled loader service repair manual
Doosan dl420 3 wheeled loader service repair manualDoosan dl420 3 wheeled loader service repair manual
Doosan dl420 3 wheeled loader service repair manual
 
Doosan dl300 a wheeled loader service repair manual
Doosan dl300 a wheeled loader service repair manualDoosan dl300 a wheeled loader service repair manual
Doosan dl300 a wheeled loader service repair manual
 

Recently uploaded

The 10th anniversary, Hyundai World Rally Team's amazing journey
The 10th anniversary, Hyundai World Rally Team's amazing journeyThe 10th anniversary, Hyundai World Rally Team's amazing journey
The 10th anniversary, Hyundai World Rally Team's amazing journeyHyundai Motor Group
 
John Deere Tractors 5515 Diagnostic Repair Manual
John Deere Tractors 5515 Diagnostic Repair ManualJohn Deere Tractors 5515 Diagnostic Repair Manual
John Deere Tractors 5515 Diagnostic Repair ManualExcavator
 
Hyundai World Rally Team in action at 2024 WRC
Hyundai World Rally Team in action at 2024 WRCHyundai World Rally Team in action at 2024 WRC
Hyundai World Rally Team in action at 2024 WRCHyundai Motor Group
 
Russian Call Girls Delhi Indirapuram {9711199171} Aarvi Gupta ✌️Independent ...
Russian  Call Girls Delhi Indirapuram {9711199171} Aarvi Gupta ✌️Independent ...Russian  Call Girls Delhi Indirapuram {9711199171} Aarvi Gupta ✌️Independent ...
Russian Call Girls Delhi Indirapuram {9711199171} Aarvi Gupta ✌️Independent ...shivangimorya083
 
2024 WRC Hyundai World Rally Team’s i20 N Rally1 Hybrid
2024 WRC Hyundai World Rally Team’s i20 N Rally1 Hybrid2024 WRC Hyundai World Rally Team’s i20 N Rally1 Hybrid
2024 WRC Hyundai World Rally Team’s i20 N Rally1 HybridHyundai Motor Group
 
如何办理(UQ毕业证书)昆士兰大学毕业证毕业证成绩单原版一比一
如何办理(UQ毕业证书)昆士兰大学毕业证毕业证成绩单原版一比一如何办理(UQ毕业证书)昆士兰大学毕业证毕业证成绩单原版一比一
如何办理(UQ毕业证书)昆士兰大学毕业证毕业证成绩单原版一比一hnfusn
 
꧁༒☬ 7042364481 (Call Girl) In Dwarka Delhi Escort Service In Delhi Ncr☬༒꧂
꧁༒☬ 7042364481 (Call Girl) In Dwarka Delhi Escort Service In Delhi Ncr☬༒꧂꧁༒☬ 7042364481 (Call Girl) In Dwarka Delhi Escort Service In Delhi Ncr☬༒꧂
꧁༒☬ 7042364481 (Call Girl) In Dwarka Delhi Escort Service In Delhi Ncr☬༒꧂Hot Call Girls In Sector 58 (Noida)
 
FULL ENJOY - 9953040155 Call Girls in Sector 61 | Noida
FULL ENJOY - 9953040155 Call Girls in Sector 61 | NoidaFULL ENJOY - 9953040155 Call Girls in Sector 61 | Noida
FULL ENJOY - 9953040155 Call Girls in Sector 61 | NoidaMalviyaNagarCallGirl
 
UNIT-II-ENGINE AUXILIARY SYSTEMS &TURBOCHARGER
UNIT-II-ENGINE AUXILIARY SYSTEMS &TURBOCHARGERUNIT-II-ENGINE AUXILIARY SYSTEMS &TURBOCHARGER
UNIT-II-ENGINE AUXILIARY SYSTEMS &TURBOCHARGERDineshKumar4165
 
Hot And Sexy 🥵 Call Girls Delhi Daryaganj {9711199171} Ira Malik High class G...
Hot And Sexy 🥵 Call Girls Delhi Daryaganj {9711199171} Ira Malik High class G...Hot And Sexy 🥵 Call Girls Delhi Daryaganj {9711199171} Ira Malik High class G...
Hot And Sexy 🥵 Call Girls Delhi Daryaganj {9711199171} Ira Malik High class G...shivangimorya083
 
Innovating Manufacturing with CNC Technology
Innovating Manufacturing with CNC TechnologyInnovating Manufacturing with CNC Technology
Innovating Manufacturing with CNC Technologyquickpartslimitlessm
 
Delhi Call Girls Saket 9711199171 ☎✔👌✔ Full night Service for more than 1 person
Delhi Call Girls Saket 9711199171 ☎✔👌✔ Full night Service for more than 1 personDelhi Call Girls Saket 9711199171 ☎✔👌✔ Full night Service for more than 1 person
Delhi Call Girls Saket 9711199171 ☎✔👌✔ Full night Service for more than 1 personshivangimorya083
 
John Deere 200lc Excavator Operation And Tests Repair Manual.pdf
John Deere 200lc Excavator Operation And Tests Repair Manual.pdfJohn Deere 200lc Excavator Operation And Tests Repair Manual.pdf
John Deere 200lc Excavator Operation And Tests Repair Manual.pdfExcavator
 
( Best ) Genuine Call Girls In Mandi House =DELHI-| 8377087607
( Best ) Genuine Call Girls In Mandi House =DELHI-| 8377087607( Best ) Genuine Call Girls In Mandi House =DELHI-| 8377087607
( Best ) Genuine Call Girls In Mandi House =DELHI-| 8377087607dollysharma2066
 
VIP Mumbai Call Girls Thakur village Just Call 9920874524 with A/C Room Cash ...
VIP Mumbai Call Girls Thakur village Just Call 9920874524 with A/C Room Cash ...VIP Mumbai Call Girls Thakur village Just Call 9920874524 with A/C Room Cash ...
VIP Mumbai Call Girls Thakur village Just Call 9920874524 with A/C Room Cash ...Garima Khatri
 
VIP Kolkata Call Girl Kasba 👉 8250192130 Available With Room
VIP Kolkata Call Girl Kasba 👉 8250192130  Available With RoomVIP Kolkata Call Girl Kasba 👉 8250192130  Available With Room
VIP Kolkata Call Girl Kasba 👉 8250192130 Available With Roomdivyansh0kumar0
 
2024 TOP 10 most fuel-efficient vehicles according to the US agency
2024 TOP 10 most fuel-efficient vehicles according to the US agency2024 TOP 10 most fuel-efficient vehicles according to the US agency
2024 TOP 10 most fuel-efficient vehicles according to the US agencyHyundai Motor Group
 

Recently uploaded (20)

The 10th anniversary, Hyundai World Rally Team's amazing journey
The 10th anniversary, Hyundai World Rally Team's amazing journeyThe 10th anniversary, Hyundai World Rally Team's amazing journey
The 10th anniversary, Hyundai World Rally Team's amazing journey
 
John Deere Tractors 5515 Diagnostic Repair Manual
John Deere Tractors 5515 Diagnostic Repair ManualJohn Deere Tractors 5515 Diagnostic Repair Manual
John Deere Tractors 5515 Diagnostic Repair Manual
 
Hyundai World Rally Team in action at 2024 WRC
Hyundai World Rally Team in action at 2024 WRCHyundai World Rally Team in action at 2024 WRC
Hyundai World Rally Team in action at 2024 WRC
 
Call Girls in Shri Niwas Puri Delhi 💯Call Us 🔝9953056974🔝
Call Girls in  Shri Niwas Puri  Delhi 💯Call Us 🔝9953056974🔝Call Girls in  Shri Niwas Puri  Delhi 💯Call Us 🔝9953056974🔝
Call Girls in Shri Niwas Puri Delhi 💯Call Us 🔝9953056974🔝
 
Russian Call Girls Delhi Indirapuram {9711199171} Aarvi Gupta ✌️Independent ...
Russian  Call Girls Delhi Indirapuram {9711199171} Aarvi Gupta ✌️Independent ...Russian  Call Girls Delhi Indirapuram {9711199171} Aarvi Gupta ✌️Independent ...
Russian Call Girls Delhi Indirapuram {9711199171} Aarvi Gupta ✌️Independent ...
 
2024 WRC Hyundai World Rally Team’s i20 N Rally1 Hybrid
2024 WRC Hyundai World Rally Team’s i20 N Rally1 Hybrid2024 WRC Hyundai World Rally Team’s i20 N Rally1 Hybrid
2024 WRC Hyundai World Rally Team’s i20 N Rally1 Hybrid
 
如何办理(UQ毕业证书)昆士兰大学毕业证毕业证成绩单原版一比一
如何办理(UQ毕业证书)昆士兰大学毕业证毕业证成绩单原版一比一如何办理(UQ毕业证书)昆士兰大学毕业证毕业证成绩单原版一比一
如何办理(UQ毕业证书)昆士兰大学毕业证毕业证成绩单原版一比一
 
꧁༒☬ 7042364481 (Call Girl) In Dwarka Delhi Escort Service In Delhi Ncr☬༒꧂
꧁༒☬ 7042364481 (Call Girl) In Dwarka Delhi Escort Service In Delhi Ncr☬༒꧂꧁༒☬ 7042364481 (Call Girl) In Dwarka Delhi Escort Service In Delhi Ncr☬༒꧂
꧁༒☬ 7042364481 (Call Girl) In Dwarka Delhi Escort Service In Delhi Ncr☬༒꧂
 
FULL ENJOY - 9953040155 Call Girls in Sector 61 | Noida
FULL ENJOY - 9953040155 Call Girls in Sector 61 | NoidaFULL ENJOY - 9953040155 Call Girls in Sector 61 | Noida
FULL ENJOY - 9953040155 Call Girls in Sector 61 | Noida
 
UNIT-II-ENGINE AUXILIARY SYSTEMS &TURBOCHARGER
UNIT-II-ENGINE AUXILIARY SYSTEMS &TURBOCHARGERUNIT-II-ENGINE AUXILIARY SYSTEMS &TURBOCHARGER
UNIT-II-ENGINE AUXILIARY SYSTEMS &TURBOCHARGER
 
Hotel Escorts Sushant Golf City - 9548273370 Call Girls Service in Lucknow, c...
Hotel Escorts Sushant Golf City - 9548273370 Call Girls Service in Lucknow, c...Hotel Escorts Sushant Golf City - 9548273370 Call Girls Service in Lucknow, c...
Hotel Escorts Sushant Golf City - 9548273370 Call Girls Service in Lucknow, c...
 
Hot And Sexy 🥵 Call Girls Delhi Daryaganj {9711199171} Ira Malik High class G...
Hot And Sexy 🥵 Call Girls Delhi Daryaganj {9711199171} Ira Malik High class G...Hot And Sexy 🥵 Call Girls Delhi Daryaganj {9711199171} Ira Malik High class G...
Hot And Sexy 🥵 Call Girls Delhi Daryaganj {9711199171} Ira Malik High class G...
 
Innovating Manufacturing with CNC Technology
Innovating Manufacturing with CNC TechnologyInnovating Manufacturing with CNC Technology
Innovating Manufacturing with CNC Technology
 
Delhi Call Girls Saket 9711199171 ☎✔👌✔ Full night Service for more than 1 person
Delhi Call Girls Saket 9711199171 ☎✔👌✔ Full night Service for more than 1 personDelhi Call Girls Saket 9711199171 ☎✔👌✔ Full night Service for more than 1 person
Delhi Call Girls Saket 9711199171 ☎✔👌✔ Full night Service for more than 1 person
 
John Deere 200lc Excavator Operation And Tests Repair Manual.pdf
John Deere 200lc Excavator Operation And Tests Repair Manual.pdfJohn Deere 200lc Excavator Operation And Tests Repair Manual.pdf
John Deere 200lc Excavator Operation And Tests Repair Manual.pdf
 
( Best ) Genuine Call Girls In Mandi House =DELHI-| 8377087607
( Best ) Genuine Call Girls In Mandi House =DELHI-| 8377087607( Best ) Genuine Call Girls In Mandi House =DELHI-| 8377087607
( Best ) Genuine Call Girls In Mandi House =DELHI-| 8377087607
 
VIP Mumbai Call Girls Thakur village Just Call 9920874524 with A/C Room Cash ...
VIP Mumbai Call Girls Thakur village Just Call 9920874524 with A/C Room Cash ...VIP Mumbai Call Girls Thakur village Just Call 9920874524 with A/C Room Cash ...
VIP Mumbai Call Girls Thakur village Just Call 9920874524 with A/C Room Cash ...
 
VIP Kolkata Call Girl Kasba 👉 8250192130 Available With Room
VIP Kolkata Call Girl Kasba 👉 8250192130  Available With RoomVIP Kolkata Call Girl Kasba 👉 8250192130  Available With Room
VIP Kolkata Call Girl Kasba 👉 8250192130 Available With Room
 
2024 TOP 10 most fuel-efficient vehicles according to the US agency
2024 TOP 10 most fuel-efficient vehicles according to the US agency2024 TOP 10 most fuel-efficient vehicles according to the US agency
2024 TOP 10 most fuel-efficient vehicles according to the US agency
 
sauth delhi call girls in Connaught Place🔝 9953056974 🔝 escort Service
sauth delhi call girls in  Connaught Place🔝 9953056974 🔝 escort Servicesauth delhi call girls in  Connaught Place🔝 9953056974 🔝 escort Service
sauth delhi call girls in Connaught Place🔝 9953056974 🔝 escort Service
 

1997 acura 3.5 rl service repair manual

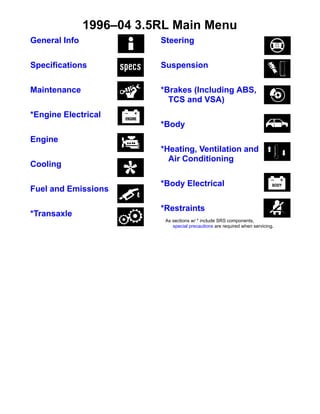
  • 1. General Info Specifications Maintenance *Engine Electrical Engine Cooling Fuel and Emissions *Transaxle Steering Suspension *Brakes (Including ABS, TCS and VSA) *Body *Heating, Ventilation and Air Conditioning *Body Electrical *Restraints 1996–04 3.5RL Main Menu As sections w/ * include SRS components, special precautions are required when servicing.
  • 2. Troubleshooting - '96 - 98 Models Diagnostic Trouble Code (DTC) Chart 24-41 24-44 24-44 24-46 24-48 24-50 24-52 24-52 24-54 24-56 24-58 24-60 24-60 24-62 24-64 24-66 24-68 24-68 24-70 24-72 24-74 Main Menu Table of Contents
  • 3. 24-181 24-181 24-181 24-181 24-76 24-81 24-181 If fuse No. 7 (10 A) is open or removed, and you keep the engine cranking, this may be self-diagnosed as a failure in the SRS system, and the SRS indicator light may indicate DTC 7-2. In this case, first check the No. 7 (10 A) fuse in the under- dash fuse/relay box. Next, erase the DTC memory (see page 24-37), and check the DTC. If DTC 7-2 doesn't reappear, the SRS unit is normal. Main Menu Table of Contents
  • 4. BackprobingSpring-loadedLock Connectors • When checking voltage or resistance on this type of connector the first time, it is necessary to remove the retainer to insert tester probes from the wire side. NOTE: It is not necessary to reinstall the removed retainer; the terminals will stay locked in the connec- tor housing. Disconnecting the Airbag Connectors and Seat Belt Tensioner Connectors '96 - 98 Models Before removing an airbag or other SRS related devices (the SRS unit and the cable reel), disconnecting connec- tors from SRS related devices, or removing the dash- board or the steering column, disconnect the airbag connectors to prevent accidental deployment. Turn the ignition switch OFF and disconnect the nega- tive cable from the battery, and wait at least 3 minutes before beginning the following procedures. • Before disconnecting the SRS main harness 18P con- nector (A) from the SRS unit, disconnect both airbag 2P connectors (C, D) and both seat belt tensioner 2P connectors (F, H). • Before disconnecting the cable reel 2P connector (B), disconnect the driver's airbag 2P connector (C). • Before disconnecting the left side wire harness 2P connector (E), disconnect the driver's seat belt ten- sioner 2P connector. (F). • Before disconnecting the right side wire harness 2P connector (G), disconnect the front passenger seat belt tensioner 2P connector (H). Refer to page 24-33 for the disconnect the connector(s). • To remove the retainer, insert a flat tip screwdriver between connector body and retainer, and carefully pry out the retainer. NOTE: Take care not to break the connector. Main Menu Table of Contents
  • 5. Chassis and Paint Codes 1996 Model Vehicle Identification Number Transmission Number Engine Number Vehicle Identification Number and Federal Motor Vehicle Safety Standard Certification. Vehicle Identification Number and Canadian Motor Vehicle Safety Standard Certification. COLOR LABEL INT. COLOR TYPE F EXT. COLOR G-79P KA SZ3 A3 C Paint Code Paint Code Paint Code Color G-79P G-83P NH-585P NH-592P RP-25P YR-508M YR-511P Juniper Green Pearl Eucalyptus Green Pearl Cayman White Pearl Flamenco Black Pearl Black Currant Pearl Heather Mist Metallic Devon Slate Pearl Main Menu Table of Contents
  • 6. 1997 Model Vehicle Identification Number Transmission Number Paint Code Paint Code B-75M G-79P G-83P NH-585P NH-592P RP-25P YR-508M YR-511P Color Crescent Silver Metallic*2 Juniper Green Pearl Eucalyptus Green Pearl*1 Cayman White Pearl Flamenco Black Pearl Black Currant Pearl*1 Heather Mist Metallic Devon Slate Pearl*1 Engine Number Vehicle Identification Number and Federal Motor Vehicle Safety Standard Certification. Vehicle Identification Number and Canadian Motor Vehicle Safety Standard Certification. COLORLABEL INT. COLOR TYPE F EXT. COLOR G-79P KA SZ3 A3 C Paint Code Main Menu Table of Contents
  • 7. Chassis and Paint Codes 1998 Model Vehicle Identification Number U.S. model: 000001- Canada model: 800001- Transmission Number *1: U.S. model only Engine Number Vehicle Identification Number and Federal Motor Vehicle Safety Standard Certification. Vehicle Identification Number and Canadian Motor Vehicle Safety Standard Certification. COLORLABEL INT. COLOR TYPE F EXT. COLOR G-79P KA SZ3 A3 C Paint Code Paint Code Paint Code Color Crystal Silver Metallic Juniper Green Pearl*1 Cayman White Pearl Flamenco Black Pearl Athlete Gray Metallic*1 Ruby Red Pearl*1 Heather Mist Metallic B-91M G-79P NH-585P NH-592P NH-611M R-504P YR-508M Main Menu Table of Contents
  • 8. 1999 Model Vehicle Identification Number TransmissionNumber *1: U.S. model only Engine Number C35A1 - 4000001 Vehicle Identification Number and Federal Motor Vehicle Safety Standard Certification. Vehicle Identification Number and Canadian Motor Vehicle Safety Standard Certification. COLOR LABEL INT. COLOR TYPE F EXT. COLOR G-97P KA SZ3 A6 C Paint Code PaintCode Paint Code Color Crystal Silver Metallic Nighthawk Black Pearl Monterey Blue Pearl*1 Vermont Green Pearl Premium White Pearl Ruby Red Pearl*1 Naples Gold Metallic B-91M B-92P B-93P G-97P NH-624P R-504P YR-524M Main Menu Table of Contents
  • 9. Chassis and Paint Codes 2000 Model Vehicle Identification Number U.S. model: 000001~ Canada model: 800001 ~ Transmission Number Engine Number Vehicle Identification Number and Federal Motor Vehicle Safety Standard Certification. Vehicle Identification Number and Canadian Motor Vehicle Safety Standard Certification. COLOR LABEL INT. COLOR TYPE F EXT. COLOR G-97P KA SZ3 A6 C Paint Code Paint Code Paint Code Color B-92P B-93P G-97P NH-552M R-504P YR-524M Nighthawk Black Pearl Monterey Blue Pearl Vermont Green Pearl*1 Sebring Silver Metallic Ruby Red Pearl*1 Naples Gold Metallic *1: U.S. model only Main Menu Table of Contents
  • 10. Chassisand PaintCodes 2001 Model Vehicle Identification Number Transmission Number *1: U.S. model only Engine Number Vehicle Identification Number and Federal Motor Vehicle Safety Standard Certification. Vehicle Identification Number and Canadian Motor Vehicle Safety Standard Certification. COLOR LABEL INT. COLOR TYPE F EXT. COLOR G-97P KA SZ3 A6 C Paint Code B-92P B-502P G-97P NH-623M NH-624P R-507P YR-524M Nighthawk Black Pearl Indigo Blue Pearl*1 Vermont Green Pearl*1 Satin Silver Metallic Premium White Pearl Firepepper Pearl Naples Gold Metallic ColorPaintCode Paint Code Main Menu Table of Contents
  • 11. ChassisandPaintCodes 2002 Model Vehicle Identification Number Transmission Number PaintCode Engine Number Main Menu Table of Contents
  • 12. Chassis and Paint Codes 2003 Model - Vehicle Identification Number TransmissionNumber Paint Code Main Menu Table of Contents
  • 13. Chassis and Paint Codes 2004 Model Main Menu Table of Contents
  • 14. Revised Component Terms Beginning with '01 models, the following component terms have been changed to conform with the standards in SAE docu- ment J1930. If you find a term or abbreviation in a '01 manual that is unfamiliar to you, check this list. If a term is not listed below, it did not change. '00 and Earlier Models '01 and LaterModels Main Menu Table of Contents
  • 15. '00 and Earlier Models '01 and Later Models Main Menu Table of Contents
  • 16. Parts Marking To deter vehicle theft, certain major components are marked with the vehicle identification number (VIN). Original parts have self-adhesive labels. Replacement body parts have generic self-adhesive labels. The original engine or transmission VIN plate is transferred to a replacement engine or transmission and attached with break-off bolts. NOTE: Be careful not to damage the parts marking labels during body repair. Mask the labels before repairing the part. Main Menu Table of Contents
  • 17. Identification Number Locations Vehicle Identification Number Vehicle Identification Number Transmission Number (Automatic) EngineNumber Main Menu Table of Contents
  • 18. Caution Label Locations SRSWARNING (HOOD) DRIVERSRSINFORMATION (see page 1-10) PASSENGER SRS INFORMATION U.S. model (on back of sunvisor, see page 1-10) PASSENGER SRS INFORMATION U.S. model (see page 1-10) FRONTSEATPASSENGER AIRBAG MODULE DANGER/ WARNING (see page 1-10) FRONTSEAT PASSENGER AIRBAG CAUTION U.S. model (see page 1-11) FRONT SEATBELT TENSIONER WARNING (see page 1-11) STEERING COLUMN NOTICE (see page 1-11) MONITOR NOTICE (see page 1-11) SIDE AIRBAG CAUTION (see page 1-11) SRS WARNING (HOOD) ('96 - 98 models) SUPPLEMENTAL RESTRAINT SYSTEM (SRS) THIS VEHICLE IS EQUIPPED WITH DRIVER AND FRONT SEAT PASSENGER AIRBAGS AND FRONT SEATBELT TENSIONER SYSTEMS. ALL SRS ELECTRICAL WIRING AND CONNECTORS ARECOLOREDYELLOW. TAMPERING WITH, DISCONNECTING OR USING ELECTRICAL TEST EQUIPMENT ON THE SRS WIRING CAN MAKE THE SYSTEM INOPERATIVE OR CAUSE ACCIDENTAL FIRING OF THE INFLATOR. WARNING THE AIRBAG INFLATOR IS EXPLOSIVE AND, IF ACCIDENTALLYDEPLOYED,CANSERIOUSLY HURT YOU. FOLLOW SERVICE MANUAL INSTRUCTIONS CAREFULLY. SRS WARNING (HOOD) ('99 - 01 models) SUPPLEMENTAL RESTRAINT SYSTEM (SRS) THIS VEHICLE IS EQUIPPED WITH DRIVER AND FRONT SEAT PASSENGER FRONT AND SIDE AIRBAGS AND FRONT SEATBELT TENSIONERS. ALL SRS ELECTRICAL WIRING AND CONNECTORS ARE COLORED YELLOW. TAMPERING WITH, DISCONNECTING OR USING TEST EQUIPMENT ON THE SRS WIRING CAN MAKE THE SYSTEM INOPERATIVE OR CAUSE ACCIDEN- TAL DEPLOYMENT. WARNING ACCIDENTAL DEPLOYMENT, CAN SERIOUSLY HURT OR KILL YOU. FOLLOW SERVICE MANUAL INSTRUCTIONS CAREFULLY. Main Menu Table of Contents
  • 19. Caution Label Locations (cont'd) DRIVER SRS INFORMATION PASSENGER SRS INFORMATION ('96, '97 models) CAUTION TO AVOID SERIOUS INJURY: FOR MAXIMUM SAFETY PROTECTION IN ALL TYPES OF CRASHES, YOU MUST ALWAYS WEAR YOUR SAFETY BELT. DO NOT INSTALL REARWARD-FACING CHILD SEATS IN ANY FRONT PASSENGER SEAT POSITION. DO NOT SIT OR LEAN UNNECESSARILY CLOSE TO THE AIRBAG. DO NOT PLACE ANY OBJECTS OVER THE AIRBAG OR BETWEEN THE AIRBAG AND YOURSELF. SEE THE OWNER'S MANUAL FOR FURTHER INFORMA- TION AND EXPLANATIONS. THE SRS MUST BE INSPECTED TEN YEARS AFTER IT IS INSTALLED. THE DATE OF INSTALLATION IS SHOWN ON THE DRIV- ER'S DOORJAMB. PASSENGER SRS INFORMATION U.S. model ('96, '97 models) AIRBAG. SEE OTHER SIDE. DRIVER SRS INFORMATION Canada model ('98, '99 models) CAUTION TO AVOID SERIOUS INJURY: FOR MAXIMUM SAFETY PROTECTION IN ALL TYPES OF CRASHES, YOU MUST ALWAYS WEAR YOUR SAFETY BELT. DO NOT INSTALL REARWARD FACING CHILD SEATS IN ANY FRONT PASSENGER SEAT POSITION. DO NOT SIT OR LEAN UNNECESSARILY CLOSE TO THE AIRBAG. DO NOT PLACE ANY OBJECTS OVER THE AIRBAG OR BETWEEN THE AIR BAG AND YOURSELF. SEE THE OWNER'S MANUAL FOR FURTHER INFORMA- TION AND EXPLANATIONS. DRIVER SRS INFORMATION PASSENGER SRS INFORMATION U.S. model ('98 - 01 models) WARNING DEATH OR SERIOUS INJURY CAN OCCUR. CHILDREN 12 AND UNDER CAN BE KILLED BY THE AIRBAG. THE BACK SEAT IS THE SAFEST PLACE FOR CHILDREN. NEVER PUT A REAR-FACING CHILD SEAT IN THE FRONT. SIT AS FAR BACK AS POSSIBLE FROM THE AIRBAG. ALWAYS USE SEAT BELTS AND CHILD RESTRAINTS. DRIVER SRS INFORMATION PASSENGER SRS INFORMATION U.S. model ('98, '99 models) AIRBAG WARNING FLIP VISOR OVER FRONT SEAT PASSENGER AIRBAG MODULE DANGER/WARNING ('96, '97 models) DANGER EXPLOSIVE/FLAMMABLE CONTACT WITH ACID, WATER OR HEAVY METALS SUCH AS COPPER, LEAD OR MERCURY MAY PRODUCE HARMFUL AND IRRITATING GASES OR EXPLOSIVE COMPOUNDS. STORAGE TEMPERATURES MUST NOT EXCEED 200°F (93°C). FOR PROPER HANDLING, STORAGE AND DISPOSAL PROCE- DURES REFER TO THE SERVICE MANUAL SRS SUPPLEMENT. POISON, CONTAINS POISONOUS SODIUM AZIDE AND POTASSIUM NITRATE. FIRST AID IF CONTENTS ARE SWALLOWED, INDUCE VOMIT- ING. FOR EYE CONTACT, FLUSH EYES WITH WATER FOR 15 MINUTES. IF GASES (FROM ACID OR WATER CONTACT) ARE INHALED, SEEK FRESH AIR. IN EVERY CASE, GET PROMPT MEDICAL ATTENTION. KEEP OUT OF REACH OF CHILDREN. . WARNING THE AIRBAG INFLATOR IS EXPLOSIVE AND, IF ACCIDEN- TALLY DEPLOYED, CAN SERIOUSLY HURT OR KILL YOU. DO NOT USE ELECTRICAL TEST EQUIPMENT OR PROB- ING DEVICES. THEY CAN CAUSE ACCIDENTAL DEPLOYMENT. NO SERVICEABLE PARTS INSIDE. DO NOT DISASSEM- BLE. PLACE THE AIRBAG UPRIGHT WHEN REMOVED. FOLLOW THE SERVICE MANUAL INSTRUCTIONS CARE- FULLY. FRONT SEAT PASSENGER AIRBAG MODULE DANGER/WARNING ('98 - 01 models) DANGER EXPLOSIVE/FLAMMABLE STORAGE TEMPERATURES MUST NOT EXCEED 200°F (93°C). FOR PROPER HANDLING, STORAGE AND DISPOSAL PROCE- DURES REFER TO THE SERVICE MANUAL SRS SUPPLEMENT. FIRST AID IF CONTENTS ARE SWALLOWED, INDUCE VOMIT- ING. FOR EYE CONTACT, FLUSH EYES WITH WATER FOR 15 MINUTES. IN EVERY CASE, GET PROMPT MEDICAL ATTEN- TION. KEEP OUT OF REACH OF CHILDREN. WARNING THE AIRBAG INFLATOR IS EXPLOSIVE AND, IF ACCIDEN- TALLY DEPLOYED, CAN SERIOUSLY HURT OR KILL YOU. DO NOT USE ELECTRICAL TEST EQUIPMENT OR PROB- ING DEVICES. THEY CAN CAUSE ACCIDENTAL DEPLOY- MENT. NO SERVICEABLE PARTS INSIDE. DO NOT DISASSEMBLE. PLACE AIRBAG UPRIGHT WHEN REMOVED. FOLLOW THE SERVICE MANUAL INSTRUCTIONS CARE- FULLY. Main Menu Table of Contents
  • 20. STEERING COLUMN NOTICE TO PREVENT SRS DAMAGE, REMOVE STEERING WHEEL BEFORE REMOVING STEERING SHAFT CONNECTING BOLT. MONITOR NOTICE NOTICE NO SERVICEABLE PARTS INSIDE. REFER TO SERVICE MANUAL FOR DETAILED INSTRUC- TIONS. FRONT SEATBELT TENSIONER WARNING WARNING EXPLOSIVE MATERIAL INSIDE YOU CAN BE SERIOUSLY HURT OR BURNED. DO NOT TAMPER OR DISASSEMBLE. NO SERVICEABLE PARTS INSIDE. REFER TO SERVICE MANUAL FOR COMPLETE INSTRUC- TIONS. FRONT SEAT PASSENGER AIRBAG CAUTION '96 - 99 U.S. model WARNING CHILDREN CAN BE KILLED OR INJURED BY A PASSENGER AIRBAG. THE BACK SEAT IS THE SAFEST PLACE FOR CHILDREN AGES 12 AND UNDER. MAKE SURE ALL CHILDREN USE SEAT BELTS OR CHILD SEATS. FRONT SEAT PASSENGER AIRBAG CAUTION '00 - 01 U.S. models WARNING CHILDREN CAN BE KILLED OR INJURED BY PASSENGER AIRBAG. MAKE SURE ALL CHILDREN USE SEAT BELTS OR CHILD SEATS. CABLE REEL CAUTION DRIVER MODULE DANGER ('97, '98 models) DRIVER MODULE WARNING DRIVER MODULE DANGER ('99 - 01 models) CABLE REEL CAUTION INSTALLATION OF THE SRS CABLE REEL IS CRITICAL TO THE PROPER OPERATION OF THE SRS SYSTEM. REFER TO THE SERVICE MANUAL DETAILED INSTALLATION INSTRUCTIONS. DRIVER MODULE DANGER ('97 model) DANGER EXPLOSIVE/FLAMMABLE CONTACT WITH ACID, WATER OR HEAVY METALS SUCH AS COPPER, LEAD OR MERCURY MAY PRODUCE HARMFUL AND IRRITATING GASES OR EXPLOSIVE COMPOUNDS. STORAGE TEMPERATURES MUST NOT EXCEED 200°F (93°C). FOR PROPER HANDLING, STORAGE AND DISPOSAL PROCE- DURES REFER TO SERVICE MANUAL SRS SUPPLEMENT. POISON, CONTAINS POISONOUS SODIUM AZIDE AND POTASSIUM NITRATE. FIRST AID IF CONTENTS ARE SWALLOWED, INDUCE VOMIT- ING. FOR EYE CONTACT, FLUSH EYES WITH WATER FOR 15 MINUTES. IF GASES (FROM ACID OR WATER CONTACT) ARE INHALED, SEEK FRESH AIR. IN EVERY CASE, GET PROMPT MEDICAL ATTENTION. KEEP OUT OF REACH OF CHILDREN. DRIVER MODULE DANGER ('98 model) DANGER EXPLOSIVE/FLAMMABLE STORAGE TEMPERATURES MUST NOT EXCEED 200°F <93°C). FOR PROPER HANDLING, STORAGE AND DISPOSAL PROCE- DURES REFER TO SERVICE MANUAL SRS SUPPLEMENT. FIRST AID IF CONTENTS ARE SWALLOWED, INDUCE VOMIT- ING. FOR EYE CONTACT, FLUSH EYES WITH WATER FOR 15 MINUTES. IN EVERY CASE, GET PROMPT MEDICAL ATTENTION. KEEP OUT OF REACH OF CHILDREN. DRIVER MODULE WARNING WARNING THE AIRBAG INFLATOR IS EXPLOSIVE AND, IF ACCIDEN- TALLY DEPLOYED, CAN SERIOUSLY HURT OR KILL YOU. DO NOT USE ELECTRICAL TEST EQUIPMENT OR PROB- ING DEVICES. THEY CAN CAUSE ACCIDENTAL DEPLOY- MENT. NO SERVICEABLE PARTS INSIDE. DO NOT DISASSEM- BLE. PLACE AIRBAG UPRIGHT WHEN REMOVED. FOLLOW SERVICE MANUAL INSTRUCTIONS CAREFULLY. SIDE AIRBAG CAUTION ('99 - 01 models) SIDE AIRBAG THIS CAR IS EQUIPPED WITH SIDE AIRBAGS IN THE DRIVER'S AND PASSENGER'S SEAT. DO NOT LEAN AGAINST THE DOOR. SEE OWNER'S MANUAL FOR MORE INFORMATION. SRS NOTICE Main Menu Table of Contents
  • 21. Caution Label Locations (cont'd) SERVICE INFORMATION Under-hood Emissions Control Label HEADLIGHT AIMING INFORMATION '96 - 99 models See page 1-11. This caution is also labeled on passenger doorjamb. AIR CONDITIONING INFORMATION TIREINFORMATION SIDEAIRBAGCAUTION TIRE INFORMATION RADIATOR CAP CAUTION '00-01 models BATTERY CAUTION COOLANT INFORMATION Main Menu Table of Contents
  • 22. Under-hood Emissions Control Label Emission Group Identification (1997 model) Example: VACUUM HOSE ROUTING DIAGRAM 50ST (50 State): THIS VEHICLE CONFORMS TO THE U.S. EPA AND THE STATE OF CALIFORNIA REGULATIONS APPLICABLE TO 1997 MODEL YEAR NEW MOTOR VEHICLES. Engine and Evaporative Families Engine Family: Main Menu Table of Contents
  • 23. Under-hood Emissions Control Label Emission Group Identification (1998 model) Example: VACUUM HOSE ROUTING DIAGRAM 50ST (50 States): THIS VEHICLE CONFORMS TO THE U.S. EPA AND THE STATE OF CALIFORNIA REGULATIONS APPLICABLE TO 1998 MODEL YEAR NEW MOTOR VEHICLES. Engine and Evaporative Families Engine Family: Evaporative Family: Main Menu Table of Contents
  • 24. Emission Group Identification (1999 model) Example: VACUUM HOSE ROUTING DIAGRAM 50ST (50 States): THIS VEHICLE CONFORMS TO THE U.S. EPA AND THE STATE OF CALIFORNIA REGULATIONS APPLICABLE TO 1999 MODEL YEAR NEW MOTOR VEHICLES. Engine and Evaporative Families Engine Family: Evaporative Family: Main Menu Table of Contents
  • 25. Under-hood Emissions Control Label Emission Group Identification (2000 model) Example: 50ST (50 States): THIS VEHICLE CONFORMS TO U.S. EPA NLEV REGULA- TIONS APPLICABLE TO 2000 MODEL YEAR NEW LEV PASSENGER CARS AND CALIFORNIA REGULATIONS APPLICABLE TO 2000 MODEL YEAR NEW LEV PASSEN- GERCARS. Engine and Evaporative Families Engine Family: Evaporative Family: VACUUM HOSE ROUTING DIAGRAM Main Menu Table of Contents
  • 26. Emission Group Identification (2001 model) Example: VEHICLE EMISSION CONTROL INFORMATION 50ST (50 States): THIS VEHICLE CONFORMS TO U.S. EPA NLEV REGULA- TIONS APPLICABLE TO 2001 MODEL YEAR NEW LEV PASSENGER CARS AND CALIFORNIA REGULATIONS APPLICABLE TO 2001 MODEL YEAR NEW LEV PASSEN- GER CARS. CANADIAN TIER 1: THIS VEHICLE CONFORMS CANADIAN TIER 1 STAN- DARDS FOR 2001 MODEL YEAR NEW PASSENGER CARS. Engine and Evaporative Families Engine Family: Evaporative Family: Main Menu Table of Contents
  • 27. Emission Group Identification (2003 model) Under-hood Emissions Control Label Engine and Evaporative Families Main Menu Table of Contents
  • 28. Under-hood Emissions Control Label Emission Group Identification (2004 model) Main Menu Table of Contents
  • 29. Lift and Support Points Lift and Safety Stands 1. Place the lift blocks as shown. 2. Raise the hoist a few inches (centimeters), and rock the vehicle to be sure it is firmly supported. 3. Raise the hoist to full height, and inspect the lift points for solid support. NOTE: Use the same support points to support the vehicle on safety stands. FRONT SUPPORT POINT REAR SUPPORT POINT LIFT BLOCKS Main Menu Table of Contents
  • 30. FloorJack 1. Block the rear wheels when raising the front of the vehicle; block the front wheels when raising the rear of the vehicle. Place the blocks behind and ahead of the wheels. 2. Raise the vehicle high enough to insert the safety stands. 3. Adjust and place the safety stands so the vehicle will be approximately level, then lower the vehicle onto them. Always use safety stands when working on or under any vehicle that is supported by only a jack. Never attempt to use a bumper jack for lifting or supporting the vehicle. Front Center the jack bracket in the middle ofthe jack lift platform. JACK LIFT PLATFORM Rear Center the jack bracket in the middle of the jack lift platform. JACK LIFT PLATFORM Main Menu Table of Contents
  • 31. Towing If the vehicle needs to be towed, call a professional tow- ing service. Never tow the vehicle behind another vehi- cle with just a rope or chain. It is very dangerous. EmergencyTowing There are three popular methods of towing a vehicle. Flat-bed Equipment — The operator loads the vehicle on the back of a truck. This is the best way of transporting the vehicle. Wheel Lift Equipment — The tow truck uses two pivoting arms that go under the tires (front or rear) and lifts them off the ground. The other two wheels remain on the ground. Sling-type Equipment — The tow truck uses metal cables with hooks on the ends. These hooks go around parts of the frame or suspension and the cables lift that end of the vehicle off the ground. The vehicle's suspension and body can be seriously damaged if this method of towing is attempted. If the vehicle cannot be transported by flat-bed, it should be towed with the front wheels off the ground. If due to damage, the vehicle must be towed with the front wheels on the ground, do the following. Releasethe parking brake. Start the engine. Shift to position, then position. Turn off the engine. Leave the ignition switch in Accessory (I) so the steer- ing wheel does not look. CAUTION: Improper towing preparation will damage the transmission. Follow the above procedure exactly. If you cannot shift the transmission or start the engine, the vehicle must be transported on a flat-bed. It is best to tow the vehicle no farther than 50 miles (80 km), and keep the speed below 35 mph (55 km/h). CAUTION: Trying to lift or tow the vehicle by the bumpers will cause serious damage. The bumpers are not designed to support the vehicle's weight. Front: TOWING HOOKS and TIE DOWN BRACKETS Rear: TIE DOWN BRACKET Main Menu Table of Contents
  • 32. Service Precautions Handling of Special Nuts and Bolts Because the front sub frame sections on this vehicle are constructed with aluminum alloys, use only the special "Dacro" type nuts and bolts recommended by Acura. NOTE: Dacro finish can be identified by gray plating. Some Dacro finish bolts have a green coating on the thread section of the bolt for easier application. This type of bolt is called a "Torquer" bolt. Use of other types of nuts and bolts may cause elec- trolysis and corrosion which in turn could cause the bolt to loosen. Gray plating Green coating on the threads of some bolts. Gray plating: "Dacro" type Gray plating + Green coating on the threads: "Torquer" type 1. When replacing nuts and bolts, use only the same type. 2. Tighten the nuts and bolts with a torque wrench to the specifications provided in this manual. 3. Clean all thread ridges with a non-wire-type bristle brush. Foreign matter in the threads may cause the bolt to loosen. 4. Sections on this vehicle requiring the use of Dacro nuts and bolts will be indicated by a ( ) in this manual. Main Menu Table of Contents
  • 33. Standards and Service Limits Engine Electrical — Section 4 *1 When using a new belt, adjust deflection to new value. Run the engine for 5 minutes then turn it off. Readjust deflection to used belt value. *2 Do not adjust the gap, replace the spark plug if it is out of service limit. '1: NIHON HATSUJO manufactured valve spring *2: CHUO HATSUJO manufactured valve spring Cylinder Head/Valve Train — Section 6 Main Menu Table of Contents
  • 34. Standards and Service Limits Engine Electrical — Section 4 *1 When using a new belt, adjust deflection or tension to new value. Run the engine for 5 minutes then turn it off. Readjust deflection or tension to used belt value. *2 Do not adjust the gap, replace the spark plug if it is out of service limit. Cylinder Head/Valve Train — Section 6 *1: NIHON HATSUJO manufactured valve spring *2: CHUO HATSUJO manufactured valve spring Main Menu Table of Contents
  • 35. Standards and Service Limits Engine Electrical — Section 4 Cylinder Head/Valve Train — Section 6 Main Menu Table of Contents
  • 36. Standards and Service Limits Engine Electrical —Section 4 Cylinder Head/Valve Train — Section 6 *1 When using a new belt, adjust deflection or tension to new value. Run the engine for 5 minutes then turn it off. Readjust deflection or tension to used belt value. *2 Do not adjust the gap, replace the spark plug if it is out of service limit. Main Menu Table of Contents
  • 37. Engine Lubrication — Section 8 Engine Block — Section 7 Main Menu Table of Contents
  • 38. Engine Block — Section 7 Engine Lubrication — Section 8 *1: RIKEN manufactured piston ring. *2: TEIKOKU PISTON RING manufactured piston ring. Main Menu Table of Contents
  • 39. - Engine Block — Section 7 Engine Lubrication — Section 8 Main Menu Table of Contents
  • 40. Engine Block — Section 7 Engine Lubrication — Section 8 Main Menu Table of Contents
  • 41. Standards and Service Limits Cooling — Section 10 Fuel and Emissions — Section 11 Main Menu Table of Contents
  • 42. Standards and Service Limits Cooling — Section 10 Fuel and Emissions — Section 11 Main Menu Table of Contents
  • 43. Fuel and Emissions — Section 11 Standards and Service Limits Cooling — Section 10 - Main Menu Table of Contents
  • 44. Standards and Service Limits Cooling — Section 10 Fuel and Emissions — Section 11 Main Menu Table of Contents
  • 45. Standards and Service Limits Differential — Section 15 Main Menu Table of Contents
  • 46. Standards and Service Limits Differential — Section 15 Main Menu Table of Contents
  • 47. Standards and Service Limits Differential — Section 15 Main Menu Table of Contents
  • 48. Standards and Service Limits Differential — Section 15 Main Menu Table of Contents
  • 49. Steering — Section 17 Suspension — Section 18 Brakes — Section 19 Main Menu Table of Contents
  • 50. Steering — Section 17 Suspension — Section 18 Brakes — Section 19 Main Menu Table of Contents
  • 51. Steering — Section 17 Suspension — Section 18 Brakes — Section 19 Main Menu Table of Contents
  • 52. Brakes — Section 19 Suspension — Section 18 Steering — Section 17 Main Menu Table of Contents
  • 53. Standards and Service Limits AirConditioning—Section22 Main Menu Table of Contents
  • 54. Standards and Service Limits Air Conditioning — Section 22 * When using a new belt, adjust deflection or tension to new value. Run the engine for 5 minutes then turn it off. Readjust deflection or tension to used belt value. Main Menu Table of Contents
  • 55. Standards and Service Limits Air Conditioning— Section 22 Main Menu Table of Contents
  • 56. Design Specifications Main Menu Table of Contents
  • 58. Standards and Service Limits Air Conditioning — Section 22 Main Menu Table of Contents
  • 59. Design Specifications Main Menu Table of Contents
  • 61. Design Specifications Main Menu Table of Contents
  • 62. Design Specifications Main Menu Table of ContentsMain Menu Table of Contents
  • 63. Design Specifications Main Menu Table of Contents
  • 65. Body Specifications Main Menu Table of Contents
  • 66. Body Specifications Main Menu Table of Contents
  • 67. Body Specifications Main Menu Table of Contents
  • 68. Body Specifications Main Menu Table of Contents
  • 69. LubricationPoints For the details of lubrication points and types of lubricants to be applied, refer to the Illustrated Index and various work procedures (such as Assembly/Reassembly, Replacement, Overhaul, Installation, etc.) contained in each section. No. 1 2 3 4 5 6 7 8 9 10 11 12 13 14 15 16 17 18 19 20 21 22 LUBRICATION POINTS Engine Transmission Brake line (Includes ABS line) Power steering gearbox Steering boots Throttle cable end Steering ball joints Shift lever (Automatic transmission) Pedallinkage Intermediate shaft Brake master cylinder pushrod Fuel fill lid Battery terminals Trunk hinges and latch Door hinges upper and lower Door opening detents Hood hinges and hood latch Brake line joints (Front and rear wheelhouse) Caliper Piston boot, caliper Pins and boots Power steering system Differential A/C compressor API SERVICE LABEL API CERTIFICATION SEAL LUBRICANT API Service Grade: Use SJ "Energy Conserving" grade oil. The oil container may also display the API Certification seal shown below. Make sure it says "For Gasoline Engines." SAE Viscosity: See chart below. HondaATF-Z1(ATF)*1 Genuine Honda DOT3 brake fluid*2 Steering grease P/N 08733 - B070E Multi-purpose grease Honda White Lithium Grease Rust preventive Silicone grease Genuine Honda power steering fluid*3 Hypoid gear Oil API GL4 or GL5 Viscosity: at above -18°C (0°F): SAE 90 at less than -18°C (0°F): SAE 80W-90 Compressor oil: DENSO: ND-OIL8 (P/N) 38897 - PR7 - A01AH or 38899 - PR7-A01) (For Refrigerant: HFC-134a (R-134a)) Recommendedengineoil viscosity for ambient temperature ranges *1: Always use Honda ATF-Z1 (ATF). Using a non-Honda ATF can affect shift quality. *2: Always use Genuine Honda DOT3 Brake Fluid. Using a non-Honda brake fluid can cause corrosion and decrease the life of the system. *3: Always use Genuine Honda Power Steering Fluid. Using any other type of power steering fluid or automatic transmis- sion fluid can cause increased wear and poor steering in cold weather. Main Menu Table of Contents
  • 70. NOTE: Lubricate all hinges, latches, and locks once a year. In corrosive areas, more frequent lubrication is necessary. We recommend Honda White Lithium Grease. Main Menu Table of Contents
  • 71. Follow the Normal Conditions Maintenance Schedule if the severe driving conditions specified in the Severe Conditions Maintenance Schedule on pages 3-6 and 3-7 do not apply. 8-4 8-5 8-4, 10-5 11-153 4-22 6-8 to 6-13, 10-10 4-33, 17-15, 22-85 11-124 10-5 14-108 15-4 19-10, 19-11, 12, 17, 18, 19-19, 19-23 19-8 19-6 22-68 Main Menu Table of Contents
  • 72. According to state and federal regulations, failure to perform maintenance on the items marked with an asterisk (*) will not void customer's emission warranties. However, Acura recommends that all maintenance services be performed at the recommended time or mileage period to ensure long-term reliability. For Canadian models: This Maintenance Schedule outlines the minimum required maintenance. 17-14, 17-23 18-3,18-21, 18-22 16-3 19-28 8-4, 10-5, 14-108, 15-4, 17-16, 19-8 10-2 9-5 11-126 Main Menu Table of Contents
  • 73. Follow the Normal Conditions Maintenance Schedule if the severe driving conditions specified in the Severe Conditions Maintenance Schedule on pages 3-10 and 3-11 do not apply. 8-4 8-5 8-4, 10-5 11-153 4-22 6-8 to 6-13, 10-10 4-33, 17-15, 22-85 11-124 10-5 14-108 15-4 19-10, 19-11, 12, 17, 18, 19-19, 19-23 19-8 19-6 22-68 Main Menu Table of Contents
  • 74. According to state and federal regulations, failure to perform maintenance on the items marked with an asterisk (*) will not void customer's emission warranties. However, Acura recommends that all maintenance services be performed at the recommended time or mileage period to ensure long-term reliability. ForCanadianmodels: This Maintenance Schedule outlines the minimum required maintenance. 17-14, 17-23 18-3, 18-21, 18-22 16-3 19-28 8-4, 10-5, 14-108, 15-4, 17-16, 19-8 10-3 9-5 11-126 Main Menu Table of Contents
  • 75. Follow the Normal Conditions Maintenance Schedule if the severe driving conditions specified in the Severe Conditions Maintenance Schedule on pages 3-14 and 3-15 do not apply. 8-4 8-5 8-4, 10-5 11-153 4-22 6-8 to 6-13, 10-10 4-33, 17-15, 22-85 11-124 10-5 14-108 15-4 19-10, 19-11, 12, 17, 18, 19-19, 19-23 19-8 19-6 22-68 Main Menu Table of Contents
  • 76. According to state and federal regulations, failure to perform maintenance on the items marked with an asterisk (*) will not void customer's emission warranties. However, Acura recommends that all maintenance services be performed at the recommended time or mileage period to ensure long-term reliability. For Canadian models: This Maintenance Schedule outlines the minimum required maintenance. 17-14, 17-23 18-3, 18-21, 18-22 16-3 19-28 8-4, 10-5, 14-108, 15-4, 17-16, 19-8 10-2 9-5 11-126 Main Menu Table of Contents
  • 77. Follow the Normal Conditions Maintenance Schedule if the severe driving conditions specified in the Severe Conditions Maintenance Schedule on pages 3-4 and 3-5 do not apply. 8-4 8-5 8-4,10-5 11-153 4-22 6-8 to 6-13, 10-10 4-33, 17-15, 22-85 11-124 10-5 14-108 15-4 19-10, 19-11, 19-12, 19-17, 19-18, 19-19, 19-23 19-8 19-6 22-68 Main Menu Table of Contents
  • 78. * According to state and federal regulations, failure to perform maintenance on the items marked with an asterisk (*) will not void customer's emission warranties. However, Acura recommends that all maintenance services be performed at the recommended time or mileage period to ensure long-term reliability. For Canadian models: Follow the Severe Conditions Maintenance Schedule on page 3-4 and 3-5. 17-14, 17-23 18-3, 18-21, 18-22 16-3 19-28 8-4, 10-5, 14-108, 15-4, 17-16, 19-8 10-2 9-5 11-126 Main Menu Table of Contents
  • 79. Follow the Normal Conditions Maintenance Schedule if the severe driving conditions specified in the Severe Conditions Maintenance Schedule on pages 3-4 and 3-5 do not apply. 8-4 8-5 8-4, 10-5 11-150 4-22 6-8 to 6-13, 10-10 4-33, 17-15, 22-85 11-121 10-5 14-108 15-4 19-10, 19-11, 19-12, 19-17, 19-18, 19-19, 19-23 19-8 19-7 22-68 Main Menu Table of Contents
  • 80. For Canadian models: Follow the Severe Conditions Maintenance Schedule on page 3-4 and 3-5. 17-14, 17-23 18-3, 18-21, 18-22 16-3 19-28 8-4, 10-5, 14-108 15-4, 17-16, 19-8 9-5 11-123 Main Menu Table of Contents
  • 81. Follow the Severe Conditions Maintenance Schedule if the vehicle is driven in Canada or MAINLY under one or more of the Severe Driving Conditions (page 3-7): 8-4, 8-5 8-4, 10-5 11-153 4-22 6-8 to 6-13, 10-10 4-33, 17-15, 22-85 11-124 10-5 14-108 15-4 19-10, 19-11, 19-12,19-17,19-18, 19-19, 19-23 19-8 19-6 22-68 3-2, 3-3 *1: Do not adjust the gap, replace the spark plug if it is out of service limit. *2: Replace the tinning belt and timing balancer belt at 60,000 miles (U.S.) 100,000 km (Canada) if the vehicle regularly is driven in one or more of these conditions: • In very high temperatures (over 110°F, 43°C). • In very low temperatures (under -20°F, -29°C). *3: Replace every 15,000 miles (24,000 km) if the vehicle is driven primarily in urban areas that have high concentrations of soot in the air from industry and diesel-powered vehi- cles. Replace the air conditioning filter more often if air flow from the climate control system becomes less than usual. Main Menu Table of Contents
  • 82. According to state and federal regulations, failure to perform maintenance on the items marked with an asterisk (*) will not void customer's emission warranties. However, Acura recommends that all maintenance services be performed at the recommended time or mileage period to ensure long-term reliability. Severe Driving Conditions: • Driving less than 5 miles (8 km) per trip or, in freezing temperatures, driving less than 10 miles (16 km) per trip. • Driving in hot [over 90°F (32°C)] conditions. • Extensive idling or long periods of stop-and-go driving. • Trailer towing, driving with a roof-top carrier, or driving in mountainous conditions. • Driving on muddy, dusty, or de-iced roads. NOTE: If the vehicle is driven OCCASIONALLY under a 3-4 and 3-5. 'severe" condition, you should follow the Normal Conditions Maintenance Schedule on pages 23-123 11-126 9-5 10-2 8-4, 10-5, 14-108, 15-4, 17-16, 19-8 19-28 16-3 18-3, 18-21, 18-22 17-14, 17-23 Main Menu Table of Contents
  • 83. Follow the Severe Conditions Maintenance Schedule if the vehicle is driven in Canada or MAINLY under one or more of the Severe Driving Conditions (page 3-11): 8-4,8-5 8-4, 10-5 11-153 4-22 6-8 to 6-13, 10-10 4-33, 17-15, 22-85 11-124 10-5 14-108 15-4 19-10, 19-11, 12, 17, 18, 19,23 19-8 19-6 22-68 3-2, 3-3 Main Menu Table of Contents
  • 84. According to state and federal regulations, failure to perform maintenance on the items marked with an asterisk (*) will not void customer's emission warranties. However, Acura recommends that all maintenance services be performed at the recommended time or mileage period to ensure long-term reliability. Severe Driving Conditions: • Driving less than 5 miles (8 km) per trip or, in freezing temperatures, driving less than 10 miles (16 km) per trip. • Driving in hot [over 90°F (32°C)] conditions. • Extensive idling or long periods of stop-and-go driving. • Trailer towing, driving with a roof-top carrier, or driving in mountainous conditions. • Driving on muddy, dusty, or de-iced roads. NOTE: If the vehicle is driven OCCASIONALLY under a "severe" condition, you should follow the Normal Conditions Maintenance Schedule on pages 3-8 and 3-9. 17-14, 17-23 18-3, 21, 22 16-3 19-28 8-4, 10-5, 14-108, 15-4, 17-16, 19-8 10-2 9-5 11-126 23-123 Main Menu Table of Contents
  • 85. Follow the Severe Conditions Maintenance Schedule if the vehicle is driven MAINLY under one or more of the Severe Driving Conditions (page 3-15): 8-4, 8-5 8-4, 10-5 11-153 4-22 6-8 to 6-13, 10-10 4-33, 17-15, 22-85 11-124 10-5 14-108 15-4 19-10, 19-11, 12, 17, 18, 19-19, 19-23 19-8 19-6 22-68 3-2, 3-3 *1: Do not adjust the gap, replace the spark plug if it is out of service limit. *2: Replace the timing belt and timing balancer belt at 60,000 miles (U.S.) 100,000 km (Canada) if the vehicle regularly is driven in one or more of these conditions: • In very high temperatures (over 110°F, 43°C). • In very low temperatures (under -20°F, -29°C). *3: Replace every 15,000 miles (24,000 km) if the vehicle is driven primarily in urban areas that have high concentrations of soot in the air from industry and diesel-powered vehi- cles. Replace the air conditioning filter more often if air flow from the climate control system becomes less than usual. Main Menu Table of Contents
  • 86. According to state and federal regulations, failure to perform maintenance on the items marked with an asterisk (*) will not void customer's emission warranties. However, Acura recommends that all maintenance services be performed at the recommended time or mileage period to ensure long-term reliability. Severe Driving Conditions: • Driving less than 5 miles (8 km) per trip or, in freezing temperatures, driving less than 10 miles (16 km) per trip. • Driving in hot [over 90°F (32°C)] conditions. • Extensive idling or long periods of stop-and-go driving. • Trailer towing, driving with a roof-top carrier, or driving in mountainous conditions. • Driving on muddy, dusty, or de-iced roads. NOTE: If the vehicle is driven OCCASIONALLY under a "severe" condition, you should follow the Normal Conditions Maintenance Schedule on pages 3-12 and 3-13. 17-14, 17-23 18-3, 18-21, 18-22 16-3 19-28 8-4, 10-5, 14-108, 15-4, 17-16, 19-8 10-2 9-5 11-126 23-123 Main Menu Table of Contents
  • 87. 8-4,8-5 11-153 4-22 6-8 to 6-13, 10-10 4-33, 17-15, 22-85 19-8 19-6 22-68 3-2, 3-3 8-4, 10-5 19-10, 19-11, 19-12,19-17, 19-18, 19-19,19-23 11-124 10-5 14-108 15-4 *1: Replace the timing belt and timing balancer belt at 60,000 miles (U.S.) 96,000 km (Canada) if the vehicle regularly is driven in one or more of these conditions: • In very high temperatures (over 110°F, 43°C). • In very low temperatures (under -20°F, -29°C). *2: Replace every 15,000 miles (24,000 km) if the vehicle is driven primarily in urban areas that have high concentrations of soot in the air from industry and diesel-powered vehi- Follow the Severe Conditions Maintenance Schedule if the vehicle is driven in Canada or MAINLY under one or more of the Severe Driving Conditions (page 3-5): cles. Replace the air conditioning filter more often if air flow from the climate control system becomes less than usual. Main Menu Table of Contents
  • 88. 17-14, 17-23 18-3,18-21,18-22 16-3 19-28 8-4, 10-5, 14-108, 15-4, 17-16, 19-8 10-2 9-5 11-126 23-123 * According to state and federal regulations, failure to perform maintenance on the items marked with an asterisk (*) will not void customer's emission warranties. However, Acura recommends that all maintenance services be performed at the recommended time or mileage period to ensure long-term reliability. Severe Driving Conditions: • Driving less than 5 miles (8 km) per trip or, in freezing temperatures, driving less than 10 miles (16 km) per trip. • Driving in hot [over 90°F (32°C)] conditions. • Extensive idling or long periods of stop-and-go driving. • Trailer towing, driving with a roof-top carrier, or driving in mountainous conditions. • Driving on muddy, dusty, or de-iced roads. NOTE: If the vehicle is driven OCCASIONALLY under a "severe" condition, you should follow the Normal Conditions Maintenance Schedule on pages 3-2 and 3-3. Main Menu Table of Contents
  • 89. Follow the Severe Conditions Maintenance Schedule if the vehicle is driven in Canada or MAINLY under one or more of the Severe Driving Conditions (page 3-5): 8-4, 8-5 8-4, 10-5 11-150 4-22 6-8 to 6-13, 10-10 4-33, 17-15, 22-85 11-121 10-5 14-108 15-4 19-10, 19-11, 19-12, 19-17, 19-18, 19-19, 19-23 19-8 19-7 22-68 3-2, 3-3 Main Menu Table of Contents
  • 90. NOTE: If the vehicle is driven OCCASIONALLY under a "severe" condition, you should follow the Normal Conditions Maintenance Schedule on pages 3-2 and 3-3. 17-14, 17-23 18-3, 18-21, 18-22 16-3 19-28 8-4, 10-5, 14-108, 15-4, 17-16, 19-8 9-5 11-123 23-123 Main Menu Table of Contents
  • 91. Special Tools Ref. No. Tool Number Description Qty Page Reference A973X - 041 - XXXXX 07JGG-001010A 07PAZ-0010100 Vacuum Pump Gauge Belt Tension Gauge SCS Service Connector 4-43 4-33 4-18 * Included in Belt Tension Gauge Set, T/N 07TGG - 001000A. Main Menu Table of Contents
  • 92. Starting System ComponentLocation Index STARTER CUT RELAY Wire colors: BLK/WHT, BLK/WHT, BLK/WHT and WHT/RED UNDER-DASH FUSE/RELAY BOX STARTER Test, page 4-5 Replacement, page 4-6 Overhaul, page 4-8 Solenoid Test, page 4-9 Reassembly, page 4-14 Main Menu Table of Contents
  • 93. Starter Test NOTE: The air temperature must be between 59 and 100°F (15 and 38°C) before testing. Recommended Procedure: Use a starter system tester. Connect and operate the equipment in accordance with the manufacturer's instructions. Test and troubleshoot as described. Alternate Procedure: Use following equipment: — Ammeter, 0 - 400 A — Voltmeter, 0 - 20 V (accurate within 0.1 volt) — Tachometer, 0 - 1,200 rpm Hook up a voltmeter and ammeter as shown. NEGATIVE TERMINAL NOTE: After this test, or any subsequent repair, reset the PCM to clear any codes (see section 11). Check the Starter Engagement 1. Disconnect the 8P and 6P connector from the ICM. 6P CONNECTOR ICM 8P CONNECTOR 2. 3. With the shift lever in or , turn the ignition switch to START (III). The starter should crank the engine. If the starter does not crank the engine, go to step 3. If it cranks the engine erratically or too slowly, go to "Check for Wear and Damage" on the next page. Check the battery, battery positive cable, ground, starter cut relay, and the wire connections for loose- ness and corrosion. Test again. If the starter still does not crank the engine, go to step 4. Unplug the connector (BLK/WHT wire) from the starter. Make sure the shift lever is in or , then connect a jumper wire from the battery positive (+) terminal to the solenoid terminal. The starter should crank the engine. S (SOLENOID) TERMINAL BLK/WHT WIRE If the starter still does not crank the engine, remove it, and diagnose its internal problem. If the starter cranks the engine, go to step 5 and continue the test. 5. Check the ignition switch. 6. Check the starter cut relay. 7. Check for an open in the wire between the ignition switch and starter. 8. Check the immobilizer system (see section 23). 4. Main Menu Table of Contents
  • 94. Starting System Starter Test (cont'd) Checkfor Wear and Damage The starter should crank the engine smoothly and steadily. If the starter engages, but cranks the engine erratically, remove it, and inspect the starter drive gear and drive plate ring gear for damage. Check the drive gear overrunning clutch for binding or slipping when the armature is rotated with the drive gear held. If the clutch is damaged, replace the clutch assem- bly. Check Cranking Voltage and Current Draw Cranking voltage should be no less than 8.0 volts. Current draw should be no more than 400 amperes. If cranking voltage is too low, or current draw too high, check for: Dead or low battery Open circuit in starter armature commutator segments Starter armature dragging Shorted armature winding Excessive drag in engine Check Cranking rpm Engine speed during cranking should be above 100 rpm. If speed is too low, check for: Loose battery or starter terminals Excessively worn starter brushes Open circuit in commutator segments Dirty or damaged helical spline or drive gear Defective drive gear overrunning clutch Check Starter Disengagement With the shift lever in turn the ignition switch to "START (III)", and release to "ON (II)". The starter drive gear should disengage from the drive plate ring gear when you release the key. If the drive gear hangs up on the drive plate ring gear, check for: • Solenoid plunger and switch malfunction • Dirty drive gear assembly or damaged overrunning clutch Main Menu Table of Contents
  • 95. 4. Remove the alternator belt and alternator (see page 4-29). 5. Remove the left exhaust manifold cover. (see section 9). 6. Remove the left damper fork (see section 18). 7. Disconnect the left suspension lower arm ball joint (see section 18). 8. Remove the left driveshaft (see section 16). Starter Replacement 1. Make sure you have the anti-theft code for the radio, then write down the frequencies for the radio's pre- set buttons. 2. Disconnect the battery negative terminal first, then the positive terminal. NOTE: The PCM memory setting is needed after reconnecting the battery (see page 11-123). 3. Raise the coolant reservoir, then remove the battery and battery base. Starting System Main Menu Table of Contents
  • 96. GASKET Replace. EXHAUST PIPE A SELF-LOCKING NUT 10 x 1.25 mm 54 N-m (5.5 kgf-m, 40 Ibf-ft) Replace. 10 x 1.25 mm 38 N-m (3.9 kgf-m, 28 Ibf-ft) SELF-LOCKING NUT 10 x 1.25 mm 54 N-m (5.5 kgf-m, 40 Ibf-ft) Replace. TRANSMISSION STOP COLLAR 10. Remove the front mount mounting bolts (see section 5). 11. Attach the chain hoist to the engine (see section 5). 12. Remove the left engine mount bracket. 12 x 1.25 mm 54 N-m (5.5 kgf-m, 40 Ibf-ft) 12 x 1.25 mm 64 N-m (6.5 kgf-m, 47 Ibf-ft) LEFT ENGINE MOUNT BRACKET 12 x 1.25 mm 54 N-m (5.5 kgf-m, 40 Ibf-ft) 13. Disconnect the starter cable and BLK/WHT wire, then remove the starter. 8 x 1.25 mm 8.8 N-m (0.9 kgf-m, 6.5 Ibf-ft) 10 x 1.25 mm STARTER 44 N-m (4.5 kgf-m, 33 Ibf-ft) CABLE BLK/WHT WIRE 10 x 1.25 mm 44 N-m (4.5 kgf-m, 33 Ibf-ft) STARTER 14. Install in the reverse order of removal. NOTE: When installing the starter cable, make sure that the crimped side of the ring terminal is facing out. Crimped side of ring terminal NUT TERMINAL 15. Enter the anti-theft code for the radio, then enter the customer's radio station presets. 9. Remove the transmission stop collar, then remove the exhaust pipe A. GASKETS Replace. SELF-LOCKING NUT 8 x 1.25 mm 22 N-m (2.2 kgf-m, 16 Ibf-ft) Replace. Main Menu Table of Contents
  • 97. Starting System Starter Overhaul CAUTION: Disconnect the battery cable before remov- ing the starter (see page 4-6). NOTE: The PCM memory setting is needed after recon- necting the battery (see page 11-125). BRUSH HOLDER BRUSH SPRING BRUSH HOLDER Test, page 4-12 END COVER RING GEAR ARMATURE HOUSING Test, page 4-9 MOLYBDENUM DISULFIDE OVERRUNNING CLUTCH ASSEMBLY GEAR SHAFT PLANETARY GEAR Inspection, page 4-13 PLATE MOLYBDENUM DISULFIDE ARMATURE Inspection and Test, page 4-10 MOLYBDENUM DISULFIDE OVERRUNNING CLUTCH ASSEMBLY Inspection, page 4-13 SOLENOID LEVER STARTER SOLENOID Test, page 4-9 RINGGEAR PINION STOP SPRING CLIP Replace MOLYBDENUM DISULFIDE GEAR HOUSING PLANETARY GEARARMATURE STEEL BALL Main Menu Table of Contents
  • 98. Starter Solenoid Test 1. Remove the starter solenoid from the gear housing. SOLENOID SCREWS GEAR HOUSING 2. Check for continuity between the terminals in each solenoid plunger position according to the table. PLUNGER SOLENOID HOUSING (GROUND) Starter Field Winding Test 1. Check for continuity between the brushes. If there's no continuity, replace the armature housing. 2. Check for continuity between each brush and the armature housing (ground). If continuity exists, replace the armature housing. BRUSHES ARMATURE HOUSING (GROUND) GROUND PULL-IN COIL HOLD-IN COIL Main Menu Table of Contents
  • 99. StartingSystem ArmatureInspectionandTest 1. Inspect the armature for wear or damage due to con- tact with the permanent magnet. If there is wear or damage, replace the armature. Inspect for damage 2. Check commutator surface and diameter. If the surface is dirty or burnt, resurface with emery cloth or a lathe within the following specifications, or recondition with #500 or #600 sandpaper. COMMUTATOR SANDPAPER If commutator diameter is below the service limit, replace the armature. Commutator Diameter Standard (NEW) 31.9-32.1 mm (1.256 -1.264 in) Service Limit 31.5 mm (1.240 in) VERNIER CALIPER COMMUTATOR 3. Measure the commutator runout. If the commutator runout is within the service limit, check the commutator for carbon dust or brass chips between the segments. If the commutator runout is not within the ser- vice limit, replace the armature. Commutator Runout Standard(NEW) 0-0.05 mm (0-0.002 in) Service Limit 0.1 mm (0.004in) DIAL INDICATOR COMMUTATOR Main Menu Table of Contents
  • 100. 4. Check for mica depth. If necessary, undercut the mica with a hacksaw blade to achieve proper depth. If the service limit cannot be maintained, replace the arma- ture. NO-GOOD GOOD MICA DEPTH Commutator Mica Depth Standard (NEW) 0.5-0.8 mm (0.020-0.031 in) Service Limit 0.20 mm (0.008 in) 5. Check for continuity between the segments of the commutator. If an open circuit exists between any segments, replace the armature. COMMUTATOR SEGMENT 6. Place the armature on an armature tester. Hold a hacksaw blade on the armature core. If the blade is attracted to the core or vibrates while the core is turned, the armature is shorted. Replace the arma- ture. ARMATURE TESTER HACKSAW BLADE ARMATURE 7. With an ohmmeter, check that no continuity exists between the commutator and armature coil core, and between the commutator and armature shaft. If there is continuity, replace the armature. SHAFT COIL CORE COMMUTATOR HIGH MICA Main Menu Table of Contents
  • 101. Starting System Starter Brush Holder Test 1. Check that there is no continuity between the and brush holders. If there is continuity, replace the brush holder assembly. BRUSH HOLDER BRUSH HOLDER BRUSH HOLDER 2. Insert the brush into the brush holder, and bring the brush into contact with the commutator, then attach a spring scale to the spring. Measure the spring ten- sion at the moment the spring lifts off the brush. SPRING SCALE (Commercially available) SPRING BRUSH SpringTension 29.1 - 37.8 N (2.97 - 3.85 kgf, 6.548 - 8.488 Ibf) Starter Brush Inspection Measure the brush length. If the length not within the service limit, replace the brush holder assembly. Brush Length Standard(NEW) 18 mm (0.71in) Service Limit 10 mm (0.39 in) BRUSH NOTE: To seat new brushes after installing them in their holders, slip a strip of #500 or #600 sandpaper, with the grit side up, over the commutator, and smoothly rotate the armature. The contact surface of the brushes will be sanded to the same contour as the commutator. BRUSH HOLDER Main Menu Table of Contents
  • 102. Planetary Gear Inspection Check if the planetary gears are worn or damaged. If they are, also check the condition of the armature shaft gear and ring gear. ARMATURE SHAFTGEAR RING GEAR PLANETARY GEARS Overrunning Clutch Inspection Slide the overrunning clutch along the shaft. Does it move freely? If not, replace it. 1. 2. Rotate the overrunning clutch both ways. Does it lock in one direction and rotate smoothly in reverse? If it does not lock in either direction or it locks in both directions, replace it. SHAFT 3. 4. DRIVE GEAR If the starter drive gear is worn or damaged, replace the overrunning clutch assembly; the gear is not avail- able separately. Check the condition of the torque converter ring gear if the starter drive gear teeth are damaged. Main Menu Table of Contents
  • 103. Starting System Overrunning Clutch Removal 1. Put the end of a pipe (inner diameter 13 mm (0.51 in)) against the pinion stop, and strike the pipe to force the pinion stop over the spring clip. A: 13 mm (0.51 in) PINION STOP PIPE SPRING CLIP PLANETARY GEAR SHAFT NOTE: Be careful not to damage the planetary gear shaft when striking the pipe. 2. Remove the spring clip then pull the pinion stop and overrunning clutch off the shaft. SPRING CLIP PINION STOP Starter Reassembly NOTE: Use the illustration on page 4-8 as reference for reassembly. 1. Pry back each brush spring with a screwdriver, then position the brush about halfway out of its holder, and release the spring to hold it there. 2. Install the armature in the housing. Next pry back each brush spring again and push the brush down until it seats against the commutator, then release the spring against the end of the brush. 3. Install the end cover on the brush holder. END COVER BRUSH HOLDER Main Menu Table of Contents
  • 104. Performance Test NOTE: Before starting the following checks, disconnect the wire from terminal M, and make a connection as described below using as heavy a wire as possible (prefer- ably equivalent to the wire used in the vehicle). Pull-in Coil Test: Connect the battery as shown. If the starter pinion pops out, it is working properly. CAUTION: Do not leave the battery connected for more than 10 seconds. Disconnect the wire. Hold-in Coil Test: Disconnect the battery from the M terminal. If the pinion does not retract, the hold-in coil is working properly. CAUTION: Do not leave the battery connected for more than 10 seconds. RetractingTest: Disconnect the battery also from the body. If the pinion retracts immediately, it is working properly. CAUTION: Do not leave the battery connected for more than 10 seconds. NOTE: The PCM memory must be reset after reconnect- ing the battery (see page 11-125). Starter No-load Test: 1. Clamp the starter firmly in a vise. 2. Connect the starter to the battery as shown in the diagram below, and confirm that the motor starts and keeps rotating. 3. If the electric current and motor speed meet the specifications when the battery voltage is at 11 V, the starter is working properly. Specifications: 145 A or less current draw 3,300 rpm or more rpm BODY (GROUND) BODY (GROUND) BATTERY STARTER BATTERY BODY (GROUND) Main Menu Table of Contents
  • 105. Ignition System Component Location Index IGNITION COILS Test, page 4-21 SPARKPLUGS Inspection, page 4-22 NOISE CONDENSER Test, page 4-19 IGNITION CONTROL MODULE (ICM) Input Test, page 4-20 Main Menu Table of Contents
  • 106. Ignition System Ignition Timing Inspection SRS components are located in this area. Review the SRS component locations, precautions, and procedures in the SRS (section 24) before performing repairs or service. 1. Start the engine. Hold the engine at 3,000 rpm with no load (shift lever in or position) until the radiator fan comes on, then let it idle. 2. Pull out the service check connector located under the glove box. Connect the GRN/BLK and RED wire terminals with the special tool. SERVICE CHECK CONNECTOR (2P) NOTE: Located under the glove box SCS SERVICE CONNECTOR (07PAZ-0010100) 3. Check the idle speed (see page 4-19). 4. Remove the engine cover (see section 5). 5. Connect a timing light to the No. 1 ignition coil wires; while the engine idles, point the timing light toward the pointer on the timing belt cover. No. 1 IGNITION COIL WIRES TIMING LIGHT CRANKSHAFTPULLEY 6. Inspect ignition timing at idle speed. Ignition Timing: 15 ± 2° BTDC (RED) at 650 ± 50 rpm with shift lever in or position and electrical systems turned off. WHITE MARK POINTER CRANKSHAFT PULLEY RED MARK 7. If the ignition timing is incorrect, replace the PCM (there is no way to adjust ignition timing). 8. Disconnect the special tool from the service check connector (2P). Main Menu Table of Contents
  • 107. Idle Speed Check 1. Start the engine. Hold the engine at 3,000 rpm with no load (shift lever in or ) until the radiator fan comes on, then let it idle. 2. Connect a tachometer to the test tachometer connec- tor. TEST TACHOMETER CONNECTOR BATTERY Idle speed: 650 ± 50 rpm with shift lever in position or and electrical systemsturned off. 3. Adjust the idle speed if necessary (see section 11). Noise Condenser Capacity Test 1. Use a commercially available condenser tester. Con- nect the condenser tester probes, and measure the condenser capacity. Condenser capacity: 0.47 ± 0.09 microfarads( F) POSITIVE TERMINAL BODY GROUND (Negative) NOTE: The noise condenser is intended to reduce ignition noise. However, condenser failure may cause the engine to stop running. 2. If not within the specifications, replace the noise con- denser. CLIP TACHOMETER Main Menu Table of Contents
  • 108. Ignition System Ignition Control Module (ICM) Input Test NOTE: See section 11 if the malfunction indicator lamp (MIL) blinks. Disconnect the 8P connector from the ignition control module (ICM). Inspect the connector and socket terminals to be sure they are all making good contact. If any terminals are bent, loose or corroded, repair them as necessary, and recheck the system. If the terminals look OK, make the following input tests at the connector. — If any test indicates a problem, find and correct the cause, then recheck the system. — If all the input tests prove OK, the ICM must be faulty; replace it. Wire side of female terminals ICM 8P CONNECTOR Trml Wire Test condition Test: Desired result Possible cause if result is not obtained 2 7 4 3 1 8 6 5 BLK3 BLK4 WHT1 WHT/GRN WHT/BLK WHT/BLU RED/GRN WHT/RED Under all conditions Ignition switch ON (ID Check for continuity to ground: There should be continuity. Check for voltage to ground: There should be battery voltage. • Poor ground (G151) • An open in the wire • Blown 30 A fuse in the under-dash fuse/relay box • Faulty ignition coil • An open in the wire Main Menu Table of Contents
  • 109. Ignition Coil Test 1. Turn the ignition switch OFF. 2. Remove the strut brace, then remove the engine cover (see section 5). 3. Remove the ignition coil. 4. Using an ohmmeter, measure resistance between the terminals. Replace the coil if the resistance is not within specification. NOTE: Resistance will vary with the coil tempera- ture; specification is at 77°F (25°C). Primary Winding Resistance (between the No. 1 and No. 2 terminals) 0.9- 1.1 ohms If the resistance is not within specification, replace the coil. If the resistance is OK, but other troubleshooting doesn't reveal the cause of the problem, substi- tute a known-good ignition coil and check engine operation again. If the engine then runs OK, replace the original coil. Terminal side of male terminals IGNITION COIL SECONDARY WINDING TERMINAL SECONDARY WINDING TERMINAL Main Menu Table of Contents
  • 110. Ignition System Spark Plug Inspection 1. Inspect the electrodes and ceramic insulator for: Worn or deformed electrodes Damaged gasket Cracked insulator Improper gap Oil-fouling Carbon deposits Cracked center electrode insulator Burned or worn electrodes may be caused by: Advanced ignition timing Loose spark plug Plug heat range too hot Insufficient cooling Fouled plug may be caused by: Retarded ignition timing Oil in combustion chamber Incorrect spark plug gap Plug heat range too cold Excessive idling/low speed running Clogged air cleaner element Deteriorated ignition coil or ignition wires 2. Do not adjust the gap of platinum tip plugs; replace the spark plug if the gap is out of specification or if the center electrode is rounded. Electrode Gap: Standard Service Limit 1.1 mm (0.043 in) 1.3 mm (0.051 in) Platinum tip plug: Do not adjust the gap; replace the spark plug if the gap is out of specification or if the center electrode is rounded. 3. Replace the plug at the specified interval, or if the center electrode is rounded as shown below: ROUNDED ELECTRODE NOTE: Use only the spark plugs listed below. SparkPlugs PFR5L-11 (NGK) PK16PR-L11 (DENSO) 4. Apply a small quantity of anti-seize compound to the plug threads, and screw the plugs into the cylin- der head finger-tight. Then torque them to 18 N-m (1.8 kgf-m, 13 Ibf-ft). Main Menu Table of Contents
  • 111. Charging System Component Location Index ALTERNATOR BELT Inspection and Adjustment, page 4-33 ALTERNATOR Alternator and Regulator Test, page 4-27 Replacement, page 4-29 Overhaul, page 4-30 Main Menu Table of Contents
  • 112. Troubleshooting If the charging system light does not come on or does not go off, or the battery is dead or low, test the following items in the order listed below: 1. Battery (see section 23) 2. Charging System Light (see below) 3. Alternator/Regulator (see page 4-27) Charging System Light Test Check the No. 20 (7.5 A) fuse in the under-dash fuse/relay box. Is the fuse OK? Check for an open in the L circuit: 1. Disconnect the 4P connector from the alternator. 2. Ground the No. 3 terminal of the 4P connector. 3. Turn the ignition switch ON (II). Does the charging system light come on? Disconnect the No. 3 terminal of the 4P connector from the ground. Does the charging system light go off? Check for a short to body ground in the L circuit: 1. Turn the ignition switch OFF. 2. Disconnect the ABS control unit (C447) and passenger's multiplex control unit (C401), as applicable. 3. Turn the ignition switch ON (II). Does the charging system light stay off? Check for short in control unit(s): 1. Turn the ignition switch OFF. 2. Reconnect the ABS control unit connector. 3. Turn the ignition switch ON (II), and check the charging system light. Did the light stay off when you turned on the ignition switch after connecting ABS control unit connector? Substitute a known-good ABS control unit, and recheck. ALTERNATOR 4PCONNECTOR Replace the fuse. Check for a blown charging sys- tem light bulb. If the bulb is OK, repair the open in the WHT/BLU Wire side of female terminals (To page 4-26) Turn the ignition switch OFF, and repair the short to ground in the WHT/BLU wire. Substitute a known-good pas- senger's multiplex control unit, and recheck. Main Menu Table of Contents
  • 113. Charging System Troubleshooting (cont'd) (From page 4-25) Check for an open in the IG circuit: Measure the voltage at the No. 1 terminal of the 4P connector. Is there battery voltage? Check the Alternator/Regulator: 1. Turn the ignition switch OFF. 2. Connect the 4P connector to the alternator. 3. Turn the ignition switch ON (II). Does the charging system lightcome on? 4. Start the engine. Does the charging system light go off? The charging system light circuit is OK. Turn the ignition switch OFF, and repair the open circuit in the BLK/ YELwire. ALTERNATOR 4PCONNECTOR Wire side of female terminals Check the alternator/regulator (see page 4-27). Check the alternator/regulator (seepage4-27). Main Menu Table of Contents
  • 114. AlternatorReplacement 1. Make sure you have the anti-theft code for the radio, then write down the frequencies for the radio's pre- set buttons. 2. Disconnect the battery negative terminal first, then the positive terminal. NOTE: The PCM memory must be reset after recon- necting the battery (see page 11-125). 3. Remove the battery and battery base (see page 4-6). 4. Remove the mounting bolt, lock bolt and adjusting rod, then remove the alternator belt. LOCK BOLT 8 x 1.25 mm 22 N-m (2.2 kgf-m, 16 Ibf-ft) ADJUSTING ROD ALTERNATOR BELT MOUNTING BOLT 10 x 1.25 mm 44 N-m (4.5 kgf-m, 33 Ibf-ft) 5. Remove the alternator bracket. ALTERNATOR BRACKET 10 x 1.25 mm 44 N-m (4.5 kgf-m, 33 Ibf-ft) 8 x 1.25 mm 22 N-m (2.2 kgf-m, 16 Ibf-ft) 6. Disconnect the 4P connector and harness clip bracket, then remove the terminal nut and the BLK wire from the B terminal. Take out the alternator. BLKWIRE 8 x 1.25 mm 12 N-m (1.2 kgf-m, 8.7 Ibf-ft) 4P CONNECTOR ALTERNATOR 7. Install the reverse order of removal. 8. Adjust the alternator belt (see page 4-33). 9. Enter the anti-theft code for the radio, then enter the customer's radio station presets. Main Menu Table of Contents
  • 115. Charging System Alternator Overhaul NOTE: Do not remove the pulley unless the front bear- ing needs replacement. To loosen the pulley locknut, use the tools as shown. If necessary, use an impact wrench. HARNESS CLIP BRACKET PULLEY END COVER BRUSH HOLDER INSULATOR BRUSH ASSEMBLY Inspection, page 4-31 22 mm BOX WRENCH 10 mm BOX WRENCH PULLEY LOCKNUT 110 N-m (11.3 kgf-m, 81.7 Ibf-ft) VOLTAGE REGULATOR RECTIFIER ASSEMBLY Test, page 4-31 TERMINAL INSULATOR INSULATOR SLEEVE REAR HOUSING SPACER CAUTION: Do not get grease or oil on the slip rings. ROTOR Test, page 4-32 PULLEY LOCKNUT 110 N-m (11.3 kgf-m, 81.7 Ibf-ft) STATOR THROUGH BOLT STATOR/DRIVE END HOUSING Test, page 4-32 PULLEY FRONT BEARING BEARING RETAINER Do not disassemble. REAR BEARING Main Menu Table of Contents
  • 116. RectifierTest NOTE: The diodes are designed to allow current to pass in one direction while blocking it in the opposite direc- tion. Since the alternator rectifier is made up of eight diodes (four pairs), each diode must be tested for conti- nuity in both directions with an ohmmeter that has diode checking capability; a total of 16 checks. 1. Check for continuity in each direction, between the B and P, and between the E (ground) and P termi- nals of each diode pair. All diodes should have con- tinuity in only one direction. 2. If any of the eight diodes fails, replace the rectifier assembly. (Diodes are not available separately.) Alternator Brush Inspection 1. Remove the end cover, then take out the brush holder by removing its two screws. 2. Measure the length of the brushes with a vernier caliper. Alternator Brush Length: Standard: 10.5 mm (0.41 in) Service Limit: 1.5 mm (0.06 in) ALTERNATOR BRUSHES VERNIER CALIPER If the brushes are less than the service limit, replace the alternator brush assembly. Main Menu Table of Contents
  • 117. Charging System Rotor Slip Ring Test 1. Check the resistance between the slip rings. There should be 2.9 ohms. If resistance meets the specification, go to step 2. If resistance does not meet the specification, replace the alternator. ROTOR SHAFT SLIP RINGS ROTOR 2. Check that there is no continuity between the slip rings and the rotor or rotor shaft. 3. If the rotor fails either continuity check, replace the alternator. Stator Test 1. Check that there is continuity between each pair of leads. LEADS COIL CORE 2. Check that there is no continuity between each lead and the coil core. 3. If the coil fails either continuity check, replace the alternator. Main Menu Table of Contents
  • 118. Alternator Belt Inspection and Adjustment NOTE: When using a new belt, first adjust the deflection or tension to the values for the new belt, then readjust the deflection or tension to the values for the used belt after running engine for 5 minutes. Deflection method: Apply a force of 98 N (10 kgf, 22 Ibf), and measure the deflection between the alternator and crankshaft pulley. Deflection: Used Belt: 9.5 - 11.5 mm (0.37 - 0.45 in) New Belt: 7.0 - 8.0 mm (0.28 - 0.31 in) NOTE: If the belt is worn or damaged, replace it. Belt tension gauge method: Attach the belt tension gauge to the belt and measure the tension. Follow the gauge manufacturer's instructions. Tension: Used Belt: 390 - 590 N (40 - 60 kgf, 88 - 130 Ibf) New Belt: 780 - 980 N (80 - 100 kgf, 180 - 220 Ibf) NOTE: If the belt is worn or damaged, replace it. BELT TENSION GAUGE 07JGG-001010A Main Menu Table of Contents
  • 119. Charging System Alternator Belt Inspection and Adjustment(cont'd) Ifadjustmentisnecessary: 1. Loosen the mounting bolt and the lock bolt. 2. Move the alternator by turning the adjusting rod to obtain the proper belt tension, then retighten the bolts. Looser Tighter ADJUSTING ROD MOUNTING BOLT 10 x 1.25 mm 44 N-m (4.5 kgf-m, 33 Ibf-ft) LOCK BOLT 8 x 1.25 mm 22 N-m (2.2 kgf-m, 16 Ibf-ft) 3. Recheck the deflection or tension of the belt. NOTE: For the power steering pump belt and A/C compressor belt adjustments, refer to section 17 and section 22. Main Menu Table of Contents
  • 120. Cruise Control Component Location Index SRS components are located in this area. Review the SRS component locations, precautions, and procedures in the SRS (section 24) before performing repairs or service. CRUISE CONTROL INDICATOR LIGHT Bulb Locations, page 23-76 MAIN SWITCH Test/Replacement, page 4-41 SET/RESUME/CANCEL SWITCH Test/Replacement, page 4-39 CRUISE CONTROL UNIT Input Test, page 4-37 VEHICLE SPEED SENSOR (VSS) Troubleshooting, page 23-86 TRANSMISSION RANGE SWITCH Test, section 14 ACTUATOR CABLE Adjustment, page 4-45 ACTUATOR Test, page 4-43 Replacement, page 4-44, Solenoid Test, page 4-42 BRAKE PEDAL POSITION SWITCH Test, page 4-41 Main Menu Table of Contents
  • 121. Control Unit Input Test SRS components are located in this area. Review the SRS component locations, precautions, and procedures in the SRS (section 24) before performing repairs or service. 1. Disconnect the 14P connector from the control unit. 2. Inspect the connector and socket terminals to be sure they are all making good contact. If the terminals are bent, loose, or corroded, repair them as necessary, and recheck the system. If the terminals look OK, make the following input tests at the connector. — If any test indicates a problem, find and correct the cause, then recheck the system. — If all the input tests prove OK, the control unit must be faulty; replace it. CRUISE CONTROL UNIT 14P CONNECTOR Wire side of female terminals Main Menu Table of Contents
  • 122. CruiseControl Control Unit Input Test (cont'd) Cavity Wire Test condition Test:Desiredresult Possible cause if result is not obtained 3 13 7 6 14 12 2 5 10 9 11 1 BLK LT GRN LT GRN/BLK LT GRN/RED PNK BLU/WHT GRY GRN/WHT BLU/YEL BRN BRN/BLK BRN/WHT Under all conditions Ignition switch ON (II) and main switch ON Resume button pushed Cancel button pushed Set button pushed Cancel button pushed Shift lever in , or Ignition switch ON (II), and main switch ON; raise the front of the vehicle, and rotate one wheel slowly while holding the other wheel. Ignition switch ON (II), main switch ON; brake pedal pressed, then released Brake pedal pressed then released Ignition switch ON (II) Under all conditions Under all conditions Under all conditions Check for continuity to ground: There should be continuity. Check for voltage to ground: There should be battery voltage. Check for voltage to ground: There should be battery voltage. When testing terminal No. 7, there should be no voltage on terminal No. 6. Check for voltage to ground: There should be battery voltage. When testing terminal No. 7, there should be voltage on terminal No. 6. Check for voltage to ground: There should be battery voltage. When testing terminal No. 6, there should be no voltage on terminal No. 7. Check for voltage to ground: There should be battery voltage. When testing terminal No. 6, there should be voltage on terminal No. 7. Check for continuity to ground: There should be continuity. NOTE: There should be no continuity when the shift lever is in other positions. Check for voltage between the BLU/WHT andBLK terminals: There should be cycle 0 - 5 V or battery voltage. Check for voltage to ground: There should be 0 V with the pedal pressed, and battery voltage with the pedal released. Check for voltage to ground: There should be battery voltage with the pedal pressed, and 0 V with the pedalreleased. Attach to ground: The cruise light in the gauge assembly should come on. Check for resistance to ground: There should be 80 -120 Check for resistance to ground: There should be 70 -110 Check for resistance to ground: There should be 40 - 60 • Poor ground (G401, G402) • An open in the wire • Blown No. 20 (20 A) fuse in the under-dash fuse/relay box • Faulty main switch • An open in the wire • Blown No. 39 (15 A) fuse in the under-hood fuse/relay box • Faulty horn relay • Faulty set/resume/cancel switch • Faulty cable reel • An open in the wire • Short between LT GRN/BLK and LT GRN/REDwires • Blown No. 39 (15 A) fuse in the under-hood fuse/relay box • Faulty horn relay • Faulty set/resume/cancel switch • Faulty cable reel • An open in the wire • Blown No. 39 (15 A) fuse in the under-hood fuse/relay box • Faulty horn relay • Faulty set/resume/cancel switch • Faulty cable reel • An open in the wire • Short between LT GRN/BLK and LT GRN/RED wires • Blown No. 39 (15 A) fuse in the under-hood fuse/relay box • Faulty horn relay • Faulty set/resume/cancel switch • Faulty cable reel • An open in the wire • Faulty A/T gear position switch • Poor ground (G401, G402) • An open in the wire • Faulty vehicle speed sensor (VSS) • An open in the wire • Short to ground • Blown No. 39 (15 A) fuse in the under-hood fuse/relay box • Faulty brake switch • An open in the wire • Blown No. 39 (15 A) fuse in the under-hood fuse/relay box • Faulty brake switch • An open in the wire • Blown bulb • Faulty gauge circuit • An open in the wire • Faulty actuator solenoid • An open in the wire Main Menu Table of Contents
  • 123. Set/Resume/Cancel Switch Test/Replacement SRS components are located in this area. Review the SRS component locations, precautions, and procedures in the SRS (section 24) before performing repairs or service. 1. Make sure you have the anti-theft code for the radio, then write down the frequencies for the radio's pre- set buttons. 2. Disconnect the battery negative cable, then discon- nect the positive cable, and wait at least 3 minutes. NOTE: The PCM memory must be reset after recon- necting the battery (see page 11-125). 3. Disconnect the airbag connectors. Driver's Side: Remove the access panel from the steering wheel, then disconnect the 2P connector between the driver's airbag and cable reel. CABLE REEL CONNECTOR DRIVER'S AIRBAG 2P CONNECTOR ACCESS PANEL Front Passenger's Side: Remove the glove box (see section 20). Disconnect the front passenger's 2P connector from the SRS main harness. FRONT PASSENGER'S AIRBAG 2P CONNECTOR SRS MAIN HARNESS 4. Remove the dashboard lower cover. 5. Disconnect the combination switch 20P connector from the main harness. 20P CONNECTOR Wire side of female terminals Main Menu Table of Contents
  • 124. Cruise Control Set/Resume/Cancel SwitchTest/Replacement(cont'd) 6. Check for continuity between the terminals of the combination switch harness connector in each switch position according to the table. If there is continuity, and it matches the table, the switch is OK. If there is no continuity in any positions, go to step 7. 7. Carefully remove the set/resume/cancel switch cover by prying between the cover and the switch in the sequence shown. SET/RESUME/CANCEL SWITCH SET/RESUME/CANCEL SWITCH COVER 8. Remove the two screws, and disconnect the 4P con- nector. Then remove the switch. SET/RESUME/CANCEL SWITCH SCREWS 9. Check for continuity between the terminals in each switch position according to the table. If there is continuity, and it matches the table, replace the cable reel. If there is no continuity in any positions, replace the switch. 10. If all the tests prove OK, reconnect the battery cables, and enter the anti-theft code for the radio. Then enter the customer's radio station presets. Terminal side of male terminals Main Menu Table of Contents
  • 125. Main Switch Test 1. Remove the driver's switch panel (see section 20). DRIVER'S SWITCH PANEL TCS SWITCH CRUISE MAIN SWITCH BULBS (0.84 W x 2) 2. Remove the TCS and cruise main switch assembly from the driver's switch panel. 3. Check for continuity between the terminals in each switch position according to the table. If there is no continuity, replace the switch. BrakePedalPositionSwitchTest 1. Disconnect the 4P connector from the switch. Terminal side of male terminals 4P CONNECTOR BRAKE PEDAL 2. Check for continuity between the terminals accord- ing to the table. 3. If necessary, replace the switch or adjust pedal height (see section 19). Main Menu Table of Contents
  • 126. Cruise Control Actuator Solenoid Test 1. Disconnect the 4P connector from the actuator. Terminal side of male terminals 2. Check for resistance between the terminals accord- ing to the table. NOTE: Resistance will vary slightly with tempera- ture; specified resistance is at 70°F (20°C). VENT VALVE From VENT HOSE To VACUUM TANK VACUUM VALVE SAFETY VALVE Main Menu Table of Contents
  • 127. Actuator Test 1. Disconnect the actuator cable from the actuator rod, and disconnect the 4P connector. 2. Connect battery power to the No. 4 terminal and ground to the No. 1, No. 2, and No. 3 terminals. 3. Connect a vacuum pump to the check valve. Then apply vacuum to the actuator. VACUUM PUMP GAUGE A973X-041-XXXXX Terminal side of male terminals 4. The actuator rod should pull in completely. If the rod pulls in only part-way or not at all, check for a leaking vacuum line or defective solenoid. ACTUATOR ROD 5. 6. 7. 8. 9. With voltage and vacuum still applied, try to pull the actuator rod out by hand. You should not be able to pull it out. If you can, it is defective. Disconnect ground from the No. 3 terminal. The actuator rod should return. If it does not return, and the vent hose and filter are not plugged, the solenoid valve assembly is defective. Repeat steps 2 through 5, and disconnect ground from the No. 1 terminal. The actuator rod should return. If it does not return, and the vent hose and filter are not plugged, the solenoid valve assembly is defective. If you replace the solenoid valve assembly, be sure to use new O-rings on each solenoid. Disconnect power and ground from the 4P connec- tor. Disconnect the vent hose from the actuator. Con- nect a vacuum pump to the actuator vent hose port, and apply vacuum. The actuator rod should pull in completely. If not, the vacuum valve is stuck open. Replace the actuator. Main Menu Table of Contents
  • 128. CruiseControl Actuator/Cable Replacement 1. Disconnect the 4P connector from the actuator. 2. Remove the three mounting bolts and the actuator with the bracket. 4P CONNECTOR 3. Remove the vacuum hose. 4. Remove the three nuts. 5. Disconnect the actuator cable from the actuator rod by releasing the clip from the rod with a screwdriver as shown. CLIP ACTUATOR ROD ACTUATOR CABLE NUTS 6. Loosen the locknut, then disconnect the actuator cable from the throttle linkage. ADJUSTING NUT LOCKNUT ACTUATOR CABLE CABLE BRACKET THROTTLE LINKAGE 7. Install in the reverse order of removal, and adjust free play at the throttle linkage after connecting the actuatorcable. MOUNTING BOLTS VACUUM HOSE MOUNTING BOLT Main Menu Table of Contents
  • 129. Actuator Cable Adjustment 1. Check that the actuator cable moves smoothly with no binding or sticking. 2. Measure the amount of movement of the output linkage until the engine speed starts to increase. At first, the output linkage should be located at the fully closed position. Free play should be 5 ± 0.5 mm (0.20 ± 0.02 in). OUTPUT LINKAGE ADJUSTING NUT FREE PLAY: 5 ± 0.5 mm (0.20 ± 0.02 in) ACTUATOR CABLE 3. If the free play is not within specs, move the cable to the point where the engine speed starts to increase, and tighten the locknut and adjusting nut. CABLE BRACKET ADJUSTING NUT LOCKNUT ACTUATOR CABLE 4. Turn the adjusting nut until it is 5 ± 0.5 mm (0.20 ± 0.02 in) away from the bracket. 5 ± 0.5 mm (0.20 ± 0.02 in) CABLE BRACKET ADJUSTING NUT 5. Pull the cable so that the adjusting nut touches the bracket, and tighten the locknut. ADJUSTING NUT LOCKNUT Main Menu Table of Contents
  • 130. Engine Engine Removal/Installation 5–1. . . . . . . . . . . . . . . . . . . . . . . . Cylinder Head/Valve Train 6–1. . . . . . . . . . . . . . . . . . . . . . . . . . . Engine Block 7–1. . . . . . . . . . . . . . . . . . . . . . . . . . . . . . . . . . . . . . Engine Lubrication 8–1. . . . . . . . . . . . . . . . . . . . . . . . . . . . . . . . . Intake Manifold/Exhaust System 9–1. . . . . . . . . . . . . . . . . . . . Cooling 10–1. . . . . . . . . . . . . . . . . . . . . . . . . . . . . . . . . . . . . . . . . . . . Main Menu
  • 131. Thank you very much for your reading. Please Click Here Then Get More Information.