Avaya daysavings
•
0 likes•262 views

This document provides instructions for setting daylight savings rules and locations on an Avaya S8700 Media Server. It describes how to: 1. Set up to 15 customized daylight savings time rules by specifying start and stop times and time increments. 2. Set locations for media gateways by specifying timezones and associated daylight savings rules. 3. Verify the date, time, and daylight savings rule displayed are correct and make adjustments if needed through the media server web interface.

Recommended
More Related Content
Recently uploaded
Recently uploaded (20)
Featured
Featured (20)
Avaya daysavings
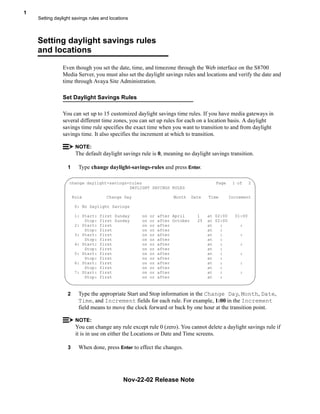
- 1. 1 Setting daylight savings rules and locations Setting daylight savings rules and locations Even though you set the date, time, and timezone through the Web interface on the S8700 Media Server, you must also set the daylight savings rules and locations and verify the date and time through Avaya Site Administration. Set Daylight Savings Rules You can set up to 15 customized daylight savings time rules. If you have media gateways in several different time zones, you can set up rules for each on a location basis. A daylight savings time rule specifies the exact time when you want to transition to and from daylight savings time. It also specifies the increment at which to transition. NOTE: The default daylight savings rule is 0, meaning no daylight savings transition. 1 Type change daylight-savings-rules and press Enter. change daylight-savings-rules Page 1 of 2 DAYLIGHT SAVINGS RULES Rule Change Day Month Date Time Increment 0: No Daylight Savings 1: Start: first Sunday on or after April 1 at 02:00 01:00 Stop: first Sunday on or after October 25 at 02:00 2: Start: first on or after at : : Stop: first on or after at : 3: Start: first on or after at : : Stop: first on or after at : 4: Start: first on or after at : : Stop: first on or after at : 5: Start: first on or after at : : Stop: first on or after at : 6: Start: first on or after at : : Stop: first on or after at : 7: Start: first on or after at : : Stop: first on or after at : 2 Type the appropriate Start and Stop information in the Change Day, Month, Date, Time, and Increment fields for each rule. For example, 1:00 in the Increment field means to move the clock forward or back by one hour at the transition point. NOTE: You can change any rule except rule 0 (zero). You cannot delete a daylight savings rule if it is in use on either the Locations or Date and Time screens. 3 When done, press Enter to effect the changes. Nov-22-02 Release Note
- 2. 2 Setting daylight savings rules and locations Set Locations (if necessary) After you set the daylight savings rules, you must set the locations for all media gateways (cabinets). It is possible to have media gateways in different time zones. 1 Type change locations and press Enter. change locations Page 1 of 5 LOCATIONS ARS Prefix 1 Required For 10-Digit NANP Calls? y Number Name Timezone Daylight-Savings Number Plan Offset Rule Area Code 1 Main + 00:00 0 2 CA - 02:00 0 3 : 4 : 5 : 6 : 7 : 8 : 9 : 10 : 11 : 2 Type y in the ARS Prefix 1 Required for 10-Digit NANP Calls? field. 3 Type the information in the various fields for each media gateway. NOTE: In the Name field for location 1, call the media gateway (cabinet) Main. 4 Press Enter to effect the changes. Verify Date and Time 1 Type display time and press Enter display time Page 1 of 1 DATE AND TIME DATE Day of the Week: Friday Month: November Day of the Month: 8 Year: 2002 TIME Hour: 14 Minute: 19 Second: 36 Type: Standard Daylight Savings Rule: 0 WARNING: Changing the date or time may impact BCMS, CDR, SCHEDULED EVENTS, 2 Verify that the date and time are correct. Nov-22-02 Release Note
- 3. 3 Setting daylight savings rules and locations 3 Verify that the correct rule (number) is displayed in the Daylight Savings Rule field. 4 If correct, press Cancel. 5 If not, go to the media server Web interface. 6 Under Server click Set Server Time/Timezone. 7 Verify that the date and time are correct. If not, set it here. 8 Repeat steps 1 through 3. Nov-22-02 Release Note