- This document provides instructions for setting and using the various functions of a remote-controlled countdown clock, including setting the time, date, alarms, countdown timer, and stopwatch.
- There is a learning curve to using the remote, as some functions like setting the time are less intuitive than using the buttons on the clock directly.
- The instructions provide step-by-step details on how to set each function using the remote control. Troubleshooting tips are also included, such as changing batteries if the time is inaccurate.
1. Quick Guide For The Countdown Clock
Thanks for your time to allow us to do a simple product presentation here. This
advanced clock has multi functions, and it’s remote-controlled. So there is a learning
curve on this.
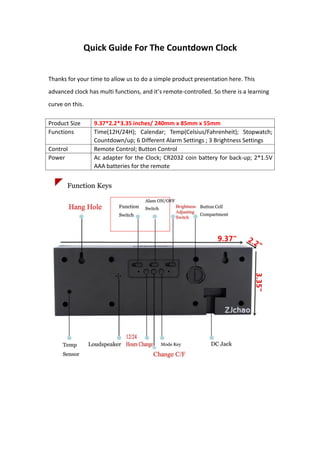
Product Size 9.37*2.2*3.35 inches/ 240mm x 85mm x 55mm
Functions Time(12H/24H); Calendar; Temp(Celsius/Fahrenheit); Stopwatch;
Countdown/up; 6 Different Alarm Settings ; 3 Brightness Settings
Control Remote Control; Button Control
Power Ac adapter for the Clock; CR2032 coin battery for back-up; 2*1.5V
AAA batteries for the remote
2. Learning Curve for this Advanced Clock:
IMPORTANT: If the remote doesn't work, set the switch to AL-ON in back of the clock.
To disable the remote, set the switch to AL-OFF. With the remote disabled, all
functions except for the stopwatch are accessible. Using the rear switches and
buttons feels more intuitive, but it's also more cumbersome. Using the remote is less
intuitive, but easier to input numbers and access the other features. The guide below
is for remote users.
Set the time:
3. - Push T SET on the remote.
- Use 0-9 on the keypad, or use the UP or DOWN keys.
- Use the MODE button to advance.
- Push RET when finished.
* By default, the clock is set to 24-hour mode. To switch it to 12-hour mode, push
DOWN once on the back of the clock. To set the time in 12-hour mode, use the
UP/DOWN buttons to advance to PM.
Set the date:
- Push C SET on the remote.
- Use 0-9 or the UP and DOWN keys. *Note: The date is entered day/month/year, but
will display as month/day/year.
- Use MODE to advance.
- Push RET when finished.
Set the alarm:
- Push AL SET
- Use 1-6 or the UP/DOWN keys to select a setting. You can manage up to six alarm
settings.
- Push MODE to adjust the time. Use the numeric buttons or the UP/DOWN key to
change the time. Using the UP/DOWN keys is the only way to access AM or PM. Push
MODE to advance.
- When you see SN and a number, this is your snooze setting. You can enter 1-59
minutes for the snooze setting.
- When you see AL, you can turn your alarm on or off.
- When you see SN again, choose ON to enable snooze or C to disable it.
- Pushing MODE again will return you to alarm management.
* Turning the alarm on here does not turn it on. It only enables the setting.
To manage your alarm settings:
4. - Push the A1-A6 button to select a setting.
- Push AL ON OFF to enable or disable the alarm.
- Push RET to exit.
- Push the AL ON OFF button to activate all enabled alarms. You'll see a bell icon. No
bell icon means the alarm feature is deactivated.
* Activating the alarm enables all alarms that have been set to ON.
* The snooze button is located at the top of the clock and the play/pause button on
the remote.
* To turn off the alarm if it's beeping, push the AL ON OFF button.
Set the countdown:
- Push CD SET.
- Use 0-9 or the UP and DOWN keys to set the time.
- Push MODE to advance.
- When it shows CD, this is the countdown save option. If you switch it to ON, it will
save whatever time you entered.
- Push the play/pause button to start the countdown.
* Push the CD PREP button to enable the 10-second pre-countdown (this is not
adjustable). The letter "E" will appear when this is enabled.
* Push MUTE or the play/pause button to turn off the alarm.
* If you need to reset the countdown, pause it and hit the CD SET key.
(Use the MUTE button to select ring or Blinking when countdown is over)
Use the stopwatch:
- Push ST.
- Push the play/pause button to start or stop it (stopwatch will only show hours,
minutes, and seconds).
- Push ST again to reset the stopwatch to zero.
- Push RET to exit.
5. Troubleshooting:
- Time is not accurate any more: please change the backup battery CR2032 from the
back of the clock
- Remote not work: use new 1.5V aaa batteries, make sure the switch is turned to
NORMAL and ALARM is on
- Any other problems: Get a little stick to press the RESET hole on the back of the
clock for 10s till the clock display 00:00:00. The reset of the clock is done and you
could sent the time, alarm again. If that could not resolve the problem, please emails.
Thanks.