Bajaj Allianz Life Insurance Company - Insurer Innovation Award 2024
Worklowsinsharepoint
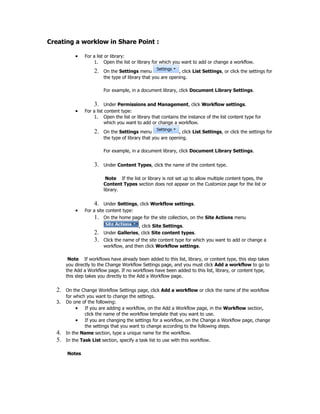
1. Creating a worklow in Share Point :
• For a list or library:
1. Open the list or library for which you want to add or change a workflow.
2. On the Settings menu , click List Settings, or click the settings for
the type of library that you are opening.
For example, in a document library, click Document Library Settings.
3. Under Permissions and Management, click Workflow settings.
• For a list content type:
1. Open the list or library that contains the instance of the list content type for
which you want to add or change a workflow.
2. On the Settings menu , click List Settings, or click the settings for
the type of library that you are opening.
For example, in a document library, click Document Library Settings.
3. Under Content Types, click the name of the content type.
Note If the list or library is not set up to allow multiple content types, the
Content Types section does not appear on the Customize page for the list or
library.
4. Under Settings, click Workflow settings.
• For a site content type:
1. On the home page for the site collection, on the Site Actions menu
, click Site Settings.
2. Under Galleries, click Site content types.
3. Click the name of the site content type for which you want to add or change a
workflow, and then click Workflow settings.
Note If workflows have already been added to this list, library, or content type, this step takes
you directly to the Change Workflow Settings page, and you must click Add a workflow to go to
the Add a Workflow page. If no workflows have been added to this list, library, or content type,
this step takes you directly to the Add a Workflow page.
2. On the Change Workflow Settings page, click Add a workflow or click the name of the workflow
for which you want to change the settings.
3. Do one of the following:
• If you are adding a workflow, on the Add a Workflow page, in the Workflow section,
click the name of the workflow template that you want to use.
• If you are changing the settings for a workflow, on the Change a Workflow page, change
the settings that you want to change according to the following steps.
4. In the Name section, type a unique name for the workflow.
5. In the Task List section, specify a task list to use with this workflow.
Notes
2. • You can use the default Tasks list or you can create a new one. If you use the default
Tasks list, workflow participants will be able to find and view their workflow tasks easily
by using the My Tasks view of the Tasks list.
• If the tasks for this workflow will reveal sensitive or confidential data that you want to
keep separate from the general Tasks list, you should create a new tasks list.
• If your organization will have numerous workflows or if workflows will involve numerous
tasks, you should create a new tasks list. In this instance, you might want to create tasks
lists for each workflow.
6. In the History List section, select a history list to use with this workflow. The history list displays
all of the events that occur during each instance of the workflow.
Note You can use the default History list or you can create a new one. If your organization will
have numerous workflows, you might want to create a separate history list for each workflow.
7. In the Start Options section, specify how, when, or by whom a workflow can be started.
Notes
• Specific options may not be available if they are not supported by the workflow template
that you selected.
• The option Start this workflow to approve publishing a major version of an item
is available only if support for major and minor versioning is enabled for the library and if
the workflow template that you selected can be used for content approval.
8. If you are adding this workflow to a site content type, specify whether or not you want to add this
workflow to all content types that inherit from this content type in the Update List and Site
Content Types section.
Note The Update List and Site Content Types section displays on the Add a Workflow page
only for site content types.
9. If there are additional customization options available for your workflow, click Next, and then
specify the options that you want on the Customize page for your workflow.
10. If there are no additional customization options available for your workflow, click OK.