SlideShare a Scribd company logo
1 of 192
Download to read offline
KE300X/KE300B Inverter
1
Preface
Thank you for purchasing KE300X/KE300B series inverters.
This manual describes how to use KE300X/KE300B series inverters properly.
Please read it carefully before installation, operation, maintenance and
inspection. Besides, please use the product after understanding the safety
precautions.
Precautions
 In order to describe the product’s details, the drawings presented in this
instruction are sometimes shown without covers or protective guards.
When using the product, please make sure to install the cover or
protective guard as specified firstly, and operate the products in
accordance with the instructions.
 Since the drawings in this manual are represented examples, some are
subject to differ from delivered products.
 This manual may be modified when necessary because of improvement
of the product, modification or changes in specifications. Such
modifications are denoted by a revised manual No.
 If you want to order the manual due to loss or damage, please contact
our company agents in each region or our company customer service
center directly.
 If there is still any problem during using the products, please contact our
company customer service center directly.
KE300X/KE300B Inverter
2
Contents
Chapter 1 Safety and Precautions ............................................................... 4
1.1 Safety Precautions ............................................................................ 4
1.2 Precautions ....................................................................................... 7
Chapter 2 Product Information....................................................................11
2.1 Product Inspection............................................................................11
2.2 Model Description.............................................................................11
2.3 Description of Nameplate................................................................. 12
2.4 Selection Guide............................................................................... 12
2.5 Technical Specifications................................................................... 12
2.6 External & Installation Dimensions................................................... 16
2.7 Routine Maintenance of Inverter ...................................................... 18
2.8 Instructions on Warranty of Inverter ................................................. 20
Chapter 3 Mechanical and Electric Installation......................................... 21
3.1 Mechanical Installation .................................................................... 21
3.2 Electrical Installation........................................................................ 22
Chapter 4 Operation and Display............................................................... 33
4.1 Keypad Description ......................................................................... 33
4.2 Function Code Checking and Modification Methods Description....... 34
4.3 Power-on Initialization...................................................................... 35
4.4 Fault Protection ............................................................................... 35
4.5 Stand By ......................................................................................... 36
4.6 Running........................................................................................... 36
4.7 Password Setting............................................................................. 36
4.8 Motor Parameters Autotuning .......................................................... 37
Chapter 5 Function Parameter List............................................................ 38
5.1 Basic Function Parameter Table ...................................................... 39
5.2 Monitoring Parameter Table............................................................. 84
KE300X/KE300B Inverter
3
Chapter 6 Parameter Description............................................................... 87
Group P0 Basic Function....................................................................... 87
Group P1 Motor Parameters.................................................................. 96
Group P2 Vector Control Parameters..................................................... 98
Group P3 V/F Control Parameters....................................................... 100
Group P4 Input Terminal...................................................................... 104
Group P5 Output Terminal ....................................................................117
Group P6 Start and Stop Control ......................................................... 122
Group P7 Keypad and Display............................................................. 127
Group P8 Enhanced Function.............................................................. 133
Group P9 Fault and Protection ............................................................ 142
Group PA PID Function........................................................................ 148
Group PB Wobble Frequency, Fixed Length, Counting......................... 153
Group PC Multi-step Command and Simple PLC Function................... 155
Group PD Communication Parameters................................................ 159
Group PP Function Code Management ............................................... 159
Group A0 Torque Control Parameters.................................................. 160
Group U0 Monitoring Parameters ........................................................ 162
Chapter 7 Trouble Shooting ..................................................................... 170
7.1 Fault and Trouble Shooting............................................................ 170
7.2 Common Faults and Solutions....................................................... 178
Chapter 8 MODBUS Communication Protocol........................................ 180
8.1 About Protocol............................................................................... 180
8.2 Application Method ........................................................................ 180
8.3 Bus Structure................................................................................. 180
8.4 Protocol Description....................................................................... 181
8.5 Communication Data Structure...................................................... 181
8.6 Command Code and Communication Data Description.................. 182
8.7 PD Group Communication Parameter Description.......................... 190
KE300X/KE300B Inverter
4
Chapter 1 Safety and Precautions
Safety definition:
In this manual, safety precautions are classified as follows:
Danger: Operations which are not performed according to requirements
may cause serious equipment loss or personnel injury.
Caution: Operations which are not performed according to requirements
may cause medium hurt or light hurt or material loss.
During the installation, commissioning and maintenance of the system, please
make sure to follow the safety and precautions of this chapter. In case of a result
of illegal operations, caused any harm and losses is nothing to do with the
company.
1.1 Safety Precautions
1.1.1 Before Installation:
Danger
 Do not use the water-logged inverter, damaged inverter or
inverter with missing parts. Otherwise, there may be risk of
injury.
 Use the motor with Class B or above insulation. Otherwise,
there may be risk of electric shock.
Caution
 Carefully handled when loading, otherwise it may damage the
inverter.
 Please don’t use the damaged driver or inverter with missing
parts, there may be risk of injury.
 Do not touch the electronic parts and components; otherwise
it will cause static electricity.
1.1.2 During Installation:
 Install the inverter on incombustible surface such as metal,
KE300X/KE300B Inverter
5
Danger and keep away from flammable substances. Otherwise it may
cause fire.
 Do not loose the set screw of the equipment, especially the
screws marked in RED.
Caution
 Do not drop the cable residual or screw in the inverter.
Otherwise it may damage the inverter.
 Please install the driver in the place where there is no direct
sunlight or less vibratory.
 When more than two inverters are to be installed in one
cabinet, due attention should be paid to the installation
locations (refer to Chapter 3 Mechanical and Electrical
Installation) to ensure the heat sinking effect.
1.1.3 During Wiring:
Danger
 Operation should be performed by the professional
engineering technician. Otherwise there will be danger of
electric shock!
 There should be circuit breaker between the inverter and
power supply. Otherwise, there may be fire!
 Make sure the power is disconnected prior to the connection.
Otherwise there will be danger of electric shock!
 The ground terminal should be earthed reliably. Otherwise
there may be danger of electric shock.
Caution
 Never connect AC power to output UVW terminals. Please
note the remark of the wiring terminals, connect them
correctly. Otherwise may cause inverter damaged.
 Ensure the wiring circuit can meet the requirement of EMC
and the area safety standard. Please follow the instructions in
the manual before wiring. Otherwise may cause injury or
electric shock.
 Never connect the braking resistor between DC bus (+), (-)
terminals. Otherwise may cause fire.
 Encoder must be used together with shielded wire, and
KE300X/KE300B Inverter
6
ensure the single terminal of the shielded lay is connected
with ground well.
1.1.4 Before Power-on:
Danger
 Please confirm whether the power voltage class is consistent
with the rated voltage of the inverter and whether the I/O cable
connecting positions are correct, and check whether the
external circuit is short circuited and whether the connecting
line is firm. Otherwise it may damage the inverter. The cover
must be well closed prior to the inverter power-on. Otherwise
electric shock may be caused.
 The inverter is free from dielectric test because this test is
performed prior to the delivery. Otherwise accident may occur.
Caution
 The cover must be well closed prior to the inverter power-on.
Otherwise electric shock may be caused!
 Whether all the external fittings are connected correctly in
accordance with the circuit provided in this manual. Otherwise
accident may occur!
1.1.5 After Power-on:
Danger
 Do not open the cover of the inverter upon power-on.
Otherwise there will be danger of electric shock!
 Do not touch the inverter and its surrounding circuit with wet
hand. Otherwise there will be danger of electric shock!
 Do not touch the inverter terminals (including control terminal).
Otherwise there will be danger of electric shock!
 At power-on, the inverter will perform the security check of the
external heavy-current circuit automatically. Thus, at the
moment please do not touch the terminals U, V and W, or the
terminals of motor, otherwise there will be danger of electric
shock.
Caution
 If parameter identification is required, due attention should be
paid to the danger of injury arising from the rotating motor.
KE300X/KE300B Inverter
7
Otherwise accident may occur!
 Do not change the factory settings at will. Otherwise it may
damage the equipment!
1.1.6 During Operation:
Danger
 Do not touch the fan or discharge resistor to sense the
temperature. Otherwise, you may get burnt!
 Detection of signals during the operation should only be
conducted by qualified technician. Otherwise, personal injury
or equipment damage may be caused!
Caution
 During the operation of the inverter, keep items from falling
into the equipment. Otherwise, it may damage the equipment!
 Do not start and shut down the inverter by connecting and
disconnecting the contactor. Otherwise, it may damage the
equipment!
1.1.7 During Maintain:
Danger
 Do not repair and maintain the equipment with power
connection. Otherwise there will be danger of electric shock!
 Be sure to conduct repair and maintenance after the charge
LED indictor of the inverter is OFF. Otherwise, the residual
charge on the capacitor may cause personal injury!
 The inverter should be repaired and maintained only by the
qualified person who has received professional training.
Otherwise, it may cause personal injury or equipment
damage!
 Carry out parameter setting after replacing the inverter, all the
plug-ins must be plug and play when power outage.
1.2 Precautions
1.2.1 Motor Insulation Inspection
When the motor is used for the first time, or when the motor is reused after
KE300X/KE300B Inverter
8
being kept, or when periodical inspection is performed, it should conduct motor
insulation inspection so as to avoid damaging the inverter because of the
insulation failure of the motor windings. The motor wires must be disconnected
from the inverter during the insulation inspection. It is recommended to use the
500V megameter, and the insulating resistance measured should be at least
5MΩ.
1.2.2 Thermal Protection of the Motor
If the ratings of the motor does not match those of the inverter, especially when
the rated power of the inverter is higher than the rated power of the motor, the
relevant motor protection parameters in the in the inverter should be adjusted,
or thermal relay should be mounted to protect the motor.
1.2.3 Running with Frequency higher than Standard Frequency
This inverter can provide output frequency of 0Hz to 3000Hz (KE300B,
0Hz~400Hz). If the user needs to run the inverter with frequency of more than
50Hz, please take the resistant pressure of the mechanical devices into
consideration.
1.2.4 Vibration of Mechanical Device
The inverter may encounter the mechanical resonance point at certain output
frequencies, which can be avoided by setting the skip frequency parameters in
the inverter.
1.2.5 Motor Heat and Noise
Since the output voltage of inverter is PWM wave and contains certain
harmonics, the temperature rise, noise and vibration of the motor will be higher
than those at power frequency.
1.2.6 Voltage-sensitive Device or Capacitor Improving Power Factor at the
Output Side
Since the inverter output is PWM wave, if the capacitor for improving the power
factor or voltage-sensitive resistor for lightning protection is mounted at the
KE300X/KE300B Inverter
9
output side, it is easy to cause instantaneous over current in the inverter, which
may damage the inverter. It is recommended that such devices not be used.
1.2.7 Switching Devices like Contactors Used at the Input and Output
terminal
If a contactor is installed between the power supply and the input terminal of the
inverter, it is not allowed to use the contactor to control the startup/stop of the
inverter. If such contactor is unavoidable, it should be used with interval of at
least one hour. Frequent charge and discharge will reduce the service life of the
capacitor inside the inverter. If switching devices like contactor are installed
between the output end of the inverter and the motor, it should ensure that the
on/off operation is conducted when the inverter has no output. Otherwise the
modules in the inverter may be damaged.
1.2.8 Use under voltage rather than rated voltage
If the KE300X/KE300B series inverter is used outside the allowable working
voltage range as specified in this manual, it is easy to damage the devices in the
inverter. When necessary, use the corresponding step-up or step-down
instruments to change the voltage.
1.2.9 Change Three-phase Input to Two-phase Input
It is not allowed to change the KE300X/KE300B series three-phase inverter into
two-phase one. Otherwise, it may cause fault or damage to the inverter.
1.2.10 Lightning Impulse Protection
The series inverter has lightning over current protection device, and has certain
self-protection capacity against the lightning. In applications where lightning
occurs frequently, the user should install additional protection devices at the
front-end of the inverter.
1.2.11 Altitude and Derating
In areas with altitude of more than 1,000 meters, the heat sinking effect of the
inverter may turn poorer due to rare air. Therefore, it needs to derate the
inverter for use. Please contact our company for technical consulting in case of
KE300X/KE300B Inverter
10
such condition.
1.2.12 Certain Special Use
If the user needs to use the inverter with the methods other than the
recommended wiring diagram in this manual, such as shared DC bus, please
consult our company.
1.2.13 Note of Inverter Disposal
The electrolytic capacitors on the main circuit and the PCB may explode when
they are burnt. Emission of toxic gas may be generated when the plastic parts
are burnt. Please dispose the inverter as industrial wastes.
1.2.14 Adaptable Motor
1) The standard adaptable motor is four-pole squirrel-cage asynchronous
induction motor. If such motor is not available, be sure to select adaptable
motors in according to the rated current of the motor. In applications where drive
permanent magnetic synchronous motor is required, please consult our
company;
2) The cooling fan and the rotor shaft of the non-variable-frequency motor adopt
coaxial connection. When the rotating speed is reduced, the cooling effect will
be poorer. Therefore, a powerful exhaust fan should be installed, or the motor
should be replaced with variable frequency motor to avoid the over heat of the
motor.
3) Since the inverter has built-in standard parameters of the adaptable motors, it
is necessary to perform motor parameter identification or modify the default
values so as to comply with the actual values as much as possible, or it may
affect the running effect and protection performance;
4) The short circuit of the cable or motor may cause alarm or explosion of the
inverter. Therefore, please conduct insulation and short circuit test on the newly
installed motor and cable. Such test should also be conducted during routine
maintenance. Please note that the inverter and the test part should be
completely disconnected during the test.
KE300X/KE300B Inverter
11
Chapter 2 Product Information
2.1 Product Inspection
Checking the following items when receiving the inverter
Confirmation Items Method
Confirm if the inverter is what you
ordered
Check name plate
Damaged or not
Inspect the entire exterior of the
inverter to see if there are any
scratches or other damage resulting
from shipping
Confirm if the fastening parts (screws,
etc.)
are loose or not
Check with a screw driver if
necessary
User’s manual, certification and
other spares
User’s manual and the relative
spares
Please contact the local agent or our company directly if there is any damage on
the inverter.
2.2 Model Description
KE300X–1R5G - S2
General purpose
mini size inverter
Power rating:
0R7:0.75kW
1R5:1.5kW
G: constant torque
Input voltage:
S2:Single phase 220V
T2:Three phase 220V
Figure 2-1 KE300X Model description
KE300X/KE300B Inverter
12
KE300B–1R5G–T4
General purpose
inverter
Power rating:
0R7:0.75kW
1R5:1.5kW
G: constant torque
Input voltage:
S2:Single phase 220V
T4:Three phase 380V
Figure 2-2 KE300B Model description
2.3 Description of Nameplate
Figure 2-3 Nameplate
2.4 Selection Guide
Table 2-1 KE300X/KE300B series Inverter Model and Technical Data
Inverter Model
Motor Rated
Input
Current (A)
Rated
Output
Current (A)
kW HP
KE300X 1AC 220~240V ±15%
KE300X-0R4G-S2 0.4 0.5 5.4 2.3
KE300X-0R7G-S2 0.75 1 8.2 4
KE300X-1R5G-S2 1.5 2 14 7
KE300X 3AC 220~240V ±15%
KE300X-0R4G-T2 0.4 0.5 3.4 2.3
Model No.
Power rating
Input specification
Output specification
Bar code
KE300X/KE300B Inverter
13
KE300X-0R7G-T2 0.75 1 5 4
KE300X-1R5G-T2 1.5 2 7.7 7
KE300B 1AC 220~240V ±15%
KE300B-0R4G-S2 0.4 0.5 6.5 2.6
KE300B-0R7G-S2 0.75 1 11 4.6
KE300B-1R5G-S2 1.5 2 18 8
KE300B-2R2G-S2 2.2 3 27 11
KE300B 3AC 380~415V ±15%
KE300B-0R7G-T4 0.75 1 4.5 3.4
KE300B-1R5G-T4 1.5 2 5.5 4.8
KE300B-2R2G-T4 2.2 3 6.5 5.5
KE300B-004G-T4 4.0 5 11 9.5
2.5 Technical Specifications
Table 2-2 KE300X series Mini Size Inverter Technical Specifications
Item
Technical
Index
Specification
Input
Input voltage 1AC/3AC 220V±15%, 3AC 380V±15%
Input
frequency
47~63Hz
Output
Output voltage 0~rated input voltage
Output
frequency
KE300X: V/f control: 0~3000Hz
Sensorless vector control: 0~300Hz
KE300B: 0~300Hz
Control
Features
Control mode
V/f control(KE300X & KE300B-S2)
Sensorless vector control (KE300X & KE300B-T4)
Torque control (KE300X)
Operation
command
mode
Keypad control
Terminal control
Serial communication control
Frequency
setting mode
Digital setting, analog setting, pulse frequency
setting, serial communication setting, multi-step
speed setting & simple PLC, PID setting, etc.
These frequency settings can be combined &
switched in various modes.
KE300X/KE300B Inverter
14
Overload
capacity
150% 60s, 180% 10s, 200% 3s
Starting torque 0.5Hz/150% (SVC); 1Hz/150% (V/f)
Speed
adjustment
range
1:100 (SVC), 1:50 (V/f)
Speed control
precision
±0.5% (SVC)
Carrier
frequency
1.0--16.0kHz, automatically adjusted according to
temperature and load characteristics
Frequency
accuracy
Digital setting: 0.01Hz
Analog setting: maximum frequency * 0.05%
Torque boost
Automatically torque boost; manually torque
boost: 0.1%~30.0%
V/f curve
Three types: linear, multiple point and square type
(1.2 power, 1.4 power, 1.6 power, 1.8 power,
square)
Acceleration/d
eceleration
mode
Straight line/S curve; four kinds of
acceleration/deceleration time, range:
0.1s~3600.0s
DC braking
DC braking when starting and stopping
DC braking frequency: 0.0Hz~maximum
frequency, braking time: 0.0s~100.0s
Jog operation
Jog operation frequency: 0.0Hz~maximum
frequency
Jog acceleration/deceleration time: 0.1s~3600.0s
Simple PLC &
multi-step
speed
operation
It can realize a maximum of 16 segments speed
running via the built-in PLC or control terminal.
Built-in PID
Built-in PID control to easily realize the close loop
control of the process parameters (such as
pressure, temperature, flow, etc.)
Automatic
voltage
regulation
Keep output voltage constant automatically when
input voltage fluctuating
KE300X/KE300B Inverter
15
Control
Function
Common DC
bus
Common DC bus for several inverters, energy
balanced automatically
Torque control Torque control without PG
Torque limit
“Rooter” characteristics, limit the torque
automatically and prevent frequent over-current
tripping during the running process
Wobble
frequency
control
Multiple triangular-wave frequency control, special
for textile
Timing/length/
counting
control
Timing/length/counting control function
Over-voltage &
over-current
stall control
Limit current & voltage automatically during the
running process, prevent frequent over-current &
over-voltage tripping
Fault
protection
function
Up to 30 fault protections including over-current,
over-voltage, under-voltage, overheating, default
phase, overload, shortcut, etc., can record the
detailed running status during failure & has fault
automatic reset function
Input/
output
terminals
Input terminals
Programmable DI: 5 on-off inputs (KE300B: 4), 1
high-speed pulse input
1 programmable AI1: 0~10V or 0/4~20mA
Output
terminals
1 programmable open collector output: 1 analog
output (KE300X: open collector output or
high-speed pulse output)
1 relay output
1 analog output: 0/4~20mA or 0~10V
Communicatio
n terminals
Offer RS485 communication interface, support
MODBUS-RTU communication protocol
Human
machine
interface
LED display
Display frequency setting, output frequency,
output voltage, output current, etc.
Multifunction
key
QUICK/JOG key, can be used as multifunction key
Environ-
ment
Ambient
temperature
-10℃~40℃, derated 4% when the temperature
rise by every 1℃ (40℃~50℃).
KE300X/KE300B Inverter
16
Humidity 90%RH or less (non-condensing)
Altitude
≤1000M: output rated power, >1000M: output
derated
Storage
temperature
-20℃~60℃
2.6 External & Installation Dimensions
2.6.1 KE300X External & Installation Dimensions
2.6.2 KE300X Keypad External Dimension
Keypad dimension
58
76
30.2
5 0 .0 0
50.00
78
73
73 M4 Grounding
124.8
121.8
148.4
140
128
KE300X/KE300B Inverter
17
Illustration: This keypad can be connected with the inverter externally by
ordinary network cable, also can be mounted on the front side of panel directly.
The suggested thickness of panel is 1.2mm.
The installation size on the panel
2.6.3 KE300B External & Installation Dimensions
KE300B can be installed on the guide rail; the dimension of the guide rail is as
follow:
55.4
73.4
KE300X/KE300B Inverter
18
2.7 Routine Maintenance of Inverter
2.7.1 Routine Maintenance
The influence of the ambient temperature, humidity, dust and vibration will
cause the aging of the devices in the inverter, which may cause potential fault of
the inverter or reduce the service life of the inverter. Therefore, it is necessary to
carry out routine and periodical maintenance on the inverter.
Routine inspection Items include:
1) Whether there is any abnormal change in the running sound of the motor;
2) Whether the motor has vibration during the running;
3) Whether there is any change to the installation environment of the
inverter;
4) Whether the inverter cooling fan works normally;
5) Whether the inverter has over temperature.
Routine cleaning:
1) The inverter should be kept clean all the time.
2) The dust on the surface of the inverter should be effectively removed, so
as to prevent the dust entering the inverter. Especially the metal dust is
not allowed.
3) The oil stain on the inverter cooling fan should be effectively removed.
2.7.2 Periodic Inspection
Please perform periodic inspection on the places where the inspection is a
difficult thing.
Periodic inspection Items include:
1) Check and clean the air duct periodically;
2) Check if the screws are loose;
3) Check if the inverter is corroded;
KE300X/KE300B Inverter
19
4) Check if the wire connector has arc signs;
5) Main circuit insulation test.
Remainder: When using the megameter (DC 500V megameter recommended)
to measure the insulating resistance, the main circuit should be disconnected
with the inverter. Do not use the insulating resistance meter to test the insulation
of control circuit. It is not necessary to conduct the high voltage test (which has
been completed upon delivery).
2.7.3 Replacement of Vulnerable Parts for Inverter
The vulnerable parts of the inverter include cooling fan and filter electrolytic
capacitor, whose service life depends on the operating environment and
maintenance status. General service life is shown as follows:
Part Name Service Life
Fan 2~3 years
Electrolytic capacitor 4~5 years
The user can determine the year of replacement according to the operating
time.
1) Cooling fan
Possible reason for damage: Bearing is worn and blade is aging.
Judging criteria: Whether there is crack on the blade and whether there is
abnormal vibration noise upon startup.
2) Filter electrolytic capacitor
Possible reason for damage: Input power supply in poor quality, high ambient
temperature, frequent load jumping, and electrolyte aging.
Judging criteria: Whether there is liquid leakage and whether the safe valve has
projected, and measure the static capacitance, and the insulating resistance.
2.7.4 Storage of Inverter
Upon acquiring the inverter, the user should pay attention to the following points
regarding the temporary and long-term storage of the inverter:
1) Pack the inverter with original package and place back into the packing box
KE300X/KE300B Inverter
20
of our company.
2) Long-term storage will degrade the electrolytic capacitor. Thus, the product
should be powered up once every 2 years, each time lasting at least five hours.
The input voltage should be increased slowly to the rated value with the
regulator.
2.8 Instructions on Warranty of Inverter
Free warranty only applies to the inverter itself.
1) MICNO provides 12 month warranty (starting from the date of original
shipment as indicated on the barcode) for the failure or damage under normal
use conditions. If the equipment has been used for over 12 months, reasonable
repair expenses will be charged.
2) Reasonable repair expenses will be charged for the following situations within
12 months:
a) The equipment is damaged because the user fails to comply with the
requirements of the user’s manual;
b) Damage caused by fire, flood and abnormal voltage;
3) Damage caused when the inverter is used for abnormal function.
The service expenses will be calculated according to the standard of the
manufacturer. If there is any agreement, the agreement should prevail.
KE300X/KE300B Inverter
21
Chapter 3 Mechanical and Electric
Installation
3.1 Mechanical Installation
3.1.1 Installation environment
1) Ambient temperature: The ambient temperature exerts great influences on
the service life of the inverter and is not allowed to exceed the allowable
temperature range (-10℃ to 50℃).
2) The inverter should be mounted on the surface of incombustible articles, with
sufficient spaces nearby for heat sinking. The inverter is easy to generate large
amount of heat during the operation. The inverter should be mounted vertically
on the base with screws.
3) The inverter should be mounted in the place without vibration or with vibration
of less than 0.6G, and should be kept away from such equipment as punching
machine.
4) The inverter should be mounted in locations free from direct sunlight, high
humidity and condensate.
5) The inverter should be mounted in locations free from corrosive gas,
explosive gas or combustible gas.
6) The inverter should be mounted in locations free from oil dirt, dust, and metal
powder.
Single Unit Installation Diagram Installation Diagram of Upper
and Down Parts
Figure 3-1 Installation Diagram
B
A
A
50.00
B
50.00
50.00
100mm
KE300X/KE300B Inverter
22
3.1.2 Heat dissipation should be taken into account during the mechanical
installation. Please pay attention the following items:
1) Install the inverter vertically so that the heat may be expelled from the top.
However, the equipment cannot be installed upside down. If there are multiple
inverters, parallel installation is a better choice. In applications where the upper
and lower inverters need to be installed, please refer to Figure 3-1 “Installation
Diagram” and install an insulating splitter.
2) The mounting space should be as indicated as Figure 3-1, so as to ensure
the heat dissipation space of the inverter. However, the heat dissipation of other
devices in the cabinet should also be taken into account.
3) The installation bracket must be flame retardant.
4) In the applications where there are metal dusts, it is recommended to mount
the radiator outside the cabinet. In this case, the space in the sealed cabinet
should be large enough.
3.2 Electrical Installation
3.2.1 Guide to the external electrical parts
Table 3-1 Selection Guide of External Electrical Parts
Inverter Model
Circuit
Break
-er
(MCCB)
(A)
Recomme-
nded
Contactor
(A)
Recommend-
ed
Conducting
Wire of Main
Circuit at
Input Side
(mm2)
Recommend-
ed
Conducting
Wire of Main
Circuit at
Output Side
(mm2)
Recommend
-ed
Conducting
Wire of
Control
Circuit
(mm2)
KE300X 1AC 220V
KE300X-0R4G-S2 16 10 2.5 2.5 0.5
KE300X-0R7G-S2 16 10 2.5 2.5 0.5
KE300X-1R5G-S2 20 16 4.0 2.5 0.5
KE300X 3AC 220V
KE300X-0R4G-T2 10 10 2.5 2.5 0.5
KE300X-0R7G-T2 16 10 2.5 2.5 0.5
KE300X-1R5G-T2 16 10 2.5 2.5 0.5
KE300B 1AC 220V
KE300X/KE300B Inverter
23
KE300B-0R4G-S2 10 9 0.75 0.75 0.5
KE300B-0R7G-S2 16 12 1.5 0.75 0.5
KE300B-1R5G-S2 32 25 2.5 1.5 0.5
KE300B-2R2G-S2 40 32 4.0 2.5 0.5
KE300B 3AC 380V
KE300B-0R7G-T4 10 9 0.75 0.75 0.5
KE300B-1R5G-T4 10 9 1.5 0.75 0.5
KE300B-2R2G-T4 10 9 2.5 1.5 0.5
KE300B-004G-T4 16 12 4.0 2.5 0.5
3.2.2 Connection to peripheral devices
KE300X/KE300B Inverter
24
Figure3-2 Diagram of the connection to peripheral devices
 Do not install the capacitor or surge suppressor at the output side of the
inverter, otherwise it may cause inverter failure or capacitor and surge
suppressor damaged.
 The Inverter input / output (main circuit) contains harmonic components, it
may interfere with inverter accessories communications equipment.
Therefore, please install anti-interference filter to minimize interference.
 The details of external devices and accessories selection refer to the
manual of external devices.
3.2.3 Using instruction of the external electrical parts
Table 3-2 Using Instruction of the External Electrical Parts
Part Name Installing Location Function Description
Circuit
breaker
Front end of input
circuit
Disconnect the power supply when the
equipment at the lower part is over current.
Contactor
Between the circuit
breaker and the
inverter input side
Connection and disconnection of inverter.
Frequent power-on and power-off
operations on the inverter should be
id d
AC input
reactor
Input side of the
inverter
Improve the power factor of the input side;
Eliminate the higher harmonics of the input
side effectively and prevent other
equipment from damaging due to distortion
of voltage wave.
Eli i t th i t t b l d
EMC input
filter
Input side of the
inverter
Reduce the external conduction and
radiation interference of the inverter.
Decrease the conduction interference
flowing from the power end to the inverter
and improve the anti-interference capacity
DC reactor
DC reactor is
optional for
inverters above
18.5kW
Improve the power factor of the input side;
Improve the whole efficiency and thermal
stability of the inverter.
Eliminate the impact of higher harmonics of
the input side on the inverter and reduce
th t l d ti d di ti
KE300X/KE300B Inverter
25
AC output
reactor
Between the
inverter output side
and the motor,
close to the
inverter
Between the inverter output side and the
motor. close to the inverter
The inverter output side generally has
higher harmonics. When the motor is far
from the inverter, since there are many
distributed capacitors in the circuit, certain
harmonics may cause resonance in the
circuit and bring about the following two
impacts:
Degrade the motor insulation performance
and damage the motor for the long run.
Generate large leakage current and cause
3.2.4 Wiring diagram
+24V
PLC
HDO
COM
3AC(1AC) 220
15% 50/60Hz
+
-
Instantaneous
shortcut
protection circuit
R
S
T
Multifunctional
On-off input 1 D1
D2
D4
D3
COM
PE
+10V Power supply for frequency setting
AI1 Analog output 1
Frequency setting
GND
PE
W
V
U
MOTOR
GND
AO1
0-10V/4-20mA
Analog output 1
0.4-1.5kW Inverter
T1/C
T1/A
T1/B
Relay output 1
1K¦ Έ
-5K¦ Έ 0-10Vinput/4-20mA
485+
485-
V I
Jumper J1
I
V
Multifunctional
On-off input 2
Multifunctional
On-off input 3
Multifunctional
On-off input 4
Jumper J2
High-speed pulse output
or open collector output
HDI/D6
High-speed pulse input
or open collector input
Multifunctional
On-off input 5 D5
(L)
(N)
KE300X/KE300B Inverter
26
Figure 3-3 KE300X Wiring Diagram
Figure 3-4 KE300B Wiring Diagram
Note:
1. Terminal ◎ refers to the main circuit terminal; terminal ○ refers to the
control circuit terminal.
2. Braking unit is standard build-in.
3. Braking resistor is optional for user.
3.2.5 Main circuit terminals and connections
485-
485+
0-10V Input
T1/A
T1/C
KE300B Inverter
0-10V
AO1
GND
MOTOR
U
V
W
PE
GND
+10V
PE
COM
D3
D4
D2
D1
T
S
R (L)
(N)
Power supply for
frequency setting
1K¦ Έ
-5K¦ Έ
Multifunctional 0n-off input 1
Multifunctional 0n-off input 2
Multifunctional 0n-off input 3
Multifunctional 0n-off input 4
-
+
1 AC/3AC
220 15%
380 15%
50/60Hz
AI Analog input
frequency setting
Relay output
Analog output
+
-
PLC
+24V
KE300X/KE300B Inverter
27
Danger
 Make sure that the power switch is at OFF status prior to
perform wiring connection. Otherwise there may be danger of
electric shock!
 Only the qualified and trained personnel can perform wiring
connection. Otherwise it may cause equipment and human
injuries!
 It should be earthed reliably. Otherwise there may be danger
of electric shock or fire!
Caution
 Make sure that the rated value of the input power supply is
consistent with that of the inverter. Otherwise it may damage
the inverter!
 Make sure that the motor matches the inverter. Otherwise it
may damage the motor or generate inverter protection!
 Do not connect the power supply to the terminals of U, V and
W. Otherwise it may damage the inverter!
 Do not directly connect the brake resistor between the DC bus
terminals (+) and (-). Otherwise it may cause fire!
1) Main circuit terminals
Figure 3-5 Main circuit terminals (KE300X 1AC 220V, 0.4~1.5kW)
Figure 3-6 Main circuit terminals (KE300X 3AC 220V, 0.4~1.5kW)
Figure 3-7 Main circuit terminals
b
R W
V
U
PB
(+)
N
L
b
R T W
V
U
PB
(+)
S
R
KE300X/KE300B Inverter
28
(KE300B 1AC 220V, 0.4~2.2kW; 3AC 380, 0.75~4.0kW)
2) Instructions of main circuit terminals
Terminal Name Description
L, N
R, S, T
Input terminal of
power supply
Connect to AC power
(+) , PB
Connection
terminals of brake
resistor
Connection terminals of brake resistor
U, V, W
Output terminal of
inverter
Connect to the three phase motor
Earth terminal Earth connection terminal
Precautions on Wiring:
a) Input power terminals L, N and R, S, T
There is no phase sequence requirement for the cable connection at the input
side of the inverter,
b) Connecting terminals (+) and PB of brake resistor:
The connecting terminals of the brake resistor are effective only for the inverter
of less than 30kW with built-in brake unit.
The prototype of brake resistor can refer to the recommended value and the
wiring length should be less than 5 meters. Otherwise it may damage the
inverter.
c) Terminals U, V, W at the output side of the inverter:
The inverter output side cannot connect to the capacitor or surge absorber.
Otherwise, it may cause frequent inverter protection and even damage the
inverter.
In case the motor cable is too long, it may generate electrical resonance easily
due to the impact of distributed capacitance, thus damaging the motor insulation
or generating higher leakage current to invoke over current protection of the
inverter. When the length of motor cable is longer than 100 meters, it needs to
install a AC output reactor.
d) Earth terminal PE :
KE300X/KE300B Inverter
29
This terminal should be earthed reliably, with resistance of earth cable of less
than 0.1Ω. Otherwise, it may cause fault or damage the inverter.
Do not share the earth terminal and zero line of the power supply.
3.2.6 Control terminals and connections
1) Control circuit terminals
AO1 RS485+ RS485- COM PLC +24V D4 HDO
AI1 GND +10V D1 D2 D3 D5 HDI
T1A T1B T1C
Figure 3-8 KE300X Control Circuit Terminals
Figure 3-9 KE300B Control Circuit Terminals
2) Function description of control terminal
Table 3-3 Description of Control Terminal Function
Type
Terminal
Symbol
Terminal
Name
Function Description
Power
Supply
+10V~
GND
External
+10V power
Provide +10V power supply for external
units, and the maximum output current is
10mA.
It is generally used as the operating power
supply for the external potentiometer. The
potentiometer resistance range is 1kΩ~5kΩ.
+24V~
COM
External
+24V power
Provide +24V power supply for external
units. It is generally used as the operating
power supply for digital input/output
terminals and the external sensor.
The maximum output current is 200mA.
PLC
External
power input
terminal
Connect to 24V by default upon delivery
When external signal is used to drive D1 ~
D6, and HDI, PLC needs to connect to the
external power supply and disconnect from
the +24V power terminal
Analog
Input
AI1~GND
Analog input
terminal 1
1. Input range: DC 0V~10V/4mA~20mA,
determined by J1 jumper on the control
board.
2. Input impedance: 22kΩ (voltage);
500Ω(current)
TA TC COM 485+ 485-
D1 D2 D3 D4 PLC +24V +10V AI1 AO1 GND
KE300X/KE300B Inverter
30
Digital
Input
D1 Digital input 1
1. Optical coupling isolation, compatible with
dual polarity input
2. Input impedance: 4.7kΩ
3. Voltage range for level input: 9V ~ 30V
D2 Digital input 2
D3 Digital input 3
D4 Digital input 4
D5 Digital input 5
HDI/D6~
COM
High-speed
pulse input
terminal
In addition to the characteristics of D1 to D5,
it can also be used as the high speed pulse
input channel.
Maximum input frequency is 100kHz
Analog
Output
AO1~
GND
Analog
output 1
The voltage or current output is determined
by J3 jumper on the control board.
Output voltage range: 0V ~ 10V. Output
Digital
Output
HDO~
CME
High speed
pulse output /
open
collector
output
It can be used as high speed pulse output or
open collector output which is determined by
function code P5-00.
High speed pulse output: maximum
frequency is 100kHz
Open collector output :Optical coupling
isolation, dual polarity
Output voltage range: 0V~24V
Output current range: 0mA~50mA
Relay
Output 1
T1B-T1C
Normally
closed
terminal
Driving capacity:
AC 250V, 3A, COSø=0.4
DC 30V, 1A
T1A-T1C
Normally
open terminal
3) Description of connection of control terminals
a) Analog input terminal
Since the weak analog voltage signal is easy to suffer external interferences, it
needs to employ shielded cable generally and the length should be no longer
than 20 meters, as shown in Figure 3-10. In case the analog signal is subject to
severe interference, and filter capacitor or ferrite magnetic core should be
installed at analog signal source side, as shown in Figure 3-11.
KE300X/KE300B Inverter
31
Figure 3-10 Connection of analog input
Figure 3-11 Connection of analog Input
b) Digital input terminal
It needs to employ shielded cable generally, with cable length of no more than
20 meters. When active driving is adopted, necessary filtering measures
should be taken to prevent the interference to the power supply.
It is recommended to use the contact control mode.
D1~D6 terminal connection: NPN type
less than 20 meters
Potentiometer
PE
GND
AI1
+10V
0.022uF,50V
C
External analog source
Cross in the same direction or wind 2
or 3 coils in the same direction
Ferrite bead
AI1
GND
KE300X/KE300B Inverter
32
This is the most commonly used wiring connection, if external power supply is
used, the +24V terminal must disconnect with PLC terminal. The positive pole
of external power supply should connect with PLC terminal, and the negative
pole connects with COM.
D1~D6 terminal connection: PNP type
In this type, +24V terminal must disconnect with PLC terminal, +24V should
connect the common port of external controller, and meantime short connect
PLC and COM.
External controller
NPN
3.3Ω
0V
COM
+VCC
Signal
+24
+24
D
3.3k
3.3K
D
PLC
Control board of inverter
External controller
PNP
COM
+VCC
+24V
+24V
D5
4.7K
4.7K
D1
Control board of inverter
0V
Signal
3.3 Ω PLC
KE300X/KE300B Inverter
33
Chapter 4 Operation and Display
4.1 Keypad Description
With the operation keypad, it can perform such operations on the inverter as
function parameter modification, working status monitor and running control
(start and stop).
Figure4-1 Operation Keypad Diagram
1) Function key description
Function indicator Description
RUN
Extinguished: stop status
Light on: operating status
FWD/REV
Extinguished: forward operation
Light on: reverse operation
LOCAL/REMOT
Extinguished: keypad control
Flickering: communication control
Light on: terminal control
TUNE/TRIP
Light on: torque control
Flickering slowly: parameter autotuning status
Flickering quickly: fault status
KE300X/KE300B Inverter
34
2) Unit indictor light description
Unit indictor Description
Hz Frequency unit
A Current unit
V Voltage unit
RPM Rotation speed unit
% Percentage
3) Digital display zone
Five-number digit LED display, can display setting frequency, output frequency,
various monitoring data and alarm code.
4) Keypad button description
Button Name Function
PRG/ESC Programming Entry and exit of primary menu
DATA/ENT
ER
Confirmation
key
Progressively enter menu, and confirm
parameters
Increment key Progressively increase of data or function codes
Decrement key Progressively decrease of data or function
Shift key
Select the displayed parameters in turn on the
stop display interface and running display
interface, and select the modification bit of
parameters when modifying parameters.
RUN Running key Start to run inverter under keyboard control
d
STOP/RS
T
Stop/reset
Stop inverter in running status and reset
operation in fault alarm status. The button’s
characteristics are restricted by function code
P7-02.
QUICK/JO
G
Multi-function
selection key
According to P7-01, take function switching
selection.
4.2 Function Code Checking and Modification Methods
Description
The operation keypad of the KE300X series Inverter adopts three-level menu
structure to carry out operations such as parameter setting.
KE300X/KE300B Inverter
35
The three-level menu includes function parameter group (level 1 menu) →
Function code (level 2 menu) → Function code setting value (level 3 menu).
Refer to Figure 4-2 for the operation procedure.
Figure 4-2 Operation Procedure of Three-level Menu
Description: When operating on level 3 menu, press PRG key or ENTER key to
return to level 2 menu. The difference between PRG key and ENTER key is
described as follows: Pressing ENTER KEY will save the setup parameter and
return to the level 2 menu and then automatically shift to the next function code,
while pressing PRG key will directly return to level 2 menu without saving the
parameter, and it will return to the current function code.
Example: Modify the function code P3-02 from 10.00Hz to 15.00Hz. (The
bold-type word indicates the flashing bit.)
In level 3 menu, if there is no flashing bit, it indicates that the function code
cannot be modified. The possible reasons include:
1) The function code is an unchangeable parameter, such as actual detection
parameter, running record parameter, etc.
2) The function code cannot be modified in running status. It can be modified
only after the unit is stopped.
4.3 Power-on Initialization
Firstly the system initializes during the inverter power-on, and LED displays
“8.8.8.8.8.8”. After initialization, the inverter is in fault protection status if a fault
happens, or the inverter is in stand-by status.
4.4 Fault Protection
Setting value modification
PRG
PRG
ENTER
PRG
Zero level menu First level menu Second level menu Third level menu
Function code modification
50.00 P0 P0-08 30.00
ENTER
PRG
Parameter code modification
PRG
PRG ENTER
PRG
50.00 P0 P3 P3.00 P3-02
010.00
010.00
015.00
P3-03
P3
PRG
ENTER
KE300X/KE300B Inverter
36
In fault status, inverter will display fault code & record output current, output
voltage, etc. For details, please refer to P9 (fault and protection) parameter
group. Fault can be reset via STOP/RST key or external terminals.
4.5 Stand By
In stop or stand by status, parameters of multi-status can be displayed. Whether
or not to display this parameter can be chosen through function code P7-05
(Stop status display parameter) according to binary bits.
In stop status, there are thirteen parameters can be chosen to display or not.
They are: setting frequency, bus voltage, DI input status, DO output status,
analog input AI1 voltage, radiator temperature, count value, actual length, PLC
running step, load speed display, PID setting, HDI input pulse frequency. The
displaying of the chosen parameters can be switched in sequence by press
“ ” button.
Power on after power-off, the displayed parameters would be default
considered as the chosen parameters before power-off.
4.6 Running
In running status, there are thirty two parameters can be chosen to display or
not through function code P7-04 (running status display parameter 2) according
to binary bits. They are: running frequency, setting frequency, DC bus voltage,
output voltage, output current, output torque, DI input status, DO output status,
analog input AI1 voltage, radiator temperature, actual count value, actual length,
line speed, PID setting, PID feedback, etc. The displaying of the chosen
parameters can be switched in sequence by pressing “ ” button.
4.7 Password Setting
The inverter provides user password protection function. When PP-00 is set to
non-zero value, it indicates the user password, and the password protection
turns valid after exiting the function code editing status. When pressing PRG
key again, “------“ will be displayed, and common menu cannot be entered until
user password is input correctly.
To cancel the password protection function, enter with password and set PP-00
to “0”.
KE300X/KE300B Inverter
37
4.8 Motor Parameters Autotuning
To select the vector control running mode, it must input the nameplate
parameter of the motor accurately prior to the running of the inverter. The
Inverter will select standard motor parameters matching the nameplate
parameter. Since the vector control mode relies highly on the motor parameters,
it must acquire the accurate parameters of the controlled motor to ensure the
good control performance.
The procedures for the automatic tuning of motor parameters are described
below:
First, select the command source (P0-02) as the command channel of the
operation keypad. Second, input the following parameters in accordance with
the actual motor parameters:
P1-01: Rated motor power
P1-02: Rated motor voltage
P1-03: Rated motor current
P1-04: Rated motor frequency
P1-05: Rated rotation speed of motor
If the motor is completely disconnected from the load, set P1.11 to “2” (complete
tuning), and press RUN key on the keyboard keypad, then the inverter will
automatically calculate the following parameters:
P1-06: Stator resistance
P1-07: Rotor resistance
P1-08: Leakage inductance
P1-09: Mutual inductance
P1-10: Current without load
Finally, complete the automatic tuning of motor parameters.
If the motor cannot be completely disconnected with the load, set P1-11 to “1”
(static tuning), and then press RUN key on the keyboard panel.
The following motor parameters can be calculated automatically:
P1-06: Stator resistance
P1-07: Rotor resistance
P1-08: Leakage inductive reactance
KE300X/KE300B Inverter
38
Chapter 5 Function Parameter List
The function parameters of KE300X series inverter have been divided into 19
groups including P0~PP, A0, U0 according to the function. Each function group
contains certain function codes. For example, “P1-10” means the tenth function
code in the P1 function group. P0~PE are basic function parameter groups; PF
is factory parameter group (users are forbidden to access); A0 is torque control
function parameter group; U0 is monitor function parameter group.
If PP-00 is set to non-zero value, it means parameter protection password is set,
and the parameter menu cannot be entered until correct password is input. To
cancel the password, please set PP-00 to “0”.
A0 and U0 are default hidden parameter groups, which can be displayed by
modifying PP-02.
The instruction of the symbols in function parameter list is as following:
“○”:means that the parameter setting value can be modified on stop and
running status.
“◎”:means that the parameter setting value cannot be modified on the running
status.
“●”:means that the value of the parameter is the real detection value which
cannot be modified.
KE300X/KE300B Inverter
39
5.1 Basic Function Parameter Table
Function
code
Name Detailed instruction
Factory
default
Modify
P0 Group: Basic Function
P0-00 Inverter model
1: G model (constant
torque load model)
2: Reserved
1 ◎
P0-01 Control mode
0: V/F control
1: Sensorless vector
control
0 ◎
P0-02
Running
command
source
0: Keypad (LED OFF)
1: Terminal (LED ON)
2: Communication (LED
flickers)
0 ◎
P0-03
Main frequency
source
A selection
0: Keypad
(P0-08, UP and DOWN
Adjustable, non-recorded)
1: Keypad
(P0-08, UP and DOWN
Adjustable, recorded)
2: Al1
3: Reserved
4: Keypad potentiometer
5: High speed pulse (HDI)
6: Multi-step speed
7: Simple PLC
8: PID
9: Communication
1 ◎
P0-04
Auxiliary
frequency
source B
selection
The same as P0-03 0 ◎
P0-05 Reference of 0: Relative to maximum 0 ○
KE300X/KE300B Inverter
40
Function
code
Name Detailed instruction
Factory
default
Modify
Frequency
source B
frequency
1: Relative to frequency
source A
P0-06
Range of
Auxiliary
Frequency
source B
0%~150% 100% ○
P0-07
Frequency
source selection
Units place: frequency
source selection
0: Main frequency source
A
1: Calculation result of
frequency A and B
(determined by tens
place)
2: Switching between A
and B
3: Switching between A
and calculation result
4: Switching between B
and calculation result
Tens place: calculation
relationship between
frequency A and B
0: A + B
1: A - B
2: Max (A, B)
3: Min (A, B)
00 ○
P0-08
Keypad
reference
frequency
0.00Hz ~ maximum
frequency:P0-10
50.00Hz ○
P0-09 Running 0: Forward 0 ○
KE300X/KE300B Inverter
41
Function
code
Name Detailed instruction
Factory
default
Modify
direction
selection
1: Reverse
P0-10
Maximum
frequency
50.00Hz ~ 300.00Hz 50.00Hz ◎
P0-11
Frequency
source
upper limit
0: P0-12
1: AI1
2: Reserved
3: Keypad potentiometer
4: HDI
5: Communication
0 ◎
P0-12
Frequency upper
limit
P0-14 (frequency lower
limit) ~ P0-10 (max.
frequency)
50.00Hz ○
P0-13
Frequency upper
limit offset
0.00Hz ~ P0-10 (max.
frequency)
0.00Hz ○
P0-14
Frequency lower
limit
0.00Hz ~ P0-12
(frequency upper limit)
0.00Hz ○
P0-15
Carrier
frequency
1.0kHz ~ 16.0kHz
Model
depend
○
P0-16
Carrier
frequency
adjusting
according to
temperature
0: No
1: Yes
1 ○
P0-17
Acceleration
time 1
0.01s ~ 36000s
Model
depend
○
P0-18
Deceleration
time 1
0.01s ~ 36000s
Model
depend
○
P0-19
ACC/DEC time
unit
0: 1s
1: 0.1s
2: 0.01s
1 ◎
P0-21 Auxiliary 0.00Hz ~ P0-10 (max. 0.00Hz ○
KE300X/KE300B Inverter
42
Function
code
Name Detailed instruction
Factory
default
Modify
frequency
source offset
frequency when
combination
frequency)
P0-22
Frequency
command
resolution
1: 0.1Hz
2: 0.01Hz
2 ◎
P0-23
Digital setting
frequency
storage selection
when stop
0: Not store
1: store
1 ○
P0-24 Reserved ●
P0-25
ACC/DEC time
reference
frequency
0: P0-10 (max. frequency)
1: Setting frequency
2: 100Hz
0 ◎
P0-26
Running
frequency
command
UP/DN
reference
0: Running frequency
1: Setting frequency
0 ◎
P0-27
Command
source
combination with
frequency
source
Units place: Operation
keypad command
combination with
frequency source
0: No combination
1: Keypad
2: AI1
3: Reserved
4: Keypad potentiometer
5: High speed pulse HDI
6: Multi-step speed
7: Simple PLC
000 ○
KE300X/KE300B Inverter
43
Function
code
Name Detailed instruction
Factory
default
Modify
8: PID
9: Communication
Tens place: Terminal
command combination
with frequency source
Hundreds place:
Communication
command combination
with frequency source
P1 Group: Motor Parameters
P1-00 Motor type
0: Common
asynchronous motor
1: Variable frequency
asynchronous motor
0 ◎
P1-01 Rated power 0.1kW ~ 1000.0kW
Model
depend
◎
P1-02 Rated voltage 1V ~ 2000V
Model
depend
◎
P1-03 Rated current 0.01A ~ 655.35A
Model
depend
◎
P1-04 Rated frequency
0.00Hz ~ P0-10 (max.
frequency)
Model
depend
◎
P1-05 Rated speed 1rpm ~ 36000rpm
Model
depend
◎
P1-06 Stator resistance 0.001Ω ~ 65.535Ω
Motor
parameter
◎
P1-07 Rotor resistance 0.001Ω ~ 65.535Ω
Motor
parameter
◎
P1-08
Leakage
inductance
0.01mH ~ 655.35mH
Motor
parameter
◎
P1-09
Mutual
inductance
0.01mH ~ 655.35mH
Motor
parameter
◎
KE300X/KE300B Inverter
44
Function
code
Name Detailed instruction
Factory
default
Modify
P1-10 No-load current
0.01A ~ P1-03 (rated
current)
Motor
parameter
◎
P1-11
Parameters
autotuning
0: No action
1: Static autotuning
2: Rotation autotuning
0 ◎
P2 Group: Vector Control Parameters
P2-00
Speed loop
proportional gain
1
1 ~ 100 30 ○
P2-01
Speed loop
integration
time 1
0.01s ~ 10.00s 0.50s ○
P2-02
Low switching
frequency
0.00 ~ P2-05 5.00Hz ○
P2-03
Speed loop
proportional gain
2
1 ~ 100 20 ○
P2-04
Speed loop
integration
time 2
0.01s ~ 10.00s 1.00s ○
P2-05
High switching
frequency
P2-02 ~ P0-10 (max.
frequency)
10.00Hz ○
P2-06
Vector control
slip
compensation
coefficient
50% ~ 200% 100% ○
P2-07
Speed loop filter
time
0.000s ~ 0.100s 0.000s ○
P2-08
Vector control
over excitation
gain
0 ~ 200 64 ○
P2-09 Torque upper 0: P2-10 0 ○
KE300X/KE300B Inverter
45
Function
code
Name Detailed instruction
Factory
default
Modify
limit source
selection in
speed control
mode
1: AI1
2: Reserved
3: Keypad potentiometer
4: High speed pulse HDI
5: Communication
6: Reserved
7: Reserved
Full scale of 1-7 selection
corresponds to P2-10
P2-10
Torque upper
limit
digital setting
0.0% ~ 200.0% 150.0% ○
P3 Group: V/F Control Parameters
P3-00 V/F curve setting
0: Linear
1: Multiple-point
2: Square
3: 1.2 power
4: 1.4 power
6: 1.6 power
8: 1.8 power
0 ◎
P3-01 Torque boost
0.0: auto
0.1% ~ 30.0%
Model
depend
○
P3-02
Torque boost
cutoff frequency
0.00Hz ~ P0-10 (max.
frequency)
50.00Hz ◎
P3-03
V/F frequency
point 1
0.00Hz ~ P3-05 0.00Hz ◎
P3-04
V/F voltage point
1
0.0% ~ 100.0% 0.0% ◎
P3-05
V/F frequency
point 2
P3-03 ~ P3-07 0.00Hz ◎
P3-06
V/F voltage point
2
0.0% ~ 100.0% 0.0% ◎
KE300X/KE300B Inverter
46
Function
code
Name Detailed instruction
Factory
default
Modify
P3-07
V/F frequency
point 3
P3-05 ~ P1-04 (motor
rated power)
0.00Hz ◎
P3-08
V/F voltage point
3
0.0% ~ 100.0% 0.0% ◎
P3-09
V/F slip
compensation
gain
0.0% ~ 200.0% 0.0% ○
P3-10
V/F over
excitation gain
0 ~ 200 64 ○
P3-11
V/F oscillation
suppression gain
0 ~ 100
Model
depend
○
P3-18
Over-current
stall action
current (For
KE300B only)
50% ~ 200% 150% ○
P3-19
Over-current
stall suppression
(For KE300B
only)
0: Invalid
1: Valid
1 ○
P3-20
Over-current
stall suppression
gain
(For KE300B
only)
0 ~ 100 20 ○
P3-21
Double-speed
over-current stall
action current
compensation
coefficient (For
KE300B only)
0 ~ 200% 50% ○
P3-22
Over-current
stall action
voltage
(For KE300B
only)
330.0V ~ 390.0V 390.0V ○
P3-23 Over-voltage
stall enable
0: Invalid
1: Valid
1 ○
KE300X/KE300B Inverter
47
Function
code
Name Detailed instruction
Factory
default
Modify
(For KE300B
only)
P3-24
Over-voltage
stall suppression
frequency gain
(For KE300B
only)
0 ~ 100 50 ○
P3- 25
Over-voltage
stall suppression
voltage gain
(For KE300B
only)
0 ~ 100 30 ○
P3-26
Over-voltage
stall max. rising
frequency limit
(For KE300B
only)
0 ~ 50Hz 5Hz ○
P3-27
Slip
compensation
time constant
(For KE300B
only)
0.1 ~ 10.0s 0.5 ○
P4 Group: Input Terminal
P4-00
D1 terminal
function
0: No function
1: Forward (FWD)
2: Reverse (REV)
3: Three-line running
control
4: Forward Jog (FJOG)
5: Reverse Jog (RJOG)
6: Terminal UP
7: Terminal DOWN
8: Coast to stop
9: Fault reset (RESET)
10: Pause running
11: External fault (normal
1 ◎
P4-01
D2 terminal
function
2 ◎
P4-02
D3 terminal
function
0 ◎
P4-03 Reserved 0 ◎
P4-04
D5 terminal
function
0 ◎
P4-05 Reserved 0 ◎
P4-06
HDI terminal
function
0 ◎
KE300X/KE300B Inverter
48
Function
code
Name Detailed instruction
Factory
default
Modify
open) input
12: Multi-step speed
terminal 1
13: Multi-step speed
terminal 2
14: Multi-step speed
terminal 3
15: Multi-step speed
terminal 4
16: ACC/DEC selection
terminal 1
17: ACC/DEC selection
terminal 2
18: Main frequency
source switching
19: UP and DOWN
setting clear
(terminal and keypad)
20: Running command
switching terminal
21: ACC/DEC invalid
22: PID Pause
23: PLC status reset
24: Wobble frequency
pause
25: Counter input
26: Counter reset
27: Length count input
28: Length reset
29: Torque control invalid
30: PULSE frequency
input (only valid for HDI)
KE300X/KE300B Inverter
49
Function
code
Name Detailed instruction
Factory
default
Modify
31: Reserved
32: DC braking command
33: External fault (normal
closed) input
34: Frequency
modification enabled
35: PID action direction
reverse
36: External stop terminal
1
37: Control command
switching terminal 2
38: PID integration stop
39: Switch frequency
source A to preset
frequency
40: Switch frequency
source B to preset
frequency
41, 42: Reserved
43: PID parameter
switching
44: Customized fault 1
45: Customized fault 2
46: Speed control /
torque control switching
47: Emergency stop
48: External stop terminal
2
49: Deceleration DC
braking
50: The running time
KE300X/KE300B Inverter
50
Function
code
Name Detailed instruction
Factory
default
Modify
reset
P4-07~
P4-09
Reserved ●
P4-10
Terminal filter
time
0.000s ~ 1.000s 0.010s ○
P4-11
Terminal
command mode
0: Two-line mode 1
1: Two-line mode 2
2: Three-line mode 1
3: Three-line mode 2
0 ◎
P4-12
UP/DN change
rate
0.001Hz/s ~ 50.000Hz/s 1.00Hz/s ○
P4-13
AI curve 1
minimum input
0.00V ~ P4-15 0.00V ○
P4-14
AI curve 1
minimum input
corresponding
setting
-100.0% ~ +100.0% 0.0% ○
P4-15
AI curve 1
maximum input
P4-13 ~ +10.00V 10.00V ○
P4-16
AI curve 1
maximum input
corresponding
setting
-100.0% ~ +100.0% 100.0% ○
P4-17 AI1 filter time 0.00s ~ 10.00s 0.10s ○
P4-18
AI curve 2
minimum input
0.00V ~ P4-20 0.00V ○
P4-19
AI curve 2
minimum input
corresponding
setting
-100.0% ~ +100.0% 0.0% ○
P4-20
AI curve 2
maximum input
P4-18 ~ +10.00V 10.00V ○
KE300X/KE300B Inverter
51
Function
code
Name Detailed instruction
Factory
default
Modify
P4-21
AI curve 2
maximum input
corresponding
setting
-100.0% ~ +100.0% 100.0% ○
P4-22 Reserved ○
P4-23
AI curve 3
minimum input
-10.00V ~ P4-25 -10.00V ○
P4-24
AI curve 3
minimum input
corresponding
setting
-100.0% ~ +100.0% 0.0% ○
P4-25
AI curve 3
maximum input
P4-23 ~ +10.00V 10.00V ○
P4-26
AI curve 3
maximum input
corresponding
setting
-100.0% ~ +100.0% 100.0% ○
P4-27
Keypad
potentiometer
input filter time
0.00s ~ 10.00s 0.10s ○
P4-28
HDI minimum
input
0.00kHz ~ P4-30 0.00kHz ○
P4-29
HDI minimum
input
corresponding
setting
-100.0% ~ 100.0% 0.0% ○
P4-30
HDI maximum
input
P4-28 ~ 100.00kHz 50.00kHz ○
P4-31
HDI maximum
input
corresponding
setting
-100.0% ~ 100.0% 100.0% ○
KE300X/KE300B Inverter
52
Function
code
Name Detailed instruction
Factory
default
Modify
P4-32 HDI filter time 0.00s ~ 10.00s 0.10s ○
P4-33
AI curve
selection
Units place: AI1
1: Curve 1 (see P4-13 ~
P4-16)
2: Curve 2 (see P4-18 ~
P4-21)
3: Curve 3 (see P4-23 ~
P4-26)
Tens place: Reserved
321 ○
P4-34
AI below
minimum input
setting selection
Units place: AI1
0: Correspond to
minimum input setting
1: 0.0%
Tens place: Reserved
Hundreds place: Keypad
potentiometer, ibid
000 ○
P4-35 D1 delay time 0.0s ~ 3600.0s 0.0s ◎
P4-36 D2 delay time 0.0s ~ 3600.0s 0.0s ◎
P4-37 D3 delay time 0.0s ~ 3600.0s 0.0s ◎
P4-38
DI terminal valid
mode selection 1
0: Active-high
1: Active-low
Units place: D1
Tens place: D2
Hundreds place: D3
Thousands place: D4
Ten thousands place: D5
00000 ◎
P4-39
DI terminal valid
mode selection 2
0: Active-high
1: Active-low
Units place: D6
Tens place: HDI
00 ◎
P5 Group: Output Terminal
KE300X/KE300B Inverter
53
Function
code
Name Detailed instruction
Factory
default
Modify
P5-00
HDO terminal
output mode
selection
0: High speed pulse
output
1: Open collector output
0 ○
P5-01
HDO open
collector output
selection
0: No output
1: Inverter is running
2: Fault output (fault stop)
3: FDT1 output
4: Frequency arrival
5: Zero-speed running
(no output when stop)
6: Motor overload
pre-alarm
7: Inverter overload
pre-alarm
8: Setting count value
arrival
9: Designated count
value arrival
10: Length arrival
11: PLC loop completed
12: Accumulated running
time arrival
13: Frequency limiting
14: Torque limiting
15: Ready for running
16: Reserved
17: Frequency upper limit
arrival
18: Frequency lower limit
arrival
19: Under voltage status
output
0 ○
P5-02
Relay T1 output
selection
2 ○
P5-03 Reserved 0 ○
KE300X/KE300B Inverter
54
Function
code
Name Detailed instruction
Factory
default
Modify
20: Communication
setting
21: Orientation finished
(reserved)
22: Orientation approach
(reserved)
23: Zero-speed running 2
(output when stop)
24: Accumulated
power-on time arrival
25: FDT2 output
26: Frequency 1 arrival
output
27: Frequency 2 arrival
output
28: Current 1 arrival
output
29: Current 2 arrival
output
30: Timing arrival output
31: AI1 input over limit
32: Off load
33: Reverse running
34: Zero-current status
35: Module temperature
arrival
36: Output current over
limit
37: Lower limit frequency
arrival (output when stop)
38: Warning output (keep
running)
KE300X/KE300B Inverter
55
Function
code
Name Detailed instruction
Factory
default
Modify
39: Motor over
temperature pre-alarm
40: This running time
arrival
41: Reserved
P5-04
~
P5-05
Reserved ●
P5-06
HDO function
selection
0: Running frequency
1: Setting frequency
2: Output current
3: Output torque
4: Output power
5: Output voltage
6: Pulse input
7: AI1
8: Reserved
9: Reserved
10: Length
11: Count value
12: Communication
13: Motor speed
14: Output current
(100.0% corresponds to
1000.0A)
15: Output voltage
(100.0% corresponds to
1000.0V)
16: Reserved
0 ○
P5-07
AO1 output
function
selection
0 ○
P5-08 Reserved 0 ○
P5-09
HDO output
maximum
frequency
0.01kHz ~ 100.00kHz 50.00kHz ○
KE300X/KE300B Inverter
56
Function
code
Name Detailed instruction
Factory
default
Modify
P5-10
AO1 offset
coefficient
-100.0% ~ +100.0% 0.0% ○
P5-11 AO1 gain -10.00 ~ +10.00 1.00 ○
P5-12 Reserved ○
P5-13 Reserved ○
P5-17
HDO open
collector output
delay time
0.0s ~ 3600.0s 0.0s ○
P5-18
Relay 1 output
delay time
0.0s ~ 3600.0s 0.0s ○
P5-19~
P5-21
Reserved
P5-22
Output terminal
valid status
selection
0: Positive logic
1: Negative logic
Units place: HDO
Tens place: Relay1
Hundreds place:
Reserved
000 ○
P6 Group: Start and Stop Control
P6-00 Start mode
0: Direct start
1: Speed tracking and
restart
2: Pre-excitation start
0 ○
P6-01
Speed tracking
mode
0: Begin from stop
frequency
1: Begin from zero speed
2: Begin from maximum
frequency
0 ◎
P6-02
Speed tracking
speed
1 ~ 100 20 ○
P6-03 Start frequency 0.00Hz ~ 10.00Hz 0.00Hz ○
P6-04 Start frequency 0.0s ~ 100.0s 0.0s ◎
KE300X/KE300B Inverter
57
Function
code
Name Detailed instruction
Factory
default
Modify
holding time
P6-05
DC braking
current before
start/pre-excitati
on current
0% ~ 100% 0% ◎
P6-06
DC braking time
before
start/pre-excitati
on time
0.0s ~ 100.0s 0.0s ◎
P6-07 ACC/DEC mode
0: Linear ACC/DEC
1: S-curve ACC/DEC A
2: S-curve ACC/DEC B
0 ◎
P6-08
Time of S
curve's start part
0.0% ~ (100.0% ~ P6-09) 30.0% ◎
P6-09
Time of S
curve's end part
0.0% ~ (100.0% ~ P6-08) 30.0% ◎
P6-10 Stop mode
0: Deceleration to stop
1: Coast to stop
0 ○
P6-11
DC braking start
frequency after
stop
0.00Hz ~ P0-10
(maximum frequency)
0.00Hz ○
P6-12
DC braking
delay time after
stop
0.0s ~ 100.0s 0.0s ○
P6-13
DC braking
current
after stop
0% ~ 100% 0% ○
P6-14
DC braking time
after stop
0.0s ~ 100.0s 0.0s ○
P6-15
Braking usage
ratio
0% ~ 100% 100% ○
P7 Group: Keypad and Display
KE300X/KE300B Inverter
58
Function
code
Name Detailed instruction
Factory
default
Modify
P7-00
Inverter rated
power
0.1kW~1000.0kW
Model
depend
●
P7-01
QUICK/JOG
function
selection
0: Invalid
1: Switching between
keypad command and
remote command
(terminal command and
communication
command)
2: FDW/REV Switching
3: Forward Jog
4: Reverse Jog
0 ◎
P7-02
STOP/RST
function
selection
0: Valid when keypad
control
1: Always valid
1 ○
P7-03
Running status
display 1
0000 ~ FFFF
Bit00: Running frequency
1 (Hz)
Bit01: Setting frequency
(Hz)
Bit02: Bus voltage (V)
Bit03: Output voltage (V)
Bit04: Output current (A)
Bit05: Output power (kW)
Bit06: Output torque (%)
Bit07: DI status
Bit08: DO status
Bit09: AI1 voltage (V)
Bit10: Reserved
Bit11: Radiator
temperature
Bit12: Count value
81F ○
KE300X/KE300B Inverter
59
Function
code
Name Detailed instruction
Factory
default
Modify
Bit13: Length value
Bit14: Load speed display
Bit15: PID setting
P7-04
Running status
display 2
0000 ~ FFFF
Bit00: PID feedback
Bit01: PLC step
Bit02: HDI input pulse
frequency (kHz)
Bit03: Running frequency
2 (Hz)
Bit04: Remain running
time
Bit05: AI1 voltage before
calibration (V)
Bit06: Reserved
Bit07: Reserved
Bit08: Linear speed
Bit09: Current power-on
time (Hour)
Bit10: Current running
time (Min)
Bit11: HDI input pulse
frequency (Hz)
Bit12: Communication
setting value
Bit13: Reserved
Bit14: Main frequency A
display (Hz)
Bit15: Auxiliary frequency
B display (Hz)
0 ○
P7-05
Stop status
display
0000 ~ FFFF
Bit00: Setting frequency
73 ○
KE300X/KE300B Inverter
60
Function
code
Name Detailed instruction
Factory
default
Modify
(Hz)
Bit01: Bus voltage (V)
Bit02: DI input status
Bit03: DO output status
Bit04: AI1 voltage(V)
Bit05: Reserved
Bit06: Radiator
temperature
Bit07: Count value
Bit08: Length value
Bit09: PLC step
Bit10: Load speed
Bit11: PID setting
Bit12: HDI input pulse
frequency (kHz)
P7-06
Load speed
display
coefficient
0.0001 ~ 6.5000 3.0000 ○
P7-07
IGBT module
temperature
0.0℃~ 100.0℃ - ●
P7-08
Inverter rated
voltage
1V~2000V
Model
depend
●
P7-09
Accumulated
running time
0h ~ 65535h - ●
P7-10 Model No. - - ●
P7-11
Software version
No.
- - ●
P7-12
Load speed
display decimal
place
0: 0 decimal place
1: 1 decimal place
2: 2 decimal places
3: 3 decimal places
1 ○
P7-13 Accumulated 0h ~ 65535h - ●
KE300X/KE300B Inverter
61
Function
code
Name Detailed instruction
Factory
default
Modify
Power-on time
P7-14
Accumulated
power
consumption
0kW ~ 65535 kW - ●
P8 Group: Enhanced Function
P8-00
Jog running
frequency
0.00Hz ~ P0-10 (max.
frequency)
2.00Hz ○
P8-01
Jog acceleration
time
0.1s ~ 3600.0s 20.0s ○
P8-02
Jog deceleration
time
0.1s ~ 3600.0s 20.0s ○
P8-03
Acceleration
time 2
0.1s ~ 3600.0s
Model
depend
○
P8-04
Deceleration
time 2
0.1s ~ 3600.0s
Model
depend
○
P8-05
Acceleration
time 3
0.1s ~ 3600.0s
Model
depend
○
P8-06
Deceleration
time 3
0.1s ~ 3600.0s
Model
depend
○
P8-07
Acceleration
time 4
0.1s ~ 3600.0s
Model
depend
○
P8-08
Deceleration
time 4
0.1s ~ 3600.0s
Model
depend
○
P8-09
Jump frequency
1
0.00Hz ~ P0-10
(maximum frequency)
0.00Hz ○
P8-10
Jump frequency
2
0.00Hz ~ P0-10
(maximum frequency)
0.00Hz ○
P8-11
Jump frequency
amplitude
0.00Hz ~ P0-10
(maximum frequency)
0.01Hz ○
P8-12
FWD/REV dead
time
0.0s ~ 3600.0s 0.0s ○
P8-13 Reverse control 0: Enable 0 ○
KE300X/KE300B Inverter
62
Function
code
Name Detailed instruction
Factory
default
Modify
1: Disable
P8-14
Action when
setting
frequency lower
than frequency
lower limit
0: Running at frequency
lower limit
1: Stop
2: Zero-speed running
0 ○
P8-15 Droop control 0.00Hz ~ 10.00Hz 0.00Hz ○
P8-16
Accumulated
power-on arrival
time
0h ~ 36000h 0h ○
P8-17
Accumulated
running arrival
time
0h ~ 36000h 0h ○
P8-18
Power-on
running
command valid
protection
selection
0: No protection
1: Protection
0 ○
P8-19
Frequency
detection value
(FDT1)
0.00Hz ~ P0-10
(maximum frequency)
50.00Hz ○
P8-20
Frequency
detection lagging
value
(FDT1)
0.0% ~ 100.0% (FDT1
level)
5.0% ○
P8-21
Frequency
arrival detection
amplitude
0.0% ~ 100.0%
(maximum frequency)
0.0% ○
P8-22
Jump frequency
control
during ACC/DEC
0: Invalid
1: Valid
0 ○
P8-25 Acceleration 0.00Hz ~ P0-10 0.00Hz ○
KE300X/KE300B Inverter
63
Function
code
Name Detailed instruction
Factory
default
Modify
time 1 and
acceleration time
2 switching
frequency point
(maximum frequency)
P8-26
Deceleration
time 1 and
deceleration
time 2 switching
frequency point
0.00Hz ~ P0-10
(maximum frequency)
0.00Hz ○
P8-27
Terminal jog
priority
0: Invalid
1: Valid
0 ○
P8-28
Frequency
detection value
(FDT2)
0.00Hz ~ P0-10
(maximum frequency)
50.00Hz ○
P8-29
Frequency
detection lagging
value (FDT2)
0.0% ~ 100.0% (FDT2
level)
5.0% ○
P8-30
Any arrival
frequency
detection value 1
0.00Hz ~ P0-10
(maximum frequency)
50.00Hz ○
P8-31
Any arrival
frequency
detection
amplitude 1
0.0% ~ 100.0%
(maximum frequency)
0.0% ○
P8-32
Any arrival
frequency
detection value 2
0.00Hz ~ P0-10
(maximum frequency)
50.00Hz ○
P8-33
Any arrival
frequency
detection
amplitude 2
0.0% ~ 100.0%
(maximum frequency)
0.0% ○
P8-34 Zero-current 0.0% ~ 300.0% 5.0% ○
KE300X/KE300B Inverter
64
Function
code
Name Detailed instruction
Factory
default
Modify
detection level 100.0% corresponds to
motor rated current
P8-35
Zero-current
detection delay
time
0.01s ~ 360.00s 0.10s ○
P8-36
Output current
over
limit value
0.0% (No detection)
0.1% ~ 300.0% (motor
rated current)
200.0% ○
P8-37
Output current
over limit
detection delay
time
0.00s ~ 360.00s 0.00s ○
P8-38
Any arrival
current 1
0.0% ~ 300.0%
(motor rated current)
100.0% ○
P8-39
Any arrival
current 1
amplitude
0.0% ~ 300.0%
(motor rated current)
0.0% ○
P8-40
Any arrival
current 2
0.0% ~ 300.0%
(motor rated current)
100.0% ○
P8-41
Any arrival
current 2
amplitude
0.0% ~ 300.0%
(motor rated current)
0.0% ○
P8-42
Timing function
selection
0: Invalid 1: Valid 0 ○
P8-43
Timing running
time selection
0:P8-44
1:AI1
2:Reserved
3:Keypad potentiometer
Analog input scale
corresponds to P8-44
0 ○
P8-44 Timing running 0.0Min ~ 3600.0Min 0.0Min ○
KE300X/KE300B Inverter
65
Function
code
Name Detailed instruction
Factory
default
Modify
time
P8-45
AI1 input voltage
protection lower
limit
0.00V ~ P8-46 3.10V ○
P8-46
AI1 input voltage
protection upper
limit
P8-45 ~ 10.00V 6.80V ○
P8-47
Module
temperature
arrival
0℃ ~ 100℃ 75℃ ○
P8-48
Cooling fan
control
0: Fan runs when inverter
running
1: Fan always runs
0 ○
P8-49
Wake up
frequency
0.0 ~ PA-04 (PID given
feedback range)
3.0 ○
P8-50
Wake up delay
time
0.0s ~ 3600.0s 0.0s ○
P8-51
Dormancy
frequency
0.00Hz ~ P0-10
(maximum frequency)
0.00Hz ○
P8-52
Dormancy delay
time
0.0s ~ 3600.0s 0.0s ○
P8-53
Running arrival
time setting
0.0Min ~ 3600.0Min 0.0Min ○
P9 Group: Fault and Protection
P9-00
Motor overload
protection
selection
0: Disable
1: Enable
1 ○
P9-01
Motor overload
protection gain
0.20 ~ 10.00 1.00 ○
P9-02
Motor overload
pre-alarm
coefficient
50% ~ 100% 80% ○
KE300X/KE300B Inverter
66
Function
code
Name Detailed instruction
Factory
default
Modify
P9-03
Stall
over-voltage
gain
0 ~ 100 0 ○
P9-04
Stall
over-voltage
point / Braking
threshold
120% ~ 150% 130% ○
P9-05
Stall over current
gain
1 ~ 100 20 ○
P9-06
Stall
over-current
point
100% ~ 200% 160% ○
P9-07
Short-circuit to
ground
protection
selection when
power-on
0: Invalid
1: Valid
1 ○
P9-08
Fast current
limitation
0: Disable
1: Enable
1 ○
P9-08
Braking unit
action starting
voltage (For
KE300B only)
310.0V ~ 800.0V 378.0V ○
P9-09
Fault auto reset
times
0 ~ 5 0 ○
P9-10
Fault HDO acts
selection in fault
auto reset
0: No action
1: Action
0 ○
P9-11
Fault auto reset
interval
0.1s ~ 100.0s 1.0s ○
P9-12 Reserved
P9-13 Output phase 0: Disable 1 ○
KE300X/KE300B Inverter
67
Function
code
Name Detailed instruction
Factory
default
Modify
failure protection
selection
1: Enable
P9-14
The first fault
type
0: No fault
1: Reserved
2: Acc over current
3: Dec over current
4: Over current in
constant speed
5: Over voltage in Acc
process
6: Over voltage in Dec
process
7: Over voltage in
constant speed
8: Reserved
9: Under voltage
10: Inverter overload
11: Motor overload
12: Input side phase
failure
13: Output side phase
failure
14: Module overheat
1 5: External fault
16: Communication fault
17: Contactor fault
1 8: Current detection
fault
19: Motor autotuning fault
20: Reserved
21: Parameter R/W fault
2 2: Inverter hardware
- ●
KE300X/KE300B Inverter
68
Function
code
Name Detailed instruction
Factory
default
Modify
fault
23: Motor short circuit to
ground fault
24: Reserved
25: Reserved
26: Running time arrival
27: Customized fault 1
28: Customized fault 2
29: Power-on time arrival
30: Off load
31: PID feedback lost
when running
40: Fast current limiting
over time
41: Reserved
42: Speed deviation
oversize
43: Motor over speed
P9-15
The second fault
type
- ●
P9-16
The third (latest)
fault type
- ●
P9-17
Frequency at the
third (latest) fault
- - ●
P9-18
Current at the
third (latest) fault
- - ●
P9-19
Bus voltage at
the third (latest)
fault
- - ●
P9-20
Input terminal’s
status at the
third (latest) fault
- - ●
KE300X/KE300B Inverter
69
Function
code
Name Detailed instruction
Factory
default
Modify
P9-21
Output terminal’s
status at the
third (latest) fault
- - ●
P9-22
Inverter status at
the third (latest)
fault
- - ●
P9-23
Power-on time at
the third (latest)
fault
- - ●
P9-24
Running time at
the third (latest)
fault
- - ●
P9-27
Frequency at the
second fault
- - ●
P9-28
Current at the
second fault
- - ●
P9-29
Bus voltage at
the second fault
- - ●
P9-30
Input terminal’s
status at the
second fault
- - ●
P9-31
Output terminal’s
status at the
second fault
- - ●
P9-32
Inverter status at
the second fault
- - ●
P9-33
Power-on time at
the second fault
- - ●
P9-34
Running time at
the second fault
- - ●
P9-37
Frequency at the
first fault
- - ●
KE300X/KE300B Inverter
70
Function
code
Name Detailed instruction
Factory
default
Modify
P9-38
Current at the
first fault
- - ●
P9-39
Bus voltage at
the first fault
- - ●
P9-40
Input terminal’s
status at the first
fault
- - ●
P9-41
Output terminal’s
status at the first
fault
- - ●
P9-42
Inverter status at
the first fault
- - ●
P9-43
Power-on time at
the first fault
- - ●
P9-44
Running time at
the first fault
- - ●
P9-47
Action selection
1 for fault
protection
Units place: Motor
overload (11)
0: Coast to stop
1: Dec-to-stop
2: Keep running
Tens place: Input phase
failure (12)
Hundreds place: Output
phase failure (13)
Thousands place:
External fault (15)
Ten thousands place:
communication fault (16)
00000 ○
P9-48
Fault protection
action selection
2
Units place: Encoder/PG
card fault
0: Coast to stop
00000 ○
KE300X/KE300B Inverter
71
Function
code
Name Detailed instruction
Factory
default
Modify
Tens place: Function code
R/W fault
0: Coast to stop
1: Dec-to-stop
Hundreds place:
Reserved
Thousands place: Motor
over heat (25)
Ten thousands: Running
time arrival (26)
P9-49
Fault protection
action selection
3
Units place: Customized
fault 1 (27)
0: Coast to stop
1: Dec-to-stop
2: Keep running
Tens place: Customized
fault 2 (28)
0: Coast to stop
1: Dec-to-stop
2: Keep running
Hundreds place:
Power-on time arrival time
(29)
0: Coast to stop
1: Dec-to-stop
2: Keep running
Thousands place: Off
load (30)
0: Coast to stop
1: Dec-to-stop
2: Decelerate to 7% of
motor rated power, then
00000 ○
KE300X/KE300B Inverter
72
Function
code
Name Detailed instruction
Factory
default
Modify
keep running; run at
setting frequency when
no off-load
Ten thousands place: PID
feedback lost when
running (31)
0: Coast to stop
1: Dec-to-stop
2: Keep running
P9-50
Fault protection
action selection
4
Units place:
Speed deviation oversize
(42)
0: Coast to stop
1: Dec-to-stop
2: Keep running
Tens place: motor over
speed (43)
Hundreds place: Initial
place fault (51)
00000 ○
P9-54
Running
frequency
selection when
fault
0: Run at current running
frequency
1: Run at setting
frequency
2: Run at upper limit
frequency
3: Run at lower limit
frequency
4: Run at abnormal
backup frequency
0 ○
P9-55
Abnormal
backup
frequency
60.0% ~ 100.0% (100.0%
corresponds to maximum
frequency( P0-10))
100.0% ○
KE300X/KE300B Inverter
73
Function
code
Name Detailed instruction
Factory
default
Modify
P9-56~
P9-58
Reserved ●
P9-59
Instantaneous
power-off action
selection
0: Invalid
1: Deceleration
2: Dec-to-stop
0 ○
P9-60
Recover
judgment
voltage when
Instantaneous
power-off
80 ~ 100.0% 90.0% ○
P9-61
Recover
judgment time
when
Instantaneous
power-off
0.00s ~ 100.00s 0.50s ○
P9-62
Action judgment
voltage when
instantaneous
power-off
60.0% ~ 100.0%
(standard bus voltage)
80.0% ○
P9-63
Off-load
protection
selection
0: Disable
1: Enable
0 ○
P9-64
Off-load
detection level
0.0 ~ 100.0% 10.0% ○
P9-65
Off-load
detection time
0.0 ~ 60.0s 1.0s ○
PA Group: PID Function
PA-00
PID given
source
0: PA-01
1: AI1
2: Reserved
3: Keypad potentiometer
4: High speed pulse HDI
0 ○
KE300X/KE300B Inverter
74
Function
code
Name Detailed instruction
Factory
default
Modify
5: Communication
6: Multi-step command
PA-01
PID given
through keypad
0.0 ~ PA-04 (PID given
feedback range)
0.0 ○
PA-02
PID feedback
source
0: AI1
1: Reserved
2: Keypad potentiometer
3: Reserved
4: High speed pulse HDI
5: Communication
6: Reserved
7: Reserved
8: Reserved
0 ○
PA-03
PID action
direction
0: Positive
1: Negative
0 ○
PA-04
PID given
feedback range
PA-01(PID given through
keypad)~ 1000.0
100.0 ○
PA-05
Proportional gain
Kp1
0.0 ~ 100.0 20.0 ○
PA-06
Integration time
Ti1
0.01s ~ 10.00s 2.00s ○
PA-07
Differential time
Td1
0.000s ~ 10.000s 0.000s ○
PA-08
Cutoff frequency
of PID reverse
0.00 ~ P0-10 (maximum
frequency)
0.00Hz ○
PA-09
PID deviation
limit
0.0% ~ 100.0% 0.0% ○
PA-10
PID differential
amplitude
0.00% ~ 100.00% 0.10% ○
PA-11
PID given filter
time
0.00 ~ 650.00s 0.00s ○
PA-12 PID feedback 0.00 ~ 60.00s 0.00s ○
KE300X/KE300B Inverter
75
Function
code
Name Detailed instruction
Factory
default
Modify
filter time
PA-13
PID output filter
time
0.00 ~ 60.00s 0.00s ○
PA-14 Reserved ○
PA-15
Proportional gain
Kp2
0.0 ~ 100.0 20.0 ○
PA-16
Integration time
Ti2
0.01s ~ 10.00s 2.00s ○
PA-17
Differential time
Td2
0.000s ~ 10.000s 0.000s ○
PA-18
PID parameter
switching
condition
0: No switching
1: Switching via terminals
2: Automatic switching
according to the deviation
0 ○
PA-19
PID parameter
switching
deviation 1
0.0% ~ PA-20 20.0% ○
PA-20
PID parameter
switching
deviation 2
PA-19 ~ 100.0% 80.0% ○
PA-21 PID initial value 0.0% ~ 00.0% 0.0% ○
PA-22
PID initial value
holding time
0.00 ~ 360.00s 0.00s ○
PA-23
Forward
maximum value
between two
output deviation
0.00% ~ 100.00% 1.00% ○
PA-24
Reverse
maximum value
between two
output deviation
0.00% ~ 100.00% 1.00% ○
PA-25 PID integration Units place: Integration 00 ○
KE300X/KE300B Inverter
76
Function
code
Name Detailed instruction
Factory
default
Modify
attribute separate
0: Invalid
1: Valid
Tens place: Stop
integrating or not after
output reach limit
0: Keep integrating
1: Stop integrating
PA-26
PID feedback
lost detection
value
0.0%: No judgment for
feedback lost
0.1% ~ 100.0%
0.0% ○
PA-27
PID feedback
lost detection
time
0.0s ~ 20.0s 0.0s ○
PA-28
PID stop
calculation
0: No calculation when
stop
1: Calculation when stop
1 ○
Pb Group: Wobble Frequency, Fixed Length, Counting
Pb-00
Wobble
frequency
setting mode
0: Relative to center
frequency
1: Relative to maximum
frequency
0 ○
Pb-01
Wobble
frequency
amplitude
0.0% ~ 100.0% 0.0% ○
Pb-02
Sudden Jump
frequency
amplitude
0.0% ~ 50.0% 0.0% ○
Pb-03
Wobble
frequency cycle
0.1s ~ 3000.0s 10.0s ○
Pb-04
Triangular wave
rise time of
0.1% ~ 100.0% 50.0% ○
KE300X/KE300B Inverter
77
Function
code
Name Detailed instruction
Factory
default
Modify
wobble
frequency
Pb-05 Setting length 0m ~ 65535m 1000m ○
Pb-06 Actual length 0m ~ 65535m 0m ○
Pb-07
Number of
pulses
per meter
0.1 ~ 6553.5 100.0 ○
Pb-08
Setting count
value
1 ~ 65535 1000 ○
Pb-09
Designated
count value
1 ~ 65535 1000 ○
PC Group: Multi-step Command and Simple PLC
PC-00
Multi-step
command 0
-100.0% ~ 100.0% 0.0% ○
PC-01
Multi-step
command 1
-100.0% ~ 100.0% 0.0% ○
PC-02
Multi-step
command 2
-100.0% ~ 100.0% 0.0% ○
PC-03
Multi-step
command 3
-100.0% ~ 100.0% 0.0% ○
PC-04
Multi-step
command 4
-100.0% ~ 100.0% 0.0% ○
PC-05
Multi-step
command 5
-100.0% ~ 100.0% 0.0% ○
PC-06
Multi-step
command 6
-100.0% ~ 100.0% 0.0% ○
PC-07
Multi-step
command 7
-100.0% ~ 100.0% 0.0% ○
PC-08
Multi-step
command 8
-100.0% ~ 100.0% 0.0% ○
PC-09
Multi-step
command 9
-100.0% ~ 100.0% 0.0% ○
KE300X/KE300B Inverter
78
Function
code
Name Detailed instruction
Factory
default
Modify
PC-10
Multi-step
command 10
-100.0% ~ 100.0% 0.0% ○
PC-11
Multi-step
command 11
-100.0% ~ 100.0% 0.0% ○
PC-12
Multi-step
command 12
-100.0% ~ 100.0% 0.0% ○
PC-13
Multi-step
command 13
-100.0% ~ 100.0% 0.0% ○
PC-14
Multi-step
command 14
-100.0% ~ 100.0% 0.0% ○
PC-15
Multi-step
command 15
-100.0% ~ 100.0% 0.0% ○
PC-16
Simple PLC
running mode
0: Stop after one cycle
1: Keep last frequency
after one cycle
2: Circular running
0 ○
PC-17
Simple PLC
storage selection
when
power-down
Units place: Storage
selection when power-off
0: Not store
1: Store
Tens place: Storage
selection when stop
0: Not store
1: Store
00 ○
PC-18
0
th
phase
running time
0.0s (m) ~ 6500.0s (m) 0.0s (m) ○
PC-19
0
th
phase
ACC/DCC
time selection
0 ~ 3 0 ○
PC-20
1st
phase
running time
0.0s (m) ~ 6500.0s (m) 0.0s (m) ○
PC-21 1st
phase 0 ~ 3 0 ○
KE300X/KE300B Inverter
79
Function
code
Name Detailed instruction
Factory
default
Modify
ACC/DCC
time selection
PC-22
2
nd
phase
running time
0.0s (m) ~ 6500.0s (m) 0.0s (m) ○
PC-23
2nd
phase
ACC/DCC
time selection
0 ~ 3 0 ○
PC-24
3rd
phase
running time
0.0s (m) ~ 6500.0s (m) 0.0s (m) ○
PC-25
3rd
phase
ACC/DCC
time selection
0 ~ 3 0 ○
PC-26
4th
phase
running time
0.0s (m) ~ 6500.0s (m) 0.0s (m) ○
PC-27
4th
phase
ACC/DCC
time selection
0 ~ 3 0 ○
PC-28
5
th
phase
running time
0.0s (m) ~ 6500.0s (m) 0.0s (m) ○
PC-29
5
th
phase
ACC/DCC
time selection
0 ~ 3 0 ○
PC-30
6
th
phase
running time
0.0s (m) ~ 6500.0s (m) 0.0s (m) ○
PC-31
6th
phase
ACC/DCC
time selection
0 ~ 3 0 ○
PC-32
7
th
phase
running time
0.0s (m) ~ 6500.0s (m) 0.0s (m) ○
PC-33
7
th
phase
ACC/DCC
time selection
0 ~ 3 0 ○
KE300X/KE300B Inverter
80
Function
code
Name Detailed instruction
Factory
default
Modify
PC-34
8
th
phase
running time
0.0s (m) ~ 6500.0s (m) 0.0s (m) ○
PC-35
8
th
phase
ACC/DCC
time selection
0 ~ 3 0 ○
PC-36
9th
phase
running time
0.0s (m) ~ 6500.0s (m) 0.0s (m) ○
PC-37
9th phase
ACC/DCC
time selection
0 ~ 3 0 ○
PC-38
10
th
phase
running time
0.0s (m) ~ 6500.0s (m) 0.0s (m) ○
PC-39
10th
phase
ACC/DCC
time selection
0 ~ 3 0 ○
PC-40
11
th
phase
running time
0.0s (m) ~ 6500.0s (m) 0.0s (m) ○
PC-41
11
th
phase
ACC/DCC
time selection
0 ~ 3 0 ○
PC-42
12
th
phase
running time
0.0s (m) ~ 6500.0s (m) 0.0s (m) ○
PC-43
12
th
phase
ACC/DCC
time selection
0 ~ 3 0 ○
PC-44
13th
phase
running time
0.0s (m) ~ 6500.0s (m) 0.0s (m) ○
PC-45
13
th
phase
ACC/DCC
time selection
0 ~ 3 0 ○
PC-46
14th
phase
running time
0.0s (m) ~ 6500.0s (m) 0.0s (m) ○
KE300X/KE300B Inverter
81
Function
code
Name Detailed instruction
Factory
default
Modify
PC-47
14
th
phase
ACC/DCC
time selection
0 ~ 3 0 ○
PC-48
15
th
phase
running time
0.0s (m) ~ 6500.0s (m) 0.0s (m) ○
PC-49
15th
phase
ACC/DCC
time selection
0 ~ 3 0 ○
PC-50
Timing unit
(Simple PLC
mode)
0: s (second)
1: m (minute)
0 ○
PC-51
Multi-step
command 0
given mode
0: PC-00
1: AI1
2: Reserved
3: Keypad potentiometer
4: High speed pulse HDI
5: PID control
6: Keypad setting
frequency (P0-08), can be
modified via UP/DN
0 ○
Pd Group: Communication Parameters
Pd-00 Baud rate
0: 300BPS
1: 600BPS
2: 1200BPS
3: 2400BPS
4: 4800BPS
5: 9600BPS
6: 19200BPS
7: 38400BPS
5 ○
Pd-01 Data format
0: No parity check (8-N-2)
1: Even parity check
(8-E-1)
0 ○
KE300X/KE300B Inverter
82
Function
code
Name Detailed instruction
Factory
default
Modify
2: Odd parity check
(8-O-1)
3: No parity check (8-N-1)
Pd-02 Local address
1 ~ 247,
0 is broadcast address
1 ○
Pd-03 Response delay 0ms ~ 20ms 2 ○
Pd-04
Communication
timeout time
0.0 (invalid)
0.1s ~ 60.0s
0.0 ○
Pd-05
Communication
protocol
selection
0: Non-standard
MODBUS protocol
1: Standard MODBUS
protocol
1 ○
Pd-06
Communication
read current
resolution
0: 0.01A
1: 0.1A
0 ○
Pd-07
Communication
selection (For
KE300B only)
0: External terminal
1: Keypad
0 ○
PE Group: Reserved Function
FE-00 Reserved ○
PP Group: Function Code Management
PP-00 User password 0 ~ 65535 0 ○
PP-01
Parameter
initialization
0: No action
1: Restore factory default,
but not including motor
parameters
2: Clear the record
0 ◎
PP-02
Function
parameter group
display selection
Units place: U0 group
display selection
0: No display
1: Display
Tens place: A0 group
00 ◎
KE300X/KE300B Inverter
83
Function
code
Name Detailed instruction
Factory
default
Modify
display selection
0: No display
1: Display
PP-03 Reserved ●
PP-04
Function code
modification
attribute
0: Disable
1: Enable
0 ○
A0 Group: Torque Control Parameters
A0-00
Speed/torque
control mode
selection
0: Speed control
1: Torque control
0 ◎
A0-01
Torque setting
source selection
in torque control
mode
0: Keypad (A0-03)
1: AI1
2: Reserved
3: Keypad potentiometer
4: High speed pulse HDI
5: Communication
6: Reserved
7: Reserved
0 ◎
A0-03
Torque setting
throught keypad
in torque control
mode
-200.0% ~ 200.0% 150.0% ○
A0-04 Torque filter time 0.00s ~ 10.00s 0.00s ○
A0-05
Forward
maximum
frequency in
torque control
mode
0.00Hz ~ P0-10
(maximum frequency)
50.00Hz ○
A0-06
Reverse
maximum
frequency in
0.00Hz ~ P0-10
(maximum frequency)
50.00Hz ○
KE300X/KE300B Inverter
84
Function
code
Name Detailed instruction
Factory
default
Modify
torque control
mode
A0-07
Acc time in
torque control
mode
0.00s ~ 36000s 0.00s ○
A0-08
Dec time in
torque control
mode
0.00s ~ 36000s 0.00s ○
5.2 Monitoring Parameter Table
Function code Name
Minimum
unit
U0:Group Basic Monitoring Parameter
U0-00 Running frequency (Hz) 0.01Hz
U0-01 Setting frequency (Hz) 0.01Hz
U0-02 DC bus voltage (V) 0.1V
U0-03 Output voltage (V) 1V
U0-04 Output current (A) 0.01A
U0-05 Output power (kW) 0.1kW
U0-06 Output torque (%) 0.1%
U0-07 DI input status 1
U0-08 DO output status 1
U0-09 AI1 voltage (V) 0.01V
U0-10 Reserved 0
U0-11 Radiator temperature 1℃
U0-12 Count value 1
KE300X/KE300B Inverter
85
Function code Name
Minimum
unit
U0-13 Length value 1
U0-14 Load speed 1
U0-15 PID setting 1
U0-16 PID feedback 1
U0-17 PLC phase 1
U0-18 HDI input pulse frequency (Hz) 0.01kHz
U0-19 Feedback speed (unit 0.1Hz) 0.1Hz
U0-20 Remain running time 0.1Min
U0-21 AI1 voltage before calibration 0.001V
U0-22 Reserved 0
U0-23
Keypad potentiometer voltage before
calibration
0.001V
U0-24 linear velocity 1m/Min
U0-25 Current power-on time 1Min
U0-26 Current running time 0.1Min
U0-27 HDI input pulse frequency 1Hz
U0-28 Communication setting value 0.01%
U0-29 Reserved 0.01Hz
U0-30 Main frequency A display 0.01Hz
U0-31 Auxiliary frequency B display 0.01Hz
U0-32 Reserved 1
U0-33 Reserved 0.1°
U0-34 Motor temperature 1℃
U0-35 Target torque (%) 0.1%
U0-36 Reserved 1
U0-37 Power factor angle 0.1°
U0-38 Reserved 1
U0-39 Reserved 1V
KE300X/KE300B Inverter
86
Function code Name
Minimum
unit
U0-40 Reserved 1V
U0-41 DI input status visual display 1
U0-42 DO input status visual display 1
U0-43
DI function status display 1
(function 01-function 40)
1
U0-44
DI function status visual display 2
(function 41-function 80)
1
U0-59 Setting frequency (%) 0.01%
U0-60 Running frequency (%) 0.01%
U0-61 Inverter status 1
KE300X/KE300B Inverter
87
Chapter 6 Parameters Description
Group P0 Basic Function
P0-00 Inverter model Factory default 1
1: G model: Applicable to constant torque load.
2: Reserved
P0-01 Control mode Factory default 0
0: V/F control
It is suitable for general purpose application such as pumps, fans etc. One
inverter can drive multiple motors.
1: Sensorless vector control
It is widely used for the application which requires high torque at low speed,
high speed accuracy, and quicker dynamic response, such as machine tool,
injection molding machine, centrifugal machine and wire-drawing machine, etc.
Note:
The autotuning of motor parameters must be accomplished properly if
you use the sensorless vector control. How to autotuning of motor
parameters please refer to P4 Group.
In order to achieve better control characteristic, the parameters of vector
control (P2 Group) should be adjusted.
P0-02
Running Command
source
Factory default 0
Select the input channel for control command. The inverter control commands
include start, stop, forward run, reverse run, Jog and so on.
0: Keypad (“LOCAL/REMOT” LED OFF)
Both RUN and STOP/RST keys are used for running command control. If
multifunction key QUICK/JOG is set as FWD/REV switching function (P7-01 is
set to be 2), it will be used to change the rotating orientation. If multifunction key
QUICK/JOG is set as FWD jog (P7-01 is set to be 3) or REV jog (P7-01 is set to
KE300X/KE300B Inverter
88
be 4), it will be used for jog running.
1: Terminal (“LOCAL/REMOT” LED ON)
The operations, including FWD, REV, JOGF, JOGR, etc. can be controlled by
multifunctional input terminals.
2: Communication (“LOCAL/REMOT” LED flickers)
The operation of inverter can be controlled by host through communication.
P0-03
Main frequency
source A selection
Factory default 0
0: Keypad (not store)
The initial value is the value of P0-08. The setting frequency value of inverter
can be modified through the keys “▲” and “▼” of the keyboard (or UP and
DOWN of multifunctional input terminals).
“Not store” means that the setting frequency is recovered to the value of P0-08
in case of inverter power- off.
1: Keypad (store)
The initial value is the value of P0-08.
“Store” means that the setting frequency remains the same as the value before
inverter power-off.
2: Al1
The reference frequency is set by analog input. KE300X series mini size
inverter provides 1 analog input terminal AI1, which is compatible with both
0~10V / 0~20mA input signal.
User can select the corresponding relation between the objective frequency and
the input voltage value of AI freely. KE300X series inverter provides 3
corresponding relation curves which can be set by users through P4 group
function code.
3. Reserved
4: Keypad potentiometer
The reference frequency is set by keypad potentiometer.
5: High speed PULSE (HDI)
The reference frequency is set by high speed pulse.
KE300X/KE300B Inverter
89
Pulse reference signal specification: the voltage range is 9V to 30V, and the
frequency range is 0kHz to
50kHz. Pulse given can only be input from the multifunctional input terminal
HDI.
6: Multi-step speed
The reference frequency is determined by P4 and PC groups. The selection of
steps is determined by combination of multi-step speed terminals.
7: Simple PLC
User can set reference frequency, hold time, running direction of each step and
acceleration/deceleration time between steps. For details, please refer to
description of PC group.
8: PID
The reference frequency is the result of PID adjustment. For details, please
refer to description of PA group.
9: Communication
The reference frequency is set through RS485. For details, please refer to
Modbus protocol in Chapter 9.
P0-04
Auxiliary frequency
source B selection
Factory default 0
When the auxiliary frequency source is used as independent frequency
reference channel (i.e. frequency source switching from A to B), it is used in the
same way as the main frequency source. Please refer to P0-03.
When the auxiliary frequency source is used as combination reference, please
note:
1. If the auxiliary frequency source is keypad reference, the frequency (P0-08) is
invalid, and it needs to adjust the main reference frequency through the keys
“▲”and “▼” of the keyboard (or UP and DOWN of multifunctional input
terminals).
2. If the auxiliary frequency source is analog input reference AI1 or pulse input
reference, 100% of input corresponds to the auxiliary frequency source range
(refer to P0-05 and P-06).
KE300X/KE300B Inverter
90
3. If the frequency source is pulse input reference, it is similar to the analog
input reference.
Note: P0-03 and P0-04 can’t be set to be the same value. Otherwise,
disorder will occur.
P0-05
Frequency source
B reference
Factory
default
0
P0-06
Auxiliary Frequency
source B range
Factory
default
100%
When the frequency source selection is frequency combination reference
(P0-07 is set to 1 or 3), the two parameters are used to determine the
adjustment range of auxiliary frequency source.
P0-05 is used to determine the relative object of that range. If it is relative to
maximum frequency A, that range will change with the main frequency A.
P0-07
Frequency source
selection
Factory
default
00
Units place: Frequency source selection
0: Main frequency source A
Reference frequency = A
1: Calculation result of frequency A and B
Reference frequency = Calculation result of frequency A and B (determined
by tens place)
2: Switching between A and B
If the multifunctional input terminal HDI (P4-0X=18: frequency switching) is
invalid,
reference frequency = A.
If the multifunctional input terminal HDI (frequency source switching) is valid,
reference frequency = B.
3: Switching between A and calculation result
If the multifunctional input terminal HDI (frequency switching) is invalid,
reference frequency = A.
If the multifunctional input terminal HDI (frequency switching) is valid,
reference frequency = calculation result.
KE300X/KE300B Inverter
91
4: Switching between B and calculation result
If the multifunctional input terminal HDI (frequency switching) is invalid,
reference frequency = B.
If the multifunctional input terminal HDI (frequency switching) is valid,
reference frequency = calculation result.
Tens place: Frequency source main/auxiliary calculation relationship
0: A + B
Reference frequency = A + B, achieving frequency combination given
function.
1: A - B
Reference frequency = A - B
2: Max (A, B)
Reference frequency = Max (A, B)
3: Min (A, B)
Reference frequency = Min (A, B)
Note: When the frequency source selection is main/auxiliary calculation, the
preset offset frequency can be set via P0-21, which can be added to
main/auxiliary calculation result to meet different kinds of demand.
P0-08
Keypad reference
frequency
Factory default 50.00Hz
When the main frequency source is selected as “Keypad” or “Terminals UP/DN”,
this function code is the initial value of frequency digital setting of the inverter.
P0-09 Running direction Factory default 0
Through modifying this function code, it can change the rotary direction of the
motor without changing motor wiring. It’s equal to adjust any two lines of the
motor (U, V and W) and further change the rotary direction of the motor.
Note: If the parameters are restored, the running direction will be back to
its original status.
Guide to Installation and Operation of KE300X/KE300B Inverters

More Related Content

Similar to Guide to Installation and Operation of KE300X/KE300B Inverters

Infini solar 10kw-manual
Infini solar 10kw-manualInfini solar 10kw-manual
Infini solar 10kw-manualNaveed Ahmed
 
Vfd m operation manual
Vfd m operation manualVfd m operation manual
Vfd m operation manualspectra-tw
 
Bien tan ls tai lieu huong dan su dung bien tan i g5 series 1-dienhathe.vn
Bien tan ls   tai lieu huong dan su dung  bien tan  i g5 series 1-dienhathe.vnBien tan ls   tai lieu huong dan su dung  bien tan  i g5 series 1-dienhathe.vn
Bien tan ls tai lieu huong dan su dung bien tan i g5 series 1-dienhathe.vnDien Ha The
 
Bien tan ls tai lieu huong dan su dung bien tan i g5 series 1
Bien tan ls   tai lieu huong dan su dung  bien tan  i g5 series 1Bien tan ls   tai lieu huong dan su dung  bien tan  i g5 series 1
Bien tan ls tai lieu huong dan su dung bien tan i g5 series 1Dien Ha The
 
I g5a manual_v2.4_ 110131
I g5a manual_v2.4_ 110131I g5a manual_v2.4_ 110131
I g5a manual_v2.4_ 110131Chan Suk
 
Vf s15 intruction manual
Vf s15 intruction manualVf s15 intruction manual
Vf s15 intruction manualToàn Huỳnh
 
Sv i e5-eng_081014
Sv i e5-eng_081014Sv i e5-eng_081014
Sv i e5-eng_081014Chan Suk
 
I v5 eng_110526
I v5 eng_110526I v5 eng_110526
I v5 eng_110526Chan Suk
 
Bien tan ls gioi thieu bien tan i e5 series (new)-2-dienhathe.vn
Bien tan ls   gioi thieu bien tan i e5 series (new)-2-dienhathe.vnBien tan ls   gioi thieu bien tan i e5 series (new)-2-dienhathe.vn
Bien tan ls gioi thieu bien tan i e5 series (new)-2-dienhathe.vnDien Ha The
 
Bien tan ls gioi thieu bien tan i e5 series (new)-2-dienhathe.vn
Bien tan ls   gioi thieu bien tan i e5 series (new)-2-dienhathe.vnBien tan ls   gioi thieu bien tan i e5 series (new)-2-dienhathe.vn
Bien tan ls gioi thieu bien tan i e5 series (new)-2-dienhathe.vnDien Ha The
 
Bien tan ls gioi thieu bien tan i e5 series (new)-2
Bien tan ls   gioi thieu bien tan i e5 series (new)-2Bien tan ls   gioi thieu bien tan i e5 series (new)-2
Bien tan ls gioi thieu bien tan i e5 series (new)-2Dien Ha The
 
Sv ig5a manual dienhathe.vn
Sv ig5a manual dienhathe.vnSv ig5a manual dienhathe.vn
Sv ig5a manual dienhathe.vnDien Ha The
 
Sv i p5a-manual_(english)
Sv i p5a-manual_(english)Sv i p5a-manual_(english)
Sv i p5a-manual_(english)Toàn Huỳnh
 
Goodrive100 pv series solar pumping inverters v1.6
Goodrive100 pv series solar pumping inverters v1.6Goodrive100 pv series solar pumping inverters v1.6
Goodrive100 pv series solar pumping inverters v1.6Florencio Pérez
 
Haier l26 f6 l32f6 l42f6 sm oficial (1)
Haier l26 f6 l32f6 l42f6 sm oficial (1)Haier l26 f6 l32f6 l42f6 sm oficial (1)
Haier l26 f6 l32f6 l42f6 sm oficial (1)flillud
 

Similar to Guide to Installation and Operation of KE300X/KE300B Inverters (20)

Infini solar 10kw-manual
Infini solar 10kw-manualInfini solar 10kw-manual
Infini solar 10kw-manual
 
Vfd m operation manual
Vfd m operation manualVfd m operation manual
Vfd m operation manual
 
Bien tan ls tai lieu huong dan su dung bien tan i g5 series 1-dienhathe.vn
Bien tan ls   tai lieu huong dan su dung  bien tan  i g5 series 1-dienhathe.vnBien tan ls   tai lieu huong dan su dung  bien tan  i g5 series 1-dienhathe.vn
Bien tan ls tai lieu huong dan su dung bien tan i g5 series 1-dienhathe.vn
 
Bien tan ls tai lieu huong dan su dung bien tan i g5 series 1-dienhathe.vn
Bien tan ls   tai lieu huong dan su dung  bien tan  i g5 series 1-dienhathe.vnBien tan ls   tai lieu huong dan su dung  bien tan  i g5 series 1-dienhathe.vn
Bien tan ls tai lieu huong dan su dung bien tan i g5 series 1-dienhathe.vn
 
Bien tan ls tai lieu huong dan su dung bien tan i g5 series 1
Bien tan ls   tai lieu huong dan su dung  bien tan  i g5 series 1Bien tan ls   tai lieu huong dan su dung  bien tan  i g5 series 1
Bien tan ls tai lieu huong dan su dung bien tan i g5 series 1
 
I g5a manual_v2.4_ 110131
I g5a manual_v2.4_ 110131I g5a manual_v2.4_ 110131
I g5a manual_v2.4_ 110131
 
Vf s15 intruction manual
Vf s15 intruction manualVf s15 intruction manual
Vf s15 intruction manual
 
756 i e5_eng_081014
756 i e5_eng_081014756 i e5_eng_081014
756 i e5_eng_081014
 
Sv i e5-eng_081014
Sv i e5-eng_081014Sv i e5-eng_081014
Sv i e5-eng_081014
 
I g5a
I g5aI g5a
I g5a
 
I v5 eng_110526
I v5 eng_110526I v5 eng_110526
I v5 eng_110526
 
I v5 eng_110526
I v5 eng_110526I v5 eng_110526
I v5 eng_110526
 
Bien tan ls gioi thieu bien tan i e5 series (new)-2-dienhathe.vn
Bien tan ls   gioi thieu bien tan i e5 series (new)-2-dienhathe.vnBien tan ls   gioi thieu bien tan i e5 series (new)-2-dienhathe.vn
Bien tan ls gioi thieu bien tan i e5 series (new)-2-dienhathe.vn
 
Bien tan ls gioi thieu bien tan i e5 series (new)-2-dienhathe.vn
Bien tan ls   gioi thieu bien tan i e5 series (new)-2-dienhathe.vnBien tan ls   gioi thieu bien tan i e5 series (new)-2-dienhathe.vn
Bien tan ls gioi thieu bien tan i e5 series (new)-2-dienhathe.vn
 
Bien tan ls gioi thieu bien tan i e5 series (new)-2
Bien tan ls   gioi thieu bien tan i e5 series (new)-2Bien tan ls   gioi thieu bien tan i e5 series (new)-2
Bien tan ls gioi thieu bien tan i e5 series (new)-2
 
Sv ig5a manual
Sv ig5a manualSv ig5a manual
Sv ig5a manual
 
Sv ig5a manual dienhathe.vn
Sv ig5a manual dienhathe.vnSv ig5a manual dienhathe.vn
Sv ig5a manual dienhathe.vn
 
Sv i p5a-manual_(english)
Sv i p5a-manual_(english)Sv i p5a-manual_(english)
Sv i p5a-manual_(english)
 
Goodrive100 pv series solar pumping inverters v1.6
Goodrive100 pv series solar pumping inverters v1.6Goodrive100 pv series solar pumping inverters v1.6
Goodrive100 pv series solar pumping inverters v1.6
 
Haier l26 f6 l32f6 l42f6 sm oficial (1)
Haier l26 f6 l32f6 l42f6 sm oficial (1)Haier l26 f6 l32f6 l42f6 sm oficial (1)
Haier l26 f6 l32f6 l42f6 sm oficial (1)
 

Recently uploaded

costume and set research powerpoint presentation
costume and set research powerpoint presentationcostume and set research powerpoint presentation
costume and set research powerpoint presentationphoebematthew05
 
My Hashitalk Indonesia April 2024 Presentation
My Hashitalk Indonesia April 2024 PresentationMy Hashitalk Indonesia April 2024 Presentation
My Hashitalk Indonesia April 2024 PresentationRidwan Fadjar
 
Kotlin Multiplatform & Compose Multiplatform - Starter kit for pragmatics
Kotlin Multiplatform & Compose Multiplatform - Starter kit for pragmaticsKotlin Multiplatform & Compose Multiplatform - Starter kit for pragmatics
Kotlin Multiplatform & Compose Multiplatform - Starter kit for pragmaticsAndrey Dotsenko
 
Tech-Forward - Achieving Business Readiness For Copilot in Microsoft 365
Tech-Forward - Achieving Business Readiness For Copilot in Microsoft 365Tech-Forward - Achieving Business Readiness For Copilot in Microsoft 365
Tech-Forward - Achieving Business Readiness For Copilot in Microsoft 3652toLead Limited
 
Unleash Your Potential - Namagunga Girls Coding Club
Unleash Your Potential - Namagunga Girls Coding ClubUnleash Your Potential - Namagunga Girls Coding Club
Unleash Your Potential - Namagunga Girls Coding ClubKalema Edgar
 
Swan(sea) Song – personal research during my six years at Swansea ... and bey...
Swan(sea) Song – personal research during my six years at Swansea ... and bey...Swan(sea) Song – personal research during my six years at Swansea ... and bey...
Swan(sea) Song – personal research during my six years at Swansea ... and bey...Alan Dix
 
APIForce Zurich 5 April Automation LPDG
APIForce Zurich 5 April  Automation LPDGAPIForce Zurich 5 April  Automation LPDG
APIForce Zurich 5 April Automation LPDGMarianaLemus7
 
SQL Database Design For Developers at php[tek] 2024
SQL Database Design For Developers at php[tek] 2024SQL Database Design For Developers at php[tek] 2024
SQL Database Design For Developers at php[tek] 2024Scott Keck-Warren
 
Artificial intelligence in the post-deep learning era
Artificial intelligence in the post-deep learning eraArtificial intelligence in the post-deep learning era
Artificial intelligence in the post-deep learning eraDeakin University
 
Unlocking the Potential of the Cloud for IBM Power Systems
Unlocking the Potential of the Cloud for IBM Power SystemsUnlocking the Potential of the Cloud for IBM Power Systems
Unlocking the Potential of the Cloud for IBM Power SystemsPrecisely
 
CloudStudio User manual (basic edition):
CloudStudio User manual (basic edition):CloudStudio User manual (basic edition):
CloudStudio User manual (basic edition):comworks
 
Build your next Gen AI Breakthrough - April 2024
Build your next Gen AI Breakthrough - April 2024Build your next Gen AI Breakthrough - April 2024
Build your next Gen AI Breakthrough - April 2024Neo4j
 
"Federated learning: out of reach no matter how close",Oleksandr Lapshyn
"Federated learning: out of reach no matter how close",Oleksandr Lapshyn"Federated learning: out of reach no matter how close",Oleksandr Lapshyn
"Federated learning: out of reach no matter how close",Oleksandr LapshynFwdays
 
Streamlining Python Development: A Guide to a Modern Project Setup
Streamlining Python Development: A Guide to a Modern Project SetupStreamlining Python Development: A Guide to a Modern Project Setup
Streamlining Python Development: A Guide to a Modern Project SetupFlorian Wilhelm
 
Pigging Solutions in Pet Food Manufacturing
Pigging Solutions in Pet Food ManufacturingPigging Solutions in Pet Food Manufacturing
Pigging Solutions in Pet Food ManufacturingPigging Solutions
 
Unblocking The Main Thread Solving ANRs and Frozen Frames
Unblocking The Main Thread Solving ANRs and Frozen FramesUnblocking The Main Thread Solving ANRs and Frozen Frames
Unblocking The Main Thread Solving ANRs and Frozen FramesSinan KOZAK
 
Are Multi-Cloud and Serverless Good or Bad?
Are Multi-Cloud and Serverless Good or Bad?Are Multi-Cloud and Serverless Good or Bad?
Are Multi-Cloud and Serverless Good or Bad?Mattias Andersson
 
New from BookNet Canada for 2024: BNC BiblioShare - Tech Forum 2024
New from BookNet Canada for 2024: BNC BiblioShare - Tech Forum 2024New from BookNet Canada for 2024: BNC BiblioShare - Tech Forum 2024
New from BookNet Canada for 2024: BNC BiblioShare - Tech Forum 2024BookNet Canada
 

Recently uploaded (20)

costume and set research powerpoint presentation
costume and set research powerpoint presentationcostume and set research powerpoint presentation
costume and set research powerpoint presentation
 
My Hashitalk Indonesia April 2024 Presentation
My Hashitalk Indonesia April 2024 PresentationMy Hashitalk Indonesia April 2024 Presentation
My Hashitalk Indonesia April 2024 Presentation
 
Kotlin Multiplatform & Compose Multiplatform - Starter kit for pragmatics
Kotlin Multiplatform & Compose Multiplatform - Starter kit for pragmaticsKotlin Multiplatform & Compose Multiplatform - Starter kit for pragmatics
Kotlin Multiplatform & Compose Multiplatform - Starter kit for pragmatics
 
Tech-Forward - Achieving Business Readiness For Copilot in Microsoft 365
Tech-Forward - Achieving Business Readiness For Copilot in Microsoft 365Tech-Forward - Achieving Business Readiness For Copilot in Microsoft 365
Tech-Forward - Achieving Business Readiness For Copilot in Microsoft 365
 
Unleash Your Potential - Namagunga Girls Coding Club
Unleash Your Potential - Namagunga Girls Coding ClubUnleash Your Potential - Namagunga Girls Coding Club
Unleash Your Potential - Namagunga Girls Coding Club
 
Swan(sea) Song – personal research during my six years at Swansea ... and bey...
Swan(sea) Song – personal research during my six years at Swansea ... and bey...Swan(sea) Song – personal research during my six years at Swansea ... and bey...
Swan(sea) Song – personal research during my six years at Swansea ... and bey...
 
APIForce Zurich 5 April Automation LPDG
APIForce Zurich 5 April  Automation LPDGAPIForce Zurich 5 April  Automation LPDG
APIForce Zurich 5 April Automation LPDG
 
SQL Database Design For Developers at php[tek] 2024
SQL Database Design For Developers at php[tek] 2024SQL Database Design For Developers at php[tek] 2024
SQL Database Design For Developers at php[tek] 2024
 
Artificial intelligence in the post-deep learning era
Artificial intelligence in the post-deep learning eraArtificial intelligence in the post-deep learning era
Artificial intelligence in the post-deep learning era
 
Unlocking the Potential of the Cloud for IBM Power Systems
Unlocking the Potential of the Cloud for IBM Power SystemsUnlocking the Potential of the Cloud for IBM Power Systems
Unlocking the Potential of the Cloud for IBM Power Systems
 
CloudStudio User manual (basic edition):
CloudStudio User manual (basic edition):CloudStudio User manual (basic edition):
CloudStudio User manual (basic edition):
 
Build your next Gen AI Breakthrough - April 2024
Build your next Gen AI Breakthrough - April 2024Build your next Gen AI Breakthrough - April 2024
Build your next Gen AI Breakthrough - April 2024
 
The transition to renewables in India.pdf
The transition to renewables in India.pdfThe transition to renewables in India.pdf
The transition to renewables in India.pdf
 
"Federated learning: out of reach no matter how close",Oleksandr Lapshyn
"Federated learning: out of reach no matter how close",Oleksandr Lapshyn"Federated learning: out of reach no matter how close",Oleksandr Lapshyn
"Federated learning: out of reach no matter how close",Oleksandr Lapshyn
 
Streamlining Python Development: A Guide to a Modern Project Setup
Streamlining Python Development: A Guide to a Modern Project SetupStreamlining Python Development: A Guide to a Modern Project Setup
Streamlining Python Development: A Guide to a Modern Project Setup
 
Pigging Solutions in Pet Food Manufacturing
Pigging Solutions in Pet Food ManufacturingPigging Solutions in Pet Food Manufacturing
Pigging Solutions in Pet Food Manufacturing
 
Unblocking The Main Thread Solving ANRs and Frozen Frames
Unblocking The Main Thread Solving ANRs and Frozen FramesUnblocking The Main Thread Solving ANRs and Frozen Frames
Unblocking The Main Thread Solving ANRs and Frozen Frames
 
Hot Sexy call girls in Panjabi Bagh 🔝 9953056974 🔝 Delhi escort Service
Hot Sexy call girls in Panjabi Bagh 🔝 9953056974 🔝 Delhi escort ServiceHot Sexy call girls in Panjabi Bagh 🔝 9953056974 🔝 Delhi escort Service
Hot Sexy call girls in Panjabi Bagh 🔝 9953056974 🔝 Delhi escort Service
 
Are Multi-Cloud and Serverless Good or Bad?
Are Multi-Cloud and Serverless Good or Bad?Are Multi-Cloud and Serverless Good or Bad?
Are Multi-Cloud and Serverless Good or Bad?
 
New from BookNet Canada for 2024: BNC BiblioShare - Tech Forum 2024
New from BookNet Canada for 2024: BNC BiblioShare - Tech Forum 2024New from BookNet Canada for 2024: BNC BiblioShare - Tech Forum 2024
New from BookNet Canada for 2024: BNC BiblioShare - Tech Forum 2024
 

Guide to Installation and Operation of KE300X/KE300B Inverters

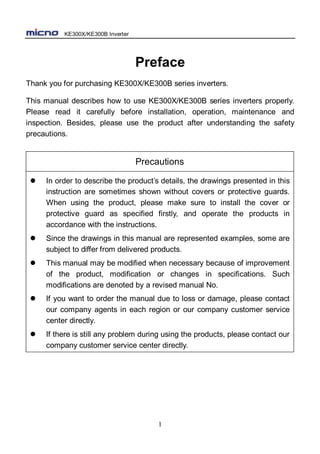
  • 1. KE300X/KE300B Inverter 1 Preface Thank you for purchasing KE300X/KE300B series inverters. This manual describes how to use KE300X/KE300B series inverters properly. Please read it carefully before installation, operation, maintenance and inspection. Besides, please use the product after understanding the safety precautions. Precautions  In order to describe the product’s details, the drawings presented in this instruction are sometimes shown without covers or protective guards. When using the product, please make sure to install the cover or protective guard as specified firstly, and operate the products in accordance with the instructions.  Since the drawings in this manual are represented examples, some are subject to differ from delivered products.  This manual may be modified when necessary because of improvement of the product, modification or changes in specifications. Such modifications are denoted by a revised manual No.  If you want to order the manual due to loss or damage, please contact our company agents in each region or our company customer service center directly.  If there is still any problem during using the products, please contact our company customer service center directly.
  • 2. KE300X/KE300B Inverter 2 Contents Chapter 1 Safety and Precautions ............................................................... 4 1.1 Safety Precautions ............................................................................ 4 1.2 Precautions ....................................................................................... 7 Chapter 2 Product Information....................................................................11 2.1 Product Inspection............................................................................11 2.2 Model Description.............................................................................11 2.3 Description of Nameplate................................................................. 12 2.4 Selection Guide............................................................................... 12 2.5 Technical Specifications................................................................... 12 2.6 External & Installation Dimensions................................................... 16 2.7 Routine Maintenance of Inverter ...................................................... 18 2.8 Instructions on Warranty of Inverter ................................................. 20 Chapter 3 Mechanical and Electric Installation......................................... 21 3.1 Mechanical Installation .................................................................... 21 3.2 Electrical Installation........................................................................ 22 Chapter 4 Operation and Display............................................................... 33 4.1 Keypad Description ......................................................................... 33 4.2 Function Code Checking and Modification Methods Description....... 34 4.3 Power-on Initialization...................................................................... 35 4.4 Fault Protection ............................................................................... 35 4.5 Stand By ......................................................................................... 36 4.6 Running........................................................................................... 36 4.7 Password Setting............................................................................. 36 4.8 Motor Parameters Autotuning .......................................................... 37 Chapter 5 Function Parameter List............................................................ 38 5.1 Basic Function Parameter Table ...................................................... 39 5.2 Monitoring Parameter Table............................................................. 84
  • 3. KE300X/KE300B Inverter 3 Chapter 6 Parameter Description............................................................... 87 Group P0 Basic Function....................................................................... 87 Group P1 Motor Parameters.................................................................. 96 Group P2 Vector Control Parameters..................................................... 98 Group P3 V/F Control Parameters....................................................... 100 Group P4 Input Terminal...................................................................... 104 Group P5 Output Terminal ....................................................................117 Group P6 Start and Stop Control ......................................................... 122 Group P7 Keypad and Display............................................................. 127 Group P8 Enhanced Function.............................................................. 133 Group P9 Fault and Protection ............................................................ 142 Group PA PID Function........................................................................ 148 Group PB Wobble Frequency, Fixed Length, Counting......................... 153 Group PC Multi-step Command and Simple PLC Function................... 155 Group PD Communication Parameters................................................ 159 Group PP Function Code Management ............................................... 159 Group A0 Torque Control Parameters.................................................. 160 Group U0 Monitoring Parameters ........................................................ 162 Chapter 7 Trouble Shooting ..................................................................... 170 7.1 Fault and Trouble Shooting............................................................ 170 7.2 Common Faults and Solutions....................................................... 178 Chapter 8 MODBUS Communication Protocol........................................ 180 8.1 About Protocol............................................................................... 180 8.2 Application Method ........................................................................ 180 8.3 Bus Structure................................................................................. 180 8.4 Protocol Description....................................................................... 181 8.5 Communication Data Structure...................................................... 181 8.6 Command Code and Communication Data Description.................. 182 8.7 PD Group Communication Parameter Description.......................... 190
  • 4. KE300X/KE300B Inverter 4 Chapter 1 Safety and Precautions Safety definition: In this manual, safety precautions are classified as follows: Danger: Operations which are not performed according to requirements may cause serious equipment loss or personnel injury. Caution: Operations which are not performed according to requirements may cause medium hurt or light hurt or material loss. During the installation, commissioning and maintenance of the system, please make sure to follow the safety and precautions of this chapter. In case of a result of illegal operations, caused any harm and losses is nothing to do with the company. 1.1 Safety Precautions 1.1.1 Before Installation: Danger  Do not use the water-logged inverter, damaged inverter or inverter with missing parts. Otherwise, there may be risk of injury.  Use the motor with Class B or above insulation. Otherwise, there may be risk of electric shock. Caution  Carefully handled when loading, otherwise it may damage the inverter.  Please don’t use the damaged driver or inverter with missing parts, there may be risk of injury.  Do not touch the electronic parts and components; otherwise it will cause static electricity. 1.1.2 During Installation:  Install the inverter on incombustible surface such as metal,
  • 5. KE300X/KE300B Inverter 5 Danger and keep away from flammable substances. Otherwise it may cause fire.  Do not loose the set screw of the equipment, especially the screws marked in RED. Caution  Do not drop the cable residual or screw in the inverter. Otherwise it may damage the inverter.  Please install the driver in the place where there is no direct sunlight or less vibratory.  When more than two inverters are to be installed in one cabinet, due attention should be paid to the installation locations (refer to Chapter 3 Mechanical and Electrical Installation) to ensure the heat sinking effect. 1.1.3 During Wiring: Danger  Operation should be performed by the professional engineering technician. Otherwise there will be danger of electric shock!  There should be circuit breaker between the inverter and power supply. Otherwise, there may be fire!  Make sure the power is disconnected prior to the connection. Otherwise there will be danger of electric shock!  The ground terminal should be earthed reliably. Otherwise there may be danger of electric shock. Caution  Never connect AC power to output UVW terminals. Please note the remark of the wiring terminals, connect them correctly. Otherwise may cause inverter damaged.  Ensure the wiring circuit can meet the requirement of EMC and the area safety standard. Please follow the instructions in the manual before wiring. Otherwise may cause injury or electric shock.  Never connect the braking resistor between DC bus (+), (-) terminals. Otherwise may cause fire.  Encoder must be used together with shielded wire, and
  • 6. KE300X/KE300B Inverter 6 ensure the single terminal of the shielded lay is connected with ground well. 1.1.4 Before Power-on: Danger  Please confirm whether the power voltage class is consistent with the rated voltage of the inverter and whether the I/O cable connecting positions are correct, and check whether the external circuit is short circuited and whether the connecting line is firm. Otherwise it may damage the inverter. The cover must be well closed prior to the inverter power-on. Otherwise electric shock may be caused.  The inverter is free from dielectric test because this test is performed prior to the delivery. Otherwise accident may occur. Caution  The cover must be well closed prior to the inverter power-on. Otherwise electric shock may be caused!  Whether all the external fittings are connected correctly in accordance with the circuit provided in this manual. Otherwise accident may occur! 1.1.5 After Power-on: Danger  Do not open the cover of the inverter upon power-on. Otherwise there will be danger of electric shock!  Do not touch the inverter and its surrounding circuit with wet hand. Otherwise there will be danger of electric shock!  Do not touch the inverter terminals (including control terminal). Otherwise there will be danger of electric shock!  At power-on, the inverter will perform the security check of the external heavy-current circuit automatically. Thus, at the moment please do not touch the terminals U, V and W, or the terminals of motor, otherwise there will be danger of electric shock. Caution  If parameter identification is required, due attention should be paid to the danger of injury arising from the rotating motor.
  • 7. KE300X/KE300B Inverter 7 Otherwise accident may occur!  Do not change the factory settings at will. Otherwise it may damage the equipment! 1.1.6 During Operation: Danger  Do not touch the fan or discharge resistor to sense the temperature. Otherwise, you may get burnt!  Detection of signals during the operation should only be conducted by qualified technician. Otherwise, personal injury or equipment damage may be caused! Caution  During the operation of the inverter, keep items from falling into the equipment. Otherwise, it may damage the equipment!  Do not start and shut down the inverter by connecting and disconnecting the contactor. Otherwise, it may damage the equipment! 1.1.7 During Maintain: Danger  Do not repair and maintain the equipment with power connection. Otherwise there will be danger of electric shock!  Be sure to conduct repair and maintenance after the charge LED indictor of the inverter is OFF. Otherwise, the residual charge on the capacitor may cause personal injury!  The inverter should be repaired and maintained only by the qualified person who has received professional training. Otherwise, it may cause personal injury or equipment damage!  Carry out parameter setting after replacing the inverter, all the plug-ins must be plug and play when power outage. 1.2 Precautions 1.2.1 Motor Insulation Inspection When the motor is used for the first time, or when the motor is reused after
  • 8. KE300X/KE300B Inverter 8 being kept, or when periodical inspection is performed, it should conduct motor insulation inspection so as to avoid damaging the inverter because of the insulation failure of the motor windings. The motor wires must be disconnected from the inverter during the insulation inspection. It is recommended to use the 500V megameter, and the insulating resistance measured should be at least 5MΩ. 1.2.2 Thermal Protection of the Motor If the ratings of the motor does not match those of the inverter, especially when the rated power of the inverter is higher than the rated power of the motor, the relevant motor protection parameters in the in the inverter should be adjusted, or thermal relay should be mounted to protect the motor. 1.2.3 Running with Frequency higher than Standard Frequency This inverter can provide output frequency of 0Hz to 3000Hz (KE300B, 0Hz~400Hz). If the user needs to run the inverter with frequency of more than 50Hz, please take the resistant pressure of the mechanical devices into consideration. 1.2.4 Vibration of Mechanical Device The inverter may encounter the mechanical resonance point at certain output frequencies, which can be avoided by setting the skip frequency parameters in the inverter. 1.2.5 Motor Heat and Noise Since the output voltage of inverter is PWM wave and contains certain harmonics, the temperature rise, noise and vibration of the motor will be higher than those at power frequency. 1.2.6 Voltage-sensitive Device or Capacitor Improving Power Factor at the Output Side Since the inverter output is PWM wave, if the capacitor for improving the power factor or voltage-sensitive resistor for lightning protection is mounted at the
  • 9. KE300X/KE300B Inverter 9 output side, it is easy to cause instantaneous over current in the inverter, which may damage the inverter. It is recommended that such devices not be used. 1.2.7 Switching Devices like Contactors Used at the Input and Output terminal If a contactor is installed between the power supply and the input terminal of the inverter, it is not allowed to use the contactor to control the startup/stop of the inverter. If such contactor is unavoidable, it should be used with interval of at least one hour. Frequent charge and discharge will reduce the service life of the capacitor inside the inverter. If switching devices like contactor are installed between the output end of the inverter and the motor, it should ensure that the on/off operation is conducted when the inverter has no output. Otherwise the modules in the inverter may be damaged. 1.2.8 Use under voltage rather than rated voltage If the KE300X/KE300B series inverter is used outside the allowable working voltage range as specified in this manual, it is easy to damage the devices in the inverter. When necessary, use the corresponding step-up or step-down instruments to change the voltage. 1.2.9 Change Three-phase Input to Two-phase Input It is not allowed to change the KE300X/KE300B series three-phase inverter into two-phase one. Otherwise, it may cause fault or damage to the inverter. 1.2.10 Lightning Impulse Protection The series inverter has lightning over current protection device, and has certain self-protection capacity against the lightning. In applications where lightning occurs frequently, the user should install additional protection devices at the front-end of the inverter. 1.2.11 Altitude and Derating In areas with altitude of more than 1,000 meters, the heat sinking effect of the inverter may turn poorer due to rare air. Therefore, it needs to derate the inverter for use. Please contact our company for technical consulting in case of
  • 10. KE300X/KE300B Inverter 10 such condition. 1.2.12 Certain Special Use If the user needs to use the inverter with the methods other than the recommended wiring diagram in this manual, such as shared DC bus, please consult our company. 1.2.13 Note of Inverter Disposal The electrolytic capacitors on the main circuit and the PCB may explode when they are burnt. Emission of toxic gas may be generated when the plastic parts are burnt. Please dispose the inverter as industrial wastes. 1.2.14 Adaptable Motor 1) The standard adaptable motor is four-pole squirrel-cage asynchronous induction motor. If such motor is not available, be sure to select adaptable motors in according to the rated current of the motor. In applications where drive permanent magnetic synchronous motor is required, please consult our company; 2) The cooling fan and the rotor shaft of the non-variable-frequency motor adopt coaxial connection. When the rotating speed is reduced, the cooling effect will be poorer. Therefore, a powerful exhaust fan should be installed, or the motor should be replaced with variable frequency motor to avoid the over heat of the motor. 3) Since the inverter has built-in standard parameters of the adaptable motors, it is necessary to perform motor parameter identification or modify the default values so as to comply with the actual values as much as possible, or it may affect the running effect and protection performance; 4) The short circuit of the cable or motor may cause alarm or explosion of the inverter. Therefore, please conduct insulation and short circuit test on the newly installed motor and cable. Such test should also be conducted during routine maintenance. Please note that the inverter and the test part should be completely disconnected during the test.
  • 11. KE300X/KE300B Inverter 11 Chapter 2 Product Information 2.1 Product Inspection Checking the following items when receiving the inverter Confirmation Items Method Confirm if the inverter is what you ordered Check name plate Damaged or not Inspect the entire exterior of the inverter to see if there are any scratches or other damage resulting from shipping Confirm if the fastening parts (screws, etc.) are loose or not Check with a screw driver if necessary User’s manual, certification and other spares User’s manual and the relative spares Please contact the local agent or our company directly if there is any damage on the inverter. 2.2 Model Description KE300X–1R5G - S2 General purpose mini size inverter Power rating: 0R7:0.75kW 1R5:1.5kW G: constant torque Input voltage: S2:Single phase 220V T2:Three phase 220V Figure 2-1 KE300X Model description
  • 12. KE300X/KE300B Inverter 12 KE300B–1R5G–T4 General purpose inverter Power rating: 0R7:0.75kW 1R5:1.5kW G: constant torque Input voltage: S2:Single phase 220V T4:Three phase 380V Figure 2-2 KE300B Model description 2.3 Description of Nameplate Figure 2-3 Nameplate 2.4 Selection Guide Table 2-1 KE300X/KE300B series Inverter Model and Technical Data Inverter Model Motor Rated Input Current (A) Rated Output Current (A) kW HP KE300X 1AC 220~240V ±15% KE300X-0R4G-S2 0.4 0.5 5.4 2.3 KE300X-0R7G-S2 0.75 1 8.2 4 KE300X-1R5G-S2 1.5 2 14 7 KE300X 3AC 220~240V ±15% KE300X-0R4G-T2 0.4 0.5 3.4 2.3 Model No. Power rating Input specification Output specification Bar code
  • 13. KE300X/KE300B Inverter 13 KE300X-0R7G-T2 0.75 1 5 4 KE300X-1R5G-T2 1.5 2 7.7 7 KE300B 1AC 220~240V ±15% KE300B-0R4G-S2 0.4 0.5 6.5 2.6 KE300B-0R7G-S2 0.75 1 11 4.6 KE300B-1R5G-S2 1.5 2 18 8 KE300B-2R2G-S2 2.2 3 27 11 KE300B 3AC 380~415V ±15% KE300B-0R7G-T4 0.75 1 4.5 3.4 KE300B-1R5G-T4 1.5 2 5.5 4.8 KE300B-2R2G-T4 2.2 3 6.5 5.5 KE300B-004G-T4 4.0 5 11 9.5 2.5 Technical Specifications Table 2-2 KE300X series Mini Size Inverter Technical Specifications Item Technical Index Specification Input Input voltage 1AC/3AC 220V±15%, 3AC 380V±15% Input frequency 47~63Hz Output Output voltage 0~rated input voltage Output frequency KE300X: V/f control: 0~3000Hz Sensorless vector control: 0~300Hz KE300B: 0~300Hz Control Features Control mode V/f control(KE300X & KE300B-S2) Sensorless vector control (KE300X & KE300B-T4) Torque control (KE300X) Operation command mode Keypad control Terminal control Serial communication control Frequency setting mode Digital setting, analog setting, pulse frequency setting, serial communication setting, multi-step speed setting & simple PLC, PID setting, etc. These frequency settings can be combined & switched in various modes.
  • 14. KE300X/KE300B Inverter 14 Overload capacity 150% 60s, 180% 10s, 200% 3s Starting torque 0.5Hz/150% (SVC); 1Hz/150% (V/f) Speed adjustment range 1:100 (SVC), 1:50 (V/f) Speed control precision ±0.5% (SVC) Carrier frequency 1.0--16.0kHz, automatically adjusted according to temperature and load characteristics Frequency accuracy Digital setting: 0.01Hz Analog setting: maximum frequency * 0.05% Torque boost Automatically torque boost; manually torque boost: 0.1%~30.0% V/f curve Three types: linear, multiple point and square type (1.2 power, 1.4 power, 1.6 power, 1.8 power, square) Acceleration/d eceleration mode Straight line/S curve; four kinds of acceleration/deceleration time, range: 0.1s~3600.0s DC braking DC braking when starting and stopping DC braking frequency: 0.0Hz~maximum frequency, braking time: 0.0s~100.0s Jog operation Jog operation frequency: 0.0Hz~maximum frequency Jog acceleration/deceleration time: 0.1s~3600.0s Simple PLC & multi-step speed operation It can realize a maximum of 16 segments speed running via the built-in PLC or control terminal. Built-in PID Built-in PID control to easily realize the close loop control of the process parameters (such as pressure, temperature, flow, etc.) Automatic voltage regulation Keep output voltage constant automatically when input voltage fluctuating
  • 15. KE300X/KE300B Inverter 15 Control Function Common DC bus Common DC bus for several inverters, energy balanced automatically Torque control Torque control without PG Torque limit “Rooter” characteristics, limit the torque automatically and prevent frequent over-current tripping during the running process Wobble frequency control Multiple triangular-wave frequency control, special for textile Timing/length/ counting control Timing/length/counting control function Over-voltage & over-current stall control Limit current & voltage automatically during the running process, prevent frequent over-current & over-voltage tripping Fault protection function Up to 30 fault protections including over-current, over-voltage, under-voltage, overheating, default phase, overload, shortcut, etc., can record the detailed running status during failure & has fault automatic reset function Input/ output terminals Input terminals Programmable DI: 5 on-off inputs (KE300B: 4), 1 high-speed pulse input 1 programmable AI1: 0~10V or 0/4~20mA Output terminals 1 programmable open collector output: 1 analog output (KE300X: open collector output or high-speed pulse output) 1 relay output 1 analog output: 0/4~20mA or 0~10V Communicatio n terminals Offer RS485 communication interface, support MODBUS-RTU communication protocol Human machine interface LED display Display frequency setting, output frequency, output voltage, output current, etc. Multifunction key QUICK/JOG key, can be used as multifunction key Environ- ment Ambient temperature -10℃~40℃, derated 4% when the temperature rise by every 1℃ (40℃~50℃).
  • 16. KE300X/KE300B Inverter 16 Humidity 90%RH or less (non-condensing) Altitude ≤1000M: output rated power, >1000M: output derated Storage temperature -20℃~60℃ 2.6 External & Installation Dimensions 2.6.1 KE300X External & Installation Dimensions 2.6.2 KE300X Keypad External Dimension Keypad dimension 58 76 30.2 5 0 .0 0 50.00 78 73 73 M4 Grounding 124.8 121.8 148.4 140 128
  • 17. KE300X/KE300B Inverter 17 Illustration: This keypad can be connected with the inverter externally by ordinary network cable, also can be mounted on the front side of panel directly. The suggested thickness of panel is 1.2mm. The installation size on the panel 2.6.3 KE300B External & Installation Dimensions KE300B can be installed on the guide rail; the dimension of the guide rail is as follow: 55.4 73.4
  • 18. KE300X/KE300B Inverter 18 2.7 Routine Maintenance of Inverter 2.7.1 Routine Maintenance The influence of the ambient temperature, humidity, dust and vibration will cause the aging of the devices in the inverter, which may cause potential fault of the inverter or reduce the service life of the inverter. Therefore, it is necessary to carry out routine and periodical maintenance on the inverter. Routine inspection Items include: 1) Whether there is any abnormal change in the running sound of the motor; 2) Whether the motor has vibration during the running; 3) Whether there is any change to the installation environment of the inverter; 4) Whether the inverter cooling fan works normally; 5) Whether the inverter has over temperature. Routine cleaning: 1) The inverter should be kept clean all the time. 2) The dust on the surface of the inverter should be effectively removed, so as to prevent the dust entering the inverter. Especially the metal dust is not allowed. 3) The oil stain on the inverter cooling fan should be effectively removed. 2.7.2 Periodic Inspection Please perform periodic inspection on the places where the inspection is a difficult thing. Periodic inspection Items include: 1) Check and clean the air duct periodically; 2) Check if the screws are loose; 3) Check if the inverter is corroded;
  • 19. KE300X/KE300B Inverter 19 4) Check if the wire connector has arc signs; 5) Main circuit insulation test. Remainder: When using the megameter (DC 500V megameter recommended) to measure the insulating resistance, the main circuit should be disconnected with the inverter. Do not use the insulating resistance meter to test the insulation of control circuit. It is not necessary to conduct the high voltage test (which has been completed upon delivery). 2.7.3 Replacement of Vulnerable Parts for Inverter The vulnerable parts of the inverter include cooling fan and filter electrolytic capacitor, whose service life depends on the operating environment and maintenance status. General service life is shown as follows: Part Name Service Life Fan 2~3 years Electrolytic capacitor 4~5 years The user can determine the year of replacement according to the operating time. 1) Cooling fan Possible reason for damage: Bearing is worn and blade is aging. Judging criteria: Whether there is crack on the blade and whether there is abnormal vibration noise upon startup. 2) Filter electrolytic capacitor Possible reason for damage: Input power supply in poor quality, high ambient temperature, frequent load jumping, and electrolyte aging. Judging criteria: Whether there is liquid leakage and whether the safe valve has projected, and measure the static capacitance, and the insulating resistance. 2.7.4 Storage of Inverter Upon acquiring the inverter, the user should pay attention to the following points regarding the temporary and long-term storage of the inverter: 1) Pack the inverter with original package and place back into the packing box
  • 20. KE300X/KE300B Inverter 20 of our company. 2) Long-term storage will degrade the electrolytic capacitor. Thus, the product should be powered up once every 2 years, each time lasting at least five hours. The input voltage should be increased slowly to the rated value with the regulator. 2.8 Instructions on Warranty of Inverter Free warranty only applies to the inverter itself. 1) MICNO provides 12 month warranty (starting from the date of original shipment as indicated on the barcode) for the failure or damage under normal use conditions. If the equipment has been used for over 12 months, reasonable repair expenses will be charged. 2) Reasonable repair expenses will be charged for the following situations within 12 months: a) The equipment is damaged because the user fails to comply with the requirements of the user’s manual; b) Damage caused by fire, flood and abnormal voltage; 3) Damage caused when the inverter is used for abnormal function. The service expenses will be calculated according to the standard of the manufacturer. If there is any agreement, the agreement should prevail.
  • 21. KE300X/KE300B Inverter 21 Chapter 3 Mechanical and Electric Installation 3.1 Mechanical Installation 3.1.1 Installation environment 1) Ambient temperature: The ambient temperature exerts great influences on the service life of the inverter and is not allowed to exceed the allowable temperature range (-10℃ to 50℃). 2) The inverter should be mounted on the surface of incombustible articles, with sufficient spaces nearby for heat sinking. The inverter is easy to generate large amount of heat during the operation. The inverter should be mounted vertically on the base with screws. 3) The inverter should be mounted in the place without vibration or with vibration of less than 0.6G, and should be kept away from such equipment as punching machine. 4) The inverter should be mounted in locations free from direct sunlight, high humidity and condensate. 5) The inverter should be mounted in locations free from corrosive gas, explosive gas or combustible gas. 6) The inverter should be mounted in locations free from oil dirt, dust, and metal powder. Single Unit Installation Diagram Installation Diagram of Upper and Down Parts Figure 3-1 Installation Diagram B A A 50.00 B 50.00 50.00 100mm
  • 22. KE300X/KE300B Inverter 22 3.1.2 Heat dissipation should be taken into account during the mechanical installation. Please pay attention the following items: 1) Install the inverter vertically so that the heat may be expelled from the top. However, the equipment cannot be installed upside down. If there are multiple inverters, parallel installation is a better choice. In applications where the upper and lower inverters need to be installed, please refer to Figure 3-1 “Installation Diagram” and install an insulating splitter. 2) The mounting space should be as indicated as Figure 3-1, so as to ensure the heat dissipation space of the inverter. However, the heat dissipation of other devices in the cabinet should also be taken into account. 3) The installation bracket must be flame retardant. 4) In the applications where there are metal dusts, it is recommended to mount the radiator outside the cabinet. In this case, the space in the sealed cabinet should be large enough. 3.2 Electrical Installation 3.2.1 Guide to the external electrical parts Table 3-1 Selection Guide of External Electrical Parts Inverter Model Circuit Break -er (MCCB) (A) Recomme- nded Contactor (A) Recommend- ed Conducting Wire of Main Circuit at Input Side (mm2) Recommend- ed Conducting Wire of Main Circuit at Output Side (mm2) Recommend -ed Conducting Wire of Control Circuit (mm2) KE300X 1AC 220V KE300X-0R4G-S2 16 10 2.5 2.5 0.5 KE300X-0R7G-S2 16 10 2.5 2.5 0.5 KE300X-1R5G-S2 20 16 4.0 2.5 0.5 KE300X 3AC 220V KE300X-0R4G-T2 10 10 2.5 2.5 0.5 KE300X-0R7G-T2 16 10 2.5 2.5 0.5 KE300X-1R5G-T2 16 10 2.5 2.5 0.5 KE300B 1AC 220V
  • 23. KE300X/KE300B Inverter 23 KE300B-0R4G-S2 10 9 0.75 0.75 0.5 KE300B-0R7G-S2 16 12 1.5 0.75 0.5 KE300B-1R5G-S2 32 25 2.5 1.5 0.5 KE300B-2R2G-S2 40 32 4.0 2.5 0.5 KE300B 3AC 380V KE300B-0R7G-T4 10 9 0.75 0.75 0.5 KE300B-1R5G-T4 10 9 1.5 0.75 0.5 KE300B-2R2G-T4 10 9 2.5 1.5 0.5 KE300B-004G-T4 16 12 4.0 2.5 0.5 3.2.2 Connection to peripheral devices
  • 24. KE300X/KE300B Inverter 24 Figure3-2 Diagram of the connection to peripheral devices  Do not install the capacitor or surge suppressor at the output side of the inverter, otherwise it may cause inverter failure or capacitor and surge suppressor damaged.  The Inverter input / output (main circuit) contains harmonic components, it may interfere with inverter accessories communications equipment. Therefore, please install anti-interference filter to minimize interference.  The details of external devices and accessories selection refer to the manual of external devices. 3.2.3 Using instruction of the external electrical parts Table 3-2 Using Instruction of the External Electrical Parts Part Name Installing Location Function Description Circuit breaker Front end of input circuit Disconnect the power supply when the equipment at the lower part is over current. Contactor Between the circuit breaker and the inverter input side Connection and disconnection of inverter. Frequent power-on and power-off operations on the inverter should be id d AC input reactor Input side of the inverter Improve the power factor of the input side; Eliminate the higher harmonics of the input side effectively and prevent other equipment from damaging due to distortion of voltage wave. Eli i t th i t t b l d EMC input filter Input side of the inverter Reduce the external conduction and radiation interference of the inverter. Decrease the conduction interference flowing from the power end to the inverter and improve the anti-interference capacity DC reactor DC reactor is optional for inverters above 18.5kW Improve the power factor of the input side; Improve the whole efficiency and thermal stability of the inverter. Eliminate the impact of higher harmonics of the input side on the inverter and reduce th t l d ti d di ti
  • 25. KE300X/KE300B Inverter 25 AC output reactor Between the inverter output side and the motor, close to the inverter Between the inverter output side and the motor. close to the inverter The inverter output side generally has higher harmonics. When the motor is far from the inverter, since there are many distributed capacitors in the circuit, certain harmonics may cause resonance in the circuit and bring about the following two impacts: Degrade the motor insulation performance and damage the motor for the long run. Generate large leakage current and cause 3.2.4 Wiring diagram +24V PLC HDO COM 3AC(1AC) 220 15% 50/60Hz + - Instantaneous shortcut protection circuit R S T Multifunctional On-off input 1 D1 D2 D4 D3 COM PE +10V Power supply for frequency setting AI1 Analog output 1 Frequency setting GND PE W V U MOTOR GND AO1 0-10V/4-20mA Analog output 1 0.4-1.5kW Inverter T1/C T1/A T1/B Relay output 1 1K¦ Έ -5K¦ Έ 0-10Vinput/4-20mA 485+ 485- V I Jumper J1 I V Multifunctional On-off input 2 Multifunctional On-off input 3 Multifunctional On-off input 4 Jumper J2 High-speed pulse output or open collector output HDI/D6 High-speed pulse input or open collector input Multifunctional On-off input 5 D5 (L) (N)
  • 26. KE300X/KE300B Inverter 26 Figure 3-3 KE300X Wiring Diagram Figure 3-4 KE300B Wiring Diagram Note: 1. Terminal ◎ refers to the main circuit terminal; terminal ○ refers to the control circuit terminal. 2. Braking unit is standard build-in. 3. Braking resistor is optional for user. 3.2.5 Main circuit terminals and connections 485- 485+ 0-10V Input T1/A T1/C KE300B Inverter 0-10V AO1 GND MOTOR U V W PE GND +10V PE COM D3 D4 D2 D1 T S R (L) (N) Power supply for frequency setting 1K¦ Έ -5K¦ Έ Multifunctional 0n-off input 1 Multifunctional 0n-off input 2 Multifunctional 0n-off input 3 Multifunctional 0n-off input 4 - + 1 AC/3AC 220 15% 380 15% 50/60Hz AI Analog input frequency setting Relay output Analog output + - PLC +24V
  • 27. KE300X/KE300B Inverter 27 Danger  Make sure that the power switch is at OFF status prior to perform wiring connection. Otherwise there may be danger of electric shock!  Only the qualified and trained personnel can perform wiring connection. Otherwise it may cause equipment and human injuries!  It should be earthed reliably. Otherwise there may be danger of electric shock or fire! Caution  Make sure that the rated value of the input power supply is consistent with that of the inverter. Otherwise it may damage the inverter!  Make sure that the motor matches the inverter. Otherwise it may damage the motor or generate inverter protection!  Do not connect the power supply to the terminals of U, V and W. Otherwise it may damage the inverter!  Do not directly connect the brake resistor between the DC bus terminals (+) and (-). Otherwise it may cause fire! 1) Main circuit terminals Figure 3-5 Main circuit terminals (KE300X 1AC 220V, 0.4~1.5kW) Figure 3-6 Main circuit terminals (KE300X 3AC 220V, 0.4~1.5kW) Figure 3-7 Main circuit terminals b R W V U PB (+) N L b R T W V U PB (+) S R
  • 28. KE300X/KE300B Inverter 28 (KE300B 1AC 220V, 0.4~2.2kW; 3AC 380, 0.75~4.0kW) 2) Instructions of main circuit terminals Terminal Name Description L, N R, S, T Input terminal of power supply Connect to AC power (+) , PB Connection terminals of brake resistor Connection terminals of brake resistor U, V, W Output terminal of inverter Connect to the three phase motor Earth terminal Earth connection terminal Precautions on Wiring: a) Input power terminals L, N and R, S, T There is no phase sequence requirement for the cable connection at the input side of the inverter, b) Connecting terminals (+) and PB of brake resistor: The connecting terminals of the brake resistor are effective only for the inverter of less than 30kW with built-in brake unit. The prototype of brake resistor can refer to the recommended value and the wiring length should be less than 5 meters. Otherwise it may damage the inverter. c) Terminals U, V, W at the output side of the inverter: The inverter output side cannot connect to the capacitor or surge absorber. Otherwise, it may cause frequent inverter protection and even damage the inverter. In case the motor cable is too long, it may generate electrical resonance easily due to the impact of distributed capacitance, thus damaging the motor insulation or generating higher leakage current to invoke over current protection of the inverter. When the length of motor cable is longer than 100 meters, it needs to install a AC output reactor. d) Earth terminal PE :
  • 29. KE300X/KE300B Inverter 29 This terminal should be earthed reliably, with resistance of earth cable of less than 0.1Ω. Otherwise, it may cause fault or damage the inverter. Do not share the earth terminal and zero line of the power supply. 3.2.6 Control terminals and connections 1) Control circuit terminals AO1 RS485+ RS485- COM PLC +24V D4 HDO AI1 GND +10V D1 D2 D3 D5 HDI T1A T1B T1C Figure 3-8 KE300X Control Circuit Terminals Figure 3-9 KE300B Control Circuit Terminals 2) Function description of control terminal Table 3-3 Description of Control Terminal Function Type Terminal Symbol Terminal Name Function Description Power Supply +10V~ GND External +10V power Provide +10V power supply for external units, and the maximum output current is 10mA. It is generally used as the operating power supply for the external potentiometer. The potentiometer resistance range is 1kΩ~5kΩ. +24V~ COM External +24V power Provide +24V power supply for external units. It is generally used as the operating power supply for digital input/output terminals and the external sensor. The maximum output current is 200mA. PLC External power input terminal Connect to 24V by default upon delivery When external signal is used to drive D1 ~ D6, and HDI, PLC needs to connect to the external power supply and disconnect from the +24V power terminal Analog Input AI1~GND Analog input terminal 1 1. Input range: DC 0V~10V/4mA~20mA, determined by J1 jumper on the control board. 2. Input impedance: 22kΩ (voltage); 500Ω(current) TA TC COM 485+ 485- D1 D2 D3 D4 PLC +24V +10V AI1 AO1 GND
  • 30. KE300X/KE300B Inverter 30 Digital Input D1 Digital input 1 1. Optical coupling isolation, compatible with dual polarity input 2. Input impedance: 4.7kΩ 3. Voltage range for level input: 9V ~ 30V D2 Digital input 2 D3 Digital input 3 D4 Digital input 4 D5 Digital input 5 HDI/D6~ COM High-speed pulse input terminal In addition to the characteristics of D1 to D5, it can also be used as the high speed pulse input channel. Maximum input frequency is 100kHz Analog Output AO1~ GND Analog output 1 The voltage or current output is determined by J3 jumper on the control board. Output voltage range: 0V ~ 10V. Output Digital Output HDO~ CME High speed pulse output / open collector output It can be used as high speed pulse output or open collector output which is determined by function code P5-00. High speed pulse output: maximum frequency is 100kHz Open collector output :Optical coupling isolation, dual polarity Output voltage range: 0V~24V Output current range: 0mA~50mA Relay Output 1 T1B-T1C Normally closed terminal Driving capacity: AC 250V, 3A, COSø=0.4 DC 30V, 1A T1A-T1C Normally open terminal 3) Description of connection of control terminals a) Analog input terminal Since the weak analog voltage signal is easy to suffer external interferences, it needs to employ shielded cable generally and the length should be no longer than 20 meters, as shown in Figure 3-10. In case the analog signal is subject to severe interference, and filter capacitor or ferrite magnetic core should be installed at analog signal source side, as shown in Figure 3-11.
  • 31. KE300X/KE300B Inverter 31 Figure 3-10 Connection of analog input Figure 3-11 Connection of analog Input b) Digital input terminal It needs to employ shielded cable generally, with cable length of no more than 20 meters. When active driving is adopted, necessary filtering measures should be taken to prevent the interference to the power supply. It is recommended to use the contact control mode. D1~D6 terminal connection: NPN type less than 20 meters Potentiometer PE GND AI1 +10V 0.022uF,50V C External analog source Cross in the same direction or wind 2 or 3 coils in the same direction Ferrite bead AI1 GND
  • 32. KE300X/KE300B Inverter 32 This is the most commonly used wiring connection, if external power supply is used, the +24V terminal must disconnect with PLC terminal. The positive pole of external power supply should connect with PLC terminal, and the negative pole connects with COM. D1~D6 terminal connection: PNP type In this type, +24V terminal must disconnect with PLC terminal, +24V should connect the common port of external controller, and meantime short connect PLC and COM. External controller NPN 3.3Ω 0V COM +VCC Signal +24 +24 D 3.3k 3.3K D PLC Control board of inverter External controller PNP COM +VCC +24V +24V D5 4.7K 4.7K D1 Control board of inverter 0V Signal 3.3 Ω PLC
  • 33. KE300X/KE300B Inverter 33 Chapter 4 Operation and Display 4.1 Keypad Description With the operation keypad, it can perform such operations on the inverter as function parameter modification, working status monitor and running control (start and stop). Figure4-1 Operation Keypad Diagram 1) Function key description Function indicator Description RUN Extinguished: stop status Light on: operating status FWD/REV Extinguished: forward operation Light on: reverse operation LOCAL/REMOT Extinguished: keypad control Flickering: communication control Light on: terminal control TUNE/TRIP Light on: torque control Flickering slowly: parameter autotuning status Flickering quickly: fault status
  • 34. KE300X/KE300B Inverter 34 2) Unit indictor light description Unit indictor Description Hz Frequency unit A Current unit V Voltage unit RPM Rotation speed unit % Percentage 3) Digital display zone Five-number digit LED display, can display setting frequency, output frequency, various monitoring data and alarm code. 4) Keypad button description Button Name Function PRG/ESC Programming Entry and exit of primary menu DATA/ENT ER Confirmation key Progressively enter menu, and confirm parameters Increment key Progressively increase of data or function codes Decrement key Progressively decrease of data or function Shift key Select the displayed parameters in turn on the stop display interface and running display interface, and select the modification bit of parameters when modifying parameters. RUN Running key Start to run inverter under keyboard control d STOP/RS T Stop/reset Stop inverter in running status and reset operation in fault alarm status. The button’s characteristics are restricted by function code P7-02. QUICK/JO G Multi-function selection key According to P7-01, take function switching selection. 4.2 Function Code Checking and Modification Methods Description The operation keypad of the KE300X series Inverter adopts three-level menu structure to carry out operations such as parameter setting.
  • 35. KE300X/KE300B Inverter 35 The three-level menu includes function parameter group (level 1 menu) → Function code (level 2 menu) → Function code setting value (level 3 menu). Refer to Figure 4-2 for the operation procedure. Figure 4-2 Operation Procedure of Three-level Menu Description: When operating on level 3 menu, press PRG key or ENTER key to return to level 2 menu. The difference between PRG key and ENTER key is described as follows: Pressing ENTER KEY will save the setup parameter and return to the level 2 menu and then automatically shift to the next function code, while pressing PRG key will directly return to level 2 menu without saving the parameter, and it will return to the current function code. Example: Modify the function code P3-02 from 10.00Hz to 15.00Hz. (The bold-type word indicates the flashing bit.) In level 3 menu, if there is no flashing bit, it indicates that the function code cannot be modified. The possible reasons include: 1) The function code is an unchangeable parameter, such as actual detection parameter, running record parameter, etc. 2) The function code cannot be modified in running status. It can be modified only after the unit is stopped. 4.3 Power-on Initialization Firstly the system initializes during the inverter power-on, and LED displays “8.8.8.8.8.8”. After initialization, the inverter is in fault protection status if a fault happens, or the inverter is in stand-by status. 4.4 Fault Protection Setting value modification PRG PRG ENTER PRG Zero level menu First level menu Second level menu Third level menu Function code modification 50.00 P0 P0-08 30.00 ENTER PRG Parameter code modification PRG PRG ENTER PRG 50.00 P0 P3 P3.00 P3-02 010.00 010.00 015.00 P3-03 P3 PRG ENTER
  • 36. KE300X/KE300B Inverter 36 In fault status, inverter will display fault code & record output current, output voltage, etc. For details, please refer to P9 (fault and protection) parameter group. Fault can be reset via STOP/RST key or external terminals. 4.5 Stand By In stop or stand by status, parameters of multi-status can be displayed. Whether or not to display this parameter can be chosen through function code P7-05 (Stop status display parameter) according to binary bits. In stop status, there are thirteen parameters can be chosen to display or not. They are: setting frequency, bus voltage, DI input status, DO output status, analog input AI1 voltage, radiator temperature, count value, actual length, PLC running step, load speed display, PID setting, HDI input pulse frequency. The displaying of the chosen parameters can be switched in sequence by press “ ” button. Power on after power-off, the displayed parameters would be default considered as the chosen parameters before power-off. 4.6 Running In running status, there are thirty two parameters can be chosen to display or not through function code P7-04 (running status display parameter 2) according to binary bits. They are: running frequency, setting frequency, DC bus voltage, output voltage, output current, output torque, DI input status, DO output status, analog input AI1 voltage, radiator temperature, actual count value, actual length, line speed, PID setting, PID feedback, etc. The displaying of the chosen parameters can be switched in sequence by pressing “ ” button. 4.7 Password Setting The inverter provides user password protection function. When PP-00 is set to non-zero value, it indicates the user password, and the password protection turns valid after exiting the function code editing status. When pressing PRG key again, “------“ will be displayed, and common menu cannot be entered until user password is input correctly. To cancel the password protection function, enter with password and set PP-00 to “0”.
  • 37. KE300X/KE300B Inverter 37 4.8 Motor Parameters Autotuning To select the vector control running mode, it must input the nameplate parameter of the motor accurately prior to the running of the inverter. The Inverter will select standard motor parameters matching the nameplate parameter. Since the vector control mode relies highly on the motor parameters, it must acquire the accurate parameters of the controlled motor to ensure the good control performance. The procedures for the automatic tuning of motor parameters are described below: First, select the command source (P0-02) as the command channel of the operation keypad. Second, input the following parameters in accordance with the actual motor parameters: P1-01: Rated motor power P1-02: Rated motor voltage P1-03: Rated motor current P1-04: Rated motor frequency P1-05: Rated rotation speed of motor If the motor is completely disconnected from the load, set P1.11 to “2” (complete tuning), and press RUN key on the keyboard keypad, then the inverter will automatically calculate the following parameters: P1-06: Stator resistance P1-07: Rotor resistance P1-08: Leakage inductance P1-09: Mutual inductance P1-10: Current without load Finally, complete the automatic tuning of motor parameters. If the motor cannot be completely disconnected with the load, set P1-11 to “1” (static tuning), and then press RUN key on the keyboard panel. The following motor parameters can be calculated automatically: P1-06: Stator resistance P1-07: Rotor resistance P1-08: Leakage inductive reactance
  • 38. KE300X/KE300B Inverter 38 Chapter 5 Function Parameter List The function parameters of KE300X series inverter have been divided into 19 groups including P0~PP, A0, U0 according to the function. Each function group contains certain function codes. For example, “P1-10” means the tenth function code in the P1 function group. P0~PE are basic function parameter groups; PF is factory parameter group (users are forbidden to access); A0 is torque control function parameter group; U0 is monitor function parameter group. If PP-00 is set to non-zero value, it means parameter protection password is set, and the parameter menu cannot be entered until correct password is input. To cancel the password, please set PP-00 to “0”. A0 and U0 are default hidden parameter groups, which can be displayed by modifying PP-02. The instruction of the symbols in function parameter list is as following: “○”:means that the parameter setting value can be modified on stop and running status. “◎”:means that the parameter setting value cannot be modified on the running status. “●”:means that the value of the parameter is the real detection value which cannot be modified.
  • 39. KE300X/KE300B Inverter 39 5.1 Basic Function Parameter Table Function code Name Detailed instruction Factory default Modify P0 Group: Basic Function P0-00 Inverter model 1: G model (constant torque load model) 2: Reserved 1 ◎ P0-01 Control mode 0: V/F control 1: Sensorless vector control 0 ◎ P0-02 Running command source 0: Keypad (LED OFF) 1: Terminal (LED ON) 2: Communication (LED flickers) 0 ◎ P0-03 Main frequency source A selection 0: Keypad (P0-08, UP and DOWN Adjustable, non-recorded) 1: Keypad (P0-08, UP and DOWN Adjustable, recorded) 2: Al1 3: Reserved 4: Keypad potentiometer 5: High speed pulse (HDI) 6: Multi-step speed 7: Simple PLC 8: PID 9: Communication 1 ◎ P0-04 Auxiliary frequency source B selection The same as P0-03 0 ◎ P0-05 Reference of 0: Relative to maximum 0 ○
  • 40. KE300X/KE300B Inverter 40 Function code Name Detailed instruction Factory default Modify Frequency source B frequency 1: Relative to frequency source A P0-06 Range of Auxiliary Frequency source B 0%~150% 100% ○ P0-07 Frequency source selection Units place: frequency source selection 0: Main frequency source A 1: Calculation result of frequency A and B (determined by tens place) 2: Switching between A and B 3: Switching between A and calculation result 4: Switching between B and calculation result Tens place: calculation relationship between frequency A and B 0: A + B 1: A - B 2: Max (A, B) 3: Min (A, B) 00 ○ P0-08 Keypad reference frequency 0.00Hz ~ maximum frequency:P0-10 50.00Hz ○ P0-09 Running 0: Forward 0 ○
  • 41. KE300X/KE300B Inverter 41 Function code Name Detailed instruction Factory default Modify direction selection 1: Reverse P0-10 Maximum frequency 50.00Hz ~ 300.00Hz 50.00Hz ◎ P0-11 Frequency source upper limit 0: P0-12 1: AI1 2: Reserved 3: Keypad potentiometer 4: HDI 5: Communication 0 ◎ P0-12 Frequency upper limit P0-14 (frequency lower limit) ~ P0-10 (max. frequency) 50.00Hz ○ P0-13 Frequency upper limit offset 0.00Hz ~ P0-10 (max. frequency) 0.00Hz ○ P0-14 Frequency lower limit 0.00Hz ~ P0-12 (frequency upper limit) 0.00Hz ○ P0-15 Carrier frequency 1.0kHz ~ 16.0kHz Model depend ○ P0-16 Carrier frequency adjusting according to temperature 0: No 1: Yes 1 ○ P0-17 Acceleration time 1 0.01s ~ 36000s Model depend ○ P0-18 Deceleration time 1 0.01s ~ 36000s Model depend ○ P0-19 ACC/DEC time unit 0: 1s 1: 0.1s 2: 0.01s 1 ◎ P0-21 Auxiliary 0.00Hz ~ P0-10 (max. 0.00Hz ○
  • 42. KE300X/KE300B Inverter 42 Function code Name Detailed instruction Factory default Modify frequency source offset frequency when combination frequency) P0-22 Frequency command resolution 1: 0.1Hz 2: 0.01Hz 2 ◎ P0-23 Digital setting frequency storage selection when stop 0: Not store 1: store 1 ○ P0-24 Reserved ● P0-25 ACC/DEC time reference frequency 0: P0-10 (max. frequency) 1: Setting frequency 2: 100Hz 0 ◎ P0-26 Running frequency command UP/DN reference 0: Running frequency 1: Setting frequency 0 ◎ P0-27 Command source combination with frequency source Units place: Operation keypad command combination with frequency source 0: No combination 1: Keypad 2: AI1 3: Reserved 4: Keypad potentiometer 5: High speed pulse HDI 6: Multi-step speed 7: Simple PLC 000 ○
  • 43. KE300X/KE300B Inverter 43 Function code Name Detailed instruction Factory default Modify 8: PID 9: Communication Tens place: Terminal command combination with frequency source Hundreds place: Communication command combination with frequency source P1 Group: Motor Parameters P1-00 Motor type 0: Common asynchronous motor 1: Variable frequency asynchronous motor 0 ◎ P1-01 Rated power 0.1kW ~ 1000.0kW Model depend ◎ P1-02 Rated voltage 1V ~ 2000V Model depend ◎ P1-03 Rated current 0.01A ~ 655.35A Model depend ◎ P1-04 Rated frequency 0.00Hz ~ P0-10 (max. frequency) Model depend ◎ P1-05 Rated speed 1rpm ~ 36000rpm Model depend ◎ P1-06 Stator resistance 0.001Ω ~ 65.535Ω Motor parameter ◎ P1-07 Rotor resistance 0.001Ω ~ 65.535Ω Motor parameter ◎ P1-08 Leakage inductance 0.01mH ~ 655.35mH Motor parameter ◎ P1-09 Mutual inductance 0.01mH ~ 655.35mH Motor parameter ◎
  • 44. KE300X/KE300B Inverter 44 Function code Name Detailed instruction Factory default Modify P1-10 No-load current 0.01A ~ P1-03 (rated current) Motor parameter ◎ P1-11 Parameters autotuning 0: No action 1: Static autotuning 2: Rotation autotuning 0 ◎ P2 Group: Vector Control Parameters P2-00 Speed loop proportional gain 1 1 ~ 100 30 ○ P2-01 Speed loop integration time 1 0.01s ~ 10.00s 0.50s ○ P2-02 Low switching frequency 0.00 ~ P2-05 5.00Hz ○ P2-03 Speed loop proportional gain 2 1 ~ 100 20 ○ P2-04 Speed loop integration time 2 0.01s ~ 10.00s 1.00s ○ P2-05 High switching frequency P2-02 ~ P0-10 (max. frequency) 10.00Hz ○ P2-06 Vector control slip compensation coefficient 50% ~ 200% 100% ○ P2-07 Speed loop filter time 0.000s ~ 0.100s 0.000s ○ P2-08 Vector control over excitation gain 0 ~ 200 64 ○ P2-09 Torque upper 0: P2-10 0 ○
  • 45. KE300X/KE300B Inverter 45 Function code Name Detailed instruction Factory default Modify limit source selection in speed control mode 1: AI1 2: Reserved 3: Keypad potentiometer 4: High speed pulse HDI 5: Communication 6: Reserved 7: Reserved Full scale of 1-7 selection corresponds to P2-10 P2-10 Torque upper limit digital setting 0.0% ~ 200.0% 150.0% ○ P3 Group: V/F Control Parameters P3-00 V/F curve setting 0: Linear 1: Multiple-point 2: Square 3: 1.2 power 4: 1.4 power 6: 1.6 power 8: 1.8 power 0 ◎ P3-01 Torque boost 0.0: auto 0.1% ~ 30.0% Model depend ○ P3-02 Torque boost cutoff frequency 0.00Hz ~ P0-10 (max. frequency) 50.00Hz ◎ P3-03 V/F frequency point 1 0.00Hz ~ P3-05 0.00Hz ◎ P3-04 V/F voltage point 1 0.0% ~ 100.0% 0.0% ◎ P3-05 V/F frequency point 2 P3-03 ~ P3-07 0.00Hz ◎ P3-06 V/F voltage point 2 0.0% ~ 100.0% 0.0% ◎
  • 46. KE300X/KE300B Inverter 46 Function code Name Detailed instruction Factory default Modify P3-07 V/F frequency point 3 P3-05 ~ P1-04 (motor rated power) 0.00Hz ◎ P3-08 V/F voltage point 3 0.0% ~ 100.0% 0.0% ◎ P3-09 V/F slip compensation gain 0.0% ~ 200.0% 0.0% ○ P3-10 V/F over excitation gain 0 ~ 200 64 ○ P3-11 V/F oscillation suppression gain 0 ~ 100 Model depend ○ P3-18 Over-current stall action current (For KE300B only) 50% ~ 200% 150% ○ P3-19 Over-current stall suppression (For KE300B only) 0: Invalid 1: Valid 1 ○ P3-20 Over-current stall suppression gain (For KE300B only) 0 ~ 100 20 ○ P3-21 Double-speed over-current stall action current compensation coefficient (For KE300B only) 0 ~ 200% 50% ○ P3-22 Over-current stall action voltage (For KE300B only) 330.0V ~ 390.0V 390.0V ○ P3-23 Over-voltage stall enable 0: Invalid 1: Valid 1 ○
  • 47. KE300X/KE300B Inverter 47 Function code Name Detailed instruction Factory default Modify (For KE300B only) P3-24 Over-voltage stall suppression frequency gain (For KE300B only) 0 ~ 100 50 ○ P3- 25 Over-voltage stall suppression voltage gain (For KE300B only) 0 ~ 100 30 ○ P3-26 Over-voltage stall max. rising frequency limit (For KE300B only) 0 ~ 50Hz 5Hz ○ P3-27 Slip compensation time constant (For KE300B only) 0.1 ~ 10.0s 0.5 ○ P4 Group: Input Terminal P4-00 D1 terminal function 0: No function 1: Forward (FWD) 2: Reverse (REV) 3: Three-line running control 4: Forward Jog (FJOG) 5: Reverse Jog (RJOG) 6: Terminal UP 7: Terminal DOWN 8: Coast to stop 9: Fault reset (RESET) 10: Pause running 11: External fault (normal 1 ◎ P4-01 D2 terminal function 2 ◎ P4-02 D3 terminal function 0 ◎ P4-03 Reserved 0 ◎ P4-04 D5 terminal function 0 ◎ P4-05 Reserved 0 ◎ P4-06 HDI terminal function 0 ◎
  • 48. KE300X/KE300B Inverter 48 Function code Name Detailed instruction Factory default Modify open) input 12: Multi-step speed terminal 1 13: Multi-step speed terminal 2 14: Multi-step speed terminal 3 15: Multi-step speed terminal 4 16: ACC/DEC selection terminal 1 17: ACC/DEC selection terminal 2 18: Main frequency source switching 19: UP and DOWN setting clear (terminal and keypad) 20: Running command switching terminal 21: ACC/DEC invalid 22: PID Pause 23: PLC status reset 24: Wobble frequency pause 25: Counter input 26: Counter reset 27: Length count input 28: Length reset 29: Torque control invalid 30: PULSE frequency input (only valid for HDI)
  • 49. KE300X/KE300B Inverter 49 Function code Name Detailed instruction Factory default Modify 31: Reserved 32: DC braking command 33: External fault (normal closed) input 34: Frequency modification enabled 35: PID action direction reverse 36: External stop terminal 1 37: Control command switching terminal 2 38: PID integration stop 39: Switch frequency source A to preset frequency 40: Switch frequency source B to preset frequency 41, 42: Reserved 43: PID parameter switching 44: Customized fault 1 45: Customized fault 2 46: Speed control / torque control switching 47: Emergency stop 48: External stop terminal 2 49: Deceleration DC braking 50: The running time
  • 50. KE300X/KE300B Inverter 50 Function code Name Detailed instruction Factory default Modify reset P4-07~ P4-09 Reserved ● P4-10 Terminal filter time 0.000s ~ 1.000s 0.010s ○ P4-11 Terminal command mode 0: Two-line mode 1 1: Two-line mode 2 2: Three-line mode 1 3: Three-line mode 2 0 ◎ P4-12 UP/DN change rate 0.001Hz/s ~ 50.000Hz/s 1.00Hz/s ○ P4-13 AI curve 1 minimum input 0.00V ~ P4-15 0.00V ○ P4-14 AI curve 1 minimum input corresponding setting -100.0% ~ +100.0% 0.0% ○ P4-15 AI curve 1 maximum input P4-13 ~ +10.00V 10.00V ○ P4-16 AI curve 1 maximum input corresponding setting -100.0% ~ +100.0% 100.0% ○ P4-17 AI1 filter time 0.00s ~ 10.00s 0.10s ○ P4-18 AI curve 2 minimum input 0.00V ~ P4-20 0.00V ○ P4-19 AI curve 2 minimum input corresponding setting -100.0% ~ +100.0% 0.0% ○ P4-20 AI curve 2 maximum input P4-18 ~ +10.00V 10.00V ○
  • 51. KE300X/KE300B Inverter 51 Function code Name Detailed instruction Factory default Modify P4-21 AI curve 2 maximum input corresponding setting -100.0% ~ +100.0% 100.0% ○ P4-22 Reserved ○ P4-23 AI curve 3 minimum input -10.00V ~ P4-25 -10.00V ○ P4-24 AI curve 3 minimum input corresponding setting -100.0% ~ +100.0% 0.0% ○ P4-25 AI curve 3 maximum input P4-23 ~ +10.00V 10.00V ○ P4-26 AI curve 3 maximum input corresponding setting -100.0% ~ +100.0% 100.0% ○ P4-27 Keypad potentiometer input filter time 0.00s ~ 10.00s 0.10s ○ P4-28 HDI minimum input 0.00kHz ~ P4-30 0.00kHz ○ P4-29 HDI minimum input corresponding setting -100.0% ~ 100.0% 0.0% ○ P4-30 HDI maximum input P4-28 ~ 100.00kHz 50.00kHz ○ P4-31 HDI maximum input corresponding setting -100.0% ~ 100.0% 100.0% ○
  • 52. KE300X/KE300B Inverter 52 Function code Name Detailed instruction Factory default Modify P4-32 HDI filter time 0.00s ~ 10.00s 0.10s ○ P4-33 AI curve selection Units place: AI1 1: Curve 1 (see P4-13 ~ P4-16) 2: Curve 2 (see P4-18 ~ P4-21) 3: Curve 3 (see P4-23 ~ P4-26) Tens place: Reserved 321 ○ P4-34 AI below minimum input setting selection Units place: AI1 0: Correspond to minimum input setting 1: 0.0% Tens place: Reserved Hundreds place: Keypad potentiometer, ibid 000 ○ P4-35 D1 delay time 0.0s ~ 3600.0s 0.0s ◎ P4-36 D2 delay time 0.0s ~ 3600.0s 0.0s ◎ P4-37 D3 delay time 0.0s ~ 3600.0s 0.0s ◎ P4-38 DI terminal valid mode selection 1 0: Active-high 1: Active-low Units place: D1 Tens place: D2 Hundreds place: D3 Thousands place: D4 Ten thousands place: D5 00000 ◎ P4-39 DI terminal valid mode selection 2 0: Active-high 1: Active-low Units place: D6 Tens place: HDI 00 ◎ P5 Group: Output Terminal
  • 53. KE300X/KE300B Inverter 53 Function code Name Detailed instruction Factory default Modify P5-00 HDO terminal output mode selection 0: High speed pulse output 1: Open collector output 0 ○ P5-01 HDO open collector output selection 0: No output 1: Inverter is running 2: Fault output (fault stop) 3: FDT1 output 4: Frequency arrival 5: Zero-speed running (no output when stop) 6: Motor overload pre-alarm 7: Inverter overload pre-alarm 8: Setting count value arrival 9: Designated count value arrival 10: Length arrival 11: PLC loop completed 12: Accumulated running time arrival 13: Frequency limiting 14: Torque limiting 15: Ready for running 16: Reserved 17: Frequency upper limit arrival 18: Frequency lower limit arrival 19: Under voltage status output 0 ○ P5-02 Relay T1 output selection 2 ○ P5-03 Reserved 0 ○
  • 54. KE300X/KE300B Inverter 54 Function code Name Detailed instruction Factory default Modify 20: Communication setting 21: Orientation finished (reserved) 22: Orientation approach (reserved) 23: Zero-speed running 2 (output when stop) 24: Accumulated power-on time arrival 25: FDT2 output 26: Frequency 1 arrival output 27: Frequency 2 arrival output 28: Current 1 arrival output 29: Current 2 arrival output 30: Timing arrival output 31: AI1 input over limit 32: Off load 33: Reverse running 34: Zero-current status 35: Module temperature arrival 36: Output current over limit 37: Lower limit frequency arrival (output when stop) 38: Warning output (keep running)
  • 55. KE300X/KE300B Inverter 55 Function code Name Detailed instruction Factory default Modify 39: Motor over temperature pre-alarm 40: This running time arrival 41: Reserved P5-04 ~ P5-05 Reserved ● P5-06 HDO function selection 0: Running frequency 1: Setting frequency 2: Output current 3: Output torque 4: Output power 5: Output voltage 6: Pulse input 7: AI1 8: Reserved 9: Reserved 10: Length 11: Count value 12: Communication 13: Motor speed 14: Output current (100.0% corresponds to 1000.0A) 15: Output voltage (100.0% corresponds to 1000.0V) 16: Reserved 0 ○ P5-07 AO1 output function selection 0 ○ P5-08 Reserved 0 ○ P5-09 HDO output maximum frequency 0.01kHz ~ 100.00kHz 50.00kHz ○
  • 56. KE300X/KE300B Inverter 56 Function code Name Detailed instruction Factory default Modify P5-10 AO1 offset coefficient -100.0% ~ +100.0% 0.0% ○ P5-11 AO1 gain -10.00 ~ +10.00 1.00 ○ P5-12 Reserved ○ P5-13 Reserved ○ P5-17 HDO open collector output delay time 0.0s ~ 3600.0s 0.0s ○ P5-18 Relay 1 output delay time 0.0s ~ 3600.0s 0.0s ○ P5-19~ P5-21 Reserved P5-22 Output terminal valid status selection 0: Positive logic 1: Negative logic Units place: HDO Tens place: Relay1 Hundreds place: Reserved 000 ○ P6 Group: Start and Stop Control P6-00 Start mode 0: Direct start 1: Speed tracking and restart 2: Pre-excitation start 0 ○ P6-01 Speed tracking mode 0: Begin from stop frequency 1: Begin from zero speed 2: Begin from maximum frequency 0 ◎ P6-02 Speed tracking speed 1 ~ 100 20 ○ P6-03 Start frequency 0.00Hz ~ 10.00Hz 0.00Hz ○ P6-04 Start frequency 0.0s ~ 100.0s 0.0s ◎
  • 57. KE300X/KE300B Inverter 57 Function code Name Detailed instruction Factory default Modify holding time P6-05 DC braking current before start/pre-excitati on current 0% ~ 100% 0% ◎ P6-06 DC braking time before start/pre-excitati on time 0.0s ~ 100.0s 0.0s ◎ P6-07 ACC/DEC mode 0: Linear ACC/DEC 1: S-curve ACC/DEC A 2: S-curve ACC/DEC B 0 ◎ P6-08 Time of S curve's start part 0.0% ~ (100.0% ~ P6-09) 30.0% ◎ P6-09 Time of S curve's end part 0.0% ~ (100.0% ~ P6-08) 30.0% ◎ P6-10 Stop mode 0: Deceleration to stop 1: Coast to stop 0 ○ P6-11 DC braking start frequency after stop 0.00Hz ~ P0-10 (maximum frequency) 0.00Hz ○ P6-12 DC braking delay time after stop 0.0s ~ 100.0s 0.0s ○ P6-13 DC braking current after stop 0% ~ 100% 0% ○ P6-14 DC braking time after stop 0.0s ~ 100.0s 0.0s ○ P6-15 Braking usage ratio 0% ~ 100% 100% ○ P7 Group: Keypad and Display
  • 58. KE300X/KE300B Inverter 58 Function code Name Detailed instruction Factory default Modify P7-00 Inverter rated power 0.1kW~1000.0kW Model depend ● P7-01 QUICK/JOG function selection 0: Invalid 1: Switching between keypad command and remote command (terminal command and communication command) 2: FDW/REV Switching 3: Forward Jog 4: Reverse Jog 0 ◎ P7-02 STOP/RST function selection 0: Valid when keypad control 1: Always valid 1 ○ P7-03 Running status display 1 0000 ~ FFFF Bit00: Running frequency 1 (Hz) Bit01: Setting frequency (Hz) Bit02: Bus voltage (V) Bit03: Output voltage (V) Bit04: Output current (A) Bit05: Output power (kW) Bit06: Output torque (%) Bit07: DI status Bit08: DO status Bit09: AI1 voltage (V) Bit10: Reserved Bit11: Radiator temperature Bit12: Count value 81F ○
  • 59. KE300X/KE300B Inverter 59 Function code Name Detailed instruction Factory default Modify Bit13: Length value Bit14: Load speed display Bit15: PID setting P7-04 Running status display 2 0000 ~ FFFF Bit00: PID feedback Bit01: PLC step Bit02: HDI input pulse frequency (kHz) Bit03: Running frequency 2 (Hz) Bit04: Remain running time Bit05: AI1 voltage before calibration (V) Bit06: Reserved Bit07: Reserved Bit08: Linear speed Bit09: Current power-on time (Hour) Bit10: Current running time (Min) Bit11: HDI input pulse frequency (Hz) Bit12: Communication setting value Bit13: Reserved Bit14: Main frequency A display (Hz) Bit15: Auxiliary frequency B display (Hz) 0 ○ P7-05 Stop status display 0000 ~ FFFF Bit00: Setting frequency 73 ○
  • 60. KE300X/KE300B Inverter 60 Function code Name Detailed instruction Factory default Modify (Hz) Bit01: Bus voltage (V) Bit02: DI input status Bit03: DO output status Bit04: AI1 voltage(V) Bit05: Reserved Bit06: Radiator temperature Bit07: Count value Bit08: Length value Bit09: PLC step Bit10: Load speed Bit11: PID setting Bit12: HDI input pulse frequency (kHz) P7-06 Load speed display coefficient 0.0001 ~ 6.5000 3.0000 ○ P7-07 IGBT module temperature 0.0℃~ 100.0℃ - ● P7-08 Inverter rated voltage 1V~2000V Model depend ● P7-09 Accumulated running time 0h ~ 65535h - ● P7-10 Model No. - - ● P7-11 Software version No. - - ● P7-12 Load speed display decimal place 0: 0 decimal place 1: 1 decimal place 2: 2 decimal places 3: 3 decimal places 1 ○ P7-13 Accumulated 0h ~ 65535h - ●
  • 61. KE300X/KE300B Inverter 61 Function code Name Detailed instruction Factory default Modify Power-on time P7-14 Accumulated power consumption 0kW ~ 65535 kW - ● P8 Group: Enhanced Function P8-00 Jog running frequency 0.00Hz ~ P0-10 (max. frequency) 2.00Hz ○ P8-01 Jog acceleration time 0.1s ~ 3600.0s 20.0s ○ P8-02 Jog deceleration time 0.1s ~ 3600.0s 20.0s ○ P8-03 Acceleration time 2 0.1s ~ 3600.0s Model depend ○ P8-04 Deceleration time 2 0.1s ~ 3600.0s Model depend ○ P8-05 Acceleration time 3 0.1s ~ 3600.0s Model depend ○ P8-06 Deceleration time 3 0.1s ~ 3600.0s Model depend ○ P8-07 Acceleration time 4 0.1s ~ 3600.0s Model depend ○ P8-08 Deceleration time 4 0.1s ~ 3600.0s Model depend ○ P8-09 Jump frequency 1 0.00Hz ~ P0-10 (maximum frequency) 0.00Hz ○ P8-10 Jump frequency 2 0.00Hz ~ P0-10 (maximum frequency) 0.00Hz ○ P8-11 Jump frequency amplitude 0.00Hz ~ P0-10 (maximum frequency) 0.01Hz ○ P8-12 FWD/REV dead time 0.0s ~ 3600.0s 0.0s ○ P8-13 Reverse control 0: Enable 0 ○
  • 62. KE300X/KE300B Inverter 62 Function code Name Detailed instruction Factory default Modify 1: Disable P8-14 Action when setting frequency lower than frequency lower limit 0: Running at frequency lower limit 1: Stop 2: Zero-speed running 0 ○ P8-15 Droop control 0.00Hz ~ 10.00Hz 0.00Hz ○ P8-16 Accumulated power-on arrival time 0h ~ 36000h 0h ○ P8-17 Accumulated running arrival time 0h ~ 36000h 0h ○ P8-18 Power-on running command valid protection selection 0: No protection 1: Protection 0 ○ P8-19 Frequency detection value (FDT1) 0.00Hz ~ P0-10 (maximum frequency) 50.00Hz ○ P8-20 Frequency detection lagging value (FDT1) 0.0% ~ 100.0% (FDT1 level) 5.0% ○ P8-21 Frequency arrival detection amplitude 0.0% ~ 100.0% (maximum frequency) 0.0% ○ P8-22 Jump frequency control during ACC/DEC 0: Invalid 1: Valid 0 ○ P8-25 Acceleration 0.00Hz ~ P0-10 0.00Hz ○
  • 63. KE300X/KE300B Inverter 63 Function code Name Detailed instruction Factory default Modify time 1 and acceleration time 2 switching frequency point (maximum frequency) P8-26 Deceleration time 1 and deceleration time 2 switching frequency point 0.00Hz ~ P0-10 (maximum frequency) 0.00Hz ○ P8-27 Terminal jog priority 0: Invalid 1: Valid 0 ○ P8-28 Frequency detection value (FDT2) 0.00Hz ~ P0-10 (maximum frequency) 50.00Hz ○ P8-29 Frequency detection lagging value (FDT2) 0.0% ~ 100.0% (FDT2 level) 5.0% ○ P8-30 Any arrival frequency detection value 1 0.00Hz ~ P0-10 (maximum frequency) 50.00Hz ○ P8-31 Any arrival frequency detection amplitude 1 0.0% ~ 100.0% (maximum frequency) 0.0% ○ P8-32 Any arrival frequency detection value 2 0.00Hz ~ P0-10 (maximum frequency) 50.00Hz ○ P8-33 Any arrival frequency detection amplitude 2 0.0% ~ 100.0% (maximum frequency) 0.0% ○ P8-34 Zero-current 0.0% ~ 300.0% 5.0% ○
  • 64. KE300X/KE300B Inverter 64 Function code Name Detailed instruction Factory default Modify detection level 100.0% corresponds to motor rated current P8-35 Zero-current detection delay time 0.01s ~ 360.00s 0.10s ○ P8-36 Output current over limit value 0.0% (No detection) 0.1% ~ 300.0% (motor rated current) 200.0% ○ P8-37 Output current over limit detection delay time 0.00s ~ 360.00s 0.00s ○ P8-38 Any arrival current 1 0.0% ~ 300.0% (motor rated current) 100.0% ○ P8-39 Any arrival current 1 amplitude 0.0% ~ 300.0% (motor rated current) 0.0% ○ P8-40 Any arrival current 2 0.0% ~ 300.0% (motor rated current) 100.0% ○ P8-41 Any arrival current 2 amplitude 0.0% ~ 300.0% (motor rated current) 0.0% ○ P8-42 Timing function selection 0: Invalid 1: Valid 0 ○ P8-43 Timing running time selection 0:P8-44 1:AI1 2:Reserved 3:Keypad potentiometer Analog input scale corresponds to P8-44 0 ○ P8-44 Timing running 0.0Min ~ 3600.0Min 0.0Min ○
  • 65. KE300X/KE300B Inverter 65 Function code Name Detailed instruction Factory default Modify time P8-45 AI1 input voltage protection lower limit 0.00V ~ P8-46 3.10V ○ P8-46 AI1 input voltage protection upper limit P8-45 ~ 10.00V 6.80V ○ P8-47 Module temperature arrival 0℃ ~ 100℃ 75℃ ○ P8-48 Cooling fan control 0: Fan runs when inverter running 1: Fan always runs 0 ○ P8-49 Wake up frequency 0.0 ~ PA-04 (PID given feedback range) 3.0 ○ P8-50 Wake up delay time 0.0s ~ 3600.0s 0.0s ○ P8-51 Dormancy frequency 0.00Hz ~ P0-10 (maximum frequency) 0.00Hz ○ P8-52 Dormancy delay time 0.0s ~ 3600.0s 0.0s ○ P8-53 Running arrival time setting 0.0Min ~ 3600.0Min 0.0Min ○ P9 Group: Fault and Protection P9-00 Motor overload protection selection 0: Disable 1: Enable 1 ○ P9-01 Motor overload protection gain 0.20 ~ 10.00 1.00 ○ P9-02 Motor overload pre-alarm coefficient 50% ~ 100% 80% ○
  • 66. KE300X/KE300B Inverter 66 Function code Name Detailed instruction Factory default Modify P9-03 Stall over-voltage gain 0 ~ 100 0 ○ P9-04 Stall over-voltage point / Braking threshold 120% ~ 150% 130% ○ P9-05 Stall over current gain 1 ~ 100 20 ○ P9-06 Stall over-current point 100% ~ 200% 160% ○ P9-07 Short-circuit to ground protection selection when power-on 0: Invalid 1: Valid 1 ○ P9-08 Fast current limitation 0: Disable 1: Enable 1 ○ P9-08 Braking unit action starting voltage (For KE300B only) 310.0V ~ 800.0V 378.0V ○ P9-09 Fault auto reset times 0 ~ 5 0 ○ P9-10 Fault HDO acts selection in fault auto reset 0: No action 1: Action 0 ○ P9-11 Fault auto reset interval 0.1s ~ 100.0s 1.0s ○ P9-12 Reserved P9-13 Output phase 0: Disable 1 ○
  • 67. KE300X/KE300B Inverter 67 Function code Name Detailed instruction Factory default Modify failure protection selection 1: Enable P9-14 The first fault type 0: No fault 1: Reserved 2: Acc over current 3: Dec over current 4: Over current in constant speed 5: Over voltage in Acc process 6: Over voltage in Dec process 7: Over voltage in constant speed 8: Reserved 9: Under voltage 10: Inverter overload 11: Motor overload 12: Input side phase failure 13: Output side phase failure 14: Module overheat 1 5: External fault 16: Communication fault 17: Contactor fault 1 8: Current detection fault 19: Motor autotuning fault 20: Reserved 21: Parameter R/W fault 2 2: Inverter hardware - ●
  • 68. KE300X/KE300B Inverter 68 Function code Name Detailed instruction Factory default Modify fault 23: Motor short circuit to ground fault 24: Reserved 25: Reserved 26: Running time arrival 27: Customized fault 1 28: Customized fault 2 29: Power-on time arrival 30: Off load 31: PID feedback lost when running 40: Fast current limiting over time 41: Reserved 42: Speed deviation oversize 43: Motor over speed P9-15 The second fault type - ● P9-16 The third (latest) fault type - ● P9-17 Frequency at the third (latest) fault - - ● P9-18 Current at the third (latest) fault - - ● P9-19 Bus voltage at the third (latest) fault - - ● P9-20 Input terminal’s status at the third (latest) fault - - ●
  • 69. KE300X/KE300B Inverter 69 Function code Name Detailed instruction Factory default Modify P9-21 Output terminal’s status at the third (latest) fault - - ● P9-22 Inverter status at the third (latest) fault - - ● P9-23 Power-on time at the third (latest) fault - - ● P9-24 Running time at the third (latest) fault - - ● P9-27 Frequency at the second fault - - ● P9-28 Current at the second fault - - ● P9-29 Bus voltage at the second fault - - ● P9-30 Input terminal’s status at the second fault - - ● P9-31 Output terminal’s status at the second fault - - ● P9-32 Inverter status at the second fault - - ● P9-33 Power-on time at the second fault - - ● P9-34 Running time at the second fault - - ● P9-37 Frequency at the first fault - - ●
  • 70. KE300X/KE300B Inverter 70 Function code Name Detailed instruction Factory default Modify P9-38 Current at the first fault - - ● P9-39 Bus voltage at the first fault - - ● P9-40 Input terminal’s status at the first fault - - ● P9-41 Output terminal’s status at the first fault - - ● P9-42 Inverter status at the first fault - - ● P9-43 Power-on time at the first fault - - ● P9-44 Running time at the first fault - - ● P9-47 Action selection 1 for fault protection Units place: Motor overload (11) 0: Coast to stop 1: Dec-to-stop 2: Keep running Tens place: Input phase failure (12) Hundreds place: Output phase failure (13) Thousands place: External fault (15) Ten thousands place: communication fault (16) 00000 ○ P9-48 Fault protection action selection 2 Units place: Encoder/PG card fault 0: Coast to stop 00000 ○
  • 71. KE300X/KE300B Inverter 71 Function code Name Detailed instruction Factory default Modify Tens place: Function code R/W fault 0: Coast to stop 1: Dec-to-stop Hundreds place: Reserved Thousands place: Motor over heat (25) Ten thousands: Running time arrival (26) P9-49 Fault protection action selection 3 Units place: Customized fault 1 (27) 0: Coast to stop 1: Dec-to-stop 2: Keep running Tens place: Customized fault 2 (28) 0: Coast to stop 1: Dec-to-stop 2: Keep running Hundreds place: Power-on time arrival time (29) 0: Coast to stop 1: Dec-to-stop 2: Keep running Thousands place: Off load (30) 0: Coast to stop 1: Dec-to-stop 2: Decelerate to 7% of motor rated power, then 00000 ○
  • 72. KE300X/KE300B Inverter 72 Function code Name Detailed instruction Factory default Modify keep running; run at setting frequency when no off-load Ten thousands place: PID feedback lost when running (31) 0: Coast to stop 1: Dec-to-stop 2: Keep running P9-50 Fault protection action selection 4 Units place: Speed deviation oversize (42) 0: Coast to stop 1: Dec-to-stop 2: Keep running Tens place: motor over speed (43) Hundreds place: Initial place fault (51) 00000 ○ P9-54 Running frequency selection when fault 0: Run at current running frequency 1: Run at setting frequency 2: Run at upper limit frequency 3: Run at lower limit frequency 4: Run at abnormal backup frequency 0 ○ P9-55 Abnormal backup frequency 60.0% ~ 100.0% (100.0% corresponds to maximum frequency( P0-10)) 100.0% ○
  • 73. KE300X/KE300B Inverter 73 Function code Name Detailed instruction Factory default Modify P9-56~ P9-58 Reserved ● P9-59 Instantaneous power-off action selection 0: Invalid 1: Deceleration 2: Dec-to-stop 0 ○ P9-60 Recover judgment voltage when Instantaneous power-off 80 ~ 100.0% 90.0% ○ P9-61 Recover judgment time when Instantaneous power-off 0.00s ~ 100.00s 0.50s ○ P9-62 Action judgment voltage when instantaneous power-off 60.0% ~ 100.0% (standard bus voltage) 80.0% ○ P9-63 Off-load protection selection 0: Disable 1: Enable 0 ○ P9-64 Off-load detection level 0.0 ~ 100.0% 10.0% ○ P9-65 Off-load detection time 0.0 ~ 60.0s 1.0s ○ PA Group: PID Function PA-00 PID given source 0: PA-01 1: AI1 2: Reserved 3: Keypad potentiometer 4: High speed pulse HDI 0 ○
  • 74. KE300X/KE300B Inverter 74 Function code Name Detailed instruction Factory default Modify 5: Communication 6: Multi-step command PA-01 PID given through keypad 0.0 ~ PA-04 (PID given feedback range) 0.0 ○ PA-02 PID feedback source 0: AI1 1: Reserved 2: Keypad potentiometer 3: Reserved 4: High speed pulse HDI 5: Communication 6: Reserved 7: Reserved 8: Reserved 0 ○ PA-03 PID action direction 0: Positive 1: Negative 0 ○ PA-04 PID given feedback range PA-01(PID given through keypad)~ 1000.0 100.0 ○ PA-05 Proportional gain Kp1 0.0 ~ 100.0 20.0 ○ PA-06 Integration time Ti1 0.01s ~ 10.00s 2.00s ○ PA-07 Differential time Td1 0.000s ~ 10.000s 0.000s ○ PA-08 Cutoff frequency of PID reverse 0.00 ~ P0-10 (maximum frequency) 0.00Hz ○ PA-09 PID deviation limit 0.0% ~ 100.0% 0.0% ○ PA-10 PID differential amplitude 0.00% ~ 100.00% 0.10% ○ PA-11 PID given filter time 0.00 ~ 650.00s 0.00s ○ PA-12 PID feedback 0.00 ~ 60.00s 0.00s ○
  • 75. KE300X/KE300B Inverter 75 Function code Name Detailed instruction Factory default Modify filter time PA-13 PID output filter time 0.00 ~ 60.00s 0.00s ○ PA-14 Reserved ○ PA-15 Proportional gain Kp2 0.0 ~ 100.0 20.0 ○ PA-16 Integration time Ti2 0.01s ~ 10.00s 2.00s ○ PA-17 Differential time Td2 0.000s ~ 10.000s 0.000s ○ PA-18 PID parameter switching condition 0: No switching 1: Switching via terminals 2: Automatic switching according to the deviation 0 ○ PA-19 PID parameter switching deviation 1 0.0% ~ PA-20 20.0% ○ PA-20 PID parameter switching deviation 2 PA-19 ~ 100.0% 80.0% ○ PA-21 PID initial value 0.0% ~ 00.0% 0.0% ○ PA-22 PID initial value holding time 0.00 ~ 360.00s 0.00s ○ PA-23 Forward maximum value between two output deviation 0.00% ~ 100.00% 1.00% ○ PA-24 Reverse maximum value between two output deviation 0.00% ~ 100.00% 1.00% ○ PA-25 PID integration Units place: Integration 00 ○
  • 76. KE300X/KE300B Inverter 76 Function code Name Detailed instruction Factory default Modify attribute separate 0: Invalid 1: Valid Tens place: Stop integrating or not after output reach limit 0: Keep integrating 1: Stop integrating PA-26 PID feedback lost detection value 0.0%: No judgment for feedback lost 0.1% ~ 100.0% 0.0% ○ PA-27 PID feedback lost detection time 0.0s ~ 20.0s 0.0s ○ PA-28 PID stop calculation 0: No calculation when stop 1: Calculation when stop 1 ○ Pb Group: Wobble Frequency, Fixed Length, Counting Pb-00 Wobble frequency setting mode 0: Relative to center frequency 1: Relative to maximum frequency 0 ○ Pb-01 Wobble frequency amplitude 0.0% ~ 100.0% 0.0% ○ Pb-02 Sudden Jump frequency amplitude 0.0% ~ 50.0% 0.0% ○ Pb-03 Wobble frequency cycle 0.1s ~ 3000.0s 10.0s ○ Pb-04 Triangular wave rise time of 0.1% ~ 100.0% 50.0% ○
  • 77. KE300X/KE300B Inverter 77 Function code Name Detailed instruction Factory default Modify wobble frequency Pb-05 Setting length 0m ~ 65535m 1000m ○ Pb-06 Actual length 0m ~ 65535m 0m ○ Pb-07 Number of pulses per meter 0.1 ~ 6553.5 100.0 ○ Pb-08 Setting count value 1 ~ 65535 1000 ○ Pb-09 Designated count value 1 ~ 65535 1000 ○ PC Group: Multi-step Command and Simple PLC PC-00 Multi-step command 0 -100.0% ~ 100.0% 0.0% ○ PC-01 Multi-step command 1 -100.0% ~ 100.0% 0.0% ○ PC-02 Multi-step command 2 -100.0% ~ 100.0% 0.0% ○ PC-03 Multi-step command 3 -100.0% ~ 100.0% 0.0% ○ PC-04 Multi-step command 4 -100.0% ~ 100.0% 0.0% ○ PC-05 Multi-step command 5 -100.0% ~ 100.0% 0.0% ○ PC-06 Multi-step command 6 -100.0% ~ 100.0% 0.0% ○ PC-07 Multi-step command 7 -100.0% ~ 100.0% 0.0% ○ PC-08 Multi-step command 8 -100.0% ~ 100.0% 0.0% ○ PC-09 Multi-step command 9 -100.0% ~ 100.0% 0.0% ○
  • 78. KE300X/KE300B Inverter 78 Function code Name Detailed instruction Factory default Modify PC-10 Multi-step command 10 -100.0% ~ 100.0% 0.0% ○ PC-11 Multi-step command 11 -100.0% ~ 100.0% 0.0% ○ PC-12 Multi-step command 12 -100.0% ~ 100.0% 0.0% ○ PC-13 Multi-step command 13 -100.0% ~ 100.0% 0.0% ○ PC-14 Multi-step command 14 -100.0% ~ 100.0% 0.0% ○ PC-15 Multi-step command 15 -100.0% ~ 100.0% 0.0% ○ PC-16 Simple PLC running mode 0: Stop after one cycle 1: Keep last frequency after one cycle 2: Circular running 0 ○ PC-17 Simple PLC storage selection when power-down Units place: Storage selection when power-off 0: Not store 1: Store Tens place: Storage selection when stop 0: Not store 1: Store 00 ○ PC-18 0 th phase running time 0.0s (m) ~ 6500.0s (m) 0.0s (m) ○ PC-19 0 th phase ACC/DCC time selection 0 ~ 3 0 ○ PC-20 1st phase running time 0.0s (m) ~ 6500.0s (m) 0.0s (m) ○ PC-21 1st phase 0 ~ 3 0 ○
  • 79. KE300X/KE300B Inverter 79 Function code Name Detailed instruction Factory default Modify ACC/DCC time selection PC-22 2 nd phase running time 0.0s (m) ~ 6500.0s (m) 0.0s (m) ○ PC-23 2nd phase ACC/DCC time selection 0 ~ 3 0 ○ PC-24 3rd phase running time 0.0s (m) ~ 6500.0s (m) 0.0s (m) ○ PC-25 3rd phase ACC/DCC time selection 0 ~ 3 0 ○ PC-26 4th phase running time 0.0s (m) ~ 6500.0s (m) 0.0s (m) ○ PC-27 4th phase ACC/DCC time selection 0 ~ 3 0 ○ PC-28 5 th phase running time 0.0s (m) ~ 6500.0s (m) 0.0s (m) ○ PC-29 5 th phase ACC/DCC time selection 0 ~ 3 0 ○ PC-30 6 th phase running time 0.0s (m) ~ 6500.0s (m) 0.0s (m) ○ PC-31 6th phase ACC/DCC time selection 0 ~ 3 0 ○ PC-32 7 th phase running time 0.0s (m) ~ 6500.0s (m) 0.0s (m) ○ PC-33 7 th phase ACC/DCC time selection 0 ~ 3 0 ○
  • 80. KE300X/KE300B Inverter 80 Function code Name Detailed instruction Factory default Modify PC-34 8 th phase running time 0.0s (m) ~ 6500.0s (m) 0.0s (m) ○ PC-35 8 th phase ACC/DCC time selection 0 ~ 3 0 ○ PC-36 9th phase running time 0.0s (m) ~ 6500.0s (m) 0.0s (m) ○ PC-37 9th phase ACC/DCC time selection 0 ~ 3 0 ○ PC-38 10 th phase running time 0.0s (m) ~ 6500.0s (m) 0.0s (m) ○ PC-39 10th phase ACC/DCC time selection 0 ~ 3 0 ○ PC-40 11 th phase running time 0.0s (m) ~ 6500.0s (m) 0.0s (m) ○ PC-41 11 th phase ACC/DCC time selection 0 ~ 3 0 ○ PC-42 12 th phase running time 0.0s (m) ~ 6500.0s (m) 0.0s (m) ○ PC-43 12 th phase ACC/DCC time selection 0 ~ 3 0 ○ PC-44 13th phase running time 0.0s (m) ~ 6500.0s (m) 0.0s (m) ○ PC-45 13 th phase ACC/DCC time selection 0 ~ 3 0 ○ PC-46 14th phase running time 0.0s (m) ~ 6500.0s (m) 0.0s (m) ○
  • 81. KE300X/KE300B Inverter 81 Function code Name Detailed instruction Factory default Modify PC-47 14 th phase ACC/DCC time selection 0 ~ 3 0 ○ PC-48 15 th phase running time 0.0s (m) ~ 6500.0s (m) 0.0s (m) ○ PC-49 15th phase ACC/DCC time selection 0 ~ 3 0 ○ PC-50 Timing unit (Simple PLC mode) 0: s (second) 1: m (minute) 0 ○ PC-51 Multi-step command 0 given mode 0: PC-00 1: AI1 2: Reserved 3: Keypad potentiometer 4: High speed pulse HDI 5: PID control 6: Keypad setting frequency (P0-08), can be modified via UP/DN 0 ○ Pd Group: Communication Parameters Pd-00 Baud rate 0: 300BPS 1: 600BPS 2: 1200BPS 3: 2400BPS 4: 4800BPS 5: 9600BPS 6: 19200BPS 7: 38400BPS 5 ○ Pd-01 Data format 0: No parity check (8-N-2) 1: Even parity check (8-E-1) 0 ○
  • 82. KE300X/KE300B Inverter 82 Function code Name Detailed instruction Factory default Modify 2: Odd parity check (8-O-1) 3: No parity check (8-N-1) Pd-02 Local address 1 ~ 247, 0 is broadcast address 1 ○ Pd-03 Response delay 0ms ~ 20ms 2 ○ Pd-04 Communication timeout time 0.0 (invalid) 0.1s ~ 60.0s 0.0 ○ Pd-05 Communication protocol selection 0: Non-standard MODBUS protocol 1: Standard MODBUS protocol 1 ○ Pd-06 Communication read current resolution 0: 0.01A 1: 0.1A 0 ○ Pd-07 Communication selection (For KE300B only) 0: External terminal 1: Keypad 0 ○ PE Group: Reserved Function FE-00 Reserved ○ PP Group: Function Code Management PP-00 User password 0 ~ 65535 0 ○ PP-01 Parameter initialization 0: No action 1: Restore factory default, but not including motor parameters 2: Clear the record 0 ◎ PP-02 Function parameter group display selection Units place: U0 group display selection 0: No display 1: Display Tens place: A0 group 00 ◎
  • 83. KE300X/KE300B Inverter 83 Function code Name Detailed instruction Factory default Modify display selection 0: No display 1: Display PP-03 Reserved ● PP-04 Function code modification attribute 0: Disable 1: Enable 0 ○ A0 Group: Torque Control Parameters A0-00 Speed/torque control mode selection 0: Speed control 1: Torque control 0 ◎ A0-01 Torque setting source selection in torque control mode 0: Keypad (A0-03) 1: AI1 2: Reserved 3: Keypad potentiometer 4: High speed pulse HDI 5: Communication 6: Reserved 7: Reserved 0 ◎ A0-03 Torque setting throught keypad in torque control mode -200.0% ~ 200.0% 150.0% ○ A0-04 Torque filter time 0.00s ~ 10.00s 0.00s ○ A0-05 Forward maximum frequency in torque control mode 0.00Hz ~ P0-10 (maximum frequency) 50.00Hz ○ A0-06 Reverse maximum frequency in 0.00Hz ~ P0-10 (maximum frequency) 50.00Hz ○
  • 84. KE300X/KE300B Inverter 84 Function code Name Detailed instruction Factory default Modify torque control mode A0-07 Acc time in torque control mode 0.00s ~ 36000s 0.00s ○ A0-08 Dec time in torque control mode 0.00s ~ 36000s 0.00s ○ 5.2 Monitoring Parameter Table Function code Name Minimum unit U0:Group Basic Monitoring Parameter U0-00 Running frequency (Hz) 0.01Hz U0-01 Setting frequency (Hz) 0.01Hz U0-02 DC bus voltage (V) 0.1V U0-03 Output voltage (V) 1V U0-04 Output current (A) 0.01A U0-05 Output power (kW) 0.1kW U0-06 Output torque (%) 0.1% U0-07 DI input status 1 U0-08 DO output status 1 U0-09 AI1 voltage (V) 0.01V U0-10 Reserved 0 U0-11 Radiator temperature 1℃ U0-12 Count value 1
  • 85. KE300X/KE300B Inverter 85 Function code Name Minimum unit U0-13 Length value 1 U0-14 Load speed 1 U0-15 PID setting 1 U0-16 PID feedback 1 U0-17 PLC phase 1 U0-18 HDI input pulse frequency (Hz) 0.01kHz U0-19 Feedback speed (unit 0.1Hz) 0.1Hz U0-20 Remain running time 0.1Min U0-21 AI1 voltage before calibration 0.001V U0-22 Reserved 0 U0-23 Keypad potentiometer voltage before calibration 0.001V U0-24 linear velocity 1m/Min U0-25 Current power-on time 1Min U0-26 Current running time 0.1Min U0-27 HDI input pulse frequency 1Hz U0-28 Communication setting value 0.01% U0-29 Reserved 0.01Hz U0-30 Main frequency A display 0.01Hz U0-31 Auxiliary frequency B display 0.01Hz U0-32 Reserved 1 U0-33 Reserved 0.1° U0-34 Motor temperature 1℃ U0-35 Target torque (%) 0.1% U0-36 Reserved 1 U0-37 Power factor angle 0.1° U0-38 Reserved 1 U0-39 Reserved 1V
  • 86. KE300X/KE300B Inverter 86 Function code Name Minimum unit U0-40 Reserved 1V U0-41 DI input status visual display 1 U0-42 DO input status visual display 1 U0-43 DI function status display 1 (function 01-function 40) 1 U0-44 DI function status visual display 2 (function 41-function 80) 1 U0-59 Setting frequency (%) 0.01% U0-60 Running frequency (%) 0.01% U0-61 Inverter status 1
  • 87. KE300X/KE300B Inverter 87 Chapter 6 Parameters Description Group P0 Basic Function P0-00 Inverter model Factory default 1 1: G model: Applicable to constant torque load. 2: Reserved P0-01 Control mode Factory default 0 0: V/F control It is suitable for general purpose application such as pumps, fans etc. One inverter can drive multiple motors. 1: Sensorless vector control It is widely used for the application which requires high torque at low speed, high speed accuracy, and quicker dynamic response, such as machine tool, injection molding machine, centrifugal machine and wire-drawing machine, etc. Note: The autotuning of motor parameters must be accomplished properly if you use the sensorless vector control. How to autotuning of motor parameters please refer to P4 Group. In order to achieve better control characteristic, the parameters of vector control (P2 Group) should be adjusted. P0-02 Running Command source Factory default 0 Select the input channel for control command. The inverter control commands include start, stop, forward run, reverse run, Jog and so on. 0: Keypad (“LOCAL/REMOT” LED OFF) Both RUN and STOP/RST keys are used for running command control. If multifunction key QUICK/JOG is set as FWD/REV switching function (P7-01 is set to be 2), it will be used to change the rotating orientation. If multifunction key QUICK/JOG is set as FWD jog (P7-01 is set to be 3) or REV jog (P7-01 is set to
  • 88. KE300X/KE300B Inverter 88 be 4), it will be used for jog running. 1: Terminal (“LOCAL/REMOT” LED ON) The operations, including FWD, REV, JOGF, JOGR, etc. can be controlled by multifunctional input terminals. 2: Communication (“LOCAL/REMOT” LED flickers) The operation of inverter can be controlled by host through communication. P0-03 Main frequency source A selection Factory default 0 0: Keypad (not store) The initial value is the value of P0-08. The setting frequency value of inverter can be modified through the keys “▲” and “▼” of the keyboard (or UP and DOWN of multifunctional input terminals). “Not store” means that the setting frequency is recovered to the value of P0-08 in case of inverter power- off. 1: Keypad (store) The initial value is the value of P0-08. “Store” means that the setting frequency remains the same as the value before inverter power-off. 2: Al1 The reference frequency is set by analog input. KE300X series mini size inverter provides 1 analog input terminal AI1, which is compatible with both 0~10V / 0~20mA input signal. User can select the corresponding relation between the objective frequency and the input voltage value of AI freely. KE300X series inverter provides 3 corresponding relation curves which can be set by users through P4 group function code. 3. Reserved 4: Keypad potentiometer The reference frequency is set by keypad potentiometer. 5: High speed PULSE (HDI) The reference frequency is set by high speed pulse.
  • 89. KE300X/KE300B Inverter 89 Pulse reference signal specification: the voltage range is 9V to 30V, and the frequency range is 0kHz to 50kHz. Pulse given can only be input from the multifunctional input terminal HDI. 6: Multi-step speed The reference frequency is determined by P4 and PC groups. The selection of steps is determined by combination of multi-step speed terminals. 7: Simple PLC User can set reference frequency, hold time, running direction of each step and acceleration/deceleration time between steps. For details, please refer to description of PC group. 8: PID The reference frequency is the result of PID adjustment. For details, please refer to description of PA group. 9: Communication The reference frequency is set through RS485. For details, please refer to Modbus protocol in Chapter 9. P0-04 Auxiliary frequency source B selection Factory default 0 When the auxiliary frequency source is used as independent frequency reference channel (i.e. frequency source switching from A to B), it is used in the same way as the main frequency source. Please refer to P0-03. When the auxiliary frequency source is used as combination reference, please note: 1. If the auxiliary frequency source is keypad reference, the frequency (P0-08) is invalid, and it needs to adjust the main reference frequency through the keys “▲”and “▼” of the keyboard (or UP and DOWN of multifunctional input terminals). 2. If the auxiliary frequency source is analog input reference AI1 or pulse input reference, 100% of input corresponds to the auxiliary frequency source range (refer to P0-05 and P-06).
  • 90. KE300X/KE300B Inverter 90 3. If the frequency source is pulse input reference, it is similar to the analog input reference. Note: P0-03 and P0-04 can’t be set to be the same value. Otherwise, disorder will occur. P0-05 Frequency source B reference Factory default 0 P0-06 Auxiliary Frequency source B range Factory default 100% When the frequency source selection is frequency combination reference (P0-07 is set to 1 or 3), the two parameters are used to determine the adjustment range of auxiliary frequency source. P0-05 is used to determine the relative object of that range. If it is relative to maximum frequency A, that range will change with the main frequency A. P0-07 Frequency source selection Factory default 00 Units place: Frequency source selection 0: Main frequency source A Reference frequency = A 1: Calculation result of frequency A and B Reference frequency = Calculation result of frequency A and B (determined by tens place) 2: Switching between A and B If the multifunctional input terminal HDI (P4-0X=18: frequency switching) is invalid, reference frequency = A. If the multifunctional input terminal HDI (frequency source switching) is valid, reference frequency = B. 3: Switching between A and calculation result If the multifunctional input terminal HDI (frequency switching) is invalid, reference frequency = A. If the multifunctional input terminal HDI (frequency switching) is valid, reference frequency = calculation result.
  • 91. KE300X/KE300B Inverter 91 4: Switching between B and calculation result If the multifunctional input terminal HDI (frequency switching) is invalid, reference frequency = B. If the multifunctional input terminal HDI (frequency switching) is valid, reference frequency = calculation result. Tens place: Frequency source main/auxiliary calculation relationship 0: A + B Reference frequency = A + B, achieving frequency combination given function. 1: A - B Reference frequency = A - B 2: Max (A, B) Reference frequency = Max (A, B) 3: Min (A, B) Reference frequency = Min (A, B) Note: When the frequency source selection is main/auxiliary calculation, the preset offset frequency can be set via P0-21, which can be added to main/auxiliary calculation result to meet different kinds of demand. P0-08 Keypad reference frequency Factory default 50.00Hz When the main frequency source is selected as “Keypad” or “Terminals UP/DN”, this function code is the initial value of frequency digital setting of the inverter. P0-09 Running direction Factory default 0 Through modifying this function code, it can change the rotary direction of the motor without changing motor wiring. It’s equal to adjust any two lines of the motor (U, V and W) and further change the rotary direction of the motor. Note: If the parameters are restored, the running direction will be back to its original status.