Call girls in Kanpur - 9761072362 with room service
How to draw a horse head
1. How to draw a horse head
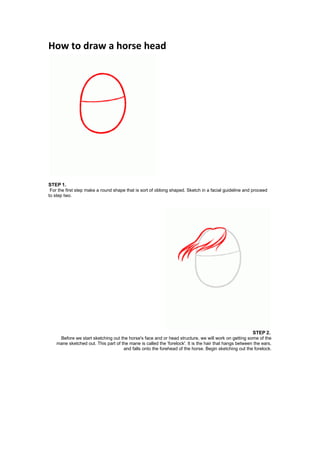
STEP 1.
For the first step make a round shape that is sort of oblong shaped. Sketch in a facial guideline and proceed
to step two.
STEP 2.
Before we start sketching out the horse's face and or head structure, we will work on getting some of the
mane sketched out. This part of the mane is called the 'forelock'. It is the hair that hangs between the ears,
and falls onto the forehead of the horse. Begin sketching out the forelock.
2. STEP 3.
Next, begin sketching out the horse's face starting with the bump where the eye is located. Next, continue to
sketch downward until the muzzle is sketched in. This should also include the mouth and nose of the horse.
STEP 4.
Now that some of the main parts of the horse's face and head is drawn out, we can continue the momentum
by making the lower portion of the mouth like so, and then draw the chin grove, and then sketch the actual
structural shape of the side of the horse's jaw. Next and lastly for this step, carefully sketch out the ears which
should stand erect and pointed.
3. STEP 5.
At this point you have yourself an outline of a horses head. You will now begin drawing or sketching in the
face. Start by adding the tissue inside of the ears, and then draw the dark, almond shaped eyes using the
facial guide you added in step one. Next, sketch the lining that adds definition to the horse's snout or muzzle,
and then draw the nostrils or nose holes. Sketch a bit of detailing above the eye, then move along to step six.
Did you know that horses have the largest eye among all land mammals?
STEP 6.
Next up, start this step by sketching out the crest of the horse which looks like the back of the neck to us. You
will then draw the front part of the neck which is also home to the jugular groove. That line you see starting
from the side of the jaw is what you call the jugular groove. Sketch in more of the horses mane to completion,
and then proceed to step seven.
4. STEP 7.
Here is what the basic sketch looks like when you are all done. Obviously all the detailing comes from
shading and other lining effects.
STEP 8.
Before we even TOUCH the facial shading any further, we must evaluate the importance of the 'light source'.
In the case of this drawing, we will determine the darkest shadows hitting the brow, and nostrils of the horse.
These are the key darkest areas of this figure. By using various strokes either hatching or crosshatching, we
will progress and add dimension and depth to mold a sort of 3-D presence.
STEP 9.
This is a progressive look at how I shaded and detailed the horses eye. Notice how shiny and realistic the eye
comes out when it's all done.
5. STEP 10.
Start the base coat for the shading process before detailing can start. darken certain areas for a more defined
look, as well as where certain areas of the horse is hollow like the nose and inside of the ears.
STEP 11.
Thicken or darken the outer lining for the horse until you have a sketch in front of you that looks like the one
you see here.
6. STEP 12.
When all is said and done, here is what the beautiful sketch looks like once you are finished with everything.
Of course your sketch will look different than mine, but that is the beauty of art, everyone has their own
drawing and sketching style.