
Recommended
More Related Content
Similar to Easy upgrade steps for an audi a3 radio head unit
Similar to Easy upgrade steps for an audi a3 radio head unit (20)
Recently uploaded
Recently uploaded (20)
Easy upgrade steps for an audi a3 radio head unit
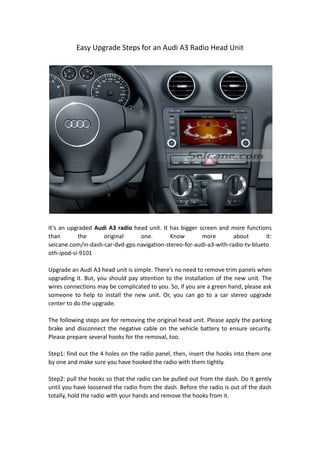
- 1. Easy Upgrade Steps for an Audi A3 Radio Head Unit It’s an upgraded Audi A3 radio head unit. It has bigger screen and more functions than the original one. Know more about it: seicane.com/in-dash-car-dvd-gps-navigation-stereo-for-audi-a3-with-radio-tv-blueto oth-ipod-si-9101 Upgrade an Audi A3 head unit is simple. There’s no need to remove trim panels when upgrading it. But, you should pay attention to the installation of the new unit. The wires connections may be complicated to you. So, if you are a green hand, please ask someone to help to install the new unit. Or, you can go to a car stereo upgrade center to do the upgrade. The following steps are for removing the original head unit. Please apply the parking brake and disconnect the negative cable on the vehicle battery to ensure security. Please prepare several hooks for the removal, too. Step1: find out the 4 holes on the radio panel, then, insert the hooks into them one by one and make sure you have hooked the radio with them tightly. Step2: pull the hooks so that the radio can be pulled out from the dash. Do it gently until you have loosened the radio from the dash. Before the radio is out of the dash totally, hold the radio with your hands and remove the hooks from it.
- 2. Step3: take the radio out the dash carefully and remove the wires at the back of it. Now, you have removed the original Audi A3 radio. The next would be installing a new unit in your car. The installations of different units may be different. You should refer to installation guide or follow a professional to install it. If you meet any problem, you can contact the dealer for help, too. After installation, it’s time to test the new unit. Please check GPS, TV, radio and rearview function carefully. If there are problems, first check the wires connections. The technicians from the dealer can help a lot, too. If everything’s good, you can go for a drive and enjoy the time with the new unit now. If you are still looking for a new unit for your car, there’s a multifunction GPS DVD stereo for your choice. It fits Audi A3 from 2003 to 2011. And, it’s on discount now. Check it out: seicane.com/in-dash-car-dvd-gps-navigation-stereo-for-audi-a3-with-radio-tv-blueto oth-ipod-si-9101 This aftermarket Audi A3 radio GPS DVD player has 7 inch 16:9 800*480 digital high definition TFT LCD touch screen. It combines with the original car perfectly. It supports steering wheel control, too. You can play songs from an IPod or an IPhone by connecting the unit and your device with an IPod cable. It supports Bluetooth function. You can pick up phone calls in the
- 3. head unit; you can read phone book in the screen; you can play songs in your cell phone in the head unit and so on. It comes with USB port and SD card slot for media files from external devices, such as, MP3, MP4, MPEG and so on. You can upgrade software by this function, too. It can do more for you. Wish you like it. Please make sure you have added all the functions you like when placing the order.