
Recommended
Recommended
More Related Content
What's hot
What's hot (20)
Similar to Case 430 tier 3, 440 tier 3 skid steer and 440 ct tier 3 compact track loader cab up grade machines service repair manual
Similar to Case 430 tier 3, 440 tier 3 skid steer and 440 ct tier 3 compact track loader cab up grade machines service repair manual (13)
More from jksjmdmd
More from jksjmdmd (20)
Recently uploaded
Recently uploaded (20)
Case 430 tier 3, 440 tier 3 skid steer and 440 ct tier 3 compact track loader cab up grade machines service repair manual
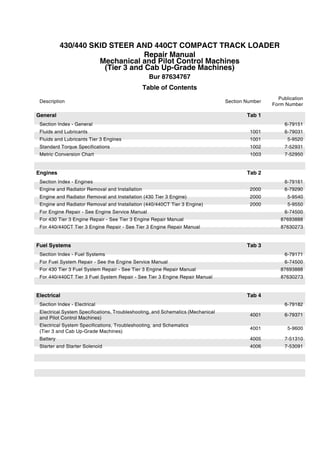
- 1. 430/440 SKID STEER AND 440CT COMPACT TRACK LOADER Repair Manual Mechanical and Pilot Control Machines (Tier 3 and Cab Up-Grade Machines) Bur 87634767 Table of Contents Description Section Number Publication Form Number General Tab 1 Section Index - General 6-79151 Fluids and Lubricants 1001 6-79031 Fluids and Lubricants Tier 3 Engines 1001 5-9520 Standard Torque Specifications 1002 7-52931 Metric Conversion Chart 1003 7-52950 Engines Tab 2 Section Index - Engines 6-79161 Engine and Radiator Removal and Installation 2000 6-79290 Engine and Radiator Removal and Installation (430 Tier 3 Engine) 2000 5-9540 Engine and Radiator Removal and Installation (440/440CT Tier 3 Engine) 2000 5-9550 For Engine Repair - See Engine Service Manual 6-74500 For 430 Tier 3 Engine Repair - See Tier 3 Engine Repair Manual 87693888 For 440/440CT Tier 3 Engine Repair - See Tier 3 Engine Repair Manual 87630273 Fuel Systems Tab 3 Section Index - Fuel Systems 6-79171 For Fuel System Repair - See the Engine Service Manual 6-74500 For 430 Tier 3 Fuel System Repair - See Tier 3 Engine Repair Manual 87693888 For 440/440CT Tier 3 Fuel System Repair - See Tier 3 Engine Repair Manual 87630273 Electrical Tab 4 Section Index - Electrical 6-79182 Electrical System Specifications, Troubleshooting, and Schematics (Mechanical and Pilot Control Machines) 4001 6-79371 Electrical System Specifications, Troubleshooting, and Schematics (Tier 3 and Cab Up-Grade Machines) 4001 5-9600 Battery 4005 7-51310 Starter and Starter Solenoid 4006 7-53091
- 2. Bur 5-4941 Revised 12-07 Printed in U.S.A. 430/440 SKID STEER AND 440CT COMPACT TRACK LOADER Repair Manual Mechanical and Pilot Control Machines (Tier 3 and Cab Up-Grade Machines) Bur 87634767 Table of Contents (Continued) Tracks Tab 5 Section Index - Tracks 5-2630 Tracks 5001 5-2610 Drive Sprocket, Idler Wheels, and Rollers 5002 5-2620 Power Train Tab 6 Section Index - Power Train 6-79192 Hydrostatic System “How it Works” (ISO- Pattern and H-Pattern Pilot Control Machines) 6000 5-4930 Hydrostatic System Troubleshooting 6001 6-79331 Hydrostatic System Troubleshooting (Machines Equipped with Pilot Controls) 6001 5-4910 Removal and Installation of Hydrostatic Components (Mechanical and Pilot Control Machines) 6002 6-79322 Drive Coupling 6003 6-79230 Drive Coupling Tier 3 Engines 6003 5-9530 Piston Pump 6004 6-49580 Piston Pump (Machines Equipped with Pilot Controls) 6004 5-4921 Drive Motors Single Speed 6005 6-79000 Drive Motors Two Speed 6005 6-79010 Sprocket, Chains, and Axle Assemblies 6007 6-79300 Wheels and Tires 6011 6-79310 Brakes Tab 7 Section Index - Brakes 6-79200 Removal and Installation of Park Brake Components 7002 6-79441 Hydraulics Tab 8 Section Index - Hydraulics 6-79212 Hydraulic System Troubleshooting and Schematics (Mechanical and Pilot Control Machines) 8001 6-79342 Cleaning the Hydraulic System and Hydrostatic System 8002 6-45290 Removal and Installation of Hydraulic Components 8003 6-79431 Gear Pump (Equipment and High Flow) 8004 6-79350 Loader Control Valve 8005 5-2640 Cylinders 8006 6-79360 Flat Faced Couplers 8007 7-54740 Accumulator for Ride Control 8013 6-45550 Description Section Number Publication Form Number
- 3. Bur 5-4941 Revised 12-07 Printed in U.S.A. 430/440 SKID STEER AND 440CT COMPACT TRACK LOADER Repair Manual Mechanical and Pilot Control Machines (Tier 3 and Cab Up-Grade Machines) Bur 87634767 Table of Contents (Continued) Mounted Equipment Tab 9 Section Index - Mounted Equipment 6-79221 Pedals and Levers 9001 6-79421 Pedals and Levers (Cab Up-Grade Machines) 9001 5-9560 Loader 9002 6-79390 Attachment Coupler 9003 6-79400 ROPS Canopy, Seat, Seat Belts, and Operators Compartment 9004 6-79410 ROPS Canopy, Seat, Seat Belts, and Operators Compartment (Cab Up-Grade Machines) 9004 5-9460 Heater 9006 6-79450 Air Conditioning Troubleshooting for Systems with R-134A Refrigerant 9011 6-79460 Air Conditioning Troubleshooting for Systems with R-134A Refrigerant (Cab Up-Grade Machines) 9011 5-9480 Air Conditioner System Gauges and Testing for Systems with R-134A Refrigerant 9012 6-79470 Air Conditioner System Gauges and Testing for Systems with R-134A Refrigerant (Cab Up-Grade Machines) 9012 5-9490 Air Conditioner System Service for Systems with R-134A Refrigerant Refrigerant Recovery, Compressor Removal and System Evacuation and Recharging 9013 6-79480 Air Conditioner System Service for Systems with R-134A Refrigerant Refrigerant Recovery, Compressor Removal and System Evacuation and Recharging (Cab Up-Grade Machines) 9013 5-9500 Air Conditioner Component Service for Systems with R-134A Refrigerant 9014 6-79490 Air Conditioner Component Service for Systems with R-134A Refrigerant (Cab Up-Grade Machines) 9014 5-9510 Schematic Set Hydraulic and Electrical Schematic Foldout In Rear Pocket 5-5351 Hydraulic and Electrical Schematic Foldout (Tier 3 Cab Up-Grade and Pilot Control Machines) In Rear Pocket 5-9620 Description Section Number Publication Form Number
- 4. Bur 5-4941 Revised 12-07 Printed in U.S.A. 430/440 SKID STEER AND 440CT COMPACT TRACK LOADER Repair Manual Mechanical and Pilot Control Machines (Tier 3 and Cab Up-Grade Machines) Bur 87634767 Table of Contents (Continued) NOTES
- 5. Copyright © 2007 CNH America LLC All rights reserved. Printed in U.S.A. Issued February, 2005 (Revised December, 2007) CNH AMERICA LLC 700 State Street Racine, WI 53404 U.S.A. Bur 6-79151 SECTION INDEX GENERAL Fluids and Lubricants . . . . . . . . . . . . . . . . . . . . . . . . . . . . . . . . . . . . . . . . . . . . . . . . . . . . . . . . . . . . . . . . . . . . 1001 Fluids and Lubricants Tier 3 Engines . . . . . . . . . . . . . . . . . . . . . . . . . . . . . . . . . . . . . . . . . . . . . . . . . . . . . . . . 1001 Standard Torque Specifications . . . . . . . . . . . . . . . . . . . . . . . . . . . . . . . . . . . . . . . . . . . . . . . . . . . . . . . . . . . . 1002 Metric Conversion Chart . . . . . . . . . . . . . . . . . . . . . . . . . . . . . . . . . . . . . . . . . . . . . . . . . . . . . . . . . . . . . . . . . . 1003 Section Title Section Number
- 6. Section 1001 1001 CNH AMERICA LLC 700 State Street Racine, WI 53404 U.S.A. Bur 6-79031 FLUIDS AND LUBRICANTS
- 7. 1001-2 Bur 6-79031 Revised 3-06 Printed in U.S.A. TABLE OF CONTENTS CAPACITIES AND LUBRICANTS . . . . . . . . . . . . . . . . . . . . . . . . . . . . . . . . . . . . . . . . . . . . . . . . . . . . . . . . . . . . . 3 ENVIRONMENT . . . . . . . . . . . . . . . . . . . . . . . . . . . . . . . . . . . . . . . . . . . . . . . . . . . . . . . . . . . . . . . . . . . . . . . . . . 3 ENGINE LUBRICATION . . . . . . . . . . . . . . . . . . . . . . . . . . . . . . . . . . . . . . . . . . . . . . . . . . . . . . . . . . . . . . . . . . . . 4 Engine Oil Selection . . . . . . . . . . . . . . . . . . . . . . . . . . . . . . . . . . . . . . . . . . . . . . . . . . . . . . . . . . . . . . . . . . . . . 4 Oil Viscosity/Temperature Ranges . . . . . . . . . . . . . . . . . . . . . . . . . . . . . . . . . . . . . . . . . . . . . . . . . . . . . . . . . . 4 DIESEL FUEL SYSTEM . . . . . . . . . . . . . . . . . . . . . . . . . . . . . . . . . . . . . . . . . . . . . . . . . . . . . . . . . . . . . . . . . . . . 5 Fuel Storage . . . . . . . . . . . . . . . . . . . . . . . . . . . . . . . . . . . . . . . . . . . . . . . . . . . . . . . . . . . . . . . . . . . . . . . . . . . 5 Specifications for Acceptable No. 2 Diesel Fuel . . . . . . . . . . . . . . . . . . . . . . . . . . . . . . . . . . . . . . . . . . . . . . . . 5
- 8. 1001-3 Bur 6-79031 Revised 3-06 Printed in U.S.A. CAPACITIES AND LUBRICANTS FUEL TANK Capacity .................................................................................................................... 83.3 litres (22 U.S. gallons) Specifications .......................................................................................... See diesel fuel specifications on page 5 COOLING SYSTEM Capacity ................................................................................................................................17 litres (17.9 quarts) Recovery bottle capacity .......................................................................................................... 2 litres (2.1 quarts) Specifications ................................................................................................ 50% water and 50% ethylene glycol HYDRAULIC SYSTEM Capacity - Total System .................................................................................................. 50.2 litres (13.3 gallons) Capacity - Reservoir........................................................................................................... 32.4 litres (7.1 gallons) Specifications .................................................................................... Case Akcela No. 1 Engine Oil SAE 10W30 CHAIN COMPARTMENTS Capacity - Each Side ............................................................................................................ 5.7 litres (6.0 quarts) Specifications ................................................................................... Case Akcela No. 1 Engine Oil, SAE 10W30 FINAL DRIVE (CT MODELS) Capacity - Each Side .............................................................................................................. 0.55 L (0.58 quarts) Specifications ....................................................................CASE AKCELA GEAR LUBE SSL 75W-90 (Synthetic) BATTERY Quantity .............................................................................................................................................. As required Specifications ................................................................................................................................. Distilled water GREASE FITTINGS Quantity .............................................................................................................................................. As required Attachments (If equipped) ..................................................................................................... Quantity as required Specifications .............................................................................................................. Case molydisulfide grease ENGINE CRANKCASE OIL (410/420 and 420CT MACHINES) Capacity - with filter change .................................................................................................. 8.7 litres (9.2 quarts) Capacity - without filter change ................................................................................................ 8.5 litres (9 quarts) Specifications ..................................................... Case Akcela No. 1 Engine Oil SAE 10W-30 (API service CH-4) .................................................................................... (See Oil Viscosity/Temperature Ranges Chart on page 4) ENGINE CRANKCASE OIL (430/440 and 440CT MACHINES) Capacity - with filter change ................................................................................................. 12 litres (12.7 quarts) Specifications ..................................................... Case Akcela No. 1 Engine Oil SAE 10W-30 (API service CH-4) .................................................................................... (See Oil Viscosity/Temperature Ranges Chart on page 4) ENVIRONMENT Before you service this machine and dispose of oil, fluids and lubricants, always remember the environment. Do not put oil or fluids into the ground or into containers that can leak. Check with your local environmental, recycling center or your Case dealer for correct disposal information.
- 9. 1001-4 Bur 6-79031 Revised 3-06 Printed in U.S.A. ENGINE LUBRICATION Engine Oil Selection Case Akcela No. 1 Engine Oil is recommended for use in your Case Engine. Case Akcela Engine Oil will lubricate your engine correctly under all operating conditions. . See the chart below for recommended viscosity at ambient temperature ranges. NOTE: Do not put Performance Additives or other oil additive products in the engine crankcase. The oil change intervals given in the operating manual are according to tests with Case lubricants. Oil Viscosity/Temperature Ranges BS99N019
- 10. 1001-5 Bur 6-79031 Revised 3-06 Printed in U.S.A. DIESEL FUEL SYSTEM Use No. 2 diesel fuel in the engine of this machine. The use of other fuels can cause the loss of engine power and high fuel consumption. In very cold temperatures, a mixture of No. 1 and No. 2 diesel fuels is temporarily permitted. See the following: NOTE: See your fuel dealer for winter fuel requirements in your area. If the temperature of the fuel lowers below the cloud point (wax appearance point), wax crystals in the fuel will restrict the fuel filter and cause the engine to loose power or not start. The diesel fuel used in this machine must meet the specifications below, “Specifications for Acceptable No. 2 Diesel Fuel” or Specification D975-81 of the American Society for Testing and Materials. Fuel Storage If you keep fuel in storage for a period of time, you can get foreign material or water in the fuel storage tank. Many engine problems are caused by water in the fuel. Keep the fuel storage tank outside and keep the fuel as cool as possible. Remove water from the storage container at regular periods of time. Fill the fuel tank at the end of the daily operating period to prevent condensation in the fuel tank. Specifications for Acceptable No. 2 Diesel Fuel API Gravity, Minimum ............................................................................................................................................ 34 Flash Point, Minimum .......................................................................................................................... 60°C (140° F) Cloud Point (wax appearance point), Maximum ................................................................................... -20°C (-5° F) Pour Point, Maximum .......................................................................................................................... -26° C (-15° F) Distillation Temperature, 90% Point .............................................................................282 to 338°C (540 to 640° F) Viscosity, at 38° C (100° F) Centistokes ............................................................................................................................................ 2.0 to 4.3 Saybolt Seconds Universal ...................................................................................................................... 32 to 40 Cetane Number, Minimum .......................................................................... 43 (45 to 55 for winter or high altitudes) Water and Sediment, by Volume, Maximum .............................................................................................. 0.5 of 1% Sulphur, by Weight, Maximum .....................................................................................................................0.5 of 1% Copper Strip Corrosion, Maximum ................................................................................................................... No. 2 Ash, by Weight, Maximum .......................................................................................................................... 0.1 of 1%
- 11. Section 1001 1001 CNH AMERICA LLC 700 State Street Racine, WI 53404 U.S.A. Bur 5-9520 FLUIDS AND LUBRICANTS Tier 3 Engines
- 12. 1001-2 Bur 5-9520 Issued 12-07 Printed in U.S.A. TABLE OF CONTENTS CAPACITIES AND LUBRICANTS . . . . . . . . . . . . . . . . . . . . . . . . . . . . . . . . . . . . . . . . . . . . . . . . . . . . . . . . . . . . . 3 ENVIRONMENT . . . . . . . . . . . . . . . . . . . . . . . . . . . . . . . . . . . . . . . . . . . . . . . . . . . . . . . . . . . . . . . . . . . . . . . . . . 3 ENGINE LUBRICATION . . . . . . . . . . . . . . . . . . . . . . . . . . . . . . . . . . . . . . . . . . . . . . . . . . . . . . . . . . . . . . . . . . . . 4 Engine Oil Selection . . . . . . . . . . . . . . . . . . . . . . . . . . . . . . . . . . . . . . . . . . . . . . . . . . . . . . . . . . . . . . . . . . . . . 4 Oil Viscosity/Temperature Ranges . . . . . . . . . . . . . . . . . . . . . . . . . . . . . . . . . . . . . . . . . . . . . . . . . . . . . . . . . . 4 DIESEL FUEL SYSTEM . . . . . . . . . . . . . . . . . . . . . . . . . . . . . . . . . . . . . . . . . . . . . . . . . . . . . . . . . . . . . . . . . . . . 5 Fuel Storage . . . . . . . . . . . . . . . . . . . . . . . . . . . . . . . . . . . . . . . . . . . . . . . . . . . . . . . . . . . . . . . . . . . . . . . . . . . 5 Specifications for Acceptable No. 2 Diesel Fuel . . . . . . . . . . . . . . . . . . . . . . . . . . . . . . . . . . . . . . . . . . . . . . . . 5
- 13. 1001-3 Bur 5-9520 Issued 12-07 Printed in U.S.A. CAPACITIES AND LUBRICANTS FUEL TANK Capacity ................................................................................................................. 88.2 litres (23.3 U.S. gallons) Specifications .......................................................................................... See diesel fuel specifications on page 5 COOLING SYSTEM - TIER 3 ENGINES - 430/440/440CT (North American and European Machines) Capacity .............................................................................................................................11.4 litres (12.1 quarts) Recovery bottle capacity .......................................................................................................... 2 litres (2.1 quarts) Specifications ................................................................................................ 50% water and 50% ethylene glycol HYDRAULIC SYSTEM Capacity - Total System .................................................................................................. 50.2 litres (13.2 gallons) Capacity - Reservoir........................................................................................................... 26.9 litres (7.1 gallons) Specifications .................................................................................... Case Akcela No. 1 Engine Oil SAE 10W30 CHAIN COMPARTMENTS Capacity - Each Side ............................................................................................................ 3.8 litres (4.0 quarts) Specifications ................................................................................... Case Akcela No. 1 Engine Oil, SAE 10W30 FINAL DRIVE (CT MODELS) Capacity - Each Side .................................................................................................................. 0.6 L (0.6 quarts) Specifications ......................................................................................CASE AKCELA GEAR LUBE SSL 80W-90 BATTERY Quantity .............................................................................................................................................. As required Specifications ................................................................................................................................. Distilled water GREASE FITTINGS Quantity .............................................................................................................................................. As required Attachments (If equipped) ..................................................................................................... Quantity as required Specifications .............................................................................................................. Case molydisulfide grease ENGINE CRANKCASE OIL (430 MACHINES) Capacity - with filter change ..................................................................................................... 8.5 litres (9 quarts) Specifications ..................................................... Case Akcela No. 1 Engine Oil SAE 15W-40 (API service CH-4) .................................................................................... (See Oil Viscosity/Temperature Ranges Chart on page 4) ENGINE CRANKCASE OIL (440 and 440CT MACHINES) Capacity - with filter change ................................................................................................. 12 litres (12.7 quarts) Specifications ..................................................... Case Akcela No. 1 Engine Oil SAE 15W-40 (API service CH-4) .................................................................................... (See Oil Viscosity/Temperature Ranges Chart on page 4) ENVIRONMENT Before you service this machine and dispose of oil, fluids and lubricants, always remember the environment. Do not put oil or fluids into the ground or into containers that can leak. Check with your local environmental, recycling center or your Case dealer for correct disposal information.
- 14. 1001-4 Bur 5-9520 Issued 12-07 Printed in U.S.A. ENGINE LUBRICATION Engine Oil Selection Case Akcela No. 1 Engine Oil is recommended for use in your Case Engine. Case Akcela Engine Oil will lubricate your engine correctly under all operating conditions. . See the chart below for recommended viscosity at ambient temperature ranges. NOTE: Do not put Performance Additives or other oil additive products in the engine crankcase. The oil change intervals given in the operating manual are according to tests with Case lubricants. Oil Viscosity/Temperature Ranges BS99N019
- 15. 1001-5 Bur 5-9520 Issued 12-07 Printed in U.S.A. DIESEL FUEL SYSTEM Use No. 2 diesel fuel in the engine of this machine. The use of other fuels can cause the loss of engine power and high fuel consumption. In very cold temperatures, a mixture of No. 1 and No. 2 diesel fuels is temporarily permitted. See the following: NOTE: See your fuel dealer for winter fuel requirements in your area. If the temperature of the fuel lowers below the cloud point (wax appearance point), wax crystals in the fuel will restrict the fuel filter and cause the engine to loose power or not start. The diesel fuel used in this machine must meet the specifications below, “Specifications for Acceptable No. 2 Diesel Fuel” or Specification D975-81 of the American Society for Testing and Materials. Fuel Storage If you keep fuel in storage for a period of time, you can get foreign material or water in the fuel storage tank. Many engine problems are caused by water in the fuel. Keep the fuel storage tank outside and keep the fuel as cool as possible. Remove water from the storage container at regular periods of time. Fill the fuel tank at the end of the daily operating period to prevent condensation in the fuel tank. Specifications for Acceptable No. 2 Diesel Fuel API Gravity, Minimum ............................................................................................................................................ 34 Flash Point, Minimum .......................................................................................................................... 60°C (140° F) Cloud Point (wax appearance point), Maximum ................................................................................... -20°C (-5° F) Pour Point, Maximum .......................................................................................................................... -26° C (-15° F) Distillation Temperature, 90% Point .............................................................................282 to 338°C (540 to 640° F) Viscosity, at 38° C (100° F) Centistokes ............................................................................................................................................ 2.0 to 4.3 Saybolt Seconds Universal ...................................................................................................................... 32 to 40 Cetane Number, Minimum .......................................................................... 43 (45 to 55 for winter or high altitudes) Water and Sediment, by Volume, Maximum .............................................................................................. 0.5 of 1% Sulphur, by Weight, Maximum .....................................................................................................................0.5 of 1% Copper Strip Corrosion, Maximum ................................................................................................................... No. 2 Ash, by Weight, Maximum .......................................................................................................................... 0.1 of 1%
- 16. Section 1002 1002 CNH AMERICA LLC 700 State Street Racine, WI 53404 U.S.A. Bur 7-52931 STANDARD TORQUE SPECIFICATIONS
- 17. 1002-2 Bur 7-52931 Issued 9-98 Printed in U.S.A TABLE OF CONTENTS TORQUE SPECIFICATIONS - DECIMAL HARDWARE ...................................................................................................... 3 Grade 5 Bolts, Nuts, and Studs .................................................................................................................................. 3 Grade 8 Bolts, Nuts, and Studs .................................................................................................................................. 3 TORQUE SPECIFICATIONS - METRIC HARDWARE ........................................................................................................ 4 Grade 8.8 Bolts, Nuts, and Studs ................................................................................................................................ 4 Grade 12.9 Bolts, Nuts, and Studs .............................................................................................................................. 4 Grade 10.9 Bolts, Nuts, and Studs .............................................................................................................................. 4 TORQUE SPECIFICATIONS - STEEL HYDRAULIC FITTINGS ........................................................................................... 5 37 Degree Flare Fitting ............................................................................................................................................. 5 Straight Threads with O-ring ...................................................................................................................................... 5 Split Flange Mounting Bolts ....................................................................................................................................... 6 O-Ring Face Seal End .............................................................................................................................................. 6 O-Ring Boss End Fitting or Lock Nut .................................................................................................................................................... 6 Pipe fittings ............................................................................................................................................................. 7
- 18. 1002-3 Bur 7-52931 Issued 9-98 Printed in U.S.A. Template Name: SM_2_col Template Date: 1997_01_13 Alt= to hide template information Alt+ to display template information TORQUE SPECIFICATIONS - DECIMAL HARDWARE Use the torques in this chart when special torques are not given. These torques apply to fasteners with both UNC and UNF threads as received from suppliers dry, or when lubricated with engine oil. Not applicable if special graphities, Molydisulfide greases, or other extreme pressure lubricants are used. Grade 5 Bolts, Nuts, and Studs Size Newton metres Pound- Inches 1/4 inch 10 to 12 91 to 103 5/16 inch 21 to 24 188 to 212 3/8 inch 38 to 43 336 to 378 Pound- Feet 7/16 inch 61 to 69 45 to 51 1/2 inch 94 to 104 68 to 76 9/16 inch 132 to 149 98 to 110 5/8 inch 183 to 210 138 to 155 3/4 inch 325 to 370 242 to 270 7/8 inch 530 to 595 390 to 435 1.0 inch 790 to 890 585 to 655 1-1/8 inch 980 to 1100 725 to 805 1-1/4 inch 1385 to 1555 1020 to 1145 1-3/8 inch 1810 to 2030 1335 to 1495 1-1/2 inch 2400 to 2700 1770 to 1990 Grade 8 Bolts, Nuts, and Studs Size Newton metres Pound- Inches 1/4 inch 15 to 16 130 to 145 5/16 inch 30 to 34 268 to 301 3/8 inch 54 to 60 474 to 534 Pound- Feet 7/16 inch 86 to 97 63 to 71 1/2 inch 132 to 149 96 to 110 9/16 inch 191 to 213 140 to 155 5/8 inch 260 to 293 190 to 215 3/4 inch 480 to 515 340 to 380 7/8 inch 745 to 835 550 to 615 1.0 inch 1120 to 1280 825 to 925 1-1/8 inch 1585 to 1785 1170 to 1315 1-1/4 inch 2215 to 2235 1650 to 1855 1-3/8 inch 2930 to 3295 2160 to 2430 1-1/2 inch 3895 to 4375 2870 to 3225 NOTE: Use thick nuts with Grade 8 bolts.
- 19. 1002-4 Bur 7-52931 Issued 9-98 Printed in U.S.A. Template Name: SM_2_col Template Date: 1997_01_13 Alt= to hide template information Alt+ to display template information TORQUE SPECIFICATIONS - METRIC HARDWARE Use the following torques when specifications are not given. These values apply to fasteners with both coarse and fine threads as received from supplier, plated or unplated, or when lubricated with engine oil. These values do not apply if graphite or Molydisulfide grease or oil is used. Use of a click type torque wrench, or better is required. Grade 12.9 Bolts, Nuts, and Studs Usually the torque values specified for grade 10.9 fasteners can be used satisfactorily on grade 12.9 fasteners. Grade 8.8 Bolts, Nuts, and Studs Size Newton metres Pound- Inches M4 3 to 4 31 to 35 M5 5 to 6 49 to 55 M6 10 to 11 84 to 94 M8 23 to 26 229 to 277 M10 46 to 51 408 to 460 Pound- Feet M12 80 to 90 59 to 66 M14 128 to 145 94 to 106 M16 200 to 220 149 to 161 M20 400 to 450 293 to 330 M24 690 to 780 510 to 575 M30 1375 to 1545 1010 to 1140 M36 2400 to 2700 1770 to 1990 8.8 Grade 10.9 Bolts, Nuts, and Studs Size Newton metres Pound- Inches M4 5 to 6 44 to 49 M5 8 to 9 71 to 79 M6 14 to 15 120 to 136 M8 33 to 37 293 to 329 Pound- Feet M10 65 to 74 48 to 54 M12 114 to 128 85 to 94 M14 183 to 205 136 to 153 M16 285 to 320 208 to 235 M20 555 to 620 406 to 460 M24 955 to 1075 705 to 790 M30 1900 to 2140 1400 to 1580 M36 3315 to 3730 2445 to 2750 10.9 12.9
- 20. 1002-5 Bur 7-52931 Issued 9-98 Printed in U.S.A. Template Name: SM_2_col Template Date: 1997_01_13 Alt= to hide template information Alt+ to display template information TORQUE SPECIFICATIONS - STEEL HYDRAULIC FITTINGS 37 Degree Flare Fitting Nom. SAE Dash Size Tube OD/Hose ID Thread Size Newton metres Pound-Inches -2 5/16 - 24 8 to 9 72 to 84 -3 3/8 - 24 11 to 12 96 to 108 -4 6.4 mm (1/4 inch) 7/16 - 20 14 to 16 120 to 144 -5 7.9 mm (5/16 inch) 1/2 - 20 18 to 21 156 to 192 -6 9.5 mm (3/8 inch) 9/16 - 18 27 to 33 240 to 300 -8 12.7 mm (1/2 inch) 3/4 - 16 46 to 56 408 to 504 -10 15.9 mm (5/8 inch) 7/8 - 14 77 to 85 684 to 756 Pound-Feet -12 19.0 mm (3/4 inch) 1-1/16 - 12 107 to 119 79 to 88 -14 22.2 mm (7/8 inch) 1-3/16 - 12 127 to 140 94 to 103 -16 25.4 mm (1.0 inch) 1-5/16 - 12 131 to 156 97 to 117 -20 31.8 mm (1-1/4 inch) 1-5/8 - 12 197 to 223 145 to 165 -24 38.1 mm (1-1/2 inch) 1-7/8 - 12 312 to 338 230 to 250 Straight Threads with O-ring Nom. SAE Dash Size Tube OD/Hose ID Thread Size Newton metres Pound-Inches -2 5/16 - 24 8 to 9 72 to 84 -3 3/8 - 24 11 to 12 96 to 108 -4 6.4 mm (1/4 inch) 7/16-20 20 to 25 180 to 228 -5 7.9 mm (5/16 inch) 1/2-20 27 to 33 240 to 300 -6 9.5 mm (3/8 inch) 9/16-18 43 to 54 384 to 480 -8 12.7 mm (1/2 inch) 3/4-16 73 to 90 648 to 804 Pound-Feet -10 15.9 mm (5/8 inch) 7/8-14 100 to 124 74 to 92 -12 19.0 mm (3/4 inch) 1-1/16-12 138 to 173 102 to 128 -14 22.2 mm (7/8 inch) 1-3/16-12 173 to 216 128 to 160 -16 25.4 mm (1.0 inch) 1-5/16-12 203 to 253 150 to 187 -20 31.8 mm (1-1/4 inch) 1-5/8-12 308 to 357 227 to 264 -24 38.1 mm (1-1/2 inch) 1-7/8-12 492 to 542 363 to 400
- 21. 1002-6 Bur 7-52931 Issued 9-98 Printed in U.S.A. Template Name: SM_2_col Template Date: 1997_01_13 Alt= to hide template information Alt+ to display template information Split Flange Mounting Bolts Size Newton metres Pound-Inches 5/16-18 20 to 27 180 to 240 3/8-16 27 to 34 240 to 300 7/16-14 47 to 61 420 to 540 Pound-Feet 1/2-13 74 to 88 55 to 65 5/8-11 190 to 203 140 to 150 O-Ring Face Seal End O-Ring Boss End Fitting or Lock Nut Nom. SAE Dash Size Tube OD Thread Size Newton metres Pound-Inches Thread Size Newton metres Pound-Inches -4 6.4 mm (1/4 inch) 9/16-18 23 to 26 204 to 228 -6 9.5 mm (3/8 inch) 11/16-16 34 to 40 300 to 348 9/16-18 48 to 54 432 to 480 -8 12.7 mm (1/2 inch) 13/16-16 52 to 57 456 to 504 3/4-16 70 to 78 612 to 684 Pound-Feet -10 15.9 mm (5/8 inch) 1-14 81 to 90 720 to 792 7/8-14 102 to 114 75 to 84 Pound-Feet -12 19.0 mm (3/4 inch) 1-3/16-12 117 to 128 86 to 94 1-1/16-12 142 to 160 105 to 117 -16 25.4 mm (1.0 inch) 1-7/16-12 152 to 174 112 to 128 1-5/16-12 237 to 254 175 to 187 -20 31.8 mm (1-1/4 inch) 1-11/16-12 179 to 201 132 to 148 -24 38.1 mm (1-1/2 inch) 2-12 213 to 235 157 to 173
- 22. 1002-7 Bur 7-52931 Issued 9-98 Printed in U.S.A. Template Name: SM_2_col Template Date: 1997_01_13 Alt= to hide template information Alt+ to display template information NOTE: Apply sealant/lubricant to male pipe threads. The first two threads should be left uncovered to avoid system contamination. Screw pipe fitting into female pipe port to the finger tight position. Wrench tighten fitting to the appropriate turns from finger tight (TFFT) shown in table above, making sure the tube end of an elbow or tee fitting is aligned to receive incoming tube or hose fitting. Pipe fittings Nom. SAE Dash Size Thread Size TFFT (Turns For Finger Tight) -2 1/8 - 27 2.0 - 3.0 -3 1/8 - 27 2.0 - 3.0 -4 1/8 - 27 2.0 - 3.0 -5 1/8 - 27 2.0 - 3.0 -6 1/4 - 18 1.5 - 3.0 -8 3/8 - 18 2.0 - 3.0 -10 1/2 - 14 2.0 - 3.0 -12 3/4 - 14 2.0 - 3.0 -14 3/4 - 14 2.0 - 3.0 -16 1 - 11 1/2 1.5 - 2.5 -20 1 1/4 - 11 1/2 1.5 - 2.5 -24 1 1/2 - 11 1/2 1.5 - 2.5 -32 2 - 11 1/2 1.5 - 2.5
- 23. Section 1003 1003 CNH AMERICA LLC 700 State Street Racine, WI 53404 U.S.A. Bur 7-52950 METRIC CONVERSION CHART
- 24. 1003-2 Bur 7-52950 Issued 6-97 Printed in U.S.A TABLE OF CONTENTS CONVERSION FACTORS ............................................................................................................................................. 3 Metric to U.S. .......................................................................................................................................................... 3 U.S. to Metric ......................................................................................................................................................... 4
- 25. 1003-3 Bur 7-52950 Issued 6-97 Printed in U.S.A. Template Name: SM_1_col Template Date: 1994_04_05 Alt= to hide template information Alt+ to display template information CONVERSION FACTORS Metric to U.S. MULTIPLY BY TO OBTAIN Area: sq. meter hectare 10.763 91 2.471 05 square foot acre Force: newton newton 3.596 942 0.224 809 ounce force pound force Length: millimeter meter kilometer 0.039 370 3.280 840 0.621 371 inch foot mile Mass: kilogram 2.204 622 pound Mass/Area: kilogram/hectare 0.000 466 ton/acre Mass/Energy: gr/kW/hr. 0.001 644 lbs/hp/hr. Mass/Volume: kg/cubic meter 1.685 555 lb/cubic yd. Power: kilowatt 1.341 02 horsepower Pressure: kilopascal bar 0.145 038 14.50385 lb/sq. inch lb/sq. inch Temperature: degree C 1.8 x C +32 degree F Torque: newton meter newton meter 8.850 748 0.737 562 lb/inch lb/foot Velocity: kilometer/hr. 0.621 371 miles/hr. Volume: cubic centimeter cubic meter cubic meter milliliter litre litre litre litre 0.061 024 35.314 66 1.307 950 0.033 814 1.056 814 0.879 877 0.264 172 0.219 969 cubic inch cubic foot cubic yd. ounce (US fluid) quart (US liquid) quart (Imperial) gallon (US liquid) gallon (Imperial) Volume/Time: litre/min. litre/min. 0.264 172 0.219 969 gallon/min. (US liquid) gallon/min. (Imperial)
- 26. 1003-4 Bur 7-52950 Issued 6-97 Printed in U.S.A. Template Name: SM_1_col Template Date: 1994_04_05 Alt= to hide template information Alt+ to display template information U.S. to Metric * = exact MULTIPLY BY TO OBTAIN Area: square foot acre 0.092 903 0.404 686 square meter hectare Force: ounce force pound force 0.278 014 4.448 222 newton newton Length: inch foot mile 25.4 * 0.304 8 * 1.609 344 * millimeter meter kilometer Mass: pound ounce 0.453 592 28.35 kilogram gram Mass/Area: ton/acre 2241 702 kilogram/hectare Mass/Energy: lb/hp/hr 608.277 4 gr/kW/hr Mass/Volume: lb/cubic yd. 0.593 276 kg/cubic meter Power: horsepower 0.745 700 kilowatt Pressure: lbs/sq. in. lbs/sq. in. lbs/sq. in. 6.894 757 0.069 0.070 303 kilopascal bar kg/sq. cm Temperature: degree F 1.8 F - 32 degree C Torque: pound/inch pound/foot 0.112 985 1.355 818 newton meter newton meter Velocity: miles/hr. 1.609 344 * kilometer/hr. Volume: cubic inch cubic foot cubic yard ounce (US fluid) quart (US liquid) quart (Imperial) gallon (US) gallons (Imperial) 16.387 06 0.028 317 0.764.555 29.573 53 0.946 353 1.136 523 3.785 412 4.546 092 cubic centimeter cubic meter cubic meter milliliter litre litre litre litre Volume/Time: gallon/min. 3.785 412 litre/min.
- 27. Bur 6-79161 SECTION INDEX ENGINE Engine and Radiator Removal and Installation . . . . . . . . . . . . . . . . . . . . . . . . . . . . . . . . . . . . . . . . . . . . . . . . . 2000 Engine and Radiator Removal and Installation (430 Tier 3 Engine) . . . . . . . . . . . . . . . . . . . . . . . . . . . . . . . 2000 Engine and Radiator Removal and Installation (440/440CT Tier 3 Engine). . . . . . . . . . . . . . . . . . . . . . . . . 2000 For Engine Repair, see the Engine Service Manual . . . . . . . . . . . . . . . . . . . . . . . . . . . . . . . . . . . . . . . . . . . 6-74500 For 430 Tier 3 Engine Repair - See Tier 3 Engine Repair Manual . . . . . . . . . . . . . . . . . . . . . . . . . . . . . . .87693888 For 440/440CT Tier 3 Engine Repair - See Tier 3 Engine Repair Manual . . . . . . . . . . . . . . . . . . . . . . . . .87630273 Section Title Section Number
- 28. Section 2000 2000 CNH AMERICA LLC 700 State Street Racine, WI 53404 U.S.A. Bur 6-79290 ENGINE AND RADIATOR REMOVAL AND INSTALLATION
- 29. 2000-2 Bur 6-79290 Issued 2-05 Printed in U.S.A. TABLE OF CONTENTS RADIATOR . . . . . . . . . . . . . . . . . . . . . . . . . . . . . . . . . . . . . . . . . . . . . . . . . . . . . . . . . . . . . . . . . . . . . . . . . . . . . . 3 Removal . . . . . . . . . . . . . . . . . . . . . . . . . . . . . . . . . . . . . . . . . . . . . . . . . . . . . . . . . . . . . . . . . . . . . . . . . . . . . . 3 Installation . . . . . . . . . . . . . . . . . . . . . . . . . . . . . . . . . . . . . . . . . . . . . . . . . . . . . . . . . . . . . . . . . . . . . . . . . . . . . 7 ENGINE . . . . . . . . . . . . . . . . . . . . . . . . . . . . . . . . . . . . . . . . . . . . . . . . . . . . . . . . . . . . . . . . . . . . . . . . . . . . . . . . . 8 Removal . . . . . . . . . . . . . . . . . . . . . . . . . . . . . . . . . . . . . . . . . . . . . . . . . . . . . . . . . . . . . . . . . . . . . . . . . . . . . . 8 Installation . . . . . . . . . . . . . . . . . . . . . . . . . . . . . . . . . . . . . . . . . . . . . . . . . . . . . . . . . . . . . . . . . . . . . . . . . . . . 13
- 30. 2000-3 Bur 6-79290 Issued 2-05 Printed in U.S.A. RADIATOR Removal NOTE: Photos may be slightly different from the machine you are repairing. The procedure is the same. NOTE: Put caps on all fittings and plugs in all disconnected hoses. STEP 1 Park the machine on a level surface. STEP 2 Lift the hood and open the rear access door on the machine. STEP 3 Turn the ignition switch and the master disconnect switch (if equipped) to the OFF position. STEP 4 Disconnect the negative battery cable from the battery. STEP 5 BD04C007 Slowly loosen the radiator cap (15). Disconnect the overflow hose (5) from the radiator neck. NOTE: Refer to illustration on page 5. STEP 6 BD05A024 If equipped with a heater, open the heater coolant valve (1). STEP 7 Install a hose on the drain valve (16) and drain the radiator (1) into a clean container that holds approximately 17 litres (4.5 gallons). STEP 8 If equipped with a heater, close the heater coolant valve. STEP 9 BD05A026 If the machine is equipped with a High Flow Oil Cooler (1), release the latch (2) on the lower left side of the oil cooler and swing the oil cooler away from the radiator. Remove mounting bolts (3) from the hinge and remove the oil cooler (1) from the radiator mounting location. Secure the oil cooler away from the radiator. 5 15 1 3 1 2
- 31. 2000-4 Bur 6-79290 Issued 2-05 Printed in U.S.A. STEP 10 BD04C026 Release the latch on the top of the radiator and tip the radiator out from the mounting location. STEP 11 BD04C007 BD05A025 Loosen the clamps (7) on the lower radiator hose (10) and clamps (7) on the upper radiator hose (8). Remove the upper radiator hose (8) and the lower radiator hose (10) from the radiator (1). NOTE: Refer to illustration on page 5. STEP 12 BD04K036 Move the radiator (1) away from the upper radiator hose (6) and lower radiator hose (5). Remove the radiator (1) from the machine. 7 7 1 6 5
- 32. 2000-5 Bur 6-79290 Issued 2-05 Printed in U.S.A. BS04M093 1. RADIATOR 2. UPPER FRAME ASSEMBLY 3. BOLT 4. COOLANT RECOVERY HOSE 5. COOLANT EXPANSION RESERVOIR 6. UPPER RADIATOR HOSE 7. CLAMP 8. LOWER RADIATOR HOSE 9. CLAMP 10. SEAL 11. WASHER 12. LOWER FRAME ASSEMBLY 13. SPLIT PIN 14. CUSHION 15. NUT 16. DRAIN VALVE 17. RADIATOR CAP 430 AND 440 RADIATOR MOUNTING 17 16 7 9
- 33. 2000-6 Bur 6-79290 Issued 2-05 Printed in U.S.A. BS04M096 1. FAN BLADE 2. SPACER 3. LOCK WASHER 4. CAP SCREW 5. SHROUD 6. BOLT 7. CAP SCREW 8. LOCK WASHER 9. WASHER 10. FAN GUARD 11. OIL COOLER 430 AND 440 FAN MOUNTING
- 34. 2000-7 Bur 6-79290 Issued 2-05 Printed in U.S.A. Installation STEP 13 Installation of the radiator is the reverse procedure of removal. STEP 14 After the radiator has been installed, fill the cooling system. See Section 1001 for the correct coolant mixture and quantity. STEP 15 Start and run the engine until it reaches operating temperature and check for any leaks. Stop the engine. After the engine has cooled, check the level of the cooling system and add coolant as required.
- 35. 2000-8 Bur 6-79290 Issued 2-05 Printed in U.S.A. ENGINE Removal STEP 1 Remove the radiator and hydraulic oil cooler from the machine. STEP 2 Install plugs and caps on all disconnected hoses and fittings. STEP 3 Tag all electrical connection for identification during assembly. STEP 4 BD05A027 If equipped with a heater, disconnect the heater hoses (1) from the engine. STEP 5 Lift the rear hood and open the rear access door. STEP 6 BD05A028 Disconnect the electrical connectors from the rear tail lamps (1) on both sides of the rear access door. Disconnect the electrical connectors from the rear worklight (2). Disconnect the electrical connectors from the backup alarm (3). Remove mounting hardware from the wiring harness (4) and remove the harness (4) from the rear access door. STEP 7 BD05A028 Connect acceptable lifting equipment to the rear access door. Remove the pivot bolt (1) and lift the rear access door and remove from the machine. 1 1 12 3 1
- 36. 2000-9 Bur 6-79290 Issued 2-05 Printed in U.S.A. STEP 8 BD01K023 1. CYLINDER PIVOT BOLT Remove the nut from cylinder pivot bolt (1) on the hood end of the cylinder. STEP 9 BD05A0 Remove the plastic clip (2) from the hood pivot shaft. Slide the hood to the left and remove the hood from the hood pivot shaft on both sides of the machine. Remove the hood from the machine. STEP 10 BD05A051 1. AIR RESTRICTION INDICATOR SWITCH 2. GRID HEATER (IF EQUIPPED) Disconnect the electrical connector for the air restriction indicator switch (1). Disconnect the wires (3) for the grid heater (2) (if equipped). STEP 11 BD05A040 Loosen the clamps (16) on the intake manifold hose (6). Remove the hose from the intake and air filter assembly. Loosen the clamps (14) on the hose (15). Remove the hose from the engine. NOTE: Torque clamps (49) 3 to 4 Nm (25 to 35 pound-inches) during assembly. NOTE: Refer to illustration on page 16 and 17. 1 2 1 2 33 3 6 14 16 15
- 37. 2000-10 Bur 6-79290 Issued 2-05 Printed in U.S.A. STEP 12 BD05A041 Loosen and remove the bolts (9) and washers (10) from the air filter housing clamp (4). STEP 13 Remove the air cleaner (4) from the machine. STEP 14 Loosen and remove the bolts (12 and 17) and lock washers (13) and spacers (14 and 15) that fasten the muffler (1) to the exhaust manifold. NOTE: Torque the bolts (70) 51 to 61 Nm (38 to 45 pound-feet) during assembly. NOTE: Refer to illustration on page 18 and 19. STEP 15 BD05A042 BD05A043 Remove the bolts and washers that fasten the muffler to the support rods. Remove the muffler from the machine (1). NOTE: Torque bolts (62) 23 to 26 Nm (204 to 228 pound-inches) during assembly. STEP 16 Loosen and remove the cap screws (7) and washer and lock washers (8 and 9) from the fan guard (10). Remove the fan guard (10). STEP 17 Remove the bolts (4), washers (3), fan blade (1), and spacer (2) from the engine. STEP 18 Loosen and remove the bolts (6) from the shroud (5). Remove the shroud (5). STEP 19 Connect a vacuum pump top the hydraulic reservoir. Start the vacuum pump. Loosen and remove the hose connections from the hydraulic oil cooler (11). Remove the oil cooler (11). Place caps on the fittings and plugs in the hoses. Stop the vacuum pump. NOTE: Refer to illustration on page 6. 9 4 1
- 38. 2000-11 Bur 6-79290 Issued 2-05 Printed in U.S.A. STEP 20 BD05A044 1. STARTER WIRES Disconnect the wires (1) from the starter solenoid. STEP 21 BD05A068 Loosen and remove the bolt that fastens the ground cable to the engine. Remove the ground cable from the engine. STEP 22 BD05A044 Unplug the electrical connectors (1) on the engine wiring harness. STEP 23 BD01K021 Disconnect the wires from the alternator. STEP 24 Loosen and remove the nut (32) and washer (33) that fastens the throttle linkage (31) to the fuel injection pump. NOTE: Refer to illustration on page 14 and 15. STEP 25 Loosen and remove the nut (32) and washer (33) that fastens the throttle linkage (31) to the throttle handle (34). STEP 26 Disconnect the wire for the engine temperature switch. Cut the tie strap holding it to the engine and move out of the way. STEP 27 BD05A040 Disconnect the wire connector for the fuel injection pump solenoid. Loosen and remove the nut and washer that fastens the throttle linkage to the injector pump. Remove the throttle linkage. 1 1 1
- 39. 2000-12 Bur 6-79290 Issued 2-05 Printed in U.S.A. STEP 28 BD05A040 Loosen and remove the bolts that fasten all of the wire harnesses to the engine. Cut all tie straps that fasten wire harnesses to the engine. STEP 29 Move all of the wiring harnesses out of the way. STEP 30 BD01C219 Close the fuel valves. STEP 31 BD05A052 Disconnect the fuel line from the fuel pump. STEP 32 BD05A049 Start the vacuum pump. Disconnect the hoses from the high flow pump (if equipped). Install caps on the fittings and plugs in the hoses. STEP 33 BD05A067 Tag and disconnect the all of the hydraulic lines, control linkage, and electrical connections from the tandem pump. Install caps on all of the fittings and plugs in all of the hoses. Stop the vacuum pump. STEP 34 Connect equipment to the tandem pump that will hold the tandem pump in position when the engine is removed.
- 40. 2000-13 Bur 6-79290 Issued 2-05 Printed in U.S.A. STEP 35 BD05A069 Loosen and remove the upper mounting bolts and washers that fasten the tandem pump to the mounting plate on the engine. Loosen and remove the mounting bolts for the lower mounting bracket that fasten the tandem pump to the mounting plate on the engine. NOTE: During assembly torque the bolts 39 to 47 Nm (345 to 416 pound-inches). NOTE: Refer to illustration on page 14 and 15. STEP 36 Move the tandem pump assembly away from the engine. STEP 37 BD05A040 Connect acceptable lifting equipment to the engine lifting eyes on the front and the rear of the engine. STEP 38 Loosen and remove the cap screw (7), washers (5) and nut (4) from the rear engine mounts. NOTE: Torque the bolts 183 to 224 Nm (135 to 165 pound-feet) during assembly. STEP 39 Loosen and remove the cap screw (7), washers (5) and plate (9) from the front engine mounts. NOTE: Torque the bolts 183 to 224 Nm (135 to 165 pound-feet) during assembly. STEP 40 Move the engine away from the tandem pump mounting plate until the splined shaft on the tandem pump disengages the coupling. STEP 41 Remove the engine from the machine. NOTE: During assembly apply anti-seize compound to the splined shaft on the tandem pump before engaging the splined shaft in the coupling. Installation STEP 42 Installation of the engine is the reverse procedure of removal.
- 41. 2000-14 Bur 6-79290 Issued 2-05 Printed in U.S.A. BS04M105 1. ENGINE ASSEMBLY 2. CAP SCREW 3. LOCK WASHER 4. LOCKNUT 5. WASHER 6. BUSHING 7. CAP SCREW 8. REAR ENGINE MOUNT 9. PLATE 10. PUMP DRIVE ELEMENT 11. LOCK WASHER 12. CAP SCREW 13. PUMP DRIVE HUB 14. PUMP MOUNTING PLATE 15. WASHER 16. CAP SCREW 17. ENGINE OIL DIPSTICK 18. BELT 430 ENGINE MOUNTING
- 42. 2000-15 Bur 6-79290 Issued 2-05 Printed in U.S.A. BS04M108 1. ENGINE ASSEMBLY 2. CAP SCREW 3. LOCK WASHER 4. LOCKNUT 5. WASHER 6. BUSHING 7. CAP SCREW 8. REAR ENGINE MOUNT 9. PLATE 10. PUMP DRIVE ELEMENT 11. LOCK WASHER 12. CAP SCREW 13. PUMP DRIVE HUB 14. PUMP MOUNTING PLATE 15. WASHER 16. CAP SCREW 17. ENGINE OIL DIPSTICK 18. BELT 440 ENGINE MOUNTING
- 43. 2000-16 Bur 6-79290 Issued 2-05 Printed in U.S.A. BS04M101 1. AIR CLEANER BODY 2. PRIMARY FILTER ELEMENT 3. SECONDARY FILTER ELEMENT 4. COVER 5. DUST VALVE 6. OUTLET HOSE 7. CLAMP 8. BRACKET 9. CAP SCREW 10. LOCK WASHER 11. NUT 12. CAP SCREW 13. FITTING 14. CLAMP 15. HOSE 16. CLAMP 430 AIR FILTER ASSEMBLY
- 44. 2000-17 Bur 6-79290 Issued 2-05 Printed in U.S.A. BS04M102 1. AIR CLEANER BODY 2. PRIMARY FILTER ELEMENT 3. SECONDARY FILTER ELEMENT 4. COVER 5. DUST VALVE 6. OUTLET HOSE 7. CLAMP 8. BRACKET 9. CAP SCREW 10. LOCK WASHER 11. NUT 12. CAP SCREW 13. FITTING 14. CLAMP 15. HOSE 16. CLAMP 440 AIR FILTER ASSEMBLY
- 45. 2000-18 Bur 6-79290 Issued 2-05 Printed in U.S.A. BS04M099 1. MUFFLER 2. GASKET 3. SUPPORT ROD 4. CAP SCREW 5. LOCK WASHER 6. CAP SCREW 7. SPACER 8. NUT 9. SUPPORT ROD 10. CAP SCREW 11. LOCK WASHER 12. CAP SCREW 13. LOCK WASHER 14. SPACER 15. CAP SCREW 16. SUPPORT ROD 17. EXHAUST TUBE 18. CLAMP 19. SUPPORT ROD 430 MUFFLER ASSEMBLY
- 46. 2000-19 Bur 6-79290 Issued 2-05 Printed in U.S.A. BS04M100 1. MUFFLER 2. SUPPORT ROD 3. CAP SCREW 4. NUT 5. CAP SCREW 6. LOCK WASHER 7. CAP SCREW 8. LOCK WASHER 9. SPACER 10. SUPPORT ROD 11. SUPPORT ROD 12. CAP SCREW 13. LOCK WASHER 14. SUPPORT ROD 15. SPACER 16. GASKET 17. CAP SCREW 18. CLAMP 19. EXHAUST TUBE 440 MUFFLER ASSEMBLY
- 47. 2000-20 Bur 6-79290 Issued 2-05 Printed in U.S.A. NOTES
- 48. Section 2000 2000 CNH AMERICA LLC 700 State Street Racine, WI 53404 U.S.A. Bur 5-9540 430 ENGINE AND RADIATOR REMOVAL AND INSTALLATION TIER 3 ENGINE
- 49. 2000-2 Bur 5-9540 Issued 12-07 Printed in U.S.A. TABLE OF CONTENTS RADIATOR . . . . . . . . . . . . . . . . . . . . . . . . . . . . . . . . . . . . . . . . . . . . . . . . . . . . . . . . . . . . . . . . . . . . . . . . . . . . . . 3 Removal . . . . . . . . . . . . . . . . . . . . . . . . . . . . . . . . . . . . . . . . . . . . . . . . . . . . . . . . . . . . . . . . . . . . . . . . . . . . . . 3 Installation . . . . . . . . . . . . . . . . . . . . . . . . . . . . . . . . . . . . . . . . . . . . . . . . . . . . . . . . . . . . . . . . . . . . . . . . . . . . . 6 ENGINE . . . . . . . . . . . . . . . . . . . . . . . . . . . . . . . . . . . . . . . . . . . . . . . . . . . . . . . . . . . . . . . . . . . . . . . . . . . . . . . . . 7 Removal . . . . . . . . . . . . . . . . . . . . . . . . . . . . . . . . . . . . . . . . . . . . . . . . . . . . . . . . . . . . . . . . . . . . . . . . . . . . . . 7 Installation . . . . . . . . . . . . . . . . . . . . . . . . . . . . . . . . . . . . . . . . . . . . . . . . . . . . . . . . . . . . . . . . . . . . . . . . . . . . 11
- 50. 2000-3 Bur 5-9540 Issued 12-07 Printed in U.S.A. RADIATOR Removal NOTE: Put caps on all fittings and plugs in all disconnected hoses. STEP 1 Park the machine on a level surface. STEP 2 Lift the hood and open the rear access door on the machine. STEP 3 Turn the ignition switch and the master disconnect switch (if equipped) to the OFF position. STEP 4 Disconnect the negative battery cable from the battery. STEP 5 BD07M179-01 Slowly loosen the radiator cap (15). Disconnect the overflow hose (5) from the radiator neck. NOTE: Refer to illustration on page 5. STEP 6 BD07M176-01 If equipped with a heater, open the heater coolant valve. STEP 7 BD07K006-01 Install a hose on the drain valve (1) and drain the radiator into a clean container that holds approximately 17 litres (4.5 gallons). STEP 8 BD07M176-01 If equipped with a heater, close the heater coolant valve (1). 15 5 1 1 1
- 51. 2000-4 Bur 5-9540 Issued 12-07 Printed in U.S.A. STEP 9 BD07M179-01 Loosen the clamp (1) on the upper radiator hose and remove the hose from the upper radiator connection. STEP 10 BD07K006-01 Loosen and remove the top (1) and bottom (2) mounting bolts on the radiator and oil cooler module. Use acceptable lifting equipment to support the radiator and oil cooler module after removal of the mounting bolts. Pull the radiator and oil cooler module away from the fan shroud until you can access the lower radiator hose clamp. STEP 11 BD07K006-01 Loosen the clamp (4) on the lower radiator hose and remove the hose from the lower radiator connection. STEP 12 BD07K006-01 Remove the cap (1) from the hydraulic reservoir. Connect a vacuum pump to the hydraulic reservoir. Start the vacuum pump. STEP 13 BD07K006-01 Loosen and remove the upper (1) and lower (2) hoses from the oil cooler (3). Install plugs in the hoses and caps on the fittings to prevent loss of hydraulic oil from the hydraulic system. Stop the vacuum pump. STEP 14 BD07K006-01 Remove the radiator and oil cooler module from the machine. 1 1 2 1 2 4 1 1 2 3 1
- 52. 2000-5 Bur 5-9540 Issued 12-07 Printed in U.S.A. BS07K717 1. RADIATOR MODULE 2. OIL COOLER MODULE 3. UPPER RADIATOR HOSE 4. LOWER RADIATOR HOSE 5. COOLANT RECOVERY HOSE 6. COOLANT RECOVERY BOTTLE 7. CLAMP 8. LOWER HINGE MOUNTING BRACKET 9. UPPER MOUNTING BRACKET 10. FAN BLADE 11. FAN SPACER 12. FAN GUARD 13. FAN SHROUD 14. SEAL 15. RADIATOR CAP 16. DRAIN VALVE 430 RADIATOR MOUNTING 1 2 16 8 13 4 10 11 12 3 6 14 9 9 5 7 7 7 7 15
- 53. 2000-6 Bur 5-9540 Issued 12-07 Printed in U.S.A. Installation STEP 15 Installation of the radiator is the reverse procedure of removal. STEP 16 After the radiator has been installed, fill the cooling system. See Section 1001 for the correct coolant mixture and quantity. STEP 17 Start and run the engine until it reaches operating temperature and check for any leaks. Stop the engine. After the engine has cooled, check the level of the cooling system and add coolant as required.
- 54. 2000-7 Bur 5-9540 Issued 12-07 Printed in U.S.A. ENGINE Removal STEP 1 Remove the radiator from the machine. STEP 2 Install plugs and caps on all disconnected hoses and fittings. STEP 3 Tag all electrical connection for identification during assembly. STEP 4 BD07M211-01 If equipped with a heater, disconnect the heater hoses (1) from the engine. STEP 5 Lift the rear hood and open the rear access door. STEP 6 BD07M168-01 Disconnect the electrical connectors from the rear tail lamps (1) on both sides of the rear access door. Disconnect the electrical connectors from the rear worklight (2). Disconnect the electrical connectors from the backup alarm (3). Remove mounting hardware from the wiring harness (4) and remove the harness (4) from the rear access door. STEP 7 BD07M168-01 Connect acceptable lifting equipment to the rear access door. Remove the pivot bolt (1) and lift the rear access door and remove from the machine. 1 1 13 2 1
- 55. 2000-8 Bur 5-9540 Issued 12-07 Printed in U.S.A. STEP 8 BD07M179-01 1. CYLINDER PIVOT BOLT Remove the nut from cylinder pivot bolt (1) on the hood end of the cylinder. STEP 9 BD07M179-01 Remove the plastic clip (2) from the hood pivot shaft. Slide the hood to the left and remove the hood from the hood pivot shaft on both sides of the machine. Remove the hood from the machine. STEP 10 Push the hood to the right hand side of the machine and remove the left hand side of the hood from the pivot pin. Remove the hood from the machine. STEP 11 BD07M203-01 1. AIR RESTRICTION INDICATOR SWITCH Disconnect the electrical connector for the air restriction indicator switch (1). STEP 12 BD07M200-01 Loosen the clamps (1) on the outlet hose (2). Remove the outlet hose (2) from the intake and air filter assembly (3). NOTE: Torque clamps (1) 3 to 4 Nm (25 to 35 pound-inches) during assembly. STEP 13 Loosen and remove the mounting bolts and washers from the air filter housing mounting bracket. STEP 14 Remove the air cleaner and bracket from the machine. STEP 15 Remove the bolts and washers that fasten the front muffler support rods (5 and 8) and the rear muffler support rods (14 and 16) to the engine. NOTE: Torque bolts 23 to 26 Nm (204 to 228 pound-inches) during assembly. 1 2 1 12 3 1
- 56. 2000-9 Bur 5-9540 Issued 12-07 Printed in U.S.A. STEP 16 Loosen and remove the bolts and washers that fasten the muffler to the exhaust manifold. NOTE: Torque the bolts 51 to 61 Nm (38 to 45 pound-feet) during assembly. STEP 17 Remove the muffler from the engine. STEP 18 Remove the cap screws (7), washers (8), fan blade (1), from the engine. Loosen and remove cap screws (4), washers (3) and spacer (2) from the engine. STEP 19 BD0M213-01 1. STARTER WIRES 2. WIRE HARNESS CLAMP Disconnect the wires (1) from the starter and from the alternator (2). Loosen and remove the bolts and wire harness clamp (2) from the engine. STEP 20 Loosen and remove the bolts that fastens the ground wires to the engine. Keep all ground wires together. STEP 21 BD07M231-01 1. ALTERNATOR WIRES Disconnect the wires from the alternator. STEP 22 BD07M207-01 Remove the throttle linkage (1) from the fuel injection pump and the linkage to the throttle control lever. STEP 23 Disconnect the wire for the engine coolant temperature switch and the engine oil pressure switch. 1 2 1 1
- 57. 2000-10 Bur 5-9540 Issued 12-07 Printed in U.S.A. STEP 24 BD07M207-01 Disconnect the wire connector for the fuel injection pump solenoid. STEP 25 Loosen and remove the bolts that fasten the wire harness to the right side of the machine. STEP 26 Move the all of the wiring harness out of the way. STEP 27 BD07M220-01 Disconnect the fuel line from the tank connection. STEP 28 BD07M207-01 Disconnect the fuel lines (1) from the engine. Remove the bolts from the clamps and remove the fuel lines (1) from the engine. STEP 29 BD07M213-01 Loosen and remove the mounting bolts (2) which fasten the cover (1) to the engine. Slide the tandem pump (3) away from the engine. 1 3 1 2 2
- 58. 2000-11 Bur 5-9540 Issued 12-07 Printed in U.S.A. STEP 30 BD07M218-01 Connect acceptable lifting equipment to the engine at the front and rear of the engine. STEP 31 Remove the bolt, washers, and nut from the rear engine mount (2). NOTE: Torque the bolts 110 to 122 Nm (80 to 90 pound-feet) during assembly. STEP 32 Remove the bolts, washers, and nut from the front engine mounts (1). NOTE: Torque the bolts 110 to 122 Nm (80 to 90 pound-feet) during assembly. NOTE: Refer to illustration on page 12. STEP 33 Use lifting equipment and remove the engine from the chassis. Installation STEP 34 Installation of the engine is the reverse procedure of removal. STEP 35 After the engine and radiator have been installed, refill the engine cooling system. Refill the engine crankcase with engine oil. See Section 1001 for the correct type and quantity of engine coolant and engine oil. STEP 36 Start and run the engine at low idle until the engine reaches operating temperature and check for any leaks. Stop the engine. After the engine has cooled, check the level of the coolant in the cooling system. Add coolant as required. Check the oil level in the engine crankcase. Add engine oil as required.
- 59. 2000-12 Bur 5-9540 Issued 12-07 Printed in U.S.A. BS07N458 1. FRONT ENGINE MOUNT 2. REAR ENGINE MOUNT 3. FRONT ISO MOUNTS 4. REAR ISO MOUNT 5. FRONT MOUNTING BOLTS 6. FRONT MOUNTING PLATE NUT 7. REAR MOUNTING BOLT 8. LARGE MOUNTING WASHERS 9. WASHER 10. CAP SCREW 11. NUT 12. WASHER 13. REAR ENGINE MOUNT BRACKET SPACER 430 ENGINE MOUNTING 6 8 3 3 8 9 5 8 9 5 7 8 4 13 11 8 10 12 10 12 10 10 12 2 1 1
- 60. Thank you very much for your reading. Please Click Here Then Get More Information.