SlideShare a Scribd company logo
1 of 1
ANGEL HTML Editor: Inserting a Picture

Follow the steps listed below to insert a picture of yourself into a discussion posting.
(Screenshots are provided for clarity.)

   1. Click the New Post link in the discussion forum.

   2. Click on the HTML Editor link below the Message
       textbox.


   3. The HTML Editor will open in a new
      browser window. Once it is open, click the
      picture icon in the toolbar.

   4. At the bottom of the pop-up window you
      will find an “Upload Image” button; click on
      that button.


                                                 5. A new window will open. Use the
                                                     Browse button to locate the picture
                                                     file.

                                                 6. Once you have located the file, click
                                                     on the Upload button.

   7. Click the thumbnail of the picture you uploaded, and then click the OK button.

   8. At this time you should be viewing the HTML Editor with your picture located in the top
       left of the screen.

   9. Press the enter key twice and then type your
      introduction message.

   10. Once completed, click the Accept Changes
       button located at the bottom of the page.

   11. Then click the Post button to submit your
       message.


4/13/2010 19:10:10 a4/p4            ©2007 Buena Vista University
                                        All Rights Reserved

More Related Content

What's hot

UE4BlueprintLadderVolumeTutorial
UE4BlueprintLadderVolumeTutorialUE4BlueprintLadderVolumeTutorial
UE4BlueprintLadderVolumeTutorialJustin Plowman
 
How I Save Hours a Day Using Feedly & Evernote
How I Save Hours a Day Using Feedly & EvernoteHow I Save Hours a Day Using Feedly & Evernote
How I Save Hours a Day Using Feedly & Evernotehewie
 
How To Prepare Photos for WeVideo
How To Prepare Photos for WeVideoHow To Prepare Photos for WeVideo
How To Prepare Photos for WeVideoEkramOthman1
 
Customizing & Using Windows 10
Customizing & Using Windows 10Customizing & Using Windows 10
Customizing & Using Windows 10hewie
 
Getting around the desktop guide
Getting around the desktop guideGetting around the desktop guide
Getting around the desktop guideVikash Joshi
 
How to use photoshop elements 9
How to use photoshop elements 9How to use photoshop elements 9
How to use photoshop elements 9sez_fang
 
Quire Guide (English ver.)
Quire Guide (English ver.)Quire Guide (English ver.)
Quire Guide (English ver.)Crystal Chen
 
installation of Window 10 on desktop computers.
installation of Window 10 on desktop computers.installation of Window 10 on desktop computers.
installation of Window 10 on desktop computers.Umar Hayat
 

What's hot (10)

Windows 7
Windows 7Windows 7
Windows 7
 
UE4BlueprintLadderVolumeTutorial
UE4BlueprintLadderVolumeTutorialUE4BlueprintLadderVolumeTutorial
UE4BlueprintLadderVolumeTutorial
 
How I Save Hours a Day Using Feedly & Evernote
How I Save Hours a Day Using Feedly & EvernoteHow I Save Hours a Day Using Feedly & Evernote
How I Save Hours a Day Using Feedly & Evernote
 
How To Prepare Photos for WeVideo
How To Prepare Photos for WeVideoHow To Prepare Photos for WeVideo
How To Prepare Photos for WeVideo
 
Customizing & Using Windows 10
Customizing & Using Windows 10Customizing & Using Windows 10
Customizing & Using Windows 10
 
Getting around the desktop guide
Getting around the desktop guideGetting around the desktop guide
Getting around the desktop guide
 
How to use photoshop elements 9
How to use photoshop elements 9How to use photoshop elements 9
How to use photoshop elements 9
 
Quire Guide (English ver.)
Quire Guide (English ver.)Quire Guide (English ver.)
Quire Guide (English ver.)
 
installation of Window 10 on desktop computers.
installation of Window 10 on desktop computers.installation of Window 10 on desktop computers.
installation of Window 10 on desktop computers.
 
L5 kongl
L5 konglL5 kongl
L5 kongl
 

Similar to Html editor guide

Adding a-featured-image-to-a-post
Adding a-featured-image-to-a-postAdding a-featured-image-to-a-post
Adding a-featured-image-to-a-postCyri Jones
 
Photobucket story
Photobucket storyPhotobucket story
Photobucket storyjods30
 
Ten Steps to adding blog image
Ten Steps to adding blog imageTen Steps to adding blog image
Ten Steps to adding blog imagePam Cranford
 
Blog%20 guide
Blog%20 guideBlog%20 guide
Blog%20 guidesparkly
 
Wiki Moodle English
Wiki Moodle EnglishWiki Moodle English
Wiki Moodle EnglishRoman_Dudler
 
Develop blog lesson 4
Develop blog lesson 4Develop blog lesson 4
Develop blog lesson 4John Myungire
 
Adding An Avatar
Adding An AvatarAdding An Avatar
Adding An AvatarMr Hamilton
 
Adding An Avatar
Adding An AvatarAdding An Avatar
Adding An AvatarMr Hamilton
 
Illustrator portrait project-final
Illustrator portrait project-finalIllustrator portrait project-final
Illustrator portrait project-finalDaniel Downs
 
Pauline dagaas journalism t1 final exam
Pauline dagaas journalism t1 final examPauline dagaas journalism t1 final exam
Pauline dagaas journalism t1 final exampdagaas28
 
How to upload pictures to your page
How to upload pictures to your pageHow to upload pictures to your page
How to upload pictures to your pageMrsLight
 
Adobe Photoshop Elements 9
Adobe Photoshop Elements 9Adobe Photoshop Elements 9
Adobe Photoshop Elements 9Shillips19
 
Usermanualforslideshare
UsermanualforslideshareUsermanualforslideshare
Usermanualforslideshareguestfbef54
 
Usermanualforslideshare
UsermanualforslideshareUsermanualforslideshare
Usermanualforslideshareguestfbef54
 
Create a Professional Blog with WordPress Chapter 4b: Creating Post and Page
Create a Professional Blog with WordPress Chapter 4b: Creating Post and PageCreate a Professional Blog with WordPress Chapter 4b: Creating Post and Page
Create a Professional Blog with WordPress Chapter 4b: Creating Post and PageAtit Patumvan
 

Similar to Html editor guide (20)

Adding a-featured-image-to-a-post
Adding a-featured-image-to-a-postAdding a-featured-image-to-a-post
Adding a-featured-image-to-a-post
 
Photobucket story
Photobucket storyPhotobucket story
Photobucket story
 
Microsoft Powerpoint part 1
Microsoft Powerpoint part 1Microsoft Powerpoint part 1
Microsoft Powerpoint part 1
 
Ten Steps to adding blog image
Ten Steps to adding blog imageTen Steps to adding blog image
Ten Steps to adding blog image
 
Steps
StepsSteps
Steps
 
Blog%20 guide
Blog%20 guideBlog%20 guide
Blog%20 guide
 
Wiki Moodle English
Wiki Moodle EnglishWiki Moodle English
Wiki Moodle English
 
Develop blog lesson 4
Develop blog lesson 4Develop blog lesson 4
Develop blog lesson 4
 
Adding An Avatar
Adding An AvatarAdding An Avatar
Adding An Avatar
 
Adding An Avatar
Adding An AvatarAdding An Avatar
Adding An Avatar
 
Illustrator portrait project-final
Illustrator portrait project-finalIllustrator portrait project-final
Illustrator portrait project-final
 
Pauline dagaas journalism t1 final exam
Pauline dagaas journalism t1 final examPauline dagaas journalism t1 final exam
Pauline dagaas journalism t1 final exam
 
Google Picnik
Google PicnikGoogle Picnik
Google Picnik
 
My Blog
My BlogMy Blog
My Blog
 
How to upload pictures to your page
How to upload pictures to your pageHow to upload pictures to your page
How to upload pictures to your page
 
Adobe Photoshop Elements 9
Adobe Photoshop Elements 9Adobe Photoshop Elements 9
Adobe Photoshop Elements 9
 
Blog Instructions
Blog InstructionsBlog Instructions
Blog Instructions
 
Usermanualforslideshare
UsermanualforslideshareUsermanualforslideshare
Usermanualforslideshare
 
Usermanualforslideshare
UsermanualforslideshareUsermanualforslideshare
Usermanualforslideshare
 
Create a Professional Blog with WordPress Chapter 4b: Creating Post and Page
Create a Professional Blog with WordPress Chapter 4b: Creating Post and PageCreate a Professional Blog with WordPress Chapter 4b: Creating Post and Page
Create a Professional Blog with WordPress Chapter 4b: Creating Post and Page
 

Html editor guide

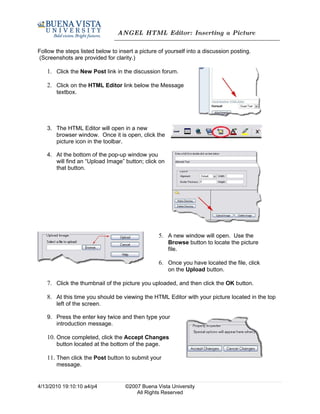
  • 1. ANGEL HTML Editor: Inserting a Picture Follow the steps listed below to insert a picture of yourself into a discussion posting. (Screenshots are provided for clarity.) 1. Click the New Post link in the discussion forum. 2. Click on the HTML Editor link below the Message textbox. 3. The HTML Editor will open in a new browser window. Once it is open, click the picture icon in the toolbar. 4. At the bottom of the pop-up window you will find an “Upload Image” button; click on that button. 5. A new window will open. Use the Browse button to locate the picture file. 6. Once you have located the file, click on the Upload button. 7. Click the thumbnail of the picture you uploaded, and then click the OK button. 8. At this time you should be viewing the HTML Editor with your picture located in the top left of the screen. 9. Press the enter key twice and then type your introduction message. 10. Once completed, click the Accept Changes button located at the bottom of the page. 11. Then click the Post button to submit your message. 4/13/2010 19:10:10 a4/p4 ©2007 Buena Vista University All Rights Reserved