1. Procedure: Design 1/ Origami Still Life
1. Fold paper flower
2. Stick straw FROM AIRBRUSH TABLE into flower.
3. Airbrush origami flower. (I will turn on the air compressor for you)
3.2 Drip only a few drops of your ink color into the airbrush reservoir.
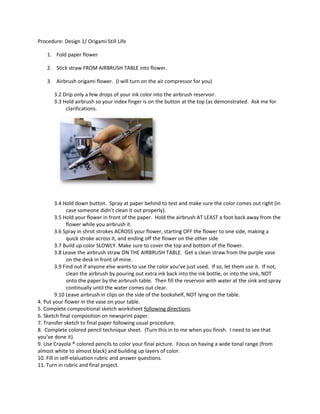
3.3 Hold airbrush so your index finger is on the button at the top (as demonstrated. Ask me for
clarifications.
3.4 Hold down button. Spray at paper behind to test and make sure the color comes out right (in
case someone didn’t clean it out properly).
3.5 Hold your flower in front of the paper. Hold the airbrush AT LEAST a foot back away from the
flower while you airbrush it.
3.6 Spray in shrot strokes ACROSS your flower, starting OFF the flower to one side, making a
quick stroke across it, and ending off the flower on the other side
3.7 Build up color SLOWLY. Make sure to cover the top and bottom of the flower.
3.8 Leave the airbrush straw ON THE AIRBRUSH TABLE. Get a clean straw from the purple vase
on the desk in front of mine.
3.9 Find out if anyone else wants to use the color you’ve just used. If so, let them use it. If not,
clean the airbrush by pouring out extra ink back into the ink bottle, or into the sink, NOT
onto the paper by the airbrush table. Then fill the reservoir with water at the sink and spray
continually until the water comes out clear.
9.10 Leave airbrush in clips on the side of the bookshelf, NOT lying on the table.
4. Put your flower in the vase on your table.
5. Complete compositional sketch worksheet following directions.
6. Sketch final composition on newsprint paper.
7. Transfer sketch to final paper following usual procedure.
8. Complete colored pencil technique sheet. (Turn this in to me when you finish. I need to see that
you’ve done it).
9. Use Crayola ® colored pencils to color your final picture. Focus on having a wide tonal range (from
almost white to almost black) and building up layers of color.
10. Fill in self-elaluation rubric and answer questions.
11. Turn in rubric and final project.