SlideShare a Scribd company logo
1 of 24
Download to read offline
CONTENTS
SECTION 1 GENERAL
Group 1 Safety hints ---------------------------------------------------------------------------------------------------- 1-1
Group 2 Specifications ------------------------------------------------------------------------------------------------- 1-5
Group 3 Periodic replacement ------------------------------------------------------------------------------------- 1-13
SECTION 2 REMOVAL AND INSTALLATION OF UNIT
Group 1 Structure -------------------------------------------------------------------------------------------------------- 2-1
Group 2 Removal and installation of unit -------------------------------------------------------------------- 2-2
SECTION 3 POWER TRAIN SYSTEM
Group 1 Structure and operation --------------------------------------------------------------------------------- 3-1
Group 2 Inspection and troubleshooting ---------------------------------------------------------------------- 3-13
Group 3 Disassembly and assembly --------------------------------------------------------------------------- 3-19
SECTION 4 BRAKE SYSTEM
Group 1 Structure and function ------------------------------------------------------------------------------------ 4-1
Group 2 Operational checks and troubleshooting ------------------------------------------------------- 4-9
Group 3 Tests and adjustments ----------------------------------------------------------------------------------- 4-11
SECTION 5 STEERING SYSTEM
Group 1 Structure and function ------------------------------------------------------------------------------------ 5-1
Group 2 Operational checks and troubleshooting ------------------------------------------------------- 5-10
Group 3 Disassembly and assembly --------------------------------------------------------------------------- 5-12
SECTION 6 HYDRAULIC SYSTEM
Group 1 Structure and function ----------------------------------------------------------------------------------- 6-1
Group 2 Operational checks and troubleshooting ------------------------------------------------------- 6-17
Group 3 Disassembly and assembly --------------------------------------------------------------------------- 6-22
SECTION 7 ELECTRICAL SYSTEM
Group 1 Component location --------------------------------------------------------------------------------------- 7-1
Group 2 Electrical circuit ---------------------------------------------------------------------------------------------- 7-2
Group 3 Component specification ------------------------------------------------------------------------------- 7-12
Group 4 Connector destination ------------------------------------------------------------------------------------ 7-13
Group 5 Troubleshooting ---------------------------------------------------------------------------------------------- 7-15
SECTION 8 MAST
Group 1 Structure -------------------------------------------------------------------------------------------------------- 8-1
Group 2 Operational checks and troubleshooting ------------------------------------------------------- 8-5
Group 3 Adjustment ----------------------------------------------------------------------------------------------------- 8-8
Group 4 Removal and installation -------------------------------------------------------------------------------- 8-11
0-1
FOREWORD
1. STRUCTURE
This service manual has been prepared as an aid to improve the quality of repairs by giving the
serviceman an accurate understanding of the product and by showing him the correct way to perform
repairs and make judgements. Make sure you understand the contents of this manual and use it to
full effect at every opportunity.
This service manual mainly contains the necessary technical information for operations performed in
a service workshop.
For ease of understanding, the manual is divided into the following sections.
SECTION 1 GENERAL
This section gives the general information of the machine and explains the safety hints for
maintenance.
SECTION 2 REMOVAL & INSTALLATION OF UNIT
This section explains the procedures and techniques of removal and installation of each component.
SECTION 3 POWER TRAIN SYSTEM
This section explains the structure of the transmission as well as control valve and drive axle.
SECTION 4 BRAKE SYSTEM
This section explains the brake piping, each component and operation.
SECTION 5 STEERING SYSTEM
This section explains the structure of the steering unit, priority valve, trail axle as well as steering
circuit and operation.
SECTION 6 HYDRAULIC SYSTEM
This section explains the structure of the gear pump, main control valve as well as work equipment
circuit, each component and operation.
SECTION 7 ELECTRICAL SYSTEM
This section explains the electrical circuit and each component.
It serves not only to give an understanding electrical system, but also serves as reference material for
troubleshooting.
SECTION 8 MAST
This section explains the structure of mast, carriage, backrest and forks.
The specifications contained in this service manual are subject to change at any time and without any
advance notice. Contact your HYUNDAI distributor for the latest information.
0-2
Revised edition mark( )
When a manual is revised, an edition mark is
recorded on the bottom outside corner of the
pages.
RRevisions
Revised pages are shown at the list of revised
pages on the between the contents page and
section 1 page.
Symbols
So that the shop manual can be of ample
practical use, important places for safety and
quality are marked with the following symbols.
2. HOW TO READ THE SERVICE MANUAL
Distribution and updating
Any additions, amendments or other changes
will be sent to HYUNDAI distributors.
Get the most up-to-date information before you
start any work.
Filing method
See the page number on the bottom of the
page.
File the pages in correct order.
Following examples shows how to read the
page number.
Example 1
2 - 3
Item number(2. Structure and
Function)
Consecutive page number for
each item.
Additional pages : Additional pages are
indicated by a hyphen(-) and number after the
page number. File as in the example.
1.
2.
3.
Symbol Item Remarks
Special safety precautions are
necessary when performing the
work.
Extra special safety precautions
are necessary when performing
the work because it is under
internal pressure.
Special technical precautions or
other precautions for preserving
standards are necessary when
performing the work.
Safety
Caution
10 - 4
10 - 4 - 1
10 - 4 - 2
10 - 5
Added pages
0-3
3. CONVERSION TABLE
Method of using the Conversion Table
The Conversion Table in this section is provided to enable simple conversion of figures. For details of
the method of using the Conversion Table, see the example given below.
Example
Method of using the Conversion Table to convert from millimeters to inches
Convert 55mm into inches.
Locate the number 50in the vertical column at the left side, take this as , then draw a
horizontal line from .
Locate the number 5in the row across the top, take this as , then draw a perpendicular line
down from .
Take the point where the two lines cross as . This point gives the value when converting
from millimeters to inches. Therefore, 55mm = 2.165 inches.
Convert 550mm into inches.
The number 550 does not appear in the table, so divide by 10(Move the decimal point one place
to the left) to convert it to 55mm.
Carry out the same procedure as above to convert 55mm to 2.165 inches.
The original value(550mm) was divided by 10, so multiply 2.165 inches by 10(Move the decimal
point one place to the right) to return to the original value.
This gives 550mm = 21.65 inches.
1.
2.
(1)
(2)
(3)
(1)
(2)
(3)
Millimeters to inches 1mm = 0.03937 in
0 1 2 3 4 5 6 7 8 9
0 0.039 0.079 0.118 0.157 0.197 0.236 0.276 0.315 0.354
10 0.394 0.433 0.472 0.512 0.551 0.591 0.630 0.669 0.709 0.748
20 0.787 0.827 0.866 0.906 0.945 0.984 1.024 1.063 1.102 1.142
30 1.181 1.220 1.260 1.299 1.339 1.378 1.417 1.457 1.496 1.536
40 1.575 1.614 1.654 1.693 1.732 1.772 1.811 1.850 1.890 1.929
50 1.969 2.008 2.047 2.087 2.126 2.165 2.205 2.244 2.283 2.323
60 2.362 2.402 2.441 2.480 2.520 2.559 2.598 2.638 2.677 2.717
70 2.756 2.795 2.835 2.874 2.913 2.953 2.992 3.032 3.071 3.110
80 3.150 3.189 3.228 3.268 3.307 3.346 3.386 3.425 3.465 3.504
90 3.543 3.583 3.622 3.661 3.701 3.740 3.780 3.819 3.858 3.898
0-4
Millimeters to inches 1mm = 0.03937in
0 1 2 3 4 5 6 7 8 9
0 0.039 0.079 0.118 0.157 0.197 0.236 0.276 0.315 0.354
10 0.394 0.433 0.472 0.512 0.551 0.591 0.630 0.669 0.709 0.748
20 0.787 0.827 0.866 0.906 0.945 0.984 1.024 1.063 1.102 1.142
30 1.181 1.220 1.260 1.299 1.339 1.378 1.417 1.457 1.496 1.536
40 1.575 1.614 1.654 1.693 1.732 1.772 1.811 1.850 1.890 1.929
50 1.969 2.008 2.047 2.087 2.126 2.165 2.205 2.244 2.283 2.323
60 2.362 2.402 2.441 2.480 2.520 2.559 2.598 2.638 2.677 2.717
70 2.756 2.795 2.835 2.874 2.913 2.953 2.992 3.032 3.071 3.110
80 3.150 3.189 3.228 3.268 3.307 3.346 3.386 3.425 3.465 3.504
90 3.543 3.583 3.622 3.661 3.701 3.740 3.780 3.819 3.858 3.898
Kilogram to Pound 1kg = 2.2046lb
0 1 2 3 4 5 6 7 8 9
0 2.20 4.41 6.61 8.82 11.02 13.23 15.43 17.64 19.84
10 22.05 24.25 26.46 28.66 30.86 33.07 35.27 37.48 39.68 41.89
20 44.09 46.30 48.50 50.71 51.91 55.12 57.32 59.5. 61.73 63.93
30 66.14 68.34 70.55 72.75 74.96 77.16 79.37 81.57 83.78 85.98
40 88.18 90.39 92.59 94.80 97.00 99.21 101.41 103.62 105.82 108.03
50 110.23 112.44 114.64 116.85 119.05 121.25 123.46 125.66 127.87 130.07
60 132.28 134.48 136.69 138.89 141.10 143.30 145.51 147.71 149.91 152.12
70 154.32 156.53 158.73 160.94 163.14 165.35 167.55 169.76 171.96 174.17
80 176.37 178.57 180.78 182.98 185.19 187.39 189.60 191.80 194.01 196.21
90 198.42 200.62 202.83 205.03 207.24 209.44 211.64 213.85 216.05 218.26
0-5
Liter to U.S. Gallon 1 = 0.2642 U.S.Gal
0 1 2 3 4 5 6 7 8 9
0 0.264 0.528 0.793 1.057 1.321 1.585 1.849 2.113 2.378
10 2.642 2.906 3.170 3.434 3.698 3.963 4.227 4.491 4.755 5.019
20 5.283 5.548 5.812 6.6076 6.340 6.604 6.869 7.133 7.397 7.661
30 7.925 8.189 8.454 8.718 8.982 9.246 9.510 9.774 10.039 10.303
40 10.567 10.831 11.095 11.359 11.624 11.888 12.152 12.416 12.680 12.944
50 13.209 13.473 13.737 14.001 14.265 14.529 14.795 15.058 15.322 15.586
60 15.850 16.115 16.379 16.643 16.907 17.171 17.435 17.700 17.964 18.228
70 18.492 18.756 19.020 19.285 19.549 19.813 20.077 20.341 20.605 20.870
80 21.134 21.398 21.662 21.926 22.190 22.455 22.719 22.983 23.247 23.511
90 23.775 24.040 24.304 24.568 24.832 25.096 25.631 25.625 25.889 26.153
Liter to U.K. Gallon 1 = 0.21997 U.K.Gal
0 1 2 3 4 5 6 7 8 9
0 0.220 0.440 0.660 0.880 1.100 1.320 1.540 1.760 1.980
10 2.200 2.420 2.640 2.860 3.080 3.300 3.520 3.740 3.950 4.179
20 4.399 4.619 4.839 5.059 5.279 5.499 5.719 5.939 6.159 6.379
30 6.599 6.819 7.039 7.259 7.479 7.969 7.919 8.139 8.359 8.579
40 8.799 9.019 9.239 9.459 9.679 9.899 10.119 10.339 10.559 10.778
50 10.998 11.281 11.438 11.658 11.878 12.098 12.318 12.528 12.758 12.978
60 13.198 13.418 13.638 13.858 14.078 14.298 14.518 14.738 14.958 15.178
70 15.398 15.618 15.838 16.058 16.278 16.498 16.718 16.938 17.158 17.378
80 17.598 17.818 18.037 18.257 18.477 18.697 18.917 19.137 19.357 19.577
90 19.797 20.017 20.237 20.457 20.677 20.897 21.117 21.337 21.557 21.777
0-6
kgf m to lbf ft 1kgf m = 7.233lbf ft
0 1 2 3 4 5 6 7 8 9
7.2 14.5 21.7 28.9 36.2 43.4 50.6 57.9 65.1
10 72.3 79.6 86.8 94.0 101.3 108.5 115.7 123.0 130.2 137.4
20 144.7 151.9 159.1 166.4 173.6 180.8 188.1 195.3 202.5 209.8
30 217.0 224.2 231.5 238.7 245.9 253.2 260.4 267.6 274.9 282.1
40 289.3 396.6 303.8 311.0 318.3 325.5 332.7 340.0 347.2 354.4
50 361.7 368.9 376.1 383.4 390.6 397.8 405.1 412.3 419.5 426.8
60 434.0 441.2 448.5 455.7 462.9 470.2 477.4 484.6 491.8 499.1
70 506.3 513.5 520.8 528.0 535.2 542.5 549.7 556.9 564.2 571.4
80 578.6 585.9 593.1 600.3 607.6 614.8 622.0 629.3 636.5 643.7
90 651.0 658.2 665.4 672.7 679.9 687.1 694.4 701.6 708.8 716.1
100 723.3 730.5 737.8 745.0 752.2 759.5 766.7 773.9 781.2 788.4
110 795.6 802.9 810.1 817.3 824.6 831.8 839.0 846.3 853.5 860.7
120 868.0 875.2 882.4 889.7 896.9 904.1 911.4 918.6 925.8 933.1
130 940.3 947.5 954.8 962.0 969.2 976.5 983.7 990.9 998.2 10005.4
140 1012.6 1019.9 1027.1 1034.3 1041.5 1048.8 1056.0 1063.2 1070.5 1077.7
150 1084.9 1092.2 1099.4 1106.6 1113.9 1121.1 1128.3 1135.6 1142.8 1150.0
160 1157.3 1164.5 1171.7 1179.0 1186.2 1193.4 1200.7 1207.9 1215.1 1222.4
170 1129.6 1236.8 1244.1 1251.3 1258.5 1265.8 1273.0 1280.1 1287.5 1294.7
180 1301.9 1309.2 1316.4 1323.6 1330.9 1338.1 1345.3 1352.6 1359.8 1367.0
190 1374.3 1381.5 1388.7 1396.0 1403.2 1410.4 1417.7 1424.9 1432.1 1439.4
0-7
kgf/cm2
to lbf/in2
1kgf / cm2
= 14.2233lbf / in2
0 1 2 3 4 5 6 7 8 9
14.2 28.4 42.7 56.9 71.1 85.3 99.6 113.8 128.0
10 142.2 156.5 170.7 184.9 199.1 213.4 227.6 241.8 256.0 270.2
20 284.5 298.7 312.9 327.1 341.4 355.6 369.8 384.0 398.3 412.5
30 426.7 440.9 455.1 469.4 483.6 497.8 512.0 526.3 540.5 554.7
40 568.9 583.2 597.4 611.6 625.8 640.1 654.3 668.5 682.7 696.9
50 711.2 725.4 739.6 753.8 768.1 782.3 796.5 810.7 825.0 839.2
60 853.4 867.6 881.8 896.1 910.3 924.5 938.7 953.0 967.2 981.4
70 995.6 1010 1024 1038 1053 1067 1081 1095 1109 1124
80 1138 1152 1166 1181 1195 1209 1223 1237 1252 1266
90 1280 1294 1309 1323 1337 1351 1365 1380 1394 1408
100 1422 1437 1451 1465 1479 1493 1508 1522 1536 1550
110 1565 1579 1593 1607 1621 1636 1650 1664 1678 1693
120 1707 1721 1735 1749 1764 1778 1792 1806 1821 1835
130 1849 2863 1877 1892 1906 1920 1934 1949 1963 1977
140 1991 2005 2020 2034 2048 2062 2077 2091 2105 2119
150 2134 2148 2162 2176 2190 2205 2219 2233 2247 2262
160 2276 2290 2304 2318 2333 2347 2361 2375 2389 2404
170 2418 2432 2446 2460 2475 2489 2503 2518 2532 2546
180 2560 2574 2589 5603 2617 2631 2646 2660 2674 2688
200 2845 2859 2873 2887 2901 2916 2930 2944 2958 2973
210 2987 3001 3015 3030 3044 3058 3072 3086 3101 3115
220 3129 3143 3158 3172 3186 3200 3214 3229 3243 3257
230 3271 3286 3300 3314 3328 3343 3357 3371 3385 3399
TEMPERATURE
Fahrenheit-Centigrade Conversion.
A simple way to convert a fahrenheit temperature reading into a centigrade temperature reading or vice
verse is to enter the accompanying table in the center or boldface column of figures.
These figures refer to the temperature in either Fahrenheit or Centigrade degrees.
If it is desired to convert from Fahrenheit to Centigrade degrees, consider the center column as a table
of Fahrenheit temperatures and read the corresponding Centigrade temperature in the column at the
left.
If it is desired to convert from Centigrade to Fahrenheit degrees, consider the center column as a table
of Centigrade values, and read the corresponding Fahrenheit temperature on the right.
0-8
C F C F C F C F
-40.4 -40 -40.0 -11.7 11 51.8 7.8 46 114.8 27.2 81 117.8
-37.2 -35 -31.0 -11.1 12 53.6 8.3 47 116.6 27.8 82 179.6
-34.4 -30 -22.0 -10.6 13 55.4 8.9 48 118.4 28.3 83 181.4
-31.7 -25 -13.0 -10.0 14 57.2 9.4 49 120.2 28.9 84 183.2
-28.9 -20 -4.0 -9.4 15 59.0 10.0 50 122.0 29.4 85 185.0
-28.3 -19 -2.2 -8.9 16 60.8 10.6 51 123.8 30.0 86 186.8
-27.8 -18 -0.4 -8.3 17 62.6 11.1 52 125.6 30.6 87 188.6
-27.2 -17 1.4 -7.8 18 64.4 11.7 53 127.4 31.1 88 190.4
-26.7 -16 3.2 -6.7 20 68.0 12.8 55 131.0 32.2 90 194.0
-26.1 -15 5.0 -6.7 20 68.0 12.8 55 131.0 32.2 90 194.0
-25.6 -14 6.8 -6.1 21 69.8 13.3 56 132.8 32.8 91 195.8
-25.0 -13 8.6 -5.6 22 71.6 13.9 57 134.6 33.3 92 197.6
-24.4 -12 10.4 -5.0 23 73.4 14.4 58 136.4 33.9 93 199.4
-23.9 -11 12.2 -4.4 24 75.2 15.0 59 138.2 34.4 94 201.2
-23.3 -10 14.0 -3.9 25 77.0 15.6 60 140.0 35.0 95 203.0
-22.8 -9 15.8 -3.3 26 78.8 16.1 61 141.8 35.6 96 204.8
-22.2 -8 17.6 -2.8 27 80.6 16.7 62 143.6 36.1 97 206.6
-21.7 -7 19.4 -2.2 28 82.4 17.2 63 145.4 36.7 98 208.4
-21.1 -6 21.2 -1.7 29 84.2 17.8 64 147.2 37.2 99 210.2
-20.6 -5 23.0 -1.1 35 95.0 21.1 70 158.0 51.7 125 257.0
-20.0 -4 24.8 -0.6 31 87.8 18.9 66 150.8 40.6 105 221.0
-19.4 -3 26.6 0 32 89.6 19.4 67 152.6 43.3 110 230.0
-18.9 -2 28.4 0.6 33 91.4 20.0 68 154.4 46.1 115 239.0
-18.3 -1 30.2 1.1 34 93.2 20.6 69 156.2 48.9 120 248.0
-17.8 0 32.0 1.7 35 95.0 21.1 70 158.0 51.7 125 257.0
-17.2 1 33.8 2.2 36 96.8 21.7 71 159.8 54.4 130 266.0
-16.7 2 35.6 2.8 37 98.6 22.2 72 161.6 57.2 135 275.0
-16.1 3 37.4 3.3 38 100.4 22.8 73 163.4 60.0 140 284.0
-15.6 4 39.2 3.9 39 102.2 23.3 74 165.2 62.7 145 293.0
-15.0 5 41.0 4.4 40 104.0 23.9 75 167.0 65.6 150 302.0
-14.4 6 42.8 5.0 41 105.8 24.4 76 168.8 68.3 155 311.0
-13.9 7 44.6 5.6 42 107.6 25.0 77 170.6 71.1 160 320.0
-13.3 8 46.4 6.1 43 109.4 25.6 78 172.4 73.9 165 329.0
-12.8 9 48.2 6.7 44 111.2 26.1 79 174.2 76.7 170 338.0
-12.2 10 50.0 7.2 45 113.0 26.7 80 176.0 79.4 172 347.0
6-20
GROUP 3 DISASSEMBLY AND ASSEMBLY
1. MAIN PUMP
STRUCTURE1)
19
20 3
12
9
21
4
6
7
15
8
16
23
26
17
1822
5
27
11
25
1
2
13
10
14
24
35DS7HS06
1 Body
2 Rear cover
3 Front cover
4 Thrust plate
5 Thrust plate
6 Drive gear
7 Driven gear
8 Drive shaft
9 Driven gear
10 Screw
11 Screw
12 Grub screw
13 Washer
14 Washer
15 Seal
16 Seal
17 Seal
18 Seal
19 Shaft seal
20 Ring
21 Back up ring
22 Antiextrusion
23 Sleeve bearing
24 Hub
25 Dowel pin
26 Steel bushing
27 Body
6-21
GENERAL INSTRUCTION
Cleanliness
Cleanliness is the primary means of assuring satisfactory hydraulic pump life.
Components such as flanges and covers are best cleaned in soap and hot water, then air dried.
Gears should be washed in solvent, air dried, and oiled immediately.
Certain cleaning solvents are flammable. Do not allow sources of ignition in the area when
using cleaning solvents.
Protect all exposed surfaces and open cavities from damage and foreign material.
Gear journals and gear faces are super finished. Take care not to touch these surfaces after oil
and solvent.
Lubrication of moving parts
During assembly, all running surfaces(Bearing and wear plate) must be lightly lubricated with a
clean oil or aerosol lubricant.
Tools required for assembly
Socket set(1/2 drive)
Internal snap ring pliers
Shaft seal sleeve or clear tape
Torque wrench(200lbf ft capacity)
Plastic hammer
Torque wrench box end adapters
22)
(1)
(2)
(3)
DISASSEMBLY
Rear section
Loosen and remove the screw(11) of
second pump.
3)
Rear section
11
Rear cover
13
35DS7HS13
(1)
Remove hub(24) and ease the drive gear
up to facilitate removal the thrust plate.
Rear section
24
Front section
D357PMP02
6-22
And remove drive gear(6), driven gear(7),
thrust plate(4), keeping gears as straight
as possible, and body(1) also.
6
7
4
4
1
D357PMP03
Front section
Loosen and remove the screw(10) from
the body(27).
Coat the sharp edges of the drive shaft
(8) with adhesive tape and smear a clean
grease on the shaft end extension to
avoid any damaging lip of the shaft seal
when removing the cover(3).
14
10
8
27
3
D357PMP04
(1)
Remove the cover(3) taking care to keep
the cover as straight as possible during
removal. If cover is stuck, tap around the
edge with rubber mallet in order to break
away from the body(27).
Ensure that while removing cover(3)
shaft and other components remain
position.
8
3
27
D357PMP05
Ease the drive gear(8) up to facilitate
removal the thrust plate(5).
Remove drive gear(8), driven gear(9),
thrust plate(5), keeping gears as straight
as possible, and body(27) also.
927
8
5
D357PMP06
6-23
Cover assembly
Remove snap ring(20) with proper
tool(Only when it is needed to replace
shaft seal).
Remove the shaft seal(19) taking care
not to give any damage on the surface of
shaft hole(Only when it is needed to
replace shaft seal).
3
19
20
D357PMP07
RREASSEMBLY
Cover assembly
Insert the shaft seal(19) carefully and fit it
inside of cover with proper tool.
Fit the snap ring(20) in pre-arranged
position with proper tool.
3
19
20
D357PMP07
(3)
(1)
FFront section
Fit the seal(17) on the pre-arrang-ed
groove of the body(27).
Smear clean grease on the parker ring to
avoid drifting away of parker ring from the
body.
27
17
D357PMP08
Locate the seals(16) on the groove pre-
arranged on the thrust plate(5).
Then, locate antiextrusion(22) on the
groove pre-arranged on the seals(16).
Smear clean grease on the seals(16,
22).
(The front and rear thrust plates and
seals and back-up rings are same).
9
8
5
16
22 5
22
16
23
23
D357PMP09
44)
(2)
6-24
Insert the steel bushing(26) into
body(27).
27
26
D357PMP10
Insert the complete pressure plate
(5+16+22) into body(27) while keeping
the plate straight.
Seal side should face to the rear side,
opposite side of gears.
Pay attention to the direction of seal.
(opened side should face suction side
always)
27
5
16
22
D357PMP11
Locate driving gear(8) and driven gear(9)
while keeping the gears straight.
Locate pressure plate(5+16+22) with
care for the direction.
27
8
9
D357PMP12
Locate complete cover(3+19+20) while
taking care not to give any damage on
the shaft seal by edge of shaft.
And tap around the cover(3) with rubber
mallet.
8
27
3
19
20
D357PMP13
6-25
Tighten the bolts(10) with washer(14) in
a crisscross pattern to torque value of
14.3kgf m(103lbf ft). 10(x4)
14(x4)
D357PMP14
RRear section
Smear clean grease on the seal(18) to
avoid drifting away of seal from the
body(1) and assemble temporarily rear
cover(2). 11
13
1
2
18
35DS7HS14
Locate the seals(15) on the groove pre-
arranged on the thrust plates(4).
Then, locate back-up ring(21) on the
groove pre-arranged on the seals(15).
Smear clean grease on the seals
(21+15).
(The front and rear thrust plates and
seals and back-up rings are same)
4
6
4
7
21
15
21
15
D357PMP16
Insert the complete pressure plate
(4+21+15) into body while keeping the
plate straight.
Seal side should face to the rear cover
(2), opposite side of gears.
Pay attention to the direction of seal.
(opened side should face suction side
always)
4
21
15
21
15
18
1
2 35DS7HS17
((3)
6-26
Locate driving gear(4) and driven gear(5)
while keeping the gears straight.
Locate pressure plate(4+21+15) with
care for the direction.
1
4
21
15
5
D357PMP18
Open rear cover(2) to locate hub(24) into
rear section.
Rear section
24
Front section
2
D357PMP19
Tighten the bolts(11) with washer(13) in
a crisscross pattern to torque value of
4.6kgf m(33.3lbf ft).
Check that the pump rotate freely when
the drive shaft is turned by hand. If not a
thrust plate seal may be pinched.
Rear section
Front section
2
11
13
35DS7HS15
6-27
2. MAIN CONTROL VALVE
Lay out valve components on a clean, flat
working surface. The inlet assembly will
include an O-ring, and the spool section(s)
include an O-ring, a load check poppet and
a load check spring. Tools required for
basic valve assembly include 3/4 and 11/16
open or box end wrenches and a torque
wrench with thin wall sockets.
Assemble tie rod nuts to one end of each
tie rod with one or two threads showing.
Insert tie rods through tie rod holes of inlet
(Large tie rod at top). Lay inlet on end with
tie rods up, place O-ring into position.
Place first spool section(O-ring side up) on
inlet section, position O-ring and insert load
check poppet(Nose down) and spring
(Behind poppet) into load check cavity as
shown. Repeat this procedure for each
spool section ; The load check springs are
compressed by the following sections
during assembly.
Position end section on last spool section
as shown and hand tighten tie rod nuts. The
end section on picture is a "turn around"
section without ports. Universal outlet
/power beyond section and power beyond
and closed center sections are also used
as end sections. These end sections do
not have O-ring grooves.
1)
2)
3)
4)
7406S MCV05(1)
7406S MCV05(2)
7406S MCV05(3)
7406S MCV05(4)
6-28
Position valve assembly with the mounting
pads of the end sections on a flat surface.
To obtain proper alignment of end sections
relative to the spool sections apply
downward pressure to the end sections ;
Snug tie rod nuts to about 10lbf ft.
Final torque the two 11/16 nuts to 48
5lbf ft ; Final torque the 3/4 nut to 74
8lbf ft. Check for proper spool movement.
5)
Install auxiliary valves and plugs and torque
to proper specifications.
GGeneral assembly notes:
A. Lever assemblies can be installed on
section before or after complete valve
assembly.
B. The load check and spring may be
omitter from assembly in certain circuit
conditions(i.e., motor spools).
6)
7406S MCV06(1)
7406S MCV06(2)
6-29
4. LIFT CYLINDER
STRUCTURE1)
1 Tube assy
2 Rod
3 Piston
4 Piston seal
5 Back up ring
6 Wear ring
7 Retaining ring
8 Gland
9 Dust wiper
10 Rod seal
11 O-ring
12 Guide
13 DU busing
14 O-ring
15 Spacer
16 O-ring
1
2
15
16
11
12
13
10
8
9
5
3
6
14 4
7
D357HS19
I.D O.D stroke(standard)
73 65 1335mm
(2.9 2.6 52.6in)
Rod O.D : 50mm(2.0in)
Thank you very much for
your reading. Please Click
Here. Then Get COMPLETE
MANUAL. NO WAITING
NOTE:
If there is no response to
click on the link above,
please download the PDF
document first and then
click on it.
6-30
DISASSEMBLY
Hold the cylinder tube in a vice, loosen the
cylinder head and remove it.
Remove the spacer from the cylinder tube
and knock out the bushing. Hook a
wrench in the hole in the retainer at the
piston end and turn. Lever up the edge of
the guide, then turn the guide in again and
the guide can be removed.
CHECK AND INSPECTION
2)
2)
(1)
ASSEMBLY
Soak the piston ring in hydraulic oil at a
temperature of 40 to 50 C , expand the
inside diameter and assemble on the
piston. Install a piston seal.
Bend the edge of the guide and rotate it to
install the guide completely.
3)
(1)
Check item Standard size RemedyRepair limit
Clearance between cylinder rod &
bushing
Clearance between piston ring &
tube
0.05~0.25
(0.002~0.01)
0.05~0.35
(0.002~0.013)
0.4
(0.0015)
0.5
(0.02)
Replace
bushing
Replace
piston ring
D503HS20
D503HS21
mm(in)
6-31
5. TILT CYLINDER
STRUCTURE1)
1 Tube assy
2 Rod
3 Gland
4 DU bushing
5 Rod seal
6 Back up ring
7 Dust wiper
8 Snap ring
9 O-ring
10 Back up ring
11 Lock washer
12 O-ring
13 Piston
14 Glyd ring
15 Wear ring
16 O-ring
17 Nylon nut
18 Rod eye
19 Spherical bearing
20 Retaining ring
21 Hexagon bolt
22 Hexagon nut
23 Spring washer
24 O-ring
1
2
13
15
24
7
16
17
4
8
5
14
11
18
19
23
22
21
12
9
10
6
3
24
20
35DS7HS16
I.D O.D stroke :
90 102 220mm
(3.5 4.0 8.7in)
Rod O.D : 45mm(1.8in)
CHECK AND INSPECTION
6-32
DISASSEMBLY
Hold the parallel parts of the cylinder tube
bottom in a vice and mark the rod head
end to show how much it is screwed in,
then remove the rod head. Next, hook a
wrench into the notch at the cylinder head
and remove the cylinder head from
cylinder tube.
When doing this, wind tape round the
threaded part of the rod and be careful not
to damage the dust seal and rod seal
inside cylinder head.
2)
3)
(1)
Check item Standard size RemedyRepair limit
Clearance between cylinder rod &
bushing
Clearance between rod
head bushing & pin
0.072~0.288
(0.003~0.011)
0.10~0.35
(0.004~0.014)
0.5
(0.020)
0.6
(0.024)
Replace bushing
Replace bushing
D503HS23
mm(in)

More Related Content

More from fjjsekmsmmes

Mc cormick g max iveco tier 3 (2007-2012) - rp74 - 135 tractor service repair...
Mc cormick g max iveco tier 3 (2007-2012) - rp74 - 135 tractor service repair...Mc cormick g max iveco tier 3 (2007-2012) - rp74 - 135 tractor service repair...
Mc cormick g max iveco tier 3 (2007-2012) - rp74 - 135 tractor service repair...fjjsekmsmmes
 
Mc cormick g max iveco tier 3 (2007-2012) - rp74 - 125 tractor service repair...
Mc cormick g max iveco tier 3 (2007-2012) - rp74 - 125 tractor service repair...Mc cormick g max iveco tier 3 (2007-2012) - rp74 - 125 tractor service repair...
Mc cormick g max iveco tier 3 (2007-2012) - rp74 - 125 tractor service repair...fjjsekmsmmes
 
Mc cormick gm series tier 2 (2003 2008) - rs11 - gm45 tractor service repair ...
Mc cormick gm series tier 2 (2003 2008) - rs11 - gm45 tractor service repair ...Mc cormick gm series tier 2 (2003 2008) - rs11 - gm45 tractor service repair ...
Mc cormick gm series tier 2 (2003 2008) - rs11 - gm45 tractor service repair ...fjjsekmsmmes
 
Mc cormick gm series tier 1 (1998 2003) - rs10 - gm50 tractor service repair ...
Mc cormick gm series tier 1 (1998 2003) - rs10 - gm50 tractor service repair ...Mc cormick gm series tier 1 (1998 2003) - rs10 - gm50 tractor service repair ...
Mc cormick gm series tier 1 (1998 2003) - rs10 - gm50 tractor service repair ...fjjsekmsmmes
 
Mc cormick gm series tier 1 (1998 2003) - rs10 - gm40 tractor service repair ...
Mc cormick gm series tier 1 (1998 2003) - rs10 - gm40 tractor service repair ...Mc cormick gm series tier 1 (1998 2003) - rs10 - gm40 tractor service repair ...
Mc cormick gm series tier 1 (1998 2003) - rs10 - gm40 tractor service repair ...fjjsekmsmmes
 
Mc cormick fxl tier 2 (2003 2008) - rp51 - f70 fge tractor service repair manual
Mc cormick fxl tier 2 (2003 2008) - rp51 - f70 fge tractor service repair manualMc cormick fxl tier 2 (2003 2008) - rp51 - f70 fge tractor service repair manual
Mc cormick fxl tier 2 (2003 2008) - rp51 - f70 fge tractor service repair manualfjjsekmsmmes
 
Mc cormick fxl tier 2 (2003 2008) - rp51 - f60 fge tractor service repair manual
Mc cormick fxl tier 2 (2003 2008) - rp51 - f60 fge tractor service repair manualMc cormick fxl tier 2 (2003 2008) - rp51 - f60 fge tractor service repair manual
Mc cormick fxl tier 2 (2003 2008) - rp51 - f60 fge tractor service repair manualfjjsekmsmmes
 
Komatsu pw160 7 k hydraulic excavator service repair manual (sn k40001 and up)
Komatsu pw160 7 k hydraulic excavator service repair manual (sn k40001 and up)Komatsu pw160 7 k hydraulic excavator service repair manual (sn k40001 and up)
Komatsu pw160 7 k hydraulic excavator service repair manual (sn k40001 and up)fjjsekmsmmes
 
Komatsu pw140 7 hydraulic excavator service repair manual (sn h55051 and up)
Komatsu pw140 7 hydraulic excavator service repair manual (sn h55051 and up)Komatsu pw140 7 hydraulic excavator service repair manual (sn h55051 and up)
Komatsu pw140 7 hydraulic excavator service repair manual (sn h55051 and up)fjjsekmsmmes
 
Komatsu pc1800 6 hydraulic excavator service repair manual (sn 10002 and up)
Komatsu pc1800 6 hydraulic excavator service repair manual (sn 10002 and up)Komatsu pc1800 6 hydraulic excavator service repair manual (sn 10002 and up)
Komatsu pc1800 6 hydraulic excavator service repair manual (sn 10002 and up)fjjsekmsmmes
 
Komatsu pc400 lc 7l galeo hydraulic excavator service repair manual (a86001 a...
Komatsu pc400 lc 7l galeo hydraulic excavator service repair manual (a86001 a...Komatsu pc400 lc 7l galeo hydraulic excavator service repair manual (a86001 a...
Komatsu pc400 lc 7l galeo hydraulic excavator service repair manual (a86001 a...fjjsekmsmmes
 
Komatsu pc250 lc 6 hydraulic excavator service repair manual sna82001 and up
Komatsu pc250 lc 6 hydraulic excavator service repair manual sna82001 and upKomatsu pc250 lc 6 hydraulic excavator service repair manual sna82001 and up
Komatsu pc250 lc 6 hydraulic excavator service repair manual sna82001 and upfjjsekmsmmes
 
Komatsu pc220 lc 6 hydraulic excavator service repair manual sn a82001 and up
Komatsu pc220 lc 6 hydraulic excavator service repair manual sn a82001 and upKomatsu pc220 lc 6 hydraulic excavator service repair manual sn a82001 and up
Komatsu pc220 lc 6 hydraulic excavator service repair manual sn a82001 and upfjjsekmsmmes
 
Komatsu pc210 lc 6 hydraulic excavator service repair manual sna82001 and up
Komatsu pc210 lc 6 hydraulic excavator service repair manual sna82001 and upKomatsu pc210 lc 6 hydraulic excavator service repair manual sna82001 and up
Komatsu pc210 lc 6 hydraulic excavator service repair manual sna82001 and upfjjsekmsmmes
 
Komatsu pc200 lc 6 hydraulic excavator service repair manual sna82001 and up
Komatsu pc200 lc 6 hydraulic excavator service repair manual sna82001 and upKomatsu pc200 lc 6 hydraulic excavator service repair manual sna82001 and up
Komatsu pc200 lc 6 hydraulic excavator service repair manual sna82001 and upfjjsekmsmmes
 
Komatsu pc200 6 hydraulic excavator service repair manual sn a82001 and up
Komatsu pc200 6 hydraulic excavator service repair manual sn a82001 and upKomatsu pc200 6 hydraulic excavator service repair manual sn a82001 and up
Komatsu pc200 6 hydraulic excavator service repair manual sn a82001 and upfjjsekmsmmes
 
John deere 8235 r tractors service repair technical manual (tm110319)
John deere 8235 r tractors service repair technical manual (tm110319)John deere 8235 r tractors service repair technical manual (tm110319)
John deere 8235 r tractors service repair technical manual (tm110319)fjjsekmsmmes
 
John deere 6600 tractors service repair technical manual (tm4493)
John deere 6600 tractors service repair technical manual (tm4493)John deere 6600 tractors service repair technical manual (tm4493)
John deere 6600 tractors service repair technical manual (tm4493)fjjsekmsmmes
 
John deere 6506 tractors service repair technical manual (tm4493)
John deere 6506 tractors service repair technical manual (tm4493)John deere 6506 tractors service repair technical manual (tm4493)
John deere 6506 tractors service repair technical manual (tm4493)fjjsekmsmmes
 
John deere 6500 l tractors service repair technical manual (tm4523)
John deere 6500 l tractors service repair technical manual (tm4523)John deere 6500 l tractors service repair technical manual (tm4523)
John deere 6500 l tractors service repair technical manual (tm4523)fjjsekmsmmes
 

More from fjjsekmsmmes (20)

Mc cormick g max iveco tier 3 (2007-2012) - rp74 - 135 tractor service repair...
Mc cormick g max iveco tier 3 (2007-2012) - rp74 - 135 tractor service repair...Mc cormick g max iveco tier 3 (2007-2012) - rp74 - 135 tractor service repair...
Mc cormick g max iveco tier 3 (2007-2012) - rp74 - 135 tractor service repair...
 
Mc cormick g max iveco tier 3 (2007-2012) - rp74 - 125 tractor service repair...
Mc cormick g max iveco tier 3 (2007-2012) - rp74 - 125 tractor service repair...Mc cormick g max iveco tier 3 (2007-2012) - rp74 - 125 tractor service repair...
Mc cormick g max iveco tier 3 (2007-2012) - rp74 - 125 tractor service repair...
 
Mc cormick gm series tier 2 (2003 2008) - rs11 - gm45 tractor service repair ...
Mc cormick gm series tier 2 (2003 2008) - rs11 - gm45 tractor service repair ...Mc cormick gm series tier 2 (2003 2008) - rs11 - gm45 tractor service repair ...
Mc cormick gm series tier 2 (2003 2008) - rs11 - gm45 tractor service repair ...
 
Mc cormick gm series tier 1 (1998 2003) - rs10 - gm50 tractor service repair ...
Mc cormick gm series tier 1 (1998 2003) - rs10 - gm50 tractor service repair ...Mc cormick gm series tier 1 (1998 2003) - rs10 - gm50 tractor service repair ...
Mc cormick gm series tier 1 (1998 2003) - rs10 - gm50 tractor service repair ...
 
Mc cormick gm series tier 1 (1998 2003) - rs10 - gm40 tractor service repair ...
Mc cormick gm series tier 1 (1998 2003) - rs10 - gm40 tractor service repair ...Mc cormick gm series tier 1 (1998 2003) - rs10 - gm40 tractor service repair ...
Mc cormick gm series tier 1 (1998 2003) - rs10 - gm40 tractor service repair ...
 
Mc cormick fxl tier 2 (2003 2008) - rp51 - f70 fge tractor service repair manual
Mc cormick fxl tier 2 (2003 2008) - rp51 - f70 fge tractor service repair manualMc cormick fxl tier 2 (2003 2008) - rp51 - f70 fge tractor service repair manual
Mc cormick fxl tier 2 (2003 2008) - rp51 - f70 fge tractor service repair manual
 
Mc cormick fxl tier 2 (2003 2008) - rp51 - f60 fge tractor service repair manual
Mc cormick fxl tier 2 (2003 2008) - rp51 - f60 fge tractor service repair manualMc cormick fxl tier 2 (2003 2008) - rp51 - f60 fge tractor service repair manual
Mc cormick fxl tier 2 (2003 2008) - rp51 - f60 fge tractor service repair manual
 
Komatsu pw160 7 k hydraulic excavator service repair manual (sn k40001 and up)
Komatsu pw160 7 k hydraulic excavator service repair manual (sn k40001 and up)Komatsu pw160 7 k hydraulic excavator service repair manual (sn k40001 and up)
Komatsu pw160 7 k hydraulic excavator service repair manual (sn k40001 and up)
 
Komatsu pw140 7 hydraulic excavator service repair manual (sn h55051 and up)
Komatsu pw140 7 hydraulic excavator service repair manual (sn h55051 and up)Komatsu pw140 7 hydraulic excavator service repair manual (sn h55051 and up)
Komatsu pw140 7 hydraulic excavator service repair manual (sn h55051 and up)
 
Komatsu pc1800 6 hydraulic excavator service repair manual (sn 10002 and up)
Komatsu pc1800 6 hydraulic excavator service repair manual (sn 10002 and up)Komatsu pc1800 6 hydraulic excavator service repair manual (sn 10002 and up)
Komatsu pc1800 6 hydraulic excavator service repair manual (sn 10002 and up)
 
Komatsu pc400 lc 7l galeo hydraulic excavator service repair manual (a86001 a...
Komatsu pc400 lc 7l galeo hydraulic excavator service repair manual (a86001 a...Komatsu pc400 lc 7l galeo hydraulic excavator service repair manual (a86001 a...
Komatsu pc400 lc 7l galeo hydraulic excavator service repair manual (a86001 a...
 
Komatsu pc250 lc 6 hydraulic excavator service repair manual sna82001 and up
Komatsu pc250 lc 6 hydraulic excavator service repair manual sna82001 and upKomatsu pc250 lc 6 hydraulic excavator service repair manual sna82001 and up
Komatsu pc250 lc 6 hydraulic excavator service repair manual sna82001 and up
 
Komatsu pc220 lc 6 hydraulic excavator service repair manual sn a82001 and up
Komatsu pc220 lc 6 hydraulic excavator service repair manual sn a82001 and upKomatsu pc220 lc 6 hydraulic excavator service repair manual sn a82001 and up
Komatsu pc220 lc 6 hydraulic excavator service repair manual sn a82001 and up
 
Komatsu pc210 lc 6 hydraulic excavator service repair manual sna82001 and up
Komatsu pc210 lc 6 hydraulic excavator service repair manual sna82001 and upKomatsu pc210 lc 6 hydraulic excavator service repair manual sna82001 and up
Komatsu pc210 lc 6 hydraulic excavator service repair manual sna82001 and up
 
Komatsu pc200 lc 6 hydraulic excavator service repair manual sna82001 and up
Komatsu pc200 lc 6 hydraulic excavator service repair manual sna82001 and upKomatsu pc200 lc 6 hydraulic excavator service repair manual sna82001 and up
Komatsu pc200 lc 6 hydraulic excavator service repair manual sna82001 and up
 
Komatsu pc200 6 hydraulic excavator service repair manual sn a82001 and up
Komatsu pc200 6 hydraulic excavator service repair manual sn a82001 and upKomatsu pc200 6 hydraulic excavator service repair manual sn a82001 and up
Komatsu pc200 6 hydraulic excavator service repair manual sn a82001 and up
 
John deere 8235 r tractors service repair technical manual (tm110319)
John deere 8235 r tractors service repair technical manual (tm110319)John deere 8235 r tractors service repair technical manual (tm110319)
John deere 8235 r tractors service repair technical manual (tm110319)
 
John deere 6600 tractors service repair technical manual (tm4493)
John deere 6600 tractors service repair technical manual (tm4493)John deere 6600 tractors service repair technical manual (tm4493)
John deere 6600 tractors service repair technical manual (tm4493)
 
John deere 6506 tractors service repair technical manual (tm4493)
John deere 6506 tractors service repair technical manual (tm4493)John deere 6506 tractors service repair technical manual (tm4493)
John deere 6506 tractors service repair technical manual (tm4493)
 
John deere 6500 l tractors service repair technical manual (tm4523)
John deere 6500 l tractors service repair technical manual (tm4523)John deere 6500 l tractors service repair technical manual (tm4523)
John deere 6500 l tractors service repair technical manual (tm4523)
 

Recently uploaded

prodtion diary final ultima.pptxoiu8edrfgrh
prodtion diary final ultima.pptxoiu8edrfgrhprodtion diary final ultima.pptxoiu8edrfgrh
prodtion diary final ultima.pptxoiu8edrfgrhLeonBraley
 
Big Mouth Season 7 Layout Storyboards by Morgan Pabst
Big Mouth Season 7 Layout Storyboards by Morgan PabstBig Mouth Season 7 Layout Storyboards by Morgan Pabst
Big Mouth Season 7 Layout Storyboards by Morgan PabstMorgan Pabst
 
Short film analysis.pptxdddddddddddddddddddddddddddd
Short film analysis.pptxddddddddddddddddddddddddddddShort film analysis.pptxdddddddddddddddddddddddddddd
Short film analysis.pptxddddddddddddddddddddddddddddLeonBraley
 
obat aborsi klaten wa 081336238223 jual obat aborsi cytotec asli di klaten54-...
obat aborsi klaten wa 081336238223 jual obat aborsi cytotec asli di klaten54-...obat aborsi klaten wa 081336238223 jual obat aborsi cytotec asli di klaten54-...
obat aborsi klaten wa 081336238223 jual obat aborsi cytotec asli di klaten54-...yulianti213969
 
一比一定制英国赫特福德大学毕业证学位证书
一比一定制英国赫特福德大学毕业证学位证书一比一定制英国赫特福德大学毕业证学位证书
一比一定制英国赫特福德大学毕业证学位证书AS
 
prodtion diary updated.pptxrfhkfjgjggjkgjk
prodtion diary updated.pptxrfhkfjgjggjkgjkprodtion diary updated.pptxrfhkfjgjggjkgjk
prodtion diary updated.pptxrfhkfjgjggjkgjkLeonBraley
 
Our great adventures in Warsaw - On arrival training
Our great adventures in Warsaw - On arrival trainingOur great adventures in Warsaw - On arrival training
Our great adventures in Warsaw - On arrival trainingAngelaHakobjanyan
 
Tagarino_14510147_Assessment 2B ThresholdProcess Journal FINAL.pdf
Tagarino_14510147_Assessment 2B ThresholdProcess Journal FINAL.pdfTagarino_14510147_Assessment 2B ThresholdProcess Journal FINAL.pdf
Tagarino_14510147_Assessment 2B ThresholdProcess Journal FINAL.pdferintagarino1
 
Tagarino_14510147_Design Communication Document AS1.pdf
Tagarino_14510147_Design Communication Document AS1.pdfTagarino_14510147_Design Communication Document AS1.pdf
Tagarino_14510147_Design Communication Document AS1.pdferintagarino1
 
Norco College - M4MH Athlete Pilot - 4.30.24 - Presentation.pdf
Norco College - M4MH Athlete Pilot - 4.30.24 - Presentation.pdfNorco College - M4MH Athlete Pilot - 4.30.24 - Presentation.pdf
Norco College - M4MH Athlete Pilot - 4.30.24 - Presentation.pdfRebeccaPontieri
 
Eco-Friendly Interior Design: Tips for sustainable living
Eco-Friendly Interior Design: Tips for sustainable livingEco-Friendly Interior Design: Tips for sustainable living
Eco-Friendly Interior Design: Tips for sustainable livingHsaa
 
Abstract Arch Design Wall Cladding - by Stone Art by SKL
Abstract Arch Design Wall Cladding -  by Stone Art by SKLAbstract Arch Design Wall Cladding -  by Stone Art by SKL
Abstract Arch Design Wall Cladding - by Stone Art by SKLstoneartbyskl
 
VIP ℂall Girls Vijay Nagar Hire Me Neha 96XXXXXXX Top Class ℂall Girl Serviℂe...
VIP ℂall Girls Vijay Nagar Hire Me Neha 96XXXXXXX Top Class ℂall Girl Serviℂe...VIP ℂall Girls Vijay Nagar Hire Me Neha 96XXXXXXX Top Class ℂall Girl Serviℂe...
VIP ℂall Girls Vijay Nagar Hire Me Neha 96XXXXXXX Top Class ℂall Girl Serviℂe...Mumbai Escorts
 
Hosewife Bangalore Just VIP Btm Layout 100% Genuine at your Door Step
Hosewife Bangalore Just VIP Btm Layout 100% Genuine at your Door StepHosewife Bangalore Just VIP Btm Layout 100% Genuine at your Door Step
Hosewife Bangalore Just VIP Btm Layout 100% Genuine at your Door Stepdarmandersingh4580
 
Museum Quality | PrintAction.pdf
Museum Quality | PrintAction.pdfMuseum Quality | PrintAction.pdf
Museum Quality | PrintAction.pdfVictoria Gaitskell
 
Gloria Marquez Resume 2024pdf.pdf pdfpdf
Gloria Marquez Resume 2024pdf.pdf pdfpdfGloria Marquez Resume 2024pdf.pdf pdfpdf
Gloria Marquez Resume 2024pdf.pdf pdfpdfgmarquez046
 
一比一原版(MQU毕业证书)麦考瑞大学毕业证成绩单原件一模一样
一比一原版(MQU毕业证书)麦考瑞大学毕业证成绩单原件一模一样一比一原版(MQU毕业证书)麦考瑞大学毕业证成绩单原件一模一样
一比一原版(MQU毕业证书)麦考瑞大学毕业证成绩单原件一模一样aqwaz
 
DeFeliceKitley_Resume_BFAVCDGraduated2024
DeFeliceKitley_Resume_BFAVCDGraduated2024DeFeliceKitley_Resume_BFAVCDGraduated2024
DeFeliceKitley_Resume_BFAVCDGraduated2024KitleyDeFelice
 

Recently uploaded (20)

prodtion diary final ultima.pptxoiu8edrfgrh
prodtion diary final ultima.pptxoiu8edrfgrhprodtion diary final ultima.pptxoiu8edrfgrh
prodtion diary final ultima.pptxoiu8edrfgrh
 
Big Mouth Season 7 Layout Storyboards by Morgan Pabst
Big Mouth Season 7 Layout Storyboards by Morgan PabstBig Mouth Season 7 Layout Storyboards by Morgan Pabst
Big Mouth Season 7 Layout Storyboards by Morgan Pabst
 
Short film analysis.pptxdddddddddddddddddddddddddddd
Short film analysis.pptxddddddddddddddddddddddddddddShort film analysis.pptxdddddddddddddddddddddddddddd
Short film analysis.pptxdddddddddddddddddddddddddddd
 
Apotik Jual Obat Aborsi asli Malang, Wa : 085180626899 - Penjual obat Cytotec...
Apotik Jual Obat Aborsi asli Malang, Wa : 085180626899 - Penjual obat Cytotec...Apotik Jual Obat Aborsi asli Malang, Wa : 085180626899 - Penjual obat Cytotec...
Apotik Jual Obat Aborsi asli Malang, Wa : 085180626899 - Penjual obat Cytotec...
 
obat aborsi klaten wa 081336238223 jual obat aborsi cytotec asli di klaten54-...
obat aborsi klaten wa 081336238223 jual obat aborsi cytotec asli di klaten54-...obat aborsi klaten wa 081336238223 jual obat aborsi cytotec asli di klaten54-...
obat aborsi klaten wa 081336238223 jual obat aborsi cytotec asli di klaten54-...
 
一比一定制英国赫特福德大学毕业证学位证书
一比一定制英国赫特福德大学毕业证学位证书一比一定制英国赫特福德大学毕业证学位证书
一比一定制英国赫特福德大学毕业证学位证书
 
prodtion diary updated.pptxrfhkfjgjggjkgjk
prodtion diary updated.pptxrfhkfjgjggjkgjkprodtion diary updated.pptxrfhkfjgjggjkgjk
prodtion diary updated.pptxrfhkfjgjggjkgjk
 
Our great adventures in Warsaw - On arrival training
Our great adventures in Warsaw - On arrival trainingOur great adventures in Warsaw - On arrival training
Our great adventures in Warsaw - On arrival training
 
Tagarino_14510147_Assessment 2B ThresholdProcess Journal FINAL.pdf
Tagarino_14510147_Assessment 2B ThresholdProcess Journal FINAL.pdfTagarino_14510147_Assessment 2B ThresholdProcess Journal FINAL.pdf
Tagarino_14510147_Assessment 2B ThresholdProcess Journal FINAL.pdf
 
Tagarino_14510147_Design Communication Document AS1.pdf
Tagarino_14510147_Design Communication Document AS1.pdfTagarino_14510147_Design Communication Document AS1.pdf
Tagarino_14510147_Design Communication Document AS1.pdf
 
Norco College - M4MH Athlete Pilot - 4.30.24 - Presentation.pdf
Norco College - M4MH Athlete Pilot - 4.30.24 - Presentation.pdfNorco College - M4MH Athlete Pilot - 4.30.24 - Presentation.pdf
Norco College - M4MH Athlete Pilot - 4.30.24 - Presentation.pdf
 
Eco-Friendly Interior Design: Tips for sustainable living
Eco-Friendly Interior Design: Tips for sustainable livingEco-Friendly Interior Design: Tips for sustainable living
Eco-Friendly Interior Design: Tips for sustainable living
 
Abstract Arch Design Wall Cladding - by Stone Art by SKL
Abstract Arch Design Wall Cladding -  by Stone Art by SKLAbstract Arch Design Wall Cladding -  by Stone Art by SKL
Abstract Arch Design Wall Cladding - by Stone Art by SKL
 
VIP ℂall Girls Vijay Nagar Hire Me Neha 96XXXXXXX Top Class ℂall Girl Serviℂe...
VIP ℂall Girls Vijay Nagar Hire Me Neha 96XXXXXXX Top Class ℂall Girl Serviℂe...VIP ℂall Girls Vijay Nagar Hire Me Neha 96XXXXXXX Top Class ℂall Girl Serviℂe...
VIP ℂall Girls Vijay Nagar Hire Me Neha 96XXXXXXX Top Class ℂall Girl Serviℂe...
 
Hosewife Bangalore Just VIP Btm Layout 100% Genuine at your Door Step
Hosewife Bangalore Just VIP Btm Layout 100% Genuine at your Door StepHosewife Bangalore Just VIP Btm Layout 100% Genuine at your Door Step
Hosewife Bangalore Just VIP Btm Layout 100% Genuine at your Door Step
 
Museum Quality | PrintAction.pdf
Museum Quality | PrintAction.pdfMuseum Quality | PrintAction.pdf
Museum Quality | PrintAction.pdf
 
Gloria Marquez Resume 2024pdf.pdf pdfpdf
Gloria Marquez Resume 2024pdf.pdf pdfpdfGloria Marquez Resume 2024pdf.pdf pdfpdf
Gloria Marquez Resume 2024pdf.pdf pdfpdf
 
Kiff
KiffKiff
Kiff
 
一比一原版(MQU毕业证书)麦考瑞大学毕业证成绩单原件一模一样
一比一原版(MQU毕业证书)麦考瑞大学毕业证成绩单原件一模一样一比一原版(MQU毕业证书)麦考瑞大学毕业证成绩单原件一模一样
一比一原版(MQU毕业证书)麦考瑞大学毕业证成绩单原件一模一样
 
DeFeliceKitley_Resume_BFAVCDGraduated2024
DeFeliceKitley_Resume_BFAVCDGraduated2024DeFeliceKitley_Resume_BFAVCDGraduated2024
DeFeliceKitley_Resume_BFAVCDGraduated2024
 

Hyundai 35 ds 7e forklift truck service repair manual

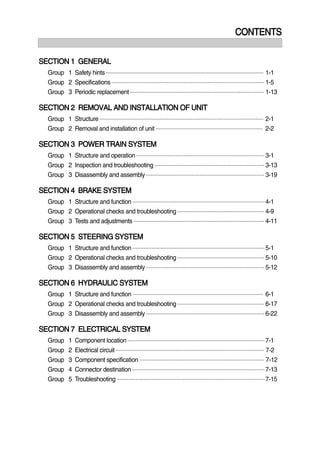
  • 1. CONTENTS SECTION 1 GENERAL Group 1 Safety hints ---------------------------------------------------------------------------------------------------- 1-1 Group 2 Specifications ------------------------------------------------------------------------------------------------- 1-5 Group 3 Periodic replacement ------------------------------------------------------------------------------------- 1-13 SECTION 2 REMOVAL AND INSTALLATION OF UNIT Group 1 Structure -------------------------------------------------------------------------------------------------------- 2-1 Group 2 Removal and installation of unit -------------------------------------------------------------------- 2-2 SECTION 3 POWER TRAIN SYSTEM Group 1 Structure and operation --------------------------------------------------------------------------------- 3-1 Group 2 Inspection and troubleshooting ---------------------------------------------------------------------- 3-13 Group 3 Disassembly and assembly --------------------------------------------------------------------------- 3-19 SECTION 4 BRAKE SYSTEM Group 1 Structure and function ------------------------------------------------------------------------------------ 4-1 Group 2 Operational checks and troubleshooting ------------------------------------------------------- 4-9 Group 3 Tests and adjustments ----------------------------------------------------------------------------------- 4-11 SECTION 5 STEERING SYSTEM Group 1 Structure and function ------------------------------------------------------------------------------------ 5-1 Group 2 Operational checks and troubleshooting ------------------------------------------------------- 5-10 Group 3 Disassembly and assembly --------------------------------------------------------------------------- 5-12 SECTION 6 HYDRAULIC SYSTEM Group 1 Structure and function ----------------------------------------------------------------------------------- 6-1 Group 2 Operational checks and troubleshooting ------------------------------------------------------- 6-17 Group 3 Disassembly and assembly --------------------------------------------------------------------------- 6-22 SECTION 7 ELECTRICAL SYSTEM Group 1 Component location --------------------------------------------------------------------------------------- 7-1 Group 2 Electrical circuit ---------------------------------------------------------------------------------------------- 7-2 Group 3 Component specification ------------------------------------------------------------------------------- 7-12 Group 4 Connector destination ------------------------------------------------------------------------------------ 7-13 Group 5 Troubleshooting ---------------------------------------------------------------------------------------------- 7-15
  • 2. SECTION 8 MAST Group 1 Structure -------------------------------------------------------------------------------------------------------- 8-1 Group 2 Operational checks and troubleshooting ------------------------------------------------------- 8-5 Group 3 Adjustment ----------------------------------------------------------------------------------------------------- 8-8 Group 4 Removal and installation -------------------------------------------------------------------------------- 8-11
  • 3. 0-1 FOREWORD 1. STRUCTURE This service manual has been prepared as an aid to improve the quality of repairs by giving the serviceman an accurate understanding of the product and by showing him the correct way to perform repairs and make judgements. Make sure you understand the contents of this manual and use it to full effect at every opportunity. This service manual mainly contains the necessary technical information for operations performed in a service workshop. For ease of understanding, the manual is divided into the following sections. SECTION 1 GENERAL This section gives the general information of the machine and explains the safety hints for maintenance. SECTION 2 REMOVAL & INSTALLATION OF UNIT This section explains the procedures and techniques of removal and installation of each component. SECTION 3 POWER TRAIN SYSTEM This section explains the structure of the transmission as well as control valve and drive axle. SECTION 4 BRAKE SYSTEM This section explains the brake piping, each component and operation. SECTION 5 STEERING SYSTEM This section explains the structure of the steering unit, priority valve, trail axle as well as steering circuit and operation. SECTION 6 HYDRAULIC SYSTEM This section explains the structure of the gear pump, main control valve as well as work equipment circuit, each component and operation. SECTION 7 ELECTRICAL SYSTEM This section explains the electrical circuit and each component. It serves not only to give an understanding electrical system, but also serves as reference material for troubleshooting. SECTION 8 MAST This section explains the structure of mast, carriage, backrest and forks. The specifications contained in this service manual are subject to change at any time and without any advance notice. Contact your HYUNDAI distributor for the latest information.
  • 4. 0-2 Revised edition mark( ) When a manual is revised, an edition mark is recorded on the bottom outside corner of the pages. RRevisions Revised pages are shown at the list of revised pages on the between the contents page and section 1 page. Symbols So that the shop manual can be of ample practical use, important places for safety and quality are marked with the following symbols. 2. HOW TO READ THE SERVICE MANUAL Distribution and updating Any additions, amendments or other changes will be sent to HYUNDAI distributors. Get the most up-to-date information before you start any work. Filing method See the page number on the bottom of the page. File the pages in correct order. Following examples shows how to read the page number. Example 1 2 - 3 Item number(2. Structure and Function) Consecutive page number for each item. Additional pages : Additional pages are indicated by a hyphen(-) and number after the page number. File as in the example. 1. 2. 3. Symbol Item Remarks Special safety precautions are necessary when performing the work. Extra special safety precautions are necessary when performing the work because it is under internal pressure. Special technical precautions or other precautions for preserving standards are necessary when performing the work. Safety Caution 10 - 4 10 - 4 - 1 10 - 4 - 2 10 - 5 Added pages
  • 5. 0-3 3. CONVERSION TABLE Method of using the Conversion Table The Conversion Table in this section is provided to enable simple conversion of figures. For details of the method of using the Conversion Table, see the example given below. Example Method of using the Conversion Table to convert from millimeters to inches Convert 55mm into inches. Locate the number 50in the vertical column at the left side, take this as , then draw a horizontal line from . Locate the number 5in the row across the top, take this as , then draw a perpendicular line down from . Take the point where the two lines cross as . This point gives the value when converting from millimeters to inches. Therefore, 55mm = 2.165 inches. Convert 550mm into inches. The number 550 does not appear in the table, so divide by 10(Move the decimal point one place to the left) to convert it to 55mm. Carry out the same procedure as above to convert 55mm to 2.165 inches. The original value(550mm) was divided by 10, so multiply 2.165 inches by 10(Move the decimal point one place to the right) to return to the original value. This gives 550mm = 21.65 inches. 1. 2. (1) (2) (3) (1) (2) (3) Millimeters to inches 1mm = 0.03937 in 0 1 2 3 4 5 6 7 8 9 0 0.039 0.079 0.118 0.157 0.197 0.236 0.276 0.315 0.354 10 0.394 0.433 0.472 0.512 0.551 0.591 0.630 0.669 0.709 0.748 20 0.787 0.827 0.866 0.906 0.945 0.984 1.024 1.063 1.102 1.142 30 1.181 1.220 1.260 1.299 1.339 1.378 1.417 1.457 1.496 1.536 40 1.575 1.614 1.654 1.693 1.732 1.772 1.811 1.850 1.890 1.929 50 1.969 2.008 2.047 2.087 2.126 2.165 2.205 2.244 2.283 2.323 60 2.362 2.402 2.441 2.480 2.520 2.559 2.598 2.638 2.677 2.717 70 2.756 2.795 2.835 2.874 2.913 2.953 2.992 3.032 3.071 3.110 80 3.150 3.189 3.228 3.268 3.307 3.346 3.386 3.425 3.465 3.504 90 3.543 3.583 3.622 3.661 3.701 3.740 3.780 3.819 3.858 3.898
  • 6. 0-4 Millimeters to inches 1mm = 0.03937in 0 1 2 3 4 5 6 7 8 9 0 0.039 0.079 0.118 0.157 0.197 0.236 0.276 0.315 0.354 10 0.394 0.433 0.472 0.512 0.551 0.591 0.630 0.669 0.709 0.748 20 0.787 0.827 0.866 0.906 0.945 0.984 1.024 1.063 1.102 1.142 30 1.181 1.220 1.260 1.299 1.339 1.378 1.417 1.457 1.496 1.536 40 1.575 1.614 1.654 1.693 1.732 1.772 1.811 1.850 1.890 1.929 50 1.969 2.008 2.047 2.087 2.126 2.165 2.205 2.244 2.283 2.323 60 2.362 2.402 2.441 2.480 2.520 2.559 2.598 2.638 2.677 2.717 70 2.756 2.795 2.835 2.874 2.913 2.953 2.992 3.032 3.071 3.110 80 3.150 3.189 3.228 3.268 3.307 3.346 3.386 3.425 3.465 3.504 90 3.543 3.583 3.622 3.661 3.701 3.740 3.780 3.819 3.858 3.898 Kilogram to Pound 1kg = 2.2046lb 0 1 2 3 4 5 6 7 8 9 0 2.20 4.41 6.61 8.82 11.02 13.23 15.43 17.64 19.84 10 22.05 24.25 26.46 28.66 30.86 33.07 35.27 37.48 39.68 41.89 20 44.09 46.30 48.50 50.71 51.91 55.12 57.32 59.5. 61.73 63.93 30 66.14 68.34 70.55 72.75 74.96 77.16 79.37 81.57 83.78 85.98 40 88.18 90.39 92.59 94.80 97.00 99.21 101.41 103.62 105.82 108.03 50 110.23 112.44 114.64 116.85 119.05 121.25 123.46 125.66 127.87 130.07 60 132.28 134.48 136.69 138.89 141.10 143.30 145.51 147.71 149.91 152.12 70 154.32 156.53 158.73 160.94 163.14 165.35 167.55 169.76 171.96 174.17 80 176.37 178.57 180.78 182.98 185.19 187.39 189.60 191.80 194.01 196.21 90 198.42 200.62 202.83 205.03 207.24 209.44 211.64 213.85 216.05 218.26
  • 7. 0-5 Liter to U.S. Gallon 1 = 0.2642 U.S.Gal 0 1 2 3 4 5 6 7 8 9 0 0.264 0.528 0.793 1.057 1.321 1.585 1.849 2.113 2.378 10 2.642 2.906 3.170 3.434 3.698 3.963 4.227 4.491 4.755 5.019 20 5.283 5.548 5.812 6.6076 6.340 6.604 6.869 7.133 7.397 7.661 30 7.925 8.189 8.454 8.718 8.982 9.246 9.510 9.774 10.039 10.303 40 10.567 10.831 11.095 11.359 11.624 11.888 12.152 12.416 12.680 12.944 50 13.209 13.473 13.737 14.001 14.265 14.529 14.795 15.058 15.322 15.586 60 15.850 16.115 16.379 16.643 16.907 17.171 17.435 17.700 17.964 18.228 70 18.492 18.756 19.020 19.285 19.549 19.813 20.077 20.341 20.605 20.870 80 21.134 21.398 21.662 21.926 22.190 22.455 22.719 22.983 23.247 23.511 90 23.775 24.040 24.304 24.568 24.832 25.096 25.631 25.625 25.889 26.153 Liter to U.K. Gallon 1 = 0.21997 U.K.Gal 0 1 2 3 4 5 6 7 8 9 0 0.220 0.440 0.660 0.880 1.100 1.320 1.540 1.760 1.980 10 2.200 2.420 2.640 2.860 3.080 3.300 3.520 3.740 3.950 4.179 20 4.399 4.619 4.839 5.059 5.279 5.499 5.719 5.939 6.159 6.379 30 6.599 6.819 7.039 7.259 7.479 7.969 7.919 8.139 8.359 8.579 40 8.799 9.019 9.239 9.459 9.679 9.899 10.119 10.339 10.559 10.778 50 10.998 11.281 11.438 11.658 11.878 12.098 12.318 12.528 12.758 12.978 60 13.198 13.418 13.638 13.858 14.078 14.298 14.518 14.738 14.958 15.178 70 15.398 15.618 15.838 16.058 16.278 16.498 16.718 16.938 17.158 17.378 80 17.598 17.818 18.037 18.257 18.477 18.697 18.917 19.137 19.357 19.577 90 19.797 20.017 20.237 20.457 20.677 20.897 21.117 21.337 21.557 21.777
  • 8. 0-6 kgf m to lbf ft 1kgf m = 7.233lbf ft 0 1 2 3 4 5 6 7 8 9 7.2 14.5 21.7 28.9 36.2 43.4 50.6 57.9 65.1 10 72.3 79.6 86.8 94.0 101.3 108.5 115.7 123.0 130.2 137.4 20 144.7 151.9 159.1 166.4 173.6 180.8 188.1 195.3 202.5 209.8 30 217.0 224.2 231.5 238.7 245.9 253.2 260.4 267.6 274.9 282.1 40 289.3 396.6 303.8 311.0 318.3 325.5 332.7 340.0 347.2 354.4 50 361.7 368.9 376.1 383.4 390.6 397.8 405.1 412.3 419.5 426.8 60 434.0 441.2 448.5 455.7 462.9 470.2 477.4 484.6 491.8 499.1 70 506.3 513.5 520.8 528.0 535.2 542.5 549.7 556.9 564.2 571.4 80 578.6 585.9 593.1 600.3 607.6 614.8 622.0 629.3 636.5 643.7 90 651.0 658.2 665.4 672.7 679.9 687.1 694.4 701.6 708.8 716.1 100 723.3 730.5 737.8 745.0 752.2 759.5 766.7 773.9 781.2 788.4 110 795.6 802.9 810.1 817.3 824.6 831.8 839.0 846.3 853.5 860.7 120 868.0 875.2 882.4 889.7 896.9 904.1 911.4 918.6 925.8 933.1 130 940.3 947.5 954.8 962.0 969.2 976.5 983.7 990.9 998.2 10005.4 140 1012.6 1019.9 1027.1 1034.3 1041.5 1048.8 1056.0 1063.2 1070.5 1077.7 150 1084.9 1092.2 1099.4 1106.6 1113.9 1121.1 1128.3 1135.6 1142.8 1150.0 160 1157.3 1164.5 1171.7 1179.0 1186.2 1193.4 1200.7 1207.9 1215.1 1222.4 170 1129.6 1236.8 1244.1 1251.3 1258.5 1265.8 1273.0 1280.1 1287.5 1294.7 180 1301.9 1309.2 1316.4 1323.6 1330.9 1338.1 1345.3 1352.6 1359.8 1367.0 190 1374.3 1381.5 1388.7 1396.0 1403.2 1410.4 1417.7 1424.9 1432.1 1439.4
  • 9. 0-7 kgf/cm2 to lbf/in2 1kgf / cm2 = 14.2233lbf / in2 0 1 2 3 4 5 6 7 8 9 14.2 28.4 42.7 56.9 71.1 85.3 99.6 113.8 128.0 10 142.2 156.5 170.7 184.9 199.1 213.4 227.6 241.8 256.0 270.2 20 284.5 298.7 312.9 327.1 341.4 355.6 369.8 384.0 398.3 412.5 30 426.7 440.9 455.1 469.4 483.6 497.8 512.0 526.3 540.5 554.7 40 568.9 583.2 597.4 611.6 625.8 640.1 654.3 668.5 682.7 696.9 50 711.2 725.4 739.6 753.8 768.1 782.3 796.5 810.7 825.0 839.2 60 853.4 867.6 881.8 896.1 910.3 924.5 938.7 953.0 967.2 981.4 70 995.6 1010 1024 1038 1053 1067 1081 1095 1109 1124 80 1138 1152 1166 1181 1195 1209 1223 1237 1252 1266 90 1280 1294 1309 1323 1337 1351 1365 1380 1394 1408 100 1422 1437 1451 1465 1479 1493 1508 1522 1536 1550 110 1565 1579 1593 1607 1621 1636 1650 1664 1678 1693 120 1707 1721 1735 1749 1764 1778 1792 1806 1821 1835 130 1849 2863 1877 1892 1906 1920 1934 1949 1963 1977 140 1991 2005 2020 2034 2048 2062 2077 2091 2105 2119 150 2134 2148 2162 2176 2190 2205 2219 2233 2247 2262 160 2276 2290 2304 2318 2333 2347 2361 2375 2389 2404 170 2418 2432 2446 2460 2475 2489 2503 2518 2532 2546 180 2560 2574 2589 5603 2617 2631 2646 2660 2674 2688 200 2845 2859 2873 2887 2901 2916 2930 2944 2958 2973 210 2987 3001 3015 3030 3044 3058 3072 3086 3101 3115 220 3129 3143 3158 3172 3186 3200 3214 3229 3243 3257 230 3271 3286 3300 3314 3328 3343 3357 3371 3385 3399
  • 10. TEMPERATURE Fahrenheit-Centigrade Conversion. A simple way to convert a fahrenheit temperature reading into a centigrade temperature reading or vice verse is to enter the accompanying table in the center or boldface column of figures. These figures refer to the temperature in either Fahrenheit or Centigrade degrees. If it is desired to convert from Fahrenheit to Centigrade degrees, consider the center column as a table of Fahrenheit temperatures and read the corresponding Centigrade temperature in the column at the left. If it is desired to convert from Centigrade to Fahrenheit degrees, consider the center column as a table of Centigrade values, and read the corresponding Fahrenheit temperature on the right. 0-8 C F C F C F C F -40.4 -40 -40.0 -11.7 11 51.8 7.8 46 114.8 27.2 81 117.8 -37.2 -35 -31.0 -11.1 12 53.6 8.3 47 116.6 27.8 82 179.6 -34.4 -30 -22.0 -10.6 13 55.4 8.9 48 118.4 28.3 83 181.4 -31.7 -25 -13.0 -10.0 14 57.2 9.4 49 120.2 28.9 84 183.2 -28.9 -20 -4.0 -9.4 15 59.0 10.0 50 122.0 29.4 85 185.0 -28.3 -19 -2.2 -8.9 16 60.8 10.6 51 123.8 30.0 86 186.8 -27.8 -18 -0.4 -8.3 17 62.6 11.1 52 125.6 30.6 87 188.6 -27.2 -17 1.4 -7.8 18 64.4 11.7 53 127.4 31.1 88 190.4 -26.7 -16 3.2 -6.7 20 68.0 12.8 55 131.0 32.2 90 194.0 -26.1 -15 5.0 -6.7 20 68.0 12.8 55 131.0 32.2 90 194.0 -25.6 -14 6.8 -6.1 21 69.8 13.3 56 132.8 32.8 91 195.8 -25.0 -13 8.6 -5.6 22 71.6 13.9 57 134.6 33.3 92 197.6 -24.4 -12 10.4 -5.0 23 73.4 14.4 58 136.4 33.9 93 199.4 -23.9 -11 12.2 -4.4 24 75.2 15.0 59 138.2 34.4 94 201.2 -23.3 -10 14.0 -3.9 25 77.0 15.6 60 140.0 35.0 95 203.0 -22.8 -9 15.8 -3.3 26 78.8 16.1 61 141.8 35.6 96 204.8 -22.2 -8 17.6 -2.8 27 80.6 16.7 62 143.6 36.1 97 206.6 -21.7 -7 19.4 -2.2 28 82.4 17.2 63 145.4 36.7 98 208.4 -21.1 -6 21.2 -1.7 29 84.2 17.8 64 147.2 37.2 99 210.2 -20.6 -5 23.0 -1.1 35 95.0 21.1 70 158.0 51.7 125 257.0 -20.0 -4 24.8 -0.6 31 87.8 18.9 66 150.8 40.6 105 221.0 -19.4 -3 26.6 0 32 89.6 19.4 67 152.6 43.3 110 230.0 -18.9 -2 28.4 0.6 33 91.4 20.0 68 154.4 46.1 115 239.0 -18.3 -1 30.2 1.1 34 93.2 20.6 69 156.2 48.9 120 248.0 -17.8 0 32.0 1.7 35 95.0 21.1 70 158.0 51.7 125 257.0 -17.2 1 33.8 2.2 36 96.8 21.7 71 159.8 54.4 130 266.0 -16.7 2 35.6 2.8 37 98.6 22.2 72 161.6 57.2 135 275.0 -16.1 3 37.4 3.3 38 100.4 22.8 73 163.4 60.0 140 284.0 -15.6 4 39.2 3.9 39 102.2 23.3 74 165.2 62.7 145 293.0 -15.0 5 41.0 4.4 40 104.0 23.9 75 167.0 65.6 150 302.0 -14.4 6 42.8 5.0 41 105.8 24.4 76 168.8 68.3 155 311.0 -13.9 7 44.6 5.6 42 107.6 25.0 77 170.6 71.1 160 320.0 -13.3 8 46.4 6.1 43 109.4 25.6 78 172.4 73.9 165 329.0 -12.8 9 48.2 6.7 44 111.2 26.1 79 174.2 76.7 170 338.0 -12.2 10 50.0 7.2 45 113.0 26.7 80 176.0 79.4 172 347.0
  • 11. 6-20 GROUP 3 DISASSEMBLY AND ASSEMBLY 1. MAIN PUMP STRUCTURE1) 19 20 3 12 9 21 4 6 7 15 8 16 23 26 17 1822 5 27 11 25 1 2 13 10 14 24 35DS7HS06 1 Body 2 Rear cover 3 Front cover 4 Thrust plate 5 Thrust plate 6 Drive gear 7 Driven gear 8 Drive shaft 9 Driven gear 10 Screw 11 Screw 12 Grub screw 13 Washer 14 Washer 15 Seal 16 Seal 17 Seal 18 Seal 19 Shaft seal 20 Ring 21 Back up ring 22 Antiextrusion 23 Sleeve bearing 24 Hub 25 Dowel pin 26 Steel bushing 27 Body
  • 12. 6-21 GENERAL INSTRUCTION Cleanliness Cleanliness is the primary means of assuring satisfactory hydraulic pump life. Components such as flanges and covers are best cleaned in soap and hot water, then air dried. Gears should be washed in solvent, air dried, and oiled immediately. Certain cleaning solvents are flammable. Do not allow sources of ignition in the area when using cleaning solvents. Protect all exposed surfaces and open cavities from damage and foreign material. Gear journals and gear faces are super finished. Take care not to touch these surfaces after oil and solvent. Lubrication of moving parts During assembly, all running surfaces(Bearing and wear plate) must be lightly lubricated with a clean oil or aerosol lubricant. Tools required for assembly Socket set(1/2 drive) Internal snap ring pliers Shaft seal sleeve or clear tape Torque wrench(200lbf ft capacity) Plastic hammer Torque wrench box end adapters 22) (1) (2) (3) DISASSEMBLY Rear section Loosen and remove the screw(11) of second pump. 3) Rear section 11 Rear cover 13 35DS7HS13 (1) Remove hub(24) and ease the drive gear up to facilitate removal the thrust plate. Rear section 24 Front section D357PMP02
  • 13. 6-22 And remove drive gear(6), driven gear(7), thrust plate(4), keeping gears as straight as possible, and body(1) also. 6 7 4 4 1 D357PMP03 Front section Loosen and remove the screw(10) from the body(27). Coat the sharp edges of the drive shaft (8) with adhesive tape and smear a clean grease on the shaft end extension to avoid any damaging lip of the shaft seal when removing the cover(3). 14 10 8 27 3 D357PMP04 (1) Remove the cover(3) taking care to keep the cover as straight as possible during removal. If cover is stuck, tap around the edge with rubber mallet in order to break away from the body(27). Ensure that while removing cover(3) shaft and other components remain position. 8 3 27 D357PMP05 Ease the drive gear(8) up to facilitate removal the thrust plate(5). Remove drive gear(8), driven gear(9), thrust plate(5), keeping gears as straight as possible, and body(27) also. 927 8 5 D357PMP06
  • 14. 6-23 Cover assembly Remove snap ring(20) with proper tool(Only when it is needed to replace shaft seal). Remove the shaft seal(19) taking care not to give any damage on the surface of shaft hole(Only when it is needed to replace shaft seal). 3 19 20 D357PMP07 RREASSEMBLY Cover assembly Insert the shaft seal(19) carefully and fit it inside of cover with proper tool. Fit the snap ring(20) in pre-arranged position with proper tool. 3 19 20 D357PMP07 (3) (1) FFront section Fit the seal(17) on the pre-arrang-ed groove of the body(27). Smear clean grease on the parker ring to avoid drifting away of parker ring from the body. 27 17 D357PMP08 Locate the seals(16) on the groove pre- arranged on the thrust plate(5). Then, locate antiextrusion(22) on the groove pre-arranged on the seals(16). Smear clean grease on the seals(16, 22). (The front and rear thrust plates and seals and back-up rings are same). 9 8 5 16 22 5 22 16 23 23 D357PMP09 44) (2)
  • 15. 6-24 Insert the steel bushing(26) into body(27). 27 26 D357PMP10 Insert the complete pressure plate (5+16+22) into body(27) while keeping the plate straight. Seal side should face to the rear side, opposite side of gears. Pay attention to the direction of seal. (opened side should face suction side always) 27 5 16 22 D357PMP11 Locate driving gear(8) and driven gear(9) while keeping the gears straight. Locate pressure plate(5+16+22) with care for the direction. 27 8 9 D357PMP12 Locate complete cover(3+19+20) while taking care not to give any damage on the shaft seal by edge of shaft. And tap around the cover(3) with rubber mallet. 8 27 3 19 20 D357PMP13
  • 16. 6-25 Tighten the bolts(10) with washer(14) in a crisscross pattern to torque value of 14.3kgf m(103lbf ft). 10(x4) 14(x4) D357PMP14 RRear section Smear clean grease on the seal(18) to avoid drifting away of seal from the body(1) and assemble temporarily rear cover(2). 11 13 1 2 18 35DS7HS14 Locate the seals(15) on the groove pre- arranged on the thrust plates(4). Then, locate back-up ring(21) on the groove pre-arranged on the seals(15). Smear clean grease on the seals (21+15). (The front and rear thrust plates and seals and back-up rings are same) 4 6 4 7 21 15 21 15 D357PMP16 Insert the complete pressure plate (4+21+15) into body while keeping the plate straight. Seal side should face to the rear cover (2), opposite side of gears. Pay attention to the direction of seal. (opened side should face suction side always) 4 21 15 21 15 18 1 2 35DS7HS17 ((3)
  • 17. 6-26 Locate driving gear(4) and driven gear(5) while keeping the gears straight. Locate pressure plate(4+21+15) with care for the direction. 1 4 21 15 5 D357PMP18 Open rear cover(2) to locate hub(24) into rear section. Rear section 24 Front section 2 D357PMP19 Tighten the bolts(11) with washer(13) in a crisscross pattern to torque value of 4.6kgf m(33.3lbf ft). Check that the pump rotate freely when the drive shaft is turned by hand. If not a thrust plate seal may be pinched. Rear section Front section 2 11 13 35DS7HS15
  • 18. 6-27 2. MAIN CONTROL VALVE Lay out valve components on a clean, flat working surface. The inlet assembly will include an O-ring, and the spool section(s) include an O-ring, a load check poppet and a load check spring. Tools required for basic valve assembly include 3/4 and 11/16 open or box end wrenches and a torque wrench with thin wall sockets. Assemble tie rod nuts to one end of each tie rod with one or two threads showing. Insert tie rods through tie rod holes of inlet (Large tie rod at top). Lay inlet on end with tie rods up, place O-ring into position. Place first spool section(O-ring side up) on inlet section, position O-ring and insert load check poppet(Nose down) and spring (Behind poppet) into load check cavity as shown. Repeat this procedure for each spool section ; The load check springs are compressed by the following sections during assembly. Position end section on last spool section as shown and hand tighten tie rod nuts. The end section on picture is a "turn around" section without ports. Universal outlet /power beyond section and power beyond and closed center sections are also used as end sections. These end sections do not have O-ring grooves. 1) 2) 3) 4) 7406S MCV05(1) 7406S MCV05(2) 7406S MCV05(3) 7406S MCV05(4)
  • 19. 6-28 Position valve assembly with the mounting pads of the end sections on a flat surface. To obtain proper alignment of end sections relative to the spool sections apply downward pressure to the end sections ; Snug tie rod nuts to about 10lbf ft. Final torque the two 11/16 nuts to 48 5lbf ft ; Final torque the 3/4 nut to 74 8lbf ft. Check for proper spool movement. 5) Install auxiliary valves and plugs and torque to proper specifications. GGeneral assembly notes: A. Lever assemblies can be installed on section before or after complete valve assembly. B. The load check and spring may be omitter from assembly in certain circuit conditions(i.e., motor spools). 6) 7406S MCV06(1) 7406S MCV06(2)
  • 20. 6-29 4. LIFT CYLINDER STRUCTURE1) 1 Tube assy 2 Rod 3 Piston 4 Piston seal 5 Back up ring 6 Wear ring 7 Retaining ring 8 Gland 9 Dust wiper 10 Rod seal 11 O-ring 12 Guide 13 DU busing 14 O-ring 15 Spacer 16 O-ring 1 2 15 16 11 12 13 10 8 9 5 3 6 14 4 7 D357HS19 I.D O.D stroke(standard) 73 65 1335mm (2.9 2.6 52.6in) Rod O.D : 50mm(2.0in)
  • 21. Thank you very much for your reading. Please Click Here. Then Get COMPLETE MANUAL. NO WAITING NOTE: If there is no response to click on the link above, please download the PDF document first and then click on it.
  • 22. 6-30 DISASSEMBLY Hold the cylinder tube in a vice, loosen the cylinder head and remove it. Remove the spacer from the cylinder tube and knock out the bushing. Hook a wrench in the hole in the retainer at the piston end and turn. Lever up the edge of the guide, then turn the guide in again and the guide can be removed. CHECK AND INSPECTION 2) 2) (1) ASSEMBLY Soak the piston ring in hydraulic oil at a temperature of 40 to 50 C , expand the inside diameter and assemble on the piston. Install a piston seal. Bend the edge of the guide and rotate it to install the guide completely. 3) (1) Check item Standard size RemedyRepair limit Clearance between cylinder rod & bushing Clearance between piston ring & tube 0.05~0.25 (0.002~0.01) 0.05~0.35 (0.002~0.013) 0.4 (0.0015) 0.5 (0.02) Replace bushing Replace piston ring D503HS20 D503HS21 mm(in)
  • 23. 6-31 5. TILT CYLINDER STRUCTURE1) 1 Tube assy 2 Rod 3 Gland 4 DU bushing 5 Rod seal 6 Back up ring 7 Dust wiper 8 Snap ring 9 O-ring 10 Back up ring 11 Lock washer 12 O-ring 13 Piston 14 Glyd ring 15 Wear ring 16 O-ring 17 Nylon nut 18 Rod eye 19 Spherical bearing 20 Retaining ring 21 Hexagon bolt 22 Hexagon nut 23 Spring washer 24 O-ring 1 2 13 15 24 7 16 17 4 8 5 14 11 18 19 23 22 21 12 9 10 6 3 24 20 35DS7HS16 I.D O.D stroke : 90 102 220mm (3.5 4.0 8.7in) Rod O.D : 45mm(1.8in)
  • 24. CHECK AND INSPECTION 6-32 DISASSEMBLY Hold the parallel parts of the cylinder tube bottom in a vice and mark the rod head end to show how much it is screwed in, then remove the rod head. Next, hook a wrench into the notch at the cylinder head and remove the cylinder head from cylinder tube. When doing this, wind tape round the threaded part of the rod and be careful not to damage the dust seal and rod seal inside cylinder head. 2) 3) (1) Check item Standard size RemedyRepair limit Clearance between cylinder rod & bushing Clearance between rod head bushing & pin 0.072~0.288 (0.003~0.011) 0.10~0.35 (0.004~0.014) 0.5 (0.020) 0.6 (0.024) Replace bushing Replace bushing D503HS23 mm(in)