1. Level 2 Proficiency: Priority Settings
Use Av (aperture priority) settings to add more control to your lighting and depth of field.
Step 1: Review Websites
Aperture Priority or Av Mode:
• http://www.youtube.com/watch?v=wtdpqvFncxg&feature=PlayList&p=9DF798A78F1C1FC7&playnext=1&index=15
Step 2: Auto Presets vs. Manual
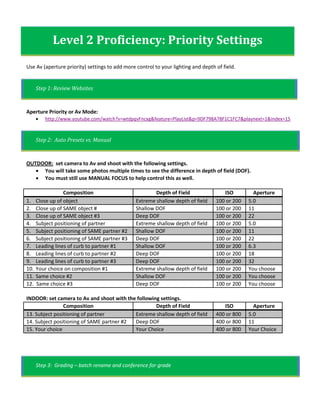
OUTDOOR: set camera to Av and shoot with the following settings.
• You will take some photos multiple times to see the difference in depth of field (DOF).
• You must still use MANUAL FOCUS to help control this as well.
Composition Depth of Field ISO Aperture
1. Close up of object Extreme shallow depth of field 100 or 200 5.0
2. Close up of SAME object # Shallow DOF 100 or 200 11
3. Close up of SAME object #3 Deep DOF 100 or 200 22
4. Subject positioning of partner Extreme shallow depth of field 100 or 200 5.0
5. Subject positioning of SAME partner #2 Shallow DOF 100 or 200 11
6. Subject positioning of SAME partner #3 Deep DOF 100 or 200 22
7. Leading lines of curb to partner #1 Shallow DOF 100 or 200 6.3
8. Leading lines of curb to partner #2 Deep DOF 100 or 200 18
9. Leading lines of curb to partner #3 Deep DOF 100 or 200 32
10. Your choice on composition #1 Extreme shallow depth of field 100 or 200 You choose
11. Same choice #2 Shallow DOF 100 or 200 You choose
12. Same choice #3 Deep DOF 100 or 200 You choose
INDOOR: set camera to Av and shoot with the following settings.
Composition Depth of Field ISO Aperture
13. Subject positioning of partner Extreme shallow depth of field 400 or 800 5.0
14. Subject positioning of SAME partner #2 Deep DOF 400 or 800 11
15. Your choice Your Choice 400 or 800 Your Choice
Step 3: Grading – batch rename and conference for grade