How can i configure my email on outlook 2007 express ssl
•Download as PPTX, PDF•
0 likes•223 views

How can i configure my email on outlook 2007 express ssl

Recommended
Recommended
More Related Content
Similar to How can i configure my email on outlook 2007 express ssl
Similar to How can i configure my email on outlook 2007 express ssl (20)
More from Wazafny Shokran
More from Wazafny Shokran (20)
Recently uploaded
Recently uploaded (20)
How can i configure my email on outlook 2007 express ssl
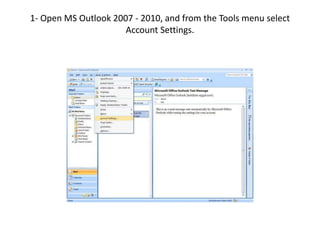
- 1. 1- Open MS Outlook 2007 - 2010, and from the Tools menu select Account Settings.
- 2. 2- Click the New... button.
- 3. 3- Check the box next to Manually configure server settings or additional server types and click Next.
- 4. 4- Now, you have to specify the email account settings. Please make sure to replace your domain.com with your actual domain name in all examples below. User Information: - Your Name type in the name that your recipients will see in the From field of e- mails you send. - Email Address type in your complete email address. Server Information: - Incoming mail server (POP3) pop.secureserver.net - Outgoing mail server (SMTP) smtpout.secureserver.net Logon Information: - User Name - type in your complete email address. - Password type in the password for this email account.
- 5. 5- Once you have filled in the above information, click on the More Settings button.
- 6. 6- Select the Outgoing Server tab and check the box next to My outgoing server (SMTP) requires authentication. Select also the radio button next to Use same settings as my incoming mail server.
- 7. 7- Now, select the Advanced tab. You have two options available for the Outgoing Server (SMTP) settings as specified below: Set the Incoming server (POP3): port to 995 Check in this server requires an encrypted connection ( SSL ) Set the Outgoing server (SMTP): port to 465 Choose ( SSL ) from the square beside use the following type of encrypted connection ( SSL ) Then Click OK.
- 8. 8- click Test Account Settings.
- 9. 9- Finally, click Next and then - Finish. NOTE: If you still have a problem, Please send us print screen snapshots to every step you follow to configure outlook just like illustrated and a print screen snapshots of the error that appears to you.