Installing MEDIALecture ontoyour PC
To record your lecture, please follow the steps below:
1. Power up and log into the PC.
2. Plug the microphone into the USB port.
3. Go to https://hml.yorksj.ac.uk/ and sign-in using Chrome browser (Top Right)
4. Click on the Record Screen button at the top of the page and when prompted click on the
download button.
5. A box will appear prompting you to download the installation of MEDIALecture.
6. The download will appear at the bottom of your browser (Chrome). Click on this box and the Open
File box will appear.
7. Click on Run
8. The installer has now downloaded. Next click the cross to close the Download box. The next page
will show you how to launch the MEDIALecture application.
2.
Launching MEDIALecture
9. Nowyou have downloaded the installer, launch the application in MEDIAL by clicking the Record
Screen button.
10. Click on Yes on the next screen that appears.
11. Click on the Open Medial Lecture button when it appears.
12. When the application is launched, it will appear in the bottom right-hand corner of the screen and
look like this:
Configuring MEDIALecture Settings
There are a few setting changes you should make before you record, to make the process quicker later.
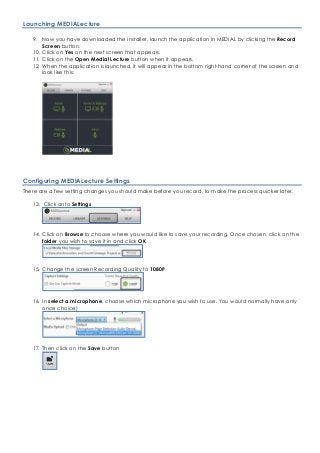
13. Click onto Settings
14. Click on Browse to choose where you would like to save your recording. Once chosen, click on the
folder you wish to save it in and click OK
15. Change the screen Recording Quality to 1080P
16. In select a microphone, choose which microphone you wish to use. You would normally have only
once choice)
17. Then click on the Save button
3.
Recording from MEDIALecture
Youare now ready to record.
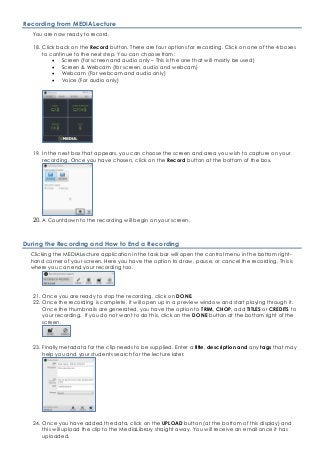
18. Click back on the Record button. There are four options for recording. Click on one of the 4 boxes
to continue to the next step. You can choose from:
• Screen (for screen and audio only – This is the one that will mostly be used)
• Screen & Webcam (for screen, audio and webcam)
• Webcam (For webcam and audio only)
• Voice (For audio only)
19. In the next box that appears, you can choose the screen and area you wish to capture on your
recording. Once you have chosen, click on the Record button at the bottom of the box.
20. A Countdown to the recording will begin on your screen.
During the Recording and How to End a Recording
Clicking the MEDIALecture application in the task bar will open the control menu in the bottom right-
hand corner of your screen. Here you have the option to draw, pause, or cancel the recording. This is
where you can end your recording too.
21. Once you are ready to stop the recording, click on DONE.
22. Once the recording is complete, it will open up in a preview window and start playing through it.
Once the thumbnails are generated, you have the option to TRIM, CHOP, add TITLES or CREDITS to
your recording. If you do not want to do this, click on the DONE button at the bottom right of the
screen.
23. Finally metadata for the clip needs to be supplied. Enter a title, description and any tags that may
help you and your students search for the lecture later.
24. Once you have added the data, click on the UPLOAD button (at the bottom of this display) and
this will upload the clip to the MediaLibrary straight away. You will receive an email once it has
uploaded.