
Recommended
Recommended
More Related Content
Viewers also liked
Viewers also liked (9)
Similar to Butterfly rearing 101
Similar to Butterfly rearing 101 (20)
Butterfly rearing 101
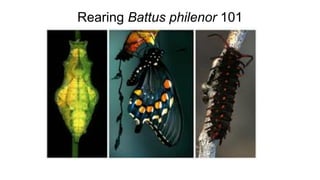
- 1. Rearing Battus philenor 101
- 2. First things first, you are going to want to care for your newly emerged butterflies. If you want to keep track of individuals, now is a good time to label them with a gold paint pen on their lower wings as close to their bodies as you can (the edges of the wings tend to get damaged and marking there will be more vulnerable). You can generally wait a day after they emerge to feed them sugar water, but it also couldn’t hurt to do it on the same day. 1) Fill the larger piece of a petri dish with your sugar water solution until it reaches all the way around the edge. 2) Nest the smaller piece of the petri dish inside the larger piece top down to get a “moat” of sugar water around the edge 3) Grab your butterfly with wings closed. Make sure you pinch both set of wings or they will flap them around and damage them 4)Stick your “poking device” into the curl of the butterflies proboscis and roll it into the sugar water mote. They may fight you on this, so you have to be careful not to unroll the proboscis if their legs have grabbed onto the poking device.
- 3. You can line up as many butterflies as you can around the edge of the petri dish. You’ll have to watch for them to finish and roll up their proboscises and remove them right away, or else they will crawl over the others and knock them out of place, which can get really annoying. But when they cooperate this is really cute :)
- 4. If you are keeping track of who mated with whom, you will want to keep your males and females in separate cages. When you do want them to mate, basically just let them all fly around in a large enclosure with UV lights and check every 10 minutes or so to move mated pairs into their own enclosure. They can mate for up to 24 hours. After they have mated you will want to collect eggs from the females. If you want to keep track of each females offspring separately, you will want to spend some time coaxing each female to lay. 1) Select a stem of host plant with a sprouting tip (If they don’t taste the sprouting tip, they will not lay on that plant). 2) Tape your aquapick to a surface with holes in it for the plant stem. 3) Place your stem into the aquapick. They wilt a bit right away after being cut, but should spring back to life after being in the water for a few minutes. 4) Grab your female by the wings and allow her to taste the sprouting tip of the plant with her front legs. After a few seconds of this you can usually let go of her and she will maneuver around on the plant to find good purchase for egg laying. I would let her start laying before putting your bottomless cup over her and the plant. 5) Place a square of window-screen over the top of the cup to prevent escapes. Check on her every half hour or so. If they aren’t laying you can try to reposition them on the plant like at the beginning. After a couple hours you should have about 30 eggs from each female. Collect them by gently rolling them off the leaf with your finger into a petri dish.Store those eggs at 30 degrees celsius.
- 5. If you aren’t concerned with keeping track of families, you can have a general egg laying cage or two with your mated females. I would put in one stem per every 2-3 females in the cage. The stems are just kept in the aquapicks and stabilized by the erlenmeyer flasks. Collect eggs daily and store at 30 degrees clesius.
- 6. When your eggs start hatching (about 4 days after being laid) you will want to move them into the cups for feeding as soon as possible. 1) Fill your large cup with deionized water to just below where the nested smaller cup reaches. You don’t want any water to seep into the small cup, but you want your stems to reach the water through the hole in the small cup. 2) Place a stem with a few nice young and light green leaves into the hole drilled into the small cup and into the water of the larger cup. Plant quality is important at this stage. The leaves should be soft rather than tough, without any sun damage, and you really want the light yellow-green color. 3) Move the tiny newly hatched caterpillars onto the leaves with a paint brush. Make sure they stay on the leaf, sometimes they fall off right away and you’ll want to try to get them to silk themselves into place on the leaf again. You can put up to 30 new caterpillars in 1 cup. 4) Secure a square of window screen over the top by folding it into place between the nesting cups. 5) Throw a label on it with the family name if you’re keeping track of that, and the hatching date so you can monitor growth.
- 7. After a couple of days of feeding in the cup, it is much easier to feed them enough in boxes. They eat like monsters at this point, and the quality of the plant is less important. If you want to continue raising them in cups, that works fine too, but after they reach third instar you will want to have less caterpillars per cup (I would say 3-5 is ok) because you won’t need to add food as often. We feed twice a day, once in the early morning and once in the late afternoon-early evening). 1) Place a paper towel in the bottom of a standard rectangular tupperware box. 2) Place a stem of food into an aquapick with deionized water. Put in one stem for every 3-4 caterpillars in the box. 3) With a large number of caterpillars per box, it can get kind of gross relatively quickly. I changed out the paper towel and dumped the poo out every other day or so. If it gets really bad, or if you see any sick looking caterpillars, change out the whole box. The aquapicks tend to leak a little bit, which doesn’t help with keeping everything clean. Putting the box at a slight incline with the tips of the plants at the highest point, and the base of the aquapicks at the lowest point minimizes leakage.
- 8. That’s pretty much it! They will pupate in the boxes or cups, and you can move them to whatever conditions you would like. We taped them to a flat surface and put them at an incline inside of a cage where they could emerge and crawl to a high point to extend their wings. If you want to keep track of families you can let them pupate in the cups, then let them emerge in the cup as well. They will grab onto the window screen at the top to let their wings dry--if you do this just make sure they have enough space in the cup to extend their wings (remove any extra plant food from before they pupated etc.). Then you just start over at the beginning. Let me know if you have any questions. I’m not sure how long my UofA email account will be active, but you can email me at sogladur@gmail.com, or you can call or text me at 520-529-9363. I will let you know if my phone number changes when I move. Good Luck! Thanks for giving me the opportunity to do this this summer! It has been a very valuable experience! -Bekah