SlideShare a Scribd company logo
1 of 23
Download to read offline
DEPLOY SERVICES FASTER WITH DELL ACTIVE SYSTEM MANAGER
AUGUST 2015
A PRINCIPLED TECHNOLOGIES TEST REPORT
Commissioned by Dell Inc.
Your administrator’s time is a valuable asset. Datacenters take time to set up
and maintain, so the more time your administrator has to tackle big projects, the better.
The right tools can make infrastructure deployment and configuration simpler and
faster, leaving your admin free to handle more important activities.
We found that Dell Active System Manager (ASM), with its unified and
comprehensive interface, required less administrative time and fewer steps to deploy
services like VMware clusters when compared to an HP OneView solution. Every
operation in Dell ASM occurs under a single interface, whereas the HP OneView solution
required our technicians to switch between three different programs to complete
deployment-related tasks. Dell ASM uses intuitive, wizard-driven automation to guide
you through deployment of enterprise IT services. With ASM, the process of discovering
hardware, defining networks, configuring resources, and deploying services is simple
and straightforward.
Once we configured our test environments, Dell ASM let us deploy a new
VMware vSphere service in just eight steps. Deploying the equivalent service with HP
OneView was cumbersome because of the additional interfaces required.
Administrators using OneView needed 37 additional steps to complete a service
deployment. Dell ASM makes routine or complex deployment tasks easier, allowing
administrators to provision and deploy servers and blades with less effort and time.
A Principled Technologies test report 2Deploy services faster with Dell Active System Manager
DELL ASM: A SIMPLIFIED VIEW
When common datacenter tasks take less time, administrators can devote the
time they have saved to larger projects that use their unique skillset. To this end, Dell
Active System Manager offers comprehensive services deployment and automation in
one package.
Dell ASM is an infrastructure and workload automation solution that provides a
single interface for managing your physical and virtual infrastructure throughout its
lifecycle. This unified approach can cut down on time wasted with different consoles
during all parts of the deployment process and subsequent lifecycle management. Dell
ASM was designed to give customers flexibility and choice in how they manage their IT
resources:
Published REST APIs allow applications and scripts to directly interface with
ASM’s key features and functionality
ASM supports Microsoft® Hyper-V® and VMware vSphere, enabling end-to-
end automation of tasks extended through to the virtualization layer.
To learn more about Dell ASM, visit www.dell.com/asm.
ABOUT OUR TESTS
With administrators striving to find robust solutions that will save them time in
the datacenter, we at Principled Technologies wanted to see how much administrator
time it would take to get two different server management solutions—Dell ASM and HP
OneView—up and ready to deploy a VMware vSphere cluster. Our technicians executed
the steps necessary to install the tools and set up a cluster within the environment for
each solution. We measured how much time a technician spent actively working on a
task, and how many steps the technician took for each task.
LESS TIME, FEWER STEPS, MORE INTUITIVE INTERFACE
Dell ASM was quicker and less complex to set up than the HP OneView solution.
It took only 10 minutes and 58 seconds of administrator time to install and configure
Dell ASM in our datacenter while HP OneView required 18 minutes and 50 seconds of
administrator time. Additionally, the HP OneView solution required setting up multiple
components to perform deployment tasks, while Dell ASM required just a single virtual
machine.
How the tools work
Dell ASM let us do everything necessary to deploy a ready-to-host vSphere
cluster (see Appendix A for hardware details) from a single interface. Its template-based
approach to deployment (see Figure 1) meant that deploying services—from installing
A Principled Technologies test report 3Deploy services faster with Dell Active System Manager
an OS to a single server to deploying VMs across multiple clusters—can be an easy and
straightforward process.
Figure 1: Creating and editing a service template with the template editor in Dell ASM.
The template editor in Dell ASM simplified the individual configuration of virtual
and physical components. It allowed for the designing of specific service deployments—
in our scenario, we used the example of deploying a VMware vSphere High Availability,
Distributed Resource Scheduler (HA/DRS) cluster. In Figure 1, the vSphere cluster is
represented along with physical server and storage resources. Admins can add storage,
servers, clusters, VMs, and applications through the interface. Clicking on each resource
allows for further configuration. From this screen in ASM, admins can publish templates
and deploy them as services.
Customizing our deployment template required an additional 21 steps and 102
seconds, which we added to the steps and time needed for setup and configuration of
ASM. At 137 steps and 12 minutes, 40 seconds of administrator time, our administrator
still finished in less time than the 18 minutes, 50 seconds required for HP OneView, with
just two additional steps. Those extra steps for a one-time task in Dell ASM provided a
reusable, automated process for deploying our service templates, which HP OneView
currently lacks. ASM includes 15 sample service templates to help administrators get
started with designing custom services, and each template can be cloned and tweaked
to suit your needs.
A Principled Technologies test report 4Deploy services faster with Dell Active System Manager
After creating a template for our own environment, it took only eight steps and
22 seconds of administrator time to deploy the cluster on our chassis. ASM
automatically designated networking resources, including management and OS IP
addresses, and installed the hypervisor OS (ESXi™ 5.5) without any additional
administrative time or steps. Each time you need to deploy the VMware HA/DRS cluster
service, you can reuse the template and deploy an identical service in your datacenter
with the same eight steps and 22 seconds of administrator time.
With OneView, we first had to create a hardware profile to add SAN fabric
connections, storage volumes, and other hardware configuration patterns. Then we had
to switch to another tool—HP Insight Control server provisioning—to discover servers
again and configure them for OS or hypervisor deployment. Finally, we switched to
VMware vCenter™ Web Console to manually configure and add the newly created
vSphere 5.5 hosts to a VMware HA DRS cluster. The HP solution required three tools to
do the same job that the Dell solution accomplished using only one.
As Figure 2 shows, an administrator using Dell ASM was able to deploy the
VMware HA/DRS cluster with 82.2 percent fewer steps than an administrator using HP
OneView.
Figure 2: Dell ASM cut the
number of steps to deliver a
VMware vSphere service by 37
- 82% fewer steps compared
to the HP OneView solution.
To deploy operating systems and hypervisors, HP requires Insight Control server
provisioning. After switching to Insight Control server provisioning, users have access to
pre-configured scripts and OS deployments, as Figure 3 shows.
A Principled Technologies test report 5Deploy services faster with Dell Active System Manager
Figure 3: Hypervisor deployment with HP Insight Control.
During our testing, our administrators needed 45 steps and took more time - 5
minutes, 38 seconds - to deploy a cluster with HP OneView, because they had to switch
to different tools and execute some parts the deployment process manually. Dell ASM
lets you perform every step from one interface and automates the deployment process,
so you can stay focused on the task at hand and reduce the potential for human error.
Figure 4 shows the difference in administrator time required to deploy a
VMware vSphere HA/DRS cluster from each solution.
Figure 4: An administrator
using Dell ASM was 93.4
percent faster deploying a
VMware vSphere cluster
compared to using HP
OneView.
A Principled Technologies test report 6Deploy services faster with Dell Active System Manager
CONCLUSION
On any given day, your systems administrator will have more urgent things to
do than sit through a long infrastructure deployment process. By freeing up their time
with Dell ASM’s user-friendly, unified interface, your administrator can spend time
improving other areas of your datacenter.
We found that Dell Active System Manager simplified and streamlined the
installation and deployment process for setting up a cluster to deliver IT services. Dell
ASM allowed us to deploy solutions 93.4 percent faster and required 82.2 percent fewer
steps to get our services up and running, compared to performing the same tasks with
an HP solution including HP OneView, HP Insight Control and VMware vSphere Web
Client. With its powerful and intuitive UI and template-based automation, Dell ASM can
streamline infrastructure provisioning and speed up workload deployment, making life
easier for administrators and saving you time and money to manage your datacenter
more efficiently.
A Principled Technologies test report 7Deploy services faster with Dell Active System Manager
APPENDIX A – SYSTEM CONFIGURATION INFORMATION
Figures 5 through 8 provide detailed configuration information for the hardware we used in our tests.
System Dell PowerEdge™ M1000e blade enclosure
Power supplies
Number of power supplies 6
Vendor and model number Dell E2700P-00
Wattage of each (W) 2,700
Cooling fans
Total number of fan modules 9
Vendor and model number Dell X46YM Rev. A00
Volts 12
Amps 5
Midplane
Chassis midplane 1.1
Chassis firmware
Chassis Management Controller firmware 4.31
iKVM firmware and hardware 01.00.01.01 A03
IOM firmware 11
IOM software 8.3.17.2
I/O modules
Switch Dell Networking MXL 10/40GbE
Occupied bay A1, A2
Management modules
Chassis Management Controller slot 1 Chassis Management Controller hardware
iKVM slot Avocent® iKVM Switch (0K036D)
Chassis Management Controller slot 2 Chassis Management Controller hardware
Figure 5: Configuration information for the Dell blade server chassis.
A Principled Technologies test report 8Deploy services faster with Dell Active System Manager
System Dell PowerEdge M620 blade server
Enclosure
Blade enclosure Dell PowerEdge M1000e
General
Number of processor packages 2
Number of cores per processor 6
Number of hardware threads per core 2
System power management policy Default
CPU
Vendor Intel®
Name Xeon®
Model number E5-2640
Stepping C2
Socket type FCLGA2011
Core frequency (GHz) 2.5
Bus frequency (GHz) 3.6
L1 cache 32KB + 32KB (per core)
L2 cache 256 KB (per core)
L3 cache 15 MB
Platform
Vendor and model number Dell PowerEdge M620
Motherboard model number 0VHRN7A03
BIOS version 1.6.0
BIOS settings Default
Memory module(s)
Total RAM in system (GB) 32
Vendor and model number Micron® MT18KSF51272PDZ
Type PC3L-10600R
Speed (MHz) 1,333
Speed running in the system (MHz) 1,333
Size (GB) 4
Number of RAM module(s) 8
Chip organization Double-sided
Rank Dual
RAID controller
Vendor and model number Dell PERC S110 Embedded
Firmware version 3.0.0-0139
Cache size (MB) 0
Ethernet adapters
Vendor and model number Broadcom® BCM57810 NetXtreme® II 10 GigE
Type LOM
A Principled Technologies test report 9Deploy services faster with Dell Active System Manager
System Dell PowerEdge M620 blade server
USB ports
Number 2 external
Type 2.0
Firmware
Integrated Dell Remote Access Controller 1.40.40
Broadcom NetXtreme II 10 Gb Ethernet BCM57810 7.4.8
BIOS 1.6.0
Lifecycle Controller, 1.1.5.165, A00 1.1.5.165
Enterprise UEFI Diagnostics 4217A4
OS drivers pack 7.2.1.4 7.2.1.4
System CPLD 1.0.2
PERC H310 Mini 3.0.0-0139
Figure 6: Configuration information for the Dell blade server we used in our tests.
System HP BladeSystem c7000
Power supplies
Number of power supplies 6
Vendor and model number HP 2400W HE PSU – HP P/N 499253-B21
Wattage of each (W) 2,400
Cooling fans
Total number of fan modules 10
Vendor and model number HP Active Cool 200 – HP P/N 412140-B21
Chassis firmware
OA Controller Hardware Version A1
OA Tray firmware 1.7
Onboard Administrator firmware 4.40
I/O modules
Switch HP VC FlexFabric 10Gb/24-Port Module
VC firmware 4.40
Interconnect bay 1, 2
Figure 7: Configuration information for the HP blade server chassis.
System HP ProLiant BL460c Gen9 blade server
Blade model
Blade Model HP ProLiant BL460c Gen9
General
Number of processor packages 2
Number of cores per processor 6
Number of hardware threads per core 1
System power management policy Default
A Principled Technologies test report 10Deploy services faster with Dell Active System Manager
System HP ProLiant BL460c Gen9 blade server
CPU
Vendor Intel
Name Xeon
Model number E5-2609 v3
Stepping M1
Socket type FCLGA2011-3
Core frequency (GHz) 1.9
Bus frequency (GT/s) 6.4
L1 cach 6 × 32 KB instruction cache, 6 × 32 KB data cache
L2 cache 6 × 256 KB
L3 cache 15 MB
Platform
Motherboard model number 744409-001
BIOS version I36 v1.40 (05/06/2015)
iLO4 Firmware 2.20 May 20 2015
Memory module(s)
Total RAM in system (GB) 16
Vendor and model number SK Hynix HMA41GR7MFR4N-TF
Type PC4-17000
Speed (MHz) 2,133
Speed running in the system (MHz) 2,133
Size (GB) 8
Number of RAM module(s) 2
Chip organization Double-sided
Rank Single
RAID controller
Vendor and model number HP Smart HBA H244br
Firmware version 2.52
Cache size (GB) 1
Mezzanine card(s)
Card model HP FlexFabric 10Gb 2-port 536FLB Adapter
Figure 8: Configuration information for the HP blade servers we used in our tests.
A Principled Technologies test report 11Deploy services faster with Dell Active System Manager
APPENDIX B – HOW WE TESTED
Configuring Dell Active System Manager 8.1
Deploying Dell ASM OVF template
Before testing, extract the Dell ASM .zip file (Dell-ActiveSystemManager-8.1.0-4567_VMware.zip) to a location
the VMware vSphere Client can access.
1. From the VMware vSphere Client, click File, and click Deploy OVF Template. The Deploy OVF Template wizard
will open.
2. On the Source page, click Browse, select the OVF package, and click Open.
3. To continue, click Next.
4. Click Next.
5. Accept the License Agreement, and click Next.
6. Enter a name (Active System Manager 8.1), select the Inventory Location, and click Next.
7. Assuming a resource pool has been configured, select the storage volume to host the appliance virtual machine,
and click Next.
8. On the Disk Format page, select Thin Provision, and click Next.
9. Verify the Destination Network for Network 1 is set to the management VLAN (mgmt vlan128), and click Next.
10. To run the deployment job, click Finish.
Configuring Dell ASM VM network adapters
1. Right-click the newly created VM (Active System Manager 8.1) from the host, and click Edit Settings…
2. Select Network adapter 1.
3. Verify the Network label is set to the management network (management vlan128), and click Add…
4. Select Ethernet Adapter, and click Next.
5. Under the Network Connection section, select the PXE network label (PXE vlan1076), and click Next.
6. Click Finish.
7. Click OK.
Defining Dell ASM appliance network
1. In the vSphere Client, right-click the Active System Manager virtual machine, and select Power On.
2. Click the Console tab.
3. When prompted, log in with the default ASM credentials (delladmin, delladmin).
4. Type sudo su – and press Enter.
5. Type the current admin password (delladmin), and press Enter.
6. Accept the License Agreement, and click Forward.
7. Click Network Configuration.
8. Select Auto eth0, and click Edit.
9. Change the connection name to management-0
10. Select the IPv4 Settings tab.
11. Change Method to Manual.
A Principled Technologies test report 12Deploy services faster with Dell Active System Manager
12. Click Add, and click the text field to enter the IPv4 address, the Netmask, and the Gateway (for our management
network, we used 10.128.0.111, 255.255.0.0, and 10.128.0.1).
13. Enter 10.128.0.10 as the DNS Servers.
14. Click Apply…
15. Select Auto eth1, and click Edit.
16. Change the connection name to PXE-1
17. Select the IPv4 Settings tab.
18. Change Method to Manual.
19. Click Add and click the text field to enter the IPv4 address, the Netmask, and the Gateway (for our PXE network,
we used 192.168.76.1, 255.255.255.0, and 0.0.0.0).
20. Click Apply…
21. Click Close.
22. Click Close again.
Using the Initial Setup Wizard
1. Open a browser on the workstation, and navigate to the ASM appliance IP (10.128.0.111).
2. Log in with the default credentials (admin, admin).
3. At the welcome screen, click Initial Setup.
4. Click Next.
5. Click Choose File, navigate to the license file location, upload the license file, and click Save and Continue.
6. Set the Time Zone ((UT-05:00) Eastern Time (US & Canada)) and Preferred NTP Server, and click Save and
Continue.
7. Leave Use a proxy server unchecked, and click Save and Continue.
8. Check Enable DHCP/PXE Server.
9. Enter the Subnet (192.168.76.0), the Netmask (255.255.255.0), the DHCP Scope Starting IP Address
(192.168.76.100), the DHCP Scope Ending IP Address (192.168.76.200), the Default Gateway
(192.168.76.1), and click Save and Continue.
10. Review the summary, and click Finish.
11. Click Yes.
Adding network definitions
These steps continue from the Getting Started wizard described above.
1. Select Define Networks.
2. We used six networks in our setup: a hypervisor management network, a hypervisor migration network, a
storage network, a PXE network, a data network, and a hardware management network. Click +Define.
3. Name the hypervisor management network (Hypervisor Management), and change Network Type to
Hypervisor Management.
4. Enter the hypervisor management VLAN ID (128), the hypervisor management network Subnet Mask
(255.255.0.0), the hypervisor management network Gateway (10.128.0.1), and the hypervisor
management network Primary DNS (10.128.0.10).
A Principled Technologies test report 13Deploy services faster with Dell Active System Manager
5. Click Add IP Address Range.
6. Enter the Starting IP Address (10.128.30.1) and the Ending IP Address (10.128.30.254), and click Save.
7. Click +Define.
8. Name the hypervisor migration network (Hypervisor Migration), and change the Network Type to
Hypervisor Migration.
9. Enter the hypervisor migration VLAN ID (200), and check the Configure static IP address ranges checkbox.
10. Enter the hypervisor migration network Subnet Mask (255.255.255.0).
11. Click Add IP Address Range.
12. Enter the Starting IP Address (192.168.200.150) and the Ending IP Address (192.168.200.199), and
click Save.
13. Click +Define.
14. Name the storage network (Storage) and change the Network Type to SAN (Software iSCSI).
15. Enter the storage VLAN ID (201), and check the Configure static IP address ranges checkbox.
16. Enter the storage network Subnet Mask (255.255.255.0).
17. Click Add IP Address Range.
18. Enter the Starting IP Address (192.168.201.150) and the Ending IP Address (192.168.201.199), and
click Save.
19. Click +Define.
20. Name the PXE network (PXE deployment).
21. Change Network Type to PXE.
22. Enter the PXE VLAN ID (1076), and click Save.
23. Click +Define.
24. Name the Data network (Data) and Change the Network Type to Private LAN.
25. Enter the data network VLAN ID (1080), and click Save.
26. Click +Define.
27. Name the hardware management network (Hardware Management), and change the Network Type to
Hardware Management.
28. Check the Configure static IP address ranges checkbox.
29. Enter the hardware management network Gateway (10.128.0.1), the hardware management network
Subnet Mask (255.255.0.0), and the hardware management network Primary DNS (10.128.0.10).
30. Click Add IP Address Range.
31. Enter the Starting IP Address (10.128.3.1), the Ending IP Address (10.128.3.254), and click Save.
32. Click Close.
Discovering the chassis, blade, storage, and vCenter
These steps continue from the Getting Started wizard described above.
1. Start the timer, and click Discover Resources to launch the discovery wizard.
2. Click Next.
3. Click Add Resource Type.
A Principled Technologies test report 14Deploy services faster with Dell Active System Manager
4. Change Resource Type to Chassis.
5. In the Starting IP Address field, enter the CMC IP address.
6. Change Select Chassis Credential to Dell chassis default, Select Blade Credential to Dell PowerEdge Default, and
Select I/O Module Credential to Dell switch default.
7. Click +Add Resource Type.
8. Change Resource Type to Storage.
9. Enter the Group Mgmt IP of the EqualLogic Storage.
10. Next to Select Storage Credential, click + to create credentials.
11. Enter a Credential Name (EqualLogic Storage).
12. Enter the storage User Name, the storage Password, confirm the Password, and click Save.
13. Click +Add Resource Type.
14. Change Resource Type to vCenter.
15. Enter the vCenter Host IP.
16. Next to Select vCenter Credential, click + to create credentials.
17. Enter a Credential Name (vCenter).
18. Enter the vCenter User Name, the vCenter Password, confirm the Password, and click Save.
19. Click Next.
20. At the Initial Chassis Configuration screen, change the Chassis Credentials to Dell chassis default, the Blade
Credentials to Dell PowerEdge Default, the I/O Module Credentials to Dell Switch Default, and click Next.
21. Click Finish.
22. When the warning dialog appears, click Yes.
Configuring resources
These steps continue from the Getting Started wizard described above.
1. Click Configure Resources.
2. Click Next.
3. Verify the Discovered Resources in your environment, and click Next.
4. Leave the Default ASM Minimum Required Firmware Repository selected, and click Next.
5. When the Firmware Compliance check completes, click Next.
6. At the Chassis Configuration screen, leave the default settings, and click Next.
7. If you wish to customize the Chassis Name, CMC DNS Name, System Input Power Cap, or Location Details, check
Configure Unique Chassis Settings; otherwise, click Next.
8. If you wish to customize the blade iDRAC DNS names, check Configure Unique Server Settings; otherwise, click
Next.
9. If you wish to customize the I/O Module host names, check Configure Unique I/O Module Settings and enter the
names; otherwise, click Next.
10. If you wish to customize the I/O Module Uplinks, check Configure Uplinks; otherwise, click Next.
11. Review the Summary, and click Finish.
12. When the warning dialog appears, click Yes.
A Principled Technologies test report 15Deploy services faster with Dell Active System Manager
Creating a template
These steps continue from the Getting Started wizard described above.
1. Start the timer, and click Publish Templates.
2. Click +Create Template.
3. Change Template Type to Clone Existing, and select Deploy VMware Cluster with iSCSI Storage.
4. Enter a Template Name (Test Cluster HA DRS).
5. Change Template Category to Create New Category, enter the New Category Name (Test Deployments),
and click Save.
6. Select the VMware Cluster, and click Edit.
7. Change the Target Virtual Machine Manager to the discovered vCenter Host.
8. Check Cluster HA Enabled and Cluster DRS Enabled, and click Save.
9. Select the first Server, and click Edit.
10. Expand the OS Settings, and change the OS Image to esxi-5.5.
11. Expand the Network Settings, and check the following Networks for each Partition:
a. Hypervisor Management, PXE
b. Hypervisor Migration
c. Storage
d. Data
12. Click Save.
13. Select the second Server, and click Edit.
14. Expand the OS Settings, and change the OS Image to esxi-5.5.
15. Expand the Network Settings, and check the following Networks for each Partition:
a. Hypervisor Management, PXE
b. Hypervisor Migration
c. Storage
d. Data
16. Select the first Storage, and click Edit.
17. Change the Target EqualLogic to the discovered EqualLogic, and click Save.
18. Select the second Storage, and click Edit.
19. Change the Target EqualLogic to the discovered EqualLogic, and click Save.
20. Click Publish Template.
21. When the warning dialog appears, click Yes.
Deploying Service from template
1. Click the Services tab.
2. Click Deploy New Service.
3. Change Select Template to the newly created template (Test Deployment).
4. Enter a service name (Test Service 1).
5. Click Next.
A Principled Technologies test report 16Deploy services faster with Dell Active System Manager
6. Name the first Server’s OS Host Name, name Server 2’s OS Host Name, and click Next.
7. Click Finish.
8. When the warning dialog appears, click Next.
Configuring HP OneView
Deploying HP OneView OVF
1. From the vSphere Client, click File, and click Deploy OVF Template.
2. When the Deploy OVF Template wizard launches, click Browse. Navigate to the HP OneView OVA location, and
click Open.
3. Click Next.
4. Review the OVF Template Details, and click Next.
5. Name the HP OneView VM (HPOneViewTest), select the inventory location, and click Next. If you did not
specify a Specific Host, at the next screen, select the Host, and click Next.
6. Select the destination storage for the virtual machine files, and click Next.
7. Select Thin Provision, and click Next.
8. Ensure the Destination Networks for the VM Network is set to the correct VLAN (for our test, we used our
management VLAN), and click Next.
9. Review the Ready to Complete summary, check Power on after deployment, and click Finish.
Completing initial setup for HP OneView
For the following steps, we assume that the OneView VM has been powered on.
1. From the vSphere Client, select the newly deployed appliance (HPOneView-NoSSH_1.20.05), and click the
Console tab.
2. Click Agree to accept the HP OneView licensing terms.
3. To turn off Authorized services access, click Disable.
4. Click OK.
5. At the HP OneView login screen, enter the default User and Password (Administrator / admin), and click
Login.
6. Enter and confirm a new password for the Administrator (Password1), and click OK.
7. Enter the hostname (oneview.local).
8. At the Appliance Networking screen, enter the IPv4 address for the appliance (10.128.54.123).
9. Verify the Gateway address and Preferred DNS server (10.128.0.1 and 10.128.0.10) are correct, leave
the default Time and Language settings, and click OK.
Deploying HP Insight Control server provisioning OVF
1. From the vSphere Client, click File, and click Deploy OVF Template.
2. When the Deploy OVF Template wizard launches, click Browse. Navigate to the Insight Controller OVF, and click
Open.
3. On the OVF Template Details screen, click Next.
A Principled Technologies test report 17Deploy services faster with Dell Active System Manager
4. Provide a name for the Virtual Machine, select an inventory location, and click Next.
5. On the Host / Cluster pane, select a host for the VM deployment, and click Next.
6. On the Storage pane, select the storage location, and click Next.
7. On the Disk Format pane, select Thick provisioned Eager Zeroed, and click Next.
8. On the Network Mapping Pane, select the appropriate network for Insight Controller to use, and click Next.
9. On the Ready to Complete pane, click Finish.
Setting up HP Insight Controller
These steps follow a successful OVF deployment. Before completing these steps, make sure that the OneView
VM is powered on.
1. From the vSphere Client, select the newly deployed appliance (ICsp-vmware-7.4.1), and click the Console tab.
2. To accept the HP Insight Control server provisioning License, click Agree.
3. To turn off Authorized services access, click Disable.
4. Click OK.
5. At the HP Insight Control login screen, enter the default username and password, and click Login.
6. Enter and confirm a new password for the Administrator, and click OK.
7. At the Appliance Networking screen, expand the Appliance tree.
8. Enter a valid IPv4 address for the gateway address, the appliance IP address, and DNS servers.
9. Expand the Deployment tree.
10. Enter a valid IPv4 address for the deployment IP address.
11. Leave the default time and language settings, and click OK.
Connecting HP Insight Control server provisioning and HP OneView
1. Navigate to the web client for HP Insight Control server provisioning.
2. Click the top drop-down menu, and select HP OneView Appliances.
3. Select Add Appliance.
4. Provide the OneView Appliance IP address, login credentials, and a description, and select Add.
Setting up the HP media server
For these steps, download the image file for Intelligent Provisioning. Ensure the media server has access to
an ISO of vSphere 5.5U2 with HP drivers slipstreamed.
1. In Windows Server 2012 R2, launch Server Manager.
2. Select Add roles and features from the Dashboard.
3. On the Before You Begin pane, click Next.
4. On the Installation Type pane, click Next.
5. On the Server Selection pane, click Next.
6. On the Server Roles pane, click Next.
7. On the Features pane, select .NET Framework 3.5 Features.
8. When a dialog to add required features appears, select Add Features.
A Principled Technologies test report 18Deploy services faster with Dell Active System Manager
9. On the Features pane, click Next.
10. On the Confirmation pane, select Finish.
11. Navigate to the Insight Controller server provisioning web client in a web browser.
12. Select the top drop-down menu, and click Settings.
13. Next to Media Server, click Edit.
14. Click the link Download HP Insight Control server provisioning Media Server setup utility.
15. When the HP Install Package window opens, click Run.
16. The Media Server setup utility will launch. At the Prerequisites screen, click Continue.
17. When the Browser For Folder window launches, navigate to the Local Disk, and create a new folder to host the
Media Server. For our test, we created a folder on C: named hpmediaserver.
18. At the Select Components to Install screen, uncheck Select All, and only check HP Intelligent Provisioning and
ESXi 5.5U2 (EN-US).
19. Click Install.
20. At the Parameters screen, enter a name for the Windows File Share Name (hpmediaserver).
21. Enter an Authorized Windows User (Administrator).
22. Click Install.
23. To mount the HP Intelligent Provisioning ISO (HPIP201.2014_0902.29), right-click on the file, and select Mount.
24. The HP Intelligent Provisioning Setup window will launch. Click the browse icon next to IP location, navigate to
the mounted HP Intelligent Provisioning Image, and click OK.
25. Click Install.
26. When the installation completes, click Close.
27. The ESXi 5.5U2 Setup window will launch. To mount the ESXi 5.5U2 ISO, right-click, and select Mount.
28. Next to the Distribution location, select the Browse icon, and select OK.
29. Click Install.
30. When the Windows Server installation completes, click Close.
31. On the still-open installation dialog, click Close.
32. Navigate back to the web client for HP Insight Control server provisioning.
33. Select the top drop-down menu, and select Settings.
34. Next to Media Server, select Edit.
35. Provide the HP ICsp media Server IP address, file share name, username, password, and the HTTP server IP
address and path.
36. Select OK.
Applying the HP iLO license
1. Navigate to the iLO of the server to be deployed.
2. Enter the credentials, and click Login.
3. In the left menu, expand the Administration tree, and select Licensing.
4. Enter the License Key, and select Install.
A Principled Technologies test report 19Deploy services faster with Dell Active System Manager
5. Navigate to the next iLO of the server to be deployed.
6. Enter the credentials, and click Login.
7. In the left menu, expand the Administration tree, and select Licensing.
8. Enter the License Key, and select Install.
Downloading HP Service Pack for ProLiant and integrating with HP OneView
1. In a web browser, navigate to
h17007.www1.hp.com/us/en/enterprise/servers/products/service_pack/spp/index.aspx. If possible, perform
these tasks on the media server.
2. Under Full ISO Image, select the link to download the HP Service Pack for ProLiant. The file is 4.69GB.
3. On the next page, select Obtain Software.
4. On the prompt that appears, select Sign in Now.
5. Sign in with an HP account that has rights to download the HP SPP.
6. Select Obtain Software.
7. Click Select.
8. Fill out the form, and click Next.
9. Choose either the HP Download Manager or Standard download, and click Download.
10. Once the file is downloaded, navigate to the web portal for HP OneView.
11. From the top left drop-down menu, select Firmware Bundles.
12. Select Add Firmware Bundle.
13. Select Choose file, and navigate to the HP Service Pack for ProLiant ISO.
14. Select Start Upload. The dialog will close once the upload is finished.
Discovering HP Insight Control server
1. Navigate to the web client for HP Insight Control server provisioning.
2. Select Add server.
3. Provide the iLO IP address or host name, enter the iLO credentials, and check the box next to Do not boot to
maintenance.
4. Select Add+ to complete server Discovery. A dialog for another server should appear.
5. Provide the iLO IP address of the second blade, enter the iLO credentials, and check the box next to Do not boot
to maintenance. Click Add.
Discovering enclosures in HP OneView
1. Navigate to the web client for HP OneView.
2. In the top left corner, select the drop-down menu, and select Enclosures.
3. Select Add Enclosure.
4. Provide the Onboard Administrator IP address or host name, and select the bubble for Managed.
5. In the expanded menu, enter the OA credentials, and change the firmware baseline to the previously installed
HP SPP.
A Principled Technologies test report 20Deploy services faster with Dell Active System Manager
6. Select Add to complete the Enclosure Discovery.
7. When the Interconnect groups dialog appears, leave default settings, and click Next.
Adding the HP OneView SAN Manager
1. From the top-left drop-down menu, select SAN Managers.
2. Select Add SAN Manager.
3. Leave the default SAN manager type as Brocade Network Advisor, provide the IP address for the previously
configured Brocade Network Advisor, and provide credentials.
4. Select Add.
Discovering the storage system with HP OneView
1. From the top-left drop-down menu, select Storage Systems.
2. Select Add Storage System.
3. Provide the IP address of the HP 3PAR StoreServ 7200, and the correct credentials. We used the default
3paradm / 3pardata. Select Connect.
4. Once the connection is successful, verify the information, and select a Storage Pool.
5. Select the correct Storage System Fibre channel ports.
6. Select Add.
Creating HP OneView networks and uplinks
1. Select the main drop-down menu in the upper left, and select Networks.
2. Select Create network.
3. Provide the name of the LAN network, select Ethernet, and select VLAN settings. (In our lab environment, we
used a tagged VLAN).
4. Leave other options at default, and select Create+.
5. Provide the name of the Fibre Channel network, and associate it with the SAN added previously.
6. Leave the rest of the settings at default, and select Create.
7. Select the main drop-down menu in the upper left, and select Logical Interconnects.
8. From the Actions menu, select Edit.
9. Select Add Uplink Set.
10. Provide a useful name for the Fibre channel uplink, and select Type Fibre Channel.
11. Select the previously created network select the correct port, and click Create+.
12. Provide a useful name for the Ethernet Channel uplink, and select Type Ethernet.
13. Select the previously created tagged network and provide an uplink port, and click Create.
Creating the storage volume on 3PAR storage
1. Select the main drop-down menu in the upper left, and select Volumes.
2. Select Create volume.
A Principled Technologies test report 21Deploy services faster with Dell Active System Manager
3. Provide the volume with a name and description, and provide a storage pool. Leave all options at default, but
change the Sharing to Shared and choose a custom size. Select Create.
Creating server profile with SAN storage and OneView networks
1. Navigate to the web client for HP OneView.
2. Select the main drop-down menu in the upper left, and select Server Profiles.
3. Select Create profile.
4. Give the profile a useful name and description, and select the correct firmware baseline. Select Add Connection.
5. Provide a connection name, and select device type Ethernet. Select the previously created Ethernet network.
Select Add+.
6. Provide a connection name, and select device type Fibre channel. Select the previously created Fibre Channel
Network. Select Add.
7. Check the box for Manage boot mode.
8. Select Boot mode UEFI.
9. Check the box for Manage SAN Storage.
10. Select Host OS type ESX 4.x/5.x. Select Add Volume.
11. Select Type Existing Volume and provide the previously created Volume Name. Select Add.
12. Select Create.
Deploying HP Insight Control ESXi 5.5U2
1. Navigate to the web client for HP Insight Control server provisioning.
2. From the top left drop down menu, select Device Groups.
3. Select Create device group.
4. Provide the group with a name, and add any previously discovered servers.
5. Select Create.
6. From the Actions drop-down menu, select Run OS Build Plans. Select Add Plan, and find the plan titled ProLiant
OS - ESXi 5.5 U2 Scripted Install. Select Add.
7. Click OK.
Manually creating a VMware vCenter cluster
This methodology uses the VMware vSphere Web Client, and assumes an existing vCenter infrastructure with an
already created datacenter object.
1. Navigate to your infrastructure’s existing VMware vCenter web client.
2. Provide the necessary login credentials, and click Login.
3. Select Hosts & Clusters.
4. Right-click the datacenter in which you would like to create a cluster, and select New Cluster.
5. Provide the Cluster a useful name.
6. Select the box next to DRS, and select the box next to vSphere HA.
7. Select OK.
A Principled Technologies test report 22Deploy services faster with Dell Active System Manager
8. Right-click the previously created cluster, and select Add Host.
9. Provide the IP address of the previously created vSphere 5.5U2 host. Click Next.
10. Provide the credentials for the ESXi 5.5U2 host, and click Next.
11. Verify the Host summary, and click Next.
12. Assign the correct licensure, and click Next.
13. Leave the default options for lockdown mode , and click Next.
14. Leave all the options for resource pooling at their default, and click Next.
15. Verify all settings, and click Finish.
16. Right-click the previously created cluster, and select Add Host.
17. Provide the IP address of the previously created vSphere 5.5U2 host. Click Next.
18. Provide the credentials for the ESXi 5.5U2 host, and click Next.
19. Verify the Host summary, and click Next.
20. Assign the correct licensure, and click Next.
21. Leave the options for lockdown mode at their default, and click Next.
22. Leave all the options for resource pooling at their default, and click Next.
23. Verify all settings, and click Finish.
A Principled Technologies test report 23Deploy services faster with Dell Active System Manager
ABOUT PRINCIPLED TECHNOLOGIES
Principled Technologies, Inc.
1007 Slater Road, Suite 300
Durham, NC, 27703
www.principledtechnologies.com
We provide industry-leading technology assessment and fact-based
marketing services. We bring to every assignment extensive experience
with and expertise in all aspects of technology testing and analysis, from
researching new technologies, to developing new methodologies, to
testing with existing and new tools.
When the assessment is complete, we know how to present the results to
a broad range of target audiences. We provide our clients with the
materials they need, from market-focused data to use in their own
collateral to custom sales aids, such as test reports, performance
assessments, and white papers. Every document reflects the results of
our trusted independent analysis.
We provide customized services that focus on our clients’ individual
requirements. Whether the technology involves hardware, software, Web
sites, or services, we offer the experience, expertise, and tools to help our
clients assess how it will fare against its competition, its performance, its
market readiness, and its quality and reliability.
Our founders, Mark L. Van Name and Bill Catchings, have worked
together in technology assessment for over 20 years. As journalists, they
published over a thousand articles on a wide array of technology subjects.
They created and led the Ziff-Davis Benchmark Operation, which
developed such industry-standard benchmarks as Ziff Davis Media’s
Winstone and WebBench. They founded and led eTesting Labs, and after
the acquisition of that company by Lionbridge Technologies were the
head and CTO of VeriTest.
Principled Technologies is a registered trademark of Principled Technologies, Inc.
All other product names are the trademarks of their respective owners.
Disclaimer of Warranties; Limitation of Liability:
PRINCIPLED TECHNOLOGIES, INC. HAS MADE REASONABLE EFFORTS TO ENSURE THE ACCURACY AND VALIDITY OF ITS TESTING, HOWEVER,
PRINCIPLED TECHNOLOGIES, INC. SPECIFICALLY DISCLAIMS ANY WARRANTY, EXPRESSED OR IMPLIED, RELATING TO THE TEST RESULTS AND
ANALYSIS, THEIR ACCURACY, COMPLETENESS OR QUALITY, INCLUDING ANY IMPLIED WARRANTY OF FITNESS FOR ANY PARTICULAR PURPOSE.
ALL PERSONS OR ENTITIES RELYING ON THE RESULTS OF ANY TESTING DO SO AT THEIR OWN RISK, AND AGREE THAT PRINCIPLED
TECHNOLOGIES, INC., ITS EMPLOYEES AND ITS SUBCONTRACTORS SHALL HAVE NO LIABILITY WHATSOEVER FROM ANY CLAIM OF LOSS OR
DAMAGE ON ACCOUNT OF ANY ALLEGED ERROR OR DEFECT IN ANY TESTING PROCEDURE OR RESULT.
IN NO EVENT SHALL PRINCIPLED TECHNOLOGIES, INC. BE LIABLE FOR INDIRECT, SPECIAL, INCIDENTAL, OR CONSEQUENTIAL DAMAGES IN
CONNECTION WITH ITS TESTING, EVEN IF ADVISED OF THE POSSIBILITY OF SUCH DAMAGES. IN NO EVENT SHALL PRINCIPLED TECHNOLOGIES,
INC.’S LIABILITY, INCLUDING FOR DIRECT DAMAGES, EXCEED THE AMOUNTS PAID IN CONNECTION WITH PRINCIPLED TECHNOLOGIES, INC.’S
TESTING. CUSTOMER’S SOLE AND EXCLUSIVE REMEDIES ARE AS SET FORTH HEREIN.

More Related Content

Viewers also liked

LEÇON 174 – Dieu n’est qu’Amour, donc je le suis aussi.
LEÇON 174 – Dieu n’est qu’Amour, donc je le suis aussi.LEÇON 174 – Dieu n’est qu’Amour, donc je le suis aussi.
LEÇON 174 – Dieu n’est qu’Amour, donc je le suis aussi.Pierrot Caron
 
Better teaching methods, better speakers
Better teaching methods, better speakersBetter teaching methods, better speakers
Better teaching methods, better speakersEmilia Frinculeasa
 
Funções sintáticas
Funções sintáticasFunções sintáticas
Funções sintáticasInês Costa
 
Erysipelothrix rhusiopathiae infection in pigs, pork and raw pork handlers in...
Erysipelothrix rhusiopathiae infection in pigs, pork and raw pork handlers in...Erysipelothrix rhusiopathiae infection in pigs, pork and raw pork handlers in...
Erysipelothrix rhusiopathiae infection in pigs, pork and raw pork handlers in...ILRI
 
Cash.io in DC - Disruption in B2C payments
Cash.io in DC - Disruption in B2C paymentsCash.io in DC - Disruption in B2C payments
Cash.io in DC - Disruption in B2C paymentsgroupcard
 

Viewers also liked (7)

LEÇON 174 – Dieu n’est qu’Amour, donc je le suis aussi.
LEÇON 174 – Dieu n’est qu’Amour, donc je le suis aussi.LEÇON 174 – Dieu n’est qu’Amour, donc je le suis aussi.
LEÇON 174 – Dieu n’est qu’Amour, donc je le suis aussi.
 
Better teaching methods, better speakers
Better teaching methods, better speakersBetter teaching methods, better speakers
Better teaching methods, better speakers
 
Funções sintáticas
Funções sintáticasFunções sintáticas
Funções sintáticas
 
Erysipelothrix rhusiopathiae infection in pigs, pork and raw pork handlers in...
Erysipelothrix rhusiopathiae infection in pigs, pork and raw pork handlers in...Erysipelothrix rhusiopathiae infection in pigs, pork and raw pork handlers in...
Erysipelothrix rhusiopathiae infection in pigs, pork and raw pork handlers in...
 
Diversity inclusion program14x11-bookletweb
Diversity inclusion program14x11-bookletwebDiversity inclusion program14x11-bookletweb
Diversity inclusion program14x11-bookletweb
 
Google hr
Google  hrGoogle  hr
Google hr
 
Cash.io in DC - Disruption in B2C payments
Cash.io in DC - Disruption in B2C paymentsCash.io in DC - Disruption in B2C payments
Cash.io in DC - Disruption in B2C payments
 

More from Principled Technologies

Dell APEX Cloud Platform for Red Hat OpenShift: An easily deployable and powe...
Dell APEX Cloud Platform for Red Hat OpenShift: An easily deployable and powe...Dell APEX Cloud Platform for Red Hat OpenShift: An easily deployable and powe...
Dell APEX Cloud Platform for Red Hat OpenShift: An easily deployable and powe...Principled Technologies
 
Upgrade your cloud infrastructure with Dell PowerEdge R760 servers and VMware...
Upgrade your cloud infrastructure with Dell PowerEdge R760 servers and VMware...Upgrade your cloud infrastructure with Dell PowerEdge R760 servers and VMware...
Upgrade your cloud infrastructure with Dell PowerEdge R760 servers and VMware...Principled Technologies
 
Realize 2.1X the performance with 20% less power with AMD EPYC processor-back...
Realize 2.1X the performance with 20% less power with AMD EPYC processor-back...Realize 2.1X the performance with 20% less power with AMD EPYC processor-back...
Realize 2.1X the performance with 20% less power with AMD EPYC processor-back...Principled Technologies
 
Improve performance and gain room to grow by easily migrating to a modern Ope...
Improve performance and gain room to grow by easily migrating to a modern Ope...Improve performance and gain room to grow by easily migrating to a modern Ope...
Improve performance and gain room to grow by easily migrating to a modern Ope...Principled Technologies
 
Boost PC performance: How more available memory can improve productivity
Boost PC performance: How more available memory can improve productivityBoost PC performance: How more available memory can improve productivity
Boost PC performance: How more available memory can improve productivityPrincipled Technologies
 
Deploy with confidence: VMware Cloud Foundation 5.1 on next gen Dell PowerEdg...
Deploy with confidence: VMware Cloud Foundation 5.1 on next gen Dell PowerEdg...Deploy with confidence: VMware Cloud Foundation 5.1 on next gen Dell PowerEdg...
Deploy with confidence: VMware Cloud Foundation 5.1 on next gen Dell PowerEdg...Principled Technologies
 
Upgrade your cloud infrastructure with Dell PowerEdge R760 servers and VMware...
Upgrade your cloud infrastructure with Dell PowerEdge R760 servers and VMware...Upgrade your cloud infrastructure with Dell PowerEdge R760 servers and VMware...
Upgrade your cloud infrastructure with Dell PowerEdge R760 servers and VMware...Principled Technologies
 
A comparison of security features in Dell, HP, and Lenovo PC systems
A comparison of security features in Dell, HP, and Lenovo PC systemsA comparison of security features in Dell, HP, and Lenovo PC systems
A comparison of security features in Dell, HP, and Lenovo PC systemsPrincipled Technologies
 
Increase security, sustainability, and efficiency with robust Dell server man...
Increase security, sustainability, and efficiency with robust Dell server man...Increase security, sustainability, and efficiency with robust Dell server man...
Increase security, sustainability, and efficiency with robust Dell server man...Principled Technologies
 
Scale up your storage with higher-performing Dell APEX Block Storage for AWS ...
Scale up your storage with higher-performing Dell APEX Block Storage for AWS ...Scale up your storage with higher-performing Dell APEX Block Storage for AWS ...
Scale up your storage with higher-performing Dell APEX Block Storage for AWS ...Principled Technologies
 
Scale up your storage with higher-performing Dell APEX Block Storage for AWS
Scale up your storage with higher-performing Dell APEX Block Storage for AWSScale up your storage with higher-performing Dell APEX Block Storage for AWS
Scale up your storage with higher-performing Dell APEX Block Storage for AWSPrincipled Technologies
 
Get in and stay in the productivity zone with the HP Z2 G9 Tower Workstation
Get in and stay in the productivity zone with the HP Z2 G9 Tower WorkstationGet in and stay in the productivity zone with the HP Z2 G9 Tower Workstation
Get in and stay in the productivity zone with the HP Z2 G9 Tower WorkstationPrincipled Technologies
 
Open up new possibilities with higher transactional database performance from...
Open up new possibilities with higher transactional database performance from...Open up new possibilities with higher transactional database performance from...
Open up new possibilities with higher transactional database performance from...Principled Technologies
 
Improving database performance and value with an easy migration to Azure Data...
Improving database performance and value with an easy migration to Azure Data...Improving database performance and value with an easy migration to Azure Data...
Improving database performance and value with an easy migration to Azure Data...Principled Technologies
 
Realize better value and performance migrating from Azure Database for Postgr...
Realize better value and performance migrating from Azure Database for Postgr...Realize better value and performance migrating from Azure Database for Postgr...
Realize better value and performance migrating from Azure Database for Postgr...Principled Technologies
 
Set up students and teachers to excel now and in the future with Intel proces...
Set up students and teachers to excel now and in the future with Intel proces...Set up students and teachers to excel now and in the future with Intel proces...
Set up students and teachers to excel now and in the future with Intel proces...Principled Technologies
 
Finding the path to AI success with the Dell AI portfolio - Summary
Finding the path to AI success with the Dell AI portfolio - SummaryFinding the path to AI success with the Dell AI portfolio - Summary
Finding the path to AI success with the Dell AI portfolio - SummaryPrincipled Technologies
 

More from Principled Technologies (20)

Dell APEX Cloud Platform for Red Hat OpenShift: An easily deployable and powe...
Dell APEX Cloud Platform for Red Hat OpenShift: An easily deployable and powe...Dell APEX Cloud Platform for Red Hat OpenShift: An easily deployable and powe...
Dell APEX Cloud Platform for Red Hat OpenShift: An easily deployable and powe...
 
Upgrade your cloud infrastructure with Dell PowerEdge R760 servers and VMware...
Upgrade your cloud infrastructure with Dell PowerEdge R760 servers and VMware...Upgrade your cloud infrastructure with Dell PowerEdge R760 servers and VMware...
Upgrade your cloud infrastructure with Dell PowerEdge R760 servers and VMware...
 
Upgrade your cloud infrastructure with Dell PowerEdge R760 servers and VMware...
Upgrade your cloud infrastructure with Dell PowerEdge R760 servers and VMware...Upgrade your cloud infrastructure with Dell PowerEdge R760 servers and VMware...
Upgrade your cloud infrastructure with Dell PowerEdge R760 servers and VMware...
 
Realize 2.1X the performance with 20% less power with AMD EPYC processor-back...
Realize 2.1X the performance with 20% less power with AMD EPYC processor-back...Realize 2.1X the performance with 20% less power with AMD EPYC processor-back...
Realize 2.1X the performance with 20% less power with AMD EPYC processor-back...
 
Improve performance and gain room to grow by easily migrating to a modern Ope...
Improve performance and gain room to grow by easily migrating to a modern Ope...Improve performance and gain room to grow by easily migrating to a modern Ope...
Improve performance and gain room to grow by easily migrating to a modern Ope...
 
Boost PC performance: How more available memory can improve productivity
Boost PC performance: How more available memory can improve productivityBoost PC performance: How more available memory can improve productivity
Boost PC performance: How more available memory can improve productivity
 
Deploy with confidence: VMware Cloud Foundation 5.1 on next gen Dell PowerEdg...
Deploy with confidence: VMware Cloud Foundation 5.1 on next gen Dell PowerEdg...Deploy with confidence: VMware Cloud Foundation 5.1 on next gen Dell PowerEdg...
Deploy with confidence: VMware Cloud Foundation 5.1 on next gen Dell PowerEdg...
 
Upgrade your cloud infrastructure with Dell PowerEdge R760 servers and VMware...
Upgrade your cloud infrastructure with Dell PowerEdge R760 servers and VMware...Upgrade your cloud infrastructure with Dell PowerEdge R760 servers and VMware...
Upgrade your cloud infrastructure with Dell PowerEdge R760 servers and VMware...
 
A comparison of security features in Dell, HP, and Lenovo PC systems
A comparison of security features in Dell, HP, and Lenovo PC systemsA comparison of security features in Dell, HP, and Lenovo PC systems
A comparison of security features in Dell, HP, and Lenovo PC systems
 
Increase security, sustainability, and efficiency with robust Dell server man...
Increase security, sustainability, and efficiency with robust Dell server man...Increase security, sustainability, and efficiency with robust Dell server man...
Increase security, sustainability, and efficiency with robust Dell server man...
 
Increase security, sustainability, and efficiency with robust Dell server man...
Increase security, sustainability, and efficiency with robust Dell server man...Increase security, sustainability, and efficiency with robust Dell server man...
Increase security, sustainability, and efficiency with robust Dell server man...
 
Scale up your storage with higher-performing Dell APEX Block Storage for AWS ...
Scale up your storage with higher-performing Dell APEX Block Storage for AWS ...Scale up your storage with higher-performing Dell APEX Block Storage for AWS ...
Scale up your storage with higher-performing Dell APEX Block Storage for AWS ...
 
Scale up your storage with higher-performing Dell APEX Block Storage for AWS
Scale up your storage with higher-performing Dell APEX Block Storage for AWSScale up your storage with higher-performing Dell APEX Block Storage for AWS
Scale up your storage with higher-performing Dell APEX Block Storage for AWS
 
Get in and stay in the productivity zone with the HP Z2 G9 Tower Workstation
Get in and stay in the productivity zone with the HP Z2 G9 Tower WorkstationGet in and stay in the productivity zone with the HP Z2 G9 Tower Workstation
Get in and stay in the productivity zone with the HP Z2 G9 Tower Workstation
 
Open up new possibilities with higher transactional database performance from...
Open up new possibilities with higher transactional database performance from...Open up new possibilities with higher transactional database performance from...
Open up new possibilities with higher transactional database performance from...
 
Improving database performance and value with an easy migration to Azure Data...
Improving database performance and value with an easy migration to Azure Data...Improving database performance and value with an easy migration to Azure Data...
Improving database performance and value with an easy migration to Azure Data...
 
Realize better value and performance migrating from Azure Database for Postgr...
Realize better value and performance migrating from Azure Database for Postgr...Realize better value and performance migrating from Azure Database for Postgr...
Realize better value and performance migrating from Azure Database for Postgr...
 
Realize better value and performance migrating from Azure Database for Postgr...
Realize better value and performance migrating from Azure Database for Postgr...Realize better value and performance migrating from Azure Database for Postgr...
Realize better value and performance migrating from Azure Database for Postgr...
 
Set up students and teachers to excel now and in the future with Intel proces...
Set up students and teachers to excel now and in the future with Intel proces...Set up students and teachers to excel now and in the future with Intel proces...
Set up students and teachers to excel now and in the future with Intel proces...
 
Finding the path to AI success with the Dell AI portfolio - Summary
Finding the path to AI success with the Dell AI portfolio - SummaryFinding the path to AI success with the Dell AI portfolio - Summary
Finding the path to AI success with the Dell AI portfolio - Summary
 

Recently uploaded

Real Time Object Detection Using Open CV
Real Time Object Detection Using Open CVReal Time Object Detection Using Open CV
Real Time Object Detection Using Open CVKhem
 
Automating Google Workspace (GWS) & more with Apps Script
Automating Google Workspace (GWS) & more with Apps ScriptAutomating Google Workspace (GWS) & more with Apps Script
Automating Google Workspace (GWS) & more with Apps Scriptwesley chun
 
Bajaj Allianz Life Insurance Company - Insurer Innovation Award 2024
Bajaj Allianz Life Insurance Company - Insurer Innovation Award 2024Bajaj Allianz Life Insurance Company - Insurer Innovation Award 2024
Bajaj Allianz Life Insurance Company - Insurer Innovation Award 2024The Digital Insurer
 
Apidays Singapore 2024 - Building Digital Trust in a Digital Economy by Veron...
Apidays Singapore 2024 - Building Digital Trust in a Digital Economy by Veron...Apidays Singapore 2024 - Building Digital Trust in a Digital Economy by Veron...
Apidays Singapore 2024 - Building Digital Trust in a Digital Economy by Veron...apidays
 
Data Cloud, More than a CDP by Matt Robison
Data Cloud, More than a CDP by Matt RobisonData Cloud, More than a CDP by Matt Robison
Data Cloud, More than a CDP by Matt RobisonAnna Loughnan Colquhoun
 
What Are The Drone Anti-jamming Systems Technology?
What Are The Drone Anti-jamming Systems Technology?What Are The Drone Anti-jamming Systems Technology?
What Are The Drone Anti-jamming Systems Technology?Antenna Manufacturer Coco
 
Strategize a Smooth Tenant-to-tenant Migration and Copilot Takeoff
Strategize a Smooth Tenant-to-tenant Migration and Copilot TakeoffStrategize a Smooth Tenant-to-tenant Migration and Copilot Takeoff
Strategize a Smooth Tenant-to-tenant Migration and Copilot Takeoffsammart93
 
Partners Life - Insurer Innovation Award 2024
Partners Life - Insurer Innovation Award 2024Partners Life - Insurer Innovation Award 2024
Partners Life - Insurer Innovation Award 2024The Digital Insurer
 
04-2024-HHUG-Sales-and-Marketing-Alignment.pptx
04-2024-HHUG-Sales-and-Marketing-Alignment.pptx04-2024-HHUG-Sales-and-Marketing-Alignment.pptx
04-2024-HHUG-Sales-and-Marketing-Alignment.pptxHampshireHUG
 
Developing An App To Navigate The Roads of Brazil
Developing An App To Navigate The Roads of BrazilDeveloping An App To Navigate The Roads of Brazil
Developing An App To Navigate The Roads of BrazilV3cube
 
Finology Group – Insurtech Innovation Award 2024
Finology Group – Insurtech Innovation Award 2024Finology Group – Insurtech Innovation Award 2024
Finology Group – Insurtech Innovation Award 2024The Digital Insurer
 
Apidays New York 2024 - Scaling API-first by Ian Reasor and Radu Cotescu, Adobe
Apidays New York 2024 - Scaling API-first by Ian Reasor and Radu Cotescu, AdobeApidays New York 2024 - Scaling API-first by Ian Reasor and Radu Cotescu, Adobe
Apidays New York 2024 - Scaling API-first by Ian Reasor and Radu Cotescu, Adobeapidays
 
Strategies for Unlocking Knowledge Management in Microsoft 365 in the Copilot...
Strategies for Unlocking Knowledge Management in Microsoft 365 in the Copilot...Strategies for Unlocking Knowledge Management in Microsoft 365 in the Copilot...
Strategies for Unlocking Knowledge Management in Microsoft 365 in the Copilot...Drew Madelung
 
How to Troubleshoot Apps for the Modern Connected Worker
How to Troubleshoot Apps for the Modern Connected WorkerHow to Troubleshoot Apps for the Modern Connected Worker
How to Troubleshoot Apps for the Modern Connected WorkerThousandEyes
 
Histor y of HAM Radio presentation slide
Histor y of HAM Radio presentation slideHistor y of HAM Radio presentation slide
Histor y of HAM Radio presentation slidevu2urc
 
🐬 The future of MySQL is Postgres 🐘
🐬  The future of MySQL is Postgres   🐘🐬  The future of MySQL is Postgres   🐘
🐬 The future of MySQL is Postgres 🐘RTylerCroy
 
A Domino Admins Adventures (Engage 2024)
A Domino Admins Adventures (Engage 2024)A Domino Admins Adventures (Engage 2024)
A Domino Admins Adventures (Engage 2024)Gabriella Davis
 
presentation ICT roal in 21st century education
presentation ICT roal in 21st century educationpresentation ICT roal in 21st century education
presentation ICT roal in 21st century educationjfdjdjcjdnsjd
 
GenAI Risks & Security Meetup 01052024.pdf
GenAI Risks & Security Meetup 01052024.pdfGenAI Risks & Security Meetup 01052024.pdf
GenAI Risks & Security Meetup 01052024.pdflior mazor
 
Axa Assurance Maroc - Insurer Innovation Award 2024
Axa Assurance Maroc - Insurer Innovation Award 2024Axa Assurance Maroc - Insurer Innovation Award 2024
Axa Assurance Maroc - Insurer Innovation Award 2024The Digital Insurer
 

Recently uploaded (20)

Real Time Object Detection Using Open CV
Real Time Object Detection Using Open CVReal Time Object Detection Using Open CV
Real Time Object Detection Using Open CV
 
Automating Google Workspace (GWS) & more with Apps Script
Automating Google Workspace (GWS) & more with Apps ScriptAutomating Google Workspace (GWS) & more with Apps Script
Automating Google Workspace (GWS) & more with Apps Script
 
Bajaj Allianz Life Insurance Company - Insurer Innovation Award 2024
Bajaj Allianz Life Insurance Company - Insurer Innovation Award 2024Bajaj Allianz Life Insurance Company - Insurer Innovation Award 2024
Bajaj Allianz Life Insurance Company - Insurer Innovation Award 2024
 
Apidays Singapore 2024 - Building Digital Trust in a Digital Economy by Veron...
Apidays Singapore 2024 - Building Digital Trust in a Digital Economy by Veron...Apidays Singapore 2024 - Building Digital Trust in a Digital Economy by Veron...
Apidays Singapore 2024 - Building Digital Trust in a Digital Economy by Veron...
 
Data Cloud, More than a CDP by Matt Robison
Data Cloud, More than a CDP by Matt RobisonData Cloud, More than a CDP by Matt Robison
Data Cloud, More than a CDP by Matt Robison
 
What Are The Drone Anti-jamming Systems Technology?
What Are The Drone Anti-jamming Systems Technology?What Are The Drone Anti-jamming Systems Technology?
What Are The Drone Anti-jamming Systems Technology?
 
Strategize a Smooth Tenant-to-tenant Migration and Copilot Takeoff
Strategize a Smooth Tenant-to-tenant Migration and Copilot TakeoffStrategize a Smooth Tenant-to-tenant Migration and Copilot Takeoff
Strategize a Smooth Tenant-to-tenant Migration and Copilot Takeoff
 
Partners Life - Insurer Innovation Award 2024
Partners Life - Insurer Innovation Award 2024Partners Life - Insurer Innovation Award 2024
Partners Life - Insurer Innovation Award 2024
 
04-2024-HHUG-Sales-and-Marketing-Alignment.pptx
04-2024-HHUG-Sales-and-Marketing-Alignment.pptx04-2024-HHUG-Sales-and-Marketing-Alignment.pptx
04-2024-HHUG-Sales-and-Marketing-Alignment.pptx
 
Developing An App To Navigate The Roads of Brazil
Developing An App To Navigate The Roads of BrazilDeveloping An App To Navigate The Roads of Brazil
Developing An App To Navigate The Roads of Brazil
 
Finology Group – Insurtech Innovation Award 2024
Finology Group – Insurtech Innovation Award 2024Finology Group – Insurtech Innovation Award 2024
Finology Group – Insurtech Innovation Award 2024
 
Apidays New York 2024 - Scaling API-first by Ian Reasor and Radu Cotescu, Adobe
Apidays New York 2024 - Scaling API-first by Ian Reasor and Radu Cotescu, AdobeApidays New York 2024 - Scaling API-first by Ian Reasor and Radu Cotescu, Adobe
Apidays New York 2024 - Scaling API-first by Ian Reasor and Radu Cotescu, Adobe
 
Strategies for Unlocking Knowledge Management in Microsoft 365 in the Copilot...
Strategies for Unlocking Knowledge Management in Microsoft 365 in the Copilot...Strategies for Unlocking Knowledge Management in Microsoft 365 in the Copilot...
Strategies for Unlocking Knowledge Management in Microsoft 365 in the Copilot...
 
How to Troubleshoot Apps for the Modern Connected Worker
How to Troubleshoot Apps for the Modern Connected WorkerHow to Troubleshoot Apps for the Modern Connected Worker
How to Troubleshoot Apps for the Modern Connected Worker
 
Histor y of HAM Radio presentation slide
Histor y of HAM Radio presentation slideHistor y of HAM Radio presentation slide
Histor y of HAM Radio presentation slide
 
🐬 The future of MySQL is Postgres 🐘
🐬  The future of MySQL is Postgres   🐘🐬  The future of MySQL is Postgres   🐘
🐬 The future of MySQL is Postgres 🐘
 
A Domino Admins Adventures (Engage 2024)
A Domino Admins Adventures (Engage 2024)A Domino Admins Adventures (Engage 2024)
A Domino Admins Adventures (Engage 2024)
 
presentation ICT roal in 21st century education
presentation ICT roal in 21st century educationpresentation ICT roal in 21st century education
presentation ICT roal in 21st century education
 
GenAI Risks & Security Meetup 01052024.pdf
GenAI Risks & Security Meetup 01052024.pdfGenAI Risks & Security Meetup 01052024.pdf
GenAI Risks & Security Meetup 01052024.pdf
 
Axa Assurance Maroc - Insurer Innovation Award 2024
Axa Assurance Maroc - Insurer Innovation Award 2024Axa Assurance Maroc - Insurer Innovation Award 2024
Axa Assurance Maroc - Insurer Innovation Award 2024
 

Deploy services faster with Dell Active System Manager

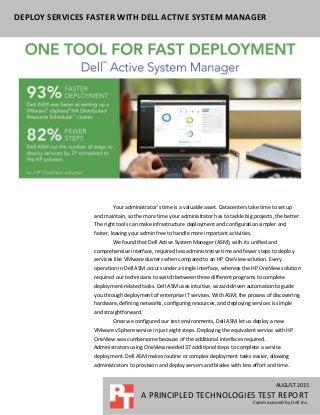
  • 1. DEPLOY SERVICES FASTER WITH DELL ACTIVE SYSTEM MANAGER AUGUST 2015 A PRINCIPLED TECHNOLOGIES TEST REPORT Commissioned by Dell Inc. Your administrator’s time is a valuable asset. Datacenters take time to set up and maintain, so the more time your administrator has to tackle big projects, the better. The right tools can make infrastructure deployment and configuration simpler and faster, leaving your admin free to handle more important activities. We found that Dell Active System Manager (ASM), with its unified and comprehensive interface, required less administrative time and fewer steps to deploy services like VMware clusters when compared to an HP OneView solution. Every operation in Dell ASM occurs under a single interface, whereas the HP OneView solution required our technicians to switch between three different programs to complete deployment-related tasks. Dell ASM uses intuitive, wizard-driven automation to guide you through deployment of enterprise IT services. With ASM, the process of discovering hardware, defining networks, configuring resources, and deploying services is simple and straightforward. Once we configured our test environments, Dell ASM let us deploy a new VMware vSphere service in just eight steps. Deploying the equivalent service with HP OneView was cumbersome because of the additional interfaces required. Administrators using OneView needed 37 additional steps to complete a service deployment. Dell ASM makes routine or complex deployment tasks easier, allowing administrators to provision and deploy servers and blades with less effort and time.
  • 2. A Principled Technologies test report 2Deploy services faster with Dell Active System Manager DELL ASM: A SIMPLIFIED VIEW When common datacenter tasks take less time, administrators can devote the time they have saved to larger projects that use their unique skillset. To this end, Dell Active System Manager offers comprehensive services deployment and automation in one package. Dell ASM is an infrastructure and workload automation solution that provides a single interface for managing your physical and virtual infrastructure throughout its lifecycle. This unified approach can cut down on time wasted with different consoles during all parts of the deployment process and subsequent lifecycle management. Dell ASM was designed to give customers flexibility and choice in how they manage their IT resources: Published REST APIs allow applications and scripts to directly interface with ASM’s key features and functionality ASM supports Microsoft® Hyper-V® and VMware vSphere, enabling end-to- end automation of tasks extended through to the virtualization layer. To learn more about Dell ASM, visit www.dell.com/asm. ABOUT OUR TESTS With administrators striving to find robust solutions that will save them time in the datacenter, we at Principled Technologies wanted to see how much administrator time it would take to get two different server management solutions—Dell ASM and HP OneView—up and ready to deploy a VMware vSphere cluster. Our technicians executed the steps necessary to install the tools and set up a cluster within the environment for each solution. We measured how much time a technician spent actively working on a task, and how many steps the technician took for each task. LESS TIME, FEWER STEPS, MORE INTUITIVE INTERFACE Dell ASM was quicker and less complex to set up than the HP OneView solution. It took only 10 minutes and 58 seconds of administrator time to install and configure Dell ASM in our datacenter while HP OneView required 18 minutes and 50 seconds of administrator time. Additionally, the HP OneView solution required setting up multiple components to perform deployment tasks, while Dell ASM required just a single virtual machine. How the tools work Dell ASM let us do everything necessary to deploy a ready-to-host vSphere cluster (see Appendix A for hardware details) from a single interface. Its template-based approach to deployment (see Figure 1) meant that deploying services—from installing
  • 3. A Principled Technologies test report 3Deploy services faster with Dell Active System Manager an OS to a single server to deploying VMs across multiple clusters—can be an easy and straightforward process. Figure 1: Creating and editing a service template with the template editor in Dell ASM. The template editor in Dell ASM simplified the individual configuration of virtual and physical components. It allowed for the designing of specific service deployments— in our scenario, we used the example of deploying a VMware vSphere High Availability, Distributed Resource Scheduler (HA/DRS) cluster. In Figure 1, the vSphere cluster is represented along with physical server and storage resources. Admins can add storage, servers, clusters, VMs, and applications through the interface. Clicking on each resource allows for further configuration. From this screen in ASM, admins can publish templates and deploy them as services. Customizing our deployment template required an additional 21 steps and 102 seconds, which we added to the steps and time needed for setup and configuration of ASM. At 137 steps and 12 minutes, 40 seconds of administrator time, our administrator still finished in less time than the 18 minutes, 50 seconds required for HP OneView, with just two additional steps. Those extra steps for a one-time task in Dell ASM provided a reusable, automated process for deploying our service templates, which HP OneView currently lacks. ASM includes 15 sample service templates to help administrators get started with designing custom services, and each template can be cloned and tweaked to suit your needs.
  • 4. A Principled Technologies test report 4Deploy services faster with Dell Active System Manager After creating a template for our own environment, it took only eight steps and 22 seconds of administrator time to deploy the cluster on our chassis. ASM automatically designated networking resources, including management and OS IP addresses, and installed the hypervisor OS (ESXi™ 5.5) without any additional administrative time or steps. Each time you need to deploy the VMware HA/DRS cluster service, you can reuse the template and deploy an identical service in your datacenter with the same eight steps and 22 seconds of administrator time. With OneView, we first had to create a hardware profile to add SAN fabric connections, storage volumes, and other hardware configuration patterns. Then we had to switch to another tool—HP Insight Control server provisioning—to discover servers again and configure them for OS or hypervisor deployment. Finally, we switched to VMware vCenter™ Web Console to manually configure and add the newly created vSphere 5.5 hosts to a VMware HA DRS cluster. The HP solution required three tools to do the same job that the Dell solution accomplished using only one. As Figure 2 shows, an administrator using Dell ASM was able to deploy the VMware HA/DRS cluster with 82.2 percent fewer steps than an administrator using HP OneView. Figure 2: Dell ASM cut the number of steps to deliver a VMware vSphere service by 37 - 82% fewer steps compared to the HP OneView solution. To deploy operating systems and hypervisors, HP requires Insight Control server provisioning. After switching to Insight Control server provisioning, users have access to pre-configured scripts and OS deployments, as Figure 3 shows.
  • 5. A Principled Technologies test report 5Deploy services faster with Dell Active System Manager Figure 3: Hypervisor deployment with HP Insight Control. During our testing, our administrators needed 45 steps and took more time - 5 minutes, 38 seconds - to deploy a cluster with HP OneView, because they had to switch to different tools and execute some parts the deployment process manually. Dell ASM lets you perform every step from one interface and automates the deployment process, so you can stay focused on the task at hand and reduce the potential for human error. Figure 4 shows the difference in administrator time required to deploy a VMware vSphere HA/DRS cluster from each solution. Figure 4: An administrator using Dell ASM was 93.4 percent faster deploying a VMware vSphere cluster compared to using HP OneView.
  • 6. A Principled Technologies test report 6Deploy services faster with Dell Active System Manager CONCLUSION On any given day, your systems administrator will have more urgent things to do than sit through a long infrastructure deployment process. By freeing up their time with Dell ASM’s user-friendly, unified interface, your administrator can spend time improving other areas of your datacenter. We found that Dell Active System Manager simplified and streamlined the installation and deployment process for setting up a cluster to deliver IT services. Dell ASM allowed us to deploy solutions 93.4 percent faster and required 82.2 percent fewer steps to get our services up and running, compared to performing the same tasks with an HP solution including HP OneView, HP Insight Control and VMware vSphere Web Client. With its powerful and intuitive UI and template-based automation, Dell ASM can streamline infrastructure provisioning and speed up workload deployment, making life easier for administrators and saving you time and money to manage your datacenter more efficiently.
  • 7. A Principled Technologies test report 7Deploy services faster with Dell Active System Manager APPENDIX A – SYSTEM CONFIGURATION INFORMATION Figures 5 through 8 provide detailed configuration information for the hardware we used in our tests. System Dell PowerEdge™ M1000e blade enclosure Power supplies Number of power supplies 6 Vendor and model number Dell E2700P-00 Wattage of each (W) 2,700 Cooling fans Total number of fan modules 9 Vendor and model number Dell X46YM Rev. A00 Volts 12 Amps 5 Midplane Chassis midplane 1.1 Chassis firmware Chassis Management Controller firmware 4.31 iKVM firmware and hardware 01.00.01.01 A03 IOM firmware 11 IOM software 8.3.17.2 I/O modules Switch Dell Networking MXL 10/40GbE Occupied bay A1, A2 Management modules Chassis Management Controller slot 1 Chassis Management Controller hardware iKVM slot Avocent® iKVM Switch (0K036D) Chassis Management Controller slot 2 Chassis Management Controller hardware Figure 5: Configuration information for the Dell blade server chassis.
  • 8. A Principled Technologies test report 8Deploy services faster with Dell Active System Manager System Dell PowerEdge M620 blade server Enclosure Blade enclosure Dell PowerEdge M1000e General Number of processor packages 2 Number of cores per processor 6 Number of hardware threads per core 2 System power management policy Default CPU Vendor Intel® Name Xeon® Model number E5-2640 Stepping C2 Socket type FCLGA2011 Core frequency (GHz) 2.5 Bus frequency (GHz) 3.6 L1 cache 32KB + 32KB (per core) L2 cache 256 KB (per core) L3 cache 15 MB Platform Vendor and model number Dell PowerEdge M620 Motherboard model number 0VHRN7A03 BIOS version 1.6.0 BIOS settings Default Memory module(s) Total RAM in system (GB) 32 Vendor and model number Micron® MT18KSF51272PDZ Type PC3L-10600R Speed (MHz) 1,333 Speed running in the system (MHz) 1,333 Size (GB) 4 Number of RAM module(s) 8 Chip organization Double-sided Rank Dual RAID controller Vendor and model number Dell PERC S110 Embedded Firmware version 3.0.0-0139 Cache size (MB) 0 Ethernet adapters Vendor and model number Broadcom® BCM57810 NetXtreme® II 10 GigE Type LOM
  • 9. A Principled Technologies test report 9Deploy services faster with Dell Active System Manager System Dell PowerEdge M620 blade server USB ports Number 2 external Type 2.0 Firmware Integrated Dell Remote Access Controller 1.40.40 Broadcom NetXtreme II 10 Gb Ethernet BCM57810 7.4.8 BIOS 1.6.0 Lifecycle Controller, 1.1.5.165, A00 1.1.5.165 Enterprise UEFI Diagnostics 4217A4 OS drivers pack 7.2.1.4 7.2.1.4 System CPLD 1.0.2 PERC H310 Mini 3.0.0-0139 Figure 6: Configuration information for the Dell blade server we used in our tests. System HP BladeSystem c7000 Power supplies Number of power supplies 6 Vendor and model number HP 2400W HE PSU – HP P/N 499253-B21 Wattage of each (W) 2,400 Cooling fans Total number of fan modules 10 Vendor and model number HP Active Cool 200 – HP P/N 412140-B21 Chassis firmware OA Controller Hardware Version A1 OA Tray firmware 1.7 Onboard Administrator firmware 4.40 I/O modules Switch HP VC FlexFabric 10Gb/24-Port Module VC firmware 4.40 Interconnect bay 1, 2 Figure 7: Configuration information for the HP blade server chassis. System HP ProLiant BL460c Gen9 blade server Blade model Blade Model HP ProLiant BL460c Gen9 General Number of processor packages 2 Number of cores per processor 6 Number of hardware threads per core 1 System power management policy Default
  • 10. A Principled Technologies test report 10Deploy services faster with Dell Active System Manager System HP ProLiant BL460c Gen9 blade server CPU Vendor Intel Name Xeon Model number E5-2609 v3 Stepping M1 Socket type FCLGA2011-3 Core frequency (GHz) 1.9 Bus frequency (GT/s) 6.4 L1 cach 6 × 32 KB instruction cache, 6 × 32 KB data cache L2 cache 6 × 256 KB L3 cache 15 MB Platform Motherboard model number 744409-001 BIOS version I36 v1.40 (05/06/2015) iLO4 Firmware 2.20 May 20 2015 Memory module(s) Total RAM in system (GB) 16 Vendor and model number SK Hynix HMA41GR7MFR4N-TF Type PC4-17000 Speed (MHz) 2,133 Speed running in the system (MHz) 2,133 Size (GB) 8 Number of RAM module(s) 2 Chip organization Double-sided Rank Single RAID controller Vendor and model number HP Smart HBA H244br Firmware version 2.52 Cache size (GB) 1 Mezzanine card(s) Card model HP FlexFabric 10Gb 2-port 536FLB Adapter Figure 8: Configuration information for the HP blade servers we used in our tests.
  • 11. A Principled Technologies test report 11Deploy services faster with Dell Active System Manager APPENDIX B – HOW WE TESTED Configuring Dell Active System Manager 8.1 Deploying Dell ASM OVF template Before testing, extract the Dell ASM .zip file (Dell-ActiveSystemManager-8.1.0-4567_VMware.zip) to a location the VMware vSphere Client can access. 1. From the VMware vSphere Client, click File, and click Deploy OVF Template. The Deploy OVF Template wizard will open. 2. On the Source page, click Browse, select the OVF package, and click Open. 3. To continue, click Next. 4. Click Next. 5. Accept the License Agreement, and click Next. 6. Enter a name (Active System Manager 8.1), select the Inventory Location, and click Next. 7. Assuming a resource pool has been configured, select the storage volume to host the appliance virtual machine, and click Next. 8. On the Disk Format page, select Thin Provision, and click Next. 9. Verify the Destination Network for Network 1 is set to the management VLAN (mgmt vlan128), and click Next. 10. To run the deployment job, click Finish. Configuring Dell ASM VM network adapters 1. Right-click the newly created VM (Active System Manager 8.1) from the host, and click Edit Settings… 2. Select Network adapter 1. 3. Verify the Network label is set to the management network (management vlan128), and click Add… 4. Select Ethernet Adapter, and click Next. 5. Under the Network Connection section, select the PXE network label (PXE vlan1076), and click Next. 6. Click Finish. 7. Click OK. Defining Dell ASM appliance network 1. In the vSphere Client, right-click the Active System Manager virtual machine, and select Power On. 2. Click the Console tab. 3. When prompted, log in with the default ASM credentials (delladmin, delladmin). 4. Type sudo su – and press Enter. 5. Type the current admin password (delladmin), and press Enter. 6. Accept the License Agreement, and click Forward. 7. Click Network Configuration. 8. Select Auto eth0, and click Edit. 9. Change the connection name to management-0 10. Select the IPv4 Settings tab. 11. Change Method to Manual.
  • 12. A Principled Technologies test report 12Deploy services faster with Dell Active System Manager 12. Click Add, and click the text field to enter the IPv4 address, the Netmask, and the Gateway (for our management network, we used 10.128.0.111, 255.255.0.0, and 10.128.0.1). 13. Enter 10.128.0.10 as the DNS Servers. 14. Click Apply… 15. Select Auto eth1, and click Edit. 16. Change the connection name to PXE-1 17. Select the IPv4 Settings tab. 18. Change Method to Manual. 19. Click Add and click the text field to enter the IPv4 address, the Netmask, and the Gateway (for our PXE network, we used 192.168.76.1, 255.255.255.0, and 0.0.0.0). 20. Click Apply… 21. Click Close. 22. Click Close again. Using the Initial Setup Wizard 1. Open a browser on the workstation, and navigate to the ASM appliance IP (10.128.0.111). 2. Log in with the default credentials (admin, admin). 3. At the welcome screen, click Initial Setup. 4. Click Next. 5. Click Choose File, navigate to the license file location, upload the license file, and click Save and Continue. 6. Set the Time Zone ((UT-05:00) Eastern Time (US & Canada)) and Preferred NTP Server, and click Save and Continue. 7. Leave Use a proxy server unchecked, and click Save and Continue. 8. Check Enable DHCP/PXE Server. 9. Enter the Subnet (192.168.76.0), the Netmask (255.255.255.0), the DHCP Scope Starting IP Address (192.168.76.100), the DHCP Scope Ending IP Address (192.168.76.200), the Default Gateway (192.168.76.1), and click Save and Continue. 10. Review the summary, and click Finish. 11. Click Yes. Adding network definitions These steps continue from the Getting Started wizard described above. 1. Select Define Networks. 2. We used six networks in our setup: a hypervisor management network, a hypervisor migration network, a storage network, a PXE network, a data network, and a hardware management network. Click +Define. 3. Name the hypervisor management network (Hypervisor Management), and change Network Type to Hypervisor Management. 4. Enter the hypervisor management VLAN ID (128), the hypervisor management network Subnet Mask (255.255.0.0), the hypervisor management network Gateway (10.128.0.1), and the hypervisor management network Primary DNS (10.128.0.10).
  • 13. A Principled Technologies test report 13Deploy services faster with Dell Active System Manager 5. Click Add IP Address Range. 6. Enter the Starting IP Address (10.128.30.1) and the Ending IP Address (10.128.30.254), and click Save. 7. Click +Define. 8. Name the hypervisor migration network (Hypervisor Migration), and change the Network Type to Hypervisor Migration. 9. Enter the hypervisor migration VLAN ID (200), and check the Configure static IP address ranges checkbox. 10. Enter the hypervisor migration network Subnet Mask (255.255.255.0). 11. Click Add IP Address Range. 12. Enter the Starting IP Address (192.168.200.150) and the Ending IP Address (192.168.200.199), and click Save. 13. Click +Define. 14. Name the storage network (Storage) and change the Network Type to SAN (Software iSCSI). 15. Enter the storage VLAN ID (201), and check the Configure static IP address ranges checkbox. 16. Enter the storage network Subnet Mask (255.255.255.0). 17. Click Add IP Address Range. 18. Enter the Starting IP Address (192.168.201.150) and the Ending IP Address (192.168.201.199), and click Save. 19. Click +Define. 20. Name the PXE network (PXE deployment). 21. Change Network Type to PXE. 22. Enter the PXE VLAN ID (1076), and click Save. 23. Click +Define. 24. Name the Data network (Data) and Change the Network Type to Private LAN. 25. Enter the data network VLAN ID (1080), and click Save. 26. Click +Define. 27. Name the hardware management network (Hardware Management), and change the Network Type to Hardware Management. 28. Check the Configure static IP address ranges checkbox. 29. Enter the hardware management network Gateway (10.128.0.1), the hardware management network Subnet Mask (255.255.0.0), and the hardware management network Primary DNS (10.128.0.10). 30. Click Add IP Address Range. 31. Enter the Starting IP Address (10.128.3.1), the Ending IP Address (10.128.3.254), and click Save. 32. Click Close. Discovering the chassis, blade, storage, and vCenter These steps continue from the Getting Started wizard described above. 1. Start the timer, and click Discover Resources to launch the discovery wizard. 2. Click Next. 3. Click Add Resource Type.
  • 14. A Principled Technologies test report 14Deploy services faster with Dell Active System Manager 4. Change Resource Type to Chassis. 5. In the Starting IP Address field, enter the CMC IP address. 6. Change Select Chassis Credential to Dell chassis default, Select Blade Credential to Dell PowerEdge Default, and Select I/O Module Credential to Dell switch default. 7. Click +Add Resource Type. 8. Change Resource Type to Storage. 9. Enter the Group Mgmt IP of the EqualLogic Storage. 10. Next to Select Storage Credential, click + to create credentials. 11. Enter a Credential Name (EqualLogic Storage). 12. Enter the storage User Name, the storage Password, confirm the Password, and click Save. 13. Click +Add Resource Type. 14. Change Resource Type to vCenter. 15. Enter the vCenter Host IP. 16. Next to Select vCenter Credential, click + to create credentials. 17. Enter a Credential Name (vCenter). 18. Enter the vCenter User Name, the vCenter Password, confirm the Password, and click Save. 19. Click Next. 20. At the Initial Chassis Configuration screen, change the Chassis Credentials to Dell chassis default, the Blade Credentials to Dell PowerEdge Default, the I/O Module Credentials to Dell Switch Default, and click Next. 21. Click Finish. 22. When the warning dialog appears, click Yes. Configuring resources These steps continue from the Getting Started wizard described above. 1. Click Configure Resources. 2. Click Next. 3. Verify the Discovered Resources in your environment, and click Next. 4. Leave the Default ASM Minimum Required Firmware Repository selected, and click Next. 5. When the Firmware Compliance check completes, click Next. 6. At the Chassis Configuration screen, leave the default settings, and click Next. 7. If you wish to customize the Chassis Name, CMC DNS Name, System Input Power Cap, or Location Details, check Configure Unique Chassis Settings; otherwise, click Next. 8. If you wish to customize the blade iDRAC DNS names, check Configure Unique Server Settings; otherwise, click Next. 9. If you wish to customize the I/O Module host names, check Configure Unique I/O Module Settings and enter the names; otherwise, click Next. 10. If you wish to customize the I/O Module Uplinks, check Configure Uplinks; otherwise, click Next. 11. Review the Summary, and click Finish. 12. When the warning dialog appears, click Yes.
  • 15. A Principled Technologies test report 15Deploy services faster with Dell Active System Manager Creating a template These steps continue from the Getting Started wizard described above. 1. Start the timer, and click Publish Templates. 2. Click +Create Template. 3. Change Template Type to Clone Existing, and select Deploy VMware Cluster with iSCSI Storage. 4. Enter a Template Name (Test Cluster HA DRS). 5. Change Template Category to Create New Category, enter the New Category Name (Test Deployments), and click Save. 6. Select the VMware Cluster, and click Edit. 7. Change the Target Virtual Machine Manager to the discovered vCenter Host. 8. Check Cluster HA Enabled and Cluster DRS Enabled, and click Save. 9. Select the first Server, and click Edit. 10. Expand the OS Settings, and change the OS Image to esxi-5.5. 11. Expand the Network Settings, and check the following Networks for each Partition: a. Hypervisor Management, PXE b. Hypervisor Migration c. Storage d. Data 12. Click Save. 13. Select the second Server, and click Edit. 14. Expand the OS Settings, and change the OS Image to esxi-5.5. 15. Expand the Network Settings, and check the following Networks for each Partition: a. Hypervisor Management, PXE b. Hypervisor Migration c. Storage d. Data 16. Select the first Storage, and click Edit. 17. Change the Target EqualLogic to the discovered EqualLogic, and click Save. 18. Select the second Storage, and click Edit. 19. Change the Target EqualLogic to the discovered EqualLogic, and click Save. 20. Click Publish Template. 21. When the warning dialog appears, click Yes. Deploying Service from template 1. Click the Services tab. 2. Click Deploy New Service. 3. Change Select Template to the newly created template (Test Deployment). 4. Enter a service name (Test Service 1). 5. Click Next.
  • 16. A Principled Technologies test report 16Deploy services faster with Dell Active System Manager 6. Name the first Server’s OS Host Name, name Server 2’s OS Host Name, and click Next. 7. Click Finish. 8. When the warning dialog appears, click Next. Configuring HP OneView Deploying HP OneView OVF 1. From the vSphere Client, click File, and click Deploy OVF Template. 2. When the Deploy OVF Template wizard launches, click Browse. Navigate to the HP OneView OVA location, and click Open. 3. Click Next. 4. Review the OVF Template Details, and click Next. 5. Name the HP OneView VM (HPOneViewTest), select the inventory location, and click Next. If you did not specify a Specific Host, at the next screen, select the Host, and click Next. 6. Select the destination storage for the virtual machine files, and click Next. 7. Select Thin Provision, and click Next. 8. Ensure the Destination Networks for the VM Network is set to the correct VLAN (for our test, we used our management VLAN), and click Next. 9. Review the Ready to Complete summary, check Power on after deployment, and click Finish. Completing initial setup for HP OneView For the following steps, we assume that the OneView VM has been powered on. 1. From the vSphere Client, select the newly deployed appliance (HPOneView-NoSSH_1.20.05), and click the Console tab. 2. Click Agree to accept the HP OneView licensing terms. 3. To turn off Authorized services access, click Disable. 4. Click OK. 5. At the HP OneView login screen, enter the default User and Password (Administrator / admin), and click Login. 6. Enter and confirm a new password for the Administrator (Password1), and click OK. 7. Enter the hostname (oneview.local). 8. At the Appliance Networking screen, enter the IPv4 address for the appliance (10.128.54.123). 9. Verify the Gateway address and Preferred DNS server (10.128.0.1 and 10.128.0.10) are correct, leave the default Time and Language settings, and click OK. Deploying HP Insight Control server provisioning OVF 1. From the vSphere Client, click File, and click Deploy OVF Template. 2. When the Deploy OVF Template wizard launches, click Browse. Navigate to the Insight Controller OVF, and click Open. 3. On the OVF Template Details screen, click Next.
  • 17. A Principled Technologies test report 17Deploy services faster with Dell Active System Manager 4. Provide a name for the Virtual Machine, select an inventory location, and click Next. 5. On the Host / Cluster pane, select a host for the VM deployment, and click Next. 6. On the Storage pane, select the storage location, and click Next. 7. On the Disk Format pane, select Thick provisioned Eager Zeroed, and click Next. 8. On the Network Mapping Pane, select the appropriate network for Insight Controller to use, and click Next. 9. On the Ready to Complete pane, click Finish. Setting up HP Insight Controller These steps follow a successful OVF deployment. Before completing these steps, make sure that the OneView VM is powered on. 1. From the vSphere Client, select the newly deployed appliance (ICsp-vmware-7.4.1), and click the Console tab. 2. To accept the HP Insight Control server provisioning License, click Agree. 3. To turn off Authorized services access, click Disable. 4. Click OK. 5. At the HP Insight Control login screen, enter the default username and password, and click Login. 6. Enter and confirm a new password for the Administrator, and click OK. 7. At the Appliance Networking screen, expand the Appliance tree. 8. Enter a valid IPv4 address for the gateway address, the appliance IP address, and DNS servers. 9. Expand the Deployment tree. 10. Enter a valid IPv4 address for the deployment IP address. 11. Leave the default time and language settings, and click OK. Connecting HP Insight Control server provisioning and HP OneView 1. Navigate to the web client for HP Insight Control server provisioning. 2. Click the top drop-down menu, and select HP OneView Appliances. 3. Select Add Appliance. 4. Provide the OneView Appliance IP address, login credentials, and a description, and select Add. Setting up the HP media server For these steps, download the image file for Intelligent Provisioning. Ensure the media server has access to an ISO of vSphere 5.5U2 with HP drivers slipstreamed. 1. In Windows Server 2012 R2, launch Server Manager. 2. Select Add roles and features from the Dashboard. 3. On the Before You Begin pane, click Next. 4. On the Installation Type pane, click Next. 5. On the Server Selection pane, click Next. 6. On the Server Roles pane, click Next. 7. On the Features pane, select .NET Framework 3.5 Features. 8. When a dialog to add required features appears, select Add Features.
  • 18. A Principled Technologies test report 18Deploy services faster with Dell Active System Manager 9. On the Features pane, click Next. 10. On the Confirmation pane, select Finish. 11. Navigate to the Insight Controller server provisioning web client in a web browser. 12. Select the top drop-down menu, and click Settings. 13. Next to Media Server, click Edit. 14. Click the link Download HP Insight Control server provisioning Media Server setup utility. 15. When the HP Install Package window opens, click Run. 16. The Media Server setup utility will launch. At the Prerequisites screen, click Continue. 17. When the Browser For Folder window launches, navigate to the Local Disk, and create a new folder to host the Media Server. For our test, we created a folder on C: named hpmediaserver. 18. At the Select Components to Install screen, uncheck Select All, and only check HP Intelligent Provisioning and ESXi 5.5U2 (EN-US). 19. Click Install. 20. At the Parameters screen, enter a name for the Windows File Share Name (hpmediaserver). 21. Enter an Authorized Windows User (Administrator). 22. Click Install. 23. To mount the HP Intelligent Provisioning ISO (HPIP201.2014_0902.29), right-click on the file, and select Mount. 24. The HP Intelligent Provisioning Setup window will launch. Click the browse icon next to IP location, navigate to the mounted HP Intelligent Provisioning Image, and click OK. 25. Click Install. 26. When the installation completes, click Close. 27. The ESXi 5.5U2 Setup window will launch. To mount the ESXi 5.5U2 ISO, right-click, and select Mount. 28. Next to the Distribution location, select the Browse icon, and select OK. 29. Click Install. 30. When the Windows Server installation completes, click Close. 31. On the still-open installation dialog, click Close. 32. Navigate back to the web client for HP Insight Control server provisioning. 33. Select the top drop-down menu, and select Settings. 34. Next to Media Server, select Edit. 35. Provide the HP ICsp media Server IP address, file share name, username, password, and the HTTP server IP address and path. 36. Select OK. Applying the HP iLO license 1. Navigate to the iLO of the server to be deployed. 2. Enter the credentials, and click Login. 3. In the left menu, expand the Administration tree, and select Licensing. 4. Enter the License Key, and select Install.
  • 19. A Principled Technologies test report 19Deploy services faster with Dell Active System Manager 5. Navigate to the next iLO of the server to be deployed. 6. Enter the credentials, and click Login. 7. In the left menu, expand the Administration tree, and select Licensing. 8. Enter the License Key, and select Install. Downloading HP Service Pack for ProLiant and integrating with HP OneView 1. In a web browser, navigate to h17007.www1.hp.com/us/en/enterprise/servers/products/service_pack/spp/index.aspx. If possible, perform these tasks on the media server. 2. Under Full ISO Image, select the link to download the HP Service Pack for ProLiant. The file is 4.69GB. 3. On the next page, select Obtain Software. 4. On the prompt that appears, select Sign in Now. 5. Sign in with an HP account that has rights to download the HP SPP. 6. Select Obtain Software. 7. Click Select. 8. Fill out the form, and click Next. 9. Choose either the HP Download Manager or Standard download, and click Download. 10. Once the file is downloaded, navigate to the web portal for HP OneView. 11. From the top left drop-down menu, select Firmware Bundles. 12. Select Add Firmware Bundle. 13. Select Choose file, and navigate to the HP Service Pack for ProLiant ISO. 14. Select Start Upload. The dialog will close once the upload is finished. Discovering HP Insight Control server 1. Navigate to the web client for HP Insight Control server provisioning. 2. Select Add server. 3. Provide the iLO IP address or host name, enter the iLO credentials, and check the box next to Do not boot to maintenance. 4. Select Add+ to complete server Discovery. A dialog for another server should appear. 5. Provide the iLO IP address of the second blade, enter the iLO credentials, and check the box next to Do not boot to maintenance. Click Add. Discovering enclosures in HP OneView 1. Navigate to the web client for HP OneView. 2. In the top left corner, select the drop-down menu, and select Enclosures. 3. Select Add Enclosure. 4. Provide the Onboard Administrator IP address or host name, and select the bubble for Managed. 5. In the expanded menu, enter the OA credentials, and change the firmware baseline to the previously installed HP SPP.
  • 20. A Principled Technologies test report 20Deploy services faster with Dell Active System Manager 6. Select Add to complete the Enclosure Discovery. 7. When the Interconnect groups dialog appears, leave default settings, and click Next. Adding the HP OneView SAN Manager 1. From the top-left drop-down menu, select SAN Managers. 2. Select Add SAN Manager. 3. Leave the default SAN manager type as Brocade Network Advisor, provide the IP address for the previously configured Brocade Network Advisor, and provide credentials. 4. Select Add. Discovering the storage system with HP OneView 1. From the top-left drop-down menu, select Storage Systems. 2. Select Add Storage System. 3. Provide the IP address of the HP 3PAR StoreServ 7200, and the correct credentials. We used the default 3paradm / 3pardata. Select Connect. 4. Once the connection is successful, verify the information, and select a Storage Pool. 5. Select the correct Storage System Fibre channel ports. 6. Select Add. Creating HP OneView networks and uplinks 1. Select the main drop-down menu in the upper left, and select Networks. 2. Select Create network. 3. Provide the name of the LAN network, select Ethernet, and select VLAN settings. (In our lab environment, we used a tagged VLAN). 4. Leave other options at default, and select Create+. 5. Provide the name of the Fibre Channel network, and associate it with the SAN added previously. 6. Leave the rest of the settings at default, and select Create. 7. Select the main drop-down menu in the upper left, and select Logical Interconnects. 8. From the Actions menu, select Edit. 9. Select Add Uplink Set. 10. Provide a useful name for the Fibre channel uplink, and select Type Fibre Channel. 11. Select the previously created network select the correct port, and click Create+. 12. Provide a useful name for the Ethernet Channel uplink, and select Type Ethernet. 13. Select the previously created tagged network and provide an uplink port, and click Create. Creating the storage volume on 3PAR storage 1. Select the main drop-down menu in the upper left, and select Volumes. 2. Select Create volume.
  • 21. A Principled Technologies test report 21Deploy services faster with Dell Active System Manager 3. Provide the volume with a name and description, and provide a storage pool. Leave all options at default, but change the Sharing to Shared and choose a custom size. Select Create. Creating server profile with SAN storage and OneView networks 1. Navigate to the web client for HP OneView. 2. Select the main drop-down menu in the upper left, and select Server Profiles. 3. Select Create profile. 4. Give the profile a useful name and description, and select the correct firmware baseline. Select Add Connection. 5. Provide a connection name, and select device type Ethernet. Select the previously created Ethernet network. Select Add+. 6. Provide a connection name, and select device type Fibre channel. Select the previously created Fibre Channel Network. Select Add. 7. Check the box for Manage boot mode. 8. Select Boot mode UEFI. 9. Check the box for Manage SAN Storage. 10. Select Host OS type ESX 4.x/5.x. Select Add Volume. 11. Select Type Existing Volume and provide the previously created Volume Name. Select Add. 12. Select Create. Deploying HP Insight Control ESXi 5.5U2 1. Navigate to the web client for HP Insight Control server provisioning. 2. From the top left drop down menu, select Device Groups. 3. Select Create device group. 4. Provide the group with a name, and add any previously discovered servers. 5. Select Create. 6. From the Actions drop-down menu, select Run OS Build Plans. Select Add Plan, and find the plan titled ProLiant OS - ESXi 5.5 U2 Scripted Install. Select Add. 7. Click OK. Manually creating a VMware vCenter cluster This methodology uses the VMware vSphere Web Client, and assumes an existing vCenter infrastructure with an already created datacenter object. 1. Navigate to your infrastructure’s existing VMware vCenter web client. 2. Provide the necessary login credentials, and click Login. 3. Select Hosts & Clusters. 4. Right-click the datacenter in which you would like to create a cluster, and select New Cluster. 5. Provide the Cluster a useful name. 6. Select the box next to DRS, and select the box next to vSphere HA. 7. Select OK.
  • 22. A Principled Technologies test report 22Deploy services faster with Dell Active System Manager 8. Right-click the previously created cluster, and select Add Host. 9. Provide the IP address of the previously created vSphere 5.5U2 host. Click Next. 10. Provide the credentials for the ESXi 5.5U2 host, and click Next. 11. Verify the Host summary, and click Next. 12. Assign the correct licensure, and click Next. 13. Leave the default options for lockdown mode , and click Next. 14. Leave all the options for resource pooling at their default, and click Next. 15. Verify all settings, and click Finish. 16. Right-click the previously created cluster, and select Add Host. 17. Provide the IP address of the previously created vSphere 5.5U2 host. Click Next. 18. Provide the credentials for the ESXi 5.5U2 host, and click Next. 19. Verify the Host summary, and click Next. 20. Assign the correct licensure, and click Next. 21. Leave the options for lockdown mode at their default, and click Next. 22. Leave all the options for resource pooling at their default, and click Next. 23. Verify all settings, and click Finish.
  • 23. A Principled Technologies test report 23Deploy services faster with Dell Active System Manager ABOUT PRINCIPLED TECHNOLOGIES Principled Technologies, Inc. 1007 Slater Road, Suite 300 Durham, NC, 27703 www.principledtechnologies.com We provide industry-leading technology assessment and fact-based marketing services. We bring to every assignment extensive experience with and expertise in all aspects of technology testing and analysis, from researching new technologies, to developing new methodologies, to testing with existing and new tools. When the assessment is complete, we know how to present the results to a broad range of target audiences. We provide our clients with the materials they need, from market-focused data to use in their own collateral to custom sales aids, such as test reports, performance assessments, and white papers. Every document reflects the results of our trusted independent analysis. We provide customized services that focus on our clients’ individual requirements. Whether the technology involves hardware, software, Web sites, or services, we offer the experience, expertise, and tools to help our clients assess how it will fare against its competition, its performance, its market readiness, and its quality and reliability. Our founders, Mark L. Van Name and Bill Catchings, have worked together in technology assessment for over 20 years. As journalists, they published over a thousand articles on a wide array of technology subjects. They created and led the Ziff-Davis Benchmark Operation, which developed such industry-standard benchmarks as Ziff Davis Media’s Winstone and WebBench. They founded and led eTesting Labs, and after the acquisition of that company by Lionbridge Technologies were the head and CTO of VeriTest. Principled Technologies is a registered trademark of Principled Technologies, Inc. All other product names are the trademarks of their respective owners. Disclaimer of Warranties; Limitation of Liability: PRINCIPLED TECHNOLOGIES, INC. HAS MADE REASONABLE EFFORTS TO ENSURE THE ACCURACY AND VALIDITY OF ITS TESTING, HOWEVER, PRINCIPLED TECHNOLOGIES, INC. SPECIFICALLY DISCLAIMS ANY WARRANTY, EXPRESSED OR IMPLIED, RELATING TO THE TEST RESULTS AND ANALYSIS, THEIR ACCURACY, COMPLETENESS OR QUALITY, INCLUDING ANY IMPLIED WARRANTY OF FITNESS FOR ANY PARTICULAR PURPOSE. ALL PERSONS OR ENTITIES RELYING ON THE RESULTS OF ANY TESTING DO SO AT THEIR OWN RISK, AND AGREE THAT PRINCIPLED TECHNOLOGIES, INC., ITS EMPLOYEES AND ITS SUBCONTRACTORS SHALL HAVE NO LIABILITY WHATSOEVER FROM ANY CLAIM OF LOSS OR DAMAGE ON ACCOUNT OF ANY ALLEGED ERROR OR DEFECT IN ANY TESTING PROCEDURE OR RESULT. IN NO EVENT SHALL PRINCIPLED TECHNOLOGIES, INC. BE LIABLE FOR INDIRECT, SPECIAL, INCIDENTAL, OR CONSEQUENTIAL DAMAGES IN CONNECTION WITH ITS TESTING, EVEN IF ADVISED OF THE POSSIBILITY OF SUCH DAMAGES. IN NO EVENT SHALL PRINCIPLED TECHNOLOGIES, INC.’S LIABILITY, INCLUDING FOR DIRECT DAMAGES, EXCEED THE AMOUNTS PAID IN CONNECTION WITH PRINCIPLED TECHNOLOGIES, INC.’S TESTING. CUSTOMER’S SOLE AND EXCLUSIVE REMEDIES ARE AS SET FORTH HEREIN.