
Recommended
More Related Content
What's hot
What's hot (20)
Similar to 15 Tutorial 1
Similar to 15 Tutorial 1 (20)
15 Tutorial 1
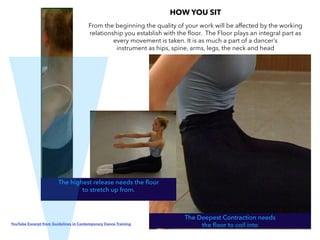
- 1. The Deepest Contraction needs the floor to coil into From the beginning the quality of your work will be affected by the working relationship you establish with the floor. The Floor plays an integral part as every movement is taken. It is as much a part of a dancer’s instrument as hips, spine, arms, legs, the neck and head YouTube Excerpt from Guidelines in Contemporary Dance Training The highest release needs the floor to stretch up from. HOW YOU SIT
- 2. A helpful image for a Beginner can be a Tree with Roots, Trunk, and Branches Begin by establishing an attitude to the ground, the idea of a rooted connection. View the Floor as an extension of your instrument. It is a part of you, as you are a part of it. Whether you are lying, sitting, kneeling or standing, whether you are moving up from down to, or traveling across the floor, you are always connected. You are aware of, and actively using the floor to create a specific quality of movement.
- 3. The Hips maintain the same perpendicular angle to the floor in relationship to the upper torso The Hips, working as a base, initiate movement providing bal- ance and support for the Upper Torso. The Waist, Ribs, Shoul- ders and Head respond to the impetus rising from the Hips. You go where the Hips take you and the Hips control how you get there. The Base of the Throat is carried perpendicular to and slightly forward of the Sacrum. This perpendicular rela- tionship helps to correctly place the Upper Torso over the Lower Torso for shifts in space from Center to Off Center in Straight, Curved, or Spiral positions. The Development of Placement Whether Straight, or in Curve Movement practiced in Second Position stretches a student’s limit of flexibility. To practice correctly the focus, in any position, is to establish a strong working base. A foundation that will support the Hips, Lower Spine and Abdominals through changes from Contrac- tion, Release, or Spiral and from Center to Off Center. As students progress and the exercises are more challenging, increased core strength also results in increased flexibility and ease as you prac- tice. Students who try to work from a forced, overstretched second tend to shift their weight forward, off of the sits bones and onto the insides of the legs. Without the all-important grounded placement correctly centered over the sits bones, movement quality loses both power and weight About Second Position Centered Release in Second Centered Spiral Release in Second Off Center Spiral Release in SecondCentered Contraction in Second Centering the Upper Torso over the Lower Torso
- 4. Then there is the power of visualization. Images that relate the body to specific movement. For Spiral movements a Braced Arms The use of Braced Arms is a teaching device that helps to develop the students awareness to use the core as their source for movement upwardlift downward pressure Another source of unwanted tension can be incorrect placement. If work shifts from the central power sources to lesser, weaker parts of the body, an immediate reaction is to tense. This also happens if a students over-reaches beyond their limit of strength or range of movement. TENSION When the body is in movement many different types of tension are possible. An example of tension to encourage in dance training would be the tension of an elastic band, stretched to maximum extension with all of its’ built up energy. Two physical qualities you use to stretch the elastic, strength and flexibility, are also essential assets for any dancer. Tension to avoid would be the tension that builds when a fist is held tightly, gripping. To hold a tightened fist, mus- cles will grip and cramp, limiting flexibility and range of movement. Movement quality becomes tight, static, without breath or flow. The student also becomes more vulnerable to injury. There is no pleasure in moving this way! The pressure of the hands, down against the floor activates a high lift to help the student to assemble Hips, Ribs, Shoulders and Head into an integrated unit for changes from Center to Off Center. Using Braced Arms also helps to establish the awareness of a basic Graham Technique Movement Principle: That the pelvis controls, supports, and balances movement. Braced Arms also will encour- age Correct Placement. It is important to keep in mind that every student’s arms varies in length in relationship to their torso. This- means that each will have to adjust how much the elbows flex and where to place the hands . For all students, the Elbows should be squared ∆Elbows & Hands turn away from the body ∆ Centered in a line to the Centerpoint of the Hips
- 5. Beginning the Floorwork Beginning the Floorwork , even for the most flexible, is never easy. For sitting positions you focus first on the sits bones and pelvic floor. These 3 points form your working base. They are your most important contact points with the floor. Essentially they are your roots reaching downward into the ground even as the trunk ( your torso ) lifts upward supporting the arms, legs and head in movement. Other positions combine similar elements but whatever the position, it is important to keep the sits bones active. In Parallel Position The length of the backs of the legs extends outward and away from the torso. Pressing down against the floor as you extend adds stability and works in opposition to the lift of the abdominals and lower back to increase the stretch. In these two positions the Buttocks Muscles, work with the Abdominals and Lower Back Muscles, to maximize the lift up from the floor. The Feet, on the other hand, are used to anchor the weight. They act as an important counterbalance, as the torso lifts, to keep the knees open dropping downward. Only as flexibility increases should a student bring the feet in closer to the hips. Some Beginners err by lifting the knees as the body rises on a breath. This causes the Thighs and the delicate muscles at the Break of the Legs to tense. The resulting irritation can become a chronic problem. Male students who tend to be tighter in the hips are more apt to suffer this painful discomfort, a very negative side effect that can be avoided. As Stomach and Lower Back muscles lift the Hips, feel the knees are heavy. Let them drop and yield to gravity’s down- ward pull even as the Sits Bones press downward to Lift . Gentle pressure down from the wrists resting on the knees may help to feel the position when it is first introduced, but should not continue in regular practice. The challenge is to correctly balance where to relax and where to use tension in both positions. With Crossed Feet With the Soles of the Feet together