SlideShare a Scribd company logo
1 of 2
Download to read offline
Centrifugal Clutch Installation
1. Set the clutch drum on the bench so the one-way
clutch side faces up (Figure 27).
2. Set the drive plate assembly into the clutch drum
so the drive plate boss sits in the one-way clutch.
Turn the drive plate assembly clockwise (Figure
28) and press it into the one-way clutch until it bot-
toms.
3. Lubricate the crankshaft, primary drive gear
bore and washer with engine oil.
4. Install the washer (Figure 26) onto the crank-
shaft.
5. Align the splines of the drive plate with those of
the crankshaft, and slide the centrifugal clutch (C,
Figure 25) onto the crankshaft. Rotate the change
clutch as necessary so the primary drive gear (B,
Figure 25) aligns with the cutout in the change
clutch (A).
6. Install the washer (B, Figure 23) onto the crank-
shaft.
NOTE
The centrifugal clutch nut has left-
hand threads.
7. Apply engine oil to the threads and flange of a
new centrifugal clutch nut, and install the nut (A,
Figure 23).
8. Hold the centrifugal clutch with the same tool
used during removal (Figure 22), and tighten the
centrifugal clutch nut to 88 N•m (65 ft.-lb.).
9. Stake the edge of the clutch nut (Figure 19) to
the notch in the crankshaft.
10. Clean the oil filter cover as described in Engine
Oil and Filter in Chapter Three.
11. Install the oil filter cover (B, Figure 20). Apply
ThreeBond 1333B to the threads of the mounting
bolts and tighten the bolts (A, Figure 20) securely.
12. Install the clutch cover as described in this
chapter.
Clutch Drum Inspection
Refer to Table 1 when inspecting the clutch drum
components. Replace parts that are out of specifica-
tion or damaged.
1. Check the one-way clutch operation by perform-
ing the following:
a. Set the clutch drum on the bench so the one-
way clutch side faces up (Figure 27).
158 CHAPTER SIX
24
25
26
27
b. Set the drive plate assembly into the clutch
drum so the drive plate boss sits in the one-
way clutch. Turn the drive plate assembly
(Figure 28) clockwise and press it into the
one-way clutch until it bottoms.
c. Hold the clutch drum and turn the drive plate
assembly. If should turn clockwise within the
clutch drum but not counterclockwise.
2. Remove the drive plate assembly from the clutch
drum.
3. Mark the one-way clutch (Figure 27) so its up
side can be identified. The one-way clutch must be
reinstalled with the same orientation during assem-
bly.
4. Remove the one-way clutch (Figure 29) from
the clutch drum. Inspect the one-way clutch for
signs of heat damage, cracks or other damage. Re-
place the one-way clutch if there is visible damage
or if it failed to operate as described in Step 1.
5. Inspect the drive plate bearing boss (A, Figure
30) for excessive wear or damage. Check for signs
of overheating.
6. Check the exterior of the clutch drum for cracks
or damage, and check the inside diameter for exces-
sive wear or damage. Measure the clutch drum in-
side diameter with a vernier caliper (Figure 31).
7. Measure the inside diameter of the clutch drum
bushing (Figure 32).
8. Check the clutch drum bushing (A, Figure 33)
for burning, scoring or other signs of damage.
9. Inspect the primary drive gear (B, Figure 33) for
broken or excessively worn teeth.
10. Measure the outside diameter of the crankshaft
at the two points shown in Figure 34.
11. Lubricate the one-way clutch and its housing in
the clutch drum with engine oil. Install the one-way
CLUTCH AND PRIMARY DRIVE GEAR 159
6
28
29
30
31
32

More Related Content

Viewers also liked

Viewers also liked (6)

Ch4 cvt continuously_variabletransmission
Ch4 cvt continuously_variabletransmissionCh4 cvt continuously_variabletransmission
Ch4 cvt continuously_variabletransmission
 
Bmw k1200 gt clutch removal
Bmw k1200 gt clutch removalBmw k1200 gt clutch removal
Bmw k1200 gt clutch removal
 
Seminar Report On Clutch Plate
Seminar Report On Clutch PlateSeminar Report On Clutch Plate
Seminar Report On Clutch Plate
 
95ZJ_21.PDF
95ZJ_21.PDF95ZJ_21.PDF
95ZJ_21.PDF
 
Clutch
ClutchClutch
Clutch
 
Clutches
ClutchesClutches
Clutches
 

Similar to 29.motorcycle sample pgs_low

Jcb ct260 tandem roller service repair manual sn 2556350 and up
Jcb ct260 tandem roller service repair manual sn 2556350 and upJcb ct260 tandem roller service repair manual sn 2556350 and up
Jcb ct260 tandem roller service repair manual sn 2556350 and upjfskekfsmemm
 
Jcb ct260 tandem roller service repair manual sn 2556350 and up
Jcb ct260 tandem roller service repair manual sn 2556350 and upJcb ct260 tandem roller service repair manual sn 2556350 and up
Jcb ct260 tandem roller service repair manual sn 2556350 and updfujsjjekme
 
Jcb ct260 tandem roller service repair manual sn 2556350 and up
Jcb ct260 tandem roller service repair manual sn 2556350 and upJcb ct260 tandem roller service repair manual sn 2556350 and up
Jcb ct260 tandem roller service repair manual sn 2556350 and upjfjkskekmmsemrt
 
Jcb ct160 tandem roller service repair manual sn 2702805 and up
Jcb ct160 tandem roller service repair manual sn 2702805 and upJcb ct160 tandem roller service repair manual sn 2702805 and up
Jcb ct160 tandem roller service repair manual sn 2702805 and updfujsjjekme
 
Jcb ct260 tandem roller service repair manual sn 2702554 and up
Jcb ct260 tandem roller service repair manual sn 2702554 and upJcb ct260 tandem roller service repair manual sn 2702554 and up
Jcb ct260 tandem roller service repair manual sn 2702554 and upjfjkskekmmsemrt
 
Jcb ct160 tandem roller service repair manual sn 2556201 and up
Jcb ct160 tandem roller service repair manual sn 2556201 and upJcb ct160 tandem roller service repair manual sn 2556201 and up
Jcb ct160 tandem roller service repair manual sn 2556201 and upfisejfjsekfksem
 
Jcb ct260 tandem roller service repair manual sn 2702554 and up
Jcb ct260 tandem roller service repair manual sn 2702554 and upJcb ct260 tandem roller service repair manual sn 2702554 and up
Jcb ct260 tandem roller service repair manual sn 2702554 and upjfskekfsmemm
 
Jcb ct160 tandem roller service repair manual sn 2702805 and up
Jcb ct160 tandem roller service repair manual sn 2702805 and upJcb ct160 tandem roller service repair manual sn 2702805 and up
Jcb ct160 tandem roller service repair manual sn 2702805 and upfisejfjsekfksem
 
Jcb ct260 tandem roller service repair manual sn 2702554 and up
Jcb ct260 tandem roller service repair manual sn 2702554 and upJcb ct260 tandem roller service repair manual sn 2702554 and up
Jcb ct260 tandem roller service repair manual sn 2702554 and upfisejfjsekfksem
 
Jcb ct160 tandem roller service repair manual sn 2702805 and up
Jcb ct160 tandem roller service repair manual sn 2702805 and upJcb ct160 tandem roller service repair manual sn 2702805 and up
Jcb ct160 tandem roller service repair manual sn 2702805 and upjfskekfsmemm
 
Jcb ct160 tandem roller service repair manual sn 2556201 and up
Jcb ct160 tandem roller service repair manual sn 2556201 and upJcb ct160 tandem roller service repair manual sn 2556201 and up
Jcb ct160 tandem roller service repair manual sn 2556201 and updfujsjjekme
 
Jcb ct260 tandem roller service repair manual sn 2556350 and up
Jcb ct260 tandem roller service repair manual sn 2556350 and upJcb ct260 tandem roller service repair manual sn 2556350 and up
Jcb ct260 tandem roller service repair manual sn 2556350 and upfisejfjsekfksem
 
Jcb ct260 tandem roller service repair manual sn 2702554 and up
Jcb ct260 tandem roller service repair manual sn 2702554 and upJcb ct260 tandem roller service repair manual sn 2702554 and up
Jcb ct260 tandem roller service repair manual sn 2702554 and updfujsjjekme
 
Jcb ct160 tandem roller service repair manual sn 2556201 and up
Jcb ct160 tandem roller service repair manual sn 2556201 and upJcb ct160 tandem roller service repair manual sn 2556201 and up
Jcb ct160 tandem roller service repair manual sn 2556201 and upjfskekfsmemm
 
Caterpillar cat 225 excavator (prefix 76 u) service repair manual (76u01200 0...
Caterpillar cat 225 excavator (prefix 76 u) service repair manual (76u01200 0...Caterpillar cat 225 excavator (prefix 76 u) service repair manual (76u01200 0...
Caterpillar cat 225 excavator (prefix 76 u) service repair manual (76u01200 0...fjjskekskem
 
Caterpillar cat 225 excavator (prefix 76 u) service repair manual (76u01200 0...
Caterpillar cat 225 excavator (prefix 76 u) service repair manual (76u01200 0...Caterpillar cat 225 excavator (prefix 76 u) service repair manual (76u01200 0...
Caterpillar cat 225 excavator (prefix 76 u) service repair manual (76u01200 0...uuudfjjdjkskem
 
Caterpillar cat 225 excavator (prefix 76 u) service repair manual (76u01200 0...
Caterpillar cat 225 excavator (prefix 76 u) service repair manual (76u01200 0...Caterpillar cat 225 excavator (prefix 76 u) service repair manual (76u01200 0...
Caterpillar cat 225 excavator (prefix 76 u) service repair manual (76u01200 0...fhshefjjskefkem
 

Similar to 29.motorcycle sample pgs_low (17)

Jcb ct260 tandem roller service repair manual sn 2556350 and up
Jcb ct260 tandem roller service repair manual sn 2556350 and upJcb ct260 tandem roller service repair manual sn 2556350 and up
Jcb ct260 tandem roller service repair manual sn 2556350 and up
 
Jcb ct260 tandem roller service repair manual sn 2556350 and up
Jcb ct260 tandem roller service repair manual sn 2556350 and upJcb ct260 tandem roller service repair manual sn 2556350 and up
Jcb ct260 tandem roller service repair manual sn 2556350 and up
 
Jcb ct260 tandem roller service repair manual sn 2556350 and up
Jcb ct260 tandem roller service repair manual sn 2556350 and upJcb ct260 tandem roller service repair manual sn 2556350 and up
Jcb ct260 tandem roller service repair manual sn 2556350 and up
 
Jcb ct160 tandem roller service repair manual sn 2702805 and up
Jcb ct160 tandem roller service repair manual sn 2702805 and upJcb ct160 tandem roller service repair manual sn 2702805 and up
Jcb ct160 tandem roller service repair manual sn 2702805 and up
 
Jcb ct260 tandem roller service repair manual sn 2702554 and up
Jcb ct260 tandem roller service repair manual sn 2702554 and upJcb ct260 tandem roller service repair manual sn 2702554 and up
Jcb ct260 tandem roller service repair manual sn 2702554 and up
 
Jcb ct160 tandem roller service repair manual sn 2556201 and up
Jcb ct160 tandem roller service repair manual sn 2556201 and upJcb ct160 tandem roller service repair manual sn 2556201 and up
Jcb ct160 tandem roller service repair manual sn 2556201 and up
 
Jcb ct260 tandem roller service repair manual sn 2702554 and up
Jcb ct260 tandem roller service repair manual sn 2702554 and upJcb ct260 tandem roller service repair manual sn 2702554 and up
Jcb ct260 tandem roller service repair manual sn 2702554 and up
 
Jcb ct160 tandem roller service repair manual sn 2702805 and up
Jcb ct160 tandem roller service repair manual sn 2702805 and upJcb ct160 tandem roller service repair manual sn 2702805 and up
Jcb ct160 tandem roller service repair manual sn 2702805 and up
 
Jcb ct260 tandem roller service repair manual sn 2702554 and up
Jcb ct260 tandem roller service repair manual sn 2702554 and upJcb ct260 tandem roller service repair manual sn 2702554 and up
Jcb ct260 tandem roller service repair manual sn 2702554 and up
 
Jcb ct160 tandem roller service repair manual sn 2702805 and up
Jcb ct160 tandem roller service repair manual sn 2702805 and upJcb ct160 tandem roller service repair manual sn 2702805 and up
Jcb ct160 tandem roller service repair manual sn 2702805 and up
 
Jcb ct160 tandem roller service repair manual sn 2556201 and up
Jcb ct160 tandem roller service repair manual sn 2556201 and upJcb ct160 tandem roller service repair manual sn 2556201 and up
Jcb ct160 tandem roller service repair manual sn 2556201 and up
 
Jcb ct260 tandem roller service repair manual sn 2556350 and up
Jcb ct260 tandem roller service repair manual sn 2556350 and upJcb ct260 tandem roller service repair manual sn 2556350 and up
Jcb ct260 tandem roller service repair manual sn 2556350 and up
 
Jcb ct260 tandem roller service repair manual sn 2702554 and up
Jcb ct260 tandem roller service repair manual sn 2702554 and upJcb ct260 tandem roller service repair manual sn 2702554 and up
Jcb ct260 tandem roller service repair manual sn 2702554 and up
 
Jcb ct160 tandem roller service repair manual sn 2556201 and up
Jcb ct160 tandem roller service repair manual sn 2556201 and upJcb ct160 tandem roller service repair manual sn 2556201 and up
Jcb ct160 tandem roller service repair manual sn 2556201 and up
 
Caterpillar cat 225 excavator (prefix 76 u) service repair manual (76u01200 0...
Caterpillar cat 225 excavator (prefix 76 u) service repair manual (76u01200 0...Caterpillar cat 225 excavator (prefix 76 u) service repair manual (76u01200 0...
Caterpillar cat 225 excavator (prefix 76 u) service repair manual (76u01200 0...
 
Caterpillar cat 225 excavator (prefix 76 u) service repair manual (76u01200 0...
Caterpillar cat 225 excavator (prefix 76 u) service repair manual (76u01200 0...Caterpillar cat 225 excavator (prefix 76 u) service repair manual (76u01200 0...
Caterpillar cat 225 excavator (prefix 76 u) service repair manual (76u01200 0...
 

More from Pablo Arevalo del Aguila (6)

Microsoft windows
Microsoft windowsMicrosoft windows
Microsoft windows
 
Fedora 18
Fedora 18Fedora 18
Fedora 18
 
Win8
Win8Win8
Win8
 
Win7
Win7Win7
Win7
 
Xp
XpXp
Xp
 
Tarea tic
Tarea ticTarea tic
Tarea tic
 

29.motorcycle sample pgs_low

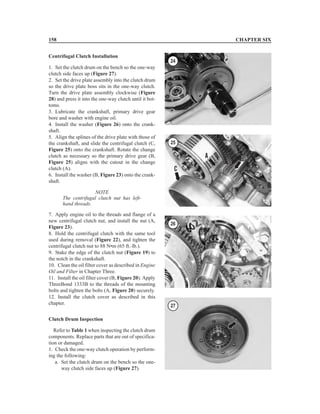
  • 1. Centrifugal Clutch Installation 1. Set the clutch drum on the bench so the one-way clutch side faces up (Figure 27). 2. Set the drive plate assembly into the clutch drum so the drive plate boss sits in the one-way clutch. Turn the drive plate assembly clockwise (Figure 28) and press it into the one-way clutch until it bot- toms. 3. Lubricate the crankshaft, primary drive gear bore and washer with engine oil. 4. Install the washer (Figure 26) onto the crank- shaft. 5. Align the splines of the drive plate with those of the crankshaft, and slide the centrifugal clutch (C, Figure 25) onto the crankshaft. Rotate the change clutch as necessary so the primary drive gear (B, Figure 25) aligns with the cutout in the change clutch (A). 6. Install the washer (B, Figure 23) onto the crank- shaft. NOTE The centrifugal clutch nut has left- hand threads. 7. Apply engine oil to the threads and flange of a new centrifugal clutch nut, and install the nut (A, Figure 23). 8. Hold the centrifugal clutch with the same tool used during removal (Figure 22), and tighten the centrifugal clutch nut to 88 N•m (65 ft.-lb.). 9. Stake the edge of the clutch nut (Figure 19) to the notch in the crankshaft. 10. Clean the oil filter cover as described in Engine Oil and Filter in Chapter Three. 11. Install the oil filter cover (B, Figure 20). Apply ThreeBond 1333B to the threads of the mounting bolts and tighten the bolts (A, Figure 20) securely. 12. Install the clutch cover as described in this chapter. Clutch Drum Inspection Refer to Table 1 when inspecting the clutch drum components. Replace parts that are out of specifica- tion or damaged. 1. Check the one-way clutch operation by perform- ing the following: a. Set the clutch drum on the bench so the one- way clutch side faces up (Figure 27). 158 CHAPTER SIX 24 25 26 27
  • 2. b. Set the drive plate assembly into the clutch drum so the drive plate boss sits in the one- way clutch. Turn the drive plate assembly (Figure 28) clockwise and press it into the one-way clutch until it bottoms. c. Hold the clutch drum and turn the drive plate assembly. If should turn clockwise within the clutch drum but not counterclockwise. 2. Remove the drive plate assembly from the clutch drum. 3. Mark the one-way clutch (Figure 27) so its up side can be identified. The one-way clutch must be reinstalled with the same orientation during assem- bly. 4. Remove the one-way clutch (Figure 29) from the clutch drum. Inspect the one-way clutch for signs of heat damage, cracks or other damage. Re- place the one-way clutch if there is visible damage or if it failed to operate as described in Step 1. 5. Inspect the drive plate bearing boss (A, Figure 30) for excessive wear or damage. Check for signs of overheating. 6. Check the exterior of the clutch drum for cracks or damage, and check the inside diameter for exces- sive wear or damage. Measure the clutch drum in- side diameter with a vernier caliper (Figure 31). 7. Measure the inside diameter of the clutch drum bushing (Figure 32). 8. Check the clutch drum bushing (A, Figure 33) for burning, scoring or other signs of damage. 9. Inspect the primary drive gear (B, Figure 33) for broken or excessively worn teeth. 10. Measure the outside diameter of the crankshaft at the two points shown in Figure 34. 11. Lubricate the one-way clutch and its housing in the clutch drum with engine oil. Install the one-way CLUTCH AND PRIMARY DRIVE GEAR 159 6 28 29 30 31 32