SlideShare a Scribd company logo
1 of 6
Download to read offline
102      Digital Flat Pattern


Introduction to Sleeves

Sleeves are both functional and design elements of a
garment. As functional elements, sleeves must allow
for freedom of movement and comfort and must
enhance the overall purpose of the garment. As design
elements, sleeves should compliment the bodice to
which they are attached.

      Sleeve Types

There are three basic types of sleeves - set in, kimono,                   Bodice with Raglan Sleeve
and raglan.
                                                                 Sleeve Cap Height
Set in sleeves are sewn to the bodice armholes. All
set in type sleeves must be eased, gathered, darted,         The form and function of set in sleeves is dependent
or tucked and sewn into the bodice armscye seam.             upon the shape and height of the sleeve cap and the
They can be fitted or flared, cut to any length, and their   style of armhole to which the sleeve is sewn. The
hemlines finished in a variety of ways.                      sleeve cap is the curved top section of the sleeve from
                                                             the front underarm to the back underarm. The sleeve
                                                             cap height is that area of the sleeve from the biceps
                                                             or underarm line to the top of the sleeve cap. The
                                                             cap height will vary with each armhole and sleeve style.
                                                             Changes in fullness of the cap seamline and cap height
                                                             will result in dramatically different sleeve styles.


               Bodice with Set In Sleeve

Kimono sleeves are cut all in one with the front and
back bodice. The kimono sleeve is always cut with a
deeper armscye than the set in sleeve. Wrinkles under
the arm are inherent to this type of sleeve because of
the extra fabric between the bodice and sleeve.                                Sleeve Cap Height

                                                                 General Principles

                                                             •   As the cap height is shortened, the sleeve will stand
                                                                 or jut away from the arm at the hemline if the
                                                                 armscye is not dropped off the shoulder tip.
                                                             •   As the cap height gets shorter, the underarm line
                                                                 must get longer in order to produce a sleeve cap
              Bodice with Kimono Sleeve                          line that can still be sewn into the bodice armscye
                                                                 with sufficient ease for comfort and movement.
Raglan sleeves have part of the sleeve attached to the       •   As the cap height is shortened, a “gusset” is formed
bodice. A diagonal seam is formed from the neckline to           at the underarm. This “gusset” is what provides the
the underarm. Underarm wrinkles are common in this               freedom of movement. It also creates folds at the
type of sleeve, as well. Extra ease is added across the          underarm that are not desirable in more tailored
chest and the armhole is lowered to increase freedom             clothing.
of movement.                                                 •   If the sleeve cap height is increased above the
                                                                 standard fitted sleeve, the cap will extend above
                                                                 the normal shoulder line.
                                                             •   Higher caps with more ease are more difficult to
                                                                 sew. They require ease stitching to mold the cap to
Chapter 5: Sleeves and Cuffs              103


    the armhole without puckering. Fabric weight and          •   Cap height for the classic sleeve should be about 5“
    stiffness will significantly influence the way a sleeve       (12.5 cm) to 6“ (15 cm).
    cap is eased into the armhole.                            •   Additional cap ease is needed to go over ball of
•   Jacket and coat sleeves are often redesigned                  the arm since the sleeve cap is high and bicep or
    to reduce ease but not restrict movement. The                 underarm line is narrower.
    shoulder line is extended past the shoulder point         •   Cap ease should be between 1 ½” (3.75 cm) to 2“
    and the shoulder slope is lengthened.                         (5 cm).

    Sleeve Styles

Set in sleeves fall into three main categories - classic,
casual, and t-shirt. The sleeve style is mainly determined
by the height of the sleeve cap.


                                                                                  Classic Sleeves


                                                              Casual Sleeve

                                                              The casual sleeve is a less tailored style. The bodice
                                                              armhole shoulder point is dropped off the shoulder one
                      Sleeve Styles                           half to one inch (1.25 to 2.5 cm). Diagonal wrinkles
                                                              will form at the armscye as a result; however, greater
Classic Sleeve                                                freedom of movement is possible. The casual styles
                                                              are a nice compromise between style and mobility and
The classic sleeve is the sleeve found in most traditional    between formal classic styles with little freedom of
tailored, fitted styles. It can be drafted with or without    movement and sloppy t-shirt styles.
an elbow fitting dart. It should be sewn to an armscye
where the shoulder point at the armscye ends at the
shoulder tip, thus the armscye is not dropped off the
shoulder. The classic sleeve is characterized by a high
sleeve cap. The higher sleeve cap is much more formal
and attractive when movement is not a priority. The
armhole depth on the bodice could be raised slightly
to provide a bit more freedom of movement without
sacrificing aesthetics. The classic sleeve is a trade off
between style and mobility.


                                                                                  Casual Bodice

                                                              •   The cap height should be about 3” (7.5 cm) to 4“
                                                                  (10 cm) with about 1“ (2.5 cm) ease.
                                                              •   The shoulder seam is lengthened one half to one
                                                                  inch (1.25 to 2.5 cm) on the bodice and the shoulder
                                                                  slope is also lengthened to raise the shoulder line
                                                                  slightly.
                                                              •   The armhole is therefore larger and the sleeve cap
                                                                  is also larger and so less ease is required in cap.

                     Classic Bodice
104       Digital Flat Pattern


                                                             •   A gusset is created at the underarm for freedom of
                                                                 movement.


                      Casual Sleeve

T-Shirt Sleeve

The t-shirt sleeve is a very casual style. The shoulder               High Sleeve Cap and Low Sleeve Cap
point on the bodice armscye is typically dropped off the
shoulder more than one inch (2.5 cm) and the armhole             Sleeve Markings
is a very shallow curve. Diagonal wrinkles will form at
the armscye as a result. Greater freedom of movement         The figure below denotes the sleeve markings that
is possible with this style though.                          will be used throughout this chapter. For the following
                                                             lessons, the front sleeve cap will always be on the right
                                                             side of the sleeve and the back sleeve cap will be on
                                                             the left side of the sleeve. The top most mid point of
                                                             the sleeve cap is the shoulder line matching point. The
                                                             biceps or underarm line is drawn from the back cap
                                                             at the underam line to the front cap at the underarm
                                                             line. The area between the biceps line and the shoulder
                                                             point is the sleeve cap. The distance is known as the
                                                             sleeve cap height.


                          T-Shirt

•     The sleeve cap height can be 0” to 2” (5 cm) with
      0” to .5” (1.25 cm) ease.
•     The shoulder line and shoulder slope are lengthened
      extensively to drop the armscye off the shoulder.
•     The sleeve cap is flat and can be sewn in before the
      underarm seam is sewn.


                                                                                 Sleeve Markings


                      T-Shirt Sleeve
116     Digital Flat Pattern


Cap Sleeve

Cap sleeves are very short sleeves with a curved
hemline. The sleeve cap seamline can extend around
part or all of the armhole seamline. The cap sleeve is a
classic sleeve with a high sleeve cap and works best in
classic armhole that is not dropped off the shoulder.

Partial Cap Sleeve

1. Choose File/Open (FO) and open the Tapered_
    Sleeve from the Patterns/Sleeves folder.
2. Choose File/Save As and save the file as Partial_
    Cap_Sleeve in the Patterns/Sleeves folder.                                  Cap Sleeve
3. Choose Line (LI) and SNAP to point 1a, the shoulder
    point of the sleeve cap (Fig. 1).
4. Hold the Control key down and drag the mouse
    down.
5. Type 5 (12.5 cm) and press the Enter key.
6. Select the line just drawn and choose Locate Points
    (LP).
7. SNAP to point 1a, the shoulder point of the sleeve
    cap (Fig. 1).
8. Enter 4 (10 cm) for the single point distance and
    press Apply (Fig 1.).
9. Choose Line (LI) and SNAP to point 2a, the bottom
    point of the line drawn down from shoulder point
    (Fig. 1).
10. Hold the Control key down and drag the mouse to
    the right past the front sleeve cap (Fig. 1).
11. CLICK to place the end point of the line (Fig. 1).              Figure 2. Intersect construction line


                                                           17. Choose Scissors (BR) and CLICK on arc 1, the lower
                                                               front sleeve cap arc (Fig. 3).
                                                           18. SNAP twice to point 1a, the front sleeve cap/line
                                                               intersection (Fig. 3).
                                                           19. Choose Scissors (BR) and CLICK on line 2, the mid
                                                               back sleeve cap line (Fig. 3).
                                                           20. SNAP twice to point 2a, the back sleeve cap/line
                                                               intersection (Fig. 3).


          Figure 1. Draw construction lines

12. Choose Intersect (IN) and CLICK on line 1 (Fig. 2).
13. CLICK on arc 2, the lower front sleeve cap arc (Fig.
    2).
14. Choose Intersect (IN) and CLICK on line 1 (Fig. 2).
15. CLICK on line 3, the mid back sleeve cap (Fig. 2).        Figure 3. Break the front and back sleeve caps
16. Choose Zoom Window (ZW) and drag a zoom
    window around the sleeve cap area.
Chapter 5: Sleeves and Cuffs               117


21. Select and delete the objects shown in Figure 4.


                                                                       Figure 7. Locate points
         Figure 4. Select and delete objects
                                                        5. Select the back underarm line and choose Locate
22. Choose Arc (AR) and SNAP to point 1a, SNAP to           Points (LP) (Fig. 7).
    point 1b, and SNAP to point 1c (Fig. 5).            6. SNAP to point 2a, enter 1 (2.5 cm) for the single
                                                            point distance and press Apply (Fig. 7).
                                                        7. Choose Zoom Window (ZW) and drag a zoom
                                                            window around the sleeve area.
                                                        8. Choose Scissors (BR) and CLICK on line 1, the front
                                                            underarm line (Fig. 8).
                                                        9. SNAP twice to point 1a to break the line (Fig. 8).
                                                        10. Choose Scissors (BR) and CLICK on line 2, the back
                                                            underarm line (Fig. 8).
                                                        11. SNAP twice to point 2a to break the line (Fig. 8).


            Figure 5. Draw hemline curve

23. Select and delete the standard point.
24. Choose File/Save (FS) to save the final pattern
    (Fig. 6).


                                                            Figure 8. Break front and back underarm lines


              Figure 6. The final pattern

Full Cap Sleeve

1. Choose File/Open (FO) and open the Tapered_
   Sleeve_Sloper from the Patterns/Sleeves folder.
2. Choose File/Save As and save the file as Full_Cap_
   Sleeve in the Patterns/Sleeves.
3. Select the front underarm line and choose Locate
   Points (LP) (Fig. 7).
4. SNAP to point 1a, enter 1 (2.5 cm) for the single
   point distance and press Apply (Fig. 7).
118     Digital Flat Pattern


12. Select and delete the objects shown in Figure 9
    including the standard points placed.


         Figure 9. Select and delete objects

13. Choose Arc (AR) and SNAP to point 1a and SNAP to
    point 1b (Fig. 10).
14. Drag the mouse to middle of the sleeve and shape
    the hemline curve as desired.
15. CLICK to place point 1c (Fig. 10).


           Figure 10. Draw hemline curve

16. Choose File/Save (FS) to save the final pattern
    (Fig. 11.)


             Figure 11. The final pattern

More Related Content

Similar to Introduction to Sleeves

Variety of Shirt Sleeves
Variety of Shirt SleevesVariety of Shirt Sleeves
Variety of Shirt SleevesIntrocanvas
 
Types of sleeves
Types of sleevesTypes of sleeves
Types of sleevessweet saran
 
terms and definitions of apparel manufacturing.pptx
terms and definitions of apparel manufacturing.pptxterms and definitions of apparel manufacturing.pptx
terms and definitions of apparel manufacturing.pptxMehbubaManir
 
Mamta Manwani. ,Fashion Design Second year Diploma Student of Dezyne E'cole C...
Mamta Manwani. ,Fashion Design Second year Diploma Student of Dezyne E'cole C...Mamta Manwani. ,Fashion Design Second year Diploma Student of Dezyne E'cole C...
Mamta Manwani. ,Fashion Design Second year Diploma Student of Dezyne E'cole C...dezyneecole
 
Fit Matters The Ultimate T-Shirt Fit Guide For Men.pptx
Fit Matters The Ultimate T-Shirt Fit Guide For Men.pptxFit Matters The Ultimate T-Shirt Fit Guide For Men.pptx
Fit Matters The Ultimate T-Shirt Fit Guide For Men.pptxbritishdsireofficial
 
Fit Matters The Ultimate T-Shirt Fit Guide For Men.pdf
Fit Matters The Ultimate T-Shirt Fit Guide For Men.pdfFit Matters The Ultimate T-Shirt Fit Guide For Men.pdf
Fit Matters The Ultimate T-Shirt Fit Guide For Men.pdfbritishdsireofficial
 
2nd yr. 4 sleeves for ladies blouse pdf.pdf
2nd yr. 4 sleeves for ladies blouse pdf.pdf2nd yr. 4 sleeves for ladies blouse pdf.pdf
2nd yr. 4 sleeves for ladies blouse pdf.pdfClarinaBergante
 
Sleeping garment
Sleeping garmentSleeping garment
Sleeping garmentRhon Rhonz
 
Latest belt styles
Latest belt stylesLatest belt styles
Latest belt stylesymeromy
 
fullness in garment ( tuck dart pleats etc)
fullness in garment ( tuck dart pleats etc)fullness in garment ( tuck dart pleats etc)
fullness in garment ( tuck dart pleats etc)Ragu Nathan
 
U 3 introduction to pattern making
U 3 introduction to pattern makingU 3 introduction to pattern making
U 3 introduction to pattern makingkibrom G
 
Types of sleeve designs in bandage dresses
Types of sleeve designs in bandage dressesTypes of sleeve designs in bandage dresses
Types of sleeve designs in bandage dressesDaniel Henny
 
Making perfect pants
Making perfect pantsMaking perfect pants
Making perfect pantsRiding Mani
 

Similar to Introduction to Sleeves (20)

Variety of Shirt Sleeves
Variety of Shirt SleevesVariety of Shirt Sleeves
Variety of Shirt Sleeves
 
Types of sleeves
Types of sleevesTypes of sleeves
Types of sleeves
 
terms and definitions of apparel manufacturing.pptx
terms and definitions of apparel manufacturing.pptxterms and definitions of apparel manufacturing.pptx
terms and definitions of apparel manufacturing.pptx
 
Mamta Manwani. ,Fashion Design Second year Diploma Student of Dezyne E'cole C...
Mamta Manwani. ,Fashion Design Second year Diploma Student of Dezyne E'cole C...Mamta Manwani. ,Fashion Design Second year Diploma Student of Dezyne E'cole C...
Mamta Manwani. ,Fashion Design Second year Diploma Student of Dezyne E'cole C...
 
Fit Matters The Ultimate T-Shirt Fit Guide For Men.pptx
Fit Matters The Ultimate T-Shirt Fit Guide For Men.pptxFit Matters The Ultimate T-Shirt Fit Guide For Men.pptx
Fit Matters The Ultimate T-Shirt Fit Guide For Men.pptx
 
Fit Matters The Ultimate T-Shirt Fit Guide For Men.pdf
Fit Matters The Ultimate T-Shirt Fit Guide For Men.pdfFit Matters The Ultimate T-Shirt Fit Guide For Men.pdf
Fit Matters The Ultimate T-Shirt Fit Guide For Men.pdf
 
2nd yr. 4 sleeves for ladies blouse pdf.pdf
2nd yr. 4 sleeves for ladies blouse pdf.pdf2nd yr. 4 sleeves for ladies blouse pdf.pdf
2nd yr. 4 sleeves for ladies blouse pdf.pdf
 
Silheuttes
SilheuttesSilheuttes
Silheuttes
 
Sleeping garment
Sleeping garmentSleeping garment
Sleeping garment
 
Dressmaking quarter 3
Dressmaking quarter 3Dressmaking quarter 3
Dressmaking quarter 3
 
Latest belt styles
Latest belt stylesLatest belt styles
Latest belt styles
 
fullness in garment ( tuck dart pleats etc)
fullness in garment ( tuck dart pleats etc)fullness in garment ( tuck dart pleats etc)
fullness in garment ( tuck dart pleats etc)
 
Yokes and Types
Yokes and TypesYokes and Types
Yokes and Types
 
Garment draping terminology
Garment draping terminologyGarment draping terminology
Garment draping terminology
 
U 3 introduction to pattern making
U 3 introduction to pattern makingU 3 introduction to pattern making
U 3 introduction to pattern making
 
Types of sleeve designs in bandage dresses
Types of sleeve designs in bandage dressesTypes of sleeve designs in bandage dresses
Types of sleeve designs in bandage dresses
 
BLOUSE.pptx
BLOUSE.pptxBLOUSE.pptx
BLOUSE.pptx
 
Types of bra
Types of braTypes of bra
Types of bra
 
Unit 1 Darts.pptx
Unit 1 Darts.pptxUnit 1 Darts.pptx
Unit 1 Darts.pptx
 
Making perfect pants
Making perfect pantsMaking perfect pants
Making perfect pants
 

Introduction to Sleeves

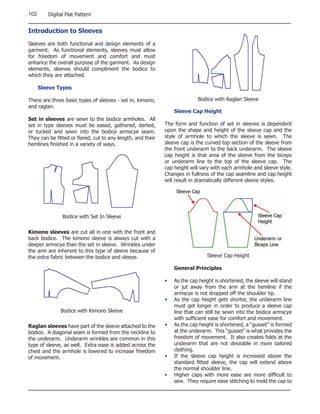
  • 1. 102 Digital Flat Pattern Introduction to Sleeves Sleeves are both functional and design elements of a garment. As functional elements, sleeves must allow for freedom of movement and comfort and must enhance the overall purpose of the garment. As design elements, sleeves should compliment the bodice to which they are attached. Sleeve Types There are three basic types of sleeves - set in, kimono, Bodice with Raglan Sleeve and raglan. Sleeve Cap Height Set in sleeves are sewn to the bodice armholes. All set in type sleeves must be eased, gathered, darted, The form and function of set in sleeves is dependent or tucked and sewn into the bodice armscye seam. upon the shape and height of the sleeve cap and the They can be fitted or flared, cut to any length, and their style of armhole to which the sleeve is sewn. The hemlines finished in a variety of ways. sleeve cap is the curved top section of the sleeve from the front underarm to the back underarm. The sleeve cap height is that area of the sleeve from the biceps or underarm line to the top of the sleeve cap. The cap height will vary with each armhole and sleeve style. Changes in fullness of the cap seamline and cap height will result in dramatically different sleeve styles. Bodice with Set In Sleeve Kimono sleeves are cut all in one with the front and back bodice. The kimono sleeve is always cut with a deeper armscye than the set in sleeve. Wrinkles under the arm are inherent to this type of sleeve because of the extra fabric between the bodice and sleeve. Sleeve Cap Height General Principles • As the cap height is shortened, the sleeve will stand or jut away from the arm at the hemline if the armscye is not dropped off the shoulder tip. • As the cap height gets shorter, the underarm line must get longer in order to produce a sleeve cap Bodice with Kimono Sleeve line that can still be sewn into the bodice armscye with sufficient ease for comfort and movement. Raglan sleeves have part of the sleeve attached to the • As the cap height is shortened, a “gusset” is formed bodice. A diagonal seam is formed from the neckline to at the underarm. This “gusset” is what provides the the underarm. Underarm wrinkles are common in this freedom of movement. It also creates folds at the type of sleeve, as well. Extra ease is added across the underarm that are not desirable in more tailored chest and the armhole is lowered to increase freedom clothing. of movement. • If the sleeve cap height is increased above the standard fitted sleeve, the cap will extend above the normal shoulder line. • Higher caps with more ease are more difficult to sew. They require ease stitching to mold the cap to
  • 2. Chapter 5: Sleeves and Cuffs 103 the armhole without puckering. Fabric weight and • Cap height for the classic sleeve should be about 5“ stiffness will significantly influence the way a sleeve (12.5 cm) to 6“ (15 cm). cap is eased into the armhole. • Additional cap ease is needed to go over ball of • Jacket and coat sleeves are often redesigned the arm since the sleeve cap is high and bicep or to reduce ease but not restrict movement. The underarm line is narrower. shoulder line is extended past the shoulder point • Cap ease should be between 1 ½” (3.75 cm) to 2“ and the shoulder slope is lengthened. (5 cm). Sleeve Styles Set in sleeves fall into three main categories - classic, casual, and t-shirt. The sleeve style is mainly determined by the height of the sleeve cap. Classic Sleeves Casual Sleeve The casual sleeve is a less tailored style. The bodice armhole shoulder point is dropped off the shoulder one Sleeve Styles half to one inch (1.25 to 2.5 cm). Diagonal wrinkles will form at the armscye as a result; however, greater Classic Sleeve freedom of movement is possible. The casual styles are a nice compromise between style and mobility and The classic sleeve is the sleeve found in most traditional between formal classic styles with little freedom of tailored, fitted styles. It can be drafted with or without movement and sloppy t-shirt styles. an elbow fitting dart. It should be sewn to an armscye where the shoulder point at the armscye ends at the shoulder tip, thus the armscye is not dropped off the shoulder. The classic sleeve is characterized by a high sleeve cap. The higher sleeve cap is much more formal and attractive when movement is not a priority. The armhole depth on the bodice could be raised slightly to provide a bit more freedom of movement without sacrificing aesthetics. The classic sleeve is a trade off between style and mobility. Casual Bodice • The cap height should be about 3” (7.5 cm) to 4“ (10 cm) with about 1“ (2.5 cm) ease. • The shoulder seam is lengthened one half to one inch (1.25 to 2.5 cm) on the bodice and the shoulder slope is also lengthened to raise the shoulder line slightly. • The armhole is therefore larger and the sleeve cap is also larger and so less ease is required in cap. Classic Bodice
  • 3. 104 Digital Flat Pattern • A gusset is created at the underarm for freedom of movement. Casual Sleeve T-Shirt Sleeve The t-shirt sleeve is a very casual style. The shoulder High Sleeve Cap and Low Sleeve Cap point on the bodice armscye is typically dropped off the shoulder more than one inch (2.5 cm) and the armhole Sleeve Markings is a very shallow curve. Diagonal wrinkles will form at the armscye as a result. Greater freedom of movement The figure below denotes the sleeve markings that is possible with this style though. will be used throughout this chapter. For the following lessons, the front sleeve cap will always be on the right side of the sleeve and the back sleeve cap will be on the left side of the sleeve. The top most mid point of the sleeve cap is the shoulder line matching point. The biceps or underarm line is drawn from the back cap at the underam line to the front cap at the underarm line. The area between the biceps line and the shoulder point is the sleeve cap. The distance is known as the sleeve cap height. T-Shirt • The sleeve cap height can be 0” to 2” (5 cm) with 0” to .5” (1.25 cm) ease. • The shoulder line and shoulder slope are lengthened extensively to drop the armscye off the shoulder. • The sleeve cap is flat and can be sewn in before the underarm seam is sewn. Sleeve Markings T-Shirt Sleeve
  • 4. 116 Digital Flat Pattern Cap Sleeve Cap sleeves are very short sleeves with a curved hemline. The sleeve cap seamline can extend around part or all of the armhole seamline. The cap sleeve is a classic sleeve with a high sleeve cap and works best in classic armhole that is not dropped off the shoulder. Partial Cap Sleeve 1. Choose File/Open (FO) and open the Tapered_ Sleeve from the Patterns/Sleeves folder. 2. Choose File/Save As and save the file as Partial_ Cap_Sleeve in the Patterns/Sleeves folder. Cap Sleeve 3. Choose Line (LI) and SNAP to point 1a, the shoulder point of the sleeve cap (Fig. 1). 4. Hold the Control key down and drag the mouse down. 5. Type 5 (12.5 cm) and press the Enter key. 6. Select the line just drawn and choose Locate Points (LP). 7. SNAP to point 1a, the shoulder point of the sleeve cap (Fig. 1). 8. Enter 4 (10 cm) for the single point distance and press Apply (Fig 1.). 9. Choose Line (LI) and SNAP to point 2a, the bottom point of the line drawn down from shoulder point (Fig. 1). 10. Hold the Control key down and drag the mouse to the right past the front sleeve cap (Fig. 1). 11. CLICK to place the end point of the line (Fig. 1). Figure 2. Intersect construction line 17. Choose Scissors (BR) and CLICK on arc 1, the lower front sleeve cap arc (Fig. 3). 18. SNAP twice to point 1a, the front sleeve cap/line intersection (Fig. 3). 19. Choose Scissors (BR) and CLICK on line 2, the mid back sleeve cap line (Fig. 3). 20. SNAP twice to point 2a, the back sleeve cap/line intersection (Fig. 3). Figure 1. Draw construction lines 12. Choose Intersect (IN) and CLICK on line 1 (Fig. 2). 13. CLICK on arc 2, the lower front sleeve cap arc (Fig. 2). 14. Choose Intersect (IN) and CLICK on line 1 (Fig. 2). 15. CLICK on line 3, the mid back sleeve cap (Fig. 2). Figure 3. Break the front and back sleeve caps 16. Choose Zoom Window (ZW) and drag a zoom window around the sleeve cap area.
  • 5. Chapter 5: Sleeves and Cuffs 117 21. Select and delete the objects shown in Figure 4. Figure 7. Locate points Figure 4. Select and delete objects 5. Select the back underarm line and choose Locate 22. Choose Arc (AR) and SNAP to point 1a, SNAP to Points (LP) (Fig. 7). point 1b, and SNAP to point 1c (Fig. 5). 6. SNAP to point 2a, enter 1 (2.5 cm) for the single point distance and press Apply (Fig. 7). 7. Choose Zoom Window (ZW) and drag a zoom window around the sleeve area. 8. Choose Scissors (BR) and CLICK on line 1, the front underarm line (Fig. 8). 9. SNAP twice to point 1a to break the line (Fig. 8). 10. Choose Scissors (BR) and CLICK on line 2, the back underarm line (Fig. 8). 11. SNAP twice to point 2a to break the line (Fig. 8). Figure 5. Draw hemline curve 23. Select and delete the standard point. 24. Choose File/Save (FS) to save the final pattern (Fig. 6). Figure 8. Break front and back underarm lines Figure 6. The final pattern Full Cap Sleeve 1. Choose File/Open (FO) and open the Tapered_ Sleeve_Sloper from the Patterns/Sleeves folder. 2. Choose File/Save As and save the file as Full_Cap_ Sleeve in the Patterns/Sleeves. 3. Select the front underarm line and choose Locate Points (LP) (Fig. 7). 4. SNAP to point 1a, enter 1 (2.5 cm) for the single point distance and press Apply (Fig. 7).
  • 6. 118 Digital Flat Pattern 12. Select and delete the objects shown in Figure 9 including the standard points placed. Figure 9. Select and delete objects 13. Choose Arc (AR) and SNAP to point 1a and SNAP to point 1b (Fig. 10). 14. Drag the mouse to middle of the sleeve and shape the hemline curve as desired. 15. CLICK to place point 1c (Fig. 10). Figure 10. Draw hemline curve 16. Choose File/Save (FS) to save the final pattern (Fig. 11.) Figure 11. The final pattern