
Recommended
More Related Content
What's hot
What's hot (20)
Similar to How to edit photos with Photoshop Elements 7
Similar to How to edit photos with Photoshop Elements 7 (20)
Recently uploaded
Recently uploaded (20)
How to edit photos with Photoshop Elements 7
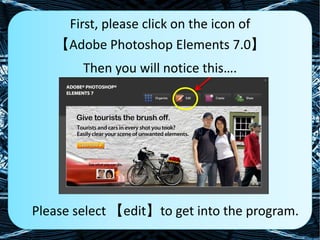
- 1. First, please click on the icon of 【Adobe Photoshop Elements 7.0】 Then you will notice this…. Please select 【edit】to get into the program.
- 2. This is what you will see once you press the button.
- 3. Press 【File】on the top of your right hand corner, then a menu will appear.
- 4. Please press 【Open】to choose the pictures that you intend to edit.
- 5. Search for and select the pictures that you want to edit, then press 【Open】
- 6. Now you can start to edit your pictures.
- 7. Now I will show you how to crop a picture. You can can crop off the parts that don’t want in a picture using the given tool.
- 8. After that, please select the area that you don’t want and click the 【tick】.
- 9. After clicking the button, you will find that your picture has been cropped.
- 10. Now, I am going to show you how to edit a picture by making a border. First, you have to select the “marquee tool”. There are two type of marquee, you can either choose rectangular marquee or elliptical marquee by right-click the tool.
- 11. Then draw a rectangular shape on the picture. (I am using rectangle as example, if you prefer elliptical you may try using it)
- 12. After that, please go to the top menu to look for 【Select – Modify – Border】, and click it.
- 13. After clicking the button, you will notice this. Please type a value for your border selection. Then click ok.
- 14. Surprisingly you will find that the line on the picture has been doubled and it looks like a border.
- 15. Now, please choose the Paint Bucket Tool. After that, we are going to choose a colour for the border.
- 16. We are going to choose the colour now. First, click the square which is filled with colour. (Remember select the second one, but not the first)
- 17. You will see this menu and you can select any colour that you prefer. After that, click ok.
- 18. After you click the ok button, please press the 【delete】key which is located on your keyboard. Then, you will notice that you transparent border has been filled with the chosen colour.
- 19. You can even create some more borders like these. You only have to repeat what you had done just now.
- 20. Besides creating a border you can add another shape on your picture. First, please select the custom shape tool.
- 21. Then, you can choose any pattern to make your picture more beautiful. You can click the arrow to view more patterns.
- 22. After that, you should choose a colour for your pattern. You can click 【More Colours】to view the other colours.
- 23. After choosing a colour, you should “draw” the chosen pattern on your picture.
- 24. After choosing a colour, you should “draw” the chosen pattern on your picture.
- 25. If you don’t like your pattern filled with colours, you can use other options, 【Style】. You can view more styles choices by clicking the arrow. Then, please select a style.
- 26. After selecting a style, you should “draw” your pattern on your picture.
- 27. You can even change the position or the angle◦ of your pattern by using 【Move Tool】.
- 28. First, select your pattern. Then, you can either adjust the angle or the location of the pattern.
- 29. Furthermore, you can use the【BrushTool】to beautify your picture.
- 30. We are required to choose a pattern as what we had done before. Of course, you can click the 【Brushes】to view the other options.
- 31. Then, you need to adjust the size of the pattern.
- 32. After that, you need to select a colour for you pattern. First, click the square which is filled with colour. (Remember select the first one, not the second)
- 33. We choose a colour and press 【OK】
- 34. Now you need to “draw” on the picture.
- 35. To perfect your picture, you can also add a text on your picture.
- 36. After that, please select a font for your text. Surely, you also can change the size of font of the words.
- 37. Then, it’s the time for us to choose the colour. As what I had shown before, you can either use the 【colour】 or 【style】
- 38. After selecting the colour, you can type the words that you want on the picture.
- 39. Lastly, I would like to remind you to save all the pictures that you have done. Press 【File – Save】
- 40. Select the location that you want to save your picture. (Remember to change the format of pictures from 【PSD to JPEG】