
Recommended
More Related Content
Viewers also liked
Similar to QUICKREFSeries2000 w links
Similar to QUICKREFSeries2000 w links (20)
QUICKREFSeries2000 w links
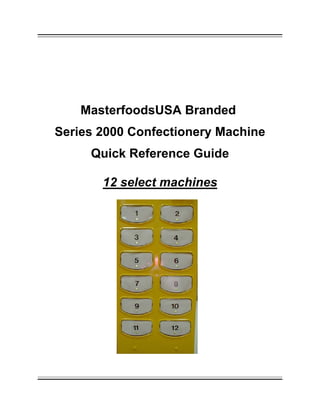
- 1. MasterfoodsUSA Branded Series 2000 Confectionery Machine Quick Reference Guide 12 select machines
- 2. 1 USING THIS GUIDE MasterfoodsUSA designed this guide to assist service personnel in initial set up, identifying, locating and correcting problems that may occur in the MasterfoodsUSA Series 2000 Branded Confectionery Machine. Use the troubleshooting section to determine the nature of the problem and the primary, and possibly secondary, module(s) that can be replaced to correct the problem. EQUIPMENT NEEDED Screwdriver (#2 Phillips) Socket Wrench (11/32" and 8MM sockets) Known Good Spare Modules Coin Changer - TRC-6512 or VN4510 – 34VDC (MDB 6-pin) Bill Validator - VN2512-U5M Control, Display & IrDA Board
- 3. 2 Table of Contents - MasterfoodsUSA Series 2000 Branded Confectionery Machine Quick Reference Guide Page Description 1 Using this Guide 3-5 Setting up of the MasterfoodsUSA Branded Vendor 3 Location of Products in the Machine (table) 5,6 Loading of Products 7 Setting Prices 8 Locations in the Machine, Contacts 9-11 Troubleshooting Guide – MasterfoodsUSA Series 2000 Branded Confectionery Machine 12,13 Troubleshooting Guide - Refrigeration 14 Quick Reference Guide - Money Handling Equipment 16 Coin Changer – VN4510 & TRC-6512 General Information, Specifications 17 General 17 Keypad Operation 17 Manual Dispense, Homing the Dispensers 18 Shifted Functions 18 Coin Teach, Coin Inhibit / Enable 19 Token Teach 20 Available Cassettes 20 Switch Settings 21 Maintenance 21 Coin Changer - VN4510 Diagnostics 22 Installation 23 Capacity 23 Switch Settings 24 Checklist 25,26 Coin Changer – TRC-6512 Maintenance 27 Features, Specifications 28,29 Option Switch Settings 30,31 Coupon Configuration 32 Mounting 32,33 Testing 33 Maintenance 34 Bill Validator - VN2512-U5M Diagnostics 35-53 Detailed Programming Instructions Configuration Set Up Set Price Machine Test STS Inquiry MIS / Errors Entry Code STS Progamming Display Programming Machine Resets Touch Memory Set Time / Shutdown By Switch Token Enabling MIS Access
- 4. 3 SETTING UP OF THE MasterfoodsUSA BRANDED VENDOR To exit any mode of the VMC (Vending Machine Control Board): Close the door. No operation for 5 minutes. Depress the mode switch, advances to next mode. Initiate a transaction. 1. After removal of the packing material, check for any visual damage. Also checking the SIDE DECALS and FRONT LEXAN for any separation, scratches and proper seating. 2. Check the plug, making sure that there are no breaks in the plug / wire. 3. Plug into wall socket. Does the display scroll the correct message (YES / NO) If yes, continue to #4, if no, refer to the troubleshooting guide, which is attached. 4. Check the STS setting. Depress the mode button four (4) times. Depressing the mode switch once from the Test Vend Mode also enters the Space to Sales Inquiry Mode. Upon entry, the words "STS INQRY" will appear on the display. Depressing a selection switch will cause the display to show that selection switch's column assignments, e.g. "COLUMN A1". If more than one column is assigned to a selection switch, then the display will rotate sequentially through all columns assigned to that column. When all columns have been displayed, the display will show "STS INQRY". If no columns are assigned to a particular selection switch, then the display will show "NO ASSIGN" for approximately two (2) seconds and two (2) audible beeps will sound. The display will then show "STS INQRY". Refer to label affixed to the inside of the inner door for correct STS configuration. To change the STS programming follow the steps listed below: Use the matrix below to document the STS before entering the programming of the machine MasterfoodsUSA BRANDED VENDOR MACHINE LAYOUT (SHOWN STANDARD FIVE COLUMN (3 BAG / 2 BAR) MACHINES) SELECTION BUTTON MODULE TYPE COLUMN(S) SELECTION BUTTON MODULE TYPE COLUMN(S) 1 BAG MODULE D1, D2, D3 2 BAG MODULE C1 3 BAG MODULE C2 4 BAG MODULE B1, B2 5 BAG MODULE C3 6 BAG MODULE B3 7 BAR MODULE A1, A2 8 BAR MODULE E1, E2 9 BAR MODULE E3 10 BAR MODULE A3 11 BAR MODULE A4 12 BAR MODULE E4 *** COLUMN (S) ASSIGNED CAN ALSO BE FOUND BY DEPRESSING THE MODE SWITCH FOUR TIMES TO SPACE TO SALES INQUIRY MODE AND THEN DEPRESSING THE SELECTION SWITCH. REFER TO OPERATION MANUAL FOR DETAILED DESCRIPTION OF OTHER FUNCTIONS. In the event that the STS configuration is not correct. STS programming is required.
- 5. 4 The Entry Code Mode is entered when the door is opened and the mode switch is depressed six (6) times. Depressing the mode switch once from the MIS Display Mode if the entry code has not previously been entered since the last door closure or service timeout also enters the Entry Code Mode. Upon entry, the words "ENTRY CODE" will appear on the display. In order to enter the Space to Sales Programming Mode or additional modes for the VMC, an entry code must be keyed in. NOTE: If the correct entry code is not keyed in, the depression of the mode switch will cause the VMC to enter the Operate Mode. The entry code is entered by depressing selection switches #3, #1, #4 and #2 in sequence, followed by a depression of the mode switch in order to proceed to the Space to Sales Programming Mode. Once the correct entry code has been keyed in, it will not need to be keyed in again unless the door has been closed or a five-minute service timeout has occurred. Depressing the mode switch once from the Entry Code Mode if the entry code procedure was completed successfully enters the Space to Sales Programming Mode. The operator can specify a preset STS setting, or he can create a totally custom configuration. It is also possible to specify a preset STS and then to modify it slightly. Note that at any time (while in the STS mode), switches 11 & 12 can be used to restore the previous STS configuration. The switch functions are given below: Selection # Description Selection # Description 1 Moves to Previous Screen 2 Moves to the Next Screen 3 Decrements the Value 4 Increments the Value 5 Moves the Cursor Left 6 Moves the Cursor Right 7 Enables / Disables 8 Enables / Disables 9 Goes to Previous Module 10 Goes to Next Module (A to B) 11 Restore 12 Restore The VMC’s Space to Sales is configured via 13 screens/lines. The 1st screen/line is used to specify if a “Custom” or “Preset” STS is used. For each selection (1 – 12), there is an additional screen/line used for setting its STS. Using Selection Switches #3 and #4 accesses the screens/lines. Once the desired screen/line is being displayed, selection switches #5 and #6 are used to move the cursor to the desired position. Once the cursor is at the desired location, selection switches #7 and #8 are used to change the setting. Note that selection switches #9 and #10, also move the cursor (multiple positions per depression). Switches #11 and #12 will restore the STS to the setting that existed before the mode was entered. NOTE: If a machine enters the Space to Sales Programming Mode and transitions through all of the columns without any selection switches being depressed, the machine will have all of its columns unassigned and will be out of order. 5. Check the label racks for product and that the compressor is cooling. 6. Check that POS and selection labels are installed correctly. 7. Set the pricing for the machine. Refer to the location's invoice for correct pricing. To set prices refer to page 7. 8. Check the coin mechanism and bill validator for acceptance, testing each selection.
- 6. 5 9. Document the total sales (AUDIT NUMBERS) by depressing the selection switches in the following order: 4,1, 3, 2 the display will show T xxx, this is the total number of vends, which is the starting number for the customer. 10. Affix bill validator label to the bill validator in the event that it is missing from the bill validator. Should you need to order, use MEI part number: 250057025 11. In the event that the location requires an Armour Bezel, use MEI part number: 250061038 12. Refer to your MasterfoodsUSA HUB Operator Technical Manual, to order additional flavor strips at no charge. NOTE: Remember to document any failures that you may encounter, however small it may appear. Loading of Products Check the machine configuration for bar and bag products before loading. All product modules should have labels indicating exactly which products must be loaded. If any are missing, please contact Mars Vending on 1-888-627-7863 and depress 1 for Customer Service. Pull each product module out such that products can be loaded into the machine. Only one product module must be loaded at a time. Refer to Figure 1. 1) Bar products, Figure 2, are loaded from one side of the product module only. 2) Bag products, Figure 3, must be loaded from each side of the product module, as the module has 2 doors for full access during loading. No gaps should be left between products. It is essential that ALL spaces be filled. Ensure that the product module door is closed after loading. Note: Bag product loading 1) Ensure that the seam is facing upwards when loaded. 2) Ensure that the product is evenly distributed in the bag. Note: Bar product loading 1) Ensure that the seam is facing upwards when loaded. 2) Ensure that the product is evenly distributed in the bar. 3) Ensure that the modules are returned to their 'home' position after loading. This can be accomplished by either depressing the door switch, located at the bottom of the inner cabinet or closing the door; at which time the display will scroll " * * * * * * * * * * ".
- 7. 6 Figure 1 : Do not remove more ------------------> than one module <--------------------------------- Figure 2: Bar Module 1) Pull module out from machine 2) Open door 3) Insert bar products, inverting 180 degrees 4) Close door 5) Push module back into machine Figure 3: Bag Module ----------------> 1) Pull module out from machine 2) Open doors 3) Insert bag products, inverting 180 degrees 4) Close door 5) Push module back into machine
- 8. 7 Setting the Prices ENTERING SET PRICE MODE The Set Price Mode is entered when the door is opened and the mode switch is depressed twice. The Set Price Mode is also entered by depressing the mode switch once from Service Mode. Upon entry, the words "Set Price" will appear on the display. SELECTION SWITCHES Depressing a selection switch once displays the present price of the selected product. Depressing the same selection switch a second time increases the price. Depressing the same selection switch a third time decreases the price. Continued depression of the same selection switch alternates between increasing and decreasing the price. A zero price enables that selection to be free vended. Whenever a product price is displayed in the Set Price Mode, the letters "Set Price" will appear in the left most character positions of the display. NOTE: one feature, with the new board, referring to Service mode selection 10. If set for Single Price, the prices for the entire machine will be that of selection #1. If set for Multiprice, each selection must be set individually. To change from Single Price to Multiprice. Close the door, depress the mode button once, display will show “SERVICE MODE” and depress selection #10 until it displays the correct information for your location. EXITING SET PRICE MODE To exit the Set Price Mode: Close the door. No operation for 5 minutes. Depress the mode switch, advances to mode #3. Initiate a transaction.
- 9. 8 Locations in the Machine Figure 4: Locations in the Mars Branded Confectionery Machine Contacts 1-888-627-7863 Press 1 for CUSTOMER SERVICE Press 2 for TECHNICAL SERVICE
- 10. 9 Troubleshooting Chart - PROBLEM POSSIBLE CAUSE CORRECTIVE ACTION Power plug on controller unplugged or loose. Check the wire connections at both ends of wire harness for good connections. Transformer assembly unplugged at cabinet. Check the wire connections (P1-1 & P1-4) for 24VAC from transformer. Check for continuity on the same wires. Fuse or circuit breaker tripped at power supply (building) outlet. Reset or replace circuit breaker / fuse. Damaged or defective power cord. Repair or replace power cord. Vendor rejects all Coins - without scrolling display Vendor unplugged or loose. Plug vendor in. Coin mechanism plug unplugged or loose. Plug coin mechanism into plug. Vend motors unassigned or vend price set for 0.00. Check for unassigned columns or defective motors by entering MODE 2 – Service Mode Check vend prices by entering MODE 3 - Set Price Mode Check vend motors by entering MODE 4 – Test Vend Mode Defective coin mechanism. Replace coin mechanism Vendor rejects all Coins - with Scrolling display Defective controller board. Replace controller board Broken or loose wire from controller to selection switch or vend motor. Check wire connections at both ends of wire harness for good connections. To check switches, enter MODE 5 - Space to Sales Inquiry and/or vend motors, enter MODE 4 – Test Vend Mode Vend prices set incorrectly. Set vend prices, using MODE 3 - Set Price Mode Selection switch defective. Replace switch. Vend motor defective. Replace vend motor. Controller board defective. Replace controller board. Vendor accepts Coins, but does not Vend on one or more selections. Coin Mechanism defective. Replace coin mechanism. Plug on controller loose or unplugged: broken wire from controller to selection switch or vend motor. Check wire connections at both ends of wire harness for good connections. To check switches, enter MODE 5 - Space to Sales Inquiry and/or vend motors, enter MODE 4 - Test Vend Displays incorrect amount deposited. Check coin mechanism configuration; using MODE 2 – Service Mode, and depressing selection switch #8. Vend prices set incorrectly. Set vend prices; using MODE 3 - Set Price Mode. Vendor accepts Coins, but does not Vend on any Selections. Controller board defective. Replace controller board. Vend prices set incorrectly. Set vend prices; using MODE 3 - Set Price Mode. Manually dispense coins By way of MODE 2- Service Mode depress selection switches 3, 4 & 5. When using, this will dispense 5¢, 10¢ and 25¢ respectively. Vendor vends Properly, but pays out wrong change or no change at all. Changer out of change, display scrolls "USE CORRECT CHANGE" Fill inventory tubes using MODE 2- Service Mode selection switch #9 and fill with changer with change. Display should read INV xx.xx. Deposit coins into changer. A broken or loose wire from controller to coin mechanism. Check wire connections at both ends of the wire harness for good connections. Repair or replace. Coin mechanism defective. Repair or replace coin mechanism. Vendor vends Properly, but pays out wrong change or no change at all. Controller board defective. Replace controller board. Product loaded wrong. Load product properly. Product dispensed incorrectly. By way of MODE 5 - STS Inquiry Mode, check for accuracy Selection switch wires crossed or vend mechanism plugs crossed. Check by way of MODE 4 - Test Vend Mode and/or MODE 5 - STS Inquiry Mode. Plug vend mechanisms in correctly if crossed. Product does not Match selection pushed. Controller board defective. Replace controller board.
- 11. 10 PROBLEM POSSIBLE CAUSE CORRECTIVE ACTION Vend switch defective or out of adjustment vend motor defective. Re-adjust or replace switch or motor. Vend prices set at 0.00. By way of MODE 3 - Set Price Mode, set vend prices correctly. Vend switch defective or out of adjustment. Readjust or replace switch. Defective optics circuitry. Check the wire connection at both ends of wire harness for good connections (JP13). Repair or replace optics circuitry. Vendor free vends. Controller board defective. Replace controller board. Door switch defective, broken or loose wire to controller board (JP5). Check wire and switch for continuity at both ends of wires for good connections (JP5). Cannot enter Service mode. Controller board defective. Replace controller board. Coin mechanism out of change. Fill inventory tubes using MODE 2- Service Mode selection switch #9 and fill with change. Display should read INV xx.xx deposit coins into changer. Bill validator defective. Replace bill validator. Check MDB harness for continuity (JP7) Repair or replace. Check coin mechanism interface. Using MODE 2 - Service Mode, depress selection switch #8. Bill Validator does not accept bills Displays "USE CORRECT CHANGE" Coin mechanism defective. Repair or replace coin mechanism. Coin mechanism out of change. Fill inventory tubes using MODE 2- Service Mode selection switch #9 and fill with change. Displays should read INV xx.xx. Deposit coins through changer. No power to bill validator. Replace bill validator. Check MDB harnesses (JP7 ) Repair or replace. Coin mechanism defective. Repair or replace coin mechanism. Controller board defective. Replace controller board. Defective bill validator harness. Plug in or replace. Bill Validator does not accept bills Defective bill validator. Replace bill validator. Broken or loose connector from the controller to the display board. Check connections at both ends for good connections or replace. Display board defective. Replace display board. No scrolling display but vendor operates properly. Controller board defective. Replace controller board. Product blocking optics circuitry. Open outer door and remove product. Close door. Optics harness defective. Check for continuity from optics boards to the controller in machine Optics board(s) out of alignment. Align and secure optics board(s). Optics board(s) defective EMITTER (left) board. Replace optics board(s). To isolate, jumper between the two outer pins of the JP13 connector (OPTICS CONNECTION) depress the door switch and observe the display. If it scrolls the correct message, the issue is with the optics board / harnessing. If it continues to scroll "OUT OF ORDER" the problem is with the VMC. Displays "OUT OF ORDER" on scrolling display. Controller board defective. Replace controller board. Check MDB harness Check for continuity Coin Changer defective Replace coin changer Displays "OUT OF ORDER" “NO CASH” on scrolling display. Control Board defective Replace Control board Product blocking optics circuitry. Open outer door and remove product. Close door. Optics harness defective. Check for continuity from optics boards to the controller in machine Optics board(s) out of alignment. Align and secure optics board(s). Optics board(s) defective DETECTOR (right) board. Replace optics board(s). Display reads "PLEASE REMOVE YOUR PRODUCT" but does not deliver product Controller board defective. Replace controller board.
- 12. 11 Refrigeration Troubleshooting Guide Problem Possible Cause Corrective Action No power to vendor Check power supply; also check service cord connections. Thermostat open (temperature control) Check thermostat (Apply insulated jumper across terminals, if compressor starts, replace thermostat) Refrigeration unit will not run at all Temperature control bulb out of position Check that bulb is in air flow Compressor will not start Overload Protector inoperative Check overload (apply insulated jumper across terminal, if compressor starts, replace overload) Check to make sure that compressor is plugged in Plug in if unpluggedCompressor will not start, condenser fan motor running, unit cool (no power to compressor) If plugged in, check for power to junction box Check for power, if no power then check for open contacts Starting relay or capacitor inoperative Check relay or capacitor replaceCompressor will not start, condenser fan motor running - unit hot (power to compressor) Compressor inoperative Disconnect power to vendor, remove all leads from compressor, and check continuity from “common”, “start” and “run” to compressor case. If continuity shows, replace compressor. Also check from “common to start”. (using continuity or IHMS.) If meter fails to show reading replace compressor. Will not cycle Check overload and contact, replace overload if necessary Thermostat inoperative Check thermostat clean contacts with approved electrical cleaner. Replace thermostat if necessary Compressor starts but does not run Compressor motor problem Check, replace Loss of refrigerant Replace refrigeration unit (Note: Any work of this nature done without express permission from The Vendo Company can void refrigeration unit warranty) Compressor runs but cabinet temperature warm Condenser fan not working Check circuit to run motor. Replace motor. Check for obstruction of fan blade. Blocked or dirty condenser (refer to initial installation in the service manual) Check condenser vanes for obstruction, lint or dirt. Clean, also check for proper airflow through refrigeration area. Evaporator fan not working Check circuit to fan motor. Replace motor also check for obstruction of fan blade Bad inner door seal Check for moisture on seal. Adjust inner door as necessary (see initial set-up section of service manual). Replace door seal. Compressor runs but cabinet temperature warm Thermostat set too high Adjust thermostat (see initial set up section of service manual) Compressor runs continuously Thermostat inoperative Check thermostat Evaporator frosted over Water at base of evaporator unit Check for proper drainage (such as plugged drain, kinks in drain tube, etc.) check door seal
- 13. 12 Problem Possible Cause Corrective Action Temperature setting too low Adjust temperature setting in electronic controller Thermostat inoperative (compressor runs continuously) Check thermostat replace if necessary Product freezing up, too cold Thermostat feeler bulb out of position Adjust feeler bulb (see initial set up section of manual) Fan blade bent or hitting shroud Straighten, relocate shroud position, or remove shroud. Fan motor noisy Replace if necessary Excessive noise Refrigeration base loose or bent Tighten bolt or replace if necessary Both compressor and condenser fan motors will not operate Bad refrigeration control relay Test relay using relay test function of the electronic controller. Replace relay if necessary. Both compressor and condenser fan motors will not operate Bad wiring connection at refrigeration control relay Check wiring connections. Make corrections if necessary.
- 14. 13 Coin Changer – VN4510 & TRC6512 Bill Validator - VN2512-U5M Quick Reference Guide
- 15. 14 THIS PAGE INTENTIONALLY LEFT BLANK
- 16. 15 Coin Changers - General Information Acceptance of nickels, dimes and quarters with dollar coin accept/reject switch. The changer is preset to accept both US dollar coins. High or low quarter level. - The level of quarter storage in the coin tube is switch- selectable. Escrow - Dependent by the Vending Machine Controller (VMC) of the MasterfoodsUSA Series 2000 Branded Confectionery Machine. Fewest coin payout - Coins of the highest denomination are selected for change, by the VMC of the MasterfoodsUSA Series 2000 Branded Confectionery Machine, enabling the changer to pay out the coins. Price setting - Dependent on the VMC of the MasterfoodsUSA Series 2000 Branded Confectionery Machine. Minimal moving parts for coin acceptance and separation - Valid coins enter the changer through a solenoid-operated Accept Gate. If the coin tube for the accepted coin is full, the coin goes directly to the cash box. If the coin tube is empty, a solenoid-operated Separator Gate diverts the coin to the tube. Dollar coins, if accepted, are always directed to the cash box. Individual coin tube overflow - Electronic sensors monitor the full/empty status of the coin tubes. Each tube is monitored individually to maximize coins available for change. Easy cleaning and maintenance - No special tools are required for cleaning, or normal field maintenance of the changers. VN4510 TRC6512 Power /Interface 34VDC / MDB 34VDC / MDB UL Listing File # E57869 File # E57869 Physical Characteristics Height:370 mm (14.67") base to top of coin return lever Width: 136 mm (5.35") Depth: 76 mm (2.99") Weight: 2.6 kg (5 lbs. 12 ozs.) in shipping container
- 17. 16 VN4510 - General When coins are inserted into the Series 4000 changer, they pass two electronic sensors that measure coin diameter, material and thickness. These measurements are sent to the microprocessor where they are compared with predetermined coin acceptance parameters. If the coin measurements are outside the parameters, the accept gate remains closed and the coin is rejected. If the measurements are within the parameters, the coin is accepted. The accept gate opens and the coin travels past the strobe sensor which signals the central processor to transmit the credit to the Vending Machine Controller (VMC). At this point the coin enters the separator. The separator will route the coin to the proper coin tube or the cashbox, depending on the level of coins in that particular tube. Along with the credit, the changer transmits other information to the VMC as well. Once a vend has been completed, the VMC must calculate the change due back to the customer and transmit that amount to the changer. The changer then pays back coins from the change tubes, if required. Keypad Operation The keypad (Figure 5) is made up of four blue buttons (labelled A, B, C, and D) and one yellow button (mode). The keypad has several functions and will be discussed here. Manual Dispense: Blue buttons correspond to the letters on the top of the tubes. Momentary press of button releases one coin. Press and hold button will pay out coins continuously. Press and hold button for 3+ seconds then release will latch the dispenser; coins will continuously dispense until the tube is near empty or another button is pressed. Homing the Dispensers: Press the Mode (yellow) button twice with the cassette fitted or not fitted. Without the cassette fitted, press A, B, C, or D Figure 5: VN4510 Keypad
- 18. 17 Shifted Functions (using the yellow Mode button) NOTE: The shifted mode must be entered by pressing the yellow Button for two seconds. Observe that the red LED will begin to flash. Once in the shifted mode, if no further button is pressed, the shifted mode will 'time-out' in 15 seconds and the changer will return to the normal mode. Any special function mode is exited automatically if no button is pressed or coin inserted for 45 seconds. If this happens, any changes will be abandoned. Float Up* Press the mode button until the LED starts to flash, then press A. Insert tube coins through the validator. Coins will be routed to the tubes but not reported to the vending machine. Full levels are: 5¢ = 70 10¢ = 102 25¢ = 70 (If dip switch 3 is 'on', 25¢ stops at the low sensor) $1 = 54 (If dip switch 2 is 'on', $1 stops at the low sensor) Press mode or A to exit float mode. Coin Teach (Figure 6) In the unlikely event that changer will need to have the coin parameters re-taught, follow these steps to quickly re-teach only the coin(s) that need calibration. Choose the coin you wish to re-calibrate and follow button sequence from the table at right. (Remember to hold the mode button for 2 seconds). Insert 20 examples of required coin into the acceptor (the coins will be rejected). NOTE: Be careful to insert the relevant coin. The 21st coin will be accepted and the LED will stop flashing. Changer returns to the normal mode. Repeat the process for other coins (if required). Figure 6: Coin Teach Sequence
- 19. 18 Coin Inhibit / Enable This feature allows the user to inhibit (or re-enable) a particular coin. Select the coin you wish to Inhibit / Enable from table (above). Use the same button sequence for the desired coin (as you would to teach). By pressing the coin return lever, you toggle the inhibit status. For example, by pressing MODE, C, B you enter the 10¢ teach function. If the 10c coin is currently enabled to accept, then pressing the return lever will inhibit the coin. Or.... If the 10¢ coin is currently inhibited, then pressing the return lever will enable the coin. NOTE: There is NO visual feedback as to whether coin is enabled or inhibited. Token Teach – VN4510 To teach the tokens into the free vend channels use the following instructions. Token #1 1) Press Mode (Yellow button for two seconds) 2) Press B button 3) Press A button 4) Drop 20 token samples (they reject and LED stops flashing for each sample) 5) 21st token sample accepts and routes to cash box and changer returns to normal operating mode. Token #2 1) Press Mode (Yellow button for two seconds) 2) Press B button 3) Press B button 4) Drop 20 token samples (they reject and LED stops flashing for each sample) 5) 21st token sample accepts and routes to cash box and changer returns to normal operating mode. To inhibit the token: 1) Press Mode (Yellow button for two seconds) 2) Press B button 3) Press A button (for Token #1) or B button (for Token #2) 4) Press reject lever down The inhibit feature does not erase the window; it merely inhibits the window. To re-enable the token, repeat the inhibit process. Figure 7: VN4510 Keypad
- 20. 19 AVAILABLE CASSETTES - VN4510: Tube Position Description Entry Code A B C D MEI P/N TC16 DDD 10 5 10 10 198130016 TC15 DAA 10 5 25 $1 198132015 TC14 DAB 5 5 10 $1 198134014 TC13 DAC 10 5 $1 $1 198136013 TC12 DAD 5 5 25 5 198138012 TC11 DBA 10 25 25 5 198130011 TC10 DBB 5 25 25 $1 198132010 TC9 DBC 5 25 $1 $1 198137009 TC8 DBD 5 25 25 25 198139008 TC7 DCA 5 5 $1 $1 198131007 TC6 DCB 5 5 25 25 198133006 TC5 DCC 5 5 10 25 198135005 TC4 DCD 5 5 5 $1 198137004 TC3 DDA 10 5 10 5 198139003 TC2 DDB 5 5 25 $1 198131002 TC1 DDC 10 25 10 5 198133001 Switch Settings – VN4510 The VN4510 Series are shipped with all the option switches in the OFF position. Default operation is as follows: Accepts $1.00 coin. $1.00 Coin tube to fill to upper level. 25¢ coin to fill to upper level. Switch Condition Description ON Accept $1 coin.1 OFF Reject $1 coin. ON $1 coins fill to low coin level and then are stored in cashbox. 2 OFF $1 coins fill to upper coin level and then are stored in cashbox. ON 25¢ coins fill to low coin level and then are stored in cashbox. 3 OFF 25¢ coins fill to upper coin level and then are stored in cashbox. ON4 - 7 OFF UNUSED ON Option switch settings are in use.8 OFF Option switch settings are ignored. Factory default settings are enabled if all (1-8) switches are in the "off" position (see default explanation above).
- 21. 20 Maintenance For trouble free operation, develop a routine maintenance schedule and periodically clean the acceptor in the areas shown on right. You can clean the Coin Changer while it is still mounted in the machine. 1. Remove power from the Coin Changer. 2. Open the acceptor lid as shown (Figure 8). (Lid will stay in the open position) 3. Use a damp cloth with a mild detergent to clean the Groove, Coin ramp and Lid areas indicated. 4. Ensure that accept gate area (below the lid when closed) is clear and not jammed with debris. 5. Close the lid 6. Turn "on" power and test. Diagnostics Status LED The LED, located on the keypad, provides an indication of the coin changer status and provides assistance in diagnosing the condition of the Series 4510. Note any problems that occur when the LED pulses one or more flashes, followed by a pause, and then repeats. The following is a description of the LED codes, their meanings, and suggested remedial actions. Signal Meaning Solution LED ON Indicates that the changer is enabled and ready to operate. No action necessary. LED OFF Indicates that no power has been applied to the changer or the vendor has an error. Check to ensure that power is applied. Check that the vendor is in proper working order and prices are set. 1 Flash Indicates that the changer requires cleaning. Deposit coins (slugs ran through unit), or reteach the changer. 2 Flashes Changer senses an error in the accept gate area Usually an obstruction of the strobe sensor. 3 Flashes Changer senses an error in the separator. This error occurs when one of the "top of tube" sensors remains covered for an extended period of time. 4 Flashes Changer senses an error in the dispenser area. This error occurs when the dispenser is not completing full dispense cycles. A jammed or bent coin could be the cause. 5 Flashes Changer has sensed water damage. Unit may have shut down. Unit may require extensive cleaning. Return unit for service. Continuous Flash Remove unit and return for service. Replace the unit. Figure 8: Cleaning Locations
- 22. 21 Installation TRC-6512 To install the TRC-6512 changer in a vending machine, follow the step-by-step instructions provided below. For more detailed instructions, refer to the Installation Guide shipped with the changer. Lower the Acceptor Gate Assembly by depressing both spring clips. Hinge the Acceptor forward. (Figure 9) Set the three option switches using a retractable ballpoint pen or small screwdriver. Do not use graphite pencil point. The option switches are located under the flap of the Control Board Assembly. Set the vend prices on the vending machine; refer to page 7 of this manual for the exact procedure. Figure 9:Lowering the Acceptor Assembly Install the changer in the vending machine. Adjust the vendor mounting screws to stand off a minimum of 1/8". Align the changer access holes in the changer with the mounting screws. Tighten all screws to secure the changer in place. Changer must be vertical within +/- 3º. Remove fuse from control board assembly and connect changer by connecting the changer power plug to the power source. Position or clamp the Main Harness clear of the Coin Cup, Coin Return Lever and Lock. Reapply the fuse. Press the Acceptor/Gate Assembly back into the housing until the spring clips engage. Fill the coin tubes to the desired levels by inserting coin into the loading slots located on the coin tube front. (Figure 10) Or by manually depositing coins through the top of the changer; refer to page 19 as to this option. Refer to table on following page for minimum coin tube levels. Figure 10: Manually filling the Coin Tubes
- 23. 22 Capacity TRC-6512 The change tubes should be checked each time the machine is filled and change added as per the instructions below. The TRC-6512 coin mechanism is the market leader. The capacity in the change tubes is broken down as follows: Value Minimum Maximum Nickels 6-8 66-67 Dimes 7-8 98-99 Quarters – w/option switch ON 6-9 68-69 Quarters – w/option switch OFF 6-9 6-9 TRC-6512 Coin Tube Levels Figure 11: TRC-6512 Option Switches Switch Setting Function 1 Quarter tube level ON OFF Stores 6 quarters for change Stores 69 quarters for change 2.Dollar Coin Acceptance ON OFF Enables dollar coin acceptance - if programmed Disables dollar coin acceptance 3 Security Option ON OFF Maximum Security Maximum Acceptance TRC-6512 Option Switches
- 24. 23 Filling the coins tubes using the MasterfoodsUSA Series 2000 Branded Confectionery Machine The Service Mode is entered when the door is opened and the mode switch is depressed once. If there are no bad motors upon entering the Service Mode, the word "Service" will appear on the display. If there are any bad motors upon entering the Service Mode, the display will continuously display all of the bad motors by column number for approximately two seconds before proceeding to the next. (e.g.: If A1 is bad, then the display will read "Bad Column A1".) Depression of selection #9 will cause the display ("INVXX.XX") to show the last known value of the coin mech tube inventory. Depositing coins will increase the value and dispensing of coins will decrease the value. Checklist Check that: Changer is flush against the vender wall. Coin insert chute is aligned above the center of the coin cup. Changer reject and cash box chutes are aligned with vender reject and cash box chutes. Vender coin return should fully depress changer coin return lever but not touch when in standby condition. Check changer operation: Test each dispense line through the service mode of the control board in sequence for 1 to 2 seconds. Enter service mode by depressing mode switch once; display will show "Service". Depress selection switches 3, 4 and 5 to dispense nickels, dimes and quarters from the changer; or switches on the front of the changer. Make sure a vend price is set. Do a test vend, by inserting more than the vend price. Make sure that the proper change is paid back, and that there are sufficient coins in the coin tubes to make proper change. Replace dispensed coins in tubes. Refer to this document for operation of set price mode. Check escrow return by inserting coins of various denominations to within 5¢ or more of vend price. Request escrow return by depressing the return button.
- 25. 24 Routine Maintenance - Coin Changer - TRC-6512 Periodic routine maintenance improves the performance and extends the optimum working life of the changer. It can also reduce the need for more costly repair or replacement measures. Frequency of routine maintenance will depend on environment and number of transactions. Cleaning Before cleaning, turn machine power off and unplug changer. The TRC-6512 should be cleaned only with a warm water and mild detergent solution. Caution Remove power to the MBD Interface by removing the fuse. Supplies power to the control board Never immerse the changer in water. Do not use solvents, steel wool, scouring pads, or metal brushes for cleaning. Do not spray the changer with any types of lubricant. Since all coins roll down a common coin ramp, heavy use can result in dirt build up. To clean the Acceptor and coin ramp: Swing the Acceptor lid diagonally upward and to the right (Figure 12). Hold the lid firmly so that it does not snap back down. Wipe the exposed coin ramp and inner surface of the lid with a damp cloth. For problem cleaning, dampen the cloth with water and mild, non-abrasive soap. Figure 12: Cleaning the Acceptor Coin Ramp
- 26. 25 To clean the Dispenser Slides, detach the Bottom Plate by removing the seven Phillips head screws - one screw on each side (A), one recessed screw on the back (B), and four screws on the bottom of the changer (C) (Figure 13). Lift out the Bottom Plate and individual slides. Clean them with a mild soap solution. Do not spray with any type of lubricant. Once the slides are clean, set them on the Bottom Plate with the numbered sides facing up into the changer. Align plunger tabs with the bolts in each side and seat the Bottom Plate. Insert opposite screw (C) first to hold the slides in place. Install the remaining screws. Figure 13: Clearing the Dispenser Slides Clearing Coin Jams If coins jam in the cash box chute, dislodge them via the access holes at the rear of the Dispenser Assembly.
- 27. 26 Bill Validator - VN2512-U5M Features Easy access to entire bill path with unit installed in machine High acceptance of US currency Returned or rejected bills held in bill acceptor mouth until removed by customer Coupon configuration for easy option programming Sealed optical sensors to enhance security and reduce effects of vandalism Status LED on back of unit to indicate current state of operation Designed for ease of maintenance Specifications Power The VN2512-U5M is a 24V unit. Power ratings for the units are: 34 VDC, 1.0 Amp Normal, 3.2 Amp Peak UL Listing The VN2512-U5M is listed under UL File # E57869 Factory Configuration The VN2512-U5M Bill Acceptor is factory configured with all switches in the OFF position. The following configuration is programmed: Two directions for bill acceptance High security $1 bill enable only 1 pulse per dollar Short Pulse Timing enabled (30 ms on/ 50 ms off) Note: all VN2512-U5M Bill Acceptors manufactured prior to week 8 of 1997 will have a Factory Configuration of $1, $2, and $5 Bills. The unit will default to these selections whenever all option switches are OFF. Placing any switch ON will override the factory settings and the bill acceptor will operate according to the switch settings you choose. The VN2512-U5M can be reprogrammed using a coupon with a different configuration; the new configuration will be the default. If any option switch is turned ON, the option switch settings will override the coupon setting. The new coupon configuration will remain in memory.
- 28. 27 Option Switch Setting The VN2512-U5M allows configuration of interface options through option switch selection. The option switches are located on the right-hand side of the bill acceptor (see option switch label on following page). The next page described how each of the option switches work. Option Switches Figure 14: Location of option switches on VN2512-U5M bill validator
- 29. 28 VN2512-U5M Switch Settings Switches 1 and 2 Action Factory Default Switch 1 Switch 2 ON OFF 1 way bill acceptance OFF ON 2 way bill acceptance ON ON 4 way bill acceptance X Switch 3* ON High security X OFF High acceptance Switch 4 ON Accept $1 bills X OFF Reject $1 bills Switch 5 ON Accept $2 bills OFF Reject $2 bills Switch 6 ON Accept $5 bills OFF Reject $5 bills Switches 7 and 8 ** Switch 7 Switch 8 ON OFF Short pulse - 30ms ON / 50ms OFF timing X OFF OFF Long pulse - 35ms ON / 300ms OFF timing OFF ON Credit line - single 150 ms pulse * Switch 3 affects all denominations. See Coupon Configuration on the next page for individual acceptance/security enabling options. Serial and MDB are auto selected at power-up and ignore option switches 7 and 8. Figure 15: VN2512-U5M Switch Setting Label
- 30. 29 Coupon Configuration The VN2512-U5M may be configured using a coupon (Figure 16). The coupon is included in the VN2512-U5M Installation Guide. Carefully cut the coupon along the dotted-line edge to remove it from the installation guide. Copies of the original coupon may be produced with a standard, carbon-based, non-color copier. Cut copies to match the size of the original coupon. All option switches must be in the OFF position for the coupon selections to be active. The coupon selection will remain with the VN2512-U5M until the unit is reprogrammed, even if power is removed. When filling out the coupon, note the following: Use only a #2 pencil to fill in the blocks Fill in the entire block Do not mark the coupon outside the blocks or on the back of the coupon Fill in ONE block for EVERY line Figure 16: VN2512-U5M Coupon (for demonstration only)
- 31. 30 Configuring with the Coupon (VN2512-U5M) 1. Fill out the coupon using the table below (Refer to Figure 16 for a sample coupon). Section 1: # of Bill Directions One- and two-direction are face up only. Four-direction acceptance is available to maximize bill handling. Section 2: Denomination Selection Select ONE of the following for each bill denomination: High Accept enhances acceptance Parameters for the particular denomination. High Security enhances security parameters for the particular denomination. OFF rejects all inserted notes for the particular denomination. Section 3: Pulse The selection made in this section determines pulse timing. Short is 30 ms ON / 50 ms OFF (use on the MasterfoodsUSA Series 2000 Branded Confectionery Machine) Long (disregard) Credit Line (disregard) Section 4: Pulses per Dollar Select one pulse per dollar. Section 5: Bezel Lights Select ON or Flashing for the bezel lights (downward arrows). 2. Locate the service button on the back of the unit (refer to Figure 17). 3. Press the button once to enter the coupon set-up mode. Pressing again will exit the mode. The unit will automatically exit coupon set-up mode upon acceptance of the coupon configuration. The LED Status indicator (located to the left of the service button) will flash rapidly indicating that the unit is in coupon set-up mode. 4. Insert the coupon marked-side up. The VN2512-U5M will pull the coupon in, read it, and then return it to the user. A good coupon will be returned immediately. After the coupon is pulled from the bill acceptor mouth, the unit will flash the Status LED ten times to confirm a good configuration. A bad coupon will be held for ten seconds before being returned. This delay is to make you aware that there is a problem with the coupon. When the coupon is pulled from the bill acceptor mouth, the unit will flash the Status LED the number of times corresponding to the section of the coupon wherein a problem lies. For example, if the problem is in section five, the LED will flash five times. Section numbers are located to the far right of each section on the coupon. 5. If the configuration is rejected, check the coupon and repeat the process.
- 32. 31 Figure 17 Location of Service button on VN2512-U5M MOUNTING The Series VN2512-U5M has been designed for ease of mounting onto existing studs provided by Vendo. The Series VN2512-U5M has a tie-wrap included with each unit to secure its interface harness to the mounting area of the machine. Use the tie-wrap for every installation. 1. Disconnect all power to the machine. 2. Connect the interface harnesses from the machine to the unit. 3. Wrap the tie-wrap around the interface harness. 4. Mount the tie-wrap to the stud. 5. Secure the unit to the mounting studs with the appropriate hardware (See Figure 18). TESTING 1. Remove power to the control board by removing the fuse. Connect bill validator and changer to the control board and reapply the fuse at that time power will be applied to the MDB connections. 2. Check the ARROWS on the front of the VN2512-U5M, they should be FLASHING or on SOLID. 3. Insert a bill to check acceptance. If enabled, the bill should be accepted. 4. Make a vend to ensure proper credit is received, 1.00 is displayed on the MasterfoodsUSA Series 2000 Branded Confectionery Machine and proper change is paid out for the bill.
- 33. 32 Figure 18: Mounting the Bill Validator Routine Maintenance – Bill Validator - VN2512-U5M You can clean the bill acceptor while it is still mounted in the machine (refer to Figure 19 below). 1. Power is removed from the validator by removing the fuse. 2. Unlatch the magazine by pushing the blue latch (located on the top of the unit) toward the front of the unit. 3. Unhook and remove the magazine by holding the latch and lifting up and then back on the magazine. 4. Unlatch the LED Housing by lifting up on the metal bar (located below the Status LED). 5. Remove the LED Housing by holding the metal bar and pulling back on the LED Housing. 6. Clean the bill path with a soft cloth. You may use mild, non-abrasive, non-petroleum based cleaners if sprayed on the cloth.
- 34. 33 Figure 19: Assemblies of the VN2512-U5M Use 1 thru 3 described above for removing bills from the bill validator. Diagnostics - Status LED A Status LED provides assistance in diagnosing the condition of the VN2512-U5M. The following is a description of the LED codes, their meanings, and suggested remedial actions. Signal Meaning Solution LED ON Indicates that the unit is enabled and ready to accept a bill. No action necessary. LED OFF Indicates that no power has been applied to the unit. Check to ensure that power is applied. 1 Flash Indicates that something is obstructing the bill path. Remove the magazine and LED housing; inspect for foreign material. 2 Flashes Indicates that the unit is not enabled. Verify configuration. Check the coin tube levels in the coin changer. Check the option switches in the coin changer. Note: This machine disables the bill acceptor
- 35. 34 if the machine is out of product. 3 Flashes Indicates that the bill path needs cleaning for optimum performance. Remove the magazine and LED housing and follow cleaning instructions to clean the bill path. 4 Flashes Indicates that something is obstructing the bill path. Remove the LED housing and look at the bill path on the housing and inside the unit for foreign material; clean as necessary. 5 Flashes Indicates that the magazine is removed (the unit will not accept without the magazine attached). Reinstall the magazine. Continuous Slow Unit is defective. Replace the unit. Continuous Fast The magazine is full of money. Remove the money from the magazine.
- 36. 35 Detailed operation of the VMC used on the MasterfoodUSA Series 2000 Branded Vendor start from this page forward: ENTERING THE SERVICE MODE The Service Mode is entered when the door is opened and the mode switch is pressed once. If the door is already open, then pressing the mode switch once from the Operate Mode enters the Service Mode. Upon entering the Service Mode, the display will show "Setup/Tube Ctl” (the 1st service mode). CONFIGURATION SETUP & TUBE CONTROL (MODE 2) This service mode is used to: configure the machine dispense coins display unassigned columns select the type of coin mech used display the coin tube inventory choice between single / multiprice option setup the Overpay feature setup the Mystery Vend feature Each of the first 12 selection switches performs one of the functions. SWITCH #1, CASH HANDLING Depressing the selection switch #1 will display the present mode of cash handling. Continued depressions of the switch, toggles between the different types of cash handling. CASH HANDLING MODE DESCRIPTION Force Vend (DEFAULT) No escrow return unless a selected product is sold out. Force Bill/Coin If a bill is stacked or a non-tubed coin is accepted, then a selection must be made. Change Machine Bills are always stacked. Escrow Return always returns the credit. Neutral Except for the first bill is held in escrow, the mode is the same as “Change Machine” No Change Change is never paid out. The machine operates with a bill acceptor only or with a tubeless mech. SWITCH #2, CHANGE HANDLING Depressing the selection switch #2 will display the present mode of Change Handling (Multi/Normal Vend). Continued depressions of the switch, toggles between the different types of change handling. CHANGE HANDLING MODE DESCRIPTION Normal Vend (DEFAULT) Change is paid out after the VMC detects the delivery of product. Multivend If the remaining credit (after a vend) is >= to min. vend price, then the credit will not automatically be returned at the end of the vend. A customer can add additional credit, buy another product, or retrieve the credit. The credit is returned after 20 sec.
- 37. 36 SWITCHES #3 - #6, COIN DISPENSE The VMC recognizes the selection switches #3 - #6 as dispense switches for a 3 or 4 tube MDB coin mech. SWITCH DESCRIPTION 3 Dispenses coins from the tube associated with the 1st /lowest value coin (typically nickels in the USA) 4 Dispenses coins from the tube associated with the 2nd coin (typically dimes in the USA) 5 Dispenses coins from the tube associated with the 3rd coin (typically quarters in the USA) 6 Dispenses coins from the tube associated with the 4th /highest value tubed coin (typically dollars in the USA) If the tube inventory mode is activated (via switch #9), these switches are still active. If an Executive mech is selected, then these switches have no function. SWITCH #7, DISPLAY OF UNASSIGNED COLUMNS Depressing selection switch #7 will cause the display to show the unassigned columns (e.g. “Column A1”) – displaying each for approx. 2 seconds. When all columns have been displayed, the display will show "Setup/Tube Ctl” (just as if the mode switch was just pressed for the 1st service mode). If there are no unassigned columns, then the display will show “No Unassigned” for approx. 2 seconds, and then it will exit the mode as mentioned above. If the VMC is in a machine with an old door, it will not display the following columns (A5, A6, B5, B6, C4, C5, C6, D5, D6, E5, and E6 (719 models only)) SWITCH #8, COIN MECH SPECIFICATION Depressing the selection switch #8 will display the present type of Executive Coin Mech, which is specified for the machine. Continued depressions of the switch, toggles between the two different types of mechs. DISPLAYED MODE DESCRIPTION Executive Specifies an executive mech, where the prices are stored in the VMC. Executive PH PD Specifies an executive mech with PH (Price Holding) and PD (Price Display). With this type of mech, the prices are held in the coin mech. NOTE: If an MDB mech is connected to the VMC, switch #8 can still be used to specify a type of Executive mech, but the setting will have no effect on the performance of the machine. Also, that it is critical to have the coin mech and the VMC set to the same configuration (either both in the normal mode or both in the Price Holding/Price Display mode (Executive Interface changers only)).
- 38. 37 SWITCH #9, COIN TUBE INVENTORY DISPLAY Depressing selection switch #9 will cause the display to show the last known value of the coin mech tube inventory (“Inv xxx.xx”). Depositing coins will increase the value and dispensing coins will decrease the value. This status is only available with MDB coin mechs (when an Executive mech is attached, the display will show “Inv 0.00”). NOTE: to advance this procedure, fill the coin tubes (all three) above the highest sensor. Deposit one of each coin. It will be routed to the cash box, but the VMMC will be reporting that the coin changer is full of coins. SWITCH #10, SINGLE/MULTI PRICE SELECTION Depressing the selection switch #10 will display the present configuration of the machine (single vs. multi price). Continued depressions of the switch, toggles between the two different modes. DISPLAYED MODE DESCRIPTION Single Price (DEFAULT) All items are sold at the price assigned to selection #1. Note the prices of selections-#2 – #12 are not cleared or reset to the price of selection #1. Multi Price All items are sold at the prices specified for each selection. SWITCH #11, INC/DEC THE OVERPAY VALUE When switch #11 is first pressed, the machine will display: DISPLAYED MODE DESCRIPTION Overpay x.xx where x is the max overpay amount While the above message is displayed, depressing selection switch #11 will increase the amount of overpay. Depressing the switch a second time will decrease the amount (similar to the manner in which prices are set). SWITCH #12, MYSTERY FEATURE Depressing the selection switch #12 will display the present configuration of the machine (Mystery Feature Off vs. On). Continued depressions of the switch, toggles between the two different modes. DISPLAYED MODE DESCRIPTION Mystery Feature On The motor associated with Selection #12, will be randomly selecting from #12’s STS setting. Mystery Feature Off There’s no special processing for Selection #12.
- 39. 38 SET PRICE (MODE 3) Upon entry into the Set Price Mode, the words "Set Price" will appear on the display. Depressing a selection switch once displays the present price of the selected product. Depressing the same selection switch a second time increases the price in base unit increments at the rate of approximately one base unit every half second for 5 seconds. After 5 seconds, the rate changes to one base unit every twentieth of a second. Depressing the same selection switch a third time decreases the price in base unit decrements at the rate of approximately one base unit every half second for 5 seconds. After 5 seconds, the rate changes to one base unit every twentieth of a second. Continued depressing of the same selection switch alternates between incrementing and decrementing the price. NOTE: with the new board, refer to Service mode selection 10. If set for Single Price, the entire machines prices will be that of selection #1. If set for Multiprice, each selection must be set individually. To change from Single Price to Multiprice just depress selection #10 until it displays the correct information for your location. MACHINE TEST (MODE 4) The Machine Test mode, has the following tests: DISPLAYED MODE DESCRIPTION Test Vend (motor selectable) Allows the operator to select a motor to be run. Vend Detect Beam Test Allows the operator to align the vend detect beam (alarm sounds when the beam is misalign). Selection Switch & LED Test Turns all LED’s to green. While a selection switch is pressed, its LED is turned red, the Exact Change LED is turned red, and the display shows the number of the switch. Touch Interface Test Sends a test pattern to a Touch chip, and verifies that it was written correctly. DEX Interface Test Sends a string out the DEX port and verifies that it is echoed back (requires a loop around plug). Exec/IrDA Interface Test Transfers strings of data between the Executive port and the IrDA interface. Verifies both ports (requires a loop around device). Auto Motor Scan Test Runs all of the motors in order (A1, A2….). Reports errors and allows the operator to skip over bad motors. By running the above tests, and by operating the following features during the normal operation of the machine, the VMC and the machine's electronics should be fully tested. MDB Interface Escrow Return Motor Door Switch Mode Switch Escrow Return Switch
- 40. 39 When the mode is first entered via the mode switch (or after one of the test has completed), the display will show “Machine Test”. While in this state, selection switches 1 – 9, will transition the machine into one of the 7 tests. TEST VEND/MOTOR While the machine is displaying “Machine Test” or any of the other tests are active (except for Switch Test), hitting switches 1, 2 or 3 will display “Test Column A1” and the machine will enter the “Test Motor” mode. Once in this mode, switch 3 will run the motor displayed, switch 1 increments the letter (e.g. “A1” is changed to “B1”), and switch 2 increments the number (e.g. “B1” is changed to “B2”). The letters wrap at “E”, while the numbers wrap at “6”. The VMC will attempt to run a motor, even if it is not at the home position, or it has been found to be bad. Possible messages during the Test Vend / Motor Test are: DISPLAYED MODE DESCRIPTION A1 Running After switch 3 if pressed, indicates that the motor is running. A1 Under Current Indicates that the motor failed due to Low Current or no motor is connected. A1 High Current Indicates that a high level of current was detected. A1 Stuck Home Indicates that the motor never left home. A1 Time Out Indicates that the motor timed out – it never reached home. The mode is exited by hitting the mode switch, switches 11 or 12. TEST VEND DETECT BEAM While the machine is displaying “Machine Test” or any of the other tests are active (except for Switch Test); hitting selection switch #4 will display “Vend Detect Test”. Hitting switch #4 a second time will activate the “Vend Detect Test” mode. While the mode is active, the alarm will sound when the beam is broken or not properly aligned (Beam Error will also be displayed). Possible messages during the beam test are: DISPLAYED MODE DESCRIPTION Beam OK Message when switch 4 is hit and the beam is good. Beam Error Message when switch 4 is hit and the beam is bad The mode is exited by hitting the mode switch, switches 11 or 12, or hitting one of the switches associated with the other tests. Selection # Description Selection # Description 1 Test motor, inc. Letter 2 Test motor, inc. number 3 Test Vend - Run motor 4 Activate Beam Test 5 Activate Switch/LED Test 6 Activate Touch Test 7 Activate DEX Test 8 Activate Exec/IrDA Test 9 Motor Scan Start/Cont. 10 Motor Scan Skip/Cont. 11 Stop Test 12 Stop Test
- 41. 40 TEST SWITCHES/LEDS While the machine is displaying “Machine Test” or any of the other tests are active, hitting selection switch #5 will display “Switch Test”. Hitting switch #5 a second time will activate the “Switch Test” mode. While the mode is active, the display will indicate when a switch is closed (plus the LED associated with the switch will turn red and the Exact Change LED will turn red). Possible messages during the switch test are: DISPLAYED MODE DESCRIPTION Switch Test The “Switch Test” mode is active, but no switches are being pressed. Switch 1 A selection switch (e.g. 1) is hit. Beyond the “1” being displayed, the LED associated with switch 1 goes from green to red (plus the Exact Change LED also goes from green to red while any switch is pressed). The mode is exited by hitting the mode switch (goes to the next service mode), or by not hitting any switch for 5 seconds (auto transfers the machine back into the state where the display shows “Switch Test”. TEST TOUCH INTERFACE While the machine is displaying “Machine Test” or any of the other tests are active (except for Switch Test); hitting selection switch #6 will display “Touch Test”. Hitting switch #6 a second time will activate the “Touch Test” mode. While the mode is active, the VMC will wait for a touch chip to be inserted into the adapter. Once the chip is inserted, the VMC will verify that the chip does not contain information. If the chip is available, the VMC will write a test pattern to the chip and then it will verify that the information was written correctly. Possible messages during the test touch interface are: DISPLAYED MODE DESCRIPTION Touch Test Message when switch 6 is first pressed (while waiting for a touch chip) Touch Test Passed Message when the Touch test passes Touch Test Failed Message when the Touch test fails The mode is exited by hitting the mode switch, switches 11 or 12, or hitting one of the switches associated with the other tests. At which time the display returns to “Machine Test”. DEX/UCS TEST While the machine is displaying “Machine Test” or any of the other tests are active (except for Switch Test); hitting selection switch #7 will display “DEX/UCS Test”. Hitting switch #7 a second time will activate the “DEX/UCS Test” mode. While the mode is active, the VMC will transmit a test pattern out the DEX/UCS port and verify that the same pattern is received by the port (a loop back cable is required to perform the test).
- 42. 41 Possible messages during the DEX/UCS test are: DISPLAYED MODE DESCRIPTION DEX/UCS Test Message when switch 7 is first pressed Insert Loop Back Message when the VMC is waiting for the loop back to be connected. DEX/UCS Test Passed Message when the DEX/UCS test passes DEX/UCS Test Failed Message when the DEX/UCS test fails (or no shorting jack was connected) The mode is exited by hitting the mode switch, switches 11 or 12, or hitting one of the switches associated with the other tests. At which time the display returns to “Machine Test”. EXECUTIVE & IrDA TEST While the machine is displaying “Machine Test” or any of the other tests are active (except for Switch Test); hitting selection switch #8 will display “IrDA Test”. Hitting switch #8 a second time will activate the “IrDA Test” mode. While the mode is active, the VMC will transmit a test pattern out the Executive port and verify that the IrDA port receives the same pattern. It will then transmit a test pattern out the IrDA port and verify that the same pattern is received by the Executive port (a loop back device is required to perform the test). Possible messages during the Executive & IrDA Test are: DISPLAYED MODE DESCRIPTION Beam OK Message when the transmission is good in both directions. Beam Error Message when their transmission is broken. When the transmission is failing the beeper will also sound. The mode is exited by hitting the mode switch, switches 11 or 12, or hitting one of the switches associated with the other tests. At which time the display returns to “Machine Test”. MOTOR SCAN While the machine is displaying “Machine Test” or any of the other tests are active (except for Switch Test); hitting selection switch #9 will display “Motor Scan Test”. Hitting switch #9 a second time will activate the “Motor Scan” mode. While the mode is active, the VMC will run each motor - starting with A1, A2…and ending with E5, E6. The VMC will attempt to run all motors, regardless if they’ve previously been marked as bad or good. Any motor that runs successfully will be marked as being good. When a motor fault occurs (e.g. over current detected, motor never gets off home, etc.), the motor is marked as bad, the problem will be displayed, the beeper will beep 3 times, and the scan will stop. The operator can hit switch 9 again to retest the same motor, or he can hit switch 10 to skip the faulty motor and to continue the test with the next motor.
- 43. 42 Possible messages during the Motor Scan test are: DISPLAYED MODE DESCRIPTION A1 Running Indicates that motor A1 is running. A1 OK Indicates that the motor ran successfully A1 Under Current Indicates that the motor failed due to Low Current (or the motor does not exist). A1 High Current Indicates that a high level of current was detected. A1 Stuck Home Indicates that the motor never left home. A1 Time Out Indicates that the motor timed out – it never reached home. The mode is exited by hitting the mode switch, switches 11 or 12, or hitting one of the switches associated with the other tests. At which time the display returns to “Machine Test”. STOP TEST IN PROCESS Selection switches 11 & 12 will stop all tests and put the machine back into the state where the display shows “Machine Test”. Note that during some tests (e.g. a motor running during Motor Scan), it is necessary to hold the switch down until the motor stops. SPACE TO SALES INQUIRY (MODE 5) The Space to Sales Inquiry Mode is entered when the door is opened and the mode switch is depressed four times. Upon entering the Space To Sales Inquiry Mode, the display will show "STS Inquiry". Depressing a selection switch will cause the display to show that selection switch's column assignments, i.e. "COLUMN A1". If there is only one column assigned to a particular selection switch, then that column will be displayed for approximately two (2) seconds and then the display will show "STS Inquiry". If more than one column is assigned to a selection switch, then the display will rotate sequentially through all the columns assigned at a rate of approximately two (2) seconds per column. When all columns have been displayed, the display will show "STS Inquiry". If no columns are assigned to a particular selection switch, then the display will show "NO Assigned" for approximately two (2) seconds and two (2) audible beeps will sound. The display will then go back to the "STS Inquiry" mode. DISPLAYING MIS/ERROR INFORMATION (MODE 6) The Display MIS/Error/History Mode is entered when the door is opened and the mode switch is depressed five times. Upon entering the mode, the display will show "MIS Display". Depressing a selection switch will cause the following: Selection # Description Selection # Description 1 Dec through Reset. MIS 2 Inc through Reset. MIS 3 Dec through Hist. MIS 4 Inc through Hist. MIS 5 Dec through Event log 6 Inc through Event log 7 Dec through Error log 8 Inc through Error log 9 Cycles through Reset type 10 Displays time/Performs Reset 11 N/A 12 N/A
- 44. 43 MIS DISPLAY Switches 1, 2, 3, and 4 are used to view the MIS information. See Appendix for the information displayed. The information is displayed in the DEX/UCS format (see the following examples). VA103 0 .... CA302 0.00 ... PA102-12 0 (where the “–12” indicates selection 12) EVENT HISTORY DISPLAY Switches 5 and 6 are used to view the Sold out, Door History, and Exact Change history. Switch #10 is used to display the time/date when the event occurred (the time/date is displayed until another switch depression). Door History is not reset; what’s always displayed is the last time the door was opened and the previous time. The “Sold Out” and “Exact Change” events can be reset. If there have not been any events since the last reset, none will be displayed. If there has been more than one event since the last reset (e.g. the machine has gone into the Exact Change state twice), the last occurrence will be logged (although the “Total Duration of Exact Change” is the total of all time the machine has been in the Exact Change condition since the last reset). NOTE: that the door has to be closed for 30 seconds before, an additional event is logged. Sold outs are displayed as: Sold Out Sel x x = the # of the sold out selection Door history is displayed as: Door Opened Last When the door was last opened. Door Opened Prev When the door was previously opened. The Exact Change information is displayed as: Exact Change Det Indicates that the machine was in the Exact Change State When switch #10 is pressed, the time date is displayed as: Where hh:mm is the time when the event occurred. Where dd/mm/yy is the date when the event occurred. hh:mm dd/mm/yy dd Where dd is the duration in hours, for Exact Change. Hitting switch #10 again, goes back to displaying the event.
- 45. 44 ERROR LOG DISPLAY Switches 7 and 8 are used to view the error log. Switch #10 is used to display the time/date when the event occurred (the time/date is displayed until another switch depression). The error log can store 20 events (the last event to occur is the 1st displayed). If the log is empty (due to a reset), “No Errors” is displayed. The possible error messages are: DISPLAYS DEFINITION Coin Mech When an MDB coin mech has reported an error Bill Acceptor When an MDB bill acceptor has reported an error Card Reader When an MDB reader has reported an error Selection xx When selection switch “xx” (01 – 12) is bad (e.g. switch is closed for > 30 sec) Motor xx When motor “xx” (A1 – E6) is assigned via STS, but is bad Door Opened When the door has been left opened > 60min Touch When there’s a problem with Touch DEX When there’s a problem with DEX IrDA When there’s a problem with IrDA Fraud Detect When a fraud attempt has been detected (e.g. reported by a card reader, etc.) Chute Fraud When a fraud at the chute has been detected Bill Fraud When a bill acceptor fraud has been detected (e.g. bill pull) Battery When the RAM is corrupted due to the battery SW Mismatch When the SW rev’s mismatch (uP and Flash) When switch #10 is pressed, the time date is displayed as: DISPLAYS DEFINITION Where hh:mm is the time when the event occurred.hh:mm dd/mm/yy Where dd/mm/yy is the date when the event occurred. Hitting switch #10 again displays the error. RESETTING THE MIS/HISTORY/ERROR LOGS Switch #9 cycles through the different types of resets: DISPLAYS DEFINITION Reset MIS Resets Interval/Resetable fields Reset Event Log Resets the Event History log (Sold Out and Exact Chg. events) Reset Error Resets the Errors on the VMC Switch #10 performs the reset (the switch must be held for 2 seconds). The beeper will sound once the reset has completed. Note that errors are not auto cleared from the log (e.g. if an error associated with switch #4 has been posted, it will not automatically be removed when switch #4 is repaired). ENTRY CODE/PASSWORD (MODE 7) The Entry Code Mode is entered when the door is opened and the mode switch is depressed six times. Upon entering the Entry Code Mode, the display will show "Entry Code". In order to enter the STS Programming mode or the modes above (modes 8 – 14), an entry code must be keyed in. If the correct entry code is not keyed in, then a depression of the mode switch will cause the system to enter the Operate mode. The entry code is entered by depressing selection switches #3, #1, #4, and #2, in sequence, followed by a depression of the mode switch in order to proceed to the Space to Sales Programming mode. Once the correct entry code has been keyed in, it will not need to be keyed in again unless the door is has been closed or a five minute service time out has occurred.
- 46. 45 SPACE TO SALES (STS) PROGRAMMING (MODE 8) The STS programming mode is entered when the door is opened and the mode switch is depressed seven times; or once from the Entry Code Mode. Upon entering the mode, the display will show "STS Programming". The operator can specify a preset STS setting, or he can create a totally custom configuration. It is also possible to specify a preset STS and then to modify it slightly. Note that at any time (while in the STS mode), switches 11 & 12 can be used to restore the previous STS configuration. The switch functions are given below: Selection # Description Selection # Description 1 Moves to Previous Screen 2 Moves to the Next Screen 3 Decrements the Value 4 Increments the Value 5 Moves the Cursor Left 6 Moves the Cursor Right 7 Enables / Disables 8 Enables / Disables 9 Goes to Previous Module 10 Goes to Next Module (A to B) 11 Restore 12 Restore The VMC’s Space to Sales is configured via 13 screens/lines. The 1st screen/line is used to specify if a “Custom” or “Preset” STS is used. For each selection (1 – 12), there is an additional screen/line used for setting its STS. Using Selection Switches #3 and #4 accesses the screens/lines. Once the desired screen/line is being displayed, selection switches #5 and #6 are used to move the cursor to the desired position. Once the cursor is at the desired location, selection switches #7 and #8 are used to change the setting. Note that selection switches #9 and #10, also move the cursor (multiple positions per depression). Switches #11 and #12 will restore the STS to the setting that existed before the mode was entered. SELECTING A PREPROGRAMMED STS SETTING With the display showing “STS Programming” (via the mode switch), depressing selection switch #4 will move control to the 1st screen/line: Preset STS Setting x (the cursor will be at the “x” location) The “x” can be either a: C Indicates that the STS configuration is presently custom 1-9 Indicates that the STS config. is one of the presets (1-9) With this screen, the operator can specify if he wants a custom STS or one of the preset STS configurations. Via switches #7 and #8, changing the “x” to 1 – 9, will select one of the preset STS settings (see Appendix for the preset STS configurations). If the mode is exited after the “x” is changed, then the STS configuration will correspond to the entered numerical value. If the operator changes the setting to a number and then proceeds to the next screen/line, it is possible to modify one of the preset settings. If a person does modify a preset setting, the 1st line will show a “C” (since it is a custom setting – even if it a variation of a preset setting).
- 47. 46 CUSTOM SPACE TO SALES PROGRAMMING With machine at the 1st screen/line (Preset STS Setting “x”), depressing selection switch #4 will move the control to the 2nd screen/line. Examples of the line are shown below: DISPLAYS DEFINITION SEL01 A……B…… Indicates that Selection 1 is not assigned to motors A1 – A6 or B1 – B6 SEL01 A..34..B1….. Indicates that Selection 1 is assigned to motors A3, A4, and B1. SEL01 A……B123456 Indicates that Selection 1 is assigned to motors B1 – B6. For the screens/lines associated with the individual selections (as shown above), when a number appears (as opposed to a “.”), it indicates that the corresponding motor is assigned to the selection. So when the display shows “B..34..” it indicates that motors B3 and B4 are assigned to the displayed selection (motors B1, B2, B5, and B6 are not assigned to the selection). SELECTING THE DIFFERENT SCREENS The operator can use selection switch #3 and #4 to access the other 12 screens (for viewing and setting the STS for each of the 12 selections). DISPLAYS DEFINITION Preset STS Setting C 1st screen SEL01 A12….B…… 2nd screen (sets the STS, Sel #1) SEL02 A…..B1….. 3rd screen (sets the STS, Sel #2) SEL03 A……B..34.. 4th screen (sets the STS, Sel #3) ….. ….. SEL12 A……B…… 13th screen (STS, Sel #12) VIEWING ALL OF THE MOTOR ASSIGNMENTS Due to size of the display, only a portion of the information can be seen at a time (an example of the complete information is shown below). SELxx A......B..3... The operator can use selection switch #5 and #6 to move the cursor one position at a time. Switches #9 and #10 move the cursor to the next module (e.g. A to B, or C to D). When the cursor reaches the end of the screen/line (e.g. it’s at the “6” for “A……B….56”), on the next switch depression, the screen shifts the modules (see the following examples). If the screen shows (cursor at the last position): A......B12.... After Switch #6 is hit, six times (cursor to the right), the screen will show: B12....C...... If the screen shows (cursor at 2nd position): C..34..D1..... After Switch #5 is hit, six times (cursor to the left), the screen will show: B12....C..34.. If the screen shows (cursor at the “3” position): C..34..D1..... After Switch #10 is hit (moves to the module on the left), the screen will show: D1.....E....56
- 48. 47 ASSIGNING A MOTOR TO A SELECTION The operator can assign a motor to a selection by changing the appropriate “.” to a number (1-6). A motor can be unassigned by changing the appropriate number (1-6) to a “.” (see the following example): Assuming that the screen shows the following setting and the operator wants to assign motor C1 to the selection and unassign D1 C..34..D1..... TO ENABLE: The operator would 1st change the “.” to a “1” (via switch #7 or #8) C1.34..D1..... The operator would then move the cursor to the D1 position (via switch #6) C1.34..D1..... TO DISABLE: The operator would then change the “1” to a “.” (via switch #7 or #8) C1.34..D...... DISPLAY PROGRAMMING (MODE 9) The Display Programming Mode is entered when the door is opened and the mode switch is depressed eight times, or twice from Entry Code Mode. Upon entering the mode, the display will show "Display Programming". Depressing a selection switch will cause the following: Switch #1 selects between the standard English messages and the alternate (programmable/loadable) messages. Note that the alternate messages are loaded via DEX (see appendix D). Switch #2 copies the English messages into the alternate message area. Note, this switch must be pressed twice (within 3 seconds) for the action to occur. The display will show “English to Alt”, in between the 2 switch depressions. Switches 3 – 10 are used to change the alternate messages. Switches #11 and #12 are used to control the information displayed to the user. Switch #11 cycles through 5 different parameters, while switch #12 cycles through the options associated with the parameters. The parameters and their options are below: Append the Block Time to the User Message INFORMATION DISPLAY MEANING Blocker Time NONE/12H/24H (no, 12 or 24 hour format) Append Time to the User Message INFORMATION DISPLAY MEANING Display Time NONE/12H/24H (no, 12 or 24 hour format) Append Reason to the Out of Order Message INFORMATION DISPLAY MEANING Display Fault ON/OFF Display Fault Yes or No Display Exact Change State (Append message, etc.) INFORMATION DISPLAY MEANING Exact Chg OFF/SOME/FULL No/Some/Full Flash LED’s if a Product is Discounted INFORMATION DISPLAY MEANING Flash Discount ON/OFF Flash Discount Yes or No
- 49. 48 After a machine reset, continuos depressions of switch #11 would display: Blocker Time 24H Display Time No Display Fault Yes Exact Chg Some Flash Discount Yes Blocker Time 24H ...... MACHINE RESETS (MODE 10) The VMC allows 4 types of Machine Resets (beyond the MIS interval reset, the error log reset, and the history event log reset). Configuration Reset Total Machine Reset MIS Historical Reset Time Percentage Reset The Machine Reset mode is entered when the door is opened and the mode switch is depressed nine times. Upon entering the mode, the display will show "Machine Reset". The switch functions (for the 20-character display) are given below: Selection # Description Selection # Description 1 N/A 2 N/A 3 Moves to Previous Menu 4 Moves to the Next Menu 5 N/A 6 N/A 7 Decrements the Value 8 Increments the Value 9 Executes Reset 10 Executes Reset 11 N/A 12 N/A CONFIGURATION RESET Once the display shows “Machine Resets” hitting selection switch #4 will move control to the next menu level, where the machine will display: Config Reset N Hitting selection switch #7 or #8 will change the “N” to a “Y”. Once the display shows: Config Reset Y hitting switches #9 or #10 will cause the machine’s configuration to be reset to the default values. TOTAL MACHINE RESET Once the display shows “Machine Resets”, hitting selection switch #4 (move to the next menu) twice or switch #3 (move to the previous menu) 3 times, will move control to the menu level, where the machine will display: Total Mach Reset N Hitting selection switch #7 or #8 will change the “N” to a “Y”. Once the display shows: Total Mach Reset Y hitting switches #9 or #10 will cause a total machine reset. The following items will be reset: Credit Machine’s configuration MIS – Resetable data MIS – Historical data Error Logs History Logs Messages (Language will be set to English) Old/New Door Support (auto detection of machine type)
- 50. 49 It is recommended, that a “Total Machine Reset” be performed, whenever a board is installed into a machine or there is a major software upgrade. MIS HISTORICAL RESET Once the display shows “Machine Resets”, hitting selection switch #4 (move to the next menu) 3 times or switch #3 (move to the previous menu) twice, will move control to the menu level, where the machine will display: MIS Historical Reset N Hitting selection switch #7 or #8 will change the “N” to a “Y”. Once the display shows: MIS Historical Reset Y hitting switches #9 or #10 will cause the Historical MIS information to be reset. TIME PERCENTAGE RESET Once the display shows “Machine Resets”, hitting selection switch #4 (move to the next menu) 4 times or switch #3 (move to the previous menu) once, will move control to the menu level, where the machine will display: Time % Reset N Hitting selection switch #7 or #8 will change the “N” to a “Y”. Once the display shows: Time % Reset Y hitting switches #9 or #10 will cause the Historical MIS information to be reset. Performing this function, will reset the 12 fields (one per selection), which provide the percentage of time, that a product has been available. TOUCH UP/DOWN LOAD (MODE 11) The Touch Up/Down Load mode is entered when the door is opened and the mode switch is depressed ten times. Upon entering the mode, the display will show "Touch Memory". The switch functions are given below: Selection # Description Selection # Description 1 Displays Touch Memory 2 N/A 3 Moves to Previous Menu 4 Moves to the Next Menu 5 N/A 6 N/A 7 N/A 8 N/A 9 Executes Up/Down Load 10 Executes Up/Down Load 11 N/A 12 N/A With “Touch Memory” displayed, hitting selection switch #3 or #4 (one or more times) will move control to the next menus: DISPLAYS DEFINITION TMU to Ctrl Config Downloads the Config info to the VMC TMU to Ctrl MSG Downloads the Messages to the VMC Ctrl to TMU Config Uploads the Config info to the TMU from the VMC Ctrl to TMU Msg. Uploads the Messages to the TMU from the VMC Ctrl to TMU MIS Uploads the MIS information to the TMU With any of the above messages on the display, hitting switches #9 or #10, will begin the execution of the selected Up/Download. Once one of the data transfers has been initiated, the operator must place a TMU (Touch Memory Unit) into the TMU socket. The unit must be held in the socket until the VMC displays “Transmission Done”.
- 51. 50 Possible messages during the Touch mode are: DISPLAYS DEFINITION Waiting for TMU Indicates the VMC is waiting for the operator to attach the TMU. Upload in Progress Indicates data is transferring to the TMU. Download in Progress Indicates data is transferring to the VMC. Transmission Done Indicates that the data transfer has been completed – the TMU can be removed. TMU Mismatch Indicates that a specific download has been specified, but the TMU contains a different type of data. Transmission Failed Indicates that the transmission failed. Note, that if a touch chip is connected while the machine’s door is opened and the machine is in the operate mode (i.e. the mode switch has not been pressed), the VMC will automatically do a MIS dump to the chip. SET TIME FUNCTIONS (MODE 12) The Time Function programming mode is entered when the door is opened and the mode switch is depressed eleven times. Upon entering the mode, the display will show "Time Programming". In this mode, the operator can: Set the Machine’s Time (2 screens/lines used for setup) Set Blocker 0 - 9 (for setup: 5 lines on 2nd gen., 7 lines on 1st gen.) Set the Discount (for setup: 6 lines on 2nd gen., 8 lines on 1st gen.) Note that at any time (while in the Time Programming mode), switches 11 & 12 can be used to restore the previous configuration. The switch functions (for the 20-character display) are given below: Selection # Description Selection # Description 1 Move to Pre Top Menu 2 Move to Next Top Menu 3 Moves to Pre Sub Menu 4 Moves to the Next Sub Menu 5 Moves the Cursor Left 6 Moves the Cursor Right 7 Decrements the Value 8 Increments the Value 9 Move to Pre Top Menu 10 Move to Pre Top Menu 11 Restore 12 Restore ACCESSING THE DIFFERENT SCREENS & FIELDS The VMC’s time related settings are configured via 12 Top menus/lines and 59 sub menus/lines. Selection Switches #1 and #2 access the top menus/lines, while using Selection Switches #3 and #4 accesses the sub menus/lines. Once the desired menu/line is being displayed, selection switches #5 and #6 are used to move the cursor to the desired position. Once the cursor is at the desired location, selection switches #7 and #8 are used to change the setting. The top menus/lines and sub menus are listed below: Set Date/Time Set Date Set Time Set DST (daylight savings time) Set Discounts Discount Active Amount Start 00:00 mtwtfss (2 separate lines for 1st gen. machines)
- 52. 51 Finish 00:00 mtwtfss (2 separate lines for 1st gen. machines) Ext Switch Set Selections Set Blocker 0 Blocker Active Start 00:00 mtwtfss (2 separate lines for 1st gen. machines) Finish 00:00 mtwtfss (2 separate lines for 1st gen. machines) Ext Switch Set Selections Set Blocker 1 Blocker Active Start 00:00 mtwtfss (2 separate lines for 1st gen. machines) Finish 00:00 mtwtfss (2 separate lines for 1st gen. machines) Ext Switch Set Selections Set Blocker 2 .... Set Blocker 3 .... Set Blocker 4 .... Set Blocker 5 .... Set Blocker 6 .... Set Blocker 7 .... Set Blocker 8 .... Set Blocker 9 Blocker Active Start 00:00 mtwtfss (2 separate lines for 1st gen. machines) Finish 00:00 mtwtfss (2 separate lines for 1st gen. machines) Ext Switch Set Selections LED INDICATION The LED associated with each selection switch, indicates if a specific feature effects a selection. As an example: if the top menu is associated with Blocker 0, then the LED’s indicate which selections have been tied to Blocker 0 (red LED is ON). If the top menu is associated with blocker 2, then the LED’s indicate which are tied to Blocker 2; and if the top menu is associated with the discount, then the LED’s indicate which selections will be effected by the programmed discount. SETTING A SELECTION, TO BE EFFECTED BY A FEATURE If the message is “Set Selections Y”, then for each selection can be tied to the feature (blocker or discount) by pressing the appropriate selection switch (the selection can be deselected by pressing the switch a second time). The state of the LED (associated with the selection switch) will change to reflect if the selection is tied to the feature (LED is red) or if it has been deselected (LED is off). The mode for specifying which selections are effected by the feature, is exited by hitting the mode switch or by not hitting any switch for 10 seconds (auto reverts back to “Set Selections N”). SET TIME When the display shows “Time Programming”, hitting selection switch #2, will display “Set Date/Time” (a top menu line). Repeatedly hitting switch #4 moves control to the following sub menu/line: Set Date dd/mm/yy Set Time hh:mm Set DST (DST = Daylight Savings Time)
- 53. 52 With the appropriate sub menu/line displayed, switches #5 and #6 are used to move the cursor between the hour, minute, day, month, and year fields. While in a field, switches #7 and #8 can be used to change value. Note that a 24-hour clock is used here. With the display showing “Set Time ...”, hitting switch #4 again, moves control to the screen used for setting the type of Daylight Savings Time: DST N. America Via switches #7 and #8, the value/type can be set to: None N. America Europe (DEFAULT) Australia SET BLOCKERS When the display shows “Time Programming”, hitting selection switch #2 three times will display “Set Blocker 0” (a top menu line). Repeatedly hitting switch #2, will change the top menu from Blocker 0, to Blocker 1, to .... Blocker 9. With the desired top menu displayed (e.g. if the operator wants to set-up Blocker 0, then “Set Blocker 0” must be displayed), repeatedly hitting switch #4 moves control to the following sub menu/line: DISPLAYS DEFINITION “Y” indicates that the feature is enabled.Blocker Active Y “N” is disabled Start hh:mm mtwtfss Indicates the time when the blocker is active (hh:mm) and for what days (upper case indicates that the blocker will be turned on for that day). Finish hh:mm mtwtfss Indicates the time when the blocker is deactivate (hh:mm) and for what days (upper case indicates that the blocker will be turned off for that day). “Y” indicates that the external switch must be active (closed) for the feature to be active. Ext Switch Y “N” indicates that the external switch is not used. Set Selections Y “Y” indicates that the selection switches are used to specify which selections are effected by the Blocker feature. For the “Start” and “Finish” screens, the cursor can be moved between the different fields (hour, minute, Monday enable, Tuesday enable, Wed. enable, Thursday enable, Friday enable, Saturday enable, and Sunday enable). Once in the field, the values can be changed via switches #7 and #8 (“Y” to “N”, hh = 00 – 23, mm = 00 – 59, m = “m’ or “M”, t = “t” or “T”, ...). SET DISCOUNT When the display shows “Time Programming”, hitting selection switch #2 twice will display “Set Discount” (a top menu line). Repeatedly hitting switch #2, will change the top menu from Discount, to Blocker 0, to .... Blocker 9. With the desired top menu displayed (e.g. if the operator wants to set-up the discount, then “Set Discount” must be displayed), repeatedly hitting switch #4 moves control to the following sub menu/line: DISPLAYS DEFINITION “Y” indicates that the feature is enabled.Discount Active Y “N” is disabled Amount xxx.xx Indicates the value of the discount. Start hh:mm mtwtfss Indicates the time when the discount is active (hh:mm)and for what days (upper case indicates that the discount will be turned on for that day). Finish hh:mm mtwtfss Indicates the time when the discount is deactivate (hh:mm) and for what days (upper case indicates that the discount will be turned off for that day). “Y” indicates that the external switch must be active (closed) for the feature to be active. Ext Switch Y “N” indicates that the external switch is not used. Set Selections Y “Y” indicates that the selection switches are used to specify which selections are effected by the Discount feature.
- 54. 53 For the “Start” and “Finish” screens, the cursor can be moved between the different fields (hour, minute, Monday enable, Tuesday enable, Wed. enable, Thursday enable, Friday enable, Saturday enable, and Sunday enable). Once in the field, the values can be changed via switches #7 and #8 (“Y” to “N”, hh = 00 – 23, mm = 00 – 59, m = “m’ or “M”, t = “t” or “T”, ...). TOKEN ENABLING (MODE 13) The Token Enabling mode is entered when the door is opened and the mode switch is depressed twelve times. Upon entering the mode, the display will show "Token Enable". While in the mode (display shows “Token Enable”), hitting a selection switch will toggle the setup for the associated selection. If the LED is red, then the selection can be purchased with a token. If the LED is off, then the selection can not be purchased with a token. SET MIS ACCESS (MODE 14) The “Set MIS Access” programming mode is entered when the door is opened and the mode switch is depressed thirteen times. Upon entering the mode, the display will show "Set MIS Access". Note that at any time (while in this programming mode), switches 11 & 12 can be used to restore the previous configuration. The switch functions are given below: Selection # Description Selection # Description 1 Controls Optics Access 2 Ind. if Optics req.’s a password 3 Controls DEX Access 4 En. Door Closed MIS access 5 Assoc’d w/Optic’s password 6 Assoc’d w/MIS password 7 N/A 8 N/A 9 N/A 10 N/A 11 Restore 12 Restore LIMITING ACCESS FOR THE OPTICS COMMUNICATIONS With the display showing “Set MIS Access”, hitting switch #1 will move control to the mode where the access to the IrDA optics communication, is set. The first time switch #1 is pressed, the display will show the present setting; additional depressions will change the setting to one of the other options. DISPLAYS DEFINITION IrDA Audit Only Indicates that MIS audit info can be retrieved from the VMC, but the VMC can not be configured via optics. IrDA Audit/Config Indicates that the MIS audit info can be retrieved from the VMC, plus the VMC can be configured via optics. IrDA Disabled Indicates that the optics comm is disabled. REQUIRING A PASSWORD FOR THE OPTICS COMM. With the display showing “Set MIS Access”, hitting switch #2 will move control to the mode where the requirement for a password (to initiate the IrDA optics communication), is set. The first time switch #2 is pressed, the display will show the present setting; additional depressions will change the setting to one of the other options. DISPLAYS DEFINITION IrDA Password Y Indicates that a password must be entered before the optics communications can begin. IrDA Password N Indicates that a password is not required to begin the optics communications.
- 55. 54 LIMITING ACCESS FOR THE DEX COMM (W/DOOR CLOSED) With the display showing “Set MIS Access”, hitting switch #3 will move control to the mode where the access to the DEX communication (with the door closed), is set. The first time switch #3 is pressed, the display will show the present setting; additional depressions will change the setting to one of the other options. DISPLAYS DEFINITION CD DEX Audit Only Indicates that MIS audit info can be retrieved from the VMC, but the VMC can not be configured via DEX. CD DEX Audit/Config Indicates that the MIS audit info can be retrieved from the VMC, plus the VMC can be configured via DEX. CD DEX Disabled Indicates that the DEX comm (when the door is closed) is disabled. LIMITING ACCESS FOR MIS DISPLAY (W/DOOR CLOSED) With the display showing “Set MIS Access”, hitting switch #4 will move control to the mode where the access to the MIS information (via the display - with the door closed), is set. The first time switch #4 is pressed, the display will show the present setting; additional depressions will change the setting to one of the other options. DISPLAYS DEFINITION Closed Door MIS Y Indicates that MIS audit info can be retrieved from the VMC. Closed Door MIS N Indicates that the MIS audit info can not be displayed when the door is closed. ENTERING THE PASSWORD FOR THE OPTICS COMM With the display showing “Set MIS Access”, hitting switch #5 will move control to the mode where the optics’ password is displayed and changed. The first time switch #5 is pressed, the display will show the present password (e.g. the default is “1212”). An additional depression will put the machine into the mode for changing the password. While in this mode, switches 1 – 4 are used to enter the new password (e.g. switch #1 is used to enter a “1”, etc.), while all other switches exit the mode. DISPLAYS DEFINITION IrDA Password 1212 Indicates the present password. (DEFAULT) IrDA Password _ _ _ _ Indicates that the next 4 switch depressions, will be used as the new password. As the keys are entered, they are displayed. ENTERING THE PASSWORD FOR DOOR CLOSED MIS DISPLAY With the display showing “Set MIS Access”, hitting switch #6 will move control to the mode where the Data Retrieval password (required to display the MIS information when the door is closed), is displayed and changed. The first time switch #6 is pressed, the display will show the present password (e.g. the default is “2314”). An additional depression will put the machine into the mode for changing the password. While in this mode, switches 1 – 4 are used to enter the new password (e.g. switch #1 is used to enter a “1”, etc.), while all other switches exit the mode. DISPLAYS DEFINITION CD MIS Password 2314 Indicates the present password. (DEFAULT) CD MIS Password _ _ _ _ Indicates that the next 4 switch depressions will be used as the new password. As the keys are entered, they are displayed